


 Loading...
HP Moonshot-45G, ProLiant m300, ProLiant m350, ProLiant m400, ProLiant m700 User Manual
...HP Moonshot iLO Chassis Management
Web Interface
User Guide
Abstract
This guide provides information about configuring, updating, and operating HP Moonshot Systems by using the Moonshot iLO Chassis Management web interface. This document is intended for system administrators, HP representatives, and HP Authorized Channel Partners who are involved in configuring and using HP Moonshot Systems.
HP Part Number: 798886-001
Published: November 2014
Edition: 1
© Copyright 2012, 2014 Hewlett-Packard Development Company, L.P
Confidential computer software. Valid license from HP required for possession, use or copying. Consistent with FAR 12.211 and 12.212, Commercial Computer Software, Computer Software Documentation, and Technical Data for Commercial Items are licensed to the U.S. Government under vendor's standard commercial license.
The information contained herein is subject to change without notice. The only warranties for HP products and services are set forth in the express warranty statements accompanying such products and services. Nothing herein should be construed as constituting an additional warranty. HP shall not be liable for technical or editorial errors or omissions contained herein.
Acknowledgements
Microsoft® and Windows® are trademarks of the Microsoft Group of companies.
Intel® is a trademark of Intel Corporation in the U.S. and other countries.
Java is a registered trademark of Oracle and/or its affiliates.
SD is a trademark or registered trademark of SD-3C in the United States, other countries or both.

Contents |
|
1 Introduction to the HP Moonshot iLO Chassis Management web interface |
..........5 |
Overview................................................................................................................................ |
5 |
HP Moonshot iLO CM firmware web interface features.................................................................. |
5 |
Moonshot web interface............................................................................................................ |
5 |
Moonshot scripting and command line........................................................................................ |
6 |
HP RESTful API for Moonshot iLO Chassis Manager....................................................................... |
6 |
2 Setting up a Moonshot System..................................................................... |
8 |
Overview................................................................................................................................ |
8 |
Connecting the Moonshot System to a network............................................................................. |
8 |
Data center management network.......................................................................................... |
8 |
Data center production network............................................................................................. |
9 |
Setting up Moonshot by using the Moonshot iLO CM firmware web interface................................. |
10 |
Logging in to the iLO CM firmware web interface for the first time............................................ |
10 |
3 Using the web interface to view Moonshot System details ............................. |
11 |
Using the iLO CM firmware web interface.................................................................................. |
11 |
Browser support................................................................................................................. |
11 |
Logging in to the iLO CM firmware web interface................................................................... |
11 |
Viewing overview information................................................................................................... |
12 |
Viewing Moonshot general information................................................................................. |
12 |
Viewing ProLiant server cartridge information......................................................................... |
15 |
Viewing ProLiant server cartridge node information................................................................. |
21 |
Viewing Moonshot switch information................................................................................... |
27 |
Viewing firmware information.............................................................................................. |
32 |
Viewing Moonshot power information................................................................................... |
33 |
Viewing fan information...................................................................................................... |
34 |
Viewing temperature information ......................................................................................... |
35 |
Viewing and managing active iLO CM firmware sessions........................................................ |
36 |
Viewing the time settings..................................................................................................... |
56 |
4 Configuring Moonshot System.................................................................... |
39 |
Updating firmware.................................................................................................................. |
39 |
Updating Moonshot firmware.............................................................................................. |
39 |
Managing iLO CM firmware user accounts................................................................................ |
41 |
Viewing local user accounts................................................................................................ |
42 |
Adding or editing local user accounts....................................................................................... |
42 |
Password guidelines........................................................................................................... |
44 |
Configuring security................................................................................................................ |
44 |
Viewing SSL certificate information....................................................................................... |
44 |
Obtaining a trusted SSL certificate........................................................................................ |
44 |
Importing a trusted SSL certificate......................................................................................... |
46 |
Viewing a certificate signing request.................................................................................... |
47 |
Managing network settings...................................................................................................... |
48 |
Viewing general network information.................................................................................... |
48 |
Viewing IPv4 information.................................................................................................... |
49 |
Configuring IPv4 settings.................................................................................................... |
52 |
Configuring the host name.................................................................................................. |
55 |
Configuring SNTP settings................................................................................................... |
56 |
5 Working with events................................................................................. |
59 |
Using the iLO CM event log..................................................................................................... |
59 |
Viewing the event log......................................................................................................... |
59 |
Contents 3
Saving the event log........................................................................................................... |
61 |
Clearing the event log........................................................................................................ |
62 |
Using the iLO CM IML............................................................................................................. |
62 |
Viewing the IML................................................................................................................. |
63 |
Marking an IML entry as repaired........................................................................................ |
65 |
Adding a maintenance note to the IML................................................................................. |
66 |
Saving the IML.................................................................................................................. |
66 |
Clearing the IML................................................................................................................ |
67 |
6 Troubleshooting........................................................................................ |
68 |
Bypassing a lost or forgotten administrator password................................................................... |
68 |
7 Support and other resources...................................................................... |
71 |
Information to collect before contacting HP................................................................................. |
71 |
How to contact HP.................................................................................................................. |
71 |
HP authorized resellers............................................................................................................ |
71 |
Related information................................................................................................................. |
71 |
Typographic conventions......................................................................................................... |
72 |
8 Documentation feedback........................................................................... |
74 |
Index......................................................................................................... |
75 |
4Contents

1 Introduction to the HP Moonshot iLO Chassis Management web interface
Overview
The Moonshot iLO Chassis Management web interface allows GUI-based aggregated chassis management on the HP Moonshot System. The interface runs on the iLO CM firmware version 1.30 and later, and provides access to many of the same functions available from the iLO CM firmware command line. The interface allows you to view component information, configure settings, update firmware, and operate HP Moonshot via a detailed graphical environment.
HP Moonshot iLO CM firmware web interface features
Using the iLO CM firmware web interface, you can do the following:
•View extensive chassis, cartridge, node and switch details and health information, all event and IML logs down to the node level, active sessions (both via CLI and web interface), and power, fan and temperature details.
•View firmware versions and update firmware for components, including the chassis components, cartridges, nodes, and switches using local or remote files, or files that are loaded in the Chassis Manager Repository.
•Manage the power and booting of all server nodes, and the power for cartridges and switches.
•Configure Moonshot 1500 Chassis networking and hostname.
•Configure SSL certificate security, time settings, and up to 12 local user accounts.
Moonshot web interface
The Moonshot web interface common areas, icons, and controls are shown below.
Overview 5

1.HP Moonshot main menu: The primary menu for navigating to resources. Click to expand.
2.View customization menus: Filters your view to only the desired components. Also available to customize log views.
3.View selector: Enables you to select the information displayed about a resource.
4.Actions menu: Provides the actions that are available to run on the current resource. Actions include, but are not limited to: adding, creating, deleting, removing, and editing a resource instance. If you do not have the appropriate permissions to perform an action, the action does not appear on the Actions menu.
5.Activity control: Expands (or hides) a sidebar of recent activity (from the current login session). This icon displays a number badge to indicate the number of activities recorded in the session.
6.Session control: Session control: Displays the current user and duration of the current session. Also provides links to the User Administration page , the Active Sessions page, and a link to Logout of the session.
7.Help control: Opens a new browser page which displays the online help.
8.Activity sidebar: Shows recent alert and task activity for the current resource. Use the Activity control icon to open (or close) this sidebar.
9.Details pane: Provides information about a selected resource.
10.Master pane: Lists all resource instances that have been configured on the appliance. In some cases, a status icon indicates general health of the resource.
Moonshot scripting and command line
You can use basic scripting tools to configure the iLO CM firmware, and to develop and incorporate a standard configuration into the deployment process for multiple HP Moonshot 1500 Chassis Management Modules.
The HP Moonshot iLO Chassis Management CLI User Guide describes the syntax and tools available for using the ILO CM firmware through a command line interface.
HP RESTful API for Moonshot iLO Chassis Manager
HP iLO CM firmware version 1.30 and later includes the HP RESTful API for Moonshot Chassis Manager. The HP RESTful API is a management interface that server management tools can use to perform configuration, inventory, and monitoring of an HP Moonshot System.
6Introduction to the HP Moonshot iLO Chassis Management web interface
For more information about the HP RESTful API see the following website: http://www.hp.com/ go/restfulinterface/docs.
HP RESTful API for Moonshot iLO Chassis Manager |
7 |

2 Setting up a Moonshot System
Overview
The default settings enable you to use most features without additional configuration. However, the configuration flexibility of iLO CM firmware enables customization for multiple enterprise environments. This chapter references the initial iLO CM setup steps.
Complete the initial setup steps:
1.Install the Moonshot System in a data center.
For more information, see the HP Moonshot 1500 Chassis Setup and Installation Guide available at http://www.hp.com/go/moonshot/docs.
2.Connect the Moonshot System to a network.
For more information, see “Connecting the Moonshot System to a network” (page 8).
3.If you are not using dynamic IP addressing, configure a static IP address. For more information, see “Managing network settings” (page 48).
4.Set up your local user accounts.
For more information, see “Managing iLO CM firmware user accounts” (page 41).
Connecting the Moonshot System to a network
You can connect the Moonshot System to the following networks:
•Data center management network
•Data center production network
Data center management network
To connect the chassis to a management network, connect an Ethernet cable from the Moonshot 1500 CM module to the management network. Always connect to the iLO CM management port first. Do not connect both the iLO CM management port and the iLO CM link port to the same network switch. For information about enabling the iLO link port using the set network daisy command, see the HP Moonshot iLO Chassis Management CLI User Guide in the HP Moonshot Information Library (http://www.hp.com/go/moonshot/docs).
Moonshot iLO CM firmware SSH sessions and switch SSH sessions share connectivity through the iLO CM management port. The iLO CM management port is located on the Moonshot 1500 CM module on the rear of the chassis.
8Setting up a Moonshot System

Data center production network
To connect the chassis to a production network, connect to any available SFP+ or QSFP+ port. The SFP+/QSFP+ ports are located on the uplink module installed in the rear of the chassis.
•Moonshot-6SFP Uplink Module
•Moonshot 4QSFP+ Uplink Module
Connecting the Moonshot System to a network |
9 |
Setting up Moonshot by using the Moonshot iLO CM firmware web interface
You can use the iLO CM firmware web interface to configure the Moonshot System if you can connect to the web interface on the network with a web browser.
Access the iLO CM firmware web interface from a remote network client by using a supported browser to access the hostname and then entering a user name and password.
Logging in to the iLO CM firmware web interface for the first time
The iLO CM firmware web interface is configured with a default user name and password. Use these values to access the web interface remotely from a network client through a web browser.
The default values follow:
•User name—Administrator
•Password—password
•DNS name—The pre-set DNS information uses the serial number located on a label attached to the chassis that contains the Moonshot 1500 CM module
In a DHCP environment, the serial number is registered as the host/DNS name with the DNS server on boot. Enter the serial number from the label together with the domain name into a browser address bar (in an HTTPS session) to access the iLO CM firmware web interface. For example, if the serial number is iLOCM1234 and your domain is domain.com, then enter https://ilocm1234.domain.com into the address bar of a supported browser.
Alternatively, use the DNS name (serial number) to determine the IP address using standard network tools.
If you enter an incorrect user name and password, or a login attempt fails, the web interface imposes a security delay.
IMPORTANT: HP recommends changing the default Administrator password after you log in to web interface for the first time. For instructions, see “Managing iLO CM firmware user accounts” (page 41).
If you reset Moonshot 1500 CM module to the factory default settings, use the default account information to log in after the reset.
10 Setting up a Moonshot System
3 Using the web interface to view Moonshot System details
This chapter provides information about viewing the available information using Moonshot web interface.
Using the iLO CM firmware web interface
You can use the iLO CM firmware web interface to manage the HP Moonshot System. You can also use the iLO CM firmware command line.
Browser support
The iLO CM firmware web interface requires a browser that supports JavaScript. For a list of supported browsers, see Table 1 (page 11).
Table 1 Supported browsers
iLO CM firmware version |
Internet Explorer |
Firefox |
Chrome |
1.30 |
11 |
ESR 24 |
Chrome (latest version) |
If you receive a notice that your browser does not have the required functionality, verify that your browser settings meet the following requirements, or contact your administrator.
The following settings must be enabled:
•JavaScript—The iLO CM firmware web interface uses client-side JavaScript extensively.
•Cookies—Cookies must be enabled for certain features to function correctly.
•Pop-up windows—Pop-up windows must be enabled for certain features to function correctly. Verify that pop-up blockers are disabled.
Logging in to the iLO CM firmware web interface
You must access the iLO CM firmware web interface through HTTPS (HTTP exchanged over an SSL encrypted session).
To log in to the iLO CM firmware web interface:
1. Enter https://<iLO CM firmware host name or IP address>. The login page opens.
2. Enter an iLO CM firmware user name and password, and then click Login. Login problems might occur for the following reasons:
•You recently upgraded the iLO CM firmware. You might need to clear your browser cache before attempting to log in again.
•You entered incorrect login information.
◦Passwords are case sensitive.
◦User names are not case sensitive. Uppercase and lowercase characters are treated the same (for example, Administrator is treated as the same user as administrator).
•Your user account is not a valid iLO CM firmware account.
•Your user account has been deleted, disabled, or locked out.
•The password for the user account must be changed.
After an initial failed login attempt, the iLO CM firmware imposes a security delay of ten seconds. Each subsequent failed attempt increases the delay by ten seconds.
Using the iLO CM firmware web interface 11

Viewing overview information
Viewing Moonshot general information
From the main menu, select Chassis to display high level information about the chassis. It includes general chassis information and reference images of the chassis, along with cartridge health and node power gauges.
Viewing the Chassis top view
From the main menu, select Chassis to view chassis cartridge and switch information.
The Top View section includes an interactive image that displays a representation of the cartridge and switch slots of the Moonshot chassis. Unoccupied slots are gray, while populated slots are white and include power, health, and UID indicators. These slots offer more information when rolled over with the mouse.
To view cartridge information
To view cartridge information, roll over a populated cartridge slot with the mouse.
•Health icon—each cartridge displays a health indicator:
◦ OK—No health issues
◦ Degraded—Significant service issue with possible service degradation
12 Using the web interface to view Moonshot System details
◦ Critical—Service lost or imminent service loss, immediate attention needed
◦ Unknown
•Cartridge number
NOTE: Click the cartridge number link to open the Cartridges page and display specifics about the installed cartridge. For more information, see Viewing ProLiant server cartridge information.
•Cartridge name (model)
•CPU number and architecture
•UID control—click this icon to turn the cartridge UID on or off.
◦ UID is off. Click the icon to turn the UID on.
◦ UID is on. Click the icon to turn the UID off.
•Power indicator—This icon reports the cartridge’s power status.
◦ The cartridge is powered off.
◦ One or more nodes are powered on.
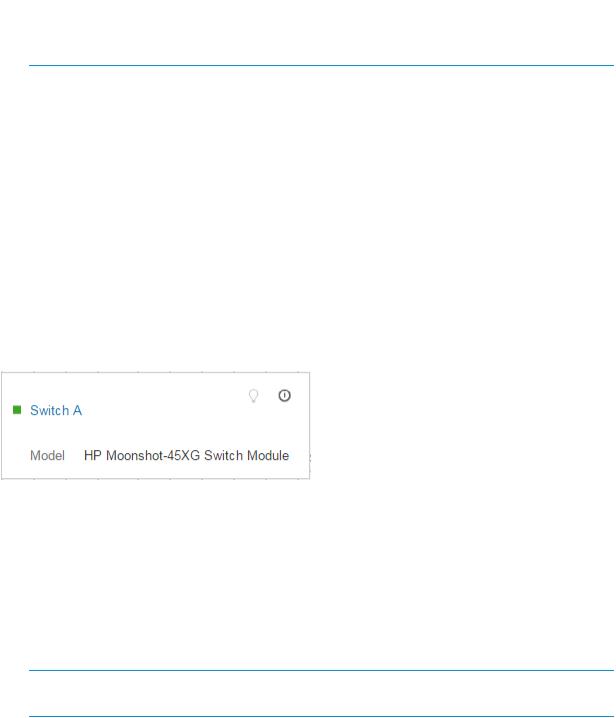
To view switch information
To view switch information, roll over a populated switch slot with the mouse.
•Health icon—each switch displays a health indicator:
◦ OK—No health issues
◦ Degraded—Significant service issue with possible service degradation
◦ Critical—Service lost or imminent service loss, immediate attention needed
◦ Unknown
•Switch designator
NOTE: Click the link to open the Switches page and display specifics about the installed switches. For more information, see Switches.
•Model
Viewing overview information |
13 |
•UID control—click this icon to turn the switch UID on or off.
◦ UID is off. Click the icon to turn the UID on.
◦ UID is on. Click the icon to turn the UID off.
•Switch power control—This icon simulates the physical power button on the switch. Click the icon to turn the switch on or off.
◦ The switch is off.
◦ The switch is on.
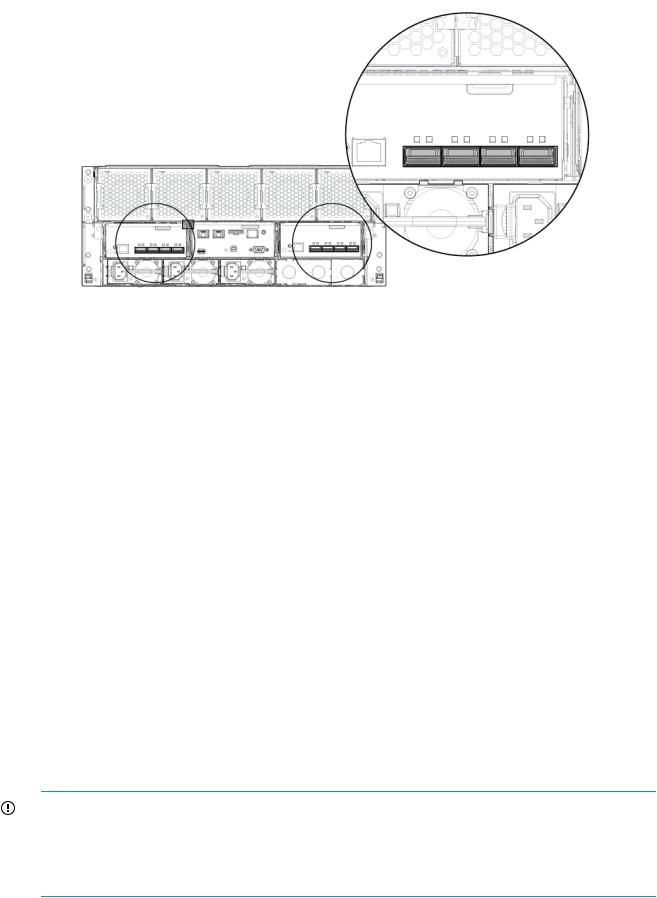
Viewing the chassis back view
From the main menu, select Chassis to view basic chassis fan and power supply information using the back view.
The Back View section displays a representation of the fans, HP Moonshot Uplink Modules, the Moonshot 1500 CM Module, and the power supplies installed in the Moonshot chassis. Unoccupied slots are gray. Populated slots are white and show a health icon and basic status information:
•Fans (top row)—Displays the speed (from zero to 100 percent) of each fan. Hover over an installed fan with the mouse to display a link to the Fans page.
•HP Moonshot Uplink Modules and Moonshot 1500 CM Module (center row): Displays the presence of the components, and the status of the Moonshot 1500 CM module.
◦HP Moonshot Uplink Modules—On the left and the right of this row, uplink positions are displayed.
◦HP Moonshot 1500 CM Module—In the center of this row, the module position is displayed, along with the health, UID state, and power status. Click the UID icon to turn it on or off.
•Power supplies (bottom row)—Displays the current output in watts for each power supply. Hover over an installed power supply with the mouse to display a link to the Power page.
Viewing general chassis information
From the main menu, select Chassis to view chassis information.
The Chassis Information section displays the following information:
•Model—The model designation of the chassis.
•Name—The chassis name set by the Administrator.
•Hostname—The FQDN of the Moonshot system.
•UUID—The universally unique identifier for the chassis. This value is assigned when the system is manufactured.
•Firmware version—The version and date of the installed iLO CM Firmware installed in the HP Moonshot 1500 Chassis Management Module.
•Serial number—The HP Moonshot 1500 Chassis serial number.
•Asset tag—The asset tracking tag assigned to the Moonshot 1500 Chassis.
•Description and IP—A description of the connected firmware and its associated IP address.
14 Using the web interface to view Moonshot System details

The Cartridge Health gauge shows the health of all cartridges. The gauge is divided into cartridges that have critical issues, issues that cause degraded performance, and cartridges that are OK (have no issues).
• Critical
• Degraded
• OK
OK
The Node Power State gauge displays the total number of nodes in the Moonshot 1500 Chassis, and how many are powered on and off.
• Nodes that are off.
• Nodes that are on.
Viewing ProLiant server cartridge information
The Moonshot web interface Cartridges page displays information about the HP ProLiant server cartridges installed in the Moonshot 1500 Chassis.
Customizing the cartridge list
By default, all of the cartridges installed in the Moonshot 1500 Chassis are listed in the left pane, including Health, Cartridge (slot), and Model information. Filter which cartridges are displayed in the list by using the cartridge filter menus.
To customize the cartridge list, do one or more of the following:
1.Click the System Power menu and select one or more power states. A selected filter is bold. Click a bold entry again to deselect it.
2.Click the Server health menu and select one or more health states. A selected filter is bold. Click a bold entry again to deselect it.
3.Click the UID menu and select one or more UID states. A selected filter is bold. Click a bold entry again to deselect it.
4.Click Reset filters to return all filters to the default selections. By default, all selections from each filter are shown (all power states, all health statuses, and all UID states).
Viewing overview information |
15 |
Selecting multiple cartridges
To select multiple cartridges from the cartridge list, do one of the following:
•Hold Ctrl and click each cartridge to be selected.
•Click Select all.
•Click a cartridge to select it, hold Shift, and then click another cartridge to select all the cartridges between the two selections.
Viewing Moonshot cartridge overview information
From the main menu, select Cartridges to view cartridge overview information. The page defaults to an overview of the first cartridge in the list of all available cartridges, shown on the left side of the page.
The General section displays the following:
•Model—The model name of the server cartridge.
•Product ID—The product ID of the server cartridge. This value is set by the manufacturer, but can be changed by an Administrator using the iLO CM firmware command line if the server cartridge is replaced.
•Serial number—The serial number of the server cartridge. This value is assigned when the system is manufactured, but can be reset by an Administrator using the command line if the server cartridge is replaced.
•AutoRev—The hardware revision of the cartridge. Used by HP Support.
•Manufacturing date—The date the server cartridge was built.
The Cartridge Information section displays the following:
•Power—Indicates the power state of the cartridge.
◦ The cartridge is powered off.
◦ One or more cartridge server nodes are powered on.
•Health status—each cartridge displays a health indicator:
◦ OK—No health issues
◦ Degraded—Significant service issue with possible service degradation
◦ Critical—Service lost or imminent service loss, immediate attention needed
◦ Unknown—A detected health problem cannot be classified
•Cartridge UID—Shows the state of the UID for the server cartridge.
◦ UID is off. Click the icon to turn the UID on.
◦ UID is on. Click the icon to turn the UID off.
•Management status—Displays whether the Moonshot web interface is successfully managing the server cartridge.
•Instant wattage—A reading of the current power usage of the server cartridge.
•Links—Displays the cartridges that are linked to the selected cartridge.
16 Using the web interface to view Moonshot System details
The System Firmware section displays the version information for the following firmware installed on the selected cartridge:
•System ROM firmware
•CPLD
•Satellite firmware
•Cartridge data
The Mezzanine section displays information about any accessory cards attached to the server cartridge. If present, the information can include the following for each mezzanine attachment:
•Model—The model name of attached accessory.
•Serial number—The serial number of the attached accessory.
•Spare part number—The part number of the spare attached accessory.
•Cartridge mezz data—The version of the accessory’s data firmware file.
When multiple cartridges are selected, the Overview page changes to display the following information about each cartridge:
•Name
•Model
•Power
•UID
•Health status
•Management status
•AutoRev
•Instant wattage
•Product ID
•Serial number
Changing the state of a cartridge’s UID
To change the state of a cartridge UID:
1.Select a cartridge.
2.Click Actions→UID on or UID off, depending on the current state of the cartridge UID.
The icon changes to indicate the new UID state, and an activity message briefly appears at the top right of the screen.
Changing the power state of a cartridge
To change the power state of a cartridge:
1.Select one or more cartridges.
2.Click Actions→Power off or Power on.
When powering off a cartridge, the iLO CM firmware warns you that this action will force the power off on the cartridge (and the nodes).
3.Click Yes if powering off a cartridge.
Viewing cartridge logs
Cartridge logs provide a record of historical events that have occurred. Events are generated by the system ROM and include all cartridge-specific events. Log entries can help you diagnose issues or identify potential issues. Preventative action might help to avoid disruption of service.
Viewing overview information |
17 |

From the main menu, select Cartridges to view the Cartridges page. The page defaults to an overview of the first cartridge in the list of all available cartridges, shown on the left side of the page. Select Logs from the View menu to show the cartridge logs.
The Log information available for each cartridge includes the following:
•ID—The event ID number. Events are numbered in the order in which they are generated. By default, the Event Log is sorted by the ID, with the most recent event at the top.
•Severity—The importance of the detected event. Possible values include:
◦ Critical—The event indicates a service loss or an imminent service loss. Immediate
attention is needed.
◦ Caution—The event is significant but does not indicate performance degradation.
◦ Informational—The event provides background information.
◦ Repaired—An event has undergone corrective action.
◦ Unknown—The event severity could not be determined.
•Type—A further descriptor of the nature of the event.
•Created on—For events with a count of 1, this is the date the event first occurred. For events with a count greater than 1, this is column shows the date the event was last updated.
•Count—The number of times this event has occurred (if supported).
In general, important events generate an event log entry each time they occur. They are not consolidated into one event log entry.
When less important events are repeated, they are consolidated into one event log entry, the Count value is updated. Each event type has a specific time interval that determines whether repeated events are consolidated or a new event is logged.
•Description—The description identifies the component and detailed characteristics of the recorded event.
Customizing the cartridge log view
You can customize which log entries are displayed as follows:
•To filter by severity, select a severity level from the Severity menu. The selection is cumulative; and you can select more than one severity level. A selected severity level is bold. Click a bold entry again to deselect it.
18 Using the web interface to view Moonshot System details

•Select a preset range or a date range in the Created on menu.
•To search for events based on dates, event IDs, or description text, enter text in the Search box, and then press Enter.
•Click Reset filters to set the filters back to the default values.
Saving the cartridge event log
To save the cartridge Moonshot Event Log as a CSV file:
Viewing overview information |
19 |

1.Click Actions→View CSV.
The Moonshot Event Log CSV for the cartridge is displayed.
2.Click Save or click Close to close the window.
Clearing the cartridge IML
Users with the Operator privilege can clear a cartridge IML of all previously logged information. To clear a cartridge IML:
1.Click Actions→Clear Log.
The following message appears:
All log entries for this device will be deleted. This action cannot be undone. Continue with clearing the log?
2.Click Yes.
The log is cleared and a new entry is recorded which includes the date and time of the event, the responsible user, and the cartridge number.
Viewing cartridge temperature sensor data
Select Thermal from the View menu to show the cartridge logs. Temperatures are displayed in degrees Celsius.
20 Using the web interface to view Moonshot System details
The Thermal table displays the following information for the selected cartridge:
•Sensor—The ID of the temperature sensor, which also gives an indication of the sensor’s location.
•Status—The temperature status of the cartridge. Depending on the server cartridge configuration, some sensors show a status of Not installed.
•Current Reading—The temperature recorded by the listed temperature sensor. If a temperature sensor is not installed, the Current Reading column shows the value N/A.
•Thresholds—The temperature thresholds for the warning for overheating conditions. The two threshold values are Caution and Critical. If a temperature sensor is not installed, the Thresholds column shows the value N/A.
◦Caution—The cartridge is designed to maintain a temperature below the caution threshold while operating. If a failure prevents the cartridge from maintaining this temperature, the chassis increases the fan speed and initiates a graceful operating system shutdown. This ensures both data integrity and system safety.
◦Critical—If temperatures are uncontrollable or rise quickly, the critical temperature threshold prevents system failure by physically shutting down the cartridge before the high temperature causes an electronic component failure.
•Temperature Meter—A graphical representation of the current temperature reading and whether that reading has reached the Caution or Critical thresholds. The left edge of the column represents a temperature of 0°C, the grey bar represents the Caution threshold, and the right edge of the column represents the Critical threshold. If a temperature sensor is not installed, is missing, or is not reporting a temperature reading, an empty graph is displayed.
Viewing ProLiant server cartridge node information
The Moonshot web interface Nodes page displays information about the HP ProLiant server cartridges installed in the chassis.
Viewing overview information |
21 |

Customizing the node list
You can customize which nodes are displayed in the node list by using the node filter menus. A selected filter is bold. Click a bold entry again to deselect it.
Customize the node list by doing one or more of the following:
•Select a power state from the System Power menu.
•Select a health status from the Server health menu.
•Select a boot source from the Boot options menu.
•Click the Reset filters link to start over with the default selections.
Viewing ProLiant server cartridge node overview information
From the main menu, select Nodes to view node overview information. The page defaults to an overview of the first node in the list, shown on the left side of the page, of installed nodes.
The General section displays the following about the server cartridge on which the node is installed:
•Model—The model name of the server cartridge.
•Product ID—The product ID of the server cartridge. This value is set by the manufacturer, but can be changed by an Administrator using the iLO CM firmware command line.
•UUID—The universally unique identifier for the node. This value is assigned when the system is manufactured.
•Serial number—The serial number of the cartridge on which the node resides.
22 Using the web interface to view Moonshot System details
The Node status section displays the following:
•Power—The node power status.
◦ The node is off.
◦ The node is on.
The Node Details section displays the following:
•Processor family—The architecture of the processor.
•Number of cores—The number of processing cores in the node.
•Max clock speed—The maximum operating speed of the node cores expressed in MHz.
•Total memory—The amount of permanent system memory available to the node expressed in GB.
•DIMM <x>—(Where x is a number indicating the memory slot.) This displays the amount of additional (optional) memory, and the serial number of the DIMM.
•MAC<x>—(Where x is a number indicating the number of the MAC address.) This displays the media access control (MAC) address.
The Node Settings menu displays the following:
•Boot order—The boot devices available to the node and the order in which a typical boot sequence will search for boot information.
•Boot once—The boot device to be used on the next boot only.
•WOL—The node wake on LAN (WOL) setting. If this setting is not supported by the node, N/A is displayed.
•CPU speed—The selected CPU speed. If this setting is not supported by the node, N/A is displayed.
•BSC—Whether the BIOS serial console is enabled or disabled. If this setting is not supported by the node, N/A is displayed.
Selecting node boot options
The boot order, boot once, and other boot options can be set from the Nodes page for one or more nodes. From the main menu, select Nodes and then select one or more nodes from the list in the left pane.
To set node boot options:
Viewing overview information |
23 |
Loading...