


Multicam Digital
Surveillance System
User’s Manual V8.3

© 2009 GeoVision, Inc. All rights reserved.
Under the copyright laws, this manual may not be copied, in whole or in part, without the written consent of GeoVision.
Every effort has been made to ensure that the information in this manual is accurate. GeoVision is not responsible for printing or clerical errors.
GeoVision, Inc.
9F, No. 246, Sec. 1, Neihu Rd., Neihu District, Taipei, Taiwan Tel: +886-2-8797-8377
Fax: +886-2-8797-8335 http://www.geovision.com.tw
Trademarks used in this manual: GeoVision, the GeoVision logo and GV series products are trademarks of GeoVision, Inc. Windows and Windows XP are registered trademarks of Microsoft Corporation.
January 2009

Important Notice
The version 8.3 only supports the following GV video capture cards:
•GV-600(S) V3.20 and later
•GV-650(S) V3.30 and later
•GV-800(S) V3.30 and later
•GV800-4A V3.10 and later
•GV-600(V4)
•GV-650(V4)
•GV-800(V4)
•GV-1120 All Series
•GV-1240 All Series
•GV-1480 All Series
•GV-2004
•GV-2008
For more information on the upgrade, please visit our website at
http://www.geovision.com.tw/english/5_0.asp, or contact your dealer.
New Features in Version 8.3
Features |
Page |
Chapter 1 Configuring Main System |
3 |
|
|
Increased number of storage groups to be created |
9 |
|
|
Turbo Mode |
42 |
|
|
Automatic Adjustment for Daylight Saving Time |
51 |
|
|
Increased number of PTZ preset points and addresses |
58 |
|
|
PTZ Tour Schedule for Idle Protection |
59 |
|
|
Colorful Mode |
76 |
|
|
|
|
Chapter 3 Video Analysis |
93 |
|
|
Single Camera Tracking |
102 |
|
|
Crowd Detection |
129 |
|
|
Advanced Scene Change Detection |
131 |
|
|
|
|
Advanced Unattended Object Detection |
133 |
|
|
|
|
Advanced Missing Object Detection |
135 |
|
|
|
|
|
|
|
Chapter 4 Playing Back Video Files |
140 |
|
|
|
|
Video Effects Applied on Multiple Channels |
151 |
|
|
|
|
Increased Number of Quad Views |
156 |
|
|
|
|
Increased Number of Multi Views |
157 |
|
|
|
|
Video Color Enriched for Playback |
161 |
|
|
|
|
GPS Tracks Playback |
187 |
|
|
|
|
|
|
|
Chapter 6 |
I/O Applications |
206 |
|
|
|
Multiple cameras recording upon input trigger |
208 |
|
|
|
|
Overlaying Input Name onto Screen upon Alarm Events |
217 |
|
|
|
|
|
|
|
Chapter 7 |
Point-Of-Sale (POS) Application |
236 |
|
|
|
Windows-Based Direct POS Integration |
236 |
|
|
|
|
|
|
|
Chapter 8 Viewing Live Video Using WebCam |
261 |
|
|
|
|
POS / Wiegand Live View |
280 |
|
|
|
|
New user interface for Remote Playback (RPB) |
311 |
|
|
|
|
Multicast and Audio Broadcast |
306 |
|
|
|
|
DST Rollback Events available on Event List Query |
313 |
|
|
|
|
BlackBerry Support |
329 |
|
|
|
|
|
|
|
Chapter 9 |
E-Map Application |
332 |
|
|
|
Simultaneous Display of Multiple Live Videos |
339 |
|
|
|
|
|
|
|
Chapter 10 Short Message Service |
346 |
|
|
|
|
Unlimited Log Retention Time |
354 |
|
|
|
|
|
|
|
Chapter 11 |
Useful Utilities |
364 |
|
|
|
Unlimited Log Retention Time (in Authentication Server) |
|
|
|
|
|
Digital Matrix |
448 |
|
|
|
|
ii

|
Contents |
|
Important Notice ...................................................... |
i |
|
1 |
Configuring Main System ............................. |
3 |
|
System Configuration.................................................................................................... |
6 |
|
Configuring Global Recording Parameters................................................................ |
7 |
|
Adjusting Individual Camera.................................................................................... |
15 |
|
Setting Up Day - Night Recording Mode ................................................................. |
19 |
|
Geo Mpeg4 (ASP) Advanced Settings .................................................................... |
20 |
|
Configuring Hotline/Network Notification ................................................................. |
21 |
|
Selecting Screen Layout.......................................................................................... |
24 |
|
Launching GV-System from System Tray ............................................................... |
25 |
|
Camera / Audio Install ............................................................................................. |
26 |
|
Setting Up Auto Reboot ........................................................................................... |
27 |
|
Logging System Activities into System Log............................................................. |
28 |
|
Setting Different Text Alignment for Each Channel................................................. |
30 |
|
Setting Up Password ............................................................................................... |
31 |
|
Sending Alerts thru E-mail Accounts ....................................................................... |
34 |
|
Audio and Video Settings............................................................................................ |
36 |
|
Choosing Video Source ........................................................................................... |
36 |
|
Adjusting Video Attributes........................................................................................ |
37 |
|
Listening to Live Audio............................................................................................. |
39 |
|
Hard Disk Calculator................................................................................................ |
40 |
|
Turbo Mode.............................................................................................................. |
42 |
|
Start/Stop Monitoring................................................................................................... |
44 |
|
Playing Back Video Files............................................................................................. |
45 |
|
Instant Playback ...................................................................................................... |
45 |
|
System Log ................................................................................................................... |
46 |
|
Daylight Saving Time Recording ................................................................................ |
51 |
|
Recording Schedule..................................................................................................... |
53 |
|
Video Schedule........................................................................................................ |
54 |
|
Special Days Schedule............................................................................................ |
55 |
|
I/O Schedule ............................................................................................................ |
55 |
|
Center V2 Schedule................................................................................................. |
55 |
iii

|
PTZ Control................................................................................................................... |
56 |
|
Mapping PTZ Cameras............................................................................................ |
57 |
|
PTZ Idle Protection .................................................................................................. |
58 |
|
Auto Switching PTZ Control Panels ........................................................................ |
60 |
|
PTZ Automation....................................................................................................... |
61 |
|
Pop-up Live Video on Triggered Events.................................................................... |
62 |
|
Advanced Motion Detection........................................................................................ |
63 |
|
Video Noise Solutions ................................................................................................. |
65 |
|
Noise Tolerance....................................................................................................... |
65 |
|
Noise Detection to Reduce File Size ....................................................................... |
66 |
|
Noise Filter............................................................................................................... |
67 |
|
Picture-in-Picture View ................................................................................................ |
68 |
|
Picture-and-Picture View............................................................................................. |
69 |
|
System Idle Protection................................................................................................. |
70 |
|
Auto Logout Administrator ....................................................................................... |
70 |
|
Auto Login User without Access Rights................................................................... |
71 |
|
Auto Start Recording ............................................................................................... |
72 |
|
Creating Shortcuts....................................................................................................... |
73 |
|
Touch Screen Support................................................................................................. |
74 |
|
PTZ and I/O Control Panel ...................................................................................... |
74 |
|
Touch Screen Panel ................................................................................................ |
74 |
|
System Tools ................................................................................................................ |
76 |
|
Colorful Mode........................................................................................................... |
76 |
|
Image Quality of DirectDraw Overlay ...................................................................... |
76 |
|
Stopping Video Lost Watchdog ............................................................................... |
77 |
|
Deactivating Video Lost Beep.................................................................................. |
77 |
|
Fast Key Lockup ...................................................................................................... |
78 |
|
Fast Key Reference ................................................................................................. |
78 |
|
Version Information.................................................................................................. |
78 |
2 |
Hybrid and NVR Solution .................... |
80 |
|
GeoVision IP Video Products...................................................................................... |
80 |
|
Dongle Type.................................................................................................................. |
81 |
|
Hybrid Solution Description........................................................................................ |
82 |
|
NVR Solution Description............................................................................................ |
83 |
|
Adding IP Video Sources............................................................................................. |
84 |
iv

|
Advanced Settings................................................................................................... |
86 |
|
Setting Up PTZ IP Camera........................................................................................... |
88 |
|
Upgrading the Dongle.................................................................................................. |
89 |
3 |
Video Analysis............................................ |
93 |
|
Object Tracking and Zooming .................................................................................... |
93 |
|
Object Tracking........................................................................................................ |
93 |
|
Starting Object Tracking .......................................................................................... |
97 |
|
Zooming in Objects during Tracking........................................................................ |
97 |
|
Object Zooming........................................................................................................ |
99 |
|
Starting Object Zooming ........................................................................................ |
101 |
|
Single Camera Tracking ............................................................................................ |
102 |
|
Adding a PTZ Camera ........................................................................................... |
102 |
|
Setting PTZ Tracking ............................................................................................. |
103 |
|
Activating PTZ Tracking......................................................................................... |
104 |
|
Object Counting ......................................................................................................... |
105 |
|
Retrieving Images Using Object Index..................................................................... |
108 |
|
Object Index Setup ................................................................................................ |
108 |
|
Live Object Index ................................................................................................... |
110 |
|
Object Index Search .............................................................................................. |
111 |
|
Face Detection............................................................................................................ |
113 |
|
Unattended and Missing Object Detection.............................................................. |
114 |
|
Detecting Unattended Objects............................................................................... |
114 |
|
Detecting Missing Objects ..................................................................................... |
116 |
|
Privacy Mask Protection............................................................................................ |
119 |
|
Setting Up a Privacy Mask..................................................................................... |
119 |
|
Granting Access Privileges to Recoverable Areas................................................ |
120 |
|
Scene Change Detection ........................................................................................... |
121 |
|
Panorama View........................................................................................................... |
123 |
|
Creating a Panorama View.................................................................................... |
124 |
|
Accessing a Panorama View ................................................................................. |
126 |
|
Defogging Live Videos............................................................................................... |
127 |
|
Video Stabilization ..................................................................................................... |
128 |
|
Crowd Detection......................................................................................................... |
129 |
|
Advanced Scene Change Detection......................................................................... |
131 |
|
Advanced Unattended Object Detection.................................................................. |
133 |
v

|
Advanced Missing Object Detection........................................................................ |
135 |
|
Specifications ............................................................................................................. |
137 |
4 |
Playing Back Video Files ........................ |
140 |
|
Playing Back on ViewLog.......................................................................................... |
141 |
|
Playback Screen Layout ........................................................................................ |
144 |
|
Playback Control Buttons ...................................................................................... |
145 |
|
A to B Playback Mode ........................................................................................... |
145 |
|
Searching a Video Event ....................................................................................... |
146 |
|
Merging and Exporting Video ................................................................................ |
149 |
|
Extracting Frames from a Video Event.................................................................. |
152 |
|
Saving Images ....................................................................................................... |
153 |
|
Printing Images...................................................................................................... |
154 |
|
Recycling Option for Video Files............................................................................ |
155 |
|
Advanced Settings................................................................................................. |
156 |
|
Object Search ............................................................................................................. |
163 |
|
Advanced Log Browser ............................................................................................. |
165 |
|
Filter Settings......................................................................................................... |
167 |
|
Quick Search .............................................................................................................. |
169 |
|
Event Query Settings............................................................................................. |
170 |
|
Advanced Search Settings .................................................................................... |
171 |
|
Playing Back over Local Area Network (LAN)......................................................... |
172 |
|
Playing Back over Internet Using Remote ViewLog Service................................. |
174 |
|
Retrieving Recordings from one Host.................................................................... |
174 |
|
Retrieving Recordings from Multiple Hosts ........................................................... |
175 |
|
Managing Connection Status................................................................................. |
176 |
|
Resuming Backup.................................................................................................. |
176 |
|
Playing Back over Internet Using Remote Playback .............................................. |
177 |
|
Working with Remote Playback Server at the Server PC ..................................... |
177 |
|
Working with Remote Playback Client at the Client PC ........................................ |
180 |
|
GPS Tracks Playback................................................................................................. |
187 |
|
Touch Screen Support............................................................................................... |
189 |
|
Fast Key Reference.................................................................................................... |
190 |
|
Specifications ............................................................................................................. |
190 |
vi

5 |
Backing Up and Deleting Files................. |
192 |
|
Backing Up Log Data Using System Log................................................................. |
192 |
|
Backing Up Files Using ViewLog ............................................................................. |
194 |
|
Splitting Files for Backup onto Multiple Discs........................................................ |
197 |
|
Excluding ViewLog Player in the Backup Files...................................................... |
197 |
|
Including ViewLog Player in the Backup Files....................................................... |
198 |
|
Deleting Files Using ViewLog ................................................................................... |
199 |
|
Repairing Damaged File Paths ................................................................................. |
201 |
|
Repairing Damaged Video Files ............................................................................... |
202 |
6 |
I/O Applications........................................ |
206 |
|
Setting Up I/O Devices............................................................................................... |
207 |
|
Latch Trigger.......................................................................................................... |
210 |
|
Keeping Last Toggle Status................................................................................... |
212 |
|
I/O Control Panel ........................................................................................................ |
214 |
|
I/O Input Control Panel .......................................................................................... |
214 |
|
I/O Output Control Panel ....................................................................................... |
214 |
|
Advanced I/O Applications........................................................................................ |
215 |
|
Moving PTZ Camera to a Preset Location upon Alarm Events............................. |
215 |
|
Setting Momentary and Maintained Modes ........................................................... |
216 |
|
Deactivating Alarm and Alert Settings upon Input Trigger .................................... |
216 |
|
Overlaying Input Name onto Screen upon Alarm Events...................................... |
217 |
|
Other Applications ................................................................................................. |
217 |
|
Input State Detection ................................................................................................. |
218 |
|
I/O Enable Setting....................................................................................................... |
219 |
|
Advanced I/O Panel.................................................................................................... |
220 |
|
The Advanced I/O Panel........................................................................................ |
220 |
|
Creating a Group for Cascade Triggers ................................................................ |
221 |
|
Configuring the Advanced I/O Panel ..................................................................... |
224 |
|
Setting Up Mode Schedule .................................................................................... |
225 |
|
Quick Link .............................................................................................................. |
227 |
|
Forcing Output ....................................................................................................... |
227 |
|
Editing Background Image..................................................................................... |
228 |
|
System-Wide Triggers ........................................................................................... |
228 |
vii

The “Advanced Logical Input Status in Mutlicam” Option ..................................... |
229 |
Managing a Group of I/O Devices ......................................................................... |
230 |
Visual Automation...................................................................................................... |
231 |
Setting Up Visual Automation................................................................................ |
231 |
Using Visual Automation........................................................................................ |
232 |
Virtual I/O Control....................................................................................................... |
233 |
Setting Up a Module .............................................................................................. |
234 |
7 Point-Of-Sale (POS) Application.................... |
236 |
Text-Mode POS Device .............................................................................................. |
236 |
Windows-Based Direct POS Integration................................................................ |
236 |
Data Capture Box Integration ................................................................................ |
239 |
Graphic-Mode POS Device........................................................................................ |
240 |
POS Data Sender .................................................................................................. |
240 |
Setting a POS Device................................................................................................. |
242 |
Superimposing POS Data onto Camera Screen ..................................................... |
244 |
POS Field Filter........................................................................................................... |
246 |
Abnormal Transaction Alerts.................................................................................... |
248 |
Setting Alarm Frequency ....................................................................................... |
249 |
Codepage Mapping .................................................................................................... |
251 |
POS Data Search........................................................................................................ |
252 |
POS Live View ............................................................................................................ |
253 |
The POS Live View Window.................................................................................. |
253 |
Setting Live View ................................................................................................... |
254 |
POS Color Text ........................................................................................................... |
255 |
Setting POS Color Text ......................................................................................... |
255 |
8 Viewing Live Video Using WebCam.............. |
261 |
Configuring WebCam Server .................................................................................... |
261 |
WebCam Server Settings ...................................................................................... |
261 |
UPnP Settings........................................................................................................ |
271 |
FTP Server Settings .............................................................................................. |
274 |
Network Port Information ....................................................................................... |
275 |
Accessing Live Video Using a Web Browser .......................................................... |
276 |
viii
Single View MPEG4 Encoder Viewer........................................................................ |
278 |
Control Panel ......................................................................................................... |
280 |
Adding a Server ..................................................................................................... |
281 |
Video Recording .................................................................................................... |
281 |
Alarm Notification................................................................................................... |
282 |
Video and Audio Configuration.............................................................................. |
283 |
Hardware-Compressed or Megapixel Stream ....................................................... |
284 |
PTZ Control............................................................................................................ |
285 |
Visual PTZ Control Panel ...................................................................................... |
286 |
I/O Control.............................................................................................................. |
287 |
Visual Automation.................................................................................................. |
288 |
Picture-in-Picture View .......................................................................................... |
289 |
Picture-and-Picture View ....................................................................................... |
289 |
Image Enhancement.............................................................................................. |
289 |
Remote Configuration............................................................................................ |
290 |
2-Window MPEG4 Encoder Viewer........................................................................... |
292 |
Multi View MPEG4 Encoder Viewer .......................................................................... |
293 |
Starting Multi View ................................................................................................. |
293 |
Host List ................................................................................................................. |
296 |
Channel Status Information ................................................................................... |
297 |
Adding a Host ........................................................................................................ |
297 |
Combining Multiple Hosts into a Single Host......................................................... |
298 |
Video Recording .................................................................................................... |
300 |
Camera Polling ...................................................................................................... |
300 |
Hardware-Compressed or Megapixel Stream ....................................................... |
300 |
PTZ Control............................................................................................................ |
301 |
Visual PTZ Control Panel ...................................................................................... |
301 |
Output Control........................................................................................................ |
302 |
Remote ViewLog ................................................................................................... |
302 |
System Configuration ............................................................................................ |
303 |
Camera Status....................................................................................................... |
304 |
Host Information..................................................................................................... |
305 |
Multicast and Audio Broadcast ................................................................................ |
306 |
Configuring Multicast and Broadcast Settings....................................................... |
306 |
Sending Audio Broadcast ...................................................................................... |
307 |
Receiving Multicast and Audio Broadcast ............................................................. |
308 |
JPEG Image Viewer.................................................................................................... |
310 |
Remote Playback........................................................................................................ |
311 |
ix

Remote ViewLog ........................................................................................................ |
312 |
Event List Query......................................................................................................... |
313 |
Download Center........................................................................................................ |
315 |
Mobile Phone Applications ....................................................................................... |
316 |
PDA........................................................................................................................ |
318 |
I-Mode Phone ........................................................................................................ |
323 |
Windows Smartphone............................................................................................ |
325 |
Symbian Smartphone ............................................................................................ |
327 |
BlackBerry Phone .................................................................................................. |
329 |
9 E-Map Application ......................................... |
332 |
The E-Map Editor........................................................................................................ |
332 |
The E-Map Editor Window..................................................................................... |
333 |
Creating an E-Map File............................................................................................... |
334 |
Creating an E-Map File for a Remote Host ........................................................... |
335 |
Starting E-Map ............................................................................................................ |
336 |
Setting the Pop-up Map Function .......................................................................... |
337 |
Starting E-Map from a Remote Site .......................................................................... |
338 |
The Remote E-Map Window.................................................................................. |
338 |
Logging in Different Hosts ..................................................................................... |
339 |
Configuring the Remote E-Map ............................................................................. |
340 |
Viewing Host Information and Playing Back Video................................................ |
341 |
Accessing Remote ViewLog .................................................................................. |
341 |
E-Map Server .............................................................................................................. |
342 |
Installing E-Map Server ......................................................................................... |
342 |
The E-Map Server Window.................................................................................... |
342 |
Setting E-Map Server ............................................................................................ |
343 |
Remote Monitoring via E-Map Server ................................................................... |
343 |
Accessing Authentication Server Account Information.......................................... |
343 |
10 Short Message Service ................................. |
346 |
Installing SMS Server................................................................................................. |
346 |
The SMS Server Window ........................................................................................... |
347 |
SMS Server Setup ...................................................................................................... |
348 |
x

Device Settings...................................................................................................... |
348 |
Server Settings ...................................................................................................... |
349 |
Account Settings.................................................................................................... |
352 |
SMS Log ...................................................................................................................... |
354 |
Setting SMS Log.................................................................................................... |
354 |
Viewing SMS Log .................................................................................................. |
355 |
Password Security ..................................................................................................... |
357 |
Connecting GV-System to SMS Server.................................................................... |
358 |
Setting Mobile Numbers ............................................................................................ |
360 |
11 Useful Utilities............................................... |
364 |
Dynamic DNS.............................................................................................................. |
364 |
Installing Dynamic DNS ......................................................................................... |
364 |
Registering Domain Name with DDNS.................................................................. |
365 |
Starting Dynamic DNS........................................................................................... |
367 |
Local DDNS Server..................................................................................................... |
368 |
TwinDVR System........................................................................................................ |
369 |
Starting TwinServer ............................................................................................... |
371 |
Installing TwinDVR ................................................................................................ |
373 |
Starting TwinDVR .................................................................................................. |
373 |
TwinDVR Settings.................................................................................................. |
376 |
Watermark Viewer ...................................................................................................... |
377 |
Twin View Display ...................................................................................................... |
379 |
Windows Lockup........................................................................................................ |
381 |
The GV-Desktop Screen........................................................................................ |
381 |
GV-Desktop Features ............................................................................................ |
382 |
Token File for Save Mode...................................................................................... |
385 |
Authentication Server................................................................................................ |
386 |
Installing the Server ............................................................................................... |
386 |
The Server Window ............................................................................................... |
386 |
Creating a DVR List ............................................................................................... |
388 |
Editing a User ........................................................................................................ |
389 |
Starting the Server................................................................................................. |
390 |
Connecting GV-System to the Server ................................................................... |
391 |
Backup Servers ..................................................................................................... |
393 |
Remote Access from Control Center, Remote E-Map and MultiView ................... |
394 |
xi
Fast Backup and Restore .......................................................................................... |
397 |
Installing the FBR Program.................................................................................... |
397 |
Selecting a Skin ..................................................................................................... |
398 |
Customizing the Features...................................................................................... |
399 |
Backing up and Restoring Settings ....................................................................... |
400 |
Hot-Swap Recording.................................................................................................. |
402 |
The Media Man Tool Window................................................................................ |
403 |
Viewing Disk Drive Status...................................................................................... |
404 |
Adding a Disk Drive ............................................................................................... |
406 |
Removing a Disk Drive .......................................................................................... |
407 |
Logging In Automatically at Startup....................................................................... |
408 |
Setting Up LED Panel............................................................................................ |
409 |
Backup Server ............................................................................................................ |
411 |
Usage Requirement............................................................................................... |
412 |
Connecting to the Storage System........................................................................ |
412 |
Advanced Settings................................................................................................. |
413 |
Manually Adding Files for Backup ......................................................................... |
416 |
Viewing Server Status ........................................................................................... |
417 |
Retrieving Recorded Files ..................................................................................... |
419 |
Backup Viewer............................................................................................................ |
420 |
Usage Requirements ............................................................................................. |
420 |
Installing Backup Viewer........................................................................................ |
420 |
Starting Backup Viewer ......................................................................................... |
421 |
Performing Queries................................................................................................ |
422 |
Viewing the Event Files ......................................................................................... |
423 |
Using Remote ViewLog ......................................................................................... |
424 |
Bandwidth Control Application ................................................................................ |
425 |
Installing the Bandwidth Control ............................................................................ |
426 |
Allowing Remote Control at DVR........................................................................... |
427 |
Connecting to a WebCam Server.......................................................................... |
427 |
Controlling a WebCam Server ............................................................................... |
428 |
Bandwidth Setup.................................................................................................... |
429 |
Block List Setup ..................................................................................................... |
430 |
General Setup........................................................................................................ |
431 |
Report Generator........................................................................................................ |
432 |
Starting Report Generator ..................................................................................... |
432 |
Setting Up Report Generator ................................................................................. |
432 |
Setting Up Report Criteria...................................................................................... |
434 |
xii
|
E-Mail Attachment Settings ................................................................................... |
437 |
|
Playing Back the Video Recording ........................................................................ |
438 |
|
Viewing Event Log ................................................................................................. |
438 |
DSP Spot Monitor Controller .................................................................................... |
439 |
|
|
Spot Monitor Controller.......................................................................................... |
439 |
|
Spot Monitor Panel ................................................................................................ |
442 |
Quad Spot Monitor Controller................................................................................... |
443 |
|
|
Setting Up the Controller ....................................................................................... |
443 |
|
Setting Pop-up Camera Windows.......................................................................... |
446 |
|
Displaying TV Quad Panel on the Screen ............................................................. |
447 |
Digital Matrix............................................................................................................... |
448 |
|
|
Activating Multiple Monitors ................................................................................... |
448 |
|
Setting Live View ................................................................................................... |
450 |
|
Setting Scanned Pages ......................................................................................... |
451 |
|
Setting Pop-up Alert............................................................................................... |
452 |
|
Setting Live View with Pop-up Alert....................................................................... |
454 |
Troubleshooting .................................................. |
455 |
|
Appendix.............................................................. |
461 |
|
A. USB Dongle Required for IP Device Applications ........................................... |
461 |
|
B. Supported PTZ Protocol and Model.................................................................. |
462 |
|
C. Certified PTZ Models for Object Tracking ........................................................ |
464 |
|
D. |
Supported IP Devices ......................................................................................... |
465 |
E. |
Supported GPRS Models.................................................................................... |
469 |
xiii
xiv

Chapter 1 |
|
Configuring Main System................................ |
3 |
System Configuration ........................................................................................ |
6 |
Configuring Global Recording Parameters............................................................................... |
7 |
Adjusting Individual Camera................................................................................................... |
15 |
Setting Up Day - Night Recording Mode ................................................................................ |
19 |
Geo Mpeg4 (ASP) Advanced Settings ................................................................................... |
20 |
Configuring Hotline/Network Notification................................................................................ |
21 |
Selecting Screen Layout......................................................................................................... |
24 |
Launching GV-System from System Tray .............................................................................. |
25 |
Camera / Audio Install............................................................................................................. |
26 |
Setting Up Auto Reboot .......................................................................................................... |
27 |
Logging System Activities into System Log............................................................................ |
28 |
Setting Different Text Alignment for Each Channel................................................................. |
29 |
Setting Up Password .............................................................................................................. |
30 |
Sending Alerts thru E-mail Accounts ...................................................................................... |
33 |
Audio and Video Settings................................................................................ |
35 |
Choosing Video Source.......................................................................................................... |
35 |
Adjusting Video Attributes....................................................................................................... |
36 |
Listening to Live Audio............................................................................................................ |
39 |
Hard Disk Calculator............................................................................................................... |
40 |
Turbo Mode............................................................................................................................. |
42 |
Start/Stop Monitoring....................................................................................... |
44 |
Playing Back Video Files ................................................................................. |
45 |
Instant Playback ..................................................................................................................... |
45 |
System Log....................................................................................................... |
46 |
Daylight Saving Time Recording .................................................................... |
51 |
Recording Schedule......................................................................................... |
53 |
Video Schedule....................................................................................................................... |
54 |
Special Days Schedule........................................................................................................... |
55 |
I/O Schedule ........................................................................................................................... |
55 |
Center V2 Schedule................................................................................................................ |
55 |
1
PTZ Control....................................................................................................... |
56 |
Mapping PTZ Cameras .......................................................................................................... |
57 |
PTZ Idle Protection................................................................................................................. |
58 |
Auto Switching PTZ Control Panels ....................................................................................... |
60 |
PTZ Automation...................................................................................................................... |
61 |
Pop-up Live Video on Triggered Events......................................................... |
62 |
Advanced Motion Detection ............................................................................ |
63 |
Video Noise Solutions ..................................................................................... |
65 |
Noise Tolerance ...................................................................................................................... |
65 |
Noise Detection to Reduce File Size ...................................................................................... |
66 |
Noise Filter.............................................................................................................................. |
67 |
Picture-in-Picture View .................................................................................... |
68 |
Picture-and-Picture View ................................................................................. |
69 |
System Idle Protection..................................................................................... |
70 |
Auto Logout Administrator ...................................................................................................... |
70 |
Auto Login User without Access Rights.................................................................................. |
71 |
Auto Start Recording............................................................................................................... |
72 |
Creating Shortcuts ........................................................................................... |
73 |
Touch Screen Support ..................................................................................... |
74 |
PTZ and I/O Control Panel ..................................................................................................... |
74 |
Touch Screen Panel ............................................................................................................... |
74 |
System Tools .................................................................................................... |
76 |
Colorful Mode ......................................................................................................................... |
76 |
Image Quality of DirectDraw Overlay ..................................................................................... |
77 |
Stopping Video Lost Watchdog............................................................................................... |
77 |
Deactivating Video Lost Beep ................................................................................................ |
77 |
Fast Key Lockup..................................................................................................................... |
78 |
Fast Key Reference................................................................................................................ |
78 |
Version Information................................................................................................................. |
78 |
CHAPTE1R
Configuring Main System
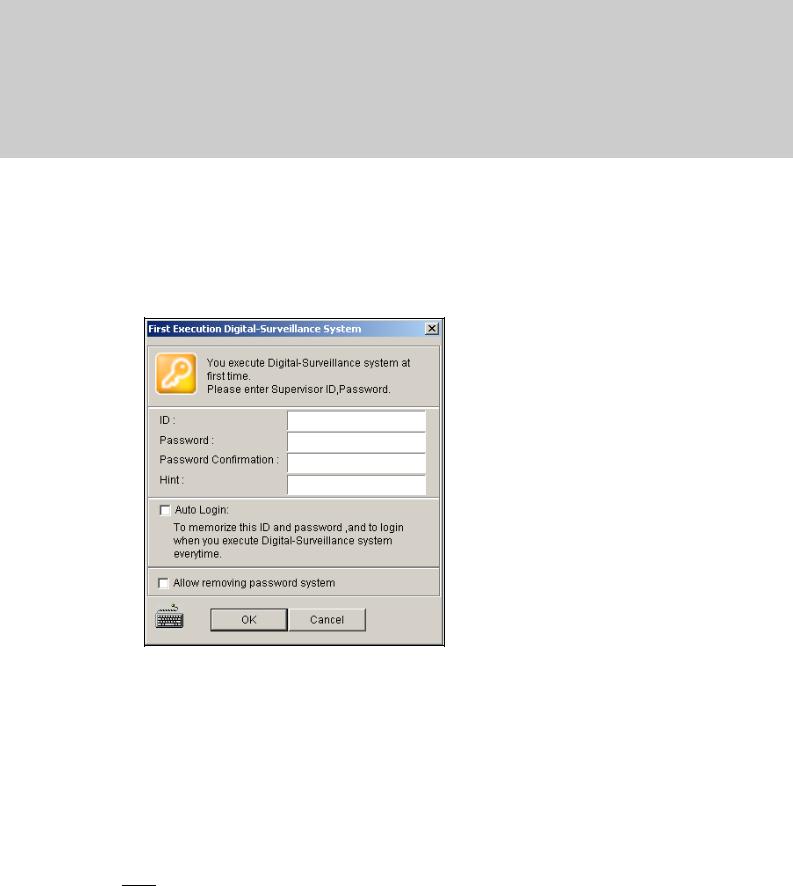
The system prompts you for a Supervisor ID and Password when starting the system for the first time, shown as below:
Figure 1-1
Enter a name you wish to be the Supervisor ID in the ID field. Finish the setup by entering Password, Password Confirmation, and a Hint (optional) that would remind you of the password. Messages entered at the Hint field will only pop up when passwords are entered incorrectly.
Auto Login: Allows auto login as the current user every time when the system is launched. For security purposes, this feature is only recommended for single-user systems.
Allow removing password System: For this setting, see Setting Up Password later in this chapter.
 : Click to open the onscreen keyboard and enter the login information.
3

After setting up the Supervisor ID and Password, launch the program to enter the Main System.
Figure 1-2
The controls in the main screen:
No. |
|
Name |
|
Description |
1 |
|
Camera Number |
|
Indicates the camera number matching the port number in the GV video |
|
|
capture card. |
||
|
|
|
|
|
|
|
|
||
2 |
Camera Name |
Indicates the given camera name. |
||
|
|
|
||
3 |
Date/Time |
Displays the current date and time. |
||
|
|
|
||
4 |
Storage Space |
Indicates the remaining disk space. |
||
|
|
|
||
5 |
Connection |
Indicates the connection status of remote applications. |
||
|
|
|
|
|
6 |
PTZ Control |
|
Displays the PTZ control panel. |
|
|
|
|
||
7 |
I/O Control |
Displays the I/O control panel. |
||
|
|
|
||
8 |
TV-Out |
Displays the TV Quad control panel. |
||
|
|
|
|
|
9 |
User-Defined |
|
Accesses other applications. |
|
|
|
|
|
|
10 |
Location Name |
|
Indicates the GV-System’s name, usually named by its geographical location. |
|
|
|
|
|
|
11 |
Network |
|
Enables the connection to remote applications. |
|
|
|
|
||
12 |
Camera Scan |
Rotates through the screen divisions. |
||
|
|
|
|
|
4
1 Configuring Main System
13 |
ViewLog |
Brings up these options: Video/Audio Log, System Log, Search POS Data, |
|
POS Live View, Live Object Index, Search Object Index and E-Map. |
|||
|
|
||
|
|
|
|
14 |
Configure |
Accesses System settings. |
|
|
|
|
|
15 |
Schedule |
Set up recording schedule. |
|
|
|
|
|
16 |
Monitor |
Starts monitoring. |
|
|
|
|
|
17 |
Camera Select |
Select the desired camera number for main division view. |
|
|
|
|
|
18 |
Screen Division |
Select screen divisions. |
|
|
|
|
|
19 |
Exit |
Brings up these options: Login/Change User, Logout, Minimize, Restart |
|
Multicam and Exit. |
|||
|
|
||
|
|
|
Press [F7] on the keyboard, or click the Monitor button to start recording. By default, every camera records with the following settings:
zIn Motion Detection mode
zWith the 320 x 240 resolution
zWith Geo Mpeg4-ASP codec
When working with the system, you will undoubtedly want to change the settings as you go along. The buttons provide quick access to several popular Main System settings. Click any button to see the menus of these settings. Let’s start with the Configure button.
5
System Configuration
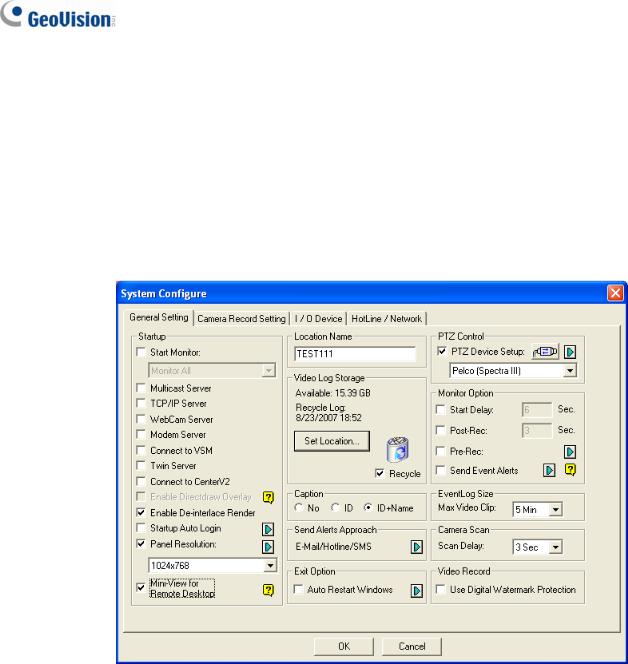
Click the Configure button (No.14, Figure 1-2), point to General Setting and select System Configure. You may configure cameras and global recording parameters in this dialog box. Changes made to the General Setting tab would apply to all available cameras attached to the system. In the Camera Record Setting tab, you can configure each individual camera. In the I/O Device tab, you can add and configure I/O devices. In the HotLine/Network tab, you can configure the system for connection to network or mobile.
Figure 1-3
6

1 Configuring Main System
Configuring Global Recording Parameters
Let’s start with the options on the General Setting tab:
[Startup] The Startup options instruct the system to enable selected features at system startup.
Start Monitor: Select one of the following monitor control modes at system startup:
~Monitor All: Allows you to monitor all cameras and I/O (if available) at system startup. It is the same as to manually click Monitor button (No. 16, Figure 1-2) and select Start All Monitoring. (For details, see Start/Stop Monitoring later in this chapter).
~Schedule Monitor: Allows you to monitor cameras by schedule. Alternatively you may click Schedule button (No. 15, Figure 1-2) and select Schedule Start. Refer to Recording Schedule later in this chapter.
~I/O Monitor: Allows you to monitor all I/O devices. Alternatively you may click the Monitor button (No. 16, Figure 1-2), and then select I/O Monitoring.
Note: To set different recording modes and alert methods for each camera, see [Monitor Control], Adjusting Individual Camera later in this chapter.
Multicast Server: Allows connection to IP Multicast (one of the remote application) at system startup. (Or click the Network button (No. 11, Figure 1-2) and select Multicast Server.)
TCP Server: Allows connection to Remote View (another remote application) by TCP. (Or click the Network button (No. 11, Figure 1-2) and select TCP Server.)
WebCam Server: Allows connection to WebCam Server at startup. (Or click the Network button (No. 11, Figure 1-2) and select WebCam Server.)
Modem Server: Allows connection to Remote View by a modem. (Or click the Network button (No. 11, Figure 1-2) and select Modem Server.)
Connect to VSM: Allows connection to VSM Server (Or click the Network button (No. 11, Figure 1-2) and select Connect to VSM.)
Twin Server: Allows connection to Twin Server at startup. (Or click the Network button (No. 11, Figure 1-2) and select Twin Server). For more details, see Twin DVR System in Chapter 11.
Connect to CenterV2: Allows connection to CenterV2. (Or click the Network button (No. 11, Figure 1-2) and select Connect to CenterV2.)
Enable DirectDraw Overlay: Applies DirectDraw Overlay to enhance image quality if your VGA card supports it. For certain VGA cards, DirectDraw Overlay can result in blurred images. To avoid the image problem and remain DirectDraw Overlay, change the image quality from High to Standard. See Image Quality of DirectDraw Overlay in the section of System Tools.
7

Enable De-interlace Render: Avoids interlace of the odd and even video lines. This feature affects only single view mode with the resolution of 640 x 480 and 720 x 480. After enabling the feature, you must restart the GV-System to apply it.
Note:
1.The Enable Directdraw Overlay and De-interlace Render features can greatly enhance image quality. If your VGA card supports DirectX9, enable both settings.
2.You may see a warning message “Directdraw Create Overlay Failed” when trying to use WebCam Remote Control to connect to a server. The message indicates the server has the Enable Directdraw Overlay feature enabled. It only means the remote side will not see the images with DirectDraw applied. It is safe to press YES to continue the connection.
Tip: To check the version of your DirectX, search for the file name dxdiag. Open the file and find the related information. DirectX 9.0c is also included in the Surveillance System Software CD.
Startup Auto Login: Select and press the Arrow button to assign an ID used at system auto startup. After the setup, the system will automatically login using this ID at next startup, without asking for ID and Password. For related settings, see Launching GV-System from System Tray later in this chapter.
Panel Resolution: Select the resolution from the drop-down list that best fits your computer monitor screen.
Mini-View for Remote Desktop: Squeezes all video channels into a single 320x240 view. Since you may use Microsoft Remote Desktop (a feature that comes with Windows XP Professional Edition) to set up the Main System through network, it is important to get smallest size possible data to transfer over network.
1.Click the Configure button (No.14, Figure 1-2), point to General Setting, and then select
System Configure.
2.In the System Configure dialog box, select Mini-View for Remote Desktop in the Startup section, and then click OK to apply the setting.
3.Restart the Main System.
4.To switch between the mini and normal view, click the Configure button (No.14, Figure 1-2), point to A/V Setting and select Mini-View Switch.
8

1 Configuring Main System
Figure 1-4 Mini View
[Location Name] The given name (maximum 14 characters) is displayed in main screen as the name of the server.
[Video Log Storage] Select storage type (recycle or not recycle) and location.
Available: Shows remaining hard disk space.
Recycle Log: Indicates the recording date of the next video file to be erased.
Set Location:
~Database Folder: You can specify a new location for the database. The database location determines where the records of ViewLog Event List (Cam*.db and Aud*.db) are stored.
~Storage Group Folder: You can create the maximum of 16 storage groups with different storage locations, keep dates and recycle sizes to store video files.
To create a storage group:
1. Select Storage Group Folder. This dialog box appears.
Figure 1-5
9

2.Click the Add Storage Group icon 
 to add a storage group. The first Storage Group is created by default.
3.Check the Cameras to be contained in the storage group.
4.Check the Keep Days option and specify the number of days to keep the video files in storage.
5.Click the Add New Path icon 
 to specify a storage location.
6.Check the Enlarge Recycle Threshold option and specify the size if you like to enlarge the default recycle size.
7.Click OK.
Recycle: When this option is selected, it will cause the oldest files to be deleted when the system requires storage space for new surveillance videos. If it is not selected, the system will stop recording when disk space is full.
Note:
1.If the designated storage space is not big enough to keep all video files for the defined days, the Recycle setting then overrides the Keep Days setting.
2.The video capture cards and GV-NVR have different default recycle sizes. When the storage space reaches the default size limit, the system will delete the oldest files. The default recycle size:
z GV-250 / 600 / 650 / 800 is 795 MB. z GV-1120 / 1240 / 1480 is 1.2 GB.
z GV-2004 is 1.2 GB plus 50 MB/per channel z GV-2008 is 1.2 GB plus 50 MB/per channel. z GV-2016 is 1.2 GB plus 50 MB/per channel. z GV-NVR is 1.2 GB.
Every added IP video channel can expand the default recycle size by 50 MB. For example, if your GV-NVR has 4 IP channels, the default size limit will be 1200 MB + 50 MB x 4 = 1400 MB.
If you find the default storage space is not enough, select the Enlarge Recycle Threshold option to expand the size limit.
Every time the 400 MB of old files will be deleted upon reaching the default limit.
10
1 Configuring Main System
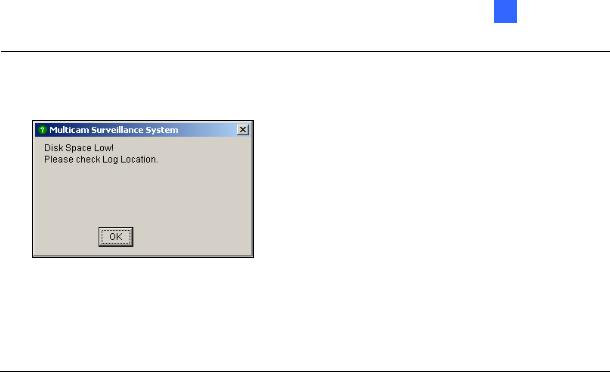
3.When one partition fell short than the minimum storage space, video files will automatically be saved to next available hard disk; when total available storage space is lower than minimum, the system will stop recording and show a Disk Space Low! message.
Figure 1-6
To solve the space shortage problem, you may add more hard disk space to the system, or to delete/back up your video files for more storage space. To correctly delete or back up video files, see Chapter 5 for more details.
[Caption] Enters heading to have it displayed on the upper left-hand corner of the camera screen. You may choose No for no heading; ID to show only camera ID; ID+Name to show both camera ID + Name.
[Send Alerts Approach] Click the arrow button to choose whether to be notified by E-mail, telephone or SMS when alert conditions occur under the surveillance area.
For the telephone setup, see Configuring Hotline/Network Notification later in this chapter. For the E-mail setup, see Sending Alerts thru E-Mail Accounts later in this chapter.
For the SMS setup, see Short Message Service in Chapter 10.
[Exit Option] Check the box to enable the feature. Press the blue Arrow button to switch between
Auto Shutdown Windows and Auto Restart Windows. Auto Shutdown Windows closes Windows OS after exiting GV-System. Auto Restart Windows restarts Windows OS after exiting GV-System.
[PTZ Control] Adds PTZ cameras to the system. See operation details in PTZ Control later in this chapter.
11
[Monitor Option]
Start Delay: Starts monitoring after x second(s) when the system is activated.
Post-Rec Motion: Keeps on recording for a set period of time after motion stops.
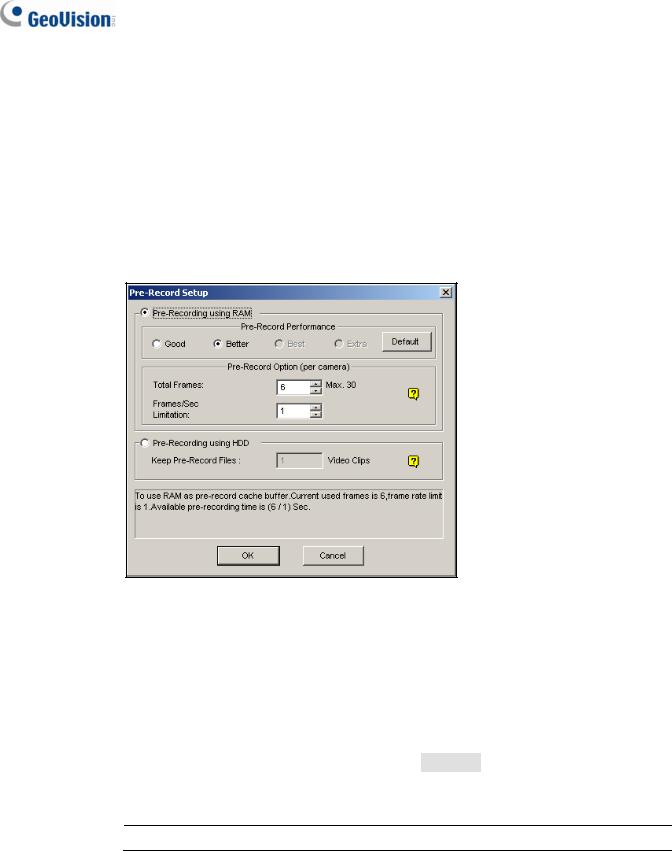
Pre-Rec Motion: Records video for a set period of time before motion starts. This feature allows you to choose RAM or HDD as a pre-recording buffer. The difference between the two is that RAM can save smaller pre-record from 1 second to 1.5 minutes, while the hard disk can save larger one from 1 minute to 45 minutes.
1.Enable the Pre-Rec Motion option.
2.Click the Arrow button beside. This dialog box appears.
Figure 1-7
[Pre-Record Performance] The amount of physical memory of the computer that the system is running on determines the pre-recording performance. Some options are grayed out if the computer does not have enough memory for the selections.
This table shows the maximum pre-recording frame rate and the physical memory requirements of each setup:
|
Good |
Better |
Best |
Extra |
|
Maximum pre-recording frames per camera (fps) |
15 fps |
30 fps |
60 fps |
90 fps |
|
RAM required |
128 MB |
256 MB |
512 MB |
768 MB |
|
Note: The recording frame rate is based on a 320x240 recording size.
[Pre-Record Option (per camera)] Determines the number of pre-record frames.
Total Frames: Specify the maximum pre-recording frames of the system.
Frame/Sec Limitation: Specify the maximum pre-recording frame rate (fps) of a camera.
12
1 Configuring Main System
Dividing the Total Frames by Frames/Sec Limitation, you will get the pre-recording
duration of each camera. For example: |
|
|
|
|
Pre-recording duration = Total Frames |
= |
30 |
= 5 seconds |
|
|
|
|
|
|
|
Frame/Sec |
|
6 |
|
|
Limitation |
|
|
|
[Pre-Recording using HDD] Use the hard disk as a pre-recording buffer. This method gives you much longer pre-recording time.
Keep Pre-Record Files: Specify the number of video clips for pre-record. The maximum number of video clips you can specify is 9, and the time range of one video clip is from 1 minute to 5 minutes. So the pre-recording time can be from 1 minute to 45 minutes. For the video clip, see
[EventLog Size] below.
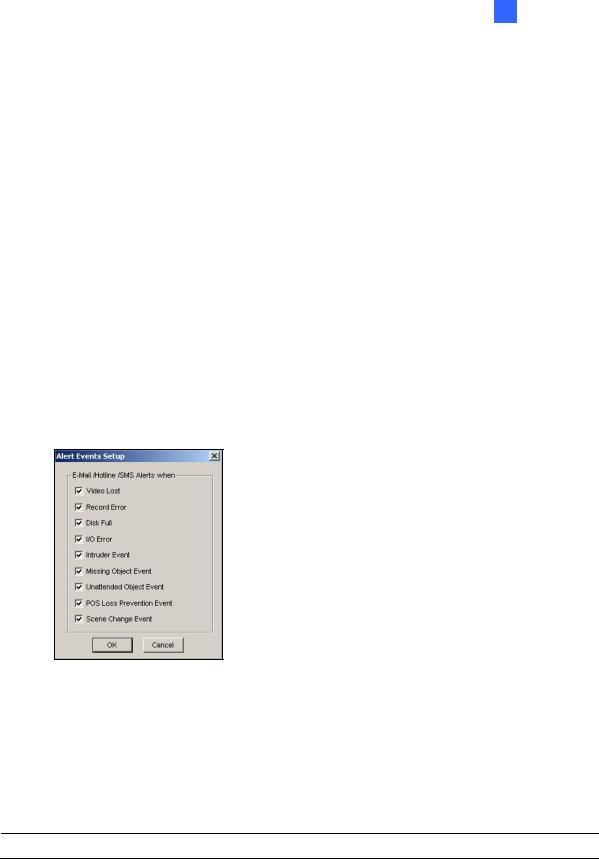
Send Event Alerts: Allows you to send out the assigned E-Mail/Hotline/SMS notification when the selected alert conditions occur. To enable the function, follow the steps below.
1.Check the Send Event Alerts option, and click the Arrow button beside to display this dialog box.
Figure 1-8
2.Select the desired alert events to send out the assigned notification, and then click OK for the application.
The alert events of Intruder Event, Missing Object, Unattended Object, and POS Loss Prevention Event are only available when the alarm settings are activated in Counter Application, Object Monitor, and POS Application separately.
Note: To select the type of notification, see [Send Alerts Approach] earlier in this chapter.
13

[EventLog Size] Determines the amount of time (from 1 to 5 minutes) of each event file. If you select 5 Min, a 30-minute event will be chopped into six 5-minute event files; if you select 1 Min, a 30-minute event will be chopped into thirty 1-minute event files. To decide what to set up here, consider how often you back up your event files, and how intensive the activity is in your surveillance area. Smaller file size makes backup process faster.
[Camera Scan] Select to rotate through screen divisions. Click the drop-down list and specify the amount of time that elapses before switching to the next screen division group. Press the Arrow button to select the mode of screen divisions.
[Video Record] Click to watermark all recorded videos. Watermark is a way to verify the authenticity of video streams, and to ensure that they have not been tampered with or modified in any way. For details, see Watermark Viewer in Chapter 11.
14
 Loading...