


 Loading...
GV-VMS
User's Manual V15.10.1.0
VMSV151010-UM-A

© 2016 GeoVision, Inc. All rights reserved.
Under the copyright laws, this manual may not be copied, in whole or in part, without the written consent of GeoVision.
Every effort has been made to ensure that the information in this manual is accurate. GeoVision, Inc. makes no expressed or implied warranty of any kind and assumes no responsibility for errors or omissions. No liability is assumed for incidental or consequential damages arising from the use of the information or products contained herein. Features and specifications are subject to change without notice.
GeoVision, Inc.
9F, No. 246, Sec. 1, Neihu Rd., Neihu District, Taipei, Taiwan Tel: +886-2-8797-8377
Fax: +886-2-8797-8335 http://www.geovision.com.tw
Trademarks used in this manual: GeoVision, the GeoVision logo and GV series products are trademarks of GeoVision, Inc. Windows is the registered trademark of Microsoft Corporation.
February 2016
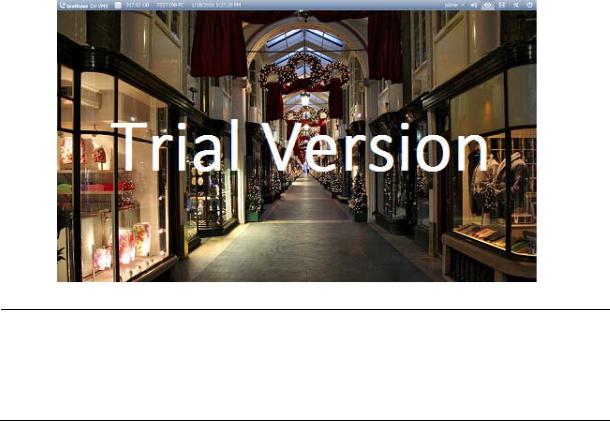
GV-VMS Trial Version
GV-VMS is a comprehensive video management system that records up to 64 channels of GeoVision and/or third-party IP devices. GeoVision offers a 60-day trial period that allows you to connect to 16 channels of third-party IP devices without license. A “Trial Version” watermark will appear on the live view and recorded files for the 16 channels of third-party IP devices.
Note:
1.If you insert a dongle for third-party IP devices, the dongle license will override the trial version and the 16 trial channels will no longer be supported.
2.Currently, you cannot remotely access the trial channels using remote applications such as GV-Edge Recording Manager and GV-Control Center…etc.
i

Once the trial period expires, you will need to purchase dongles to connect to third-party IP devices. The licenses available for purchase are shown below:
|
Supported Devices |
|
|
Channels |
|
|
License |
|
GV IP Devices Only |
|
|
32 ch |
|
|
No license required. |
|
|
|
64 ch |
|
|
GV-VMS Pro license required, 32 ch per license. |
|
|
|
|
|
|
|
||
|
|
|
|
16 ch |
|
|
Trial Version: 16 channels of 3rd party IP devices. |
|
GV + 3rd-Party IP |
|
|
32 ch |
|
|
3rd-Party license required, in increments of 1 ch. |
|
Devices |
|
|
|
|
|
2 licenses required: |
|
|
|
|
64 ch |
|
|
• GV-VMS Pro license, 32 ch per license. |
|
|
|
|
|
|
|
• 3rd-Party license, in increments of 1 ch. |
Note: GV-USB Dongle comes in internal and external dongles. It is recommended to use the internal GV-USB Dongle to have the Hardware Watchdog function, which restarts the PC when Windows crashes or freezes.
For the list of supported third-party IP camera models, please visit GeoVision’s website: http://www.geovision.com.tw/english/4_21.asp
ii

Important Notes
GPU Decoding Specifications
GPU (Graphics Processing Unit) decoding can lower the CPU loading and increase the total frame rate supported by a GV-VMS. GPU decoding can be performed on on-board VGA, external VGA, or both, under the following specifications.
On-board VGA: GPU decoding is only supported when using the following Intel chipsets:
z2nd Generation Intel Core i3 / i5 / i7 Desktop Processors (Sandy Bridge)
z3rd Generation Intel Core i3 / i5 / i7 Desktop Processors (Ivy Bridge)
z4th Generation Intel Core i3 / i5 / i7 Desktop Processors (Haswell / Haswell Refresh)
z6th Generation Intel Core i3 / i5 / i7 Desktop Processors (Skylake)
External VGA: GPU decoding is only supported when using NVIDIA graphics cards with compute capability 3.0 or above and memory 2 GB or above. To look up the commute capability of the NVIDIA graphics cards, refer to: https://developer.nvidia.com/cuda-gpus.
On-board VGA + External VGA: To have both the on-board VGA and external VGA perform GPU decoding, the VGAs must follow their respective specifications listed above.
Note:
1.If you have both on-board VGA and external VGA installed, the on-board VGA must be connected to a monitor in order for the on-board VGA to be enabled.
2.You can install multiple external graphics cards if needed.
iii

Software Specifications
GPU decoding is only supported under the following operating system, resolution, and codec.
|
|
|
|
Sandy Bridge |
|
Ivy Bridge / Haswell / Haswell Refresh / |
|
|
|
|
|
|
Skylake / External VGA (NVIDIA) |
|
Operating System |
64-Bit |
Windows 7 / 8 / 8.1 / 10 / Server 2008 R2 / Server 2012 R2 |
|||
|
|
|
|
|
|
|
|
Resolution |
|
|
1 MP / 2 MP |
|
1 MP / 2 MP / 3 MP / 4 MP / 5 MP / |
|
|
|
|
8 MP / 12 MP |
||
|
|
|
|
|
|
|
|
Codec |
|
|
H.264 |
|
|
|
|
|
|
|
|
|
iv
Multi-Channel Playback Specifications
Multi-channel playback in ViewLog has been enhanced to improve the smoothness of the video by producing higher frame rate. However, playing back multiple channels at high resolution can increase the CPU loading especially if the GV-VMS is processing other tasks simultaneously. As a result of the high CPU loading, dropped frames may sometimes occur in recorded video when playing back multiple megapixel channels.
To avoid the problem, it is recommended to play back megapixel video in single view.
v

Contents
GV-VMS Trial Version…………………..........……i
Important Notes…………………................……iii
1 |
.............................Configuring Main System |
3 |
||
|
|
|
|
|
|
1.1 |
Installing the GV-VMS............................................................................................ |
3 |
|
|
|
1.1.1 |
Dongle .................................................................................................. |
3 |
|
|
1.1.2 |
Options ................................................................................................. |
4 |
|
|
1.1.3 |
Recommended System Requirements ................................................ |
5 |
|
|
1.1.4 |
Minimum Network Requirements ......................................................... |
6 |
|
|
1.1.5 |
Installing GV-VMS ................................................................................ |
7 |
|
|
1.1.6 Uninstalling and Upgrading GV-VMS................................................... |
9 |
|
|
1.2 |
Getting Started ..................................................................................................... |
10 |
|
|
|
1.2.1 |
Main Screen ....................................................................................... |
11 |
|
|
1.2.2 |
Adding Cameras................................................................................. |
13 |
|
|
1.2.3 |
Accessing Live View........................................................................... |
15 |
|
|
1.2.4 |
Enabling the Recording...................................................................... |
16 |
|
|
1.2.5 |
Playing Back Video ............................................................................ |
17 |
|
1.3 |
Recording Settings.............................................................................................. |
18 |
|
|
|
1.3.1 Setting Global Recording Settings for All Cameras ........................... |
19 |
|
|
|
1.3.2 Setting Recording Settings for Individual Cameras ........................... |
21 |
|
|
|
1.3.3 Setting Up the Video Storage Location .............................................. |
22 |
|
|
|
1.3.4 Setting Up Motion Detection............................................................... |
24 |
|
|
1.4 Live View and Layouts ........................................................................................ |
27 |
||
|
|
1.4.1 |
Utilizing Live View Functions.............................................................. |
27 |
|
|
1.4.2 Arranging Live View Layouts.............................................................. |
30 |
|
|
|
1.4.3 Setting a Zoom Window ..................................................................... |
33 |
|
|
|
1.4.4 Setting a Scan Window ...................................................................... |
35 |
|
|
|
1.4.5 |
Setting Focus View............................................................................. |
37 |
|
|
1.4.6 Automatic Switch among Different Live View Layouts....................... |
38 |
|
|
1.5 |
Start Monitoring ................................................................................................... |
39 |
|
vi
1.6 System Configuration ......................................................................................... |
41 |
|
1.6.1 |
Configuring General Setting............................................................... |
41 |
1.6.2 |
Customizing Startup Settings............................................................. |
43 |
1.6.3 Customizing Display Position and Panel Resolution ......................... |
45 |
|
1.6.4 Setting Up Email Notification.............................................................. |
46 |
|
1.6.5 |
System Idle Protection ....................................................................... |
49 |
1.6.6 Configuring Fast Key Lock ................................................................. |
51 |
|
1.7 Account and Password....................................................................................... |
52 |
|
1.7.1 Creating a New Account..................................................................... |
53 |
|
1.7.2 |
Configuring Account Settings............................................................. |
54 |
1.7.3 Changing or Retrieving Password at Login........................................ |
56 |
|
1.7.4 |
Preventing Unauthorized System Termination................................... |
57 |
1.7.5 Setting a Startup Auto Login User...................................................... |
58 |
|
|
1.8 |
Schedule............................................................................................................... |
|
59 |
|
|
1.8.1 Creating a Schedule with Setup Wizard............................................. |
60 |
|
|
|
1.8.2 Creating a Schedule Manually ........................................................... |
63 |
|
|
|
1.8.3 Exporting and Importing Schedule Settings....................................... |
64 |
|
|
1.9 |
System Log .......................................................................................................... |
65 |
|
|
|
1.9.1 |
Setting System Log ............................................................................ |
65 |
|
|
1.9.2 |
Viewing System Log........................................................................... |
67 |
|
1.10 |
Other Functions ................................................................................................. |
69 |
|
|
|
1.10.1 Setting Live View Pop-Up Video ...................................................... |
69 |
|
|
|
1.10.2 Adjusting to Daylight Saving Time ................................................... |
70 |
|
|
|
1.10.3 |
Setting Network Failure Detection.................................................... |
71 |
|
1.11 |
PTZ Camera ........................................................................................................ |
72 |
|
|
|
1.11.1 Accessing PTZ Control Panel and Auto Functions .......................... |
73 |
|
|
|
1.11.2 Setting PTZ Idle Protection and Advanced Functions ..................... |
75 |
|
|
|
|
||
2 |
IP Camera Setup ................................. |
78 |
||
|
|
|
|
|
|
2.1 |
Adding IP Cameras.............................................................................................. |
78 |
|
|
|
2.1.1 |
Adding Cameras Manually ................................................................. |
80 |
|
|
2.1.2 |
Scanning Camera............................................................................... |
83 |
|
|
2.1.3 Mapping GV-IP Cameras Using GV-IP Device Utility ........................ |
84 |
|
|
2.2 Configuring Individual IP Cameras.................................................................... |
86 |
||
vii

2.2.1 |
Configuring Video Setting................................................................... |
86 |
2.2.2 |
Configuring Audio Setting................................................................... |
89 |
2.2.3 |
Configuring General Setting............................................................... |
90 |
|
2.3 |
Connection through RTSP, ONVIF & PSIA........................................................ |
92 |
|
|
2.4 |
On Demand Display............................................................................................. |
95 |
|
|
|
|
||
3 |
Video Analysis .................................... |
99 |
||
|
|
|
|
|
|
3.1 |
Object Counting and Intrusion Alarm................................................................ |
99 |
|
|
|
3.1.1 |
Object Counting.................................................................................. |
99 |
|
|
3.1.2 |
Intrusion Alarm ................................................................................. |
103 |
|
3.2 |
Object Index ....................................................................................................... |
108 |
|
|
|
3.2.1 |
Setting Object Index ......................................................................... |
108 |
|
|
3.2.2 |
Viewing Object Index........................................................................ |
111 |
|
|
3.2.3 |
Searching Object Index .................................................................... |
112 |
|
3.3 |
Automatic Video Snapshots ............................................................................. |
114 |
|
|
|
3.3.1 |
Setting Video Snapshots.................................................................. |
114 |
|
|
3.3.2 |
Searching Video Snapshots ............................................................. |
117 |
|
3.4 |
Face Detection ................................................................................................... |
119 |
|
|
|
3.4.1 |
Setting Face Detection ..................................................................... |
119 |
|
|
3.4.2 Searching Face Detection Snapshots.............................................. |
121 |
|
|
3.5 |
Face Count ......................................................................................................... |
122 |
|
|
|
3.5.1 |
Installing the Camera ....................................................................... |
122 |
|
|
3.5.2 |
Setting Face Count........................................................................... |
123 |
|
3.6 |
Privacy Mask Protection ................................................................................... |
127 |
|
|
|
3.6.1 Setting a Privacy Mask..................................................................... |
127 |
|
|
|
3.6.2 Granting Access Privileges to Recoverable Areas .......................... |
129 |
|
|
3.7 |
Panorama View .................................................................................................. |
130 |
|
|
|
3.7.1 |
The Main Window............................................................................. |
130 |
|
|
3.7.2 Stitching a Panorama View with Overlapping Areas........................ |
132 |
|
|
|
3.7.3 Easy Mode with No Overlapping Area ............................................. |
135 |
|
|
|
3.7.4 Accessing a Panorama View ........................................................... |
138 |
|
|
3.8 |
Video Defogging ................................................................................................ |
139 |
|
|
3.9 |
Video Stabilization ............................................................................................. |
141 |
|
|
3.10 Wide Angle Lens Dewarping .......................................................................... |
143 |
||
viii
|
3.11 |
Advanced Motion Detection ........................................................................... |
145 |
|
|
3.12 |
Crowd Detection .............................................................................................. |
148 |
|
|
3.13 |
Advanced Scene Change Detection .............................................................. |
151 |
|
|
3.14 |
Advanced Unattended Object Detection....................................................... |
154 |
|
|
3.15 |
Advanced Missing Object Detection ............................................................. |
157 |
|
|
3.16 |
Text Overlay ..................................................................................................... |
160 |
|
|
3.17 |
Fisheye View .................................................................................................... |
162 |
|
|
|
3.17.1 Setting Up a GV-Fisheye Camera.................................................. |
163 |
|
|
|
3.17.2 Setting Up a Third-Party Fisheye Camera ..................................... |
166 |
|
|
|
3.17.3 |
Object Tracking .............................................................................. |
168 |
|
3.18 |
Specifications .................................................................................................. |
175 |
|
|
3.19 |
Heat Map |
........................................................................................................... |
178 |
|
|
3.19.1 ......................................................................... |
Enabling Heat Map |
178 |
|
|
3.19.2 .............................................................................. |
Object Tracking |
182 |
|
3.20 |
PTZ Object ........................................................................................Tracking |
183 |
|
|
|
3.20.1 ................................................................... |
Dual Camera Tracking |
183 |
|
|
3.20.2 ................................................................. |
Single Camera Tracking |
186 |
|
3.21 |
Specifications .................................................................................................. |
188 |
|
|
|
|
||
4 |
Video Playback........................................ |
191 |
||
|
|
|
||
|
4.1 Playing Back on ViewLog ................................................................................. |
192 |
||
|
|
4.1.1 ..................................................................... |
ViewLog Control Panel |
194 |
|
|
4.1.2 ..............................................................Adjusting the Camera View |
197 |
|
|
|
4.1.3 ..................................................................Searching a Video Event |
198 |
|
|
|
4.1.4 ...........................................Bookmarking Video Events in ViewLog |
199 |
|
|
|
4.1.5 ...........................................................Merging and Exporting Video |
200 |
|
|
|
4.1.6 .................................................................................. |
Saving Images |
204 |
|
|
4.1.7 ................................................................................ |
Printing Images |
205 |
|
|
4.1.8 ................................................................. |
Adjusting Distorted Views |
206 |
|
4.2 |
Object Search..................................................................................................... |
208 |
|
|
4.3 |
Advanced ....................................................................................Log Browser |
210 |
|
|
|
4.3.1 ................................................................................... |
Filter Settings |
212 |
|
4.4 |
Remote ViewLog ..................................................................................Service |
213 |
|
|
|
4.4.1 .............................................. |
Retrieving Recordings from GV - VMS |
213 |
ix

|
|
4.4.2 Retrieving Images of Object Index ................................................... |
215 |
|
|
|
4.4.3 |
Resuming Backup ............................................................................ |
216 |
|
4.5 |
Single Player ...................................................................................................... |
217 |
|
|
|
4.5.1 |
Single Player Window ...................................................................... |
217 |
|
4.6 |
Specifications .................................................................................................... |
218 |
|
|
|
|
||
5 |
Backup, Deletion and Repair ................... |
220 |
||
|
|
|
|
|
|
5.1 |
Backing Up Log Data......................................................................................... |
220 |
|
|
5.2 |
Backing Up Recorded Files .............................................................................. |
222 |
|
|
5.3 |
Deleting Recorded Files.................................................................................... |
225 |
|
|
5.4 |
Repairing Damaged File Paths......................................................................... |
227 |
|
|
5.5 |
Repairing Damaged Video Files ....................................................................... |
229 |
|
|
|
|
||
6 |
I/O Applications ........................................ |
232 |
||
|
|
|
|
|
|
6.1 |
Setting I/O Devices ............................................................................................ |
233 |
|
|
|
6.1.1 |
Adding I/O Devices........................................................................... |
234 |
|
|
6.1.2 Setting the Input and Output Devices .............................................. |
235 |
|
|
|
6.1.3 |
Latch Trigger .................................................................................... |
237 |
|
|
6.1.4 Keeping Last Toggle Status ............................................................. |
239 |
|
|
6.2 |
Advanced I/O Applications ............................................................................... |
241 |
|
|
|
6.2.1 Setting Up Actions Upon Input Trigger............................................. |
242 |
|
|
|
6.2.2 Moving PTZ Camera to Preset Points upon Input Trigger ............... |
243 |
|
|
|
6.2.3 Setting Momentary and Maintained Modes...................................... |
244 |
|
|
|
6.2.4 Deactivating Alarm and Alert upon Input Trigger ............................. |
245 |
|
|
|
6.2.5 Other I/O Application Functions ....................................................... |
246 |
|
|
6.3 |
I/O Devices in Content List ............................................................................... |
247 |
|
|
6.4 |
Visual Automation ............................................................................................. |
248 |
|
x

7 Remote Viewing............................................ |
252 |
7.1 |
Remote Viewing Using a Web Browser........................................................... |
253 |
|
7.2 |
WebCam Server Settings.................................................................................. |
257 |
|
|
7.2.1 |
General Settings............................................................................... |
257 |
|
7.2.2 |
Server Settings................................................................................. |
259 |
|
7.2.3 |
Video Settings .................................................................................. |
260 |
|
7.2.4 |
Audio Settings .................................................................................. |
261 |
|
7.2.5 |
JPG Settings .................................................................................... |
263 |
|
7.2.6 |
UPnP Settings .................................................................................. |
264 |
|
7.2.7 |
Network Port Information.................................................................. |
265 |
7.3 |
Single View Viewer........................................................................................ |
266 |
|
|
7.3.1 Adjusting Video Quality and Recording Videos................................ |
268 |
|
|
7.3.2 |
Control Panel.................................................................................... |
269 |
|
7.3.3 Configuring Single View Viewer Options.......................................... |
270 |
|
|
7.3.4 |
PTZ Control Panel............................................................................ |
275 |
|
7.3.5 |
Visual PTZ Control ........................................................................... |
276 |
|
7.3.6 |
I/O Control ........................................................................................ |
277 |
|
7.3.7 |
Visual Automation ............................................................................ |
278 |
|
7.3.8 |
Picture-in-Picture View..................................................................... |
279 |
|
7.3.9 |
Picture-and-Picture View.................................................................. |
280 |
7.4 |
2-Window Viewer ............................................................................................... |
281 |
|
7.5 |
Multi-Window Viewer......................................................................................... |
282 |
|
7.6 |
JPEG Image Viewer ........................................................................................... |
283 |
|
7.7 |
Playing Back Events.......................................................................................... |
284 |
|
|
7.7.1 |
Event List Query............................................................................... |
284 |
|
7.7.2 |
Remote Playback ............................................................................. |
285 |
7.8 |
Remote ViewLog................................................................................................ |
287 |
|
7.9 |
Download Center ............................................................................................... |
288 |
|
7.10 |
GV-Edge Recording Manager ......................................................................... |
289 |
|
7.11 |
Mobile Phone Applications ............................................................................. |
291 |
|
|
7.11.1 Activating Mobile Functions on GV-VMS ....................................... |
291 |
|
|
7.11.2 |
Installing GV-Eye............................................................................ |
293 |
|
7.11.3 |
Connecting to GV-VMS.................................................................. |
294 |
7.12 Web Browsers on Smartphones .................................................................... |
296 |
||
xi

8 |
.........................................E-Map Application |
299 |
||
|
|
|
|
|
8.1 |
The E-Map Editor ............................................................................................... |
299 |
||
|
|
8.1.1 The E-Map Editor Window ............................................................... |
300 |
|
|
|
8.1.2 |
Creating an E-Map ........................................................................... |
301 |
|
|
8.1.3 Creating an E-Map for a Remote Host............................................. |
306 |
|
8.2 |
Starting E-Map.................................................................................................... |
307 |
||
|
|
8.2.1 Setting Up the Pop-up Map.............................................................. |
309 |
|
8.3 |
Remotely Accessing E-Map.............................................................................. |
311 |
||
|
|
8.3.1 The Remote E-Map Window ............................................................ |
312 |
|
|
|
8.3.2 Accessing E-Maps of Multiple Hosts................................................ |
314 |
|
|
|
8.3.3 Configuring the Remote E-Map........................................................ |
315 |
|
|
|
8.3.4 Viewing Event List and Playing Back Videos ................................... |
317 |
|
8.4 |
E-Map Server...................................................................................................... |
318 |
||
|
|
8.4.1 |
Installing E-Map Server .................................................................... |
318 |
|
|
8.4.2 The E-Map Server Window .............................................................. |
319 |
|
|
|
8.4.3 Setting up E-Map Server .................................................................. |
320 |
|
|
|
8.4.4 Connecting to E-Map Server............................................................ |
320 |
|
9 Useful Utilities…………………………………………323
9.1 Dynamic DNS ..................................................................................................... |
323 |
|
9.1.1 |
Running Dynamic DNS .................................................................... |
324 |
9.1.2 Registering Domain Name with DDNS ............................................ |
325 |
|
9.1.3 |
Starting Dynamic DNS ..................................................................... |
327 |
9.2 Watermark Viewer.............................................................................................. |
329 |
|
9.2.1 |
Activating Watermark Protection...................................................... |
329 |
9.2.2 Running the Watermark Proof.......................................................... |
330 |
|
9.2.3 |
The Main Window............................................................................. |
331 |
9.3 Windows Lockup ............................................................................................... |
332 |
|
9.3.1 |
The GV-Desktop Screen .................................................................. |
332 |
9.3.2 |
GV-Desktop Features....................................................................... |
333 |
9.3.3 Token File for Safe Mode ................................................................. |
336 |
|
xii
9.4 Authentication Server ....................................................................................... |
337 |
|
9.4.1 |
Installing the Server.......................................................................... |
337 |
9.4.2 |
The Main Window............................................................................. |
338 |
9.4.3 |
Creating Clients................................................................................ |
340 |
9.4.4 |
Creating User Accounts ................................................................... |
341 |
9.4.5 Importing Groups and Users from Active Directory ......................... |
345 |
|
9.4.6 |
Starting the Server ........................................................................... |
349 |
9.4.7 Connecting GV-VMS to the Server .................................................. |
351 |
|
9.4.8 Remote Access from Control Center and Remote E-Map ............... |
354 |
|
9.5 Fast Backup and Restore ................................................................................. |
357 |
|
9.5.1 Running the FBR Program ............................................................... |
357 |
|
9.5.2 |
Plugin Component............................................................................ |
358 |
9.5.3 |
Customizing the Features ................................................................ |
359 |
9.5.4 Backing up and Restoring Settings .................................................. |
360 |
|
9.6 Bandwidth Control Application ........................................................................ |
364 |
|
9.6.1 Installing the Bandwidth Control....................................................... |
365 |
|
9.6.2 |
The Main Window............................................................................. |
366 |
9.6.3 |
Allowing Remote Control.................................................................. |
367 |
9.6.4 Connecting to a WebCam Server .................................................... |
368 |
|
9.6.5 |
Controlling Specific WebCam Server............................................... |
369 |
9.6.6 Setting up the Bandwidth ................................................................. |
370 |
|
9.6.7 |
Block List Setup................................................................................ |
371 |
9.6.8 |
General Setup .................................................................................. |
372 |
9.7 Language Setting............................................................................................... |
373 |
|
9.7.1 Installing the MultiLang Tool............................................................. |
373 |
|
9.7.2 |
Revising the Translated Text............................................................ |
374 |
9.7.3 |
Setting Up the UI Language to English ............................................ |
378 |
9.8 Skype Video Utility ............................................................................................ |
380 |
|
9.8.1 Installing GV-Skype Video Utility...................................................... |
381 |
|
9.8.2 |
Setting Up Notifications Upon Motion or I/O Trigger........................ |
382 |
9.8.3 |
Requesting Live View....................................................................... |
387 |
9.9 GV-SDSyncCard Utility...................................................................................... |
388 |
|
9.9.1 |
Installing GV-SDCardSync Utility ..................................................... |
388 |
9.9.2 Setting Up GV-SDCardSync Utility .................................................. |
389 |
|
9.9.3 |
The Main Window............................................................................. |
392 |
9.10 The Media Man Tools Window........................................................................ |
394 |
|
9.10.1 |
The Media Man Tools Window....................................................... |
394 |
9.10.2 |
Viewing Disk Drive Status .............................................................. |
395 |
xiii

9.10.3 |
Adding a Disk Drive........................................................................ |
397 |
9.10.4 Removing a Disk Drive................................................................... |
398 |
|
9.10.5 Logging In Automatically at Startup ............................................... |
399 |
|
9.10.6 |
Setting LED Panel .......................................................................... |
399 |
9.11 Alert Notifications Through SNMP Protocol ................................................. |
402 |
|
xiv

Chapter 1
Configuring Main System ....................... |
3 |
||
1.1 |
Installing the GV-VMS.......................................................................... |
3 |
|
|
1.1.1 |
Dongle.................................................................................................................. |
3 |
|
1.1.2 |
Options ................................................................................................................ |
4 |
|
1.1.3 |
Recommended System Requirements...................................................... |
5 |
|
1.1.4 |
Minimum Network Requirements............................................................... |
6 |
|
1.1.5 |
Installing GV-VMS............................................................................................ |
7 |
|
1.1.6 Uninstalling and Upgrading GV-VMS......................................................... |
9 |
|
1.2 |
Getting Started.................................................................................... |
10 |
|
|
1.2.1 |
Main Screen..................................................................................................... |
11 |
|
1.2.2 |
Adding Cameras ............................................................................................. |
13 |
|
1.2.3 |
Accessing Live View..................................................................................... |
15 |
|
1.2.4 |
Enabling the Recording ............................................................................... |
16 |
|
1.2.5 |
Playing Back Video ....................................................................................... |
17 |
1.3 |
Recording Settings............................................................................. |
18 |
|
|
1.3.1 Setting Global Recording Settings for All Cameras........................... |
19 |
|
|
1.3.2 Setting Recording Settings for Individual Cameras .......................... |
21 |
|
|
1.3.3 Setting Up the Video Storage Location ................................................. |
22 |
|
|
1.3.4 Setting Up Motion Detection ..................................................................... |
24 |
|
1.4 Live View and Layouts ...................................................................... |
27 |
||
|
1.4.1 Utilizing Live View Functions .................................................................... |
27 |
|
|
1.4.2 Arranging Live View Layouts..................................................................... |
30 |
|
|
1.4.3 Setting a Zoom Window............................................................................... |
33 |
|
|
1.4.4 Setting a Scan Window................................................................................ |
35 |
|
|
1.4.5 |
Setting Focus View ....................................................................................... |
37 |
|
1.4.6 Automatic Switch among Different Live View Layouts.................... |
38 |
|
1.5 |
Start Monitoring .................................................................................. |
39 |
|
1.6 |
System Configuration ........................................................................ |
41 |
|
|
1.6.1 |
Configuring General Setting....................................................................... |
41 |
|
1.6.2 |
Customizing Startup Settings.................................................................... |
43 |
|
1.6.3 Customizing Display Position and Panel Resolution ......................... |
45 |
|
|
1.6.4 Setting Up Email Notification.................................................................... |
46 |
|
|
1.6.5 |
System Idle Protection ................................................................................ |
49 |
|
1.6.6 Configuring Fast Key Lock ......................................................................... |
51 |
|
|
|
|
1 |
1.7 Account and Password ..................................................................... |
52 |
1.7.1 Creating a New Account ............................................................................. |
53 |
1.7.2 Configuring Account Settings ................................................................... |
54 |
1.7.3 Changing or Retrieving Password at Login .......................................... |
56 |
1.7.4 Preventing Unauthorized System Termination.................................... |
57 |
1.7.5 Setting a Startup Auto Login User........................................................... |
58 |
1.8 Schedule ................................................................................................ |
59 |
|
1.8.1 Creating a Schedule with Setup Wizard ................................................ |
60 |
|
1.8.2 |
Creating a Schedule Manually................................................................... |
63 |
1.8.3 |
Exporting and Importing Schedule Settings ........................................ |
64 |
1.9 |
System Log ........................................................................................... |
65 |
|
|
1.9.1 |
Setting System Log....................................................................................... |
65 |
|
1.9.2 |
Viewing System Log ..................................................................................... |
67 |
1.10 |
Other Functions ................................................................................ |
69 |
|
|
1.10.1 Setting Live View Pop-Up Video............................................................. |
69 |
|
|
1.10.2 Adjusting to Daylight Saving Time ........................................................ |
70 |
|
|
1.10.3 Setting Network Failure Detection ....................................................... |
71 |
|
1.11 |
PTZ Camera........................................................................................ |
72 |
|
|
1.11.1 Accessing PTZ Control Panel and Auto Functions.......................... |
73 |
|
|
1.11.2 Setting PTZ Idle Protection and Advanced Functions ................... |
75 |
|
2

CHAPTER1
Configuring Main System
1.1Installing the GV-VMS
1.1.1Dongle
GV-VMS supports connection with up to connection with up to 64 IP devices. You can connect up to 32 channels of GV-IP Devices for free. If you need to connect more than 32 channels of GV-IP Devices or connect with third-party IP devices, license is required.
|
Supported Devices |
|
|
Channels |
|
|
License |
|
|
|
|
|
|
|
|
|
GV IP Devices Only |
|
|
32 ch |
|
|
No license required. |
|
|
|
|
|
|
|
|
|
|
|
64 ch |
|
|
GV-VMS Pro license required, 32 ch per license. |
|
|
|
|
|
|
|
||
|
|
|
|
|
|
|
|
|
|
|
|
16 ch |
|
|
Trial Version: 16 channels of 3rd party IP devices. |
|
GV + 3rd-Party IP |
|
|
32 ch |
|
|
3rd-Party license required, in increments of 1 ch. |
|
|
|
|
|
|
2 licenses required: |
|
|
Devices |
|
|
|
|
|
|
|
|
|
|
|
|
|
|
|
|
|
|
64 ch |
|
|
• GV-VMS Pro license, 32 ch per license. |
|
|
|
|
|
|
|
• 3rd-Party license, in increments of 1 ch. |
|
|
|
|
|
|
|
|
Note: GV-USB Dongle comes in internal and external dongles. It is recommended to use the internal GV-USB Dongle to have the Hardware Watchdog function, which restarts the PC when Windows crashes or freezes.
For the list of supported third-party IP camera models, please visit GeoVision’s website: http://www.geovision.com.tw/english/4_21.asp
3

1.1.2 Options
The following optional devices are available to expand your GV-VMS’s capabilities and versatility. Contact your dealer for more information.
|
Optional Devices |
|
|
Description |
|
|
|
|
|
|
|
|
|
The USB dongle can provide the Hardware Watchdog function to the |
|
Internal USB Dongle |
|
|
GV-VMS by restarting the computer when Windows crashes. You need |
|
|
|
|
to connect the dongle internally on the motherboard. |
|
|
|
|
|
|
GV-Hub V2 |
|
|
An easy way for serial port extension, this hub can add 4 RS-232 / |
|
|
|
RS-485 serial ports through the GV-VMS’s USB port. |
|
|
|
|
|
|
|
|
|
|
|
|
GV-COM V2 |
|
|
GV-COM V2 can add 1 RS-232 / RS-485 serial port through the |
|
|
|
GV-VMS’s USB port. |
|
|
|
|
|
|
|
|
|
|
|
|
|
|
|
GV-IO Box 4 Ports provides 4 inputs and 4 relay outputs, and supports |
|
GV-IO Box (4 Ports) |
|
|
both DC and AC output voltages. A USB port is also provided for PC |
|
|
|
|
connection. |
|
|
|
|
|
|
|
|
|
GV-IO Box 8 Ports provides 8 inputs and 8 relay outputs, and supports |
|
GV-IO Box (8 Ports) |
|
|
both DC and AC output voltages. You can connect the unit to the PC |
|
|
|
either by using its USB port or through network by using its Ethernet |
|
|
|
|
|
|
|
|
|
|
module. |
|
|
|
|
|
|
|
|
|
GV-IO Box 16 Ports provides 16 inputs and 16 relay outputs, and |
|
GV-IO Box (16 Ports) |
|
|
supports both DC and AC output voltages. You can connect the unit to |
|
|
|
the PC either by using its USB port or through network by using its |
|
|
|
|
|
|
|
|
|
|
Ethernet module. |
|
|
|
|
|
|
|
|
|
GV-Joystick V2 allows you to easily control PTZ cameras. It can be |
|
GV-Joystick V2 |
|
|
either plugged into the GV-VMS for independent use or connected to |
|
|
|
|
GV-Keyboard. |
|
|
|
|
|
|
|
|
|
GV-Keyboard V3 is used to program and operate GV-VMS and PTZ |
|
GV-Keyboard V3 |
|
|
cameras. Through RS-485 configuration, it can control up to 36 |
|
|
|
GV-VMS. In addition, you can connect PTZ cameras directly to the |
|
|
|
|
|
|
|
|
|
|
keyboard for PTZ control. |
|
|
|
|
|
4
1 Configuring Main System
1.1.3 Recommended System Requirements
Below are the recommended PC requirements for connecting GV-VMS with 32 and 64 channels of GV
and 3rd party IP cameras (dual streams).
|
GV-VMS (Up to 32 Channels) |
GV-VMS Pro (Up to 64 Channels) |
|
|
|
OS |
64-bit Windows 7 / 8 / 8.1 / 10 / Server 2008 R2 / Server 2012 R2 |
|
|
|
|
CPU |
4th Generation i3-4130, 3.4 GHz |
4th Generation i7-4770, 3.4 GHz |
|
|
|
Memory |
8 GB RAM |
16 GB RAM |
|
|
|
5

1.1.4 Minimum Network Requirements
The data transmitting capacity of GV-VMS depends on the number of Gigabit connections available. The numbers of Gigabit network cards required to connect 64 channels are listed below according to the resolution and codec of the source video.
|
Codec |
Resolution |
|
Bitrate Used |
Total FPS |
Gigabit Network |
Max. Channels Supported |
|
|
|
|
(Mbps) |
for 64 ch |
Cards Required |
per Network Card |
|
|
|
|
|
|
|
|
|
|
1.3 MP |
5.05 |
1920 |
1 |
Max. 64 ch / card |
|
|
|
|
|
|
|
|
|
|
|
2 MP |
|
7.01 |
1920 |
1 |
Max. 64 ch / card |
|
|
|
|
|
|
|
|
|
|
3 MP |
|
10.48 |
1280 |
1 |
Max. 64 ch / card |
|
H.264 |
|
|
|
|
|
|
|
4 MP |
|
11.65 |
960 |
2 |
Max. 50 ch / card |
|
|
|
|
|
|
|
|
|
|
|
5 MP |
|
16.48 |
640 |
2 |
Max. 38 ch / card |
|
|
|
|
|
|
|
|
|
|
8 MP |
|
17.14 |
1600 |
2 |
Max. 38 ch / card. |
|
|
|
|
|
|
|
|
|
|
12 MP |
16.67 |
960 |
2 |
Max. 38 ch / card |
|
|
|
|
|
|
|
|
|
|
|
1.3 MP |
32.36 |
1920 |
3 |
Max. 22 ch / card |
|
|
|
|
|
|
|
|
|
|
|
2 MP |
|
44.96 |
1920 |
4 |
Max. 16 ch / card |
|
|
|
|
|
|
|
|
|
|
3 MP |
|
38.73 |
1280 |
4 |
Max. 18 ch / card |
|
|
|
|
|
|
|
|
|
MJPEG |
4 MP |
|
40.35 |
960 |
4 |
Max. 17 ch / card |
|
|
|
|
|
|
|
|
|
|
5 MP |
|
30.48 |
640 |
3 |
Max. 22 ch / card |
|
|
|
|
|
|
|
|
|
|
8 MP |
|
58.52 |
1600 |
6 |
Max. 12 ch / card |
|
|
|
|
|
|
|
|
|
|
12 MP |
|
65.98 |
960 |
6 |
Max. 11 ch / card |
|
|
|
|
|
|
|
|
Note: The network requirements may vary depending on the bit rate of the streams.
6

1 Configuring Main System
1.1.5 Installing GV-VMS
Before You Start
For optimal performance of your system, it is important to follow these recommendations before installing the GV-VMS:
•It is strongly recommended to use separate hard disks. One is for installing Windows OS and GV-VMS software, and the other is for storing recorded files and system logs.
•When formatting the hard disks, select NTFS as the file system.
•GV-VMS is a multi-channel video recording system. With normal use of the system, the drive containing video files will become fragmented. This is because GV-VMS constantly stores video files of multi channels simultaneously, and video files will be scattered all over the drive. It is not necessary to regularly perform disk defragmentation. Since GV-VMS software and video files are stored on separated hard disks, the performance of GV-VMS will not be affected.
•Since the size of transmitted data from IP cameras may be quite large and reach beyond the transfer rate of a hard disk, you should note the total of recording frame rates that you can assign to a single hard disk, as listed below:
Frame rate limit in a single hard disk
|
Video Resolution |
|
|
|
H.264 |
|
|
MJPEG |
|
|||||
|
|
|
|
|
|
|
|
|
|
|
|
|
|
|
|
|
|
Frame Rate |
|
|
Bit Rate |
|
|
Frame Rate |
|
|
Bit Rate |
|
|
|
|
|
|
|
|
|
|
|
|
|
||||
|
|
|
|
|
|
|
|
|
|
|
|
|
|
|
|
1.3 MP (1280 x 1024) |
|
660 fps |
|
|
5.05 Mbit/s |
|
300 fps |
|
32.26 Mbit/s |
||||
|
|
|
|
|
|
|
|
|
|
|
||||
|
2 MP (1920 x 1080) |
|
|
660 fps |
|
|
7.01 Mbit/s |
|
|
210 fps |
|
|
44.93 Mbit/s |
|
|
|
|
|
|
|
|
|
|
|
|
|
|
|
|
|
3 MP (2048 x 1536) |
|
440 fps |
|
|
10.48 Mbit/s |
|
140 fps |
|
38.67 Mbit/s |
||||
|
|
|
|
|
|
|
|
|
|
|
||||
|
4 MP (2048 x 1944) |
|
|
330 fps |
|
|
11.65 Mbit/s |
|
|
105 fps |
|
|
40.53 Mbit/s |
|
|
|
|
|
|
|
|
|
|
|
|
|
|
|
|
|
5 MP (2560 x 1920) |
|
220 fps |
|
|
16.48 Mbit/s |
|
80 fps |
|
30.4 Mbit/s |
||||
|
|
|
|
|
|
|
|
|
|
|
||||
|
8 MP (3840 x 2120) |
|
|
660 fps |
|
|
14.13 Mbit/s |
|
|
96 fps |
|
|
58.52 Mbit/s |
|
|
|
|
|
|
|
|
|
|
|
|
|
|
|
|
|
12 MP (4000 x 3000) |
|
330 fps |
|
|
14.47 Mbit/s |
|
56 fps |
|
65.98 Mbit/s |
||||
|
|
|
|
|
|
|
|
|
|
|
|
|
|
|
Note: The data above was determined using the bit rate listed above and hard disks with average R/W speed above 110 MB/s.
7

The frame rate limit is based on the resolution of video sources. The higher video resolutions, the lower frame rates you can assign to a single hard disk. In other words, the higher frame rates you wish to record, the more hard disks you need to install. For the information of recording frame rates, you may consult the user’s manual of the IP camera that you wish to connect to.
Installing GV-VMS
1.To download GV-VMS, go to the Software Download and Upgrading page of GeoVision Website: http://www.geovision.com.tw/english/5_8_VMS.asp.
2.To install GV-VMS, find the Primary Applications section under the Video Management Software tab and click the Download icon  of GV-VMS.
3.Double-click GVVMSInstaller.exe and follow the instructions in the wizard to complete installation.
4.If you are using a USB dongle, insert the dongle to your computer. The GV-USB dongle is needed if you want to connect to more than 32 channels of IP devices or to third-party IP devices.
5.To install USB driver, find the Driver section under the Video Management Software tab, and click the Download icon  of GV-USB Devices Driver.
Figure 1-1
If you are using the GV-USB dongle, verify that the driver is installed correctly after the steps above. Go to Windows Device Manager and expand DVR-Devices. You should see the GV-Series USB Protector.
Figure 1-2
8

1 Configuring Main System
1.1.6 Uninstalling and Upgrading GV-VMS
GeoVision will periodically release software updates on our website. Before installing software upgrade, be sure to uninstall GeoVision Software first. By default, GeoVision software and log files are stored on one drive, while video files are stored on a different drive. Uninstalling GV-VMS will not remove the video, log, and setting files previously saved in the computer.
To uninstall the GV-VMS, follow these steps:
1.Close any open programs because your computer will restart during the uninstalling process.
2.Click the Start button, click Control Panel, and then click Uninstall a Program under Programs.
3.In the list of currently installed programs, select GV-VMS, and then click Uninstall/Change.
Figure 1-3
4.When you are prompted to confirm the program removal, click Yes.
To upgrade, download the newest GV-VMS from GeoVision’s website and re-install on your computer: http://www.geovision.com.tw/english/5_8_VMS.asp.
9
1.2 Getting Started
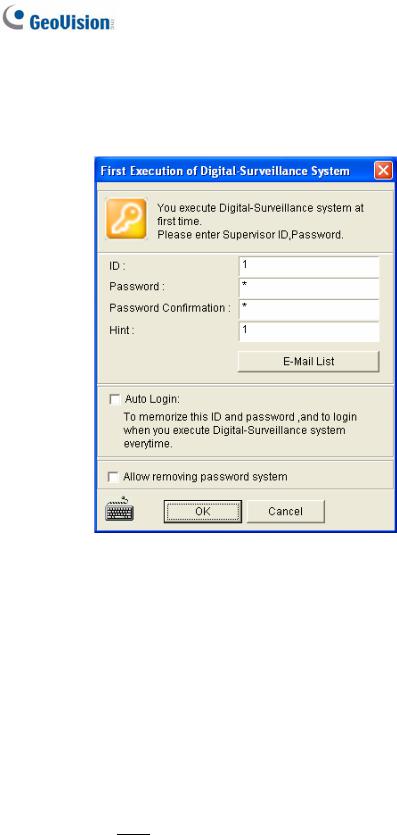
When you run GV-VMS for the first time, the system will prompt you for a Supervisor ID and Password.
Figure 1-4
1.Type an ID and a password. Type the password again for confirmation.
2.Type a hint that would remind you of the password.
3.It is recommended to click E-Mail List and enter e-mail addresses. When you forget the password, the password can be sent to your e-mail account.
4.Click OK to enter the main screen. You can also select the following options:
Auto Login: Allows auto login as the current user every time when the system is launched. For security purposes, this feature is only recommended for single-user systems.
Allow removing password System: It is recommended to select this option which allows removing the password database once you forget passwords. For details, see the same option in Account and Password later in this chapter.
 : Click to open the onscreen keyboard and enter the login information.
10

1 Configuring Main System
1.2.1 Main Screen
|
|
|
Login ID |
Home |
Toolbar |
Version Information |
|
|
|
||
|
Storage Space |
Audio |
ViewLog |
Exit |
|
|
|
|
|||
|
|
|
|
|
|
|
|
Figure 1-5 |
|
|
|
|
Name |
Description |
|
Login ID |
Click to manage accounts and passwords for accessing GV-VMS. |
|
|
|
|
Audio |
Click to control the volume of your PC. |
|
|
|
|
Home |
Shows the live view of connected cameras. |
|
|
|
|
ViewLog |
Shows a timeline of recorded events for playback. |
|
|
|
|
|
Brings up these options when Home is selected: |
|
|
• Monitor: Start / Stop monitoring, I/O monitoring and schedule monitoring |
|
|
• Network: Enable Webcam Server and connection to other GeoVision software. |
|
Toolbar |
• Tools: Show / hide volume indicator and set up Object Index. |
|
|
|
|
|
• Configure: Set up camera, recording, system, schedule, video processing and |
|
|
I/O devices. |
|
|
• Content List: Access live view layout, camera list, I/O device list and Panorama |
|
|
view. |
|
|
|
11

|
Brings up these options when ViewLog is selected: |
|
• Display Play Panel: Display or hide the ViewLog timeline. This function is grayed |
|
out when the Pinned button is selected in the bottom-right corner. |
|
• Tools: Manage event search, system log, event backup and event export. |
|
• Configure: Apply video effects and text overlay during playback. |
|
• Content List: Manage playback layout and access camera list. |
|
|
Exit |
Brings up these options: Minimize and Exit. |
|
|
12

1 Configuring Main System
1.2.2 Adding Cameras
To add cameras to the GV-VMS, click Home  , select Toolbar
  , click Configure
  and then select Camera Install. When the camera list is empty, the Automatic Setup dialog box automatically pops up.
1. Click Automatic Setup to search for IP cameras on the LAN.
Figure 1-6
2.The default login information for cameras is admin / admin. If the camera uses different ID and password, double-click the camera to specify the login information and click OK. If you select Apply All, the login information will be applied to all selected cameras.
Figure 1-7
3.Make sure the cameras you want to add are selected and click Apply. The cameras added are now listed in the Camera List.
4.Close the dialog box by clicking X in the top-right corner. When adding camera for the first time, the cameras will be automatically assigned to the live view grid.
13
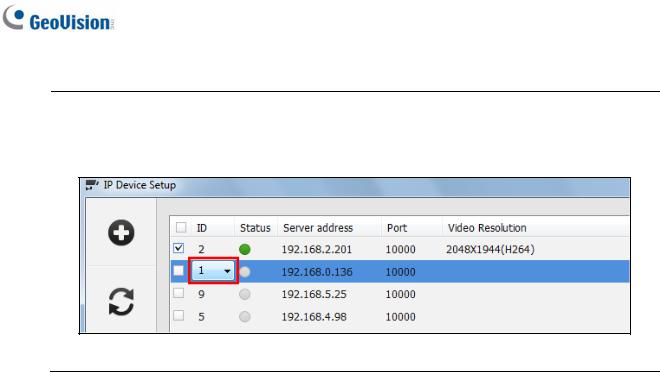
Tip: You can change the camera ID by clicking the ID of an inactive camera. The ID number does not affect where the camera is positioned in the live view grid, but the cameras will be listed according to the camera ID in setup pages such as Video Processing dialog box.
Figure 1-8
To add cameras using manual setup, camera scan or GV-IP Device Utility, refer to Adding IP Cameras in Chapter 2.
14
Loading...