

Page 1
Page 2
Page 3

English ...................................................................................................... 2
Hrvatski ................................................................................................ 16
Български .............................................................................................. 30
Ελληνικά ................................................................................................ 44
Deutsch .................................................................................................. 58
V 1.5
Page 4

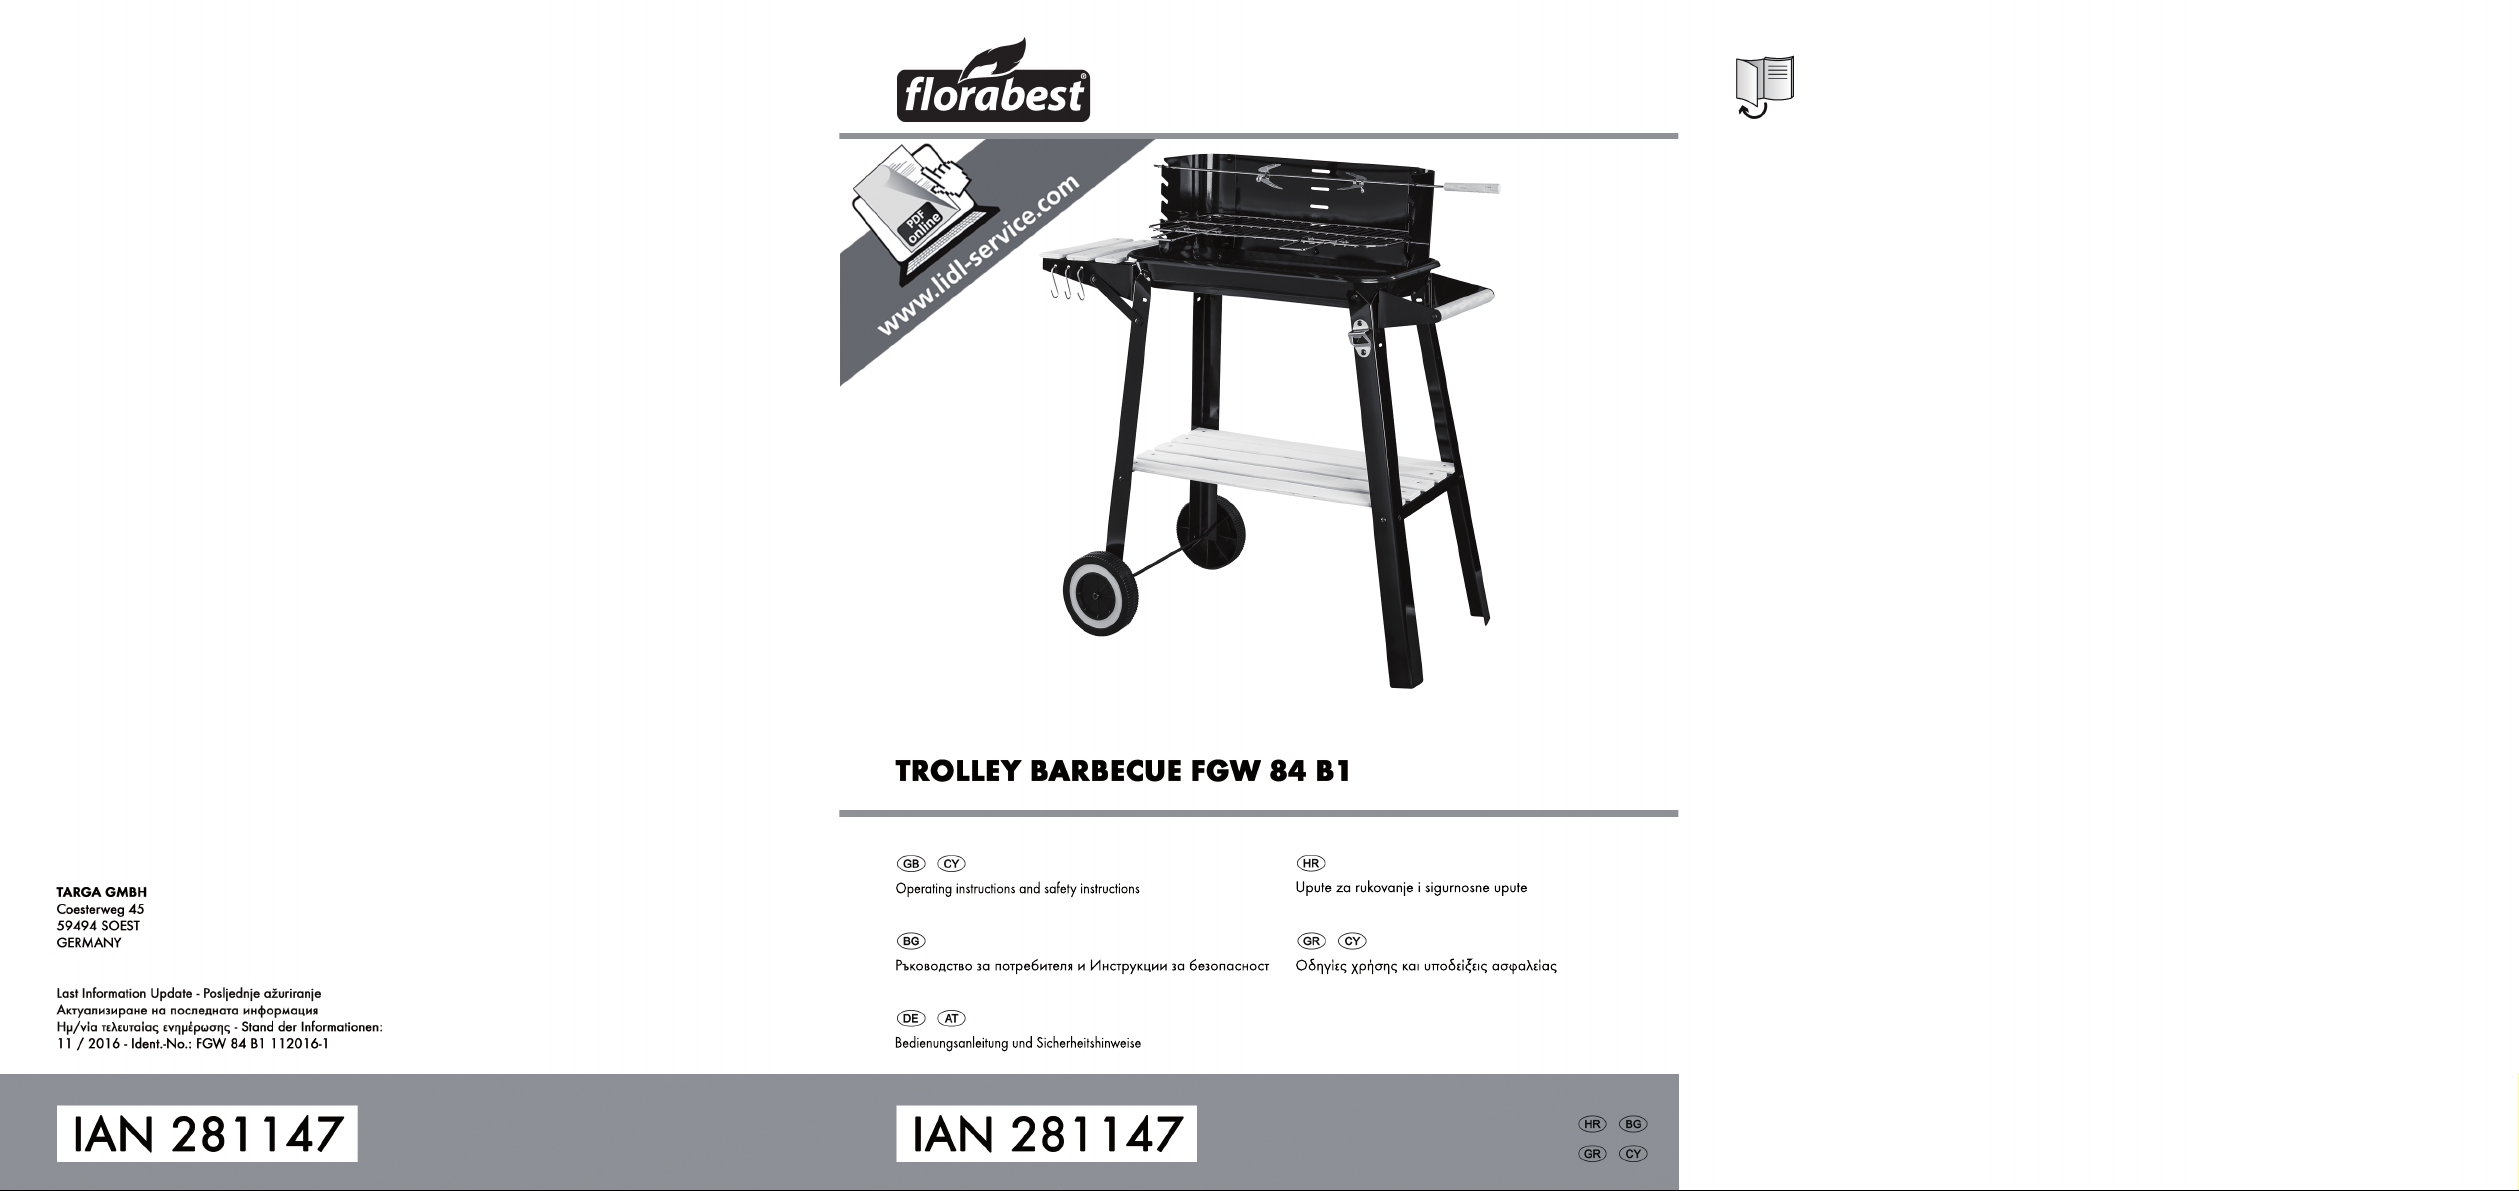
Florabest FGW 84 B1
Contents
1. Intended use ................................................................................................... 3
2. Copyright ....................................................................................................... 3
3. Package contents ........................................................................................... 4
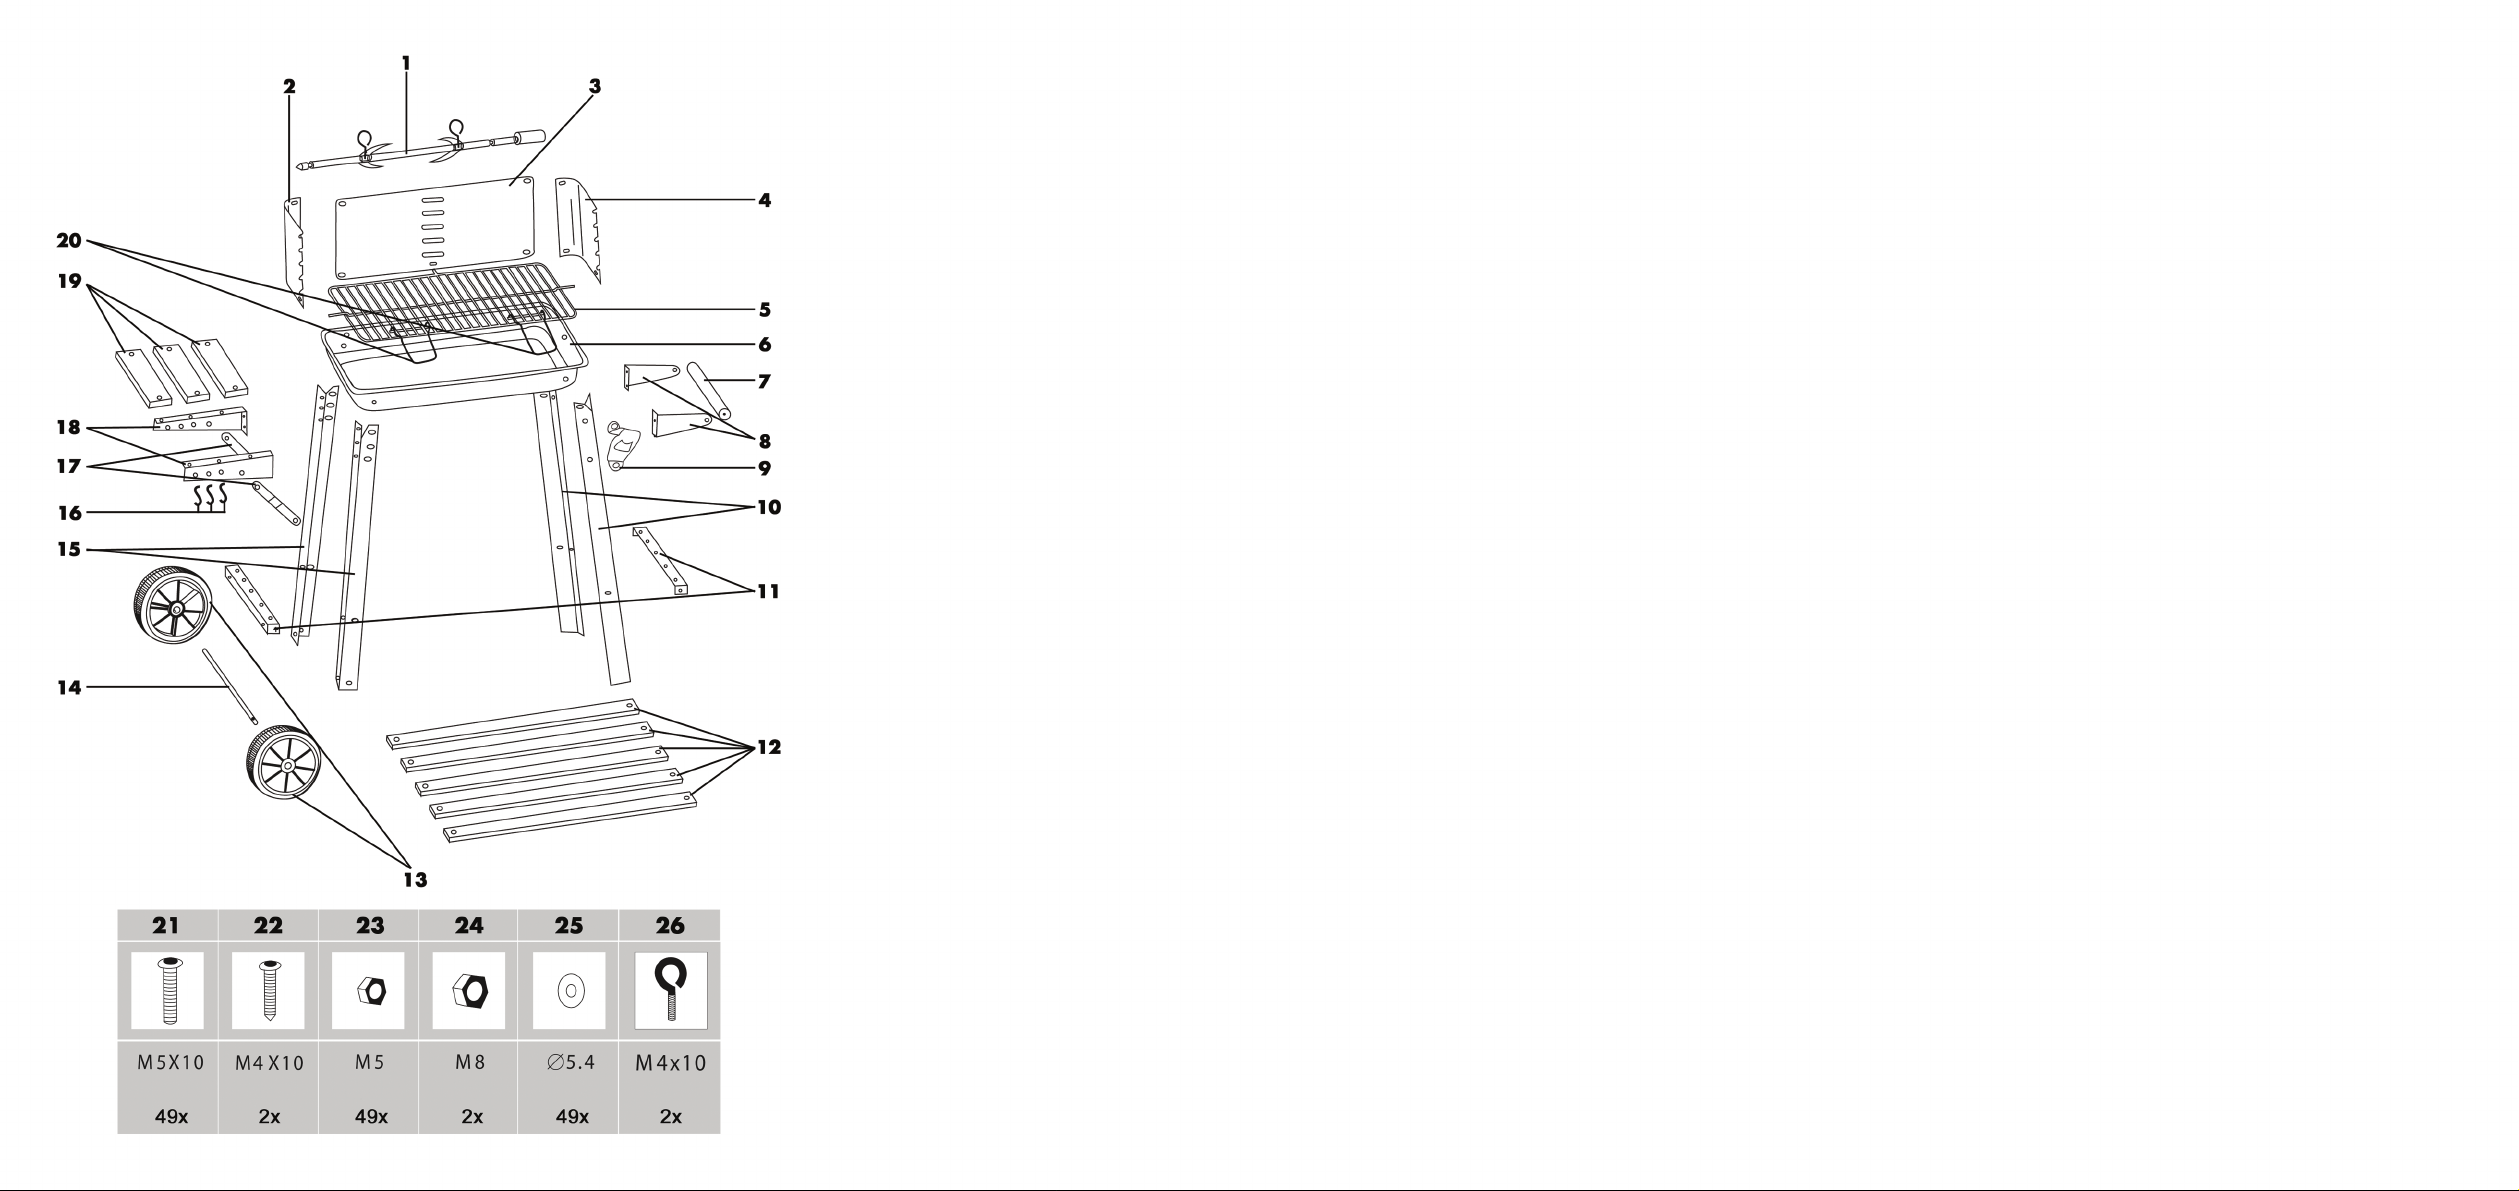
4. Assembly material.......................................................................................... 4
5. Technical data ................................................................................................ 5
6. Safety instructions .......................................................................................... 5
7. Assembly ........................................................................................................ 6
7.1. Required tools ................................................................................................................................ 6
7.2. Assembly preparation ................................................................................................................... 6
8. Initial use ...................................................................................................... 12
9. Maintenance/cleaning .................................................................................. 13
10. Storing the device when not in use ............................................................. 13
11. Environmental and waste disposal information .......................................... 13
12. Notes on guarantee and service ................................................................. 14
2 - English
Page 5

Florabest FGW 84 B1
Congratulations!
By purchasing the Florabest FGW 84 B1 trolley barbecue, hereinafter referred to as barbecue, you
have opted for a high-quality product.
Familiarise yourself with the product and the components supplied before assembling the barbecue
and read these operating instructions carefully. Observe the safety instructions and only use the
barbecue in the manner described in these operating instructions and for the indicated fields of
application.
Keep these operating instructions in a safe place. Hand over all documents in the event that you
pass on the barbecue to a third party.
1. Intended use
This barbecue is only designed to barbecue food such as meat, fish and vegetables. This barbecue
is for outdoor use only. Never use the barbecue indoors. It is not intended for business or
commercial use. Use the barbecue solely for private purposes; any other use is deemed improper.
The manufacturer shall not be liable for any damage or faults arising as a result of changes or
modifications made to the barbecue without the approval of the manufacturer.
Please observe the national regulations and/or laws of the country in which the barbecue is used.
2. Copyright
All contents of these operating instructions are subject to copyright law and are provided to the
user solely as a source of information. Any form of copying or reproduction of data and information
without the express written permission of the author is prohibited. This also concerns commercial use
of the content and data. The text and illustrations correspond to the technical standards at the time
of printing. Subject to alterations.
English - 3
Page 6

Florabest FGW 84 B1
3. Package contents
Unpack the barbecue and all of the accessories. Remove all packaging materials and check all of
the components for completeness and signs of damage. If any parts are missing or damaged,
please contact the manufacturer.
Barbecue (not assembled)
Assembly material
These operating instructions
These operating instructions also have a cover that can be unfolded. The inside of the cover
provides a schematic of the barbecue and a number legend. The numbers identify the following
parts/functions:
1 Barbecue rotisserie (including brackets)
2 Wind guard (left)
3 Wind guard (middle)
4 Wind guard (right)
5 Cooking grate
6 Charcoal basket
7 Handle
8 Handle bracket (2)
9 Bottle opener
10 Leg (2)
11 Cross-support (2)
12 Shelf slat (long, 5)
13 Wheel (2)
14 Axle
15 Wheel leg (2)
16 Hooks (3)
17 Reinforcing bar (2)
18 Slat holder (front, back)
19 Shelf slat (short, 3)
20 Handle (for the rotisserie, 2)
4. Assembly material
4 - English
Page 7

Florabest FGW 84 B1
5. Technical data
Model Florabest FGW 84 B1
Dimensions when assembled (W x H x D) Approx. 84 x 86 x 45 cm
Dimensions of rotisserie (W x D) Approx. 48 x 27 cm
Fuel Charcoal
Charcoal basket capacity max. 1 kg
Weight Approx. 6.8 kg
The specifications and design are subject to change without notice.
6. Safety instructions
Before using the barbecue for the first time, read the following instructions carefully and observe all
warnings. Keep these operating instructions in a safe place for future reference. If you give the
device away or sell it, please ensure that you also pass on this manual. It is part of the product.
Explanation of symbols used
DANGER! This icon, together with the word ‘Danger’, indicates an impending
dangerous situation that, if not prevented, can lead to serious injuries or even death.
WARNING! This icon indicates important information for the safe operation of the
barbecue and user safety.
DANGER! This icon indicates impending danger of scalding/burning.
This symbol indicates that the barbecue is designed for outdoor use only. Risk of
carbon monoxide poisoning!
DANGER! Never use the barbecue indoors. Otherwise you could be in danger of
carbon monoxide poisoning, which can lead to death in a very short time.
English - 5
Page 8
Florabest FGW 84 B1
DANGER! Always place the barbecue on an even, heat-resistant, solid surface and not in
the vicinity of flammable materials, liquids or gases. Ensure a sufficient distance from walls
and other objects and never leave the barbecue unattended when in use and after use for
as long as it is still warm. There is a risk of fire!
DANGER! Only light the barbecue with firelighters that conform to the requirements of
the European EN 1860-3 standard. Never use petrol or methylated spirits. There is
danger of deflagration or uncontrollable heat generation that can lead to serious burn
injuries or fire. There is a risk of injury and fire!
DANGER! Never use water to extinguish if there is grease on the barbecue. This
can cause an explosive deflagration. Instead, use a fire blanket to suffocate the fire.
DANGER! Only use the barbecue with charcoal. Do not use any other kind of fuel. There
is a risk of fire!
DANGER! Wear barbecue gloves when barbecuing and use a suitable instrument such
as a barbecue tongs to turn the food in order to prevent burns. There is the risk of burn
injuries.
DANGER! Allow the barbecue to cool completely before cleaning. There is the risk of
burn injuries.
WARNING! Keep children and pets away from the barbecue.
WARNING! The barbecue is very hot and must not be moved when in use!
WARNING! When you have finished barbecuing, allow the remaining charcoal to burn
out. Do not extinguish with water.
7. Assembly
7.1. Required tools
Phillips screwdriver
Open-ended spanner: SW 8 mm and SW 13 mm
7.2. Assembly preparation
Proceed with care when assembling the barbecue.
Plan a sufficient amount of time.
Ensure you have a sufficiently large workspace.
Remove all of the individual components from the packaging and place them somewhere easily
accessible.
Remove all of the assembly materials from the packaging and place them somewhere easily
accessible.
Ensure you have the required tools at hand.
6 - English
Page 9
Florabest FGW 84 B1
WARNING! When assembling the barbecue, make sure that the heads of the
screws always point outwards. This allows you to prevent injuries caused by
protruding screws.
Below are instructions on how to assemble the barbecue in eight steps, including diagrams. Set
aside the required individual components and assembly materials.
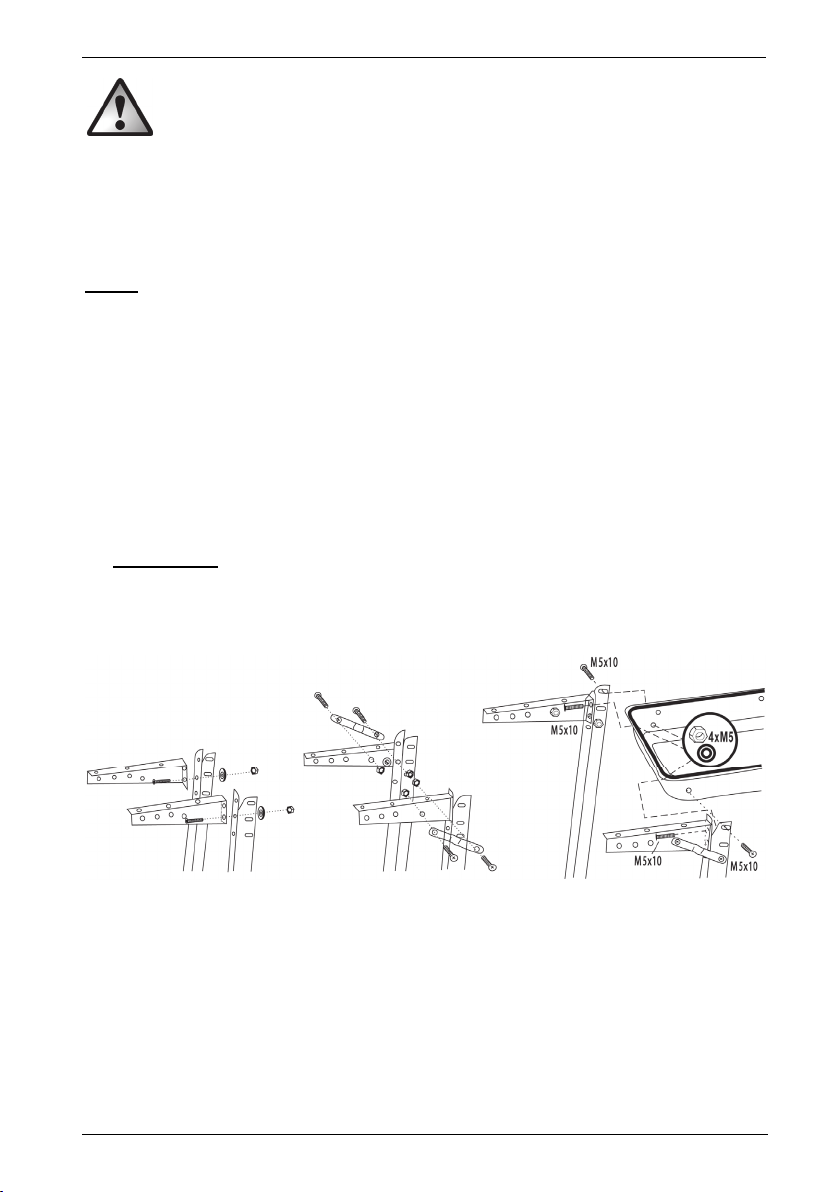
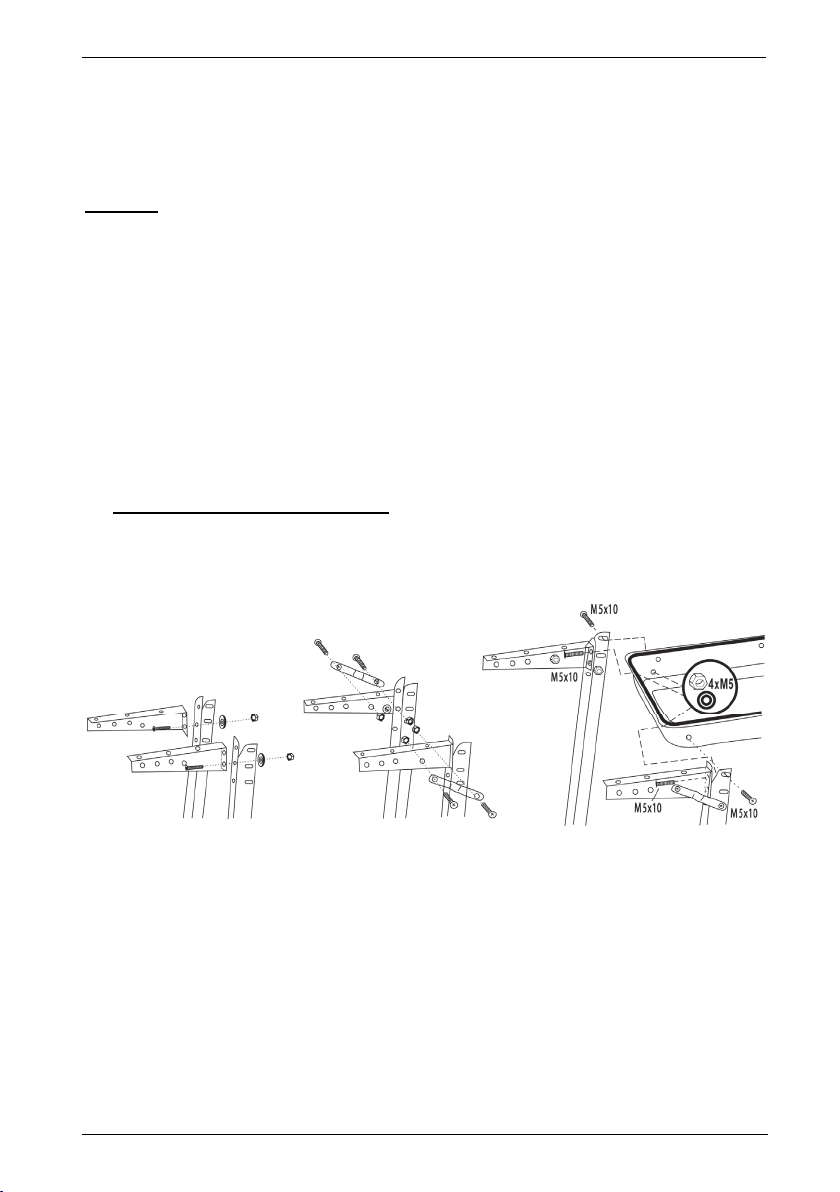
Step 1
Hand-screw the two slat holders (18) to the wheel legs (15). Use the bottom hole of the slat
holder (18) and the middle hole of the wheel leg (15) to do this, see diagram. You will need a
screw (21), a washer (25) and a nut (23) in each case.
Fasten the reinforcing bars (17) to the wheel legs (15). You will need a screw (21), a washer
(25) and a nut (23) for each one.
Now fasten the reinforcing bars (17) to the slat holders (18). You will need a screw (21), a
washer (25) and a nut (23) for each one.
Screw the wheel legs (15) and mounted slat holder (18) to the left side of the charcoal basket
(6). To do this, use the top hole of the wheel legs (15).
Please note: The three holes for assembling the wind guard in the charcoal basket (6) must
be facing the back. For each wheel leg (15) you will need two screws (21), two washers (25)
and two nuts (23).
Now tighten all the screws.
English - 7
Page 10
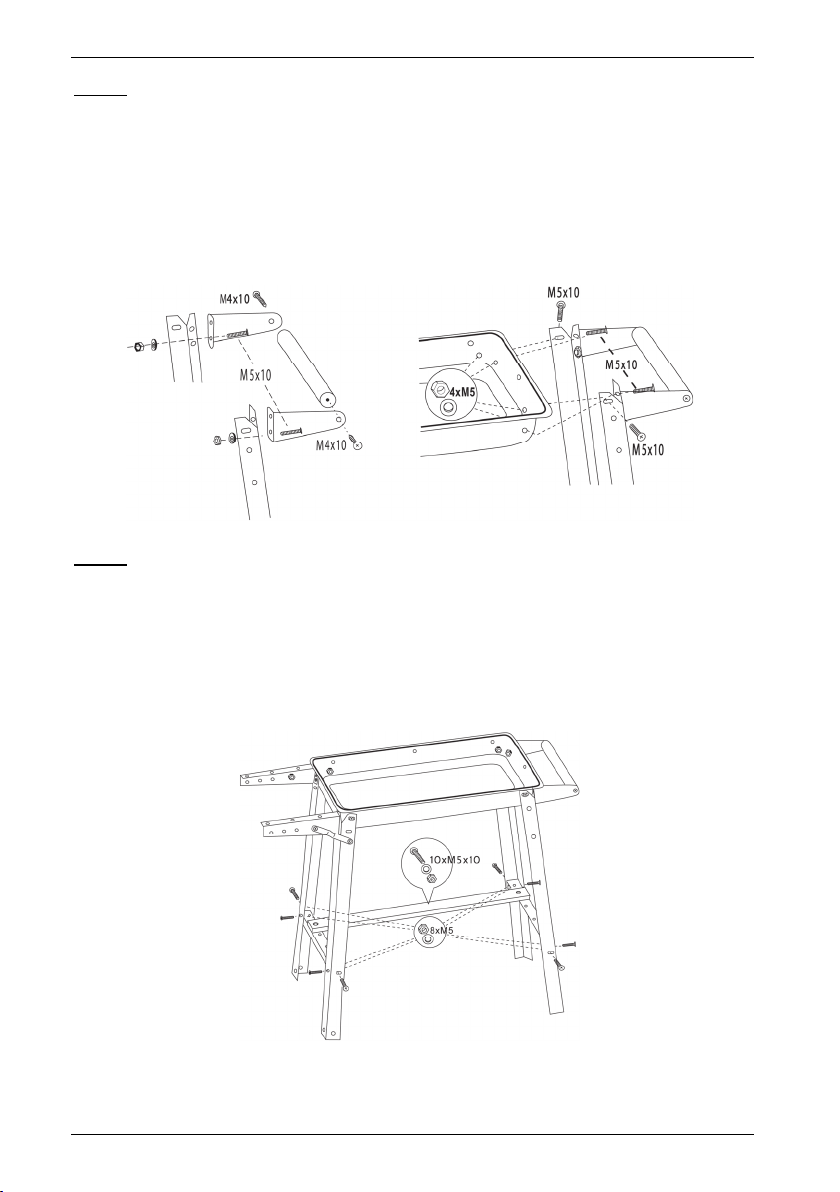
Florabest FGW 84 B1
Step 2
Hand-screw the handle bracket (8) to the legs (10). Use the bottom hole of the handle bracket
(8) for this. You will need a screw (21), a washer (25) and a nut (23) in each case.
Fasten the legs (10) and mounted handle bracket (8) to the right side of the charcoal basket
(6). To do this, use the top hole of the legs (10). You will need two screws (21), two washers
(25) and two nuts (23) for each leg (10).
Screw the handle (7) between the handle brackets (8). You will need two screws (22).
Now tighten all the screws.
Step 3
Screw the two cross-supports (11) between the legs (10) and the wheel
legs (15). The five holes on the cross-supports (11) should be facing upwards. You will need
four screws (21), four washers (25) and four nuts (23) for each cross-support (11).
Hand-screw the five shelf slats (12) to the cross-supports (11). You will need ten screws (21),
ten washers (25) and ten nuts (23).
Now tighten all the screws.
8 - English
Page 11
Florabest FGW 84 B1
Step 4
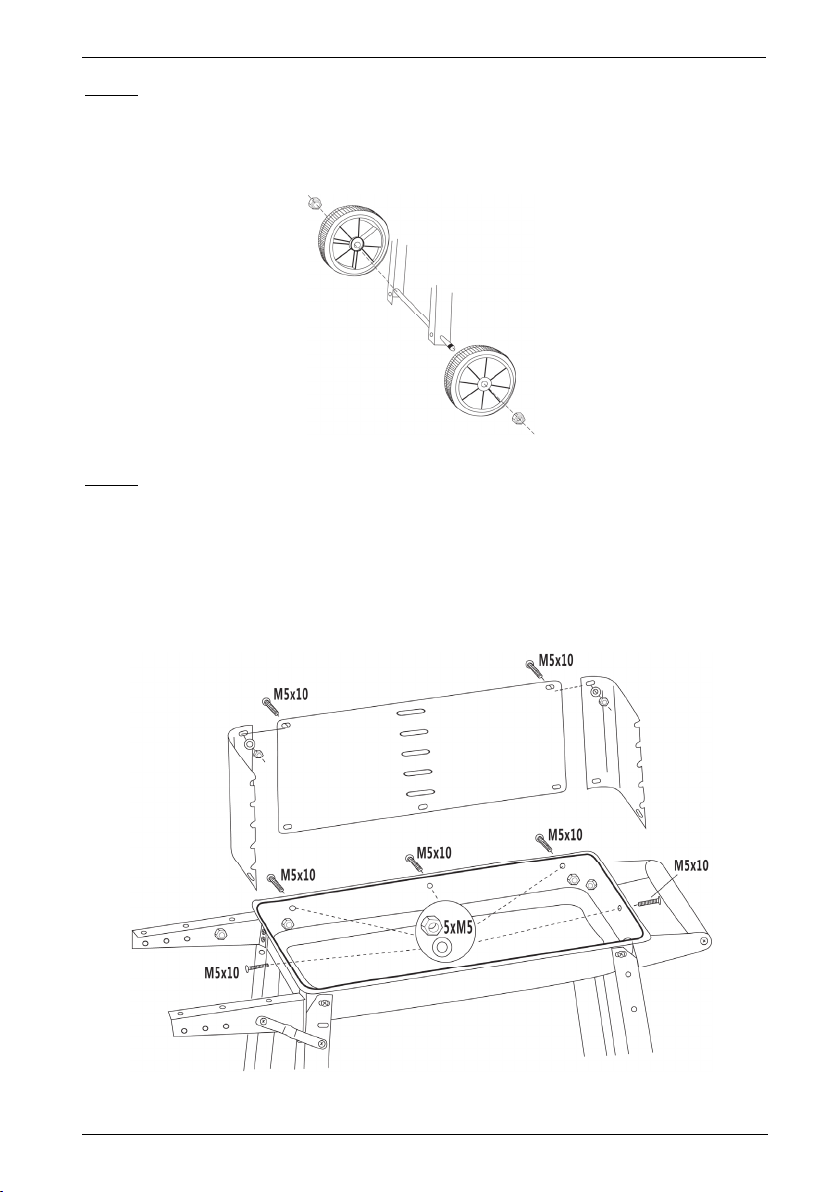
Place the axle (14) through the bottom hole of the wheel leg (15). Now place the wheels (13)
onto the ends of the axle (14). Screw the self-locking nuts (24) onto the ends of the axle (14)
until flush with the axle.
Step 5
Hand-screw the three parts of the wind guard (2, 3, 4) together using the top holes. You will
need two screws (21), two washers (25) and two nuts (23).
Screw the wind guard (2, 3, 4) to the charcoal basket (6) from the inside. Always ensure that
the heads of the screws face outwards. You will need five screws (21), five washers (25) and
five nuts (23).
Now tighten all the screws.
English - 9
Page 12

Florabest FGW 84 B1
Step 6
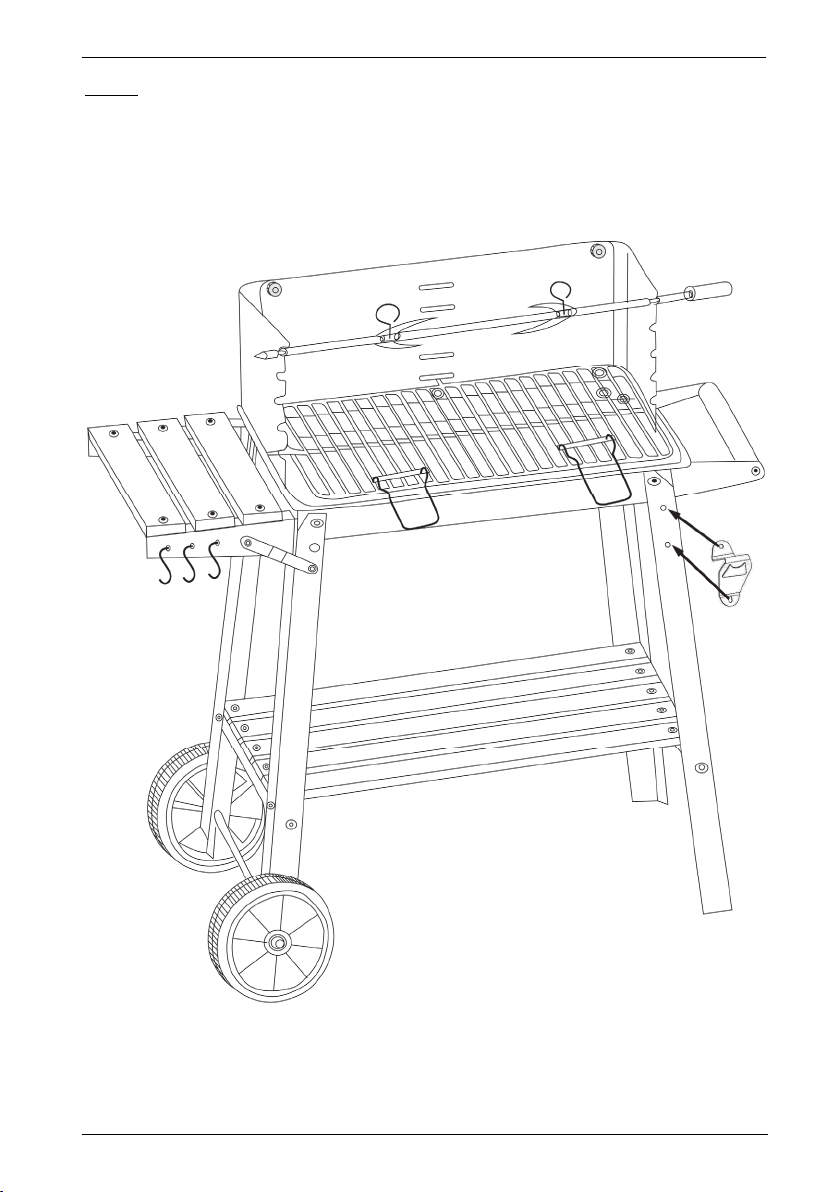
Hand-screw the three shelf slats (19) to the slat holders (18). You will need six screws (21), six
washers (25) and six nuts (23).
Now tighten all the screws.
Insert the three hooks (16) into the holes on the front slat holder (18).
Step 7
Fasten the brackets (with the forks facing each other) to the barbecue rotisserie (1) using the
eye bolts (26). Insert the handles (20) into the barbecue rotisserie (5).
10 - English
Page 13
Florabest FGW 84 B1
Step 8
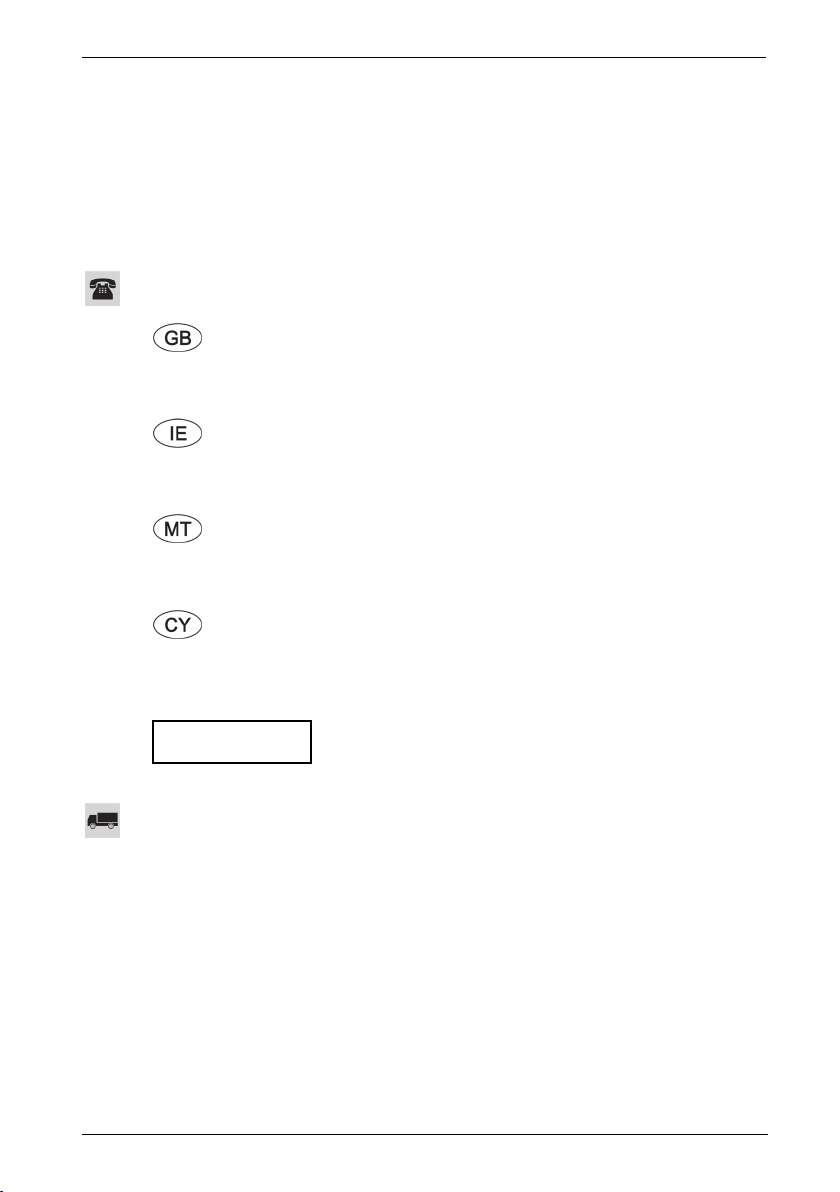
Check all screw connections and retighten as necessary!
Now insert the barbecue rotisserie (5) and cooking grate (1) into the recesses on the wind
guard (2, 3, 4)
Screw the bottle opener (9) provided to the front, right leg (10, arrows). You will need two
screws (21), two washers (25) and two nuts (23).
The barbecue is now ready for use.
English - 11
Page 14

Florabest FGW 84 B1
8. Initial use
Before using the barbecue for the first time, heat it for at least 30 minutes in order to burn any
possible production residues. Odours may develop during this time, but this is completely normal.
DANGER! Only light the barbecue with firelighters that conform to the requirements of
the European EN 1860-3 standard. Never use petrol or methylated spirits. There is
danger of deflagration or uncontrollable heat generation that can lead to serious burn
injuries or fire. There is a risk of injury and fire!
DANGER! Always place the barbecue on an even, heat-resistant, solid surface and not in
the vicinity of flammable materials, liquids or gases. Ensure a sufficient distance from walls
and other objects and never leave the barbecue unattended when in use and after use for
as long as it is still warm. There is a risk of fire!
Fill the charcoal basket (6) with enough charcoal to cover the base.
Place two or three solid firelighters on the charcoal and light them with a lighter or match.
Once the firelighters are burning properly, carefully fill the charcoal basket (6) with charcoal.
Make sure not to suffocate the firelighters.
The embers are in an ideal state when the charcoal forms a white layer of ash and the
firelighters are completely burned.
Distribute the charcoal evenly in the charcoal basket (6) using a suitable metal instrument.
Now insert the barbecue rotisserie (5) and cooking grate (1) into the recesses on the wind
guard (2, 3, 4).
Wait a short time until the cooking grate (5) is heated up and then begin barbecuing.
Remove the barbecued food once the desired cooking point/browning is achieved.
Enjoy!
12 - English
Page 15

Florabest FGW 84 B1
9. Maintenance/cleaning
Wait until the barbecue has cooled down completely before cleaning. Otherwise, there is
a risk of burn injuries.
The barbecue does not contain any components that require regular maintenance. Use a dishcloth,
water and any commercially available washing up-liquid for routine cleaning. Do not use any
aggressive or scouring cleaning agents in order to prevent damage.
Use a household sponge and washing up-liquid to clean the cooking grate (5). If the cooking grate
(5) is heavily encrusted, it is helpful to soak it in water to soften the encrustations before cleaning.
After cleaning, rinse the cooking grate (5) with clean water to remove any detergent residue.
10. Storing the device when not in use
If you do not intend to use the barbecue, clean it as described in section 9 ‘Maintenance/cleaning’
and keep it in a clean, dry place.
11. Environmental and waste disposal information
Dispose of the fuel in the containers made of incombustible materials provided once the fuel has
completely cooled down or burned out.
By properly disposing of the old device, you can avoid environmental damage and health hazards.
Further information regarding proper disposal of the old device can be obtained from your local
authority or the shop where you purchased the device.
Make sure the packaging is disposed of in an environmentally-friendly manner. Cardboard
packaging can be put out for waste-paper collection or taken to public collection points for
recycling. The plastic packaging used for your device is collected by your local waste management
company and disposed of in an environmentally-friendly manner.
English - 13
Page 16

Florabest FGW 84 B1
12. Notes on guarantee and service
Warranty of TARGA GmbH
Dear Customer,
This device is sold with three years warranty from the date of purchase. In the event of product
defects, you have legal rights towards the seller. These statutory rights are not restricted by our
warranty as described below.
Warranty conditions
The warranty period commences upon the date of purchase. Please keep the original receipt in a
safe place as it is required as proof of purchase. If any material or manufacturing faults occur within
three years of purchase of this product, we will repair or replace the product free of charge as we
deem appropriate.
Warranty period and legal warranty rights
The warranty period is not extended in the event of a warranty claim. This also applies to replaced
and repaired parts. Any damage or defects discovered upon purchase must be reported
immediately when the product has been unpacked. Any repairs required after the warranty period
will be subject to charge.
Scope of warranty
The device was carefully manufactured in compliance with stringent quality guidelines and
subjected to thorough testing before it left the works. The warranty applies to material and
manufacturing faults. This warranty does not cover product components which are subject to normal
wear and which can therefore be regarded as wearing parts, or damage to fragile components
such as switches, rechargeable batteries or components made of glass. This warranty is void if the
product is damaged, incorrectly used or serviced. To ensure correct use of the product, always
comply fully with all instructions contained in the user manual. The warnings and recommendations
in the user manual regarding correct and incorrect use and handling of the product must always be
observed and complied with. The product is solely designed for private use and is not suitable for
commercial applications. The warranty is rendered void in the event of incorrect handling and
misuse, if it is subjected to force, and also if any person other than our authorised service
technicians interfere with the device. No new warranty period commences if the product is repaired
or replaced.
Submitting warranty claims
To ensure speedy handling of your complaint, please note the following:
14 - English
Page 17
Florabest FGW 84 B1
- Before using your product for the first time, please read the enclosed documentation
carefully. Should any problems arise which cannot be solved in this way, please call our
hotline.
- Always have your receipt, the product article number as well as the serial number (if
available) to hand as proof of purchase.
- If it is not possible to solve the problem on the phone, our hotline support staff will initiate
further servicing procedures depending on the fault.
Service
E-Mail: service.GB@targa-online.com
E-Mail: service.IE@targa-online.com
E-Mail: service.MT@targa-online.com
E-Mail: service.CY@targa-online.com
Please note that the following address is not a service address. First contact the service point stated
above.
IAN: 281147
Manufacturer
Phone: 020 – 70 49 04 03
Phone: 01 - 4370121
Phone: 027 78 11 03
Phone: 02 – 20 09 025
TARGA GmbH
Coesterweg 45
59494 SOEST
GERMANY
English - 15
Page 18

Florabest FGW 84 B1
Sadržaj
1. Namjenska upotreba ................................................................................... 17
2. Autorsko pravo ............................................................................................ 17
3. Opseg isporuke ............................................................................................ 18
4. Materijal za montažu ................................................................................... 18
5. Tehnički podaci ............................................................................................. 19
6. Sigurnosne napomene ................................................................................. 19
7. Montaža ....................................................................................................... 20
7.1. Potrebni alati ............................................................................................................................... 20
7.2. Priprema montaže ...................................................................................................................... 20
8. Prva upotreba .............................................................................................. 26
9. Održavanje/čišćenje .................................................................................... 27
10. Skladištenje dok se uređaj ne upotrebljava ............................................... 27
11. Napomene o okolišu i informacije o odlaganju .......................................... 27
12. Napomene o jamstvu i servisiranju ............................................................ 28
16 - Hrvatski
Page 19

Florabest FGW 84 B1
Čestitamo!
Kupnjom kolica za roštilj Florabest FGW 84 B1, u nastavku označenih kao roštilj, odlučili ste se za
visokokvalitetni proizvod.
Prije montaže upoznajte se s roštiljem i pripadajućim dijelovima te pažljivo pročitajte ove upute za
rukovanje. Posebno obratite pozornost na sigurnosne napomene i upotrebljavajte roštilj samo na
način opisan u ovim uputama za rukovanje i za navedena područja upotrebe.
Spremite ove upute za rukovanje na sigurno mjesto. Ako predajete roštilj trećoj osobi, također
predajte sve pripadajuće dokumente.
1. Namjenska upotreba
Ovaj roštilj služi isključivo pečenju namirnica poput mesa, ribe i povrća. Roštilj je isključivo
namijenjen za korištenje na otvorenom. Nemojte ga nikad upotrebljavati u zatvorenim prostorima.
Nije predviđen za upotrebu u poduzeću ili za komercijalnu upotrebu. Roštilj upotrebljavajte
isključivo za osobne potrebe, svaka druga primjena je nenamjenska.
U slučaju oštećenja ili smetnji na roštilju nastalih zbog promjena ili preinaka koje proizvođač nije
odobrio prestaje vrijediti svaka odgovornost proizvođača.
Pridržavajte se nacionalnih propisa odnosno zakona zemlje u kojoj se uređaj upotrebljava.
2. Autorsko pravo
Svi sadržaji ovih uputa za rukovanje podliježu autorskom pravu i stavljeni su čitatelju na
raspolaganje isključivo kao izvor informacija. Svako kopiranje ili umnožavanje podataka i
informacija zabranjeno je bez izričitog i pisanog dopuštenja autora. To se odnosi i na komercijalnu
upotrebu sadržaja i podataka. Tekst i slike odgovaraju tehničkom stanju u trenutku tiskanja.
Zadržana su prava na promjene.
Hrvatski - 17
Page 20

Florabest FGW 84 B1
3. Opseg isporuke
Izvadite roštilj i sve pripadajuće dijelove iz ambalaže. Uklonite sav ambalažni materijal i provjerite
jesu li svi dijelovi potpuni i neoštećeni. U slučaju nepotpune ili oštećene pošiljke obratite se
proizvođaču.
Roštilj (nije montiran)
Materijal za montažu
Ove upute za rukovanje
Ove upute za rukovanje imaju preklopive korice. Na unutrašnjosti korica prikazan je roštilj s
numeriranim dijelovima. Brojevi označavaju sljedeće:
1 Ražanj (uključujući kopče)
2 Zaštita od vjetra (lijevo)
3 Zaštita od vjetra (sredina)
4 Zaštita od vjetra (desno)
5 Rešetka za roštilj
6 Posuda za ugljen
7 Drška
8 Držač za dršku (2 komada)
9 Otvarač za boce
10 Potporna noga (2 komada)
11 Poprečni potporanj (2 komada)
12 Daska za odlaganje (dugačka, 5 komada)
13 Kotač (2 komada)
14 Osovina
15 Potporna noga za kotač (2 komada)
16 Kuka (3 komada)
17 Dijagonalno pojačanje (2 komada)
18 Držač kratkih dasaka za odlaganje (prednja strana, stražnja strana)
19 Daska za odlaganje (kratka, 3 komada)
20 Drška (samo za rešetku, 2 komada)
4. Materijal za montažu
18 - Hrvatski
Page 21
Florabest FGW 84 B1
5. Tehnički podaci
Model Florabest FGW 84 B1
Dimenzije u montiranom stanju (Š x V x D) oko 84 x 86 x 45 cm
Dimenzije rešetke (Š x D) oko 48 x 27 cm
Gorivo Drveni ugljen
Kapacitet posude za ugljen maks. 1 kg
Masa oko 6,8 kg
Tehnički podaci i dizajn mogu se izmijeniti bez najave.
6. Sigurnosne napomene
Prije prve upotrebe roštilja temeljito pročitajte sljedeće upute i pridržavajte se svih upozorenja.
Čuvajte ove upute za rukovanje na sigurnom mjestu za buduću upotrebu. Ako prodajete ili
prosljeđujete uređaj, obvezno predajte i ove upute za rukovanje. One su sastavni dio proizvoda.
Objašnjenje korištenih simbola
OPASNOST! Ovaj simbol s napomenom „Opasnost“ označava prijeteću opasnu
situaciju koja, ako se ne spriječi, može prouzročiti teške ozljede ili čak dovesti do
smrti.
UPOZORENJE! Ovaj simbol označava važne napomene za siguran rad roštilja i
zaštitu korisnika.
OPASNOST! Ovaj simbol označava opasnost po zdravlje zbog
oparotina/opeklina.
Ovaj simbol upućuje na to da je roštilj namijenjen isključivo korištenju izvan
zatvorenih prostora. Opasnost od trovanja ugljičnim monoksidom!
OPASNOST! Roštilj upotrebljavajte samo na otvorenim prostorima. U suprotnom postoji
opasnost od trovanja ugljičnim monoksidom koje vrlo brzo može dovesti do smrti.
OPASNOST! Upotrebljavajte roštilj samo na ravnim i čvrstim površinama koje su
Hrvatski - 19
Page 22
Florabest FGW 84 B1
otporne na toplinu i izbjegavajte blizinu zapaljivih materijala, tekućina ili plinova. Ostavite
dovoljno razmaka prema zidovima i ostalim predmetima te roštilj nikad ne ostavljajte bez
nadzora tijekom i nakon upotrebe dok je još vruć. Postoji opasnost od požara!
OPASNOST! Za potpaljivanje ili ponovno potpaljivanje upotrebljavajte isključivo
sredstva za potpaljivanje koja odgovaraju europskoj normi EN 1860-3. Nikad nemojte
upotrebljavati benzin ili industrijski alkohol. U suprotnom postoji opasnost od naglog
sagorijevanja i nekontroliranog razvoja topline, što može prouzročiti teške opekline ili
požare. Postoji opasnost od ozljeda i požara!
OPASNOST! U slučaju da se zapali mast na roštilju, nikad je ne gasite vodom!
Postoji opasnost od eksplozivnog naglog sagorijevanja. Umjesto toga za gašenje
upotrijebite npr. deku za gašenje požara kojom ćete ugušiti vatru.
OPASNOST! Za roštilj upotrebljavajte isključivo drveni ugljen, nikad druga goriva.
Postoji opasnost od požara!
OPASNOST! Za vrijeme roštiljanja nosite rukavice za roštilj, a za okretanje namirnica
upotrebljavajte odgovarajuće pomagalo, npr. štipaljku za roštilj, kako biste izbjegli
opekline. Postoji opasnost od opeklina!
OPASNOST! Prije čišćenja pustite da se roštilj u potpunosti ohladi. Postoji opasnost od
opeklina!
UPOZORENJE! Djecu i životinje držite podalje od roštilja.
UPOZORENJE! Roštilj postaje veoma vruć te se ne smije pomicati za vrijeme korištenja.
UPOZORENJE! Nakon upotrebe ostavite preostali ugljen da dogori i ne gasite ga
vodom.
7. Montaža
7.1. Potrebni alati
Križni odvijač
Čeljusni ključ: širina ključa 8 mm i 13 mm
7.2. Priprema montaže
Pažljivo postupajte pri montaži roštilja.
Uzmite si dovoljno vremena.
Pronađite dovoljno veliku površinu.
Izvadite sve dijelove iz ambalaže i položite ih nadohvat ruke.
Izvadite sav materijal za montažu iz ambalaže i položite ga nadohvat ruke.
Pripremite sve potrebne alate.
UPOZORENJE! Pri montaži roštilja obavezno pazite na to da glave vijaka uvijek
pokazuju prema van. Tako ćete izbjeći ozljede koje nastaju zbog izbočenih vijaka.
20 - Hrvatski
Page 23
Florabest FGW 84 B1
U nastavku je montaža roštilja opisana u 8 koraka sa slikama. Položite potrebne dijelove i materijal
za montažu nadohvat ruke.
1. korak
Vijcima ručno pričvrstite dva držača kratkih dasaka za odlaganje (18) na potporne noge za
kotače (15). Za to upotrijebite donju rupu na držaču (18) i srednju rupu na potpornoj nozi
za kotač (15), vidi sliku. Za to je potreban po jedan vijak (21), jedna podloška (25) i jedna
matica (23).
Pričvrstite dijagonalna pojačanja (17) na potporne noge za kotače (15). Za to je potreban po
jedan vijak (21), jedna podloška (25) i jedna matica (23).
Sada pričvrstite dijagonalna pojačanja (17) za držače kratkih dasaka za odlaganje (18). Za
to je potreban po jedan vijak (21), jedna podloška (25) i jedna matica (23).
Vijcima pričvrstite potporne noge za kotače (15) s montiranim držačima (18) na lijevu stranu
posude za ugljen (6). Pritom upotrijebite gornju rupu na potpornim nogama za kotače (15).
Obratite pozornost na sljedeće: 3 rupe za montažu zaštite od vjetra na posudi za
ugljen (6) moraju se nalaziti na stražnjoj strani. Za svaku potpornu nogu za kotač (15)
potrebna su 2 vijka (21), 2 podloške (25) i 2 matice (23).
Sada čvrsto pritegnite sve vijke.
Hrvatski - 21
Page 24

Florabest FGW 84 B1
2. korak
Vijcima ručno pričvrstite držače za dršku (8) na potporne noge (10). Pritom upotrijebite donju
rupu na držaču za dršku (8). Za to je potreban po jedan vijak (21), jedna podloška (25) i
jedna matica (23).
Pričvrstite potporne noge (10) s montiranim držačima (8) na desnu stranu posude za ugljen
(6). Pritom upotrijebite gornju rupu na potpornim nogama (10). Za jednu potpornu nogu (10)
potrebna su 2 vijka (21), 2 podloške (25) i 2 matice (23).
Vijcima pričvrstite dršku (7) između držača za dršku (8). Potrebna su vam 2 vijka (22).
Sada čvrsto pritegnite sve vijke.
3. korak
Vijcima pričvrstite dva poprečna potpornja (11) između potpornih nogu (10) i potpornih nogu
za kotače (15). Pritom pet rupa na poprečnim potpornjima (11) mora pokazivati prema gore.
Za jedan poprečni potporanj (11) potrebna su vam 4 vijka (21), 4 podloške (25) i 4 matice
(23).
Rukom pričvrstite 5 dasaka za odlaganje (12) na poprečne potpornje (11). Potrebno vam je
10 vijaka (21), 10 podložaka (25) i 10 matica (23).
Sada čvrsto pritegnite sve vijke.
22 - Hrvatski
Page 25

Florabest FGW 84 B1
4. korak
Provucite osovinu (14) kroz najdonje rupe na potpornim nogama za kotače (15). Zatim
postavite kotače (13) na krajeve osovine (14). Na krajeve osovine (14) zavrnite
samoosiguravajuće matice (24) sve dok ne dođu u ravninu s osovinom.
5. korak
Međusobno ručno spojite trodijelnu zaštitu od vjetra (2, 3, 4) preko gornjih rupa. Potrebna su
vam 2 vijka (21), 2 podloške (25) i 2 matice (23).
Zaštitu od vjetra (2, 3, 4) vijcima pričvrstite na unutrašnju stranu posude za ugljen (6).
Obavezno pazite na to da glave vijaka pokazuju prema van. Potrebno vam je 5 vijaka (21), 5
podložaka (25) i 5 matica (23).
Sada čvrsto pritegnite sve vijke.
Hrvatski - 23
Page 26

Florabest FGW 84 B1
6. korak
Rukom pričvrstite 3 daske za odlaganje (19) na držače (18). Potrebno vam je 6 vijaka (21), 6
podložaka (25) i 6 matica (23).
Sada čvrsto pritegnite sve vijke.
Umetnite 3 kuke (16) u provrte prednjeg držača (18).
7. korak
Okastim vijcima (26) pričvrstite kopče za ražanj (1) tako da šiljci budu okrenuti jedni prema
drugima. Zakvačite drške (20) za rešetku (5).
24 - Hrvatski
Page 27

Florabest FGW 84 B1
8. korak
Provjerite sve vijčane spojeve i po potrebi ih dodatno pritegnite!
Zatim umetnite rešetku (5) i ražanj (1) u otvore na zaštiti od vjetra (2, 3, 4).
Isporučeni otvarač za boce (9) vijcima pričvrstite na prednju desnu potpornu nogu (10,
strelice). Potrebna su vam 2 vijka (21), 2 podloške (25) i 2 matice (23).
Roštilj je sada montiran i spreman za upotrebu.
Hrvatski - 25
Page 28

Florabest FGW 84 B1
8. Prva upotreba
Prije prve upotrebe zagrijte roštilj na minimalno 30 minuta kako biste spalili moguće ostatke
montaže. Za to vrijeme može se stvarati dim, što je u potpunosti normalno.
OPASNOST! Za potpaljivanje ili ponovno potpaljivanje upotrebljavajte isključivo
sredstva za potpaljivanje koja odgovaraju europskoj normi EN 1860-3. Nikad nemojte
upotrebljavati benzin ili industrijski alkohol. U suprotnom postoji opasnost od naglog
sagorijevanja i nekontroliranog razvoja topline, što može prouzročiti teške opekline ili
požare. Postoji opasnost od ozljeda i požara!
OPASNOST! Upotrebljavajte roštilj samo na ravnim i čvrstim površinama koje su
otporne na toplinu i izbjegavajte blizinu zapaljivih materijala, tekućina ili plinova. Ostavite
dovoljno razmaka prema zidovima i ostalim predmetima te roštilj nikad ne ostavljajte bez
nadzora tijekom i nakon upotrebe dok je još vruć. Postoji opasnost od požara!
Napunite posudu za ugljen (6) drvenim ugljenom tako da prekriva dno.
Zatim rasporedite 2-3 kruta sredstva za potpalu po drvenom ugljenu i zapalite ih upaljačem ili
šibicama.
Kad se sredstva za potpalu u potpunosti zapale, pažljivo napunite posudu za ugljen (6)
drvenim ugljenom. Pazite da ne ugasite sredstva za potpalu.
Idealan žar prepoznat ćete po bijelom sloju pepela koji se počinje stvarati na drvenom ugljenu
te po potpuno izgorjelom sredstvu za potpalu.
Odgovarajućim metalnim predmetom ravnomjerno rasporedite drveni ugljen po posudi za
ugljen (6).
Umetnite rešetku (5) odn. ražanj (1) u otvore na zaštiti od vjetra (2, 3, 4).
Kratko pričekajte da se rešetka (5) zagrije i zatim započnite s pečenjem.
Namirnice uklonite s roštilja kada se dovoljno ispeku i postignu željenu boju.
Dobar tek!
26 - Hrvatski
Page 29

Florabest FGW 84 B1
9. Održavanje/čišćenje
Pričekajte s čišćenjem sve dok se roštilj u potpunosti ne ohladi. U suprotnom postoji
opasnost od opeklina!
Roštilj ne sadrži dijelove koji se moraju redovito održavati. Za obično čišćenje upotrebljavajte krpu
za pranje i vodu s uobičajenim deterdžentom za pranje suđa. Kako biste izbjegli oštećenja,
nemojte upotrebljavati agresivna sredstva za čišćenje ili ona koja grebu površinu.
Za čišćenje rešetke (5) prikladna je kuhinjska spužva i deterdžent za pranje suđa. U slučaju da na
rešetci (5) ima okorjelih mrlja, pomoći će ako je prije čišćenja namočite u vodi kako bi okorjele
mrlje omekšale. Nakon čišćenja isperite rešetku (5) čistom vodom kako biste isprali ostatke
deterdženta.
10. Skladištenje dok se uređaj ne upotrebljava
Kada ne želite upotrebljavati roštilj, očistite ga kako je opisano u poglavlju „9.
Održavanje/čišćenje“ te ga spremite na čisto i suho mjesto.
11. Napomene o okolišu i informacije o odlaganju
Kad se gorivo u potpunosti ohladi tj. izgori, odložite ga u za to predviđene spremnike od
nezapaljivih materijala.
Propisnim odlaganjem starog uređaja izbjegavate zagađivanje okoliša i ugrožavanje ljudskog
zdravlja. Dodatne informacije o propisnom odlaganju starog uređaja dobit ćete u gradskoj upravi,
u uredu za obavljanje poslova odlaganja otpada ili u trgovini u kojoj ste kupili uređaj.
Ambalažu također odložite na ekološki prihvatljiv način. Kartonska ambalaža može se predati na
reciklažu na mjestima za prikupljanje starog papira ili na javnim sabirnim mjestima. Folije i plastične
materijale iz opsega isporuke prikuplja vaše lokalno poduzeće za odlaganje otpada i odlaže ga
na ekološki prihvatljiv način.
Hrvatski - 27
Page 30

Florabest FGW 84 B1
12. Napomene o jamstvu i servisiranju
Jamstvo tvrtke TARGA GmbH
Poštovani kupče,
na ovaj proizvod dajemo trogodišnje jamstvo koje vrijedi od datuma kupnje. Ukoliko se kod ovog
proizvoda pojave nedostaci, imate zakonska prava koja možete ostvariti kod prodavača ovog
proizvoda. Naše niže navedeno jamstvo ne ograničava ta zakonska prava.
Jamstveni uvjeti
Jamstveni rok počinje teći od datuma kupnje. Molimo Vas da sačuvate originalan račun. On će
Vam poslužiti kao dokaz kupnje. Ako se u roku od tri godine od datuma kupnje ovog proizvoda
pojave pogreške u materijalu ili proizvodne pogreške, proizvod ćemo Vam – prema našem izboru besplatno popraviti ili zamijeniti.
Jamstveni rok i zakonska prava u slučaju nedostataka
Garancija ne produžuje jamstveni rok. To vrijedi i za zamijenjene i popravljene dijelove. Štete i
nedostaci koji postoje već i pri kupnji trebate odmah prijaviti nakon raspakiravanja. Popravci koji
budu potrebni po isteku jamstvenog roka se dodatno naplaćuju.
Opseg jamstva
Uređaj je pažljivo proizveden prema najstrožim smjernicama kvalitete i savjesno provjeren prije
isporuke. Jamstvo vrijedi za pogreške materijala ili proizvodne pogreške. Ovo jamstvo ne
obuhvaća dijelove proizvoda koji su izloženi neuobičajenom habanju i zbog toga se mogu
okarakterizirati kao potrošni dijelovi ili pak oštećenja lomljivim dijelova, npr. prekidač, punjive
baterije ili one koje su od stakla. Jamstvo prestaje ako je proizvod oštećen, nije stručno korišten ili
održavan. Za stručnu uporabu proizvoda točno treba poštivati sve upute navedene u uputama za
rukovanje. Obavezno treba izbjegavati svrhe uporabe i radnje koje ne preporučujemo u uputama
za rukovanje ili na koje upozoravamo. Proizvod je namijenjen samo za privatnu, ali ne i
profesionalnu uporabu. Jamstvo se gasi u slučaju zlouporabe i nestručnog rukovanja, primjene sile
ili pri zahvatima koje ne obavlja naš ovlašteni servis. S popravkom ili zamjenom proizvoda ne
započinje novi jamstveni rok.
Postupanje u slučaju pokrivenog jamstvom
Da biste osigurali brzu obradu zahtjeva, slijedite sljedeće upute:
- Prije puštanja u rad svog proizvoda, pažljivo pročitajte priloženu dokumentaciju. Ako
dođe do problema koji se ne može riješiti na ovaj način, obratite se našoj servisnoj liniji.
- Molimo Vas da za sve upita kao dokaz kupnje imate pripremljen blagajnički račun i
kataloški broj, odn. serijski broj ako postoji.
28 - Hrvatski
Page 31

Florabest FGW 84 B1
č
- Ukoliko rješenje problema putem telefona neće biti moguće, naša servisna linija može,
ovisno o uzroku pogreške, naložiti daljnji servis.
Servis
Telefon: 01 – 77 57 179
E-Mail: service.HR@targa-online.com
IAN: 281147
Proizvođa
Uzmite u obzir da sljedeća adresa nije servisna adresa. Najprije nazovite prethodno naveden
telefonski broj.
TARGA GmbH
Coesterweg 45
59494 SOEST
GERMANY
Hrvatski - 29
Page 32

Florabest FGW 84 B1
Съдържание
1. Употреба по предназначение .................................................................... 31
2. Авторско право ........................................................................................... 31
3. Окомплектовка на доставката.................................................................... 32
4. Монтажни материали ................................................................................. 32
5. Технически данни ....................................................................................... 33
6. Указания за безопасност ............................................................................. 33
7. Монтаж ....................................................................................................... 34
7.1 Необходими инструменти ....................................................................................................... 34
7.2. Подготовка за монтажа .......................................................................................................... 34
8. Пускане в експлоатация ............................................................................. 40
9. Поддръжка / почистване ............................................................................ 41
10. Съхраняване при неизползване ............................................................... 41
11. Екологични указания и информация за изхвърляне като отпадък .......... 41
12. Указания за гаранцията и сервизното обслужване ................................. 42
30 - Български
Page 33

Florabest FGW 84 B1
Поздравяваме Ви!
С покупката на Florabest FGW 84 B1 грил на колела, наричан по-долу грил, Вие сте избрали
висококачествен и дълготраен продукт.
Преди монтажа на грила се запознайте добре с продукта и с включените в окомплектовката
части и прочетете внимателно това ръководство за експлоатация. Спазвайте преди всичко
указанията за безопасност и използвайте грила само както е описано в това ръководство за
експлоатация и само по указаното предназначение.
Съхранявайте добре това ръководство за експлоатация. Ако давате грила на трето лице,
предайте цялата документация заедно с него.
1. Употреба по предназначение
Този грил е предназначен за изпичането на хранителни продукти като например месо, риба
или зеленчуци. Грилът трябва да се използва изключително само на открито. Никога не
използвайте грила в затворени помещения. Той не е предназначен за работа във фирма или
за професионална употреба. Използвайте грила само за лична употреба, всяко друго
приложение не е по предназначение.
Производителят не носи отговорност за щети или повреди, които произтичат от
неоторизирано от производителя изменение или модификация на грила.
Моля спазвайте валидните за страната наредби, респ. закони на страната, където се
използва уредът.
2. Авторско право
Цялото съдържание на настоящето ръководство за експлоатация е предмет на авторското
право и се предоставя на читателя само като информационен източник. Забранено е всяко
копиране или размножаване на данни и информация без изричното и писмено разрешение
от автора. Това се отнася също до търговската употреба на съдържанието и данните. Текстът
и илюстрациите съответстват на техническото състояние по време на отпечатването.
Запазваме си правото на промени.
Български - 31
Page 34

Florabest FGW 84 B1
3. Окомплектовка на доставката
Извадете грила и всички части на оборудването от опаковката. Отстранете всички
опаковъчни материали и проверете, дали всички компоненти са цели и в изправност. В
случай на непълна доставка или при налични повреди, моля обърнете се към
производителя.
Грил (несглобен)
Монтажни материали
Настоящето ръководство за експлоатация
Това ръководство за експлоатация има обложка, която се разтваря. На вътрешната страна
на обложката е изобразен грилът с цифрови обозначения. Цифрите имат следното
значение:
1 Шиш (с включени щипки)
2 Защита от вятър, лява част
3 Защита от вятър, средна част
4 Защита от вятър, дясна част
5 Скара на грила
6 Тавичка за въглища
7 Дръжка
8 Държач за дръжката (2 бр.)
9 Отварачка за бутилки
10 Неподвижен крак (2 бр.)
11 Напречна разпънка (2 бр.)
12 Дъска на поставката (дълга, 5 бр.)
13 Колело (2 бр.)
14 Ос
15 Крак за колело (2 бр.)
16 Кука (3 бр.)
17 Усилваща разпънка (2 бр.)
18 Държач на поставката (предна страна, задна страна)
19 Дъска на поставката (къса, 3 бр.)
20 Дръжка (за скарата на грила, 2 бр.)
4. Монтажни материали
32 - Български
Page 35

Florabest FGW 84 B1
5. Технически данни
Модел Florabest FGW 84 B1
Размери монтиран (Ш х В х Д) около 84 x 86 x 45 cm
Размери на скарата (Ш х Д) около 48 x 27 cm
Гориво Дървени въглища
Капацитет на тавичката за въглища макс. 1 kg
Тегло: около 6,8 kg
Промени на техническите данни, както и на дизайна, могат да последват без да се обявяват.
6. Указания за безопасност
Преди първата употреба на грила прочетете внимателно следните инструкции и вземете под
внимание всички предупредителни указания. Съхранявайте това ръководство за
експлоатация грижливо, за да ви е от полза в бъдеще. Ако продавате уреда или го
предоставяте на друго лице, приложете задължително това ръководство. То е част от
продукта.
Разяснение на използваните символи
ОПАСНОСТ! Този символ заедно с указанието „опасност“ означава
застрашителна опасна ситуация, която, ако не бъде предотвратена, може да
доведе до тежки наранявания и дори до смърт.
ПРЕДУПРЕЖДЕНИЕ! Този символ означава важни указания за безопасната
експлоатация на грила и за защитата на потребителя.
ОПАСНОСТ! Този символ означава опасност за здравето поради опарване /
изгаряне.
Този символ указва, че грилът е предназначен за употреба само извън
затворени помещения. Опасност от отравяне с въглероден оксид!
ОПАСНОСТ! Използвайте грила само извън затворени помещения. В противен
случай съществува опасност от отравяне с въглероден оксид, което може да доведе
и до смърт.
Български - 33
Page 36

Florabest FGW 84 B1
ОПАСНОСТ! Използвайте грила само върху гладка, устойчива на топлина, здрава
основа и далеч от запалими материали, течности или газове. Поставете грила на
достатъчно отдалечено от стени и други предмети място и никога не го оставяйте
без надзор по време на работа и след това, докато е все още горещ. Има опасност
от пожар!
ОПАСНОСТ! Използвайте за запалването или повторното разпалване само
подпалки, които отговарят на европейския стандарт EN 1860-3. Никога не
използвайте бензин или спирт за горене. В противен случай има опасност от
експлозии или неконтролируемо отделяне на топлина, което да доведе до тежки
изгаряния или пожари. Има опасност от нараняване и от пожар!
ОПАСНОСТ! Ако върху грила се запали мазнина, в никакъв случай не гасете
с вода! Има опасност от експлозия! Вместо това използвайте за гасене напр.
негорящо покривало, с което да задушите пожара.
ОПАСНОСТ! Използвайте грила изключително само с дървени въглища, никога с
други горива. Има опасност от пожар!
ОПАСНОСТ! При работа с грила носете ръкавици за грил и обръщайте
продуктите върху скарата с подходящ инструмент, напр. щипки за грил, за избегнете
изгаряния. Има опасност от изгаряне!
ОПАСНОСТ! Оставете грила да се охлади напълно преди да го почиствате. Има
опасност от изгаряне!
ПРЕДУПРЕЖДЕНИЕ! Дръжте децата и домашните животни далеч от грила.
ПРЕДУПРЕЖДЕНИЕ! Грилът се нагрява много силно и по време на работа не
трябва да се мести!
ПРЕДУПРЕЖДЕНИЕ! След като приключите с печенето, оставете въглищата да
догорят и не ги гасете с вода.
7. Монтаж
7.1 Необходими инструменти
Отвертка за винтове с кръстообразен шлиц
Гаечен ключ: SW 8 мм, SW 13 мм
7.2. Подготовка за монтажа
Подгответе се стартелно за монтажа на грила.
Планирайте достатъчно време.
Освободете си достатъчно пространство за работа.
Извадете частите от опаковката и ги наредете така, че да удобни за взимане.
Извадете монтажните материали и ги наредете така, че да удобни за взимане.
Пригответе необходимите инструменти.
34 - Български
Page 37

Florabest FGW 84 B1
ПРЕДУПРЕЖДЕНИЕ! При монтажа внимавайте главите на всички винтове
да са обърнати винаги навън. Така ще избегнете наранявания от стърчащи
винтове.
Следва описание на монтажа на грила в 8 стъпки и илюстрации. Сложете необходимите
части и необходимите монтажни материали така, че да са удобни за взимане.
Стъпка 1
Съединете двата държача за поставката (18) с краката за колела (15). За тази цел
използвайте долната дупка в държача за поставката (18) и средната дупка в крака
за колелото (15), както е показано на фигурата. Ще са ви необходими за всеки по един
винт (21), една подложна шайба (25) и една гайка (23).
Закрепете усилващите разпънки (17) за краката за колела (15). Ще са ви необходими
по един винт (21), една подложна шайба (25) и една гайка (23).
Сега закрепете усилващите разпънки (17) за държачите на поставката (18). Ще са ви
необходими по един винт (21), една подложна шайба (25) и една гайка (23).
Монтирайте краката за колелата (15) с монтираните държачи за поставката (18) отляво
на тавичката за въглища (6). За тази цел използвайте горната дупка в краката
за колелата (15).
Моля, имайте предвид, че: Трите дупки за монтажа на защитата от вятър в
тавичката за въглища (6) трябва да останат на задната страна. За всеки крак за колело
(15) ще са ви необходими по 2 винта (21), 2 подложни шайби (25) и 2 гайки (23).
Сега затегнете добре всички винтове.
Български - 35
Page 38

Florabest FGW 84 B1
Стъпка 2
Монтирайте държачите на дръжките (8) към неподвижните крака (10). За тази цел
използвайте долната дупка в държача на дръжката (8). Ще са ви необходими за всеки
по един винт (21), една подложна шайба (25) и една гайка (23).
Закрепете неподвижните крака (10) с монтираните държачи за дръжките (8) отдясно на
тавичката за въглищата (6). За тази цел използвайте горната дупка в неподвижните
крака (10). За всеки крак (10) ще са ви необходими по 2 винта (21), 2 подложни
шайби (25) и 2 гайки (23).
Монтирайте дръжката (7) между държачите (8). Ще са ви необходими 2 винта (22).
Сега затегнете добре всички винтове.
Стъпка 3
Монтирайте двете напречни разпънки (11) между неподвижните крака (10) и краката
за колелата (15). Петте дупки на напречните разпънки (11) трябва да гледат нагоре. За
всяка напречна разпънка (11) ще са ви необходими по 4 винта (21), 4 подложни шайби
(25) и 4 гайки (23).
Закрепете петте дъски на поставката (12) върху напречните разпънки (11). Ще са ви
необходими 10 винта (21), 10 подложни шайби (25) и 10 гайки (23).
Сега затегнете добре всички винтове.
36 - Български
Page 39

Florabest FGW 84 B1
Стъпка 4
Вкарайте оста (14) през най-долните отвори на краката за колелата (15). Сложете
колелата (13) в двата края на оста (14). Завийте в двата края на оста (14)
самоосигурителните гайки (24) и фиксирайте колелата.
Стъпка 5
Съединете трите части (2, 3, 4) на защитата за вятър една към друга посредством
горните отвори. Ще са ви необходими 2 винта (21), 2 подложни шайби (25) и 2 гайки
(23).
Завинтете защитата за вятър (2, 3, 4) отвътре на тавичката за въглища (6). Внимавайте
главите на винтовете да сочат навън. Ще са ви необходими 5 винта (21), 5 подложни
шайби (25) и 5 гайки (23).
Сега затегнете добре всички винтове.
Български - 37
Page 40

Florabest FGW 84 B1
Стъпка 6
Закрепете трите дъски на поставката (19) върху държачите на поставката (18). Ще са ви
необходими 6 винта (21), 6 подложни шайби (25) и 6 гайки (23).
Сега затегнете добре всички винтове.
Мушнете трите куки (16) в отворите на предния държач на поставката (18).
Стъпка 7
Закрепете щипките (с върховете една към друга) с крилчатите винтове (26) върху шиша
(1). Сложете дръжките (20) на скарата (5).
38 - Български
Page 41

Florabest FGW 84 B1
Стъпка 8
Проверете всички винтови съединения и ги затегнете добре!
Сложете скарата (5) и шиша (1) в прорезите на защитата за вятър (2, 3, 4).
Завинтете включената в окомплектовката отварачка за бутилки (9) към предния десен
неподвижен крак (10, стрелки). Ще са ви необходими 2 винта (21), 2 подложни шайби
(25) и 2 гайки (23).
Грилът вече е готов за експлоатация.
Български - 39
Page 42

Florabest FGW 84 B1
8. Пускане в експлоатация
Преди първата употреба грилът трябва да се нагрее най-малко 30 минути, за да изгорят
възможни остатъци от монтажа. През това време е възможно да се появи миризма, това е
напълно нормално.
ОПАСНОСТ! Използвайте за запалването или повторното разпалване само
подпалки, които отговарят на европейския стандарт EN 1860-3. Никога не
използвайте бензин или спирт за горене. В противен случай има опасност от
експлозии или неконтролируемо отделяне на топлина, което да доведе до тежки
изгаряния или пожари. Има опасност от нараняване и от пожар!
ОПАСНОСТ! Използвайте грила само върху гладка, устойчива на топлина, здрава
основа и далеч от запалими материали, течности или газове. Поставете грила на
достатъчно отдалечено от стени и други предмети място и никога не го оставяйте
без надзор по време на работа и след това, докато е все още горещ. Има опасност
от пожар!
Сложете в тавичката за въглища толкова дървени въглища (6), че да покрият дъното.
Поставете върху слоя въглища 2-3 твърди подпалки и ги запалете със запалка или с
кибритена клечка.
Когато подпалките се разгорят добре, напълнете внимателно тавичката (6) с дървени
въглища. Внимавайте да не задушите подпалките.
Когато върху дървените въглища се образува бял пласт пепел и подпалките изгорят
напълно, то жаравата е достигнала оптимално състояние.
Разпределете дървените въглища равномерно в тавичката за въглища (6) с подходящ
метален инструмент.
Сложете скарата (5) респ. шиша (1) в прорезите на защитата за вятър (2, 3, 4).
Изчакайте още малко, за да се нагрее скарата на грила (5) и започнете с печенето на
грил.
Отстранявайте продуктите, когато са достигнали желаната степен на изпичане.
Добър апетит!
40 - Български
Page 43

Florabest FGW 84 B1
9. Поддръжка / почистване
Преди да почистите, изчакайте грилът да изстине напълно. В противен случай
съществува опасност от изгаряне!
Грилът не съдържа части, които се нуждаят от редовна поддръжка. За обичайното
почистване използвайте кърпа за съдове и вода с обикновен миещ препарат. Не
използвайте абразивни или агресивни препарати за почистване, за да избегнете повреди.
За почистването на скарата (5) можете да използвате домакинска гъба и миещ препарат.
При по-силни замърсявания на скарата на грила (5) е добре да я накиснете предварително
във вода, за да омекнат залепналите остатъци. След почистването на скарата на грила (5),
изплакнете с чиста вода, за да отстраните остатъците от препарат.
10. Съхраняване при неизползване
Ако няма да използвате грила, го почистете, както е описано в раздел „9. Поддръжка /
Почистване“ и го съхранявайте на чисто и сухо място.
11. Екологични указания и информация за изхвърляне като
отпадък
Изхвърляйте горивото само след като е изстинало напълно, респ. изгоряло, в предвидените
за това контейнери от незапалим материал.
С правилното изхвърляне на стария уред предотвратявате екологични щети и опасност за
собственото ви здраве. Още информация за правилното изхвърляне на стария уред като
отпадък ще получите от градската администрация, в служба „Чистота“ или в магазина, от
който сте купили уреда.
Изхвърляйте и опаковката по безопасен за околната среда начин. Картонените опаковки
могат да се предават за рециклиране в пунктовете за стара хартия или да се изхвърлят в
обществените контейнери за разделно събиране на отпадъци. Фолио и пластмаса от
доставката се предават на местната фирма за извозване на отпадъци и се изхвърлят
съобразно екологичните норми.
Български - 41
Page 44

Florabest FGW 84 B1
12. Указания за гаранцията и сервизното обслужване
Гаранция на TARGA GmbH
Уважаеми клиенти,
вие получавате за това устройство 3 години гаранция от датата на покупка. В случай на
дефекти на този продукт ви се полагат законни права спрямо продавача на продукта. Тези
законни права не се ограничават от нашата представена по-долу гаранция.
Гаранционни условия
Гаранционният срок започва от датата на покупка. Моля, съхранявайте добре оригиналната
касова бележка. Този документ ще ви бъде необходим като доказателство за покупката.
Ако в рамките на три години от датата на покупка на този продукт се появи материален или
фабричен дефект, този продукт се ремонтира или заменя от нас – по наш избор –
безплатно за вас.
Срок на гаранцията и законови искания за отстраняване на недостатъците
Отговорността за недостатъци не удължава гаранционния срок. Това се отнася също за
заменените и ремонтирани части. Евентуално налични още при покупката повреди и
недостатъци трябва да бъдат обявени веднага след разопаковането. Явяващите се след
изтичане на гаранционния срок ремонти подлежат на заплащане.
Обхват на гаранцията
Устройството е произведено старателно в съответствие със строгите критерии за качеството
и е проверено добросъвестно преди доставката. Предоставената гаранция се отнася за
материални или фабрични дефекти. Тази гаранция не се простира върху части от продукта,
които са изложени на нормално износване и поради това могат да се разглеждат като
износващи се части или за повреди на чупливи части, напр. превключватели, акумулаторни
батерии или които са произведени от стъкло. Тази гаранция отпада, когато продуктът е бил
повреден, не е бил използван или поддържан подходящо според изискванията. За
подходящото използване на продукта да се спазват точно всички посочени в инструкцията за
експлоатация указания. Непременно да се избягват предназначения и действия, за които в
инструкцията за експлоатация сте съветвани или предупреждавани да не ги правите.
Продуктът е предназначен само за употреба за лични, а не за стопански цели. При
непозволено и неподходящо обслужване, употреба на сила и при намеси, които не са
предприети от нашия оторизиран сервизен филиал, гаранцията се прекратява. С ремонта
или замяната на продукта не започва нов гаранционен период.
42 - Български
Page 45

Florabest FGW 84 B1
Изпълнение в гаранционен случай
За да се осигури бързата обработка на вашата заявка, моля, следвайте следните указания:
- Моля, преди пускането в експлоатация на вашия продукт прочетете старателно
приложената документация. Стигне ли се до проблем, който не може да бъде
решен по този начин, моля, обърнете се към нашата гореща линия.
- За всички запитвания дръжте, моля, на разположение като доказателство за
покупката касовата бележка и номера на артикула, респ. ако има наличен
сериен номер.
- В случай, че не е възможно решение по телефона, в зависимост от причината за
неизправността от нашата гореща линия ще бъде задействано по-нататъшно
сервизно обслужване.
Сервиз
Е-мейл: service.BG@targa-online.com
Моля, обърнете внимание, че следващият адрес не е адрес на сервиза. Първо се свържете с
горепосочения сервизен център.
TARGA GmbH
IAN: 281147
Производител
Coesterweg 45
59494 SOEST
GERMANY
Телефон: 02 – 44 87 215
Български - 43
Page 46

Florabest FGW 84 B1
Περιεχόμενα
1. Προβλεπόμενη χρήση ................................................................................... 45
2. Δικαιώματα πνευματικής ιδιοκτησίας ............................................................ 45
3. Περιεχόμενα συσκευασίας ............................................................................ 46
4. Υλικό συναρμολόγησης ............................................................................... 46
5. Τεχνικά στοιχεία ........................................................................................... 47
6. Υποδείξεις ασφαλείας ................................................................................... 47
7. Συναρμολόγηση .......................................................................................... 48
7.1. Απαραίτητα εργαλεία ................................................................................................................. 48
7.2. Προετοιμασία για τη συναρμολόγηση ..................................................................................... 48
8. Θέση σε λειτουργία ....................................................................................... 54
9. Συντήρηση/Καθαρισμός .............................................................................. 55
10. Αποθήκευση σε περίπτωση μη χρήσης ........................................................ 55
11. Υποδείξεις σχετικά με το περιβάλλον και πληροφορίες για την απόρριψη ... 55
12. Υποδείξεις σχετικά με την εγγύηση και το σέρβις ......................................... 56
44 - Ελληνικά
Page 47

Florabest FGW 84 B1
Συγχαρητήρια!
Με την αγορά της τροχήλατης ψησταριάς FGW 84 B1 (εφεξής θα αναφέρεται ως «ψησταριά»)
αποκτήσατε ένα προϊόν υψηλής ποιότητας.
Πριν τη συναρμολόγηση της ψησταριάς εξοικειωθείτε με το προϊόν και τα παρεχόμενα εξαρτήματα
και διαβάστε προσεκτικά το παρόν εγχειρίδιο οδηγιών χρήσης. Τηρείτε προπαντός τις υποδείξεις
ασφαλείας και χρησιμοποιείτε την ψησταριά μόνο όπως περιγράφεται στο παρόν εγχειρίδιο
οδηγιών χρήσης και μόνο για την προβλεπόμενη χρήση.
Φυλάξτε αυτό το εγχειρίδιο οδηγιών χρήσης. Αν παραδώσετε την ψησταριά σε τρίτους,
παραδώστε μαζί και όλα τα σχετικά έγγραφα.
1. Προβλεπόμενη χρήση
Αυτή η ψησταριά προορίζεται μόνο για το ψήσιμο τροφίμων, π.χ. κρέατος, ψαριών ή λαχανικών. Η
ψησταριά ενδείκνυται αποκλειστικά για χρήση σε εξωτερικό χώρο. Σε καμία περίπτωση μην τη
χρησιμοποιείτε μέσα σε κλειστούς χώρους. Η ψησταριά δεν προορίζεται για εταιρική ή
επαγγελματική χρήση. Χρησιμοποιήστε την ψησταριά αποκλειστικά για προσωπική χρήση.
Οποιαδήποτε άλλη χρήση δεν προβλέπεται.
Αποκλείεται οποιαδήποτε ευθύνη του κατασκευαστή για ζημιές ή βλάβες που προκύπτουν από
τροποποίηση ή μετατροπή της ψησταριάς χωρίς την έγκριση του κατασκευαστή.
Λάβετε υπόψη σας τους κανονισμούς ή/και τους νόμους που ισχύουν στην εκάστοτε χώρα
χρήσης του προϊόντος.
2. Δικαιώματα πνευματικής ιδιοκτησίας
Το πλήρες περιεχόμενο αυτών των οδηγιών χρήσης προστατεύεται από δικαιώματα πνευματικής
ιδιοκτησίας και παρέχεται στον χρήστη αποκλειστικά για ενημερωτικούς σκοπούς. Οποιαδήποτε
αντιγραφή ή ανατύπωση των στοιχείων και πληροφοριών απαγορεύεται χωρίς τη ρητή και έγγραφη
συγκατάθεση του συντάκτη. Αυτό αφορά επίσης την επαγγελματική χρήση του περιεχομένου και
των στοιχείων. Το κείμενο και οι εικόνες αντικατοπτρίζουν το τεχνολογικό επίπεδο τη στιγμή της
εκτύπωσης. Επιφυλασσόμαστε για τυχόν αλλαγές.
Ελληνικά - 45
Page 48

Florabest FGW 84 B1
3. Περιεχόμενα συσκευασίας
Βγάλτε την ψησταριά και όλα τα πρόσθετα εξαρτήματα από τη συσκευασία. Αφαιρέστε όλα τα
υλικά συσκευασίας και ελέγξτε αν όλα τα εξαρτήματα είναι πλήρη και σε άψογη κατάσταση. Σε
περίπτωση που κάποια περιεχόμενα της συσκευασίας λείπουν ή παρουσιάζουν ζημία,
απευθυνθείτε στον κατασκευαστή.
Ψησταριά (ασυναρμολόγητη)
Υλικό συναρμολόγησης
Το παρόν εγχειρίδιο οδηγιών χρήσης
Αυτό το εγχειρίδιο οδηγιών χρήσης είναι σε αναδιπλούμενη μορφή. Στην εσωτερική πλευρά
απεικονίζεται η ψησταριά με αριθμητικά ψηφία. Τα ψηφία σημαίνουν τα εξής:
1 Σούβλα ψησταριάς (μαζί με τους σφιγκτήρες)
2 Ανεμοφράκτης (αριστερά)
3 Ανεμοφράκτης (κέντρο)
4 Ανεμοφράκτης (δεξιά)
5 Σχάρα ψησταριάς
6 Λεκάνη θράκας
7 Λαβή
8 Στήριγμα λαβής (2 τεμάχια)
9 Ανοιχτήρι φιαλών
10 Βάση στήριξης (2 τεμάχια)
11 Εγκάρσιο στυλίδιο (2 τεμάχια)
12 Σανίδα εναπόθεσης (μακριά, 5 τεμάχια)
13 Τροχός (2 τεμάχια)
14 Άξονας
15 Βάση στήριξης τροχού (2 τεμάχια)
16 Γάντζος (3 τεμάχια)
17 Ενισχυτικό στήριγμα (2 τεμάχια)
18 Στήριγμα σανίδων απόθεσης (μπροστινή πλευρά, πίσω πλευρά)
19 Σανίδα απόθεσης (κοντή, 3 τεμάχια)
20 Λαβή (για τη σχάρα ψησταριάς, 2 τεμάχια)
4. Υλικό συναρμολόγησης
46 - Ελληνικά
Page 49

5. Τεχνικά στοιχεία
Μοντέλο Florabest FGW 84 B1
Florabest FGW 84 B1
Διαστάσεις συναρμολογημένης ψησταριάς
περ. 84 x 86 x 45 cm
(Π x Υ x Β)
Διαστάσεις σχάρας ψησταριάς (Π x Β) περ. 48 x 27 cm
Καύσιμη ύλη Ξυλοκάρβουνα
Χωρητικότητα λεκάνης θράκας μέγ. 1 kg
Βάρος περ. 6,8 kg
Τα τεχνικά στοιχεία, καθώς και ο σχεδιασμός ενδέχεται να αλλάξουν χωρίς προειδοποίηση.
6. Υποδείξεις ασφαλείας
Προτού χρησιμοποιήσετε την ψησταριά για πρώτη φορά, διαβάστε προσεκτικά τις παρακάτω
οδηγίες και λάβετε υπόψη σας όλες τις προειδοποιητικές υποδείξεις. Φυλάξτε αυτό το εγχειρίδιο
οδηγιών χρήσης προσεκτικά για μελλοντική αναφορά. Αν θέλετε να πουλήσετε ή να δώσετε τη
συσκευή σε τρίτους, παραδώστε οπωσδήποτε μαζί και αυτό το εγχειρίδιο οδηγιών χρήσης.
Αποτελούν αναπόσπαστο μέρος του προϊόντος.
Επεξήγηση συμβόλων
ΚΙΝΔΥΝΟΣ! Αυτό το σύμβολο με την προειδοποιητική λέξη «Κίνδυνος»
επισημαίνει επικείμενη επικίνδυνη κατάσταση η οποία, αν δεν αποτραπεί, μπορεί να
προκαλέσει σοβαρούς τραυματισμούς ή ακόμα και θάνατο.
ΠΡΟΕΙΔΟΠΟΙΗΣΗ! Αυτό το σύμβολο επισημαίνει σημαντικές υποδείξεις για την
ασφαλή λειτουργία της ψησταριάς και την προστασία του χρήστη.
ΚΙΝΔΥΝΟΣ! Το σύμβολο αυτό επισημαίνει κινδύνους για την υγεία από
εγκαύματα.
Το σύμβολο αυτό σημαίνει ότι η ψησταριά προορίζεται για χρήση μόνο εκτός
κλειστών χώρων. Κίνδυνος δηλητηρίασης από οξείδιο του άνθρακα!
ΚΙΝΔΥΝΟΣ! Χρησιμοποιείτε την ψησταριά μόνο εκτός κλειστών χώρων. Διαφορετικά
υπάρχει κίνδυνος δηλητηρίασης από οξείδιο του άνθρακα που μπορεί να προκαλέσει
άμεσα θάνατο.
Ελληνικά - 47
Page 50

Florabest FGW 84 B1
ΚΙΝΔΥΝΟΣ! Χρησιμοποιείτε την ψησταριά μόνο σε επίπεδο και σταθερό δάπεδο,
ανθεκτικό στη θερμότητα, μακριά από εύφλεκτα υλικά, υγρά ή αέρια. Φροντίστε να
υπάρχει επαρκής απόσταση από τοίχους και άλλα αντικείμενα και σε καμία περίπτωση
μην αφήνετε την ψησταριά ανεπιτήρητη κατά τη διάρκεια της λειτουργίας και μετά, όσο
ακόμα είναι καυτή. Κίνδυνος πυρκαγιάς!
ΚΙΝΔΥΝΟΣ! Για το άναμμα ή την αναζωογόνηση της φλόγας χρησιμοποιείτε
αποκλειστικά και μόνο προσανάμματα που συμμορφώνονται με το ευρωπαϊκό πρότυπο
EN 1860-3. Σε καμία περίπτωση μην χρησιμοποιείτε βενζίνη ή οινόπνευμα. Διαφορετικά
υπάρχει κίνδυνος έκρηξης ή ανεξέλεγκτης δημιουργίας θερμότητας με πιθανή συνέπεια
την πρόκληση σοβαρότατων εγκαυμάτων ή πυρκαγιάς. Κίνδυνος τραυματισμού και
πυρκαγιάς!
ΚΙΝΔΥΝΟΣ! Σε περίπτωση ανάφλεξης λίπους στην ψησταριά, σε καμία περίπτωση
μην το σβήσετε με νερό! Υπάρχει κίνδυνος έκρηξης. Για το σβήσιμο χρησιμοποιήστε
π.χ. πυρίμαχη κουβέρτα για να καταπνίξετε τη φωτιά.
ΚΙΝΔΥΝΟΣ! Χρησιμοποιήστε την ψησταριά αποκλειστικά με ξυλοκάρβουνα και σε
καμία περίπτωση με άλλες καύσιμες ύλες. Κίνδυνος πυρκαγιάς!
ΚΙΝΔΥΝΟΣ! Για την αποφυγή εγκαυμάτων φοράτε κατά το ψήσιμο γάντια ψησίματος
και χρησιμοποιείτε για το γύρισμα των τροφών κατάλληλο εργαλείο, π.χ. λαβή ψησίματος.
Κίνδυνος εγκαυμάτων.
ΚΙΝΔΥΝΟΣ! Πριν τον καθαρισμό περιμένετε να κρυώσει εντελώς η ψησταριά. Κίνδυνος
εγκαυμάτων!
ΠΡΟΕΙΔΟΠΟΙΗΣΗ! Μην επιτρέπετε σε παιδιά και κατοικίδια να πλησιάζουν στην
ψησταριά.
ΠΡΟΕΙΔΟΠΟΙΗΣΗ! Η θερμοκρασία αυτής της ψησταριάς αυξάνεται υπερβολικά. Η
ψησταριά δεν επιτρέπεται να μετακινείται όσο βρίσκεται σε λειτουργία!
ΠΡΟΕΙΔΟΠΟΙΗΣΗ! Μετά το ψήσιμο αφήστε τα υπόλοιπα ξυλοκάρβουνα να
αποκαούν. Μην τα σβήνετε με νερό.
7. Συναρμολόγηση
7.1. Απαραίτητα εργαλεία
Σταυροκατσάβιδο
Ανοικτό κλειδί: SW 8 mm και SW 13 mm
7.2. Προετοιμασία για τη συναρμολόγηση
Κατά τη συναρμολόγηση της ψησταριάς ενεργήστε προσεκτικά.
Προγραμματίστε επαρκή χρόνο.
Βρείτε μια επαρκώς μεγάλη επιφάνεια εργασίας.
Βγάλτε από τη συσκευασία όλα τα επιμέρους εξαρτήματα και τοποθετήστε τα κοντά σας.
Βγάλτε από τη συσκευασία το υλικό συναρμολόγησης και τοποθετήστε το κοντά σας.
Έχετε έτοιμα τα απαραίτητα εργαλεία.
48 - Ελληνικά
Page 51

Florabest FGW 84 B1
ΠΡΟΕΙΔΟΠΟΙΗΣΗ! Κατά τη συναρμολόγηση της ψησταριάς προσέξτε
οπωσδήποτε οι κεφαλές των βιδών να δείχνουν πάντα προς τα έξω. Έτσι μπορείτε να
αποφύγετε τραυματισμούς από βίδες που εξέχουν.
Παρακάτω περιγράφεται η συναρμολόγηση της ψησταριάς σε 8 βήματα με εικόνες. Έχετε κοντά
σας τα απαραίτητα επιμέρους εξαρτήματα και το απαραίτητο υλικό συναρμολόγησης.
Βήμα 1
Βιδώστε τα δύο στηρίγματα σανίδων απόθεσης (18) σφικτά στις βάσεις στήριξης τροχών (15).
Χρησιμοποιήστε την κάτω οπή του στηρίγματος (18) και τη μεσαία οπή της
βάσης στήριξης τροχού (15), βλέπε εικόνα. Χρειάζεστε από μία βίδα (21), μία ροδέλα (25)
και ένα παξιμάδι (23).
Στερεώστε τα ενισχυτικά στηρίγματα (17) στις βάσεις στήριξης τροχών (15). Χρειάζεστε από
μία βίδα (21), μία ροδέλα (25) και ένα παξιμάδι (23).
Στερεώστε έπειτα τα ενισχυτικά στηρίγματα (17) στα στηρίγματα σανίδων απόθεσης (18).
Χρειάζεστε από μία βίδα (21), μία ροδέλα (25) και ένα παξιμάδι (23).
Βιδώστε σφικτά τις βάσεις στήριξης τροχών (15) μαζί με τα συναρμολογημένα στηρίγματα
σανίδων απόθεσης (18) στην αριστερά πλευρά της λεκάνης θράκας (6). Χρησιμοποιήστε την
επάνω οπή των βάσεων στήριξης τροχών (15).
Προσέξτε: Οι 3 οπές για τη συναρμολόγηση του ανεμοφράκτη στη λεκάνη θράκας (6)
πρέπει να βρίσκονται στην πίσω πλευρά. Χρειάζεστε για κάθε βάση στήριξης τροχού (15)
2 βίδες (21), 2 ροδέλες (25) και 2 παξιμάδια (23).
Σφίξτε καλά όλες τις βίδες.
Ελληνικά - 49
Page 52

Florabest FGW 84 B1
Βήμα 2
Βιδώστε τα στηρίγματα λαβής (8) σφικτά στις βάσεις στήριξης (10). Χρησιμοποιήστε την κάτω
οπή του στηρίγματος λαβής (8). Χρειάζεστε από μία βίδα (21), μία ροδέλα (25) και ένα
παξιμάδι (23).
Στερεώστε τις βάσεις στήριξης (10) μαζί με τα συναρμολογημένα στηρίγματα λαβής (8) στη
δεξιά πλευρά της λεκάνης θράκας (6). Χρησιμοποιήστε την επάνω οπή των βάσεων στήριξης
(10). Χρειάζεστε για κάθε βάση στήριξης (10) 2 βίδες (21), 2 ροδέλες (25) και 2 παξιμάδια
(23).
Βιδώστε τη λαβή (7) ανάμεσα στα στηρίγματα λαβής (8). Χρειάζεστε 2 βίδες (22).
Σφίξτε καλά όλες τις βίδες.
Βήμα 3
Βιδώστε τα δύο εγκάρσια στυλίδια (11) ανάμεσα στις βάσεις στήριξης (10) και στις βάσεις
στήριξης τροχών (15). Οι πέντε οπές των εγκάρσιων στυλιδίων (11) πρέπει να βρίσκονται
προς πάνω. Χρειάζεστε για κάθε εγκάρσιο στυλίδιο (11) 4 βίδες (21), 4 ροδέλες (25) και 4
παξιμάδια (23).
Στερεώστε τις 5 σανίδες απόθεσης (12) σφικτά στα εγκάρσια στυλίδια (11). Χρειάζεστε 10
βίδες (21), 10 ροδέλες (25) και 10 παξιμάδια (23).
Σφίξτε καλά όλες τις βίδες.
50 - Ελληνικά
Page 53

Florabest FGW 84 B1
Βήμα 4
Περάστε τον άξονα (14) από τις κάτω οπές των βάσεων στήριξης τροχών (15). Τοποθετήστε
τώρα τους τροχούς (13) στα άκρα του άξονα (14). Βιδώστε στα άκρα του άξονα (14) τα
αυτασφαλιζόμενα παξιμάδια (24) έως ότου να εφάπτονται στον άξονα.
Βήμα 5
Συνδέστε μεταξύ τους τα 3 μέρη του ανεμοφράκτη (2, 3, 4) χρησιμοποιώντας τις επάνω οπές.
Χρειάζεστε 2 βίδες (21), 2 ροδέλες (25) και 2 παξιμάδια (23).
Βιδώστε τον ανεμοφράκτη (2, 3, 4) από μέσα στη λεκάνη θράκας (6). Προσέξτε οπωσδήποτε
οι κεφαλές των βιδών να δείχνουν προς τα έξω. Χρειάζεστε 5 βίδες (21), 5 ροδέλες (25) και 5
παξιμάδια (23).
Σφίξτε καλά όλες τις βίδες.
Ελληνικά - 51
Page 54

Florabest FGW 84 B1
Βήμα 6
Στερεώστε τις 3 σανίδες απόθεσης (19) σφικτά στα στηρίγματα σανίδων απόθεσης (18).
Χρειάζεστε 6 βίδες (21), 6 ροδέλες (25) και 6 παξιμάδια (23).
Σφίξτε καλά όλες τις βίδες.
Τοποθετήστε τους 3 γάντζους (16) στις οπές του μπροστινού στηρίγματος σανίδων απόθεσης
(18).
Βήμα 7
Στερεώστε στη σούβλα ψησταριάς (1) τους σφιγκτήρες (με τις μύτες τους αντικριστά)
χρησιμοποιώντας τις βίδες με κρίκο (26). Τοποθετήστε τις λαβές (20) στη σχάρα ψησταριάς
(5).
52 - Ελληνικά
Page 55

Florabest FGW 84 B1
Βήμα 8
Ελέγξτε όλες τις βιδωτές συνδέσεις και, αν χρειάζεται, σφίξτε τις περισσότερο!
Τοποθετήστε τώρα τη σχάρα ψησταριάς (5) και τη σούβλα ψησταριάς (1) στα ανοίγματα του
ανεμοφράκτη (2, 3, 4).
Βιδώστε σφικτά το παρεχόμενο ανοιχτήρι φιαλών (9) στην μπροστινή δεξιά βάση στήριξης
(10, βλέπε βέλη). Χρειάζεστε 2 βίδες (21), 2 ροδέλες (25) και 2 παξιμάδια (23).
Η ψησταριά είναι πλέον έτοιμη για λειτουργία.
Ελληνικά - 53
Page 56

Florabest FGW 84 B1
8. Θέση σε λειτουργία
Πριν από την πρώτη θέση σε λειτουργία θερμάνετε την ψησταριά για τουλάχιστον 30 λεπτά, για να
κάψετε τυχόν υπολείμματα κατασκευής. Στη διάρκεια αυτή μπορεί να δημιουργηθούν οσμές. Αυτό
είναι εντελώς φυσιολογικό.
ΚΙΝΔΥΝΟΣ! Για το άναμμα ή την αναζωογόνηση της φλόγας χρησιμοποιείτε
αποκλειστικά και μόνο προσανάμματα που συμμορφώνονται με το ευρωπαϊκό πρότυπο
EN 1860-3. Σε καμία περίπτωση μην χρησιμοποιείτε βενζίνη ή οινόπνευμα. Διαφορετικά
υπάρχει κίνδυνος έκρηξης ή ανεξέλεγκτης δημιουργίας θερμότητας με πιθανή συνέπεια
την πρόκληση σοβαρότατων εγκαυμάτων ή πυρκαγιάς. Κίνδυνος τραυματισμού και
πυρκαγιάς!
ΚΙΝΔΥΝΟΣ! Χρησιμοποιείτε την ψησταριά μόνο σε επίπεδο και σταθερό δάπεδο,
ανθεκτικό στη θερμότητα, μακριά από εύφλεκτα υλικά, υγρά ή αέρια. Φροντίστε να
υπάρχει επαρκής απόσταση από τοίχους και άλλα αντικείμενα και σε καμία περίπτωση
μην αφήνετε την ψησταριά ανεπιτήρητη κατά τη διάρκεια της λειτουργίας και μετά, όσο
ακόμα είναι καυτή. Κίνδυνος πυρκαγιάς!
Προσθέστε στη λεκάνη θράκας (6) τόσα ξυλοκάρβουνα έως ότου καλυφθεί ο πυθμένας.
Μοιράστε έπειτα 2-3 στέρεα προσανάμματα στα ξυλοκάρβουνα και ανάψτε τα με αναπτήρα ή
σπίρτα.
Αφού ανάψουν καλά τα προσανάμματα, γεμίστε προσεκτικά τη λεκάνη θράκας (6) με
ξυλοκάρβουνα. Προσέξτε να μην καταπνίξετε τα προσανάμματα.
Μπορείτε να αναγνωρίσετε την ιδανική κατάσταση θράκας ως εξής: Πάνω στα ξυλοκάρβουνα
δημιουργείται μια λευκή στρώση στάχτης και τα προσανάμματα έχουν καεί εντελώς.
Κατανείμετε ομοιόμορφα τα ξυλοκάρβουνα στη λεκάνη θράκας (6) με ένα κατάλληλο
μεταλλικό αντικείμενο.
Τοποθετήστε τη σχάρα (5) / τη σούβλα (1) στα ανοίγματα του ανεμοφράκτη (2, 3, 4).
Περιμένετε λίγο να ζεσταθεί η σχάρα (5) και ξεκινήστε έπειτα το ψήσιμο.
Βγάλτε τα ψημένα φαγητά, όταν φτάσουν στο επιθυμητό σημείο ψησίματος.
Καλή σας όρεξη!
54 - Ελληνικά
Page 57

Florabest FGW 84 B1
9. Συντήρηση/Καθαρισμός
Περιμένετε να κρυώσει εντελώς η ψησταριά, προτού την καθαρίσετε. Διαφορετικά υπάρχει
κίνδυνος εγκαυμάτων!
Η ψησταριά δεν περιλαμβάνει εξαρτήματα που χρειάζονται τακτική συντήρηση. Για τον κανονικό
καθαρισμό χρησιμοποιήστε σπογγοπετσέτα και νερό με κοινό απορρυπαντικό του εμπορίου. Μην
χρησιμοποιείτε διαβρωτικά ή σκληρά απορρυπαντικά, ώστε να αποφύγετε τυχόν ζημιές.
Για τον καθαρισμό της σχάρας ψησταριάς (5) ενδείκνυται η χρήση σφουγγαριού για οικιακές
εργασίες και απορρυπαντικού. Στην περίπτωση επίμονων ακαθαρσιών που έχουν σχηματίσει
σκληρή κρούστα στη σχάρα (5), βάλτε τη σχάρα σε νερό πριν την καθαρίσετε, για να μαλακώσει η
κρούστα ακαθαρσιών. Μετά τον καθαρισμό ξεπλύντε τη σχάρα (5) με καθαρό νερό, για να
απομακρύνετε τυχόν υπολείμματα απορρυπαντικού.
10. Αποθήκευση σε περίπτωση μη χρήσης
Αν δεν πρόκειται να χρησιμοποιήσετε την ψησταριά, καθαρίστε την όπως περιγράφεται στο
κεφάλαιο «9. Συντήρηση/Καθαρισμός» και αποθηκεύστε την σε καθαρό και στεγνό μέρος.
11. Υποδείξεις σχετικά με το περιβάλλον και πληροφορίες για την
απόρριψη
Απορρίψτε την καύσιμη ύλη, αφού αποκαεί και κρυώσει εντελώς, στους σχετικούς προβλεπόμενους
κάδους από μη εύφλεκτο υλικό.
Με τη σωστή απόρριψη των παλιών συσκευών συμβάλλετε στην προστασία του περιβάλλοντος και
της υγείας σας. Για περισσότερες πληροφορίες σχετικά με την απόρριψη των παλιών συσκευών,
όπως ορίζουν οι κανονισμοί, απευθυνθείτε στον δήμο, στις αρμόδιες υπηρεσίες αποκομιδής
απορριμμάτων ή στο κατάστημα από το οποίο αγοράσατε τη συσκευή.
Απορρίψτε επίσης και τη συσκευασία με τρόπο που δεν βλάπτει το περιβάλλον. Μπορείτε να
απορρίψετε τα χαρτονένια κουτιά σε κάδους συλλογής παλιού χαρτιού ή στους δημόσιους
κάδους ανακύκλωσης. Για τη συλλογή και απόρριψη των μεμβρανών και των πλαστικών της
συσκευασίας με τρόπο φιλικό προς το περιβάλλον, αρμόδιες είναι οι τοπικές εταιρίες αποκομιδής
και απόρριψης απορριμμάτων.
Ελληνικά - 55
Page 58

Florabest FGW 84 B1
12. Υποδείξεις σχετικά με την εγγύηση και το σέρβις
Εγγύηση της TARGA GmbH
Αξιότιμη πελάτισσα, αξιότιμε πελάτη,
Για τη συσκευή αυτή λαμβάνετε εγγύηση 3 ετών από την ημερομηνία αγοράς. Σε περίπτωση
ελαττωμάτων του προϊόντος αυτού έχετε νομικά δικαιώματα έναντι του πωλητή του προϊόντος. Αυτά
τα νομικά δικαιώματα δεν περιορίζονται από την εγγύησή μας η οποία περιγράφεται παρακάτω.
Όροι της εγγύησης
Η διάρκεια ισχύος της εγγύησης αρχίζει από την ημερομηνία αγοράς. Παρακαλούμε να φυλάξετε
καλά το πρωτότυπο της ταμειακής απόδειξης. Το έγγραφο αυτό χρειάζεται ως απόδειξη της
αγοράς. Αν σε διάστημα τριών ετών από την ημερομηνία αγοράς του προϊόντος αυτού προκύψει
ελάττωμα υλικού ή κατασκευής, τότε χωρίς χρέωσή σας το προϊόν – κατ' επιλογή μας – θα
επισκευαστεί ή θα αντικατασταθεί.
Διάρκεια της εγγύησης και νομικά προβλεπόμενες απαιτήσεις σε περίπτωση
ελαττώματος
Ο χρόνος ισχύος της εγγύησης δεν επεκτείνεται από τη νομικά προβλεπόμενη εγγύηση. Αυτό
ισχύει και για αντικατασταθέντα και επισκευασμένα εξαρτήματα. Ενδεχόμενες ζημιές και ελαττώματα
που υπάρχουν ήδη κατά την αγορά πρέπει να δηλώνονται αμέσως μετά την αποσυσκευασία. Οι
επισκευές που προκύπτουν μετά την παρέλευση του χρόνου της εγγύησης θα χρεώνονται.
Έκταση της εγγύησης
Η συσκευή παράχθηκε προσεκτικά σύμφωνα με αυστηρές προδιαγραφές ποιότητας και ελέγχθηκε
σχολαστικά πριν την παράδοση. Η παρεχόμενη εγγύηση ισχύει για ελαττώματα υλικών ή
κατασκευής. Η εγγύηση αυτή δεν καλύπτει εξαρτήματα του προϊόντος τα οποία είναι εκτεθειμένα σε
κανονική φθορά και ως εκ τούτου μπορούν να θεωρηθούν φθειρόμενα εξαρτήματα, ή ζημιές σε
ευπαθή εξαρτήματα, π.χ. διακόπτες, επαναφορτιζόμενες μπαταρίες ή μέρη κατασκευασμένα από
γυαλί. Η εγγύηση αυτή καταπίπτει αν το προϊόν χρησιμοποιήθηκε ενώ είχε υποστεί ζημιά, αν δεν
χρησιμοποιήθηκε σωστά ή δεν συντηρήθηκε σωστά. Για σωστή χρήση του προϊόντος πρέπει να
τηρούνται επακριβώς όλες οι υποδείξεις που αναφέρονται στις οδηγίες χρήσης. Πρέπει
οπωσδήποτε να αποφεύγονται σκοποί χρήσης και χειρισμοί για την αποφυγή των οποίων
υπάρχουν υποδείξεις ή προειδοποιήσεις στις οδηγίες χρήσης. Το προϊόν προορίζεται
αποκλειστικά για ιδιωτική και όχι για επαγγελματική χρήση. Η εγγύηση ακυρώνεται σε περίπτωση
καταχρηστικής και ακατάλληλης χρήσης, εφαρμογής βίας, καθώς και επεμβάσεων οι οποίες δεν
έγιναν από τις εξουσιοδοτημένες μας αντιπροσωπείες σέρβις. Με την επισκευή ή αντικατάσταση
του προϊόντος δεν ξεκινά νέα διάρκεια εγγύησης.
56 - Ελληνικά
Page 59

Florabest FGW 84 B1
Διαδικασία σε περίπτωση εγγύησης
Για να εξασφαλιστεί γρήγορη επεξεργασία του αιτήματός σας, παρακαλούμε να ακολουθήσετε τις
εξής υποδείξεις:
- Πριν θέσετε το προϊόν σε λειτουργία, παρακαλούμε να διαβάσετε προσεκτικά τη
συνοδευτική τεκμηρίωση. Σε περίπτωση που παρουσιαστεί ένα πρόβλημα το οποίο δεν
μπορεί να επιλυθεί με αυτό τον τρόπο, απευθυνθείτε στην ανοικτή μας γραμμή
επικοινωνίας.
- Παρακαλούμε για κάθε ερώτημα να έχετε σε ετοιμότητα την ταμειακή απόδειξη και τον
αριθμό είδους (IAN) ή αν υπάρχει τον αριθμό σειράς ως απόδειξη της αγοράς.
- Σε περίπτωση που δεν είναι εφικτή μια τηλεφωνική λύση, μέσω της ανοικτής μας γραμμής
διακανονίζεται περαιτέρω εξυπηρέτηση ανάλογα με την αιτία του σφάλματος.
Σέρβις
Τηλέφωνο: 021 - 11985557
E-Mail: service.GR@targa-online.com
Τηλέφωνο: 02 – 20 09 025
E-Mail: service.CY@targa-online.com
IAN: 281147
Κατασκευαστής
Παρακαλούμε έχετε υπόψη σας ότι η διεύθυνση που ακολουθεί δεν είναι διεύθυνση σέρβις.
Απευθυνθείτε πρώτα στις προαναφερόμενες θέσεις σέρβις.
TARGA GmbH
Coesterweg 45
59494 SOEST
GERMANY
Ελληνικά - 57
Page 60

Florabest FGW 84 B1
Inhaltsverzeichnis
1. Bestimmungsgemäße Verwendung .............................................................. 59
2. Urheberrecht ................................................................................................ 59
3. Lieferumfang ................................................................................................ 60
4. Montagematerial ......................................................................................... 60
5. Technische Daten .......................................................................................... 61
6. Sicherheitshinweise ...................................................................................... 61
7. Montage ....................................................................................................... 62
7.1. Benötigte Werkzeuge ................................................................................................................ 62
7.2. Vorbereitung der Montage........................................................................................................ 62
8. Inbetriebnahme ............................................................................................ 68
9. Wartung / Reinigung .................................................................................... 69
10. Lagerung bei Nichtbenutzung .................................................................... 69
11. Umwelthinweise und Entsorgungsangaben ................................................ 69
12. Hinweise zu Garantie und Serviceabwicklung ........................................... 70
58 - Deutsch
Page 61

Florabest FGW 84 B1
Herzlichen Glückwunsch!
Mit dem Kauf des Florabest FGW 84 B1 Grillwagens, im Folgenden als Grill bezeichnet, haben
Sie sich für ein hochwertiges Produkt entschieden.
Machen Sie sich vor der Montage des Grills mit dem Produkt und den mitgelieferten Teilen vertraut
und lesen Sie diese Bedienungsanleitung aufmerksam durch. Beachten Sie vor allem die
Sicherheitshinweise und benutzen Sie den Grill nur, wie in dieser Bedienungsanleitung beschrieben
und für die angegebenen Einsatzbereiche.
Bewahren Sie diese Bedienungsanleitung gut auf. Händigen Sie alle Unterlagen bei Weitergabe
des Grills an Dritte ebenfalls mit aus.
1. Bestimmungsgemäße Verwendung
Dieser Grill dient nur zum Grillen von Lebensmitteln wie zum Beispiel Fleisch, Fisch oder Gemüse.
Der Grill ist ausschließlich für die Verwendung im Freien geeignet. Betreiben Sie den Grill niemals
innerhalb von geschlossenen Räumen. Er ist nicht für den Betrieb in einem Unternehmen bzw. den
gewerblichen Einsatz vorgesehen. Verwenden Sie den Grill ausschließlich für den privaten
Gebrauch, jede andere Verwendung ist nicht bestimmungsgemäß.
Bei Schäden oder Störungen, die aus einer nicht mit dem Hersteller abgestimmten Änderung oder
Modifikation des Grills resultieren, ist jegliche Haftung seitens des Herstellers ausgeschlossen.
Bitte beachten Sie die Landesvorschriften bzw. Gesetze des Einsatzlandes.
2. Urheberrecht
Alle Inhalte dieser Bedienungsanleitung unterliegen dem Urheberrecht und werden dem Leser
ausschließlich als Informationsquelle bereitgestellt. Jegliches Kopieren oder Vervielfältigen von
Daten und Informationen ist ohne ausdrückliche und schriftliche Genehmigung durch den Autor
verboten. Dieses betrifft auch die gewerbliche Nutzung der Inhalte und Daten. Text und
Abbildungen entsprechen dem technischen Stand bei Drucklegung. Änderungen vorbehalten.
Deutsch - 59
Page 62

Florabest FGW 84 B1
3. Lieferumfang
Nehmen Sie den Grill und alle Zubehörteile aus der Verpackung. Entfernen Sie alle
Verpackungsmaterialien und überprüfen Sie, ob alle Komponenten vollständig und unbeschädigt
sind. Im Falle einer unvollständigen oder beschädigten Lieferung wenden Sie sich bitte an den
Hersteller.
Grill (nicht montiert)
Montagematerial
Diese Bedienungsanleitung
Diese Bedienungsanleitung ist mit einem ausklappbaren Umschlag versehen. Auf der Innenseite des
Umschlags ist der Grill mit einer Bezifferung abgebildet. Die Ziffern haben folgende Bedeutung:
1 Grillspieß (inkl. Klammern)
2 Windschutz (links)
3 Windschutz (mitte)
4 Windschutz (rechts)
5 Grillrost
6 Kohlebehälter
7 Griff
8 Griffhalter (2 Stück)
9 Flaschenöffner
10 Standfuß (2 Stück)
11 Querstrebe (2 Stück)
12 Ablagebrett (lang, 5 Stück)
13 Rad (2 Stück)
14 Achse
15 Rad-Standfuß (2 Stück)
16 Haken (3 Stück)
17 Verstärkungsstrebe (2 Stück)
18 Ablagehalter (Vorderseite, Rückseite)
19 Ablagebrett (kurz, 3 Stück)
20 Griff (für den Grillrost, 2 Stück)
4. Montagematerial
60 - Deutsch
Page 63

Florabest FGW 84 B1
5. Technische Daten
Modell Florabest FGW 84 B1
Abmessungen montiert (B x H x T) ca. 84 x 86 x 45 cm
Abmessungen Grillrost (B x T) ca. 48 x 27 cm
Brennstoff Holzkohle
Fassungsvermögen Kohlebehälter max. 1 kg
Gewicht ca. 6,8 kg
Änderungen der technischen Daten sowie des Designs können ohne Ankündigung erfolgen.
6. Sicherheitshinweise
Vor der ersten Verwendung des Grills lesen Sie die folgenden Anweisungen genau durch und
beachten Sie alle Warnhinweise. Bewahren Sie diese Bedienungsanleitung sorgfältig als zukünftige
Referenz auf. Wenn Sie das Gerät verkaufen oder weitergeben, händigen Sie unbedingt auch
diese Bedienungsanleitung aus. Sie ist Bestandteil des Produktes.
Erläuterung der verwendeten Symbole
GEFAHR! Dieses Symbol, mit dem Hinweis „Gefahr“, kennzeichnet eine drohende
gefährliche Situation, die, wenn Sie nicht verhindert wird, zu schweren Verletzungen
oder sogar zum Tod führen kann.
WARNUNG! Dieses Symbol kennzeichnet wichtige Hinweise für den sicheren
Betrieb des Grills und zum Schutz des Anwenders.
GEFAHR! Dieses Symbol kennzeichnet Gefahren für die Gesundheit durch
Verbrühen / Verbrennen.
Dieses Symbol weist darauf hin, dass der Grill nur zur Verwendung außerhalb
geschlossener Räume bestimmt ist. Gefahr einer Kohlenmonoxidvergiftung!
GEFAHR! Betreiben Sie den Grill nur außerhalb von geschlossenen Räumen. Ansonsten
besteht die Gefahr einer Kohlenmonoxidvergiftung, die in kürzester Zeit zum Tod führen
kann.
Deutsch - 61
Page 64

Florabest FGW 84 B1
GEFAHR! Betreiben Sie den Grill nur auf einem ebenen, wärmebeständigen, festen
Untergrund und nicht in der Nähe von brennbaren Materialien, Flüssigkeiten oder Gasen.
Lassen Sie ausreichend Abstand zu Wänden und anderen Gegenständen und lassen Sie
den Grill während des Betriebes und danach, solange dieser heiß ist, niemals
unbeaufsichtigt. Es besteht Brandgefahr!
GEFAHR! Verwenden Sie zum Anzünden oder Wiederanzünden ausschließlich
Anzündhilfen, die der europäischen Norm EN 1860-3 entsprechen. Verwenden Sie
niemals Benzin oder Brennspiritus. Sonst besteht die Gefahr von Verpuffungen oder
unkontrollierbaren Hitzeentwicklungen, die zu schlimmsten Verbrennungen oder Bränden
führen können. Es besteht Verletzungsgefahr und Brandgefahr!
GEFAHR! Sollte sich Fett auf dem Grill entzünden, löschen sie dieses niemals mit
Wasser! Es besteht die Gefahr einer explosionsartigen Verpuffung. Benutzen Sie
stattdessen zum Löschen z. B. eine Löschdecke, mit der Sie den Brand ersticken.
GEFAHR! Verwenden Sie den Grill ausschließlich mit Holzkohle, niemals mit anderen
Brennstoffen. Es besteht Brandgefahr!
GEFAHR! Tragen Sie beim Grillen Grillhandschuhe und benutzen Sie zum Wenden des
Grillgutes geeignetes Werkzeug, z.B. eine Grillzange, um Verbrennungen vorzubeugen.
Es besteht Verbrennungsgefahr.
GEFAHR! Lassen Sie vor einer Reinigung den Grill vollständig abkühlen. Es besteht
Verbrennungsgefahr!
WARNUNG! Halten Sie Kinder und Haustiere vom Grill fern.
WARNUNG! Dieser Grill wird sehr heiß und darf während des Betriebes nicht bewegt
werden!
WARNUNG! Lassen Sie nach dem Grillen die restliche Holzkohle verglühen und
löschen Sie diese nicht mit Wasser.
7. Montage
7.1. Benötigte Werkzeuge
Kreuzschlitzschraubendreher
Maulschlüssel: SW 8 mm und SW 13 mm
7.2. Vorbereitung der Montage
Gehen Sie bei der Montage des Grills sorgfältig vor.
Planen Sie genügend Zeit ein.
Schaffen Sie sich eine ausreichend große Arbeitsfläche.
Entnehmen Sie alle Einzelteile aus der Verpackung und legen Sie die Teile griffbereit.
Entnehmen Sie das Montagematerial aus der Verpackung und legen Sie die Teile griffbereit.
Legen Sie die benötigten Werkzeuge bereit.
62 - Deutsch
Page 65

Florabest FGW 84 B1
WARNUNG! Achten Sie bei der Montage des Grills unbedingt darauf, dass die
Köpfe der Schrauben immer nach außen zeigen. So können Sie Verletzungen durch
überstehende Schrauben vermeiden.
Im Folgenden ist die Montage des Grills in 8 Schritten mit Illustrationen beschrieben. Legen Sie sich
die benötigten Einzelteile und das benötigte Montagematerial griffbereit.
Schritt 1
Schrauben Sie die zwei Ablagehalter (18) handfest an die Rad-Standfüße (15). Verwenden
Sie hierzu das untere Loch des Ablagehalters (18) und das mittlere Loch des RadStandfußes (15), siehe Abbildung. Sie benötigen jeweils eine Schraube (21), eine
Unterlegscheibe (25) und eine Mutter (23).
Befestigen Sie die Verstärkungsstreben (17) an den Rad-Standfüßen (15). Benötigt werden je
eine Schraube (21), eine Unterlegscheibe (25) und eine Mutter (23).
Befestigen Sie die Verstärkungsstreben (17) nun an den Ablagehaltern (18). Benötigt werden
je eine Schraube (21), eine Unterlegscheibe (25) und eine Mutter (23).
Schrauben Sie die Rad-Standfüße (15) inkl. der montierten Ablagehalter (18) an der linken
Seite des Kohlebehälters (6) fest. Verwenden Sie hierzu das obere Loch der RadStandfüße (15).
Bitte beachten: Die 3 Löcher zur Montage des Windschutzes in dem Kohlebehälter (6)
müssen sich hierbei auf der Rückseite befinden. Sie benötigen je Rad-Standfuß (15)
2 Schrauben (21), 2 Unterlegscheiben (25) und 2 Muttern (23).
Ziehen Sie nun alle Schrauben fest an.
Deutsch - 63
Page 66

Florabest FGW 84 B1
Schritt 2
Schrauben Sie die Griffhalter (8) handfest an die Standfüße (10). Verwenden Sie hierzu das
untere Loch des Griffhalters (8). Sie benötigen jeweils eine Schraube (21), eine
Unterlegscheibe (25) und eine Mutter (23).
Befestigen Sie die Standfüße (10) inkl. der montierten Griffhalter (8) an der rechten Seite des
Kohlebehälters (6). Verwenden Sie hierzu das obere Loch der Standfüße (10). Sie benötigen je
Standfuß (10) 2 Schrauben (21), 2 Unterlegscheiben (25) und 2 Muttern (23).
Schrauben Sie den Griff (7) zwischen die Griffhalter (8). Sie benötigen 2 Schrauben (22).
Ziehen Sie nun alle Schrauben fest an.
Schritt 3
Schrauben Sie die zwei Querstreben (11) zwischen die Standfüße (10) und die Rad-
Standfüße (15). Die fünf Löcher der Querstreben (11) müssen dabei nach oben zeigen. Sie
benötigen je Querstrebe (11) 4 Schrauben (21), 4 Unterlegscheiben (25) und 4 Muttern (23).
Befestigen Sie die 5 Ablagebretter (12) handfest auf den Querstreben (11). Sie benötigen 10
Schrauben (21), 10 Unterlegscheiben (25) und 10 Muttern (23).
Ziehen Sie nun alle Schrauben fest an.
64 - Deutsch
Page 67

Florabest FGW 84 B1
Schritt 4
Stecken Sie die Achse (14) durch die untersten Löcher der Rad-Standfüße (15). Setzen Sie nun
die Räder (13) auf die Enden der Achse (14). Schrauben Sie auf den Enden der Achse (14)
die selbstsichernden Muttern (24) soweit auf, bis diese bündig mit der Achse abschließen.
Schritt 5
Verbinden Sie den 3-teiligen Windschutz (2, 3, 4) handfest durch die oberen Löcher
miteinander. Sie benötigen 2 Schrauben (21), 2 Unterlegscheiben (25) und 2 Muttern (23).
Schrauben Sie den Windschutz (2, 3, 4) von innen an den Kohlebehälter (6). Achten Sie
unbedingt darauf, dass die Köpfe der Schrauben nach außen zeigen. Sie benötigen 5
Schrauben (21), 5 Unterlegscheiben (25) und 5 Muttern (23).
Ziehen Sie nun alle Schrauben fest an.
Deutsch - 65
Page 68

Florabest FGW 84 B1
Schritt 6
Befestigen Sie die 3 Ablagebretter (19) handfest auf den Ablagehaltern (18). Sie benötigen 6
Schrauben (21), 6 Unterlegscheiben (25) und 6 Muttern (23).
Ziehen Sie nun alle Schrauben fest an.
Setzen Sie die 3 Haken (16) in die Bohrungen des vorderen Ablagehalters (18).
Schritt 7
Befestigen Sie die Klammern (mit den Spitzen zueinander) mit den Ösenschrauben (26) auf
dem Grillspieß (1). Setzen Sie die Griffe (20) in den Grillrost (5) ein.
66 - Deutsch
Page 69

Florabest FGW 84 B1
Schritt 8
Überprüfen Sie alle Schraubverbindungen und ziehen Sie diese ggf. nach!
Setzen Sie nun den Grillrost (5) und den Grillspieß (1) in die Aussparungen des Windschutzes
(2, 3, 4) ein.
Schrauben Sie den mitgelieferten Flaschenöffner (9) am vorderen rechten Standfuß (10, Pfeile)
fest. Sie benötigen 2 Schrauben (21), 2 Unterlegscheiben (25) und 2 Muttern (23).
Der Grill ist jetzt betriebsfertig montiert.
Deutsch - 67
Page 70

Florabest FGW 84 B1
8. Inbetriebnahme
Heizen Sie den Grill vor der ersten Inbetriebnahme für mindesten 30 Minuten auf, um mögliche
Fertigungsrückstände zu verbrennen. Während dieser Zeit kann es zu Geruchsentwicklung
kommen, diese ist aber völlig normal.
GEFAHR! Verwenden Sie zum Anzünden oder Wiederanzünden ausschließlich
Anzündhilfen, die der europäischen Norm EN 1860-3 entsprechen. Verwenden Sie
niemals Benzin oder Brennspiritus. Sonst besteht die Gefahr von Verpuffungen oder
unkontrollierbaren Hitzeentwicklungen, die zu schlimmsten Verbrennungen oder Bränden
führen können. Es besteht Verletzungsgefahr und Brandgefahr!
GEFAHR! Betreiben Sie den Grill nur auf einem ebenen, wärmebeständigen, festen
Untergrund und nicht in der Nähe von brennbaren Materialien, Flüssigkeiten oder Gasen.
Lassen Sie ausreichend Abstand zu Wänden und anderen Gegenständen und lassen Sie
den Grill während des Betriebes und danach, solange dieser heiß ist, niemals
unbeaufsichtigt. Es besteht Brandgefahr!
Füllen Sie soviel Holzkohle in die Kohlebehälter (6), dass der Boden bedeckt ist.
Verteilen Sie nun 2-3 Feststoffanzündhilfen auf der Holzkohle und zünden Sie diese mit einem
Feuerzeug oder Streichhölzern an.
Wenn die Anzündhilfen richtig brennen, füllen Sie den Kohlebehälter (6) vorsichtig mit
Holzkohle auf. Achten Sie darauf, die Anzündhilfen nicht zu ersticken.
Den idealen Zustand der Glut erkennen Sie daran, dass sich auf der Holzkohle eine weiße
Ascheschicht bildet und die Anzündhilfen vollständig verbrannt sind.
Verteilen Sie die Holzkohle mit einem geeigneten Metallgegenstand gleichmäßig im
Kohlebehälter (6).
Setzen Sie den Grillrost (5) bzw. den Grillspieß (1) in die Aussparungen des Windschutzes (2,
3, 4) ein.
Warten Sie noch kurze Zeit, bis der Grillrost (5) aufgeheizt ist und beginnen Sie dann mit dem
Grillen.
Entnehmen Sie das Grillgut, wenn der gewünschte Garpunkt/ Bräunungsgrad erreicht ist.
Guten Appetit!
68 - Deutsch
Page 71

Florabest FGW 84 B1
9. Wartung / Reinigung
Warten Sie mit der Reinigung bis der Grill vollständig abgekühlt ist. Andernfalls besteht
Gefahr durch Verbrennungen!
Der Grill beinhaltet keine regelmäßig zu wartenden Teile. Für die normale Reinigung verwenden
Sie ein Spültuch und Wasser mit einem handelsüblichen Spülmittel. Verwenden Sie keine
aggressiven oder scheuernden Reinigungsmittel, um Beschädigungen zu vermeiden.
Für die Reinigung des Grillrostes (5) eignen sich ein Haushaltsschwamm und Spülmittel. Bei starken
Verkrustungen am Grillrost (5) ist es hilfreich, wenn dieser vor der Reinigung in Wasser eingelegt
wird, um die Verkrustungen aufzuweichen. Spülen Sie nach der Reinigung den Grillrost (5) mit
klarem Wasser ab, um Spülmittelreste zu entfernen.
10. Lagerung bei Nichtbenutzung
Wenn Sie den Grill nicht einsetzen möchten, reinigen Sie ihn, wie im Kapitel „9. Wartung /
Reinigung“ beschrieben und bewahren Sie ihn an einem sauberen, trockenen Ort auf.
11. Umwelthinweise und Entsorgungsangaben
Entsorgen Sie den Brennstoff, wenn dieser vollständig abgekühlt, bzw. ausgebrannt ist, in dafür
vorgesehen Gefäße aus nicht brennbarem Material.
Mit der ordnungsgemäßen Entsorgung des alten Gerätes vermeiden Sie Umweltschäden und eine
Gefährdung Ihrer persönlichen Gesundheit. Weitere Informationen zur vorschriftsgemäßen
Entsorgung des alten Gerätes erhalten Sie bei der Stadtverwaltung, beim Entsorgungsamt oder in
dem Geschäft, wo Sie das Gerät erworben haben.
Führen Sie auch die Verpackung einer umweltgerechten Entsorgung zu. Kartonagen können bei
Altpapiersammlungen oder an öffentlichen Sammelplätzen zur Wiederverwertung abgegeben
werden. Folien und Kunststoffe des Lieferumfangs werden über Ihr örtliches
Entsorgungsunternehmen eingesammelt und umweltgerecht entsorgt.
Deutsch - 69
Page 72

Florabest FGW 84 B1
12. Hinweise zu Garantie und Serviceabwicklung
Garantie der TARGA GmbH
Sehr geehrte Kundin, sehr geehrter Kunde,
Sie erhalten auf dieses Gerät 3 Jahre Garantie ab Kaufdatum. Im Falle von Mängeln dieses
Produkts stehen Ihnen gegen den Verkäufer des Produkts gesetzliche Rechte zu. Diese gesetzlichen
Rechte werden durch unsere im Folgenden dargestellte Garantie nicht eingeschränkt.
Garantiebedingungen
Die Garantiefrist beginnt mit dem Kaufdatum. Bitte bewahren Sie den originalen Kassenbon gut
auf. Diese Unterlage wird als Nachweis für den Kauf benötigt. Tritt innerhalb von drei Jahren ab
dem Kaufdatum dieses Produkts ein Material- oder Fabrikationsfehler auf, wird das Produkt von uns
– nach unserer Wahl – für Sie kostenlos repariert oder ersetzt.
Garantiezeit und gesetzliche Mängelansprüche
Die Garantiezeit wird durch die Gewährleistung nicht verlängert. Dies gilt auch für ersetzte und
reparierte Teile. Eventuell schon beim Kauf vorhandene Schäden und Mängel müssen sofort nach
dem Auspacken gemeldet werden. Nach Ablauf der Garantiezeit anfallende Reparaturen sind
kostenpflichtig.
Garantieumfang
Das Gerät wurde nach strengen Qualitätsrichtlinien sorgfältig produziert und vor Auslieferung
gewissenhaft geprüft. Die Garantieleistung gilt für Material- oder Fabrikationsfehler. Diese Garantie
erstreckt sich nicht auf Produktteile, die normaler Abnutzung ausgesetzt sind und daher als
Verschleißteile angesehen werden können oder für Beschädigungen an zerbrechlichen Teilen, z. B.
Schalter, Akkus oder die aus Glas gefertigt sind. Diese Garantie verfällt, wenn das Produkt
beschädigt, nicht sachgemäß benutzt oder gewartet wurde. Für eine sachgemäße Benutzung des
Produkts sind alle in der Bedienungsanleitung aufgeführten Anweisungen genau einzuhalten.
Verwendungszwecke und Handlungen, von denen in der Bedienungsanleitung abgeraten oder vor
denen gewarnt wird, sind unbedingt zu vermeiden. Das Produkt ist nur für den privaten und nicht für
den gewerblichen Gebrauch bestimmt. Bei missbräuchlicher und unsachgemäßer Behandlung,
Gewaltanwendung und bei Eingriffen, die nicht von unserer autorisierten Service-Niederlassung
vorgenommen wurden, erlischt die Garantie. Mit Reparatur oder Austausch des Produkts beginnt
kein neuer Garantiezeitraum.
70 - Deutsch
Page 73

Florabest FGW 84 B1
Abwicklung im Garantiefall
Um eine schnelle Bearbeitung Ihres Anliegens zu gewährleisten, folgen Sie bitte den folgenden
Hinweisen:
- Bitte lesen Sie vor Inbetriebnahme Ihres Produktes sorgfältig die beigefügte
Dokumentation. Sollte es mal zu einem Problem kommen, welches auf diese Weise nicht
gelöst werden kann, wenden Sie sich bitte an unsere Hotline.
- Bitte halten Sie für alle Anfragen den Kassenbon und die Artikelnummer bzw. wenn
vorhanden die Seriennummer als Nachweis für den Kauf bereit.
- Für den Fall, dass eine telefonische Lösung nicht möglich ist, wird durch unsere Hotline in
Abhängigkeit der Fehlerursache ein weiterführender Service veranlasst.
Service
E-Mail: service.DE@targa-online.com
Telefon: 02921 - 89 13 000
Telefon: 01 – 26 76 195
E-Mail: service.AT@targa-online.com
Telefon: 044 – 55 10 057
E-Mail: service.CH@targa-online.com
IAN: 281147
Hersteller
Bitte beachten Sie, dass die folgende Anschrift keine Serviceanschrift ist. Kontaktieren Sie zunächst
die oben benannte Servicestelle.
TARGA GmbH
Coesterweg 45
59494 SOEST
DEUTSCHLAND / GERMANY
Deutsch - 71
Page 74

 Loading...