

Page 1

®
cesoiA A bAtteriA per erbA e cespuGli FGs 72 A1
cesoiA A bAtteriA per
erbA e cespuGli
Traduzione delle istruzioni d’uso originali
Akku-GrAs- und
strAuchschere
Originalbetriebsanleitung
cordless GrAss &
shrub cutter
Translation of original operation manual
IAN 93560
Page 2

Prima di leggere aprire la pagina con le immagini e prendere confidenza con le diverse funzioni
dell’apparecchio.
Before reading, unfold the page containing the illustrations and familiarise yourself with all functions of the
device.
Klappen Sie vor dem Lesen die Seite mit den Abbildungen aus und machen Sie sich anschließend mit allen
Funktionen des Gerätes vertraut.
IT / MT Traduzione delle istruzioni d’uso originali Pagina 4
GB / MT Translation of original operation manual Page 21
DE / AT / CH Originalbetriebsanleitung Seite 36
Page 3
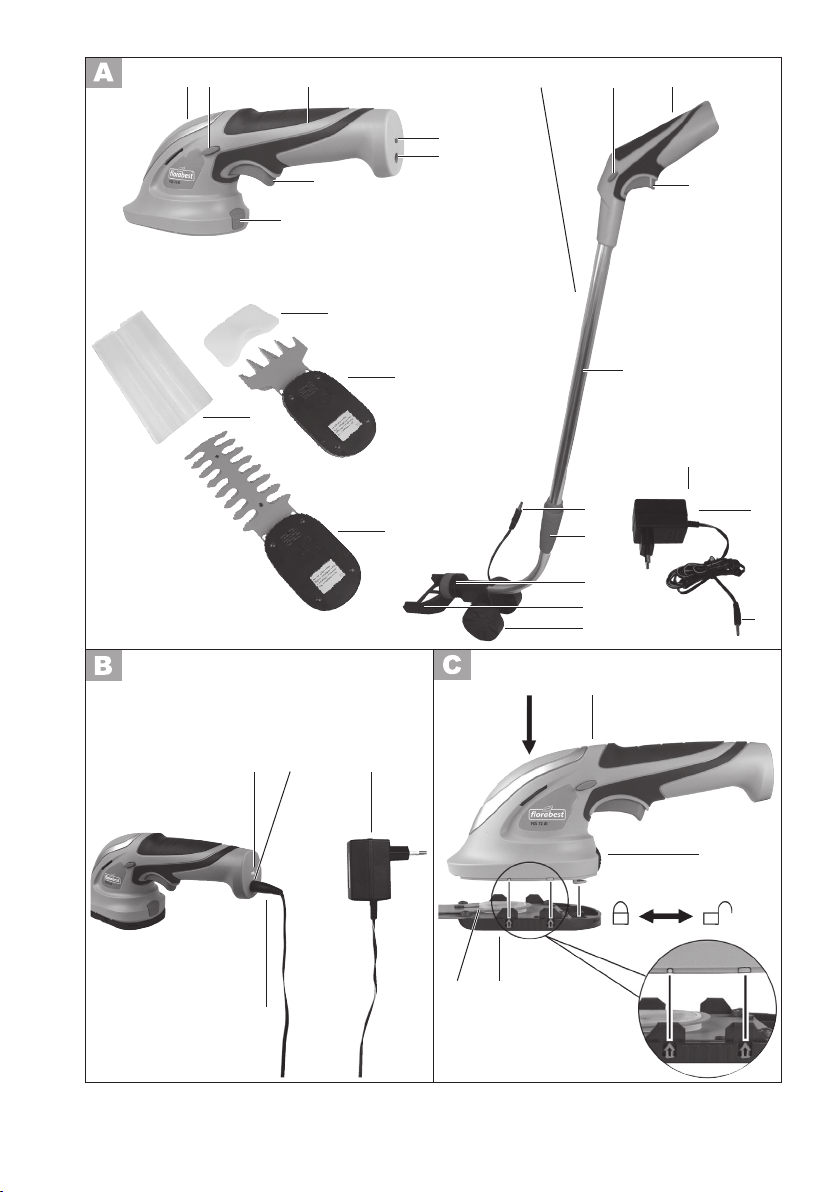
1
2
3
4
5
6
7
8
1312 14
15
10
1
17
18
19
20
21
16
22
23
24
7
9
11
234 5
24
25
9/11
Page 4

IT MT
Contenuto
Introduzione
Introduzione ...............................4
Fini d’utilizzo ...............................4
Descrizione generale ....................5
Contenuto della confezione ...............5
Descrizione del funzionamento .......... 5
Visione d’insieme .............................5
Dati tecnici ..................................6
Indicazioni di sicurezza ................6
Simboli ........................................... 7
Indicazioni di sicurezza generali per
utensili elettrici ................................. 7
Istruzioni di sicurezza speciche
per la cesoia a batteria per erba
e cespugli .....................................10
Istruzioni di sicurezza per il
caricabatteria ................................ 11
Processo di ricarica ...................12
Istruzioni di montaggio ..............13
Inserimento/sostituzione lame .......... 13
Assemblaggio manico telescopico ....13
Montaggio/smontaggio manico
telescopico ....................................14
Utilizzo ......................................14
Accensione e spegnimento ..............14
Indicazioni generali per il lavoro .....15
Utilizzo della cesoia taglia erba ......15
Utilizzo delle cesoie per cespugli .....15
Pulizia/Manutenzione ................15
Conservazione ...........................16
Smaltimento/Protezione
dell’ambiente .............................17
Pezzi di ricambio .......................18
Ricerca di errori .........................18
Garanzia ...................................19
Servizio di riparazione ...............20
Service-Center ............................20
Importatore ...............................20
Traduzione della dichiarazione
di conformità CE originale ..........53
Disegni esplosi ...........................55
Congratulazioni per l’acquisto del Suo nuovo apparecchio. Ha scelto un prodotto altamente pregiato. Le istruzioni per l’uso costituiscono parte integrante di questo prodotto.
Questo apparecchio è stato sottoposto a un
controllo di qualità durante la produzione e
quindi sottoposto a un controllo nale. Quindi è garantito il funzionamento del vostro
apparecchio. Non si esclude tuttavia che in
casi singoli possano trovarsi nell’apparec-
chio o nelle condutture essibili residui di
acqua o lubricanti. Questo non rappresen-
ta un vizio o difetto e neanche un motivo di
preoccupazione.
Contengono indicazioni importanti
per la sicurezza, l’uso e lo smaltimento. Prima dell’uso del prodotto,
si raccomanda di familiarizzare con
tutte le indicazioni di comando e
di sicurezza. Usare il prodotto solo
come descritto e per i campi d’impiego specicati. Conservare le istruzioni in un luogo sicuro e consegnare la
documentazione in caso di cessione
del prodotto a terzi.
Fini d’utilizzo
L’apparecchiatura è predisposta al taglio e
alla rinitura di rametti sottili di siepi, cespugli e di piante ornamentali e per il taglio di
erba in angoli e su piccole superci in ambito domestico.
L’utilizzo dell’apparecchiatura deve avvenire
da parte di adulti. Minorenni al di sopra dei
16 anni possono utilizzare l’apparecchiatura
sotto supervisione di un adulto.
Qualsiasi altro utilizzo che non sia specicatamente elencato in queste istruzioni per l’uso può causare danni all’apparecchiatura e
può essere causa di seri pericoli per l’utente.
4
Page 5
IT MT
L‘utilizzatore è responsabile per infortuni o
danni ad altre persone o alla proprietà delle stesse. Questo apparecchio non è adatto
per l’uso industriale. In caso di un impiego
per uso industriale decade la garanzia.
La ditta produttrice non è responsabile per
danni causati da un utilizzo contrario a
quanto specicato nelle norme o causati da
utilizzo erroneo.
Utilizzando la cesoia da erba si fa uso, come
dispositivo di taglio, di una lama di taglio a
più denti. Per lavorare velocemente e como-
damente la cesoia da erba è aggiuntivamente dotata di un bastone telescopico di guida e
di rulli. Il funzionamento delle singole parti è
indicato nelle seguenti descrizioni.
Visione d’insieme
Descrizione generale
Le gure si trovano sulle pagine
pieghevoli anteriori e posteriori.
Contenuto della confezione
Rimuovere l’apparecchio dalla confezione e
controllare se è completo.
Smaltire il materiale di imballaggio secondo
le disposizioni.
- Apparecchio
- Lama taglia erba + protezione lama
- Lama taglia cespugli + protezione lama
- Manico telescopico con ruote
- Ruote
- Apparecchiatura carica-batterie
- Istruzioni per l’uso
Descrizione del funzionamento
Il cesoia a batteria per erba e cespugli
è un’apparecchiatura combinata con due
dispositivi di taglio interscambiabili. Questi
sono muniti di un rivestimento in materia
plastica (strato antiaderente teon) a difesa
dalla ruggine.
In caso di utilizzo come cesoia da cespugli
viene utilizzata, come dispositivo di taglio,
un’asta di taglio a due lati. I denti di taglio
sono lateralmente arrotondati e posizionati in maniera alternata, per motivi di
sicurezza, di modo da ridurre il rischio di
infortunio.
1 Apparecchio:
2 Blocco accensione, apparecchio
3 Impugnatura apparecchiatura
4 Indicatore di ricarica (LED)
5 Spinotto di carica + presa per
collegamento a spina manico telescopico
6 Interruttore accensione / spegni-
mento, apparecchio
7 Tasto di sbloccaggio, lame
Dispositivo di taglio:
8 Protezione lama per cesoia taglia
erba
9 Lama taglia erba
10 Protezione lama taglia cespugli
11 Lama taglia cespugli
12 Manico telescopico con carrello:
13 Blocco accensione, manico tele-
scopico
14 Impugnatura
15 Interruttore accensione / spegni-
mento, manico telescopico
16 Tubo telescopico
17 Collegamento a spina
18 Vite di regolazione della lunghezza
19 Giunto snodato per la rotazione
dell’apparecchio
20 Sede dell‘apparecchio
21 Ruote con asse
22 Apparecchiatura carica-batterie:
23 Alimentatore
24 Spina del cavo di alimentazione
25 Alloggiamento eccentrico, lame
5
Page 6
IT MT
Dati tecnici
Apparecchio
Tensione di motore ...................... 7,2 V
Numero di giri ........................ 1100 min
Classe di sicurezza ................................III
Tipo di protezione ..............................IPX0
Lama taglia erba
Ampiezza di taglio ..................... 93 mm
Lama taglia cespugli
Lunghezza di taglio ..................120 mm
Distanza dei denti....................ca. 8 mm
Peso (incl. accessori) .......................1,6 kg
Livello di pressione acustica
(L
) ................. 59,1 dB(A), KpA=3 dB(A)
pA
Livello di potenza acustica (L
wA
)
garantito ............................... 86 dB (A)
misurata .......... 79,1 dB(A); K
Vibrazioni (a
)
n
all’impugnatura ..1,39 m/s
wA
2
, K=1,5 m/s
Accumulatore (Li-Ion)
Tensione nominale ........ 7,2 V
Tempo di ricarica ..................... ca. 3-5 h
Apparecchio carica-batterie
(BHY410900400GS)
Tensione di entrata/Input ....... 230-240 V~,
Assorbimento nominale ................... 16 W
Tensione d uscita/Output ..................... 9 V
Corrente di carico ........................400 mA
Prestazione in uscita ....................... 3,6 VA
Classe di protezione ..........................
Tipo di protezione ..............................IPX0
Modiche tecniche ed ottiche facenti parte
di processi di ulteriore sviluppo, possono
essere realizzate senza precedente avviso.
Tutte le misure, indicazioni e dichiarazioni
di queste istruzioni per l’uso sono dunque
senza garanzia. Ne consegue che eventuali
pretese giuridiche, derivate dalle istruzioni
per l’uso, non si potranno far valere.
=3 dB(A)
1,3 Ah
50-60 Hz
Il valore di emissione di vibrazioni indicato
è stato misurato attraverso un procedimento
di controllo standardizzato e può essere
utilizzato per il confronto di un apparecchio
-1
elettrico con un altro.
Il valore di emissione di vibrazioni indicato
può essere anche utilizzato per una prima
valutazione dell’esposizione alla quale si è
soggetti.
Avvertenza: Durante l’uso effettivo
dell’apparecchio elettrico, il livello di
emissione di vibrazioni può differire
da quello indicato a seconda della
tipologia e della modalità d’uso.
Per proteggere l’utilizzatore, è necessario
stabilire alcune misure di sicurezza sulla
base dei valori d’esposizione alla quale si
2
è sottoposti durante l’uso effettivo dell’appa-
recchio (qui bisogna considerare tutte le fasi
del ciclo di lavoro, ad esempio i periodi in
cui l’apparecchio è spento e quelli in cui
invece è acceso, ma senza sottoporre la
macchina a carico).
Indicazioni di sicurezza
Questa apparecchiatura, in
caso di utilizzo improprio, può
causare serie ferite. Prima
dell’utilizzo dell’apparecchia-
II
tura leggere con attenzione le
istruzioni per l’uso e acquistare dimestichezza con le diverse componenti di regolazione.
6
Page 7
IT MT
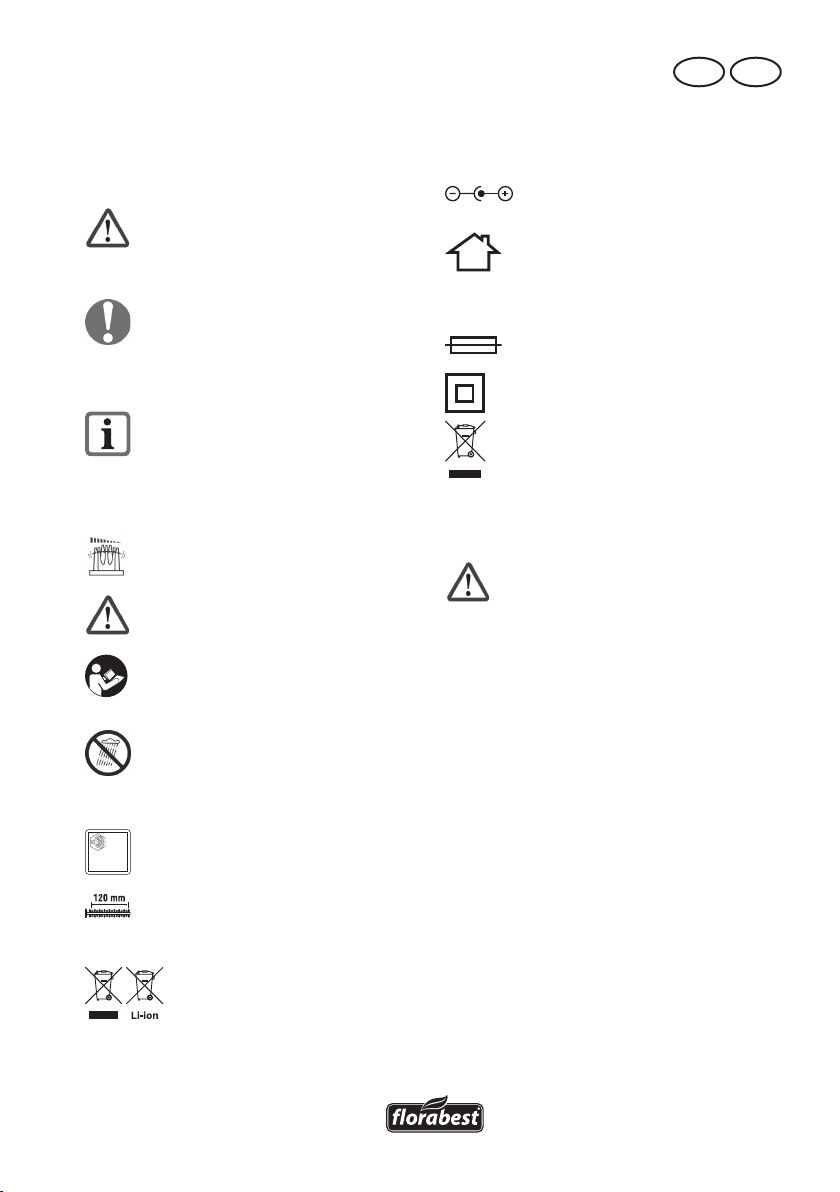
Simboli
86
T-130°C
Simboli riportati nelle istruzioni
Simboli di pericolo) con indica-
zioni relative alla prevenzione
di danni a c
ose e persone.
Simboli di divieto (al posto del punto
esclamativo il divieto viene deluci-
dato) con indicazioni relative alla
prevenzione di danni.
Simboli di avvertenza con infor-
mazioni relative ad un uso corretto
dell’apparecchio.
Simboli sull’apparecchiatura caricabatterie
Polarizzazione elettrica
Il carica-batterie può essere utiliz-
zato per la ricarica, all’interno di
locali.
Limitazione della temperatura di
sicurezza
Classe di sicurezza II
Le apparecchiature non si devono
smaltire insieme ai riuti domestici.
Simboli sull’apparecchiatura
Lo strumento da taglio si arre
ritardo.
Avvertimento
Antecedentemente alla prima messa
!
in esercizio leggere attentamente le
istruzioni per l’uso.
Non utilizzate l’apparecchiatura in
caso di pioggia, in caso di cattivo
tempo, in ambiente umido oppure
su siepi e prati bagnati o umidi.
L
WA
Livello di potenza acustica garantito
dB
Lunghezza di taglio (lama taglia
cespugli)
Non gettare l’apparecchio con
la batteria montata nel cassonetto dei riuti domestici
Indicazioni di sicurezza
generali per utensili elettrici
sta con
ATTENZIONE! Leggere tutte le
indicazioni di sicurezza e le
istruzioni. La mancata osservanza
delle indicazioni di sicurezza e delle
istruzioni possono provocare scosse
elettriche, incendi e/o lesioni gravi.
Conservare tutte le indicazioni di
sicurezza e le istruzioni per una consultazione futura.
Il termine usato nelle indicazioni di sicurezza „Utensile elettrico“ si riferisce a utensili
elettrici azionati con tensione di rete (con
cavo di rete) e a utensili elettrici azionati
con accumulatori (senza cavo di rete).
1) SICUREZZA SUL POSTO DI
LAVORO
a) Tenere la zona di lavoro pulita e
ben illuminata. Disordine o zone di
lavoro non sufcientemente illuminate
possono causare infortuni.
7
Page 8

IT MT
b) Non lavorare con l‘utensile elet-
trico in un ambiente a rischio
di esplosioni, nel quale sono
presenti liquidi, gas o polveri in-
ammabili. Utensili elettrici generano
scintille che possono inammare la polvere o i vapori.
c) Tenere bambini e altre persone
lontane durante l‘uso dell‘utensile. In caso di distrazioni si può perdere
il controllo dell‘apparecchio.
per l‘esterno riduce il rischio di scosse
elettriche.
f) Se non è possibile evitare l‘uso
dell‘utensile elettrico in un ambiente umido, usare un interruttore di sicurezza per correnti
di guasto con una corrente di
accensione di 30 mA o meno.
L‘impiego di un interruttore di sicurezza
per correnti di guasto riduce il rischio di
scosse elettriche.
2) SICUREZZA ELETTRICA
a) La spina di allacciamento dell‘u-
tensile elettrico deve essere
adatto alla presa. La spina non
deve essere modicata in alcun
modo. Non usare un adattatore
insieme a utensili elettrici collegati a massa. Spine non modicate
riducono il rischio di scosse elettriche.
b) Evitare il contatto del corpo con
superci collegate a massa,
come anche da tubi, termosifoni,
fornelli e frigoriferi. Aumento del
pericolo di scosse elettriche, quando il
corpo è collegato a massa.
c) Tenere gli utensili elettrici lontani
dalla pioggia e dall‘umidità. L‘in-
ltrazione di acqua nell‘utensile elettrico
aumenta il pericolo di scosse elettriche.
d) Non usare il cavo per trasporta-
re, appendere l‘utensile elettrico
o per staccare la spina dalla
presa. Tenere il cavo lontano da
calore, olio, spigoli vivi o componenti in movimento. Cavi danneg-
giati o attorcigliati aumentano il rischio
di una scossa elettrica.
e) Quando si lavora con un utensile
elettrico all‘aperto, usare solo
prolunghe adatte anche per l‘esterno. L‘uso di una prolunga adatta
3) SICUREZZA DELLE PERSONE
a) Prestare attenzione ai propri
movimenti e lavorare con l‘utensile elettrico usando raziocinio.
Non usare un utensile elettrico,
quando si è stanchi o si è sotto
effetto di droghe, alcol o farmaci. Un attimo di disattenzione durante
l‘uso dell‘utensile elettrico può causare
lesioni gravi.
b) Indossare un‘attrezzatura di
sicurezza personale e sempre
occhiali protettivi. Indossando
un‘attrezzatura di sicurezza personale,
come maschera antipolvere, scarpe di
sicurezza antiscivolo, casco o protezione dell‘udito a seconda dell‘impiego
dell‘utensile elettrico si riduce il pericolo
di lesioni.
c) Evitare la messa in esercizio
incustodita. Assicurarsi che l‘utensile elettrico sia spento, prima
di allacciarlo all‘alimentazione
elettrica e/o all‘accumulatore,
di sollevarlo o trasportarlo. Se
durante il trasporto dell‘utensile elettrico
si tiene il dito sull‘interruttore oppure si
allaccia l‘apparecchio all‘alimentazione
elettrica in condizioni accese, possono
vericarsi infortuni.
d) Rimuovere gli strumenti di re-
8
Page 9

IT MT
golazione o i cacciaviti, prima di
accendere l‘utensile elettrico. Un
utensile o un cacciavite che si trova in
un componente rotante dell‘apparecchio, può provocare lesioni.
e) Evitare una postura anormale.
Garantire una posizione stabile
e mantenere l‘equilibrio in ogni
momento. In questo modo l‘utensile
elettrico può essere controllato meglio
in situazioni impreviste.
f) Indossare abbigliamento ade-
guato. Non indossare abiti larghi o gioielli. Tenere i capelli,
l‘abbigliamento e i guanti lontani dalle parti in movimento.
Capi di abbigliamento larghi, gioielli o
capelli lunghi possono essere catturati
dalle parti in movimento.
g) Se è possibile montare dispo-
sitivi di aspirazione e raccolta
polveri, assicurarsi che questi siano allacciati in modo corretto e
vangano utilizzati nel modo giusto. L‘uso di un aspiratore può ridurre i
rischi causati dalla polvere.
4) USO E TRATTAMENTO DELL‘UTENSILE ELETTRICO
a) Non sovraccaricare l‘apparec-
chio. Usare l‘utensile elettrico destinato al tipo di lavoro da svolgere. Con l‘utensile elettrico adatto si
lavora in modo migliore e più sicuro nel
campo di potenza specicato.
b) Non usare utensili elettrici con
l‘interruttore difettoso. Un utensile
elettrico che non può essere acceso o
spento è pericoloso e deve essere riparato.
c) Staccare la spina dalla presa
e/o rimuovere l‘accumulatore,
prima di eseguire le regolazioni
dell‘apparecchio, di sostituire gli
accessori o di deporre l‘apparecchio. Questa misura previene l‘avvia-
mento involontario dell‘utensile elettrico.
d) Conservare gli utensili elettrici
non usati fuori dalla portata
di bambini. Non lasciare usare
l‘apparecchio a persone che non
hanno familiarizzato con lo stesso o che non hanno letto le istruzioni. Utensili elettrici sono pericolosi
se usati da persone inesperte.
e) Trattare gli utensili elettrici con
cura. Controllare se le parti in
movimento funzionano perfettamente e non si inceppano, se
sono presenti parti spezzate o
danneggiate che possono compromettere il funzionamento
dell‘utensile elettrico. Fare riparare le parti danneggiate prima
dell‘impiego dell‘apparecchio.
Le cause di molti infortuni risiedono in
una scarsa manutenzione degli utensili
elettrici.
f) Tenere gli utensili da taglio ap-
puntiti e puliti. Utensili da taglio
curati con bordi taglienti appuntiti si
inceppano meno facilmente e sono più
facili da maneggiare.
g) Usare l‘utensile elettrico, gli ac-
cessori e i ricambi ecc. conformemente alle istruzioni. A tale proposito tenere in considerazione
le condizioni di lavoro e l‘attività
da svolgere. L‘uso di utensili elettrici
per scopi diversi da quelli previsti può
generare situazioni pericolose.
5) TRATTAMENTO E USO ACCURATO
DI APPARECCHI A BATTERIA
a) Ricaricare le batterie solo con
caricabatteria consigliati dal
9
Page 10

IT MT
produttore. Un caricabatteria adatto
per un determinato tipo di batterie è a
rischio di incendio se viene usato con
altri tipi di batteria.
b) Usare solo batterie previste per
gli elettrodomestici. L‘uso di altre
batterie può causare lesioni e pericolo
di incendio.
c) Tenere la batteria non usata lon-
tana da graffe, monete, chiavi,
chiodi, viti o altri oggetti di minuteria metallici che possono causare un cavallottamento dei contatti. Un corto circuito tra i contatti della
batteria può causare ustioni o incendi.
d) In caso di un‘applicazione non
corretta possono vericarsi fuoriuscite di liquidi dalla batteria.
Evitare il contatto. In caso di
contatto involontario, sciacquare
con acqua. Se il liquido viene a
contatto con gli occhi, consultare
anche un medico. Fuoriuscite di
liquido della batteria può causare irritazioni della pelle o ustioni.
6) ASSISTENZA TECNICA
a) Fare riparare l‘utensile elettrico
da personale specializzato qualicato e solo con ricambi originali. In questo modo si garantisce il man-
tenimento della sicurezza dell‘utensile
elettrico.
Istruzioni di sicurezza
speciche per la cesoia a
batteria per erba e cespugli
1) ISTRUZIONI DI SICUREZZA SPECIFICHE PER IL TAGLIASIEPI
• Tenere tutte le parti del corpo
lontane dalla lama da taglio.
Non cercare di rimuovere il materiale tagliato o tenere fermo
il materiale da tagliare con la
lama in movimento. Rimuovere
il materiale tagliato solo con
l’apparecchio spento. Un attimo di
disattenzione durante l’uso del decespugliatore può provocare lesioni gravi.
• Trasportare il decespugliatore
dal manico con la lama ferma.
Durante il trasporto e lo stoccaggio del decespugliatore mettere
sempre la copertura di protezione. Un uso prudente dell’apparecchio
riduce i rischi di lesioni a causa della
lama.
• Tenere l’apparecchio elettrico
solo per le superci di presa isolate, in quanto la lama da taglio
può venire a contatto con condutture elettriche nascoste o con
il suo stesso cavo di alimentazione. Il contatto della lama di taglio con
una conduttura conduttiva può mettere
sotto tensione le parti metalliche dell’apparecchio causare scosse elettriche.
• Prima di iniziare il lavoro ispe-
zionare la siepe e rimuovere
eventuali oggetti nascosti, come
p. es. li metallici ecc. Così si prevengono danneggiamenti all‘apparecchio.
• Tenere il tagliasiepi in modo
corretto, p. es. con due mani sull’impugnatura, laddove presenti.
La perdita di controllo sull’apparecchio
può provocare ferite.
• Durante il lavoro con l’apparec-
chio indossare un abbigliamento
adatto e guanti da lavoro. Non
toccare mai le lame taglio o sollevare l’apparecchio dalle lame
da taglio. Il contatto con la lama da
taglio può causare lesioni.
10
Page 11

IT MT
2) ULTERIORI INFORMAZIONI DI SICUREZZA
Per la vostra sicurezza personale:
Indossare una tenuta da lavoro
adatta come calzature robuste con
suola antiscivolo, pantaloni robusti
e lunghi, guanti e occhiali di prote-
zione. Non indossare abiti lunghi o
gioielli, potrebbero restare impigliati
tra le parti in movimento. Non usare
l’apparecchio quando si è scalzi o si
indossano calzature aperte.
a) Accendere l’apparecchio solo se
mani, piedi e tutte le altre parti
del corpo si trovano ad una distanza di sicurezza dall’apparecchio. Pericolo di ferite da taglio.
b) Fare attenzione di non ferirsi
mani e piedi con gli utensili da
taglio.
c) Rimuovere l’alimentatore prima
di lavorare con l‘apparecchio.
Non usare prolunghe. L‘alimentatore può essere usato solo in
ambienti chiusi. Eventuali inltra-
zioni d’acqua aumentano il rischio di
scosse elettriche.
d) Non usare la cesoia taglia erba
in combinazione con il manico
telescopico. Pericolo di ferite da ta-
glio.
e) L’apparecchio è adatto per ta-
gliare le siepi. Non tagliare con
l’apparecchio rami, legno molto
duro o altro. Così si prevengono
danneggiamenti all‘apparecchio.
f) Non tentare di rimuovere foglie
bloccate o impigliate se prima
l’apparecchio non è stato spento.
Pericolo di lesioni!
g) Spegnere sempre prima l‘apparecchio
e togliere la batteria nei seguenti casi:
- quando si lascia l’apparecchio incustodito
- prima di rimuovere un blocco
- prima di qualsiasi operazione
sull’apparecchio (controllo, manuten-
zione, pulizia)
- quando viene toccato un oggetto
estraneo
- quando l’apparecchio inizia a vibrare in modo strano
In questo modo si evitano incidenti e
ferite.
3) INFORMAZIONI DI SICUREZZA
SPECIFICHE PER L’APPARECCHIO
SENZA FILO
a) Non esporre l‘apparecchio a for-
ti irradiazioni solari per periodi
prolungati e non posizionarli su
corpi riscaldanti. Il calore danneg-
gia la batteria e genera pericolo di
esplosioni.
b) Lasciare raffreddare una batte-
ria surriscaldata prima di ricaricarla.
c) Non aprire la batteria e preve-
nire eventuali danneggiamenti
meccanici della batteria. Pericolo
di corto circuito e di fuoriuscita di vapori che irritano le vie respiratorie. Assicu-
rare sufciente aerazione e in caso di
disturbi consultare anche un medico.
Istruzioni di sicurezza per il
caricabatteria
1) TRATTAMENTO CORRETTO DEL
CARICABATTERIA
• L’apparecchio non è adatto all’uso da
parte di persone (compresi bambini)
con facoltà siche, sensoriali o mentali
limitate o con scarse esperienze o cono-
11
Page 12
IT MT
scenze; a meno che non siano sorvegliati da una persone responsabile per
la loro sicurezza o abbiamo ricevuto
istruzioni su come usare l’apparecchio.
• Bambini devono essere sorvegliati per
assicurarsi che non giochino con l’apparecchio.
• Tenere l’apparecchio lontano da
bambini e animali domestici.
Bambini devono essere sorvegliati per
assicurarsi che non giochino con l’apparecchio.
• Per ricaricare la batteria usare
esclusivamente il caricabatteria
fornito. Pericolo di incendio e di
esplosione.
• Controllare prima di ogni uso
il caribatteria, il cavo e la spina e fare effettuare eventuali
riparazioni solo da personale
specializzato qualicato e solo
con ricambi originali. Non usare
un caricabatterie difettoso e non
aprirlo autonomamente. In questo
modo si garantisce il mantenimento
della sicurezza dell‘apparecchio.
• Collegare il caricabatteria solo
a una presa con messa a terra.
Prestare attenzione che la tensione di rete corrisponda ai dati
della targhetta sul caricabatteria. Pericolo di scosse elettriche.
• Staccare il caricabatteria dalla rete, prima di chiudere o
aprire i collegamenti con la
batteria/l‘elettrodomestico/
l‘apparecchio. Così si assicura che
l’accumulatore e il caricabatteria non
vengano danneggiati.
• Tenere il caricabatteria pulito
e lontano dall‘umidità e dalla
pioggia. Non usare mai il caricabatteria all‘aperto. A causa di
inltrazioni di sporcizia e di acqua
aumenta il rischio di scosse elettriche.
• Il caricabatteria deve essere
azionato solo con le batterie originali. Ricaricare altre batterie può
causare lesioni e pericoli di incendio.
• Prevenire danneggiamenti meccanici del caricabatteria. Possono
portare a corto circuiti interni.
• Il caricabatteria non deve es-
sere azionato su una supercie
inammabile (p. es. carta, tes-
suti). Pericolo di incendio a causa del
surriscaldamento generato durante il
caricamento.
• Nel caso in cui la conduttura di collegamento di questo apparecchio venga
danneggiata, deve essere sostituita da
parte del produttore o dal servizio di
assistenza cliente dello stesso oppure
da una persona qualicata, al ne di
evitare pericoli.
Processo di ricarica
Non esporre l’accumulatore a
condizioni estreme come calore e urti. Pericolo di lesioni a
causa di fuoriuscite di soluzione elettrolitica! In caso di contatto, sciacquare con acqua o
un neutralizzante e consultare
un medico qualora siano stati
toccati gli occhi.
Ricaricare l’accumulatore solo
in ambienti asciutti.
Non accendere l’apparecchio
durante il processo di ricarica.
Pericolo di lesioni a causa di
scosse elettriche.
12
Page 13
IT MT
Prestare attenzione che l’apparec-
chio non venga ricaricato per più di
3-5 ore consecutive. L’accumulatore
e l’apparecchio potrebbero essere
danneggiati e, in caso di ricarica
prolungata, si spreca energia inutilmente. In presenza di sovraccarico
decade il diritto di garanzia.
• Ricaricare l’accumulatore montato
nell’apparecchio prima del primo uso.
Non ricaricare l’accumulatore più volte
consecutive brevemente.
• Per ricaricare l’accumulatore al litio-ione
montato nell’apparecchio usare il cari-
cabatteria fornito.
• Ricaricare l’accumulatore quando l’apparecchio funziona troppo lentamente.
• Osservare in ogni caso le indicazioni di
sicurezza rispettivamente valide come
anche le disposizioni e avvertenze rela-
tive alla tutela dell‘ambiente.
• Difetti che risultano da un uso improprio
non rientrano nella garanzia.
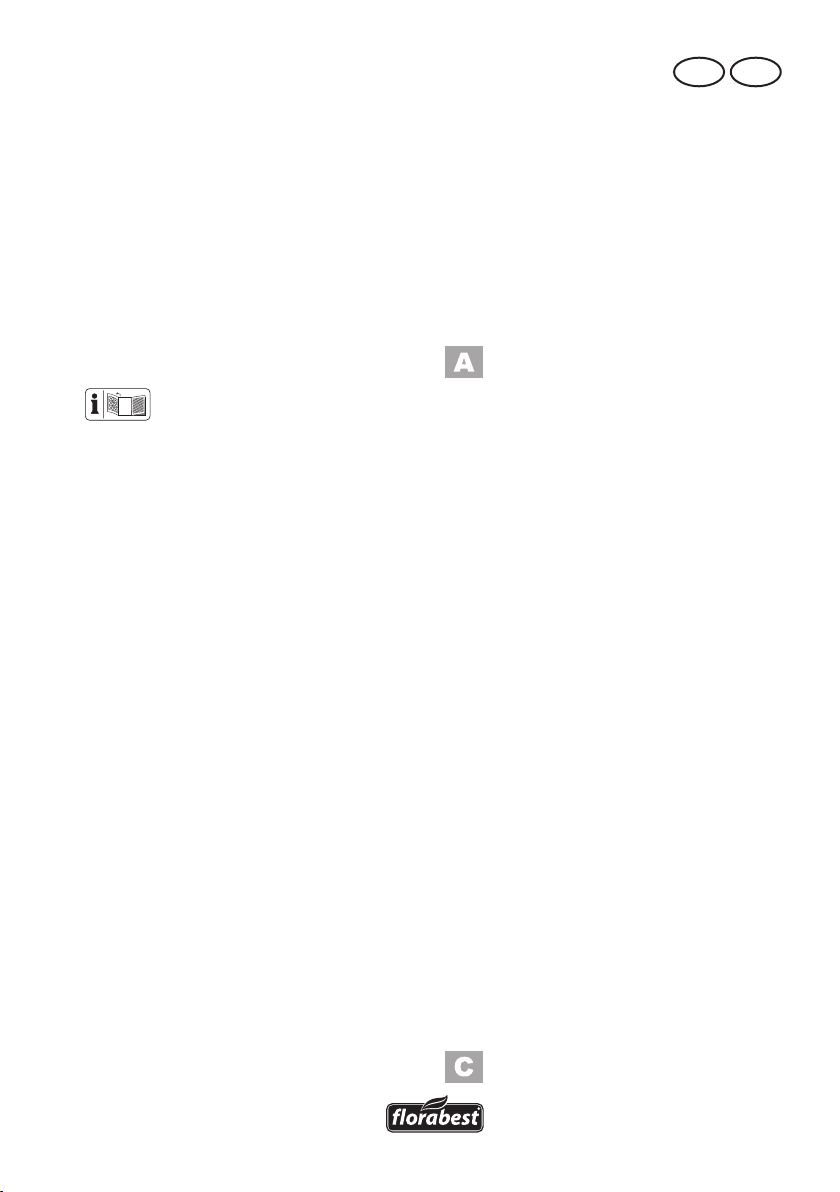
1. Collegare la spina del cavo di
ricarica (24) con la presa di ricarica dell’apparecchio (5).
2. Collegare l’alimentatore (23) a
una presa.
La spia luminosa di ricarica (4) si
accende:
rosso: ricarica dell’apparecchio
in corso
verde: il processo di ricarica è
concluso.
Il tempo di ricarica consigliato
corrisponde a max. 3-5 ore.
3. Dopo l’avvenuta ricarica, stacca-
re prima la spina dalla presa di
corrente e poi staccare la spina
del cavo di ricarica dall’apparecchio.
Istruzioni di montaggio
Inserimento/sostituzione
lame
Prestare attenzione di spe-
gnere sempre l’apparecchio
prima di sostituire le lame, al
ne di evitare pericoli e lesioni!
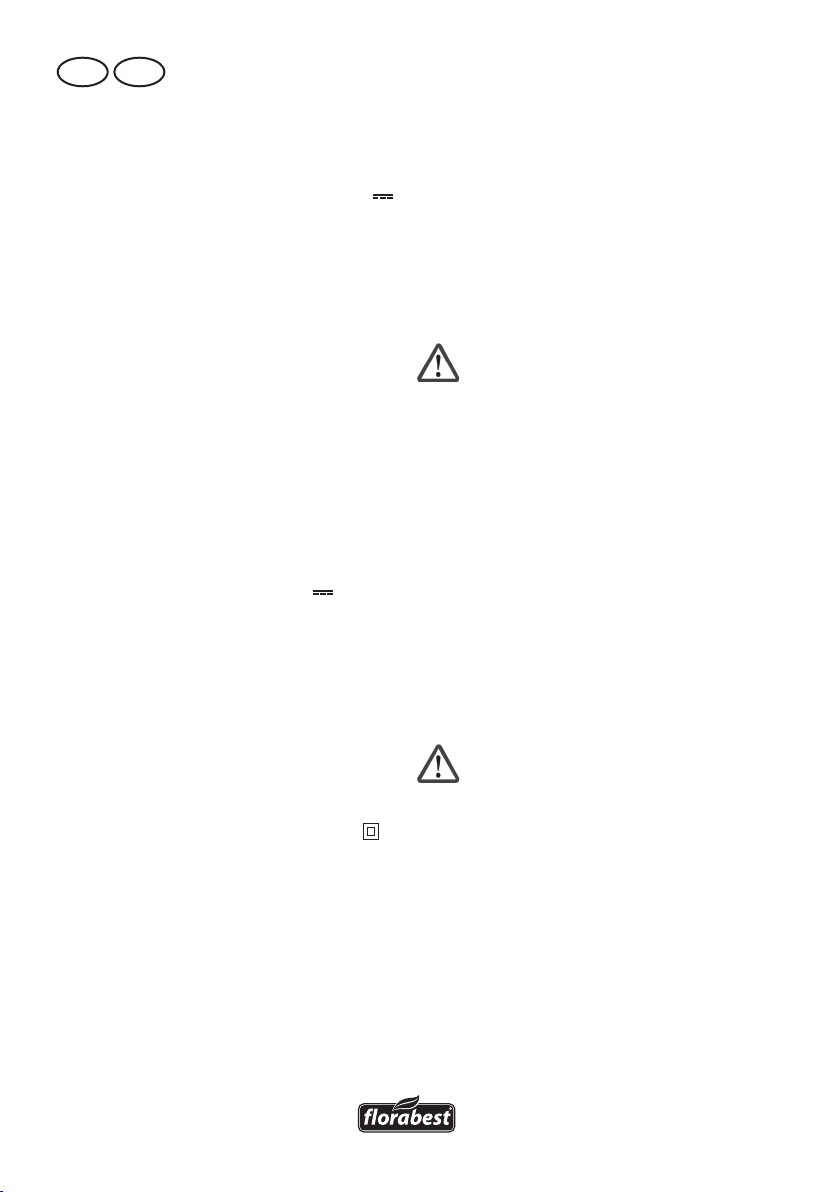
Inserimento lame
1. Inserire l’apparecchio (1) sulla
lama della cesoia taglia erba (9)
o sulla lama della cesoia taglia
cespugli (11) in modo tale che le
frecce e marcatura siano allineate.
2. Spingere l’estremità della
lama in direzione del ta-
sto di sbloccaggio (7).
Scatta in posizione in
modo udibile.
Rimozione lame:
3. Spingere il tasto di sbloccaggio
(7) posto sull’apparecchio verso
l’alto
completa.
Nel caso in cui l’alloggiamento ec-
centrico (25) delle lame dovesse essere storto, esso deve essere rigirato
a mano nella posizione giusta per il
montaggio delle lame (9/11).
Assemblaggio manico
telescopico
Per scopi di imballaggio il manico
telescopico (12) viene fornito in due
parti. Durante l‘assemblaggio le due
parti si incastrano l‘una nell‘altra e
non possono più essere staccate.
e rimuovere la lama
13
Page 14
IT MT
Assemblaggio dei tubi tele-
scopici:
1. Inlare le due parti del tubo
telescopico (16) l’una nell’altra
no all’arresto. Le due parti si
incastrano.
Durante il montaggio prestare
attenzione a che il nasello (16a)
sul tubo superiore coincida per-
fettamente con la scanalatura
(16b) presente sul tubo inferiore.
2. Far scorrere la vite di regolazio-
ne (18) verso l’alto e stringerla
forte
Prestare attenzione a non schiac-
ciare il cavo di rete.
Montaggio delle ruote:
3. Slare una ruota (21) dall’asse.
4. Inserire l’asse attraverso le aperture sul manico telescopico e ri-
assemblare le ruote e l’asse (21).
.
Montaggio/smontaggio
manico telescopico
1. Inserire l’apparecchio (1) nella
sede (20) del manico telescopico (12). Scatta in posizione in
modo udibile.
2. Inserire il collegamento a spina
(17) nella presa (5) sul lato posteriore dell’impugnatura dell‘ap-
parecchio (3).
3. Per smontare, allentare il collega-
mento a spina (17) ed estrarre
l’apparecchio dalla sede (20) sul
manico telescopico.
Utilizzo
Si prega di rispettare le norme rela-
tive alla tutela da rumori molesti e le
disposizioni locali a tal riguardo.
Accensione e spegnimento
1. Eliminare la protezione delle
lame prima di azionare l’apparecchiatura (
2. - Per accendere, tenere premu-
to il blocco accensione (2) e
azionare l’interruttore di accen-
sione/spegnimento (6). A quel
punto rilasciare il blocco accen-
sione.
- Per accendere l’apparecchio
con uso del manico telescopico
(12), azionare il blocco accensione (13) e l’interruttore di
accensione/spegnimento (15)
sul manico telescopico.
L’apparecchio funziona alla mas-
sima velocità.
3. Per spegnere l’apparecchiatura ri-
lasciare il pulsante di accensione
/spegnimento (6/15).
Nel caso in cui si utilizzi il manico telescopico (12) di guida si può accendere e spegnere l’apparecchiatura solo all’impugnatu-
ra del bastone telescopico di guida.
In seguito allo spegnimento
dell’apparecchiatura le lame
continuano a muoversi per un
breve lasso di tempo. Lasciate
che le lame si fermino completamente. Non toccare le
lame ancora in movimento e
non cercare di frenarle. Pericolo di ferimento!
8/10).
14
Page 15
IT MT
Indicazioni generali per il
lavoro
Regolazione in lunghezza del manico telescopico:
Fare attenzione durante il taglio che
oggetti come li di ferro, pezzi in
metallo, pietre ecc. non vengono
a contatto con le lame. Questo po-
trebbe causare danni al dispositivo
di taglio. Nel caso in cui le lame
fossero bloccate da corpi estranei
solidi, spegnere immediatamente
l’apparecchiatura.
• Prima di ogni utilizzo controllare che
la cesoia da cespugli non riporti danni
evidenti come ad esempio parti allentate ed usurate o danneggiate. Controllare che le viti dell’asta di taglio siano
ben strette.
• Rimuovere l’alimentatore (
di lavorare con l‘apparecchio. Non usare prolunghe. L‘alimentatore deve essere
usato solo in ambienti chiusi.
• Utilizzare solo lame aflate per ottenere
una buona prestazione di taglio e per
non sovraccaricare l’apparecchiatura e
l’accumulatore.
• Non sovraccaricare l’apparecchiatura
in maniera così forte che ne consegua
un arresto.
• Rispettare le indicazioni per la manutenzione e la pulizia dell’apparecchiatura.
Utilizzo della cesoia
23) prima
taglia erba
• L’erba si taglia nel migliore dei modi
quando è asciutta e non troppo alta.
• Il manico telescopico (
lavoro con la cesoia taglia erba:
Spingere lentamente l’apparecchio con
le ruote sul suolo. In questo modo otterrete un’altezza di taglio uniforme.
12) (facilita il
• Regolare la lunghezza del manico
telescopico in base alla propria statura
con l’aiuto della vite di regolazione
(
18).
Impostazione dell’angolo di lavoro:
Per un taglio confortevole dei bordi è possibile ruotare la sede dell’apparecchio (
20) sul giunto snodato ( 19) del manico
telescopico di 90° verso destra o sinistra.
• Impostare l’angolo di lavoro desiderato
mediante rotazione della sede dell‘apparecchio (
pico. La sede scatta nella posizione
desiderata.
20) del manico telesco-
Utilizzo delle cesoie per
cespugli
Non usare la cesoia taglia ce-
spugli in combinazione con il
manico telescopico. Pericolo di
ferite da taglio.
• Muovere l’apparecchiatura in avanti in
maniera omogenea.
• L’asta di taglio a due lati rende possi-
bile il taglio in entrambe le direzioni o
per mezzo di movimenti oscillatori, da
una parte all’altra.
Pulizia/Manutenzione
Fare eseguire al nostro centro
assistenza tutte le operazioni
non indicate in queste istruzioni per l’uso. Usare solo
pezzi originali. Utilizzate solo
parti originali. Pericolo di lesioni!
15
Page 16

IT MT
Non utilizzare agenti di pulizia o
solventi. Questi potrebbero essere la causa di danni irreparabili
all’apparecchiatura. Sostanze chimiche possono essere aggressive
nei confronti delle parti in plastica
dell’apparecchiatura.
Noi non siamo responsabili per danni causati dalle nostre apparecchiature, se sono
stati causati da riparazioni non avvenute a
regola d’arte, oppure dall’utilizzo di parti
di ricambio non originali oppure da un utilizzo dell’apparecchiatura non corrispondente a quanto previsto.
Indossare guanti quando si lavora
con delle lame (
di ferite da taglio!
Svolgere i seguenti lavori di manutenzione
e pulizia ad intervalli regolari. Così ci si
assicura un utilizzo prolungato ed afdabile:
• Controllare che la copertura ed i
dispositivi di protezione non siano
danneggiati e che siano correttamente
collocati. Se necessario sostituirli.
• Tenere pulite le feritoie di ventilazione,
l’alloggiamento del motore e le impugnature dell‘apparecchio. A tale scopo
usare un panno umido o una spazzola.
• Tenere sempre pulita la lama. Dopo
ogni uso dell’apparecchio è necessario
- pulire la lama (con
un panno oleoso);
- lubricare la barra
portalama con il
bricchetto dell’olio
o lo spray.
• Lievi intaccature sulle lame si possono
appianare da sole. Trattare le lame
con una pietra per aflatura ad olio.
Solo lame ben aflate portano ad una
buona prestazione di taglio.
• Lame senza lo, piegate o danneggia-
te devono essere sostituite.
9/11). Pericolo
Conservazione
• Conservare l’apparecchio nella guaina
di protezione della lama fornita in un
luogo asciutto e fuori dalla portata di
bambini.
• Conservare l’accumulatore solo in condizioni parzialmente cariche. Durante
un periodo di stoccaggio prolungato le
condizioni di carica devono corrispondere a 40-60 %.
• Conservare l’apparecchio a una tem-
peratura compresa tra 10° C e 25°C.
Durante un periodo di stoccaggio
prolungato evitare estreme condizioni
di freddo o caldo, in modo tale che
l’accumulatore non perda potenza.
• Durante un periodo prolungato di stoccaggio, controllare ca. ogni 3 mesi le
condizioni di carica dell‘accumulatore
e ricaricarlo se necessario.
16
Page 17
IT MT
Smaltimento/Protezione
dell’ambiente
Effettuare lo smaltimento dell’apparecchio,
degli accessori e della confezione nel
rispetto dell’ambiente presso un punto di
raccolta per riciclaggio.
Le apparecchiature non si devono
smaltire insieme ai riuti domestici.
Non gettare l’apparecchio con
la batteria montata nel cassonetto dei riuti domestici, nel
fuoco (pericolo di esplosione)
o nell’acqua. Batterie danneggiate possono nuocere all’am-
biente e alla vostra salute, se
fuoriescono vapori o liquidi
velenosi.
• Smaltire l’apparecchio con l’accumulatore scaricato. Non aprire l’apparecchio e l’accumulatore.
• Smaltire l’apparecchio secondo le
disposizioni locali. Consegnare l’apparecchio a un centro di raccolta dove
viene introdotto in un processo di
riciclaggio. A tale proposito chiedere
informazioni ai centri di raccolta riuti
o al nostro centro di assistenza.
• Lo smaltimento degli apparecchio difettosi consegnati viene effettuato gratuitamente.
• Introdurre i rami tagliati nel composto
e non gettarli nel secchio della spazzatura.
17
Page 18
IT MT
Pezzi di ricambio
È possibile ordinare pezzi di ricambio e accessori all’indirizzo
www.grizzly-service.eu
Se non si dispone di una connessione Internet, contattare telefonicamente il centro di as-
sistenza (vedere “Service-Center” a pag. 20). Tenere a portata di mano i numeri d’ordine
riportati in basso.
Pos. Denominazione numeri d‘ordine
8/9 Lama taglia erba + protezione lama 13700011
10/11 Lama taglia cespugli + protezione lama 13700012
12 Manico telescopico con carrello 91100822
22 Apparecchiatura carica-batterie 80001055
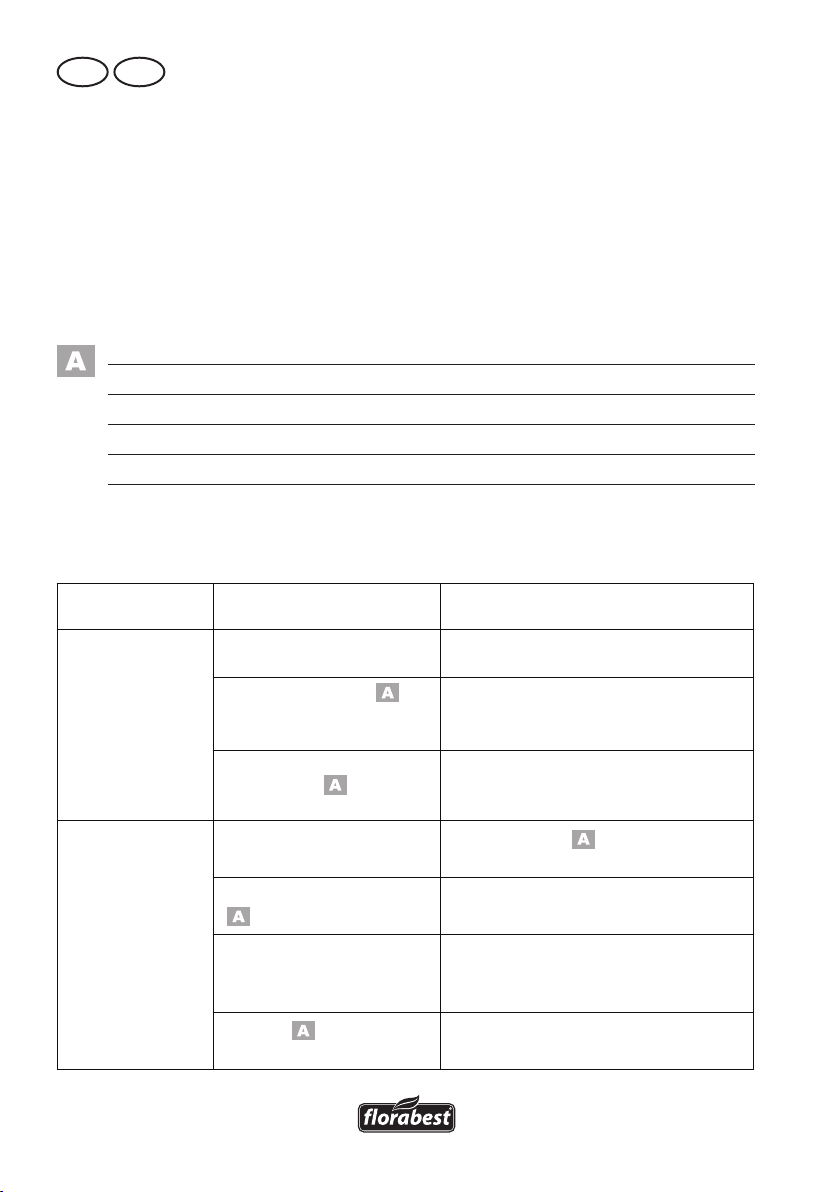
Ricerca di errori
Problema Possibile causa Soluzione
L’apparecchio non
si accende
Taglio non preciso
18
L’apparecchio è scarico
Blocco accensione (
2/13) non azionato correttamente
Interruttore di accensione/
spegnimento
difettoso
Eccessivo attrito a causa di
una scarsa lubricazione
Lame sporche
(
9/11)
Le lame sono smussate o
presentano intaccature
Le lame (
danneggiate
6/15)
9/11) sono
Caricare l’apparecchio (vedere “Pro-
cesso di ricarica”)
Accendere (vedere “Utilizzo”)
Riparazione al centro assistenza
Oliare le lame (
(vedere “Pulizia/Manutenzione”)
Pulire le lame (vedere “Pulizia/Manu-
tenzione”)
Aflare le lame (vedere “Pulizia/Ma-
nutenzione”) oppure sostituirle (vedere
“Pezzi di ricambio/Accessori”)
Sostituire le lame (vedere “Pezzi di
ricambio/Accessori”)
9/11)
Page 19

IT MT
Garanzia
Gentile cliente,
Su questo apparecchio Le viene concessa
una garanzia di 3 anni a partire dalla
data di acquisto.
In caso di difetti di questo prodotto può
avanzare diritti legali nei confronti del
venditore del prodotto. Tali diritti legali non
vengono limitati dalla nostra garanzia qui
di seguito rappresentata.
Condizioni di garanzia
Il termine di garanzia inizia con la data di
acquisto. La preghiamo di conservare in
un luogo sicuro lo scontrino scale originale. Questo documento viene richiesto come
prova d’acquisto.
Qualora subentrasse un difetto di materiale
o di fabbricazione entro tre anni a partire
dalla data di acquisto di questo prodotto,
il prodotto verrà riparato o sostituito – a
nostra discrezione - gratuitamente da noi.
Questa prestazione di garanzia presuppone che venga presentato entro il termine di
tre anni l’apparecchio difettoso e la prova
d’acquisto (scontrino scale) e descritto
brevemente per iscritto in che cosa consiste
il difetto e quando si è vericato.
Se il difetto è coperto dalla nostra garanzia, riceverà il prodotto riparato oppure
un prodotto nuovo. Con la riparazione o
la sostituzione del prodotto non inizia un
nuovo periodo di garanzia.
Tempo di garanzia e diritti legali
per vizi della cosa
Il periodo di garanzia non viene prolungato. Questo vale anche per parti sostituite
e riparate. Difetti e vizi presenti già al momento dell’acquisto devono essere segnalati
immediatamente dopo la rimozione dall’im-
ballaggio. Riparazioni che accorrono dopo
il periodo di garanzia sono a pagamento.
Volume di garanzia
L’apparecchio è stato prodotto accuratamente secondo severe direttive di qualità
e controllato con coscienza prima della
consegna.
La prestazione di garanzia vale per difetti
di materiale o di fabbricazione. Questa
garanzia non si estende ai componenti del
prodotto che sono soggetti a normale usura e che quindi possono essere visti come
parti di usura (p. es. lame, batterie, ruote
di ingranaggi) oppure per danneggiamenti
delle parti fragili (p. es. interruttori, accu-
mulatori o elementi di vetro).
Questa garanzia decade se il prodotto è
stato danneggiato, non usato correttamente o non manutenuto. Per un uso corretto
del prodotto devono essere osservate tutte
le indicazioni riportate nelle istruzioni per
l’uso. Destinazioni d’uso e azioni sconsigliate nelle istruzioni d’uso o dalle quali
si viene avvertiti, sono tassativamente da
evitare.
Il prodotto è destinato esclusivamente all’uso commerciale. In caso di uso improprio,
esercizio della forza e interventi non effettuati dalla nostra liale di assistenza tecnica autorizzata, decade la garanzia.
Svolgimento in caso di garanzia
Per garantire una rapida elaborazione della Sua pratica, La preghiamo di seguire le
seguenti indicazioni:
• Per tutte le richieste tenere a portata
di mano lo scontrino scale e il codice
di identicazione (IAN 93560) come
prova d’acquisto.
• I codici articolo sono riportati sulla targhetta del tipo.
• Nel caso in cui si dovessero vericare
difetti funzionali o altri vizi, La preghiamo di contattare telefonicamente o per
e-mail. Riceverà ulteriori informazioni
19
Page 20

IT MT
sullo svolgimento del Suo reclamo.
• Un prodotto rilevato come difettoso
può essere inviato con porto franco
all’indirizzo di assistenza comunicato,
previa consultazione del nostro servizio di assistenza tecnica, allegando
la prova d‘acquisto (scontrini scali)
e l’indicazione, in che cosa consiste
il difetto e quando si è vericato. Per
evitare problemi di accettazione e costi
aggiuntivi, usare tassativamente solo
l’indirizzo che Le è stato comunicato.
Assicurarsi che la spedizione non avvenga in porto assegnato, con merce
ingombrante, corriere espresso o altro
carico speciale. Spedire l’apparecchio
inclusi tutti gli accessori forniti insieme
al momento dell’acquisto e garantire
un imballaggio di trasporto sufcientemente sicuro.
Servizio di riparazione
Riparazioni non soggette alla garanzia
possono essere effettuate dietro fattura dal-
la nostra liale di assistenza tecnica previo
preventivo gratuito da parte della stessa.
Possiamo lavorare solo apparecchi che
vengono spediti sufcientemente imballati
e affrancati.
Attenzione: Spedire l’apparecchio alla
nostra liale in condizioni pulite e con l’indicazione del difetto.
Apparecchi spediti in porto assegnato -
con merce ingombrante, corriere espresso
o altro carico speciale - non vengono
accettati.
Lo smaltimento degli apparecchi difettosi spediti viene effettuato da noi gratuitamente.
Service-Center
Assistenza Italia
IT
Tel.: 02 36003201
E-Mail: grizzly@lidl.it
IAN 93560
Assistenza Malta
MT
Tel.: 80062230
E-Mail: grizzly@lidl.com.mt
IAN 93560
Importatore
Non dimenticare che il seguente indirizzo
non è un indirizzo di assistenza tecnica.
Contattare prima di tutto il centro di assistenza tecnica sopra nominato.
Grizzly Gartengeräte
GmbH & CO KG
Am Gewerbepark 2
64823 Groß-Umstadt
Germania
www.grizzly-service.eu
20
Page 21

GB MT
Contents
Introduction
Introduction ...............................21
Intended use .............................. 21
General description .................... 22
Extent of the delivery ..................... 22
Function description.......................22
Overview ..................................... 22
Technical data ............................ 23
Safety Instructions......................23
Symbols ....................................... 23
General safety instructions for
power tools .................................. 24
Special Safety Directions for the
cordless grass & shrub cutter ..........26
Safety Directions for the battery
charger ........................................28
Charging process .......................28
Assembling instructions ..............29
Inserting/replacing the blade .........29
Assembling the telescopic shaft .......29
Assembling/dismantling the
telescopic shaft .............................30
Operation .................................. 30
Switching on and off .....................30
General working instructions ..........30
Use as a grass trimmer ..................31
Use as a hedge trimmer ................. 31
Cleaning/Maintenance ............... 31
Storage ......................................32
Disposal and the environment .... 32
Spare parts/Accessories ............. 33
Trouble shooting ........................33
Guarantee .................................34
Repair Service ............................ 35
Service-Center ............................ 35
Importer .................................... 35
Translation of the original EC
declaration of conformity ........... 54
Exploded Drawing ..................... 55
Congratulations on the purchase of your
new device. With it, you have chosen a
high quality product. During production,
this equipment has been checked for quality and subjected to a nal inspection. The
functionality of your equipment is therefore
guaranteed. It cannot be ruled out that residual quantities of water or lubricants will
remain on or in the equipment/hose lines
in isolated cases. This is not a fault or defect and it represents no cause for concern.
The operating instructions constitute
part of this product. They contain
important information on safety, use
and disposal.
Before using the product, familiarise
yourself with all of the operating
and safety instructions. Use the
product only as described and for
the applications specied. Keep this
manual safely and in the event that
the product is passed on, hand over
all documents to the third party.
Intended use
The unit is to be used for cutting and trimming twigs on hedges, bushes and shrubs
and for trimming grass at the edges and
on smaller surfaces in domestic application
only.
The unit is only to be used by adults.
People under 16 should only use this unit
under adult supervision.
Any other use not specically mentioned
in this manual can lead to damage to the
unit and may present a serious hazard to
the user.
The operator or user is responsible for accidents or damage to other persons or their
property.
21
Page 22

GB MT
This equipment is not suitable for commercial use. Commercial use will invalidate the
guarantee.
The manufacturer will not be held responsible for damage or injuries caused by use
outside that stipulated by the manual or by
improper handling.
General description
The illustration of the princi-
pal functioning parts can be
found on the front and back
foldout pages.
Extent of the delivery
shaft and rollers for increased working
speed and comfort. Please read the following descriptions for the function of the various controlling parts of the unit.
Overview
1 Equipment
2 Switch lock, unit
3 Unit handle
4 Charge display (LED)
5 Charging socket + plug socket
for plug connection telescopic
arm
6 On/off switch, unit
7 Unlock button for blade
Carefully unpack the appliance and check
that it is complete.
Dispose of the packaging material correctly.
- Equipment
- Grass shear blade + blade guard
- Shrub shear blade + blade guard
- Telescopic shaft
- Wheels on a shaft
- Recharger
- Instruction Manual
Function description
The cordless grass & shrub cutter is a combination unit with two interchangeable cut-
ting devices. These are coated with plastic
(Teon non-stick coating) to prevent rust.
For use as a shrub trimmer, a double-sided
blade block is used as the cutting head.
The catching blades are round off at the
side to prevent accidents, and positioned
in an offset arrangement to reduce the
risk of injury. A cutting head with several
blades is provided for use as a grass trim-
mer. The unit is equipped with a telescopic
Cutter
8 Blade guard for grass shear
blade
9 Grass shear blade
10 Blade guard for shrub shear
blade
11 Shrub shear blade
12 Telescopic shaft with carrier
13 Switch lock, telescopic shaft
14 Handle
15 On/off switch, telescopic shaft
16 Telescopic tube
17 Plug connection
18 Adjusting screw for length adjust-
ment
19 Swivel joint to turn the device
20 Equipment holder
21 Wheels on a shaft
22 Battery charger
23 Power supply unit
24 Recharger cable plug
25 Eccentric holding xture, blade
22
Page 23

GB MT
Technical data
Unit
Motor voltage ............................ 7.2 V
Rated speed .......................... 1100 min
Protection class ................................... III
Protection category...........................IPX0
Grass-trimming blade
Cutting width ............................ 93 mm
Shrub-trimming blade
Cutting length ........................ 120 mm
Distance between teeth ....approx. 8 mm
Weight (incl. accessories) .............. 1.6 kg
Sound pressure level
(L
) ............... 59.1 dB(A), KpA=3 dB(A)
pA
Sound power level (L
wA
)
guaranteed ...........................86 dB(A)
measured ....... 79.1 dB(A); K
Vibration (a
)
n
at handle .........1.39 m/s
=3 dB(A)
wA
2
, K=1.5 m/s
Battery (Li-Ion)
Nominal voltage ......... 7.2 V
1.3 Ah
Loading time .................. approx. 3-5 h
Charger ................. BHY410900400GS
Voltage input ....... 230-240 V~, 50-60 Hz
Nominal consumption .................... 16 W
Voltage output ..................................9 V
Recharging current .....................400 mA
Performance output.......................3.6 VA
Protection class ...............................
II
Protection category...........................IPX0
The noise and vibration levels have been
calculated according to the norms stated
in the conformity statement. Technical and
optical alterations to serve progress may
be made without notice. All measurements,
instructions and other data given in this
manual are therefore given without guarantee of correctness. Legal claims made
on the basis of this manual are therefore
excluded.
The stated vibration emission value was
measured in accordance with a standard
testing procedure and may be used to compare one power tool to another. The stated
-1
vibration emission value may also be used
for a preliminary exposure assessment.
Warning: The vibration emission
value may differ during actual use of
the power tool from the stated value
depending on the manner in which
the power tool is used.Safety precautions aimed at protecting the user
should be based on estimated exposure under actual usage conditions
(all parts of the operating cycle are
to be considered, including, for example, times during which the power
tool is turned off and times when the
2
tool is turned on but is running idle).
Safety Instructions
This unit can cause serious in-
jury if not used correctly. Before using the unit, carefully
read through the instruction
manual and familiarise yourself with all of its controls.
Symbols
Symbols in the manual
Warning symbols (instead of
the exclamation mark, the
danger may be explained)
with information on damage
and injury prevention.
Instruction symbols (the instruction
may be explained at the place of the
exclamation mark) with information
on preventing damage.
23
Page 24

GB MT
86
T-130°C
Help symbols with information on
improving tool handling.
General safety instructions
for power tools
Symbols on the unit
Remember that the cutting equip-
ment will continue to move after
switching the unit off.
Attention!
Before using for the rst time, care-
fully read through the user manual.
Do not use the unit during rain, bad
weather damp surroundings or on
wet grass or hedges.
L
WA
Guaranteed sound power level
dB
Do not dispose of the device
with the battery installed in
household waste.
Cutting length Shrub shear blade
Symbols on the recharger
Pole orientation
The recharger is for indoor use
only.
Protective temperature limiter
Protection class II
Machines do not belong with do-
mestic waste.
WARNING! Read all safety
directions and instructions.
Omissions in the compliance with
safety directions and instructions
can cause electrical shock, re
and/or severe injuries.
Retain all safety directions and instructions for future use.
The term “Power Tools” used in the safety
instructions refers to mains-operated power
tools (with power cord) and to battery-operated power tools (without power cord).
1) WORK AREA SAFETY
a) Keep work area clean and well
lit. Cluttered or dark areas invite ac-
cidents.
b) Do not operate power tools in
explosive atmospheres, such as
in the presence of ammable
Iiquids, gases or dust. Power tools
create sparks which may ignite the
dust or fumes.
c) Keep children and bystanders
away while operating a power
tool. Distractions can cause you to
lose control.
2) ELECTRICAL SAFETY
a) Power tool plugs must match
the outlet. Never modify the
plug in any way. Do not use
any adapter plugs with earthed
(grounded) power tools. Unmodi-
ed plugs and matching outlets will
reduce risk of electric shock.
b) Avoid body contact with
earthed or grounded surfaces,
24
Page 25

GB MT
such as pipes, radiators, ranges
and refrigerators. There is an
increased risk of electric shock if your
body is earthed or grounded.
c) Do not expose power tools to
rain or wet conditions. Water
entering a power tool will increase the
risk of electric shock.
d) Do not abuse the cord. Never
use the cord for carrying, pulling
or unplugging the power tool.
Keep cord away from heat, oil,
sharp edges or moving parts.
Damaged or entangled cords increase
the risk of electric shock.
e) When operating a power tool
outdoors, use an extension cord
suitable for outdoor use. Use of a
cord suitable for outdoor use reduces
the risk of electric shock.
f) If operating a power tool in a
damp location is unavoidable,
use a residual current device
(RCD) protected supply. Use of an
RCD reduces the risk of electric shock.
3) PERSONAL SAFETY
a) Stay alert, watch what you are
doing and use common sense
when operating a power tool.
Do not use a power tool while
you are tired or under the inuence of drugs, alcohol or medication. A moment of inattention white
operating power tools may result in
serious personal injury.
b) Use personal protective equip-
ment. Always wear eye protection. Protective equipment such as
dust mask, non-skid safety shoes, hard
hat, or hearing protection used for
appropriate conditions will reduce per-
sonal injuries.
c) Prevent unintentional starting.
Ensure the switch is in the offposition before connecting to
power source and/or battery
pack, picking up or carrying
the tool. Carrying power tools with
your nger on the switch or energising
power tools that have the switch on
invites accidents.
d) Remove any adjusting key or
wrench before turning the power tool on. A wrench or a key left at-
tached to a rotating part of the power
tool may result in personal injury.
e) Do not overreach. Keep proper
footing and balance at all times.
This enables better control of the power tool in unexpected situations.
f) Dress properly. Do not wear
loose clothing or jewellery.
Keep your hair, clothing and
gloves away from moving
parts. Loose clothes, jewellery or long
hair can be caught in moving parts.
g) If devices are provided for the
connection of dust extraction
and collection facilities, ensure
these are connected and properly used. Use of dust collection can
reduce dust-related hazards.
4) POWER TOOL USE AND CARE
a) Do not force the power tool. Use
the correct power tool for your
application. The correct power tool
will do the job better and safer at the
rate for which it was designed.
b) Do not use the power tool if the
switch does not turn it on and
off. Any power tool that cannot be
controlled with the switch is dangerous
and must be repaired.
c) Disconnect the plug from the
25
Page 26

GB MT
power source and/or the battery pack from the power tool
before making any adjust
-ments, changing accessories, or
storing power tools. Such preven-
tive safety measures reduce the risk of
starting the power tool accidentaIly.
d) Store idle power tools out of the
reach of children and do not allow persons unfamiliar with the
power tool or these instructions
to operate the power tool. Power
tools are dangerous in the hands of
untrained users.
e) Maintain power tools. Check
for misalignment or binding
of moving parts, breakage of
parts and any other condition
that may affect the power tool’s
operation. If damaged, have the
power tool repaired before use. Many
accidents are caused by poorly main-
tained power tools.
f) Keep cutting tools sharp and
clean. Properly maintained cutting
tools with sharp cutting edges are less
Iikely to bind and are easier to control.
g) Use the power tool, accessories
and tool bits etc. in accordance
with these instructions, taking
into account the working conditions and the work to be performed. Use of the power tool for op-
erations different from those intended
could result in a hazardous situation.
5) CAREFUL HANDLING AND USE
OF BATTERY DEVICES
a) Charge the batteries only in
chargers that are recommended
by the manufacturer. Risk of re if a
charger that is suitable for a specic type
of battery is used with other batteries.
b) In the power tools, use only the
batteries designed for the purpose. The use of other batteries may
result in injuries and risk of re.
c) Keep the unused battery away
from paper clips, coins, keys,
nails, screws and other small
metal objects, which could
cause bridging of the contacts.
A short circuit between the battery contacts may cause burns or re.
d) If used incorrectly, liquid may
leak from the battery. Avoid
contact with this. In the event of
accidental contact, rinse off with
water. If the liquid gets into
eyes, seek medical assistance.
Leaking battery uid may cause skin
irritations or burns.
6) SERVICE
a) Have your power tool serviced
by a qualied repair person using only identical replacement
parts. This will ensure that the safety
of the power tool is maintained.
Special Safety Directions for
the cordless grass & shrub
cutter
1) SPECIAL SAFETY DIRECTIONS
FOR HEDGE TRIMMERS
a) Keep all body parts away from
the blade. Do not attempt to remove clippings while the blade
is operating or to hold on to
material which is to be cut. Only
remove trapped clippings when
the tool is switched off. One mo-
ment of carelessness in the usage of
the hedge trimmer can lead to severe
26
Page 27

GB MT
injury.
b) Carry the hedge trimmer at
the handle with an idle blade.
Always pull on the protective
cover during transport and storage of the hedge trimmer.
Careful handling of the tool reduces
the risk of injury from the blade.
c) Hold the power tool only on the
insulated handle surfaces, as
the cutting blade may come into
contact with concealed power
cables. Contact between the cutting
blade and a live cable may render metallic components live and result in an
electric shock.
d) Before the work, search the
hedge for concealed objects,
e.g. cable etc. To avoid damaging
the equipment.
e) Hold the hedge trimmer cor-
rectly, e.g. with both hands on
the handles, if there are two
handles. Loss of control of the equip-
ment may result in injuries.
f) Wear suitable clothing and
work clothes when working
with the equipment. Do not hold
the equipment by the cutting
blade or lift it on the cutting
blade. Contact with the cutting blade
can cause injuries.
2) FURTHER SAFETY DIRECTIONS
For your personal safety:
Wear suitable work clothes such
as boots with non-slip soles, sturdy
long trousers, gloves and goggles.
Do not wear long owing clothing
or jewellery, as this may be caught
by moving parts. Do not use this
tool while walking barefooted or
while wearing open sandals.
a) Only switch on the tool when
hands, feet and all other body
parts are at a secure distance to
the tool. Risk of injury from cuts.
b) Take care that you do not injure
your hands and feet with the
cutting elements.
c) Remove the power supply unit
before working with the equipment. Do not use extension
cables. The power supply unit
is to be used only in enclosed
spaces. Water entry increases the risk
of electric shock.
d) Do not use the shrub cutter in
combination with the telescopic
shaft. There is a risk of cut wounds.
e) The tool is designed to trim
hedges. Do not use the tool to
cut branches, hard wood or other. To avoid damaging the equipment.
f) Do not attempt to dislodge a
blocked/trapped blade before
switching the tool off. There is a
risk of injury.
g) Always switch off the tool and remove
the battery (if applicable)
- if you leave the tool unsupervised
- before removing jams
- before control- maintenance- or
cleaning tasks
- if you have come into contact with
a foreign object
- whenever the machine starts to vi-
brate uncontrollably
How to avoid accidents and injuries.
3) SPECIAL SAFETY DIRECTIONS
FOR BATTERY-OPERATED TOOLS
a) Do not subject the battery to
strong sunlight over long periods and do not leave it on a
heater. Heat damages the battery
27
Page 28

GB MT
and there is a risk of explosion.
b) Allow a hot battery to cool be-
fore charging.
c) Do not open up the battery and
avoid mechanical damage to
the battery. Risk of short circuit and
fumes may be emitted that irritate the
respiratory tract. Ensure fresh air and
seek medical assistance in the event of
discomfort.
Safety Directions for the
battery charger
1) CORRECT HANDLING OF THE
BATTERY CHARGER
• This appliance is not intended for use
by persons (including children) with
reduced physical, sensory or mental
capabilities, or lack of experience and
knowledge, unless they have been giv-
en supervision or instruction concern-
ing use of the appliance by a person
responsible for their safety.
• Children should be supervised to en-
sure that they do not play with the appliance.
• To charge the battery, use only
the charger supplied. Risk of re
and explosion. This ensures that the
safety of the device is maintained.
• Before each use, check the
charger, cable and plug and
have them repaired by quali-
ed professionals and only with
original parts. Do not use a defective charger and do not open
it up yourself. This ensures that the
safety of the device is maintained.
• Connect the charger only to a
socket with an earth. Ensure
that the mains voltage matches
the specications on the charger
rating plate. Risk of electric shock.
• Disconnect the charger from the
mains before closing or opening connection to the battery /
power tool / device. This ensures
that the battery and charger are not
damaged.
• Keep the charger clean and
away from wet and rain. Do
not use the charger outdoors.
Dirt and the entry of water increase the
risk of electric shock.
• Operate the charger only with
the appropriate original batteries. Charging other batteries may
result in injuries and risk of re.
• Avoid mechanical damage to
the charger. This can result in inter-
nal short circuits.
• Do not operate the charger on a
combustible surface (e.g. paper,
textiles). Risk of re due to heating
during charging.
• If the power cable for this equipment is
damaged, it must be replaced by the
manufacturer, a customer service agent
of the same or a similarly qualied person in order to prevent hazards.
• Do not use the charger to charge non-
rechargeable batteries.
Charging process
Do not expose the battery to
extreme conditions such as
heat and impact. There is a
risk of injury from leaking
electrolyte solution! In case
of contact, rinse with water
or neutraliser and consult a
doctor if contact has occurred
with eyes etc.
28
Page 29

GB MT
Charge the battery only in
dry areas.
Do not switch on the equip-
ment during charging.
There is a risk of injury from
electric shock.
is completed, rst unplug the
charger from the wall outlet, and
then remove the charger cable
plug from the tool.
Assembling instructions
Ensure that the equipment is
charged for no longer than
3-5hours without interruption. The
battery and equipment could be
damaged and they consume energy
unnecessarily in case of longer
charging time. Overcharging invalidates the guarantee.
• Before initial use, charge the battery
installed in the equipment. Do not
charge the battery for several short periods in succession.
• Use the charger supplied to charge
the Li-ion battery installed in the equipment.
• Recharge the battery if the equipment
runs too slowly.
• In all cases, observe the applicable
safety information as well as the regulations and directions for environmental protection.
• Defects resulting from improper han-
dling are not subject to the guarantee.
1. Connect the charger cable plug
(24) with the charger socket on
the tool (5).
2. Connect the power supply unit
(23) to a socket.
The charging indicator (4) lights
up:
Red: Equipment charging.
Green: Charging nished.
The recommended charging time
is max. 3 – 5 hours.
3. After the recharging process
Inserting/replacing the blade
Before replacing the blade,
ensure that the equipment is
switched off in order to avoid
danger and injuries!
Inserting the blade
1. Place the device (1) on the grass
shears blade (9) or the shrub
shears blade (11) so that the ar-
rows and markings are aligned
on top of each other.
2. Push the end of the blade
towards the unlock button
(7). It clicks audibly into
place.
Removing the blade:
3. Push the unlock button (7) upwards
remove the entire blade.
If the eccentric holding xture (25)
of the blade is twisted, it must be
turned manually until the blade
(9/11) can be mounted.
on the equipment and
Assembling the telescopic
shaft
For packaging reasons, the tel-
escopic handle (12) is delivered
in two sections. When connected
together, the two sections lock into
each other and cannot subsequently be detached.
29
Page 30

GB MT
Connecting the telescopic
tubes:
1. Put both parts of the telescopic
tube (16) together up to the stop.
They snap into place.
While putting them together
make sure that the nose (16a)
of the upper telescopic tube ts
into the notch (16b) of the lower
telescopic tube.
2. Push the adjusting screw (18) up
and screw tightly
Ensure that the mains cable is
not caught.
Assembling the rollers:
3. Remove one wheel (21) from the
axle.
4. Push the axle through the holes
on the telescopic shaft and
reconnect the wheels and axle
(21).
Assembling/dismantling the
telescopic shaft
1. Push the equipment (1) into
the telescopic shaft equipment
holder (20). It clicks audibly into
place.
2. Plug the plug connection (17)
into the charging socket (5) on
the back of the equipment handle (3).
3. To dismantle, release the plug
connection (17) and pull the
equipment out of the telescopic
shaft equipment holder (20).
Operation
Keep to noise abatement regula-
tions and other by-laws.
Switching on and off
1. Remove the blade guard (
8/10) before switching the unit
on.
2. - To switch on, hold the switch
.
- To switch on the equipment
The equipment runs at top
3. In order to switch off, let go of
When using the telescopic shaft, the unit
can only be switched on and off at the
shaft handle.
General working instructions
lock (2) depressed and operate the on/off switch (6). Then
release the switch lock.
when using the telescopic
shaft (12), operate the switch
lock (13) and on/off switch
(15) on the telescopic shaft.
speed.
the on/off switch (6/15).
After switching the unit
off, the blades take a short
time to stop moving. Let the
blades come to a complete
standstill. Do not touch the
moving blades and do not
try to stop them moving. Injury hazard!
30
While trimming, take care that there
are no objects such as wire, metal
parts, stones etc. come into contact
with the blades. This can lead to
cutting head damage. If the blades
Page 31

GB MT
become blocked by solid objects,
switch off the unit at once.
• Check the grass and bush trimmer
blades for obvious defects such as
loose, worn or damaged parts. Check
that the screws are seated rmly in the
blade block.
• Remove the power supply unit before
working with the equipment. Do not
use extension cables. The power supply unit is to be used only in enclosed
spaces.
• Only use sharp blades to achieve a
good cutting performance and pre-
serve the battery.
• Do not work the unit so hard that it
comes to a standstill.
• Pay attention to the instructions on unit
maintenance and cleaning.
Use as a grass trimmer
• Grass is best cut when dry and not too
long.
• The telescopic shaft (12) makes it
easier to work with the grass trimmer:
Push the equipment slowly over the
ground on the rollers. This will give an
even cutting height.
• Set the desired working angle by turning the telescopic shaft equipment
holder (20). The holder clicks into the
desired position.
Use as a hedge trimmer
Do not use the shrub cutter
in combination with the telescopic shaft. There is a risk
of cut wounds.
• Move the unit forward evenly.
• The double-sided cutting heads enable
cutting in both directions or by swing-
ing the unit from side to side.
Cleaning/Maintenance
Leave any work not covered
in this manual to our Service
Centre. Only use original
parts. There is a risk of injury!
Never use cleaning agents or sol-
vents, which can cause irreparable
damage to the unit. Chemicals can
attack the plastic components on
the unit.
Adjusting the length of the telescopic shaft:
• Adjust the length of the telescopic shaft
tyour size with the help of the adjusting
screw (18).
Adjusting the working angle:
For a comfortable edge cut, the equipment
holder (20) can be rotated by 90° to the
right or left on the telescopic shaft rotary
joint (19).
Wear gloves when handling the
blades (
injury from cuts!
Clean and service the unit regularly as follows. This guarantees a long life for your
unit:
• Check the covers and guards for damage and correct position. If necessary,
replace.
• Keep the ventilation slits, motor housing and handles on the equipment
9/11). There is a risk of
31
Page 32

GB MT
clean. To do this, use a damp cloth or
brush.
• Always keep the blade clean.
After using the equipment, it is impera-
tive to:
- Clean the blade
(with an oily cloth);
- Oil the blade shaft
with an oil can or
spray.
• Slight notches on the blades can be
evened out. For this, sand down the
blades with an oil stone. Only sharp
blades can cut properly.
• Blunt, bent or damaged blades must
be changed.
We are not liable for damage caused by
the use of the unit if the original cause was
improper repair or the use of non-original
parts or through use other than that designated in this manual.
Storage
• Keep the equipment in the blade guard
supplied, dry and out of reach of children.
• Store the battery only in a partially
charged state. The state of charge
should be 40 – 60 % over a longer
storage period.
• Store the equipment between 10° C
and 25° C. During storage, avoid ex-
treme cold or heat so the battery does
not lose power.
• During a longer storage period, check
the state of charge of the battery and
recharge if necessary roughly every
3months.
Disposal and the
environment
Be environmentally friendly. Return the
tool, accessories and packaging to a recy-
cling centre when you have nished with
them.
Machines do not belong with do-
mestic waste.
Do not dispose of the device
with the battery installed in
household waste, re (risk of
explosion) or water. Damaged
batteries may damage the envi-
ronment and your health if toxic
fumes or liquids leak out.
• Dispose of the equipment with the
battery discharged. Do not open the
equipment or the battery.
• Dispose of the equipment in accordance with the local regulations. Take
the equipment to a collection point,
where it will be recycled in an environmentally friendly manner. For informa-
tion about this, ask your local waste
management company or our service
centre.
• Defective units returned to us will be
disposed of for free.
• Place cut branches in compost and not
in the dustbin.
32
Page 33

GB MT
Spare parts/Accessories
Spare parts and accessories can be obtained at
www.grizzly-service.eu
If you do not have internet access, please contact the Service Centre via telephone
(see “Service-Center” page 35). Please have the order number mentioned below ready.
Item Description Order No.
8/9 Grass shear blade + blade gard 13700011
10/11 Shrub shear blade + blade gard 13700012
12 Telescopic shaft with carrier 91100822
22 Battery charger 80001055
Trouble shooting
Problem Possible Cause Error correction
Device doesn‘t
start
Bad cutting results
Equipment is not charged
Switch lock (
not been operated properly
On/off switch (
may be defective
Too much friction due to
lack of lubrication
Dirty blade
(
9/11)
Blade (
or has nicks
Blade (
aged
2/13) has
6/15)
9/11) is blunt
9/11) is dam-
Charge equipment (see „Charging
process“)
Switch on (see „Operation“)
Repair by Service Centre
Lubricate blade (
(see „Cleaning/Maintenance“)
Clean blade (see „Cleaning/Maintenance“)
Sharpen blade (see „Cleaning/
Maintenance“) or replace (see „Spare
parts/Accessories“)
Replace blade (see „Spare parts/
Accessories“)
9/11)
33
Page 34

GB MT
Guarantee
Dear Customer,
This equipment is provided with a 3-year
guarantee from the date of purchase.
In case of defects, you have statutory rights
against the seller of the product. These
statutory rights are not restricted by our
guarantee presented below.
Terms of Guarantee
The term of the guarantee begins on the
date of purchase. Please retain the original
receipt. This document is required as proof
of purchase.
If a material or manufacturing defect
occurs within three years of the date of
purchase of this product, we will repair or
replace – at our choice – the product for
you free of charge. This guarantee requires
the defective equipment and proof of pur-
chase to be presented within the three-year
period with a brief written description of
what constitutes the defect and when it occurred.
If the defect is covered by our guarantee,
you will receive either the repaired product
or a new product. No new guarantee pe-
riod begins on repair or replacement of the
product.
Guarantee Period and Statutory
Claims for Defects
The guarantee period is not extended by
the guarantee service. This also applies for
replaced or repaired parts. Any damages
and defects already present at the time of
purchase must be reported immediately after unpacking. Repairs arising after expiry
of the guarantee period are chargeable.
Guarantee Cover
The equipment has been carefully produced in accordance with strict quality
guidelines and conscientiously checked
prior to delivery.
The guarantee applies for all material and
manufacturing defects. This guarantee
does not extend to cover product parts that
are subject to normal wear and may therefore be considered as wearing parts (e.g.
cutter bars, eccentric drives and carbon
brushes) or to cover damage to breakable
parts (e.g. switches, batteries).
This guarantee shall be invalid if the product has been damaged, used incorrectly or
not maintained. Precise adherence to all of
the instructions specied in the operating
manual is required for proper use of the
product. Intended uses and actions against
which the operating manual advises or
warns must be categorically avoided.
The product is designed only for private
and not commercial use. The guarantee
will be invalidated in case of misuse or
improper handling, use of force, or inter-
ventions not undertaken by our authorised
service branch.
Processing in Case of Guarantee
To ensure quick handling of you issue,
please follow the following directions:
• Please have the receipt and identication number (IAN 93560) ready as
proof of purchase for all enquiries.
• Please nd the item number on the rating plate.
• Should functional errors or other defects occur, please initially contact the
service department specied below by
telephone or by e-mail. You will then
receive further information on the processing of your complaint.
34
Page 35

GB MT
• After consultation with our customer
service, a product recorded as defec-
tive can be sent postage paid to the
service address communicated to you,
with the proof of purchase (receipt)
and specication of what constitutes
the defect and when it occurred. In or-
der to avoid acceptance problems and
additional costs, please be sure to use
only the address communicated to you.
Ensure that the consignment is not sent
carriage forward or by bulky goods,
express or other special freight. Please
send the equipment inc. all accessories
supplied at the time of purchase and
ensure adequate, safe transport packaging.
Repair Service
For a charge, repairs not covered by the
guarantee can be carried out by our ser-
vice branch, which will be happy to issue
a cost estimate for you.
We can handle only equipment that has
been sent with adequate packaging and
postage.
Attention: Please send your equipment to
our service branch in clean condition and
with an indication of the defect.
Equipment sent carriage forward or by
bulky goods, express or other special
freight will not be accepted.
We will dispose of your defective devices
free of charge when you send them to us.
Service-Center
Service Great Britain
GB
Tel.: 0871 5000 720
(£ 0.10/Min.)
E-Mail: grizzly@lidl.co.uk
IAN 93560
Service Malta
MT
Tel.: 80062230
E-Mail: grizzly@lidl.com.mt
IAN 93560
Importer
Please note that the following address is
not a service address. Please initially con-
tact the service centre specied above.
Grizzly Gartengeräte
GmbH & CO KG
Am Gewerbepark 2
64823 Groß-Umstadt
Germany
www.grizzly-service.eu
35
Page 36

DE AT CH
Inhalt
Einleitung
Einleitung ...................................36
Verwendungszweck ................... 36
Allgemeine Beschreibung ........... 37
Lieferumfang.................................. 37
Funktionsbeschreibung .................... 37
Übersicht ...................................... 37
Technische Daten ........................ 38
Sicherheitshinweise ....................38
Symbole und Bildzeichen ................ 39
Allgemeine Sicherheitshinweise für
Elektrowerkzeuge ........................... 39
Spezielle Sicherheitshinweise für die
Akku-Gras- und Strauchschere .........42
Sicherheitshinweise für das
Akkuladegerät ............................... 44
Ladevorgang .............................45
Montage .................................... 45
Messer einsetzen/auswechseln ........ 45
Teleskopstiel zusammenbauen .......... 46
Teleskopstiel montieren/
demontieren .................................. 46
Bedienung .................................46
Ein- und Ausschalten ...................... 46
Allgemeine Arbeitshinweise ............. 47
Einsatz als Grasschere .................... 47
Einsatz als Strauchschere ................ 48
Reinigung/Wartung ...................48
Lagerung ...................................48
Entsorgung/Umweltschutz ..........49
Ersatzteile/Zubehör ...................50
Fehlersuche ................................ 50
Garantie ....................................51
Reparatur-Service ......................52
Service-Center ............................ 52
Importeur .................................. 52
Original EG-Konformitäts-
erklärung ..................................54
Explosionszeichnung .................. 55
Herzlichen Glückwunsch zum Kauf Ihres
neuen Gerätes. Sie haben sich damit für ein
hochwertiges Gerät entschieden.
Dieses Gerät wurde während der Produktion
auf Qualität geprüft und einer Endkontrolle
unterzogen. Die Funktionsfähigkeit Ihres
Gerätes ist somit sichergestellt. Es ist nicht
auszuschließen, dass sich in Einzelfällen am
oder im Gerät, bzw. in Schlauchleitungen
Restmengen von Wasser oder Schmierstoffen
benden. Dies ist kein Mangel oder Defekt
und kein Grund zur Besorgnis.
Die Betriebsanleitung ist Bestandteil
dieses Geräts. Sie enthält wichtige
Hinweise für Sicherheit, Gebrauch
und Entsorgung. Machen Sie sich
vor der Benutzung des Gerätes mit
allen Bedien- und Sicherheitshinweisen vertraut. Benutzen Sie das
Gerät nur wie beschrieben und für
die angegebenen Einsatzbereiche.
Bewahren Sie die Betriebsanleitung
gut auf und händigen Sie alle Unter-
lagen bei Weitergabe des Gerätes
an Dritte mit aus.
Verwendungszweck
Das Gerät ist nur für das Schneiden und Trim-
men von dünnen Trieben an Hecken, Büschen
und Ziersträuchern und zum Schneiden von
Gras an Kanten und auf kleinen Flächen im
häuslichen Bereich bestimmt.
Das Gerät ist zum Gebrauch durch Erwachsene bestimmt. Jugendliche über 16Jahre
dürfen das Gerät nur unter Aufsicht benutzen.
Jede andere Verwendung, die in dieser Betriebsanleitung nicht ausdrücklich zugelassen
wird, kann zu Schäden am Gerät führen
und eine ernsthafte Gefahr für den Benutzer
darstellen.
36
Page 37

DE AT CH
Der Bediener oder Nutzer ist für Unfälle
oder Schäden an anderen Menschen oder
deren Eigentum verantwortlich. Dieses
Gerät ist nicht zur gewerblichen Nutzung
geeignet. Bei gewerblichem Einsatz erlischt
die Garantie.
Der Hersteller haftet nicht für Schäden, die
durch bestimmungswidrigen Gebrauch oder
falsche Bedienung verursacht wurden.
net, um Verletzungsgefahren zu verringern.
Beim Einsatz als Grasschere wird als
Schneideinrichtung ein Schermesser mit
mehreren Zähnen eingesetzt.
Für bequemes und schnelles Arbeiten ist
die Grasschere zusätzlich mit einem Teleskopstiel und Rädern ausgestattet.
Die Funktion der Bedienteile entnehmen Sie
bitte den nachfolgenden Beschreibungen.
Allgemeine
Beschreibung
Die Abbildung der wichtigs-
ten Funktionsteile nden Sie
auf der vorderen und hinteren Ausklappseite.
Lieferumfang
Packen Sie das Gerät aus und kontrollieren
Sie, ob es vollständig ist. Entsorgen Sie
das Verpackungsmaterial ordnungsgemäß.
- Gerät
- Grasscheren-Messer mit Messerschutz
- Strauchscheren-Messer mit Messerschutz
- Teleskopstiel
- Räder mit Radachse
- Ladegerät
- Betriebsanleitung
Funktionsbeschreibung
Die Akku-Gras- und Strauchschere ist ein
Kombigerät mit zwei austauschbaren
Schneideinrichtungen. Diese sind zum
Schutz vor Rost mit Kunststoff (Teon-Antihaftschicht) beschichtet.
Beim Einsatz als Strauchschere (Hecken-
schere) wird als Schneideinrichtung ein
doppelseitiger Messerbalken eingesetzt.
Die Fangzähne sind aus Sicherheitsgründen seitlich gerundet und versetzt angeord-
Übersicht
1 Gerät:
2 Einschaltsperre, Gerät
3 Gerätegriff
4 Ladeanzeige (LED)
5 Ladebuchse + Steckbuchse für
Steckverbindung Teleskopstiel
6 Ein-/Ausschalter, Gerät
7 Entriegelungstaste für Messer
Schneideinrichtung:
8 Messerschutz Grasschere
9 Grasscheren-Messer
10 Messerschutz Strauchmesser
11 Strauchscheren-Messer
12 Teleskopstiel mit Fahrgestell:
13 Einschaltsperre, Teleskopstiel
14 Handgriff
15 Ein-/Ausschalter, Teleskopstiel
16 Teleskoprohr
17 Steckverbindung
18 Stellschraube zur Längeneinstel-
lung
19 Drehgelenk zum Drehen des Ge-
rätes
20 Gerätehalterung
21 Räder mit Radachse
22 Ladegerät:
23 Netzteil
24 Ladekabelstecker
25 Exzenteraufnahme, Messer
37
Page 38

DE AT CH
Technische Daten
Gerät
Nennspannung .......................... 7,2 V
Bemessungsdrehzahl ..............1100 min
Schutzklasse ........................................III
Schutzart.........................................IPX0
Grasscheren-Messer
Schnittbreite .............................93 mm
Strauchscheren-Messer
Schnittlänge ...........................120 mm
Zahnabstand ........................ ca. 8 mm
Gewicht (incl. Zubehör) ................ 1,6 kg
Schalldruckpegel
(L
) ............... 59,1 dB(A), KpA=3 dB(A)
pA
Schallleistungspegel (L
wA
)
garantiert .............................. 86 dB(A)
gemessen ....... 79,1 dB(A); K
Vibration (a
n)
am Handgriff .... 1,39 m/s2, K=1,5 m/s
Akku (Li-Ion)
Nennspannung ........... 7,2 V
Ladezeit ............................ ca. 3-5 Std.
Ladegerät.............. BHY410900400GS
Eingangsspannung/Input ..... 230-240 V~,
Bemessungsaufnahme .................... 16 W
Ausgangsspannung/Output................9 V
Ladestrom .................................400 mA
Ausgangsleistung ......................... 3,6 VA
Schutzklasse ...................................
Schutzart.........................................IPX0
=3 dB(A)
wA
1,3 Ah
50-60 Hz
Betriebsanleitung gestellt werden, können
daher nicht geltend gemacht werden.
Der angegebene Schwingungsemissions-
-1
wert ist nach einem genormten Prüfverfahren gemessen worden und kann zum Vergleich eines Elektrowerkzeugs mit einem
anderen verwendet werden.
Der angegebene Schwingungsemissionswert kann auch zu einer einleitenden
Einschätzung der Aussetzung verwendet
werden.
Warnung: Der Schwingungsemis-
sionswert kann sich während der
tatsächlichen Benutzung des Elek-
trowerkzeugs von dem Angabewert
unterscheiden, abhängig von der
Art und Weise, in der das Elektro-
2
werkzeug verwendet wird.
Es besteht die Notwendigkeit, Sicherheitsmaßnahmen zum Schutz des Bedieners
festzulegen, die auf einer Abschätzung
der Aussetzung während der tatsächlichen
Benutzungsbedingungen beruhen (hierbei
sind alle Anteile des Betriebszyklus zu berücksichtigen, beispielsweise Zeiten, in denen das Elektrowerkzeug abgeschaltet ist,
und solche, in denen es zwar eingeschaltet
ist, aber ohne Belastung läuft).
II
Sicherheitshinweise
Lärm- und Vibrationswerte wurden entsprechend den in der Konformitätserklärung
genannten Normen und Bestimmungen
ermittelt.
Technische und optische Veränderungen
können im Zuge der Weiterentwicklung
ohne Ankündigung vorgenommen werden.
Alle Maße, Hinweise und Angaben dieser
Betriebsanleitung sind deshalb ohne Ge-
währ. Rechtsansprüche, die aufgrund der
38
Dieses Gerät kann bei un-
sachgemäßem Gebrauch
ernsthafte Verletzungen
verursachen. Bevor Sie mit
dem Gerät arbeiten, lesen Sie
sorgfältig die Betriebsanleitung und die Sicherheitshinweise und machen Sie sich
mit allen Bedienteilen gut
vertraut.
Page 39

DE AT CH
Symbole und Bildzeichen
86
T-130°C
Bildzeichen auf dem Ladegerät
Symbole in der Betriebsanleitung
Gefahrenzeichen (anstelle
des Ausrufungszeichens kann
die Gefahr erläutert sein) mit
Angaben zur Verhütung von
Personen- oder Sachschäden.
Gebotszeichen (anstelle des Aus-
rufungszeichens kann das Gebot
erläutert sein) mit Angaben zur Ver-
hütung von Schäden.
Hinweiszeichen mit Informationen
zum besseren Umgang mit dem Gerät.
Bildzeichen auf dem Gerät
Schneidwerkzeug läuft nach.
Warnung!
Lesen Sie vor der ersten Inbetrieb-
nahme die Betriebsanleitung auf-
merksam durch.
Benutzen Sie das Gerät nicht bei
Regen, bei schlechter Witterung, in
feuchter Umgebung oder an nassen
Hecken oder Rasen.
Angabe des Schallleistungspegels
L
WA
L
in dB
dB
WA
Schnittlänge Strauchscheren-Messer
Werfen Sie das Gerät mit ein-
gebautem Akku nicht in den
Hausmüll.
Polung
Das Ladegerät ist nur zur Ver-
wendung in Räumen geeignet.
Schutztemperaturbegrenzung
Schutzklasse II
Elektrogeräte gehören nicht in
den Hausmüll.
Allgemeine Sicherheitshinweise für Elektrowerkzeuge
WARNUNG! Lesen Sie alle
Sicherheitshinweise und Anweisungen. Versäumnisse bei der
Einhaltung der Sicherheitshinweise
und Anweisungen können elektrischen Schlag, Brand und/oder
schwere Verletzungen verursachen.
Bewahren Sie alle Sicherheitshinweise und Anweisungen für die
Zukunft auf.
Der in den Sicherheitshinweisen verwendete Begriff ,,Elektrowerkzeug” bezieht sich
auf netzbetriebene Elektrowerkzeuge (mit
Netzkabel) und auf akkubetriebene Elektrowerkzeuge (ohne Netzkabel).
1) ARBEITSPLATZSICHERHEIT
a) Halten Sie Ihren Arbeitsbereich
sauber und gut beleuchtet. Un-
ordnung oder unbeleuchtete Arbeitsbereiche können zu UnfälIen führen.
b) Arbeiten Sie mit dem Elektro-
werkzeug nicht in expIosionsgefährdeter Umgebung, in der sich
brennbare Flüssigkeiten, Gase
39
Page 40

DE AT CH
oder Stäube benden.
Elektrowerkzeuge erzeugen Funken,
die den Staub oder die Dämpfe entzünden können.
c) Halten Sie Kinder und andere
Personen während der Benutzung des EIektrowerkzeugs
fern. Bei Ablenkung können Sie die
Kontrolle über das Gerät verlieren.
2) ELEKTRISCHE SICHERHEIT
a) Der Anschlussstecker des Elek-
trowerkzeuges muss in die
Steckdose passen. Der Stecker
darf in keiner Weise verändert
werden. Verwenden Sie keine
Adapterstecker gemeinsam mit
schutzgeerdeten Elektrowerkzeugen. Unveränderte Stecker und
passende Steckdosen verringern das
Risiko eines elektrischen Schlages.
b) Vermeiden Sie Körperkontakt
mit geerdeten OberfIächen, wie
von Rohren, Heizungen, Herden
und Kühlschränken. Es besteht
ein erhöhtes Risiko durch elektrischen
Schlag, wenn Ihr Körper geerdet ist.
c) Halten Sie Elektrowerkzeuge
von Regen oder Nässe fern. Das
Eindringen von Wasser in ein Elektrogerät erhöht das Risiko eines elektrischen Schlages.
d) Zweckentfremden Sie das Kabel
nicht, um das Elektrowerkzeug
zu tragen, aufzuhängen oder
um den Stecker aus der Steckdose zu ziehen. Halten Sie das
Kabel fern von Hitze, Öl, scharfen Kanten oder sich bewegenden Geräteteilen. Beschädigte oder
verwickelte Kabel erhöhen das Risiko
eines elektrischen Schlages.
e) Wenn Sie mit einem Elektro-
werkzeug im Freien arbeiten,
verwenden Sie nur Verlängerungskabel, die auch für den
Außenbereich geeignet sind. Die
Anwendung eines für den Außenbereich geeigneten Verlängerungskabels
verringert das Risiko eines elektrischen
Schlages.
f) Wenn der Betrieb des Elektro-
werkzeuges in feuchter Umgebung nicht vermeidbar ist,
verwenden Sie einen Fehlerstromschutzschalter. Der Einsatz
eines Fehlerstromschutzschalters vermindert das Risiko eines elektrischen
Schlages.
3) SICHERHEIT VON PERSONEN
a) Seien Sie aufmerksam, achten
Sie darauf, was Sie tun, und
gehen Sie mit Vernunft an die
Arbeit mit einem Elektrowerkzeug. Benutzen Sie kein Elektrowerkzeug, wenn Sie müde
sind oder unter dem Einuss
von Drogen, Alkohol oder Medikamenten stehen. Ein Moment
der Unachtsamkeit beim Gebrauch des
Elektrowerkzeuges kann zu ernsthaften
Verletzungen führen.
b) Tragen Sie persönliche Schut-
zausrüstung und immer eine
Schutzbrille. Das Tragen persön-
licher Schutzausrüstung, wie Staubmaske, rutschfeste Sicherheitsschuhe,
Schutzhelm oder Gehörschutz, je nach
Art und Einsatz des Elektrowerkzeuges,
verringert das Risiko von Verletzungen.
c) Vermeiden Sie eine unbeab-
sichtigte lnbetriebnahme. Vergewissern Sie sich, dass das
Elektrowerkzeug ausgeschaltet
ist, bevor Sie es an die Strom-
40
Page 41

DE AT CH
versorgung und/oder den Akku
anschließen, es aufnehmen oder
tragen. Wenn Sie beim Tragen des
Elektrowerkzeuges den Finger am
Schalter haben oder das Gerät eingeschaltet an die Stromversorgung anschließen, kann dies zu Unfällen führen.
d) Entfernen Sie Einstellwerkzeu-
ge oder Schraubenschlüssel,
bevor Sie das Elektrowerkzeug
einschalten. Ein Werkzeug oder
Schlüssel, der sich in einem drehenden
Geräteteil bendet, kann zu Verletzungen führen.
e) Vermeiden Sie eine abnormale
Körperhaltung. Sorgen Sie für
einen sicheren Stand und halten
Sie jederzeit das Gleichgewicht.
Dadurch können Sie das Elektrowerkzeug in unerwarteten Situationen bes-
ser kontrollieren.
f) Tragen Sie geeignete Kleidung.
Tragen Sie keine weite Kleidung
oder Schmuck. Halten Sie Haare, Kleidung und Handschuhe
fern von sich bewegenden Teilen. Lockere Kleidung, Schmuck oder
lange Haare können von sich bewegenden Teilen erfasst werden.
g) Wenn Staubabsaug- und -auf-
fangeinrichtungen montiert
werden können, vergewissern
Sie sich, dass diese angeschlossen sind und richtig verwendet
werden. Verwendung einer Staub-
absaugung kann Gefährdungen durch
Staub verringern.
4) VERWENDUNG UND BEHANDLUNG DES ELEKTROWERKZEUGES
a) Überlasten Sie das Gerät nicht.
Verwenden Sie für Ihre Arbeit
das dafür bestimmte Elektro-
werkzeug. Mit dem passenden Elek-
trowerkzeug arbeiten Sie besser und
sicherer im angegebenen Leistungsbe-
reich.
b) Benutzen Sie kein Elektrowerk-
zeug, dessen Schalter defekt ist.
Ein Elektrowerkzeug, das sich nicht
mehr ein- oder ausschalten Iässt, ist
gefährlich und muss repariert werden.
c) Ziehen Sie den Stecker aus der
Steckdose und/oder entfernen
Sie den Akku, bevor Sie GeräteeinsteIlungen vornehmen,
Zubehörteile wechseln oder das
Gerät weglegen. Diese Vorsichts-
maßnahme verhindert den unbeabsichtigten Start des Elektrowerkzeuges.
d) Bewahren Sie unbenutzte Elek-
trowerkzeuge außerhalb der
Reichweite von Kindern auf.
Lassen Sie Personen das Gerät
nicht benutzen, die mit diesem
nicht vertraut sind oder diese
Anweisungen nicht gelesen
haben. Elektrowerkzeuge sind ge-
fährlich, wenn sie von unerfahrenen
Personen benutzt werden.
e) Pegen Sie Elektrowerkzeuge
mit Sorgfalt. Kontrollieren Sie,
ob bewegliche Teile einwandfrei
funktionieren und nicht klemmen, ob Teile gebrochen oder
so beschädigt sind, dass die
Funktion des Elektrowerkzeuges
beeinträchtigt ist. Lassen Sie beschädigte Teile vor dem Einsatz
des Gerätes reparieren. Viele
Unfälle haben ihre Ursache in schlecht
gewarteten Elektrowerkzeugen.
f) Halten Sie Schneidwerkzeuge
scharf und sauber. SorgfäItig ge-
pegte Schneidwerkzeuge mit scharfen
Schneidkanten verklemmen sich weniger und sind Ieichter zu führen.
41
Page 42

DE AT CH
g) Verwenden Sie Elektrowerk-
zeug, Zubehör, Einsatzwerkzeuge usw. entsprechend diesen
Anweisungen. Berücksichtigen
Sie dabei die Arbeitsbedingungen und die auszuführende Tätigkeit. Der Gebrauch von
Elektrowerkzeugen für andere als die
vorgesehenen Anwendungen kann zu
gefährlichen Situationen führen.
5) SORGFÄLTIGER UMGANG MIT
UND GEBRAUCH VON AKKUWERKZEUGEN
a) Laden Sie die Akkus nur in La-
degeräten auf, die vom Hersteller empfohlen werden. Für ein
Ladegerät, das für eine bestimmte Art
von Akkus geeignet ist, besteht Brand-
gefahr, wenn es mit anderen Akkus
verwendet wird.
b) Verwenden Sie nur die dafür
vorgesehenen Akkus in den
Elektrowerkzeugen. Der Gebrauch
von anderen Akkus kann zu Verletzungen und Brandgefahr führen.
c) Halten Sie den nicht benutzten
Akku fern von Büroklammern,
Münzen, Schlüsseln, Nägeln,
Schrauben oder anderen kleinen Metallgegenständen, die
eine Überbrückung der Kontakte verursachen könnten. Ein Kurz-
schluss zwischen den Akkukontakten
kann Verbrennungen oder Feuer zur
Folge haben.
d) Bei falscher Anwendung kann
Flüssigkeit aus dem Akku
austreten. Vermeiden Sie den
Kontakt damit. Bei zufälligem
Kontakt mit Wasser abspülen.
Wenn die Flüssigkeit in die Augen kommt, nehmen Sie zusätz-
lich ärztliche Hilfe in Anspruch.
Austretende Akkuüssigkeit kann zu
Hautreizungen oder Verbrennungen
führen.
6) SERVICE
a) Lassen Sie lhr Elektrowerkzeug
nur von qualiziertem Fachpersonal und nur mit Original-Ersatzteilen reparieren. Damit wird
sichergestellt, dass die Sicherheit des
Gerätes erhalten bleibt.
Spezielle Sicherheitshinweise
für die Akku-Gras- und
Strauchschere
1) SPEZIELLE SICHERHEITSHINWEISE
FÜR HECKENSCHEREN
a) Halten Sie alle Körperteile vom
Schneidmesser fern. Versuchen Sie nicht, bei laufendem
Messer Schnittgut zu entfernen
oder zu schneidendes Material
festzuhalten. Entfernen Sie eingeklemmtes Schnittgut nur bei
ausgeschaltetem Gerät. Ein Mo-
ment der Unachtsamkeit bei Benutzung
der Heckenschere kann zu schweren
Verletzungen führen.
b) Tragen Sie die Heckenschere am
Griff bei stillstehendem Messer.
Bei Transport oder Aufbewahrung der Heckenschere stets die
Schutzabdeckung aufziehen.
Sorgfältiger Umgang mit dem Gerät
verringert die Verletzungsgefahr durch
das Messer.
c) Halten Sie das Elektrowerkzeug
nur an den isolierten Griffächen, da das Schneidmesser
in Berührung mit verborgenen
42
Page 43

DE AT CH
Stromleitungen kommen kann.
Der Kontakt des Schneidmessers mit
einer spannungsführenden Leitung
kann metallene Geräteteile unter Spannung setzen und zu einem elektrischen
Schlag führen.
d) Durchsuchen Sie vor der Arbeit
die Hecke nach verborgenen
Objekten, z.B. Draht etc. So ver-
meiden Sie Geräteschäden.
e) Halten Sie die Heckenschere
richtig, z. B. mit beiden Händen
an den Handgriffen, wenn zwei
Handgriffe vorhanden sind. Der
Verlust der Kontrolle über das Gerät
kann zu Verletzungen führen.
f) Tragen Sie beim Arbeiten mit
dem Gerät geeignete Kleidung
und Arbeitshandschuhe. Fassen
Sie das Gerät nie am Schneidmesser an oder heben es am
Schneidmesser auf. Der Kontakt
mit dem Schneidmesser kann zu Verletzungen führen.
2) WEITERFÜHRENDE SICHERHEITSHINWEISE
Zu Ihrer persönlichen Sicherheit:
Tragen Sie geeignete Arbeitsklei-
dung wie festes Schuhwerk mit
rutschfester Sohle, eine robuste,
lange Hose, Handschuhe und eine
Schutzbrille. Tragen Sie keine lange
Kleidung oder Schmuck, da diese
von sich bewegenden Teilen erfasst
werden können. Benutzen Sie das
Gerät nicht, wenn Sie barfuß gehen
oder offene Sandalen tragen.
a) Schalten Sie das Gerät nur ein,
wenn Hände, Füße und alle
anderen Körperteile in sicherer
Entfernung zum Gerät sind. Es
besteht die Gefahr von Schnittverletzungen.
b) Geben Sie Acht, dass Sie sich
nicht mit den Schneidelementen
an Händen und Füßen verletzen.
c) Entfernen Sie das Netzteil, be-
vor Sie mit dem Gerät arbeiten.
Verwenden Sie kein Verlängerungskabel. Das Netzteil darf
nur in geschlossenen Räumen
verwendet werden. Durch das
Eindringen von Wasser erhöht sich das
Risiko eines elektrischen Schlags.
d) Verwenden Sie die Strauchsche-
re nicht in Kombination mit dem
Teleskopstiel. Es besteht die Gefahr
von Schnittverletzungen.
e) Die Strauchschere ist für das
Schneiden von Hecken vorgesehen. Mit dem Gerät keine Zweige, hartes Holz oder anderes
schneiden. So vermeiden Sie Geräte-
schäden.
f) Versuchen Sie nicht, ein blo-
ckiertes/verklemmtes Blatt zu
lösen, bevor Sie das Gerät ausgeschaltet haben. Es besteht Verlet-
zungsgefahr.
g) Immer erst das Gerät ausschalten und
den Akku entfernen (sofern zutreffend)
- wenn Sie das Gerät unbeaufsichtigt
lassen,
- bevor Sie Blockierungen entfernen
- vor Kontroll-, Wartungs- oder Reinigungsarbeiten,
- wenn Sie einen Fremdkörper berührt haben,
- wann immer das Gerät beginnt,
ungewöhnlich zu vibrieren.
So vermeiden Sie Unfälle und Verlet-
zungen.
43
Page 44

DE AT CH
3) SPEZIELLE SICHERHEITSHINWEISE
FÜR AKKUGERÄTE
a) Setzen Sie den Akku nicht über
längere Zeit starker Sonneneinstrahlung aus und legen Sie ihn
nicht auf Heizkörpern ab. Hitze
schadet dem Akku und es besteht Explosionsgefahr.
b) Lassen Sie einen erwärmten
Akku vor dem Laden abkühlen.
c) Öffnen Sie den Akku nicht und
vermeiden Sie eine mechanische
Beschädigung des Akkus. Es
besteht die Gefahr eines Kurzschlusses und es können Dämpfe austreten,
die die Atemwege reizen. Sorgen Sie
für Frischluft und nehmen Sie bei Beschwerden zusätzlich ärztliche Hilfe in
Anspruch.
Sicherheitshinweise für das
Akkuladegerät
1) RICHTIGER UMGANG MIT DEM
AKKULADEGERÄT
a) Dieses Gerät ist nicht dafür bestimmt,
durch Personen (einschließlich Kinder)
mit eingeschränkten physischen, sensorischen oder geistigen Fähigkeiten oder
mangels Erfahrung und/oder mangels
Wissen benutzt zu werden, es sei denn,
sie werden durch eine für ihre Sicherheit
zuständige Person beaufsichtigt oder
erhielten von ihr Anweisungen, wie das
Gerät zu benutzen ist.
b) Kinder sollten beaufsichtigt werden, um
sicherzustellen, dass sie nicht mit dem
Gerät spielen.
c) Verwenden Sie zum Laden des
Akkus ausschließlich das mitgelieferte Ladegerät. Es besteht
Brand- und Explosionsgefahr.
d) Überprüfen Sie vor jeder Be-
nutzung Ladegerät, Netzkabel
und Stecker und lassen Sie es
von qualiziertem Fachpersonal
und nur mit Original-Ersatzteilen reparieren. Benutzen Sie ein
defektes Ladegerät nicht und
öffnen Sie es nicht selbst. Damit
wird sichergestellt, dass die Sicherheit
des Gerätes erhalten bleibt.
e) Schließen Sie das Ladegerät
nur an eine Steckdose mit
Fehlerstrom-Schutzeinrichtung
(FI-Schalter) an. Achten Sie darauf, dass die Netzspannung mit
den Angaben des Typenschildes
auf dem Ladegerät übereinstimmt. Es besteht die Gefahr eines
elektrischen Schlags.
f) Trennen Sie das Ladegerät vom
Netz, bevor Verbindungen zum
Elektrowerkzeug geschlossen
oder geöffnet werden. So stellen
Sie sicher, dass Akku und Ladegerät
nicht beschädigt werden.
g) Halten Sie das Ladegerät sau-
ber und fern von Nässe und
Regen. Benutzen Sie das Ladegerät niemals im Freien. Durch
Verschmutzung und das Eindringen
von Wasser erhöht sich das Risiko eines elektrischen Schlags.
h) Das Ladegerät darf nur mit den
zugehörigen Original-Akkus
betrieben werden. Das Laden von
anderen Akkus kann zu Verletzungen
und Brandgefahr führen.
i) Vermeiden Sie mechanische Be-
schädigungen des Ladegerätes.
Sie können zu inneren Kurzschlüssen
führen.
k) Das Ladegerät darf nicht auf
brennbarem Untergrund (z.B.
Papier, Textilien) betrieben wer-
44
Page 45

DE AT CH
den. Es besteht Brandgefahr wegen der
beim Laden auftretenden Erwärmung.
l) Wenn die Anschlussleitung dieses Ge-
rätes beschädigt wird, muss sie durch
den Hersteller oder seinen Kundendienst oder eine ähnlich qualizierte
Person ersetzt werden, um Gefährdungen zu vermeiden.
m) Laden Sie in dem Ladegerät keine
nichtauadbaren Batterien auf.
Ladevorgang
Setzen Sie den Akku nicht
extremen Bedingungen wie
Wärme und Stoß aus. Es
besteht Verletzungsgefahr
durch auslaufende Elektrolytlösung! Spülen Sie bei
Kontakt mit Wasser oder
Neutralisator und suchen Sie
einen Arzt auf, wenn es zu
Berührungen mit den Augen
usw. gekommen ist.
Laden Sie den Akku nur
in trockenen Räumen auf.
Schalten Sie das Gerät beim
Laden nicht ein. Es besteht
die Gefahr von Verletzungen
durch Stromschlag.
der kurz auaden.
• Verwenden Sie zum Auaden des in
das Gerät eingebauten Li-Ionen-Akkus
das mitgelieferte Ladegerät.
• Laden Sie den Akku nach, wenn das
Gerät zu langsam läuft.
• Beachten Sie in jedem Falle die jeweils
gültigen Sicherheitshinweise sowie
Bestimmungen und Hinweise zum Umweltschutz.
• Defekte, die aus unsachgemäßer
Handhabung resultieren, unterliegen
nicht der Garantie.
1. Verbinden Sie den Ladekabelstecker (24) mit der Ladebuchse (5)
des Gerätes.
2. Schließen Sie das Netzteil (23)
an eine Steckdose an.
Die Ladeanzeige (4) leuchtet:
rot: Gerät wird aufgeladen
grün: Ladevorgang ist beendet.
Die empfohlene Ladezeit beträgt
max. 3-5 Stunden.
3. Ziehen Sie nach erfolgtem Ladevorgang zuerst den Stecker des
Ladege
rätes aus der Steckdose
und entfernen dann den Ladeka-
belstecker aus dem Gerät.
Montage
Achten Sie darauf, dass das Gerät
nicht länger als 3-5 Stunden unun-
terbrochen aufgeladen wird. Der
Akku und das Gerät könnten beschädigt werden und bei längerer
Ladezeit verbrauchen Sie unnötig
Energie. Bei Überladung erlischt
der Garantieanspruch.
• Laden Sie den in das Gerät eingebaute Akku vor dem ersten Gebrauch auf.
Den Akku nicht mehrmals hintereinan-
Messer einsetzen/
auswechseln
Achten Sie darauf, vor jedem
Auswechseln der Messer das
Gerät auszuschalten, um
Gefährdungen und Verletzungen zu vermeiden!
Messer einsetzen
1. Setzen Sie das Gerät (1) so auf
das Grasscheren-Messer (9) oder
45
Page 46

DE AT CH
2. Schieben Sie das Mes-
3. Schieben Sie die Entriegelungs-
das Strauchscheren-Messer (11)
auf, dass Pfeile und Markierungen aufeinander stehen.
serende in Richtung
Entriegelungstaste (7).
Sie rastet hörbar ein.
Messer abnehmen:
taste (7) am Gerät nach oben
und nehmen Sie das komplette
Messer ab.
Sollte die Exzenteraufnahme (25)
des Messers verdreht sein, so muss
diese von Hand soweit gedreht wer-
den, dass sich das Messer (9/11)
aufsetzen lässt.
Teleskopstiel
zusammenbauen
Der Teleskopstiel (12) wird aus Ver-
packungsgründen zweiteilig geliefert. Beim Zusammenstecken rasten
die beiden Teile ineinander ein und
können nicht wieder voneinander
gelöst werden.
Achten Sie darauf, das Netzkabel nicht einzuklemmen.
Räder montieren:
3. Ziehen Sie ein Rad (21) von der
Radachse ab.
4. Schieben Sie die Radachse
durch die Öffnungen am Teleskopstiel und stecken Sie Räder
und Radachse (21) wieder zusammen.
Teleskopstiel montieren/
demontieren
1. Schieben Sie das Gerät (1) in
die Gerätehalterung (20) des Teleskopstiels (12). Es rastet hörbar
ein.
2. Stecken Sie die Steckverbindung
(17) in die Steckbuchse (5) auf
der Rückseite des Gerätegriffs
(3).
3. Zum Demontieren lösen Sie
die Steckverbindung (17) und
ziehen Sie das Gerät aus der
Gerätehalterung (20) des Teleskopstiels heraus.
Teleskoprohre zusammen-
stecken:
1. Stecken Sie die beiden Teile
des Teleskoprohrs (16) bis zum
Anschlag zusammen. Sie rasten
ineinander ein.
Achten Sie beim Zusammenstecken darauf, dass die Nase
(16a) am oberen Teleskoprohr in
die Nut (16b) am unteren Teles-
koprohr passt.
2. Schieben Sie die Stellschraube
(18) nach oben und schrauben
Sie diese fest
.
46
Bedienung
Beachten Sie den Lärmschutz und
örtliche Vorschriften.
Ein- und Ausschalten
1. Nehmen Sie vor dem Einschalten
den Messerschutz (
2. - Zum Einschalten halten Sie die
Einschaltsperre (2) gedrückt
und betätigen Sie den Ein-/
Ausschalter (6). Lassen Sie
dann die Einschaltsperre los.
- Zum Einschalten des Gerätes
8/10) ab.
Page 47

bei Einsatz des Teleskopstiels
DE AT CH
(12) betätigen Sie die Einschaltsperre (13) und den
Ein-/Ausschalter (15) am Te-
leskopstiel.
Das Gerät läuft mit höchster Ge-
schwindigkeit.
3. Zum Ausschalten lassen Sie den
Ein-/Ausschalter (6/15) los.
Bei Einsatz des Teleskopstiels (12) können
Sie das Gerät nur am Handgriff des Teleskopstiels ein- und ausschalten.
Das Netzteil darf nur in geschlossenen
Räumen verwendet werden.
• Verwenden Sie nur scharfe Messer, um
eine gute Schnittleistung zu erzielen
und das Gerät und den Akku zu schonen.
• Belasten Sie das Gerät während der
Arbeit nicht so stark, dass es zum Stillstand kommt.
• Beachten Sie die Hinweise zur Wartung und Reinigung des Gerätes.
Einsatz als Grasschere
Nach dem Ausschalten des
Gerätes bewegen sich die
Messer noch einige Zeit weiter. Lassen Sie die Messer
vollständig zur Ruhe kommen. Berühren Sie die sich
bewegenden Messer nicht
und bremsen Sie diese nicht
ab. Verletzungsgefahr!
Allgemeine Arbeitshinweise
Achten Sie beim Schneiden dar-
auf, dass keine Gegenstände wie
Draht, Metallteile, Steine usw. in
das Messer gelangen. Dies kann zu
Schäden an der Schneideinrich tung
führen. Schalten Sie bei Blockierung
der Messer durch feste Gegenstände das Gerät sofort aus.
• Kontrollieren Sie das Gerät vor jedem
Gebrauch auf offensichtliche Mängel
wie lose, abgenutzte oder beschädigte
Teile. Prüfen Sie den festen Sitz der
Schrauben im Messerbalken.
• Entfernen Sie das Netzteil (
bevor Sie mit dem Gerät arbeiten. Verwenden Sie kein Verlängerungskabel.
23),
• Gras lässt sich am besten schneiden,
wenn es trocken und nicht zu hoch ist.
• Der Teleskopstiel (
das Arbeiten mit der Grasschere:
Schieben Sie langsam das Gerät auf
den Rädern über den Boden. So erhalten Sie eine gleichmäßige Schnitthöhe.
Teleskopstiel in der Länge verstellen:
• Stellen Sie die Länge des Teleskopstiels
für Ihre Körpergröße passend mit Hilfe
der Stellschraube (
Arbeitswinkel einstellen:
Für einen komfortablen Kantenschnitt können Sie die Gerätehalterung (
Drehgelenk (
90° nach rechts oder links drehen.
• Stellen Sie den gewünschten Arbeitswinkel durch Drehen der Gerätehalterung (
Aufnahme rastet in der gewünschten
Stellung ein.
19) des Teleskopstiels um
20) des Teleskopstiels ein. Die
12) erleichtert
18) ein.
20) am
47
Page 48

Einsatz als Strauchschere
DE AT CH
Verwenden Sie die Strauch-
schere nicht in Kombination
mit dem Teleskopstiel. Es besteht die Gefahr von Schnittverletzungen.
• Bewegen Sie das Gerät gleichmäßig
vorwärts oder bogenförmig auf und
ab.
• Der doppelseitige Messerbalken
ermöglicht den Schnitt in beiden Richtungen oder durch Pendelbewegungen
von einer Seite zur anderen.
Reinigung/Wartung
Lassen Sie Arbeiten, die nicht
in dieser Betriebsanleitung
beschrieben sind, von unserem Service-Center durchführen. Verwenden Sie nur
Originalteile. Es besteht Verletzungsgefahr.
Verwenden Sie keine Reinigungs-
bzw. Lösungsmittel. Sie könnten das
Gerät damit irreparabel beschädigen. Chemische Substanzen können die Kunst stoffteile des Gerätes
angreifen.
Tragen Sie beim Umgang mit den
Messern (
Gefahr durch Schnittverletzungen!
Führen Sie folgende Wartungs- und Reini-
gungsarbeiten regelmäßig durch. Dadurch
ist eine lange und zuverlässige Nutzung
gewährleistet:
• Überprüfen Sie Abdeckungen und
9/11) Handschuhe.
Schutzeinrichtungen auf Beschädigungen und korrekten Sitz. Tauschen Sie
diese gegebenenfalls aus.
• Halten Sie Lüftungsschlitze, Motorge-
häuse und Griffe des Gerätes sauber.
Verwenden Sie dazu ein feuchtes Tuch
oder eine Bürste.
•
Halten Sie das Messer stets sauber.
Nach jeder Benutzung des Gerätes
müssen Sie
- das Messer reinigen (mit öligem
Lappen);
- den Messerbalken
einölen mit Öl-
kännchen oder
Spray.
• Leichte Scharten an den Schneiden
können Sie selbst glätten. Ziehen Sie
dazu die Schnei den mit einem Ölstein
ab. Nur scharfe Messer bringen eine
gute Schnittleistung.
• Stumpfe, verbogene oder beschädigte
Messer müssen ausgewechselt werden.
Wir haften nicht für durch unsere Geräte
hervorgerufene Schäden, sofern diese
durch unsachgemäße Reparatur oder den
Einsatz von Nicht-Originalteilen bzw. durch
nicht bestimmungsgemäßen Gebrauch ver-
ursacht werden.
Lagerung
• Bewahren Sie das Gerät im mitgelieferten Messerschutz trocken und außer-
halb der Reichweite von Kindern auf.
• Lagern Sie den Akku nur im teilgeladenen Zustand. Der Ladezustand sollte
während einer längeren Lagerzeit 40-
60% betragen.
• Lagern Sie das Gerät zwischen 10°C
bis 25°C. Vermeiden Sie während der
48
Page 49

Lagerung extreme Kälte oder Hitze, da-
DE AT CH
mit der Akku nicht an Leistung verliert.
• Prüfen Sie während einer längeren Lagerungsphase etwa alle 3 Monate den
Ladezustand des Akkus und laden Sie
bei Bedarf nach.
Entsorgung/
Umweltschutz
Führen Sie Gerät, Zubehör und Verpackung einer umweltgerechten Wiederverwertung zu.
Ladegeräte gehören nicht in den
Hausmüll.
Werfen Sie das Gerät mit ein-
gebautem Akku nicht in den
Hausmüll, ins Feuer (Explosi-
onsgefahr) oder ins Wasser.
Beschädigte Akkus können der
Umwelt und ihrer Gesundheit
schaden, wenn giftige Dämpfe
oder Flüssigkeiten austreten.
• Entsorgen Sie das Gerät mit entladenem Akku. Öffnen Sie Gerät und Akku
nicht.
• Entsorgen Sie das Gerät nach den
lokalen Vorschriften. Geben Sie das
Gerät an einer Sammelstelle ab, wo es
einer umweltgerechten Wiederverwertung zugeführt wird. Fragen Sie hierzu
Ihren lokalen Müllentsorger oder unser
Service-Center.
• Die Entsorgung Ihrer defekten eingesendeten Geräte führen wir kostenlos
durch.
• Führen Sie geschnittene Äste und Gras
der Kompostierung zu und werfen Sie
diese nicht in die Mülltonne.
49
Page 50

Ersatzteile/Zubehör
DE AT CH
Ersatzteile und Zubehör erhalten Sie unter
www.grizzly-service.eu.
Sollten Sie kein Internet haben, so wenden Sie sich bitte telefonisch an das Service-Center
(siehe „Service-Center“ Seite 52). Halten Sie die unten genannten Bestellnummern bereit.
Pos. Bezeichnung Artikel-Nr.
8/9 Grasscheren-Messer + Messerschutz 13700011
10/11 Strauchscheren-Messer + Messerschutz 13700012
12 Teleskopstiel mit Fahrgestell 91100822
22 Ladegerät 80001055
Fehlersuche
Problem Mögliche Ursache Fehlerbehebung
Gerät ist entladen Gerät laden (siehe „Ladevorgang“)
Gerät startet nicht
Schlechtes
Schneidergebnis
50
Einschaltsperre (
nicht richtig betätigt
Ein-/Ausschalter (
defekt
Zu viel Reibung wegen fehlender Schmierung
verschmutztes Messer
9/11)
(
Messer (
stumpf oder hat Scharten
Messer (
schädigt
2/13)
6/15)
9/11) ist
9/11) ist be-
Einschalten (siehe „Bedienung“)
Reparatur durch Service-Center
Messer (
(siehe „Reinigung/Wartung“)
Messer reinigen (siehe „Reinigung/
Wartung“)
Messer schärfen (siehe „Reinigung/
Wartung“) oder auswechseln (siehe
„Ersatzteile/Zubehör“)
Messer auswechseln (siehe „Ersatztei-
le/Zubehör“)
9/11) ölen
Page 51

Garantie
DE AT CH
Sehr geehrte Kundin, sehr geehrter Kunde,
Sie erhalten auf dieses Gerät 3 Jahre Garantie ab Kaufdatum.
Im Falle von Mängeln dieses Gerätes
stehen Ihnen gegen den Verkäufer des
Gerätes gesetzliche Rechte zu. Diese
gesetzlichen Rechte werden durch unsere
im Folgenden dargestellte Garantie nicht
eingeschränkt.
Garantiebedingungen
Die Garantiefrist beginnt mit dem Kaufdatum. Bitte bewahren Sie den Original Kassenbon gut auf. Diese Unterlage wird als
Nachweis für den Kauf benötigt.
Tritt innerhalb von drei Jahren ab dem Kauf-
datum dieses Gerätes ein Material- oder
Fabrikationsfehler auf, wird das Gerät von
uns – nach unserer Wahl – für Sie kostenlos
repariert oder ersetzt. Diese Garantieleis-
tung setzt voraus, dass innerhalb der DreiJahres-Frist das defekte Gerät und der Kaufbeleg (Kassenbon) vorgelegt und schriftlich
kurz beschrieben wird, worin der Mangel
besteht und wann er aufgetreten ist.
Wenn der Defekt von unserer Garantie
gedeckt ist, erhalten Sie das reparierte oder
ein neues Gerät zurück. Mit Reparatur oder
Austausch des Gerätes beginnt kein neuer
Garantiezeitraum.
Garantiezeit und gesetzliche
Mängelansprüche
Die Garantiezeit wird durch die Gewährleistung nicht verlängert. Dies gilt auch
für ersetzte und reparierte Teile. Eventuell
schon beim Kauf vorhandene Schäden und
Mängel müssen sofort nach dem Auspa-
cken gemeldet werden. Nach Ablauf der
Garantiezeit anfallende Reparaturen sind
kostenpichtig.
Garantieumfang
Das Gerät wurde nach strengen Qualitätsrichtlinien sorgfältig produziert und vor
Anlieferung gewissenhaft geprüft.
Die Garantieleistung gilt für Material- oder
Fabrikationsfehler. Diese Garantie erstreckt
sich nicht auf Geräteteile, die normaler
Abnutzung ausgesetzt sind und daher als
Verschleißteile angesehen werden können
(z.B. Messer, Akku und Getrieberad) oder
für Beschädigungen an zerbrechlichen Tei-
len (z.B. Schalter, Akkus oder die aus Glas
gefertigt sind).
Diese Garantie verfällt, wenn das Gerät
beschädigt, nicht sachgemäß benutzt oder
nicht gewartet wurde. Für eine sachgemäße
Benutzung des Gerätes sind alle in der Be-
triebsanleitung aufgeführten Anweisungen
genau einzuhalten. Verwendungszwecke
und Handlungen, von denen in der Betriebsanleitung abgeraten oder vor denen gewarnt
wird, sind unbedingt zu vermeiden.
Das Gerät ist lediglich für den privaten
und nicht für den gewerblichen Gebrauch
bestimmt. Bei missbräuchlicher und unsach-
gemäßer Behandlung, Gewaltanwendung
und bei Eingriffen, die nicht von unserer
autorisierten Service-Niederlassung vorgenommen wurden, erlischt die Garantie.
Abwicklung im Garantiefall
Um eine schnelle Bearbeitung Ihres Anliegens zu gewährleisten, folgen Sie bitte den
folgenden Hinweisen:
• Bitte halten Sie für alle Anfragen den
Kassenbon und die Identikationsnummer (IAN93560) als Nachweis für
den Kauf bereit.
• Die Artikelnummer entnehmen Sie bitte
dem Typenschild.
• Sollten Funktionsfehler oder sonstige
Mängel auftreten, kontaktieren Sie
zunächst die nachfolgend benannte
51
Page 52

DE AT CH
Serviceabteilung telefonisch oder per
E-Mail. Sie erhalten dann weitere In-
formationen über die Abwicklung Ihrer
Reklamation.
• Ein als defekt erfasstes Gerät können
Sie, nach Rücksprache mit unserem
Kundenservice, unter Beifügung des
Kaufbelegs (Kassenbons) und der
Angabe, worin der Mangel besteht
und wann er aufgetreten ist, für Sie
portofrei an die Ihnen mitgeteilte
Service-Anschrift übersenden. Um Annahmeprobleme und Zusatzkosten zu
vermeiden, benutzen Sie unbedingt nur
die Adresse, die Ihnen mitgeteilt wird.
Stellen Sie sicher, dass der Versand
nicht unfrei, per Sperrgut, Express oder
sonstiger Sonderfracht erfolgt. Senden
Sie das Gerät bitte inkl. aller beim
Kauf mitgelieferten Zubehörteile ein
und sorgen Sie für eine ausreichend
sichere Transportverpackung.
Reparatur-Service
Sie können Reparaturen, die nicht der Garantie unterliegen, gegen Berechnung von
unserer Service-Niederlassung durchführen
lassen. Sie erstellt Ihnen gerne einen Kostenvoranschlag.
Wir können nur Geräte bearbeiten, die
ausreichend verpackt und frankiert eingesandt wurden.
Achtung: Bitte senden Sie Ihr Gerät gereinigt und mit Hinweis auf den Defekt an
unsere Service-Niederlassung.
Nicht angenommen werden unfrei - per
Sperrgut, Express oder mit sonstiger Sonderfracht - eingeschickte Geräte.
Die Entsorgung Ihrer defekten eingesendeten Geräte führen wir kostenlos durch.
Service-Center
Service Deutschland
DE
Tel.: 0800 54 35 111
E-Mail: grizzly@lidl.de
IAN 93560
Service Österreich
AT
Tel.: 0820 201 222
(0,15 EUR/Min.)
E-Mail: grizzly@lidl.at
IAN 93560
Service Schweiz
CH
Tel.: 0842 665566
(0,08 CHF/Min.,
Mobilfunk max. 0,40 CHF/Min.)
E-Mail: grizzly@lidl.ch
IAN 93560
Importeur
Bitte beachten Sie, dass die folgende
Anschrift keine Serviceanschrift ist. Kontaktieren Sie zunächst das oben genannte
Service-Center.
Grizzly Gartengeräte
GmbH & CO KG
Am Gewerbepark 2
D-64823 Groß-Umstadt
www.grizzly-service.eu
52
Page 53

IT
MT
Con la presente dichiariamo che
Cesoia a batteria per erba e cespugli
serie di costruzione FGS 72 A1
Numero di serie
201311000001-201312039310
corrisponde alle seguenti direttive UE in materia nella rispettiva versione valida:
2006/42/EC • 2004/108/EC • 2000/14/EC • 2005/88/EC • 2011/65/EU
Per garantire la conformità sono state applicate le seguenti norme armonizzate e anche
le norme e disposizioni nazionali che seguono:
EN 55014-1/A1:2009/A2:2011 • EN 55014-2/A2:2008
EN 61000-3-2/A2:2009 • EN 61000-3-3:2008
EN 62233:2008 • EN 60745-1/A11:2010 • EN 60745-2-15/A1:2010
EN 60335-1/A14:2010 • EN 60335-2-29/A2:2010
Si dichiara inoltre in conformità alla direttiva 2000/14/EC sull’emissione acustica am-
bientale:
Livello di potenza sonora
garantita: 86 dB(A)
misurata: 79,1 dB(A)
Procedura della valutazione della conformità applicata come da allegato V /
2000/14/EC
Traduzione della dichiarazione
di conformità CE originale
Grizzly Gartengeräte GmbH & Co. KG
Am Gewerbepark 2
64823 Groß-Umstadt
GERMANY
15.01.2014
(Responsabile documentazione tecnica)
Volker Lappas
53
Page 54

DE
AT
CH
Original EG-
Konformitäts-
erklärung
GB
MT
Translation of the
original EC declara-
tion of conformity
Hiermit bestätigen wir, dass die
Akku-Gras- und Strauchschere
Baureihe FGS 72 A1
Seriennummer
201311000001-201312039310
folgenden einschlägigen EU-Richtlinien in
ihrer jeweils gültigen Fassung entspricht:
2006/42/EC • 2004/108/EC • 2000/14/EC • 2005/88/EC • 2011/65/EU
Um die Übereinstimmung zu gewährleisten,
wurden folgende harmonisierte Normen
sowie nationale Normen und Bestimmungen
angewendet:
EN 55014-1/A1:2009/A2:2011 • EN 55014-2/A2:2008
EN 61000-3-2/A2:2009 • EN 61000-3-3:2008
EN 62233:2008 • EN 60745-1/A11:2010 • EN 60745-2-15/A1:2010
EN 60335-1/A14:2010 • EN 60335-2-29/A2:2010
Zusätzlich wird entsprechend der Geräusch-
emissionsrichtlinie 2000/14/EG bestätigt:
Schallleistungspegel:
Garantiert: 86 dB(A);
Gemessen: 79,1 dB(A)
Angewendetes Konformitätsbewertungsver-
fahren entsprechend
Anhang V / 2000/14/EG
We declare that the unit
Cordless Grass & Shrub Cutter
model FGS 72 A1
Serial number:
201311000001-201312039310
conforms with the following applicable relevant version of the EU guidelines:
In order to guarantee consistency, the following harmonised standards as well as
national standards and stipulations have
been applied:
We additionally conrm the following in ac-
cordance with the 2000/14/EC emissions
guideline:
Sound power level
Guaranteed: 86 dB(A)
Measured: 79.1 dB(A)
Compliance evaluation process carried
out in accordance with Appendix V/
2000/14/EC
Grizzly Gartengeräte GmbH & Co. KG
Am Gewerbepark 2
D-64823 Groß-Umstadt, Germany
15.01.2014
54
(Dokumentationsbevollmächtigter,
Volker Lappas
Documentation Representative)
Page 55

FGS 72 A1
Disegni esplosi • Explosionszeichnung
Exploded Drawing
informativo, informativ, informative
2013-12-09_rev02_gs
55
Page 56

16
16a
12
3
16b
12
18
21
2
6
13
5
17
19
20
12
18
12
15
19
20
Page 57

Page 58

GRIZZLY GARTENGERÄTE GMBH & CO. KG
Am Gewerbepark 2
D-64823 Groß-Umstadt
Versione delle informazioni · Last Information
Update · Stand der Informationen: 09 / 2013
Ident.-No.: 80000498092013-IT
IAN 93560
 Loading...