


FAGOR CFF631, CFF-64MCBUT, CFF-631MCBUT, CFF-631CBUT, CFF-631ABUT User Manual
...FR
GB
Notice d'installation et d'utilisation des cuisinières mixtes
Instructions for use and maintenance of gas-electric cookers
CFF - 6 4 MC
CFF - 631A
CFF - 631
CFF - 631C
CFF - 631MC
7461 7453; 7450; 7414; 7361;
04.2005
C600240I3

GB |
20 |
|
|
thedrytheburnersandthe.sparkers |
|
Thereisdirtbetweentheburnerandthesparkerortheburnersandsparkersare.wetCarefullyclean |
• |
|
|
burnedreplace.it |
|
Power.failureCheckifthecookerisconnectedtotheelectric.installationCheckthemainfuse–ifitis |
• |
|
|
Sparkerdoesnotlightthegas(nospark) |
|
|
unblocktheinjectorwithafinecopper.wireYoumustnotusesteelwireorenlargethe.opening |
|
Dirtyinjectororflameopeningsinthe.burnerClosetheburnerknobs,cleancarefullyallitspartsand |
• |
|
|
Gasdoesnotlightup |
|
|
generate.smokeTakecaretocleanitthoroughlyaftereach.use |
|
Dirty.turnspitThefatleftontheturnspitfromtheprevioususagewillburnforsometimeandthus |
• |
|
|
amountsoffatandwaterinbakingdishcanreducetheamountof.smoke |
|
Whengrillingthegeneratedsmokeisanormal.conditionDecreasingthetemperatureorreducingthe |
• |
|
|
Toomuchsmokeintheoven |
|
|
.Fig27 |
|
230V25W,temperatureresistance3000.C |
|
|
bulb3withanewonefeaturingthefollowingparameters:typeE14 |
|
|
Burntbulb–unscrewtheglassbowl1ofthelampandreplacethe |
• |
|
lampsocket2,andscrewthebulb3alltheway(fig..27) |
|
|
Bulbisnotscrewedallthewayin–unscrewglassbowl1fromthe |
• |
|
Iftheovenhasbeenoperatedandisstillhot,waituntilitcools.down |
|
|
Ovenlighteningdoesnotfunction |
||
|
remedytheproblemby.yourselves |
|
Incaseofdisturbancesinthecookeroperation,checktheguidelinesbelowtofindoutifyouareableto |
||
byaqualifiedpersontoavoidahazard |
.2 |
|
Ifthemainscableisdamagedhaveitreplacedbytheproduceroranauthorisedserviceorelse |
||
toavoidthepossibilityofelectric.shock |
.1 |
|
Beforeproceedingwiththetroubleshooting,disconnectthecookerfromtheelectricitysupply |
||
|
CAUTION! |
|
|
TROUBLESHOOTING |
6 |
|
hangingofthe.guides |
|
.ovenThebarlimitatinginsertionofthesheetornetinchambershouldbebehindtherear |
|
|
Duringassemblyyoushouldpayattentioniftheguidesarefastenedontherightwallofthe |
.2 |
|
Donotturnontheovenifcatalyticcoverofthefanisnot.installed |
.1 |
|
|
CAUTION! |
|
|
thetwosideshieldsandthe.runners |
|
Oncetheoveniscleaned,intheovenswithladderguidesfirstassemblytherearcatalyticshieldandthen |
||
|
enamel.shield |
|
Aspecialcleanserforovenyoucanuseonlyforenamelled.surfaceDonotcleanwithitcatalytic |
||
|
CAUTION! |
|
andwithagreatcaution,observingtherecommendationsofdetergent.manufacturer |
||
intendedforcleaning.ovensSincethesedetergentsarecaustic,youshouldusetheminminimalamounts |
||
withagentsintendedforcleaning.cookersInordertocleanbakedstainsyoucanusespecialdetergent |
||
Afterremovingthecatalyticshieldsyoucancleantheinsideofthe.chamberCleantheenamelledsurfaces |
||
3.4.5CLEANINGENAMELLEDSURFACESOFTHEOVEN |
||
JA |
|
|
1 |
FR |
90/396/EEC–Lesexigencesfundamentalespourdesproduitsdegaz[GAD] |
.3 |
|
89/336/EEC–Compatibilidadelectromagnetique |
.2 |
|
73/23/EEC–Lesappareilsélectriquesdebassetension |
.1 |
|
Nosappareilsremplissentlesnormesdesécurité: |
||
.16Lacuisinièrepeutêtreinstallerentrelesmeublesdel’hauteurde850.maxmm(de.parterre) |
||
bronchemental’installationavecdesterres.correctes |
|
|
.15LacuisinièreestréaliséedanslaI-ereclassedeprotectioncontrel’électrocutionetelleexigele |
||
entenduaucunpréjudicepourles.utilisateurs |
|
|
techniquesetrépondantademeilleurscritèresde.qualitéCesmodificationsn’aurontbien |
|
|
produitsdanslebutdetoujoursoffrirdesappareilsenadéquationaveclesnouvelles |
|
|
.14Leconstructeurseréserveledroitdeprocéderadesmodificationssanspréavissurses |
||
.13Ilestinterditdesouleverlacuisinièreentirantsurlaportede.four |
||
sousladisciplinedeperdrelagaranti,saufleremplacementdel’ampouledu.four |
|
|
.12Chaqueinterventional’appareilréalisableparlemêmeutilisateurestcomplètementinterdit |
||
autoriseaprès-vente.agrée |
|
|
d’uncourtcircuitilconvientdedébrancherl’appareiletcontacterdetouteurgenceleservice |
|
|
.11Encasdepannedel’appareiletspécialementlorsd’unefuitedegazoulorsdel’apparition |
||
dommagescausaparuneinstallationouuneinstallationIncorrectesdes.appareils |
|
|
.10Leconstructeurneprendpasenchargeaucuneresponsabilitéencasdeblessuresoude |
||
confirmerdanslagarantide.produitLamanquedecetteconfirmationannulela.garantie |
|
|
constructeur,enaccordaveclestextesenvigueurdanslepaysconcernecequ’ilfaut |
|
|
régulationnedoitêtreeffectuequeparuninstallateurhabiliteouuntechnicienautoriseparle |
|
|
Laconnexiondelacuisinièreal’installationdegaznatureloual’installationdebutaneetsa |
.9 |
|
Onpeutinstallerleproduitdepuisde8heuresdeprésencedanslacuisine. |
.8 |
|
cuisinièredoitêtreeffectueenaccordaveclaloid’installationen.vigueur |
|
|
Ilestinterditdebranchercetappareilaveclescâblesde.combustionLebranchementdela |
.7 |
|
appareilsontinscritessurlaplaque.signalétique |
|
|
pression)etleréglagedel’appareilsont.compatiblesLesconditionsdesréglagedecet |
|
|
Avantl’installationassurez-vousquelesconditionsdedistributionlocale(naturedegazet |
.6 |
|
l’appareilaurecyclage. |
|
|
laporteparcequ’ilpeutprovoquerledangersurtoutparles.enfantsApresilfautpasser |
|
|
Ilfautadapterlacuisinièredétruiteal’étatdenepaspouvoirl’utiliserde.nouveauIlfautquitter |
.5 |
|
éliminerenaccordavecles.règlements |
|
|
Lesélémentsdel’emballagesonttrèsdangereuxpourdes.enfantsIlfautlessépareret |
.4 |
|
Onpeututiliserlesmatérielsdel’emballagepourle.recyclage |
.3 |
|
Lacuisinièreestunproduitquin’estpasfaitdesmatérielsdangereuxpour.l’environnement |
.2 |
|
guided’utilisationavantd’installeretd’utilisercette.cuisinière |
|
|
peututiliserlacuisinièrequedansunendroitbien.aèreVeuillezconsulterlesnoticesetle |
|
|
Lacuisinièredoitêtreinstallerenaccordaveclestextesenvigueurdanslepays.concerneOn |
.1 |
|
ATTENTION! |
||

•Next grasp the door with both hands, turn it in the closing direction through an angle of 450 and take out the hinges.
Fig. 24
Taking out the oven door
CAUTION !
1.The hinge bow is tense with a big strength, therefore while taking out the door a special care must be taken not to cut one’s own fingers.
2.During cleaning the upper wall of the oven you should pay attention to electric heaters, temperature sensor and lamp of the oven illumination; do not change position of sensor setting.
3.Do not pour water onto the bottom of oven otherwise it may trickle through some possible leakage and get on the lower heater.
5.4.2 DISASSEMBLY OF SIDE CATALYTIC SHIELDS
CFF-64MC; CFF-631C; CFF-631MC |
|
|
a) |
1 |
2 |
b) |
3 |
4 |
Fig. 25 Disassembly of side catalytic shields
To disassembly the side catalytic shields you must first disassembly the guides.
Disassembly of guides:
− |
gently press the ladder bar1 down and take it from beneath the blocking cap 2, (fig. 25a), |
− |
turn aside the guides 4, lift and take them off from the oven openings (fig. 25b), |
−take the catalytic shields 3 out.
CFF-64MC; CFF-631MC |
3 |
1 |
2 |
1 |
Caution !
Make sure that cooker is not connected to power supply.
Fig. 26
Disassembly of rear catalytic shields
Disassembly of the rear perforated shield:
–unscrew four screws 1 (fig. 26),
–take the shield 2 from the oven rear wall 3.
|
|
RESOMMAIRE |
|
|
|
|
|
1 |
INFORMATIONS GENERALES .......................................................................................................... |
3 |
|
|
1.1 |
DESTINATION DE LA CUISINIERES ............................................................................................................. |
3 |
|
1.2 |
CARACTERISTIQUES TECHNIQUES ........................................................................................................... |
3 |
|
1.3 |
INFORMATIONS IMPORTANTES.................................................................................................................. |
3 |
|
1.4 |
CONSTRUCTION DE LA CUISINIERE........................................................................................................... |
5 |
|
1.5 |
EMMENAGEMENT DE LA CUISINIERE......................................................................................................... |
6 |
|
1.6 |
MISE EN PLACE DE LA CUISINIERE ............................................................................................................ |
7 |
|
|
|
|
2 |
INSTALLATION .................................................................................................................................. |
7 |
|
|
2.1 |
CONEXION DU GAZ....................................................................................................................................... |
7 |
|
2.1.1 CONNEXION AU GAZ NATUREL .............................................................................................................. |
7 |
|
|
2.1.2 CONNEXION A UNE BONBONNE DE GAZ BUTANE............................................................................... |
8 |
|
|
2.2 |
REGULATION DES ROBINETS ..................................................................................................................... |
8 |
|
2.3 |
REMPLACEMENT DES GICLEURS............................................................................................................... |
8 |
|
2.4 |
RACCORDEMENT DE LA CUISINIERE A L’INSTALLATION ELECTRIQUE................................................ |
9 |
|
|
|
|
3 |
TABLE DES FOYERS......................................................................................................................... |
9 |
|
|
3.1 |
BRULEURS A GAZ ......................................................................................................................................... |
9 |
|
3.1.1 CHOIX DE LA FLAMME.............................................................................................................................. |
9 |
|
|
3.1.2 CHOIX DE LA VAISSELLE ....................................................................................................................... |
11 |
|
|
3.2 |
PLAQUE ELECTRIQUE ................................................................................................................................ |
11 |
|
3.2.1 CHOIX DE LA VAISSELLE POUR UNE PLAQUE ELECTRIQUE ........................................................... |
12 |
|
|
|
|
|
4 |
FOUR ................................................................................................................................................ |
12 |
|
|
4.1 |
CONSTRUCTION DU FOUR ........................................................................................................................ |
12 |
|
4.2 |
SELECTEURS DU FOUR ............................................................................................................................. |
13 |
|
4.2.1 SELECTEUR DES FONCTIONS DU FOUR............................................................................................. |
13 |
|
|
4.2.2 SELECTEUR DU REGULATEUR DE TEMPERATURE........................................................................... |
14 |
|
|
4.2.3 |
MINUTERIE............................................................................................................................................... |
14 |
|
4.2.4 |
ECLAIRAGE DU FOUR ............................................................................................................................ |
14 |
|
4.3 |
ALLUMAGE ET EXTINCTION DU FOUR ..................................................................................................... |
14 |
|
4.4 |
DESCRIPTION DES FONCTIONS DU FOUR.............................................................................................. |
14 |
|
4.5 |
INFORMATION GENERALE CONCERNANT LA PREPARATION DES PLATS ......................................... |
16 |
|
|
|
|
5 |
NETTOYAGE ET ENTRETIEN.......................................................................................................... |
19 |
|
|
5.1 |
REMARQUES GENERALES......................................................................................................................... |
19 |
|
5.2 |
NETTOYAGE DU COUVERCLE................................................................................................................... |
19 |
|
5.3 |
NETTOYAGE DES BRULEURS ................................................................................................................... |
19 |
|
5.4 |
NETTOYAGE DU FOUR ............................................................................................................................... |
20 |
|
5.4.1 DEMONTAGE DE LA PORTE DU FOUR................................................................................................. |
20 |
|
|
5.4.2 DEMONTAGE DES PROTECTEURS LATERAUX CATALYTIQUES...................................................... |
21 |
|
|
5.4.3 NETTOYAGE DE LA CAVITE................................................................................................................... |
21 |
|
|
|
|
|
6 |
RESOLUTION DES PANNES ........................................................................................................... |
22 |
|
GB |
19 |
|
2 |
FR |
GB |
18 |
|
|
.(fig24), |
• |
Lockhingesonbothsidesofthedoorbyplacingtheclampingring1onthecatch2ofthehingebow3 |
||
|
Openthedoorentirely, |
• |
|
1.4.5DISASSEMBLYOFTHEOVENDOOR |
|
Tofacilitatecleaningoftheovenenamelelementsyoucanremovetheovendoor |
• |
|
|
shining,thenyoushouldexchange.them |
• |
Aftersometimethecatalyticshieldslosetheirself-cleaningfeatures,andtheirsurfacebecomes |
||
|
.evaporate |
|
doorshouldbe.closedDuringself-cleaningprocessdirtfromthecatalyticshieldswilloxidizeand |
|
|
Switchtheovenonforanhourandselectthemaximumtemperature(2500.C)Duringthattimetheoven |
• |
|
Periodically,particularlyafterroastingveryfatmealsitisrecommendedtomakeaself-cleaning.cycle |
||
heatedtohightemperatures,inthiswaythecatalyticenamelcaneasierabsorbemitted.vapours |
|
|
Catalyticshieldshaveself-cleaning.propertiesDuringnormalusagetheinterioroftheovenbecomes |
• |
|
.17) |
equippedwithsideshieldscoveredwithcatalyticenamel.(pos6and9fig. |
|
Theoveninterioriscoveredwithceramic.enamelModelsCFF-64MC,CFF-631CandCFF-631MCare |
• |
|
|
spotsofoiltoroast.again |
.3 |
Itisbesttocleanthebottomoftheovenaftereachuse,nottoallowtheremainsoffoodand |
||
|
.allowed |
.2 |
Cleaningtheovenwiththeuseofappliancesforsteamgenerationunderpressureisnot |
||
Beforecleaningyoushouldwaituntilovencools.downHotheatersmaycause.burns |
.1 |
|
|
CAUTION! |
|
|
4.5CLEANINGTHEOVEN |
|
|
takingoff,closeattentionshouldbepaidnottodamagethe.sparkers |
|
causeitsimproper.burningOncedriedtheburnersmustbeputbackonplaceinanorderreverseto |
• |
|
Cleanburnerelementsshouldbethoroughlydried,ifleftwettheycanpreventgasfromlighteningor |
||
|
bewipedwithabrushmoistwith.solvent |
|
blocktheinjectorsandthegasflamecanbesmallortheburnerwillnotlightat.allTheinjectorsshould |
• |
|
Theburnerholdersurroundingtheinjectorshouldalwaysbekept.cleanTheaccumulateddirtcan |
||
|
.patent |
|
unblocktheflameopeningsyoucanusesteel.wireAftercleaningcheckiftheflameopeningsare |
|
|
Tocleanthecoveryoucanuseaspongeandthehead–anon-metallicbrushorsoftmetallic.brushTo |
• |
|
|
withtheadditionofwashingliquid,nextwasheach.part |
|
Tocleantheburnertakeofftheburnercoversandheads.(Fig23)thensoaktheminluke-warmwater |
• |
|
|
andimpurities |
|
Cleantheburnerseachtimetheygetspilledoverwithadishandalsoperiodicallyremovingcoatings |
• |
|
|
3.5CLEANINGTHEBURNERS |
|
|
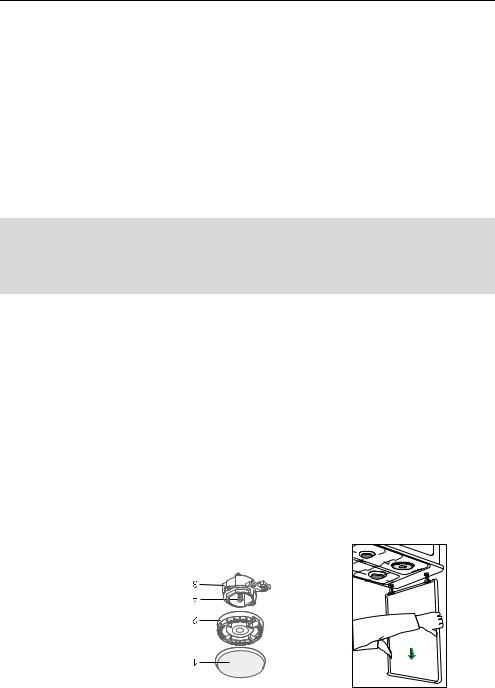
.Fig22Takingoutthecover |
|
4–injector |
|
|
3-holder |
|
|
2–head |
|
|
1–cover |
|
|
.Fig23Burnerelements |
|
|
|
JA |
|
|
|
|
|
|
|
|
|
|
|
|
3 |
|
|
|
|
|
|
|
FR |
|
|
|
|
|
|
|
|
|
|
|
|
|
|
|
|
gazchaudsdel’intérieurdufour. |
|
||||
|
Enouvrantlaportedefourilfautêtreprudentets’éloignerdelaporteparleraisond’évacuationdes |
• |
||||||||||||||||||
|
|
|
|
|
|
|
|
|
|
|
|
|
|
|
|
|
.protections |
|
||
|
Apresunecuissonneprenezpasamainnuelacasserole.rieIlestconseilled’utiliserdesgantsde |
• |
||||||||||||||||||
|
|
|
|
|
|
|
|
|
|
|
|
|
|
|
|
portechaudede.four |
|
|||
|
doiventêtreplacesloindepartie.chaudesSurtoutilfautfairel’attentiondenepaslestoucherparles |
|
||||||||||||||||||
|
Lescâblesdebranchementdesautresappareilsélectrodomestiquessetrouvantprèsdelacuisinières |
• |
||||||||||||||||||
|
|
|
|
|
|
|
|
|
|
|
|
|
|
|
|
fonctionnement! |
|
|||
|
lesenfantsdel’appareilpendantle |
du.fourEloigner |
l’intérieur |
a |
lesélémentschauds |
toucher |
|
|||||||||||||
|
Pendantl’utilisationsl’installation.chauffeIlestrecommandedeprendrelesprécautionspouréviterde |
• |
||||||||||||||||||
|
|
|
|
|
|
|
|
|
|
|
3.1INFORMATIONSIMPORTANTES |
|||||||||
|
|
|
|
|
|
|
|
|
|
|
|
|
|
|
|
|
|
|||
|
|
|
|
1.ex |
|
1.ex |
|
|
|
|
|
|
|
Cadredutournebroche |
|
|
dufour |
|||
|
1.ex |
|
1.ex |
|
1.ex |
|
1.ex |
|
1.ex |
|
|
|
|
|
Grilleplate |
|
|
|||
|
|
|
|
|
|
|
|
|
|
|
Equipement |
|||||||||
|
1.ex |
|
1.ex |
|
1.ex |
|
1.ex |
|
1.ex |
|
|
|
Platcreux(selonmodele) |
|
||||||
|
|
|
|
|
|
|
|
|
|
|
|
|||||||||
|
|
• |
|
|
|
|
|
|
|
|
|
|
|
|
|
|
|
Minutrie120 |
||
|
|
• |
|
• |
|
• |
|
• |
|
• |
|
|
|
|
Régulateurdelatempératuredufour |
|||||
|
|
• |
|
• |
|
• |
|
|
|
• |
25W |
|
|
|
|
Eclairagedufour |
|
|
|
|
|
|
• |
|
|
|
|
|
|
|
• |
2000W |
|
|
Resistancecirculaire |
|
|
|
|
||
|
|
|
|
• |
|
• |
|
|
|
|
4W |
Allimentationdutournebroche |
|
|
Electrique |
|||||
|
|
• |
|
• |
|
• |
|
• |
|
• |
2000W |
|
|
|
Resistencedegril |
|
|
Four |
||
|
|
• |
|
• |
|
• |
|
• |
|
• |
1500W |
|
|
Resistanceinferieure |
|
|
|
|
||
|
|
• |
|
• |
|
• |
|
• |
|
• |
700W |
|
|
Resistancesuperieure |
|
|
|
|
||
|
|
• |
|
• |
|
• |
|
|
|
• |
|
|
|
Allumageelectriquedesbruleursagaz |
||||||
|
1.ex |
|
1.ex |
|
1.ex |
|
|
|
|
|
|
|
|
|
Ex |
|
|
|
|
|
|
|
|
|
|
|
|
1500W |
/ |
145 |
φ |
Plaqueelectrique |
|
|
|
|
|||||
|
|
|
|
|
|
|
|
|
|
|
|
|
|
|
||||||
|
|
|
|
|
|
|
|
1.ex |
|
|
1000W |
/ |
145 |
φ |
Plaqueelectrique |
|
Tablefoyers |
|||
|
1ex. |
|
1.ex |
|
1.ex |
|
1.ex |
|
1.ex |
3100W |
|
|
|
Grandsbruleurs |
|
|||||
|
|
|
|
|
|
|
|
|
|
|
|
|||||||||
|
1.ex |
|
1.ex |
|
1.ex |
|
1.ex |
|
2.ex |
2000W |
|
|
|
Moyensbruleurs |
|
|
|
|
||
|
1.ex |
|
1.ex |
|
1.ex |
|
1.ex |
|
1.ex |
1100W |
|
|
|
Petitsbruleurs |
|
|
|
|
||
|
4200 |
|
4200 |
|
4200 |
|
3700 |
|
2200 |
[W] |
|
|
|
Puissancenominaledelacuisinière |
||||||
|
|
|
|
|
230V~50Hz |
|
|
|
|
|
|
|
|
Tensionnominaledel’alimentation |
||||||
|
58,0 |
|
61,0 |
|
65,0 |
|
65,0 |
|
58,0 |
] |
[dm |
|
|
|
|
|
|
Volume |
||
|
|
|
|
|
|
|
|
|
|
|
3 |
|
|
|
|
|
|
|
|
|
|
425 |
|
450 |
|
450 |
|
450 |
|
425 |
[mm] |
|
|
|
profondeur |
|
utilesdufour |
||||
|
395 |
|
395 |
|
430 |
|
430 |
|
395 |
[mm] |
|
|
|
largeur |
|
|||||
|
|
|
|
|
|
|
|
|
Dimensions |
|||||||||||
|
335 |
|
335 |
|
335 |
|
335 |
|
335 |
[mm] |
|
|
|
hauteur |
|
|||||
|
|
|
|
|
|
|
|
|
|
|
|
|||||||||
|
|
|
|
850x600x600 |
|
|
[mm] |
|
|
|
(hauteurxlargeurxprofondeur) |
|||||||||
|
|
|
|
|
|
|
Dimensionsd’encombrementdelacuisinière |
|||||||||||||
|
|
|
|
|
|
|
|
|
|
|
|
|||||||||
|
631MC |
|
631C |
|
631 |
|
631A |
|
64MC |
|
|
|
|
|
|
|
|
|
|
|
|
CFF |
|
CFF |
|
CFF |
|
CFF |
|
CFF |
|
|
|
|
|
|
|
|
|
|
|
|
Tableau1 |
|
|
|
|
|
|
2.1CARACTERISTIQUESTECHNIQUES |
||||||||||||
|
|
|
|
|
|
|
|
|
|
|
||||||||||
|
|
|
|
|
|
|
|
|
|
|
|
|
|
|
|
strictementinterdite! |
||||
|
finsest |
d’autres |
utilisationa |
.domestiqueSon |
usage |
un |
a |
Lacuisinièreestdestinéeuniquement |
||||||||||||
|
|
|
|
|
|
|
|
|
|
|
1.1DESTINATIONDELACUISINIERES |
|||||||||
|
|
|
|
|
|
|
|
|
|
|
INFORMATIONSGENERALES |
1 |
||||||||

Traditional grilling 
Tabela 8
Kind of dish |
|
|
Timing [min] |
|
|
one side |
|
second side |
|||
|
|
||||
Chicken steak and cutlets |
8 –10 |
|
6 – 10 |
||
Joint of pork |
10 |
– 12 |
|
6 |
– 8 |
Sausages |
8 – 10 |
|
6 |
– 8 |
|
Kebabs |
7 |
– 8 |
|
5 |
– 6 |
Beef steak |
6 |
– 7 |
|
5 |
– 6 |
Joint of beef |
10 |
– 12 |
|
10 |
– 12 |
Veal cutlet |
6 |
– 8 |
|
6 |
– 8 |
Veal steak |
6 |
– 7 |
|
5 |
– 6 |
Lamb cutlet |
8 – 10 |
|
6 |
– 8 |
|
Chicken – a half |
10 — 15 (on the inside) |
|
10 – 12 (on the outside) |
||
Fillet |
6 |
– 7 |
|
4 - 5 |
|
Trout |
4 - 7 |
|
|
6 |
|
Krouts |
2 |
– 3 |
|
2 |
– 3 |
Toast |
3 - 5 |
|
2 - 3 |
||
5 CLEANING AND MAINTANANCE
5.1 GENERAL REMARKS
CAUTION !
Before proceeding with cleaning, disconnect the cooker from the electrical power
In order to maintain the proper technical condition and aesthetic appearance, the cooker must be regularly cleaned.
•The cooker must not be cleaned with the use of any coarse-grained, abrasive powders, abrasive sponges, aggressive chemical agents and sharp objects.
•The parts made of stainless steal, knobs and fascia panel should be cleaned with soft cleaning liquids without any abrasive powders.
•The enamelled parts should be cleaned with a soft cloth or a sponge moistened with lukewarm water with the addition of soft cleaning agent. Heavy stains should be removed with the use of special agents for cleaning cookers.
•Do not let water drop beneath the hob. The area around the burners should be clean at all times since dirt worsen the combustion of gas.
•Dirty grate should be soaked in luke-warm water with the addition of washing liquid, then washed and dried.
•Burners and sparkers should be kept clean and dry at all times which will ensure their correct performance
•After using them, baking tins and forms, grates and roast pans should be soaked in luke-warm water with the addition of washing liquid, then washed and dried.
•Check to make sure that the oven door seal is clean.
5.2 CLEANING THE COVER
•Before cleaning the cooker you can disassembly the cover.
•First, open the cover completely, grasp its sides, lift it up and pull it out of the hob holes (fig. 22). Wash, wipe dry, and put aside.
GB |
17 |
•Il est interdit de mettre a l’intérieur du four des objets prenants facilement feu et des objets sensibles a des hautes températures.
•Les graisses et les huiles chaudes peuvent prendre feu. C’est pour cela qu‘il faut toujours surveiller la cuisson de ces plats.
•Les casseroles devront être posées au centre du brûleur. Eloignez les parties de plastiques des casseroles de la flammes et soyez prudents de ne pas bousculer les casseroles pendant la cuisson.
•Ne pas mettre des objets lourdes sur la porte du four ou s’appuyer dessous.
•Ne pas laisser l’appareil avec des brûleurs fonctionnes sans supervision, surtout pendant la friture, pour ne pas provoquer l’incendie de la grasse.
•Il est interdit de mettre a l’intérieur du four et dans le casserolier des objets pouvant prendre feu ainsi quo des objets sensibles aux températures élevées.
•Il est conseille de nettoyer bien la couvercle avant de le fermer.
•Avant de fermer la couvercle il faut éteindre tous les brûleurs, plaque électrique et les refroidir. La couvercle de verre après le chauffage peut se casser.
•Il est interdit d’utiliser l’appareil comme chauffage d’appoint dans une pièce.
•En cas de fuite de gaz il faut:
–Fermer le robinet de l’installation du gaz ou la bouteille de butane,
–Eteindre tous les foyers et autres sources de flamme ou de chaleur,
–Ouvrir la fenêtre et bien aérer la pièce,
–Il est interdit d’allumer tout autre appareil électrique (y compris la lumière, radio, sonneur, etc.) ou mécanique qui peut provoquer étincelle.
–Signaler la panne a un service autorise ou appeler a un installateur autorise.
•En cas d’allumer le gaz qui fuit de la valve en panne de la bouteille de butane il faut mettre un plaid humide sur la bouteille pour le refroidir. Il faut serrer la valve de la bouteille. Il est interdit d’utiliser la bouteille en panne.
•Il est interdit de faire les modification pour autre type de gaz, lui même, de faire les modification de l’installation de gaz ou électrique de l’appareil.
Bruleurs a gaz
–Ne pas poser sur les supports de casseroles ou des peules déformes ou peu stables, qui peuvent se renverser et inonder les brûleurs.
–Il est interdit d’enlever les supports pour poser les casseroles directement sur les brûleurs.
–Ne pas laisser des casseroles ou des poeles vides sur un foyer allume.
–Conserver les brûleurs en parfait état de propreté, car la saleté provoque des dysfonctionnements.
–Avant avoir retire la casserole du brûleurs, il faut baisser la flamme ou l’éteindre totalement.
Plaque chauffante
–Il faut maintenir la plaque dans un parfait état de propreté. Si elle est sale, elle perd de la puissance.
–Il faut allumer la plaque chauffante après avoir mis un récipient contenant de la nourriture, a l’exception du première usage.
–Il est interdit de mettre sur la plaque des récipients mouilles, parce que l’humidité provoque de la corrosion.
–Il est interdit de mettre de l’eau froide sur la plaque chaude.
–Il est conseille d’éteindre la plaque quelques minutes avant la fin de la préparation des plats, elle accumule la température et après son extinction, elle reste un certain temps chaude.
–Il est interdit de cuire des plats dans les récipients en aluminium ou dans des récipients en plastique sur la plaque chauffante.
–La plaque électrique ne peut pas servir de la place pour ranger des récipients chauds.
4 |
FR |

GB |
16 |
|
|
|
|
|
|
|
|
|
|
|
|
|
|
|
|
|
choosethetimedependingonweight |
||||||||
|
|
|
|
|
|
|
|
|
|
|
|
|
1) |
1) |
175 |
|
- |
|
|
|
|
|
Goose,duck |
||||
2:00–2:30 |
160 |
|
1 |
|
|
|
|
|
|
Beef |
|||
1:50–2:00 |
175 |
|
1 |
|
|
|
|
|
|
Pork |
|||
1:40–2:20 |
160 |
|
1 |
|
|
|
|
|
|
Veal |
|||
2:00–2:20 |
160 |
|
1–1,5 |
|
|
|
|
|
Venison |
||||
0:50–1:00 |
180 |
|
1 |
|
|
|
|
|
|
Chicken |
|||
Timing[hour:min] |
Temperature[0C] |
|
Amount[kg] |
|
|
Kindofmeat |
|
||||||
Tabela7 |
|
|
|
|
Roastingandstewingmeat |
||||||||
|
|
|
|
|
|||||||||
|
|
|
|
|
|
|
|
|
|
|
|||
0:30–0:40 |
|
160 |
|
|
|
|
|
|
Sponge-cake |
||||
0:40–0:55 |
|
175 |
|
|
|
|
|
|
|
Fruitcake |
|||
0:20–0:30 |
|
175 |
|
|
|
|
|
|
Streuselcakes |
||||
0:40–0:45 |
|
175 |
|
|
|
|
|
|
|
Yeastcake |
|||
1:00–1:10 |
|
160 |
|
|
|
|
|
|
|
Teacake |
|||
1:05–1:10 |
|
160 |
|
|
|
|
|
|
Roundcake |
||||
1:00–1:10 |
|
100 |
|
|
|
|
|
|
|
Meringues |
|||
Timing[hour:min] |
|
Temperature[0C] |
|
|
Kindofcake |
|
|||||||
Table6 |
|
|
|
|
|
|
|
|
|
|
|
Cakes |
|
|
|
|
|
|
|
|
|
|
|
|
|
||
|
|
|
|
|
|
|
|
|
|
||||
30-50 |
180-200 |
|
|
|
|
|
stewing,upto2kg |
- |
|||||
20–30 |
|
225–250 |
|
|
|
|
roasting,upto2kg |
- |
|||||
|
|
|
|
|
|
|
|
|
|
|
|
Fish |
|
size |
190-210 |
|
|
|
|
|
|
|
|
|
Venison |
||
Upto3hoursdependingonthe |
200-210 |
|
|
|
|
|
Goose,duck,turkey |
||||||
50–60 |
225-250 |
|
|
|
|
|
|
|
|
|
Chicken |
||
|
190-210 |
|
|
|
|
|
|
|
-longroasting |
||||
thickness |
|
|
|
|
|
|
|
|
|
Meat |
|||
|
|
|
|
|
|
|
|
|
|
|
|||
12–15percentimetreofmeat |
|
225–250 |
|
|
|
|
|
|
-shortroasting |
||||
|
|
|
|
|
|
|
|
||||||
|
|
|
|
|
|
|
|
|
|
Meat |
|||
|
|
|
|
|
|
|
|
|
|
|
|
||
Timing[min] |
|
Temperature[0C] |
|
|
|
|
Dish |
|
|||||
Table3 |
|
|
|
|
|
|
|
|
|
Meatdishes |
|||
|
|
|
|
|
|
|
|
|
|
||||
|
|
|
|
|
|
|
|
|
|
||||
|
|
|
|
|
|
|
|
|
|
|
|
|
|
200–220 |
|
0:20–0:30 |
|
|
|
|
|
|
Streuselcakes |
||||
200–210 |
|
0:25–0:50 |
|
|
|
|
|
|
|
Fruitcake |
|||
220 |
|
0:40–0:50 |
|
|
|
|
|
|
Strudel(apple) |
||||
190–200 |
|
0:30–0:40 |
|
|
|
|
|
|
|
Plaitedbun |
|||
210–220 |
|
0:10–0:25 |
|
|
|
|
|
|
|
Shortcrust |
|||
170–180 |
|
0:30–0:40 |
|
|
|
|
|
|
Sponge-cake |
||||
175–190 |
|
0:50–1:00 |
|
|
|
|
|
|
|
Yeastcake |
|||
160–175 |
|
1:15–1:20 |
|
|
|
|
|
|
Roundcake |
||||
Temperature[0C] |
|
Timing[hour:min] |
|
|
|
Kindofcake |
|
||||||
Table2 |
|
|
|
|
|
|
|
|
|
|
|
Cakes |
|
|
|
|
|
|
|
|
|
|
|
|
|
||
|
|
|
|
|
|
|
|
|
|
|
|
||
particulardishandthennotedowntheoptimumtimeand.temperature |
|
||||||||||||
values,whichinpracticemayvaryupand.downThebestsolutionistomakeseveraltriesfora |
• |
||||||||||||
and.meatTheseareindicative |
cookingtimingsfordough |
Below,tablessummarizeapproximate |
|||||||||||
|
|
|
|
5 |
|
|
|
|
|
FR |
|
|
|
|
|
|
|
|
|
|
régulateurdelatempérature; |
four;4–sélecteurdurégulateurdelatempérature;5–témoindutravaildelacuisinière;6–témoindu |
||||||||||
2–sélecteurdelalaquechauffante;3–sélecteurduchoixdesfonctionsdu |
1,–sélecteurdesbrûleurs; |
|||||||||
1 |
1 |
1 |
2 |
5 |
3 |
6 |
|
4 |
|
|
|
|
|
|
4 |
|
|
|
0 |
150 |
|
|
|
3 |
|
|
|
|
20 |
|
||
|
|
2 |
|
5 |
|
|
250 |
|
100 |
|
|
|
1 |
|
6 |
|
|
|
|
50 |
|
0 |
0 |
0 |
0 |
|
0 |
|
|
0 |
|
|
|
|
|
|
|
|
|
|
C |
|
|
|
|
|
|
|
|
C |
|
|
|
|
1 |
1 |
1 |
1 |
5 |
3 |
6 |
|
4 |
|
CFF-631A |
|
|
|
|
|
|
|
|
|
|
|
|
|
|
|
|
|
|
|
200 |
150 |
|
|
|
|
|
|
|
|
|
|
|
|
|
|
|
|
|
|
|
250 |
|
100 |
|
|
|
|
|
|
|
|
|
|
|
|
|
|
|
|
|
|
|
|
|
50 |
|
0 |
0 |
0 |
0 |
|
0 |
|
|
0 |
|
|
|
|
|
|
|
|
|
|
|
||
|
|
|
|
|
|
|
|
C |
|
|
|
|
|
|
|
|
C |
|
|
|
|
|
|
|
|
|
CFF-64MC |
|
|
|
|
|
LESBANDEAUX |
|
|
|
|
|
13–grilledufour |
7–moyenbrûleur;8–grandbrûleur;9–plaqueélectrique;10–grille;11–bandeau;12–platcreux; |
|||||
1–tabledecuisson;2–fourélectrique;3–portedufour;4–casserolier;5–couvercle;6–petitbrûleur; |
|||||
|
|
Dessin1 |
|
|
|
|
|
4 |
|
|
4 |
3 |
|
|
3 |
|
|
13 |
|
|
13 |
|
|
12 |
|
|
12 |
|
|
2 |
|
|
2 |
|
|
11 |
C |
6 |
11 |
C |
6 |
1 |
|
10 |
1 |
|
10 |
8 |
|
9 |
8 |
|
7 |
|
|
|
|
||
7 |
|
5 |
7 |
|
5 |
|
|
|
|
||
CFF-631A;CFF-531;CFF-631C;CFF-631MC |
|
CFF-64MC |
|||
|
|
4.1CONSTRUCTIONDELACUISINIERE |
|||
JA
•The dish, depending on its size, place on the third or fourth level of the oven
•His function allows for enhancing the taste of a dish; you get the crisp skin effect.
Roasting with heat evenly distributed by a fan (turbo heater)
•While using his function the circular heating element and the fan are on. The fan circulates hot air in
the whole oven chamber. This cooking method requires temperature lower than traditional cooking and it should be less than 2000C.
•Turbo heater function is particularly suitable for cooking two the same or different kind dishes (e.g. meat and fish) placed on two different levels in the oven. The two dishes should have similar cooking times. For simultaneous cooking the oven temperature should be a little higher and the time longer than required for cooking a single dish.
•For roasting and stewing of meat we recommend to prepare dishes which weight is more than 1 kg
When cooking two dishes at the same time:
−take the two dishes out of the oven and check if they are cooked thoroughly; should one of them be not ready yet, leave it in the oven until it is ready.
Once the baking is finished – turn the oven off.
Defrosting
•The turbo heater function is particularly suitable for defrosting of deep frozen food. As a rule we recommend to put frozen products on a tray placed on the second or third level. The selection of defrosting temperature depends on the kind of a dish.
•Pastry, fruit and meat jellies are defrosted using turbo heater without setting the temperature on.
•While defrosting meat or poultry wrap it in aluminium foil to prevent from direct exposure to hot air, then place in the middle – bottom part of the oven and set the temperature at about 50–700C.
•Frozen, ready to use dishes e.g. vegetables can be baked directly, without defrosting.
4.5 GENERAL HINTS ON PREPARING DISHES
•When the red pilot lamp goes off, it means the oven has reached the temperature required.
•For baking cakes you can use traditional tin trays and also Teflon covered trays, ceramic and glass trays and aluminium foil. New tin tray should be baked in a strongly heated oven before first use.
•Trays should be filled with dough up to 2/3 of their height to leave enough place for the dough to rise.. Baking tins should be placed in the centre of the wired shelf.
•Follow closely the instructions on preheating the oven since different cakes have different requirements. Usually cakes are baked in temperature about 160 – 2000C. While baking the door should be kept closed, opening can make cake fall.
•When selecting the temperature of baking, consider the following rules:
–dough rolled out to thin cake – high power, short baking time,
–thick and liquid dough – lower power, longer baking time.
•While baking the cake should be heated evenly. This requirement if fulfilled when function  or
or  . is chosen
•In order to check if the baking is ready, a few minutes before switching off the oven, a wooden rod should be put into the cake. If pastry does not stick to the rod – the baking is ready. After the baking, the cake should be preferably left in the oven for approximately 5 more minutes.
•For roasting meat you can use ceramic pots, glass, enamel and stainless steel pots, and cast-iron pots with heat resistant handles. For meat we recommend using function  or
or  . The best way of roasting meat, especially lean is to use function
  . The roasting temperature is mainly dependent on type and size of meat. Typically, the roasting temperature is from 200 – 2500C.
GB |
15 |
CFF-631 |
|
|
C |
|
|
|
|
|
|
|
CFF-631C |
|
C |
|
|
|
|
|
|
|
|
|
|
|
|
|
|
|
|
|
|
|
|
|
0 |
|
0 |
|
0 |
|
0 |
0 |
0 |
|
|
|
|
|
|
|||||
50 |
|
|
|
|
|
6 |
1 |
|
|
|
|
|
|
|
|
|
|
|
|
||
100 |
|
|
250 |
|
|
5 |
|
2 |
|
|
|
|
|
|
|
|
|
|
|
|
|
|
150 |
200 |
|
|
|
4 |
3 |
|
|
|
|
|
4 |
6 |
3 |
5 |
2 |
|
1 |
1 |
1 |
CFF-631MC |
|
C |
|
|
|
|
|
|
|
|
|
|
C |
|
|
|
|
|
|
|
|
|
|
|
|
|
|
|
|
|
|
|
0 |
|
|
0 |
|
0 |
|
0 |
0 |
0 |
0 |
20 |
|
|
50 |
|
|
6 |
|
1 |
|
|
120 |
|
|
|
|
|
|
||||
|
|
|
|
|
|
|
|
|||
40 |
|
100 |
100 |
250 |
|
5 |
|
2 |
|
|
|
|
|
|
|
|
|
|
|
||
60 |
80 |
|
150 |
200 |
|
4 |
|
3 |
|
|
|
|
|
|
|
|
|||||
7 |
|
6 |
4 |
5 |
3 |
|
2 |
1 |
1 |
1 |
Dessin 2
1, – sélecteur des brûleurs; 2 – sélecteur de la laque chauffante; 3 – sélecteur du choix des fonctions du four; 4 – sélecteur du régulateur de la température; 5 – témoin du travail de la cuisinière; 6 – témoin du régulateur de la température; 7 – sélecteur du minuterie;
Le témoin du travail de la cuisinière signalise l’allumage d’un élément chauffant de la cuisinière ça veut dire de la plaque électrique ou des résistances du four.
L’indicateur de régulation de température signalise le fonctionnement de sélecteur de température. Cet indicateur s’allume après choisir la température du four. L’indicateur s’éteignent quand la température est supérieure que celle sélectionnée.
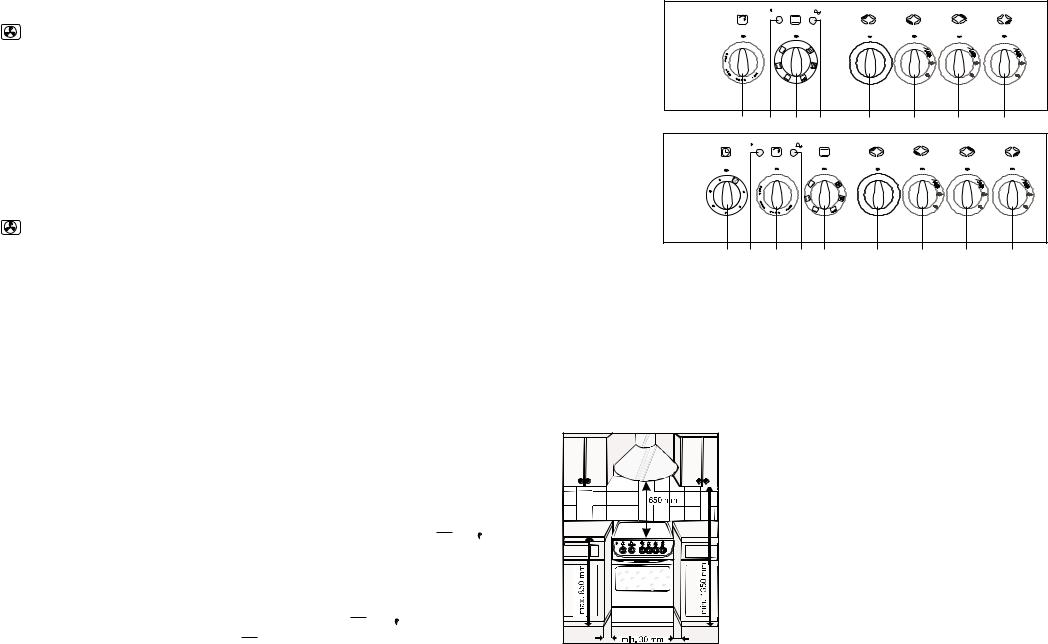
1.5 EMMENAGEMENT DE LA CUISINIERE
• La cuisine doit être sèche et elle doit avoir une bonne |
ventilation. |
• Apres le déballage, il faut placer la cuisinière dans l’endroit qui |
permet l’accès facile a la plaque en céramique et au four. On |
deconseille de placer la cuisinière sur un fondement. |
• Pour limiter l’influence négative de laps en temps, il est |
déconseille d’installer la cuisinière dans la ligne fenestrelle. |
• En emménageant la cuisinière entre les autres meubles de |
cuisine, la différence minimal entre les cotes de la cuisinière et |
les meubles de cuisine doit être 30 mm. |
• En cas d’installation d’une hotte, la distance entre la table et la |
hotte devra être d’au minimum 650 mm. Il est interdit de |
suspendre des placards au-dessus de la cuisinière (dessin 3). |
• L’appareil doit être installe loin des matériaux inflammables. Il |
est interdit de fixer des placards au-dessus de la cuisinière. |
Dessin 3 Exemple d’emménagement de la cuisinière dans la |
cuisine |
•L’interrupteur principal de la cuisine ou la prise de courant de alimentation de la cuisinière devra permettre l’accès facile pour l’usager.
6 |
FR |
 Loading...