


 Loading...
User’s Guide
NPD4384-01 EN

Epson Stylus Pro 9890/9908/7890/7908 User’s Guide
Copyrights and Trademarks
Copyrights and Trademarks
No part of this publication may be reproduced, stored in a retrieval system, or transmitted in any form or by any means, electronic, mechanical, photocopying, recording, or otherwise, without the prior written permission of Seiko Epson Corporation. The information contained herein is designed only for use with this Epson printer. Epson is not responsible for any use of this information as applied to other printers.
Neither Seiko Epson Corporation nor its affiliates shall be liable to the purchaser of this product or third parties for damages, losses, costs, or expenses incurred by the purchaser or third parties as a result of accident, misuse, or abuse of this product or unauthorized modifications, repairs, or alterations to this product, or (excluding the U.S.) failure to strictly comply with Seiko Epson Corporation’s operating and maintenance instructions.
Seiko Epson Corporation shall not be liable for any damages or problems arising from the use of any options or any consumable products other than those designated as Original Epson Products or Epson Approved Products by Seiko Epson Corporation.
Seiko Epson Corporation shall not be held liable for any damage resulting from electromagnetic interference that occurs from the use of any interface cables other than those designated as Epson Approved Products by Seiko Epson Corporation.
EPSON®, EPSON STYLUS®, Epson UltraChrome® and SpectroProofer® are registered trademarks, and EPSON EXCEED YOUR VISION or EXCEED YOUR VISION is a trademark of Seiko Epson Corporation.
Microsoft®, Windows®, and Windows Vista® are registered trademarks of Microsoft Corporation.
Apple®, Macintosh®, and Mac OS® are registered trademarks of Apple Inc.
Intel® is a registered trademark of Intel Corporation.
PowerPC® is a registered trademark of International Business Machines Corporation.
Adobe®, Photoshop®, Elements®, Lightroom®, and Adobe® RGB are registered trademarks of Adobe Systems Incorporated.
General Notice: Other product names used herein are for identification purposes only and may be trademarks of their respective owners. Epson disclaims any and all rights in those marks.
© 2010 Seiko Epson Corporation. All rights reserved.
2

Contents
Copyrights and Trademarks
Safety Instructions
Important Safety Instructions . . . . . . . . . . . . . . . . . . . . 6
Warning, Cautions, and Notes . . . . . . . . . . . . . . . . . 6 When choosing a place for this product. . . . . . . . . . 6 When setting up this product . . . . . . . . . . . . . . . . . . 6 When using this product . . . . . . . . . . . . . . . . . . . . . . 7 When handling the ink cartridges. . . . . . . . . . . . . . . 8 When transporting this product . . . . . . . . . . . . . . . . 8
Introduction
Features . . . . . . . . . . . . . . . . . . . . . . . . . . . . . . . . . . . . . . . 9
Printer Parts . . . . . . . . . . . . . . . . . . . . . . . . . . . . . . . . . . 11
Front section. . . . . . . . . . . . . . . . . . . . . . . . . . . . . . . . 11 Rear section . . . . . . . . . . . . . . . . . . . . . . . . . . . . . . . . 11
The Control Panel
Buttons, Lights, and Messages . . . . . . . . . . . . . . . . . . . 12
Buttons . . . . . . . . . . . . . . . . . . . . . . . . . . . . . . . . . . . . 12
Lights . . . . . . . . . . . . . . . . . . . . . . . . . . . . . . . . . . . . . . 13
Display. . . . . . . . . . . . . . . . . . . . . . . . . . . . . . . . . . . . . 14
Menu Mode. . . . . . . . . . . . . . . . . . . . . . . . . . . . . . . . . . . 16
Using the Menu mode . . . . . . . . . . . . . . . . . . . . . . . 16 Menu list . . . . . . . . . . . . . . . . . . . . . . . . . . . . . . . . . . . 19 Details of Menu mode . . . . . . . . . . . . . . . . . . . . . . . 21
Maintenance Mode . . . . . . . . . . . . . . . . . . . . . . . . . . . . 30
Maintenance mode list . . . . . . . . . . . . . . . . . . . . . . . 30
Paper Handling
Supported Media . . . . . . . . . . . . . . . . . . . . . . . . . . . . . . 31
Roll paper . . . . . . . . . . . . . . . . . . . . . . . . . . . . . . . . . . 31 Cut sheet . . . . . . . . . . . . . . . . . . . . . . . . . . . . . . . . . . . 31
Using Roll Paper. . . . . . . . . . . . . . . . . . . . . . . . . . . . . . . 32
Loading roll paper . . . . . . . . . . . . . . . . . . . . . . . . . . . 32 Cutting the roll paper . . . . . . . . . . . . . . . . . . . . . . . . 36 Removing the roll paper . . . . . . . . . . . . . . . . . . . . . . 37
Using Cut Sheet Media . . . . . . . . . . . . . . . . . . . . . . . . . 39
Loading cut sheet smaller than A3 size . . . . . . . . . 39 Loading cut sheet A3 size or larger /
thick paper . . . . . . . . . . . . . . . . . . . . . . . . . . . . . . . . . 40
Ejecting Paper . . . . . . . . . . . . . . . . . . . . . . . . . . . . . . . . . 42
For roll paper . . . . . . . . . . . . . . . . . . . . . . . . . . . . . . .42 For cut sheet media . . . . . . . . . . . . . . . . . . . . . . . . . .42 Using the paper basket and paper guides . . . . . . . .43 Using Auto Take-up Reel Unit (For Epson Stylus Pro 9890/9908 only) . . . . . . . . . . . . . . . . . . . . . . . . .47 Printable area . . . . . . . . . . . . . . . . . . . . . . . . . . . . . . .53
Basic Settings
Print Settings . . . . . . . . . . . . . . . . . . . . . . . . . . . . . . . . . .55
Printing procedures (Windows) . . . . . . . . . . . . . . .55 Printing procedures (Mac OS X) . . . . . . . . . . . . . . .56 Checking the printer status . . . . . . . . . . . . . . . . . . .59 When problem occurs during printing. . . . . . . . . .59
Canceling Printing . . . . . . . . . . . . . . . . . . . . . . . . . . . . .60
Canceling printing using the computer
(Windows) . . . . . . . . . . . . . . . . . . . . . . . . . . . . . . . . .60 Canceling printing using the computer
(Mac OS X) . . . . . . . . . . . . . . . . . . . . . . . . . . . . . . . . .61 Canceling printing using the printer. . . . . . . . . . . .61
Changing the Black Ink . . . . . . . . . . . . . . . . . . . . . . . . .61
Options and Consumable Products
Maintenance
Daily Maintenance . . . . . . . . . . . . . . . . . . . . . . . . . . . . .65
Instructions for placing the printer . . . . . . . . . . . . .65 Notes for when you are not using the printer . . . .65 Instructions for using paper . . . . . . . . . . . . . . . . . . .65
Replacing Ink Cartridges . . . . . . . . . . . . . . . . . . . . . . . .67
When ink needs to be replaced/
When ink gets low . . . . . . . . . . . . . . . . . . . . . . . . . . .67 Confirming the ink cartridge remaining . . . . . . . .67 About ink cartridges . . . . . . . . . . . . . . . . . . . . . . . . .69 Replacing ink cartridges . . . . . . . . . . . . . . . . . . . . . .70
Replacing the Maintenance Tank. . . . . . . . . . . . . . . . .72
Confirming the free space of the maintenance tank. . . . . . . . . . . . . . . . . . . . . . . . . . . . . . . . . . . . . . . .72 Replacing the maintenance tank . . . . . . . . . . . . . . .72
Replacing the Cutter. . . . . . . . . . . . . . . . . . . . . . . . . . . .73
Adjusting the Print Head. . . . . . . . . . . . . . . . . . . . . . . .76
Nozzle check . . . . . . . . . . . . . . . . . . . . . . . . . . . . . . . .77 Head cleaning . . . . . . . . . . . . . . . . . . . . . . . . . . . . . . .79 Power cleaning . . . . . . . . . . . . . . . . . . . . . . . . . . . . . .81 Automatic maintenance function . . . . . . . . . . . . . .82
3

Contents
Print head alignment. . . . . . . . . . . . . . . . . . . . . . . . . 83
Cleaning the Printer. . . . . . . . . . . . . . . . . . . . . . . . . . . . 85
Cleaning outside of the printer . . . . . . . . . . . . . . . . 85 Cleaning inside of the printer . . . . . . . . . . . . . . . . . 86
Keeping the Printer . . . . . . . . . . . . . . . . . . . . . . . . . . . . 87
If you do not use your printer for a long time. . . . 87 If you have not used your printer for
more than six months . . . . . . . . . . . . . . . . . . . . . . . . 88 Protecting the print head . . . . . . . . . . . . . . . . . . . . . 88
Transporting the Printer . . . . . . . . . . . . . . . . . . . . . . . . 88
Repacking the printer . . . . . . . . . . . . . . . . . . . . . . . . 88 Transporting the printer. . . . . . . . . . . . . . . . . . . . . . 89 Setting up the printer after transporting . . . . . . . . 89
Problem Solver
Error Messages on the LCD Panel . . . . . . . . . . . . . . . . 90
Error messages . . . . . . . . . . . . . . . . . . . . . . . . . . . . . . 90 When the maintenance request occurs . . . . . . . . . 99 When the call for service occurs . . . . . . . . . . . . . . . 99
Troubleshooting . . . . . . . . . . . . . . . . . . . . . . . . . . . . . . 100
You cannot print (because the printer does not work) . . . . . . . . . . . . . . . . . . . . . . . . . . . . . . . . . . . . . 100 The printer sounds like it is printing, but nothing prints . . . . . . . . . . . . . . . . . . . . . . . . . . . . . . . . . . . . . 103 The prints are not what you expected . . . . . . . . . 104 Feeding or ejecting troubles . . . . . . . . . . . . . . . . . . 108 Other troubles . . . . . . . . . . . . . . . . . . . . . . . . . . . . . 111
Using the Printer Driver (Windows)
Displaying the Settings Screen . . . . . . . . . . . . . . . . . . 112
From the Printer icon . . . . . . . . . . . . . . . . . . . . . . . 112
Displaying Help . . . . . . . . . . . . . . . . . . . . . . . . . . . . . . 113
Click the Help Button to Display . . . . . . . . . . . . . 113 Right-click on the item you want to check
and display . . . . . . . . . . . . . . . . . . . . . . . . . . . . . . . . 113
Customizing the Printer Driver . . . . . . . . . . . . . . . . . 114
Saving various settings as your Select Settings . . 114 Saving media settings . . . . . . . . . . . . . . . . . . . . . . . 114 Rearranging display items . . . . . . . . . . . . . . . . . . . 115
Summary of the Utility Tab . . . . . . . . . . . . . . . . . . . . 116
Uninstalling the printer driver . . . . . . . . . . . . . . . . . . 117
Using the Printer Driver
(Mac OS X)
Displaying the Settings Screen . . . . . . . . . . . . . . . . . . 119
Displaying Help . . . . . . . . . . . . . . . . . . . . . . . . . . . . . . 119
Using Epson Printer Utility 4 . . . . . . . . . . . . . . . . . . .119
Starting Epson Printer Utility 4 . . . . . . . . . . . . . . .119
Epson Printer Utility 4 Functions . . . . . . . . . . . . .119
Uninstalling the printer driver . . . . . . . . . . . . . . . . . .120
Removing EPSON LFP Remote Panel 2. . . . . . . .121
Printing Varieties
Auto Correct Color and Print Photos (PhotoEnhance) . . . . . . . . . . . . . . . . . . . . . . . . . . . . . .122
Correct color and print . . . . . . . . . . . . . . . . . . . . . . . .123
Printing Black and White Photos. . . . . . . . . . . . . . . .127
Borderless printing . . . . . . . . . . . . . . . . . . . . . . . . . . . .130
Types of Borderless Printing Methods . . . . . . . . .130 Supported Media Sizes for Borderless Printing. .131 About Roll Paper Cutting . . . . . . . . . . . . . . . . . . . .132 Setting Procedures for Printing . . . . . . . . . . . . . . .133
Enlarged/Reduced Printing. . . . . . . . . . . . . . . . . . . . .135
Fit to Page/Scale to fit paper size . . . . . . . . . . . . . .136 Fit to Roll Paper Width
(Windows only) . . . . . . . . . . . . . . . . . . . . . . . . . . . .137 Custom Scale Setting . . . . . . . . . . . . . . . . . . . . . . . .137
Multi-Page Printing . . . . . . . . . . . . . . . . . . . . . . . . . . .139
Poster Printing (Enlarge to cover several sheets and print - Windows only) . . . . . . . . . . . . . . . . . . . . . . . . .140
Setting Procedures for Printing . . . . . . . . . . . . . . .141 Joining the output paper together . . . . . . . . . . . . .142
Printing on custom paper . . . . . . . . . . . . . . . . . . . . . .145
Banner printing (on roll paper) . . . . . . . . . . . . . . . . .147
Layout Manager
(Windows only) . . . . . . . . . . . . . . . . . . . . . . . . . . . . . .150
Setting Procedures for Printing . . . . . . . . . . . . . . .151 Saving and Calling Layout Manager Settings . . .152
Color Management Printing
About Color Management . . . . . . . . . . . . . . . . . . . . .153
Color Management Print Settings . . . . . . . . . . . . . . .153
Setting profiles . . . . . . . . . . . . . . . . . . . . . . . . . . . . .154
Setting color management with the application. . . .154
Setting color management with the printer
driver . . . . . . . . . . . . . . . . . . . . . . . . . . . . . . . . . . . . . . .155
Color management printing by Host ICM (Windows) . . . . . . . . . . . . . . . . . . . . . . . . . . . . . . . .155 Color management printing by ColorSync
(Mac OS X) . . . . . . . . . . . . . . . . . . . . . . . . . . . . . . . .156 Color management printing by Driver ICM (Windows only) . . . . . . . . . . . . . . . . . . . . . . . . . . . .158
4

Contents
Paper Information
Paper Information . . . . . . . . . . . . . . . . . . . . . . . . . . . . 160
Roll paper . . . . . . . . . . . . . . . . . . . . . . . . . . . . . . . . . 161 Cut sheet . . . . . . . . . . . . . . . . . . . . . . . . . . . . . . . . . . 168
Where To Get Help
Technical Support Web Site . . . . . . . . . . . . . . . . . . . . 171
Contacting Epson Support . . . . . . . . . . . . . . . . . . . . . 171
Before Contacting Epson . . . . . . . . . . . . . . . . . . . . 171 Help for Users in North America . . . . . . . . . . . . . 172 Help for Users in Europe . . . . . . . . . . . . . . . . . . . . 172 Help for Users in Taiwan . . . . . . . . . . . . . . . . . . . . 172 Help for Users in Australia. . . . . . . . . . . . . . . . . . . 173 Help for Users in Singapore. . . . . . . . . . . . . . . . . . 173 Help for Users in Thailand. . . . . . . . . . . . . . . . . . . 174 Help for Users in Vietnam . . . . . . . . . . . . . . . . . . . 174 Help for Users in Indonesia . . . . . . . . . . . . . . . . . . 174 Help for Users in Hong Kong . . . . . . . . . . . . . . . . 174 Help for Users in Malaysia . . . . . . . . . . . . . . . . . . . 175 Help for Users in India . . . . . . . . . . . . . . . . . . . . . . 175 Help for Users in the Philippines . . . . . . . . . . . . . 176
Product Information
System Requirements for the Printer Driver . . . . . . 177
System requirements. . . . . . . . . . . . . . . . . . . . . . . . 177
Printer Specifications. . . . . . . . . . . . . . . . . . . . . . . . . . 177
Printing . . . . . . . . . . . . . . . . . . . . . . . . . . . . . . . . . . . 177 Electrical . . . . . . . . . . . . . . . . . . . . . . . . . . . . . . . . . . 178 Ink cartridges . . . . . . . . . . . . . . . . . . . . . . . . . . . . . . 179 Environmental . . . . . . . . . . . . . . . . . . . . . . . . . . . . . 180 Standards and Approvals . . . . . . . . . . . . . . . . . . . . 180 Interface . . . . . . . . . . . . . . . . . . . . . . . . . . . . . . . . . . 181
Software License Terms
Open Source Software Licenses . . . . . . . . . . . . . . . . . 182
Bonjour . . . . . . . . . . . . . . . . . . . . . . . . . . . . . . . . . . . 182
Other Software Licenses . . . . . . . . . . . . . . . . . . . . . . . 188
Info-ZIP copyright and license . . . . . . . . . . . . . . . 188
5

Epson Stylus Pro 9890/9908/7890/7908 User’s Guide
Safety Instructions
Safety Instructions
Important Safety
Instructions
Read all of these instructions before using the printer. Also be sure to follow all warnings and instructions marked on the printer.
Warning, Cautions, and Notes
wWarning:
must be followed carefully to avoid bodily injury.
cCaution:
must be observed to avoid damage to your equipment.
Note:
contain important information and useful tips on the operation of this printer.
When choosing a place for this product
OPlace this product on a flat, stable surface that is larger than this product. This product will not operate properly if it is tilted or at an angle.
OAvoid places subject to rapid changes in temperature and humidity. Also keep it away from direct sunlight, strong light, or heat sources.
OAvoid places subject to shocks and vibrations.
OKeep this product away from dusty areas.
OPlace this product near a wall outlet where the plug can be easily unplugged.
When setting up this product
ODo not block or cover the openings in this product’s cabinet.
ODo not insert objects through the slots. Take care not to spill liquid on this product.
OThis product’s power cord is for use with this product only. Use with other equipment may result in fire or electric shock.
OConnect all equipment to properly grounded power outlets. Avoid using outlets on the same circuit as photocopiers or air control systems that regularly switch on and off.
OAvoid electrical outlets controlled by wall switches or automatic timers.
OKeep the entire computer system away from potential sources of electromagnetic interference, such as loudspeakers or the base units of cordless telephones.
OUse only the type of power source indicated on the product’s label.
OUse only the power cord that comes with this product. Use of another cord may result in fire or electric shock.
O Do not use a damaged or frayed power cord.
6

Epson Stylus Pro 9890/9908/7890/7908 User’s Guide
Safety Instructions
OIf you use an extension cord with this product, make sure the total ampere rating of the devices plugged into the extension cord does not exceed the cord’s ampere rating. Also, make sure the total ampere rating of all devices plugged into the wall outlet does not exceed the wall outlet’s ampere rating.
ODo not attempt to service this product yourself.
OUnplug this product and refer servicing to qualified service personnel under the following conditions:
The power cord or plug is damaged; liquid has entered the product; the product has been dropped or the cabinet damaged; the product does not operate normally or exhibits a distinct change in performance.
OIf you plan to use the printer in Germany, observe the following:
To provide adequate short-circuit protection and over-current protection for this printer, the building installation must be protected by a 10 or 16 amp circuit breaker.
OIf damage occurs to the plug, replace the cord set or consult a qualified electrician. If there are fuses in the plug, make sure you replace them with fuses of the correct size and rating.
When using this product
ODo not put your hand inside this product or touch the ink cartridges during printing.
ODo not move the print heads by hand; otherwise you may damage this product.
OAlways turn the product off using the Power button on the control panel. When this button is pressed, the Power light flashes briefly then goes off. Do not unplug the power cord or turn off the product until the Power light stops flashing.
7

Epson Stylus Pro 9890/9908/7890/7908 User’s Guide
Safety Instructions
When handling the ink cartridges
OKeep ink cartridges out of the reach of children and do not drink.
OIf ink gets on your skin, wash it off with soap and water. If it gets in your eyes, flush them immediately with water.
OBefore installing the new ink cartridge in the printer, shake it back and forth horizontally in five centimeter movements about 15 times within five seconds.
OUse the ink cartridge before the date printed on its package.
OUse up the ink cartridge within six months of installation for best results.
ODo not dismantle the ink cartridges or try to refill them. This could damage the print head.
ODo not touch the green IC chip on the side of the cartridge. This may affect normal operation and printing.
OThe IC chip on this ink cartridge retains a variety of cartridge related-information, such as the ink cartridge status, so that the cartridge may be removed and reinserted freely. However, each time the cartridge is inserted, some ink is consumed because the printer automatically performs a reliability check.
OIf you remove an ink cartridge for later use, protect the ink supply area from dirt and dust, and store it in the same environment as this product. Note that there is a valve in the ink supply port, making covers or plugs unnecessary, but care is needed to prevent the ink from staining items that the cartridge touches. Do not touch the ink supply port or surrounding area.
When transporting this product
OBefore transporting the printer, make sure the print heads are in the home (far right) position.
8

Epson Stylus Pro 9890/9908/7890/7908 User’s Guide
Introduction
Introduction
Features
Epson Stylus Pro 9890/9908 and Epson Stylus Pro 7890/7908 are wide-format ink jet color printers supporting 44-inch and 24-inch paper respectively.
The features of this printer are described below.
Pigment inks have greater light fastness and resistance to ozone for reducing fading effect
This opens up the range of uses from printing photos to displays and banners for storefronts using long paper or posters normally subject to fading.
Reduced color difference in different light source conditions
Previously, coloring with light colors was used to achieve subtle tones. However, to minimize this and thereby reduce color differences in different light source conditions, Light Light Black ink is used instead. The color remains stable even under different light sources*, ensuring consistently high quality printing.
* These are measured results using A/F11 light sources against a D50 light source.
Printing monochrome photos
Using the three densities of black ink as the main inks adjusted with light coloring, you can achieve subtle black and white tones. Also, you can print monochrome photos with rich tones from color photo data using only the functions of the printer driver, without having to use an application.
 See “Printing Black and White Photos” on page 127
Support for a range of paper types
Epson offers a range of special media for ensuring high-quality printing. By selecting the right paper for the application, whether for indoor or outdoor use (lamination is recommended), you can express a whole new world of art. Also, the printer handles paper up to 1.5-mm thick and can also print on paperboard.
 See “Paper Information” on page 160
Spindleless simplifies the roll paper setting
Since the printer employs a spindleless mechanism, you do not have to set the roll paper to a spindle. This allows you to set the paper in a small space, as well. Tension adjustment is also adjusted automatically according to the media type. You can also set the tension on the LCD panel.
Stability of ink after printing
Since the color of the ink stabilizes soon after printing, the prints can be used in the prepress workflow and for color proof purposes.
Support two kind of black inks
Both Photo and Matte Black ink are installed in this printer. Photo Black ink can be used for all media types with professional quality results. Matte Black ink significantly increases black optical density when printing on matte and fine-art type papers. Switch the black ink on the printer’s control panel according to the paper used.
Large-capacity (350 or 700 ml) ink cartridge
Epson provides large-capacity (350 or 700 ml) ink cartridges for this printer that realize the high productivity required for professional work.
Roll paper remaining
The remaining amount of the roll paper is displayed on the LCD panel. When you remove the roll paper, the barcode (including the paper type, the roll paper length, and the roll length alert value information) is printed on the roll paper edge. This will facilitate paper setting the next time the same paper is used.
High-speed USB / Ethernet
You can connect to a network using Hi-Speed USB or Ethernet.
9

Epson Stylus Pro 9890/9908/7890/7908 User’s Guide
Introduction
Borderless printing
Using Auto Expand or Retain Size, you can perform borderless printing.
 See “Borderless printing” on page 130
There is also a borderless poster printing function that allows you to make big posters by simply joining together a number of prints.
 See “Poster Printing (Enlarge to cover several sheets and print - Windows only)” on page 140
Automate the post-process by using Auto Take-up Reel Unit and SpectroProofer (optional)
By installing SpectroProofer, you can perform the color measurement operation using the print result done.
Auto Take-up Reel Unit winds the roll paper automatically. The Auto Take-up Reel Unit is optional with Epson Stylus Pro 9890/9908.
10
Epson Stylus Pro 9890/9908/7890/7908 User’s Guide
Introduction
Printer Parts
Front section
1. Adapter holder
Fix the roll paper when setting the roll paper.
2. Roll paper cover
Open the roll paper cover when you set or remove the roll paper.
3. Control panel
The control panel consists of buttons, lights, and a liquid crystal display (LCD).
4. Ink cover (on both sides)
Open the ink cover when installing the ink cartridges. It slightly opens when you push the 
 button on the printer’s control panel.
5. Front cover
Open the front cover when you remove jammed paper.
6. Paper basket
Receives the ejected paper.
7. Paper guides
Use the paper guides to lead the paper for feeding forward or backward.
8. Manual box
Place the manual in here. You can set it either on the left or right side of the stand.
Rear section
1. Maintenance tanks (on both sides)
The tank where the waste ink goes into. There are two maintenance tanks on both sides of Epson Stylus Pro 9890/9908. There is one maintenance tank on the right side of Epson Stylus Pro 7890/7908.
2. USB interface connector
Connects the computer and printer with a USB interface cable.
3. Option interface connector
Connects the printer and options with a cable.
4. Network interface connector
Connects the printer to the network with a network interface cable.
5. AC inlet
Plug the power cord.
11

Epson Stylus Pro 9890/9908/7890/7908 User’s Guide
The Control Panel
The Control Panel
Buttons, Lights, and
Messages
You can check the ink remaining and printer status on the control panel.
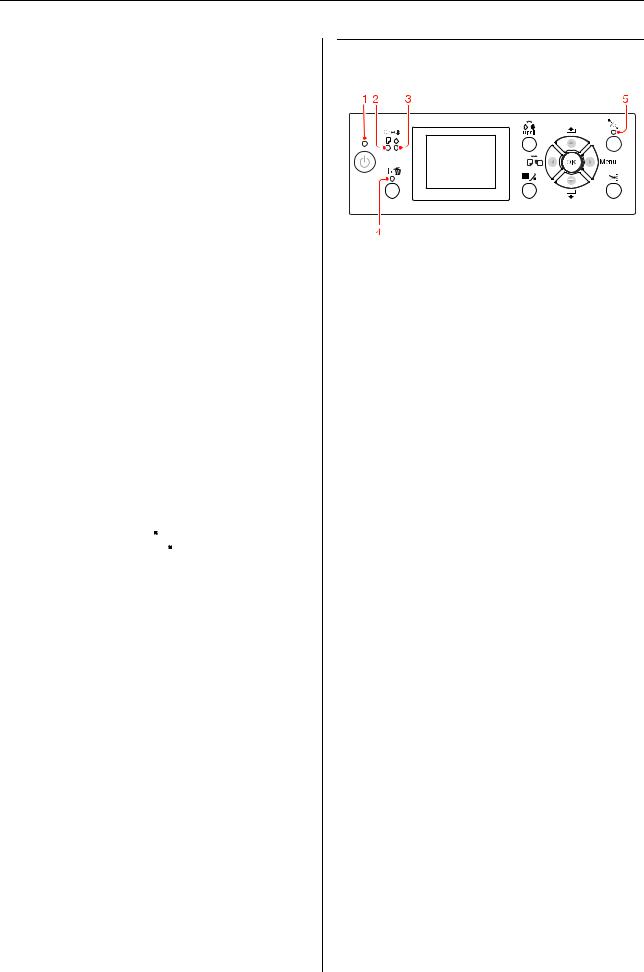
Buttons
1.Power button (  )
)
Turns the printer on or off.
2.Pause/Reset button ( 


 )
)
OThe printer enters the PAUSE state when this button is pressed in the READY state. To cancel the pause, select PAUSE CANCEL on the LCD panel. When selecting JOB CANCEL, it functions as the Reset button. The printer stops printing and clears print data in the printer. After clearing the data, it may take a while to return to the READY state.
OThe printer returns to the READY state when this button is pressed in the Menu mode.
OClears errors if it is possible.
 See “Error messages” on page 90
3.Black Ink Change button ( 
 )
)
Switches the black ink types.
 See “Changing the Black Ink” on page 61
4.Ink Cover Open button ( 
 )
)
Slightly opens the selected ink cover, choosing left or right side indicated on the display.
5. Paper Source button (  )
)
OSelects a paper source and roll paper cut method. The icon changes by pressing this button. However, you cannot change the paper source
icon to Sheet |
when you set the paper while |
||
REMAINING PAPER SETUP is set to ON. |
|||
|
|
|
|
Icon |
Explanation |
|
|
|
|
|
|
|
Roll Auto Cut |
Prints on the roll paper. |
|
|
On |
|
It cuts the roll paper |
|
|
|
automatically after |
|
|
|
printing each page. |
|
|
|
|
|
Roll Auto Cut |
Prints on the roll paper. |
|
|
Off |
|
It does not cut the paper |
|
|
|
automatically after |
|
|
|
printing. You need to |
|
|
|
cut the paper with a |
|
|
|
cutter manually. |
|
|
|
|
|
Sheet |
|
Prints on the sheet. |
|
|
|
|
OReturns to the previous level when pressed in the Menu mode.
OWhen you print from the printer driver, the settings you make on the printer driver have priority over the settings you make on the printer’s control panel.
6. Paper Feed button (  /
/  )
)
OFeeds the roll paper in the forward  or reverse
 direction.
You can feed 3 m of paper in the forward  direction with one press. If you want to feed the paper faster in the forward
  direction, press and hold it for 3 seconds. You can feed 20 cm of paper in the reverse
  direction with one press.
OIf you press these buttons while the paper presser is released, you can adjust the paper suction in the paper feed path in 3 stages.
 See “Loading cut sheet A3 size or larger / thick paper” on page 40
OPress the  button when setting a single cut sheet having a thickness under 0.5 mm, the printer starts paper feeding and then goes to the READY state.
OFeeds the sheet in the forward direction when you press the  button.
OChanges the parameter in the forward  or reverse
  order when selecting a desired parameter in the Menu mode.
12
Epson Stylus Pro 9890/9908/7890/7908 User’s Guide
The Control Panel
7. Menu button (  )
)
OEnters the Menu mode when pressed in the READY state.
 See “Menu Mode” on page 16
OEnters the PRINTER STATUS menu if pressed during printing.
 See “PRINTER STATUS” on page 24
OWhen pressed in the Menu mode, a desired menu can be selected.
8. OK button ( 
 )
)
OSets the selected parameter in the selected item in the Menu mode. Executes the item if the selected item is for execution only.
OThe printer ejects the cut sheet by pressing this button after printing.
OPress this button during ink drying or color chart drying, the printer stops the operation.
OWhen you press this button while there is no paper in the printer, you can see the paper feeding procedures on the LCD panel.
9. Paper Cut button (  )
)
Cut the roll paper by the built-in cutter.
10. Paper Secure button (  )
)
OThis button locks or unlocks the paper presser. When you set the paper, press the button to unlock the paper presser first, and then set the paper. Press the button again so the printer starts feeding the paper and then goes to the READY state.
OWhen you press this button while REMAINING PAPER SETUP is ON, a barcode is printed on the roll paper edge and the paper presser is released.
Lights
|
|
|
|
|
|
|
|
|
|
|
|
|
|
|
|
|
|
|
|
|
1 |
Power light |
On |
The printer is on. |
|||
|
|
|
|
|
|
|
|
|
|
Flashing |
The printer is receiving |
||
|
|
|
|
the data. |
||
|
|
|
|
The printer is in process |
||
|
|
|
|
of turning off. |
||
|
|
|
|
|
|
|
|
|
|
Off |
The printer is off. |
||
|
|
|
|
|
|
|
2 |
Paper Check |
On |
No paper is loaded in the |
|||
|
light |
|
paper source. |
|||
|
|
|
|
The paper setting is not |
||
|
|
|
|
correct. |
||
|
|
|
|
|
|
|
|
|
|
Flashing |
Paper is jammed. |
||
|
|
|
|
Paper is not loaded |
||
|
|
|
|
straight. |
||
|
|
|
|
|
|
|
|
|
|
Off |
The printer is ready to |
||
|
|
|
|
print data. |
||
|
|
|
|
|
|
|
3 |
Ink Check |
On |
The installed ink |
|||
|
light |
|
cartridge is expended. |
|||
|
|
|
|
The ink cartridge is not |
||
|
|
|
|
installed. |
||
|
|
|
|
The wrong ink cartridge |
||
|
|
|
|
is installed. |
||
|
|
|
|
|
|
|
|
|
|
Flashing |
The installed ink |
||
|
|
|
|
cartridge is nearly |
||
|
|
|
|
expended. |
||
|
|
|
|
|
|
|
|
|
|
Off |
The printer is ready for |
||
|
|
|
|
print data. |
||
|
|
|
|
|
|
|
4 |
Pause light |
On |
The printer is in the |
|||
|
|
|
|
Menu mode or pause |
||
|
|
|
|
mode. |
||
|
|
|
|
The printer has an error. |
||
|
|
|
|
|
|
|
|
|
|
Off |
The printer is ready to |
||
|
|
|
|
print data. |
||
|
|
|
|
|
|
|
5 |
Paper |
On |
The paper presser is |
|||
|
Secure light |
|
released. |
|||
|
|
|
|
|
|
|
|
|
|
Off |
The printer is ready to |
||
|
|
|
|
print data. |
||
|
|
|
|
|
|
|
13
Epson Stylus Pro 9890/9908/7890/7908 User’s Guide
The Control Panel
Display
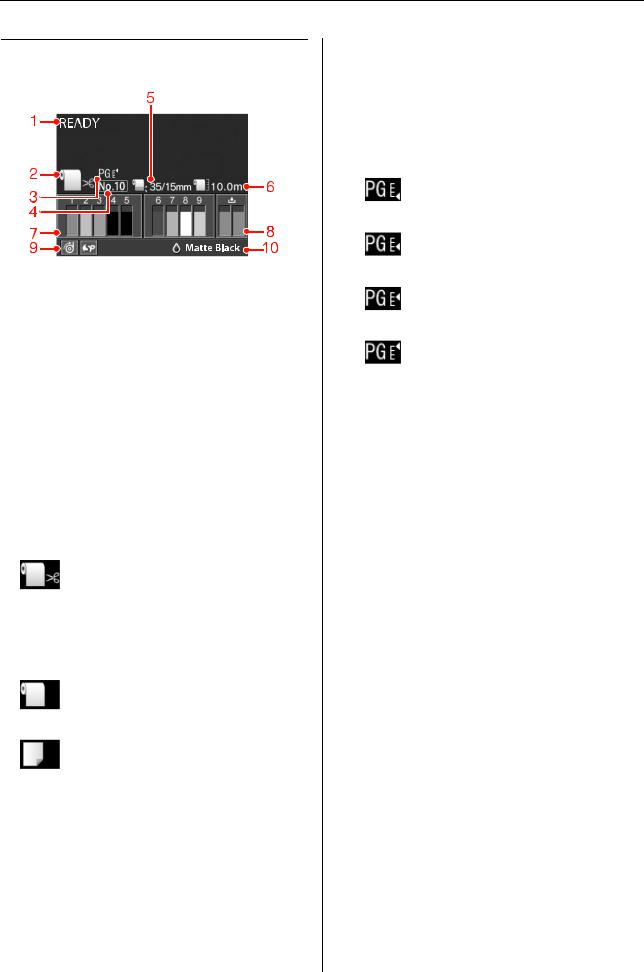
1. Messages
Displays the printer status, operation, and error messages.
 See “Error Messages on the LCD Panel” on page 90
  See “Details of Menu mode” on page 21
2. Paper Source icon
Displays the paper source and roll paper cut setting. You can select the following paper source icons by pressing the  button displayed on the LCD panel. When you print from the printer driver, the settings you make on the printer driver have priority over the settings you make on the printer’s control panel.
Icon |
Explanation |
|
|
|
Prints on the roll paper. It cuts the roll |
|
paper automatically after printing each |
|
page. |
|
When using the optional Auto Take-up |
|
Reel Unit, set the Auto switch to Off; |
|
otherwise, the printer does not cut the |
|
paper. |
|
|
|
Prints on the roll paper. It does not cut |
|
automatically after printing. |
|
|
|
Prints on the sheet. |
|
|
3. Platen Gap icon
Displays the Platen Gap setting.  See “Menu list” on page 19
Icon |
Explanation |
|
|
None |
STANDARD |
|
|
|
NARROW |
|
|
|
WIDE |
|
|
|
WIDER |
|
|
|
WIDEST |
|
|
4. Paper Number
When you select paper number (1 to 10) for CUSTOM PAPER, the number you selected appears.
 See “Printing on custom paper” on page 145
5. Roll Paper Margin icon
Displays the paper margin icon  with the margins you have selected for the ROLL PAPER MARGIN.
O15mm: When TOP/BOTTOM 15mm is selected.
O35/15mm: When TOP 35/BOTTOM 15mm is selected.
O3mm: When 3mm is selected.
O15mm: When 15mm is selected.
OAuto: When DEFAULT is selected.
 See “Menu list” on page 19
14
Epson Stylus Pro 9890/9908/7890/7908 User’s Guide
The Control Panel
6. Roll Paper Counter icon
Displays the remaining amount of roll paper.
When you make the following settings in ROLL PAPER REMAINING of the PAPER SETUP menu, the  icon and the remaining amount of roll paper is displayed.
OREMAINING PAPER SETUP is set to ON.
OThe length of the roll paper is set for the ROLL PAPER LENGTH.
OThe roll length alert value is set for the ROLL LENGTH ALERT.
 See “PAPER SETUP” on page 25
7. Ink cartridge status icon
Displays the remaining amount of ink in each cartridge.
O Ink cartridge
Number |
Ink color |
|
|
1 |
Cyan (C) |
|
|
2 |
Yellow (Y) |
|
|
3 |
Light Cyan (LC) |
|
|
4 |
Matte Black (MK) |
|
|
5 |
Photo Black (PK) |
|
|
6 |
Vivid Magenta (VM) |
|
|
7 |
Light Black (LK) |
|
|
8 |
Light Light Black (LLK) |
|
|
9 |
Vivid Light Magenta (VLM) |
|
|
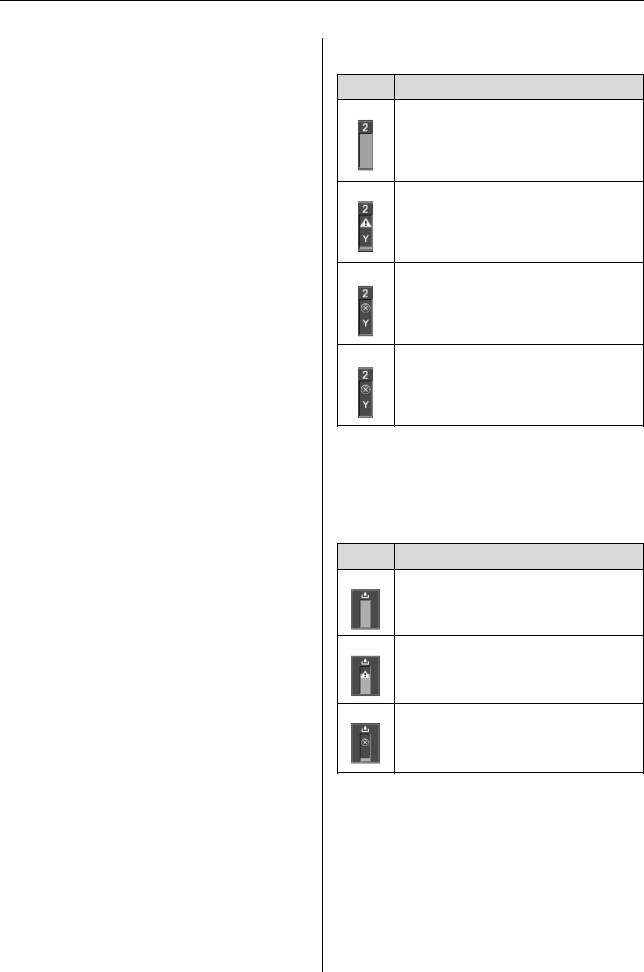
O Ink remaining
Icon Description
There is enough ink remaining.
Prepare a new ink cartridge. (flashing)
This icon indicates the yellow tank.
The ink is expended so you cannot print. Replace the ink cartridge with a new one. (flashing)
This icon indicates the yellow tank.
Cartridge error or no cartridge. (flashing)
This icon indicates the yellow tank.
8. Maintenance tank icon
The rightmost icons show the free space of the maintenance tanks. There are two maintenance icons for Epson Stylus Pro 9890/9908 and one for Epson Stylus Pro 7890/7908.
Icon Description
There is enough free space in the maintenance tanks.
We recommend you prepare a new maintenance tank. (flashing)
The maintenance tank is at the end of its service life. Replace the maintenance tank with a new one. (flashing)
15

Epson Stylus Pro 9890/9908/7890/7908 User’s Guide
The Control Panel
9. Option usage icon
Displays whether options are available to use or not.
Option |
Icon |
Description |
|
|
|
Auto |
|
Available |
Take-up |
|
|
Reel Unit |
|
|
|
|
Not available |
|
|
|
|
No icon |
Not connected |
|
|
|
SpectroPr |
|
Available |
oofer |
|
|
|
|
|
|
|
Not available |
|
|
|
|
No icon |
Not connected |
|
|
|
10. Black Ink icon
Displays the black ink that is selected.
Menu Mode
The Menu mode enables you to make printer settings similar to those you would normally make in the driver or software, as well as other additional settings, directly through the control panel. The control panel shows the printer information, and operations such as nozzle check can be performed using the control panel.
Using the Menu mode
Note:
Press the 


 button whenever you want to exit the Menu mode and return to the READY state.
Press the  button to return to the previous step.
Follow the steps below to use the Menu mode.
16

Epson Stylus Pro 9890/9908/7890/7908 User’s Guide
The Control Panel
1. Select a menu.
Example: Select PRINTER SETUP.
A Press the  button to enter the Menu mode.
The first menu appears on the LCD panel.
B SETUPPress the |
/ |
button to select PRINTER |
|||
. |
|
|
|
|
|
|
|
|
|
|
|
|
|
|
|
|
|
|
|
|
|
|
|
C |
Press the |
button to enter the PRINTER |
|||
SETUP menu. |
|
|
|
||
|
|
|
|
|
|
|
|
|
|
|
|
|
|
|
|
|
|
2. There are three cases depending on the items you have selected.
A. When you can select a parameter
Example: When selecting PLATEN GAP in the PRINTER SETUP menu
A Press the |
/ |
button to select PLATEN GAP. |
|||
|
|
|
|
|
|
|
|
|
|
|
|
|
|
|
|
|
|
B item.Press the |
button to enter the PLATEN GAP |
|||
|
|
|
|
|
|
|
|
|
|
|
|
|
|
|
Press the |
/ |
button to select a parameter |
C for the item. |
|
|
The current setting is marked with (  ).
).
|
|
|
|
|
|
D parameter.Press the |
|
|
|
|
|
|
button to store the selected |
||||
|
|||||
|
|||||
|
|
|
|
|
|
|
|
|
|
|
|
Press the |
button to return to the previous |
||||
E level, or press the |
button to exit the Menu |
||||
mode.
17

Epson Stylus Pro 9890/9908/7890/7908 User’s Guide
The Control Panel
B. When you execute a function |
|
C. When you want to display the printer information |
||||||||
Example: When selecting NOZZLE CHECK in the TEST |
Example: When selecting INK LEVEL in the PRINTER |
|||||||||
PRINT menu |
|
STATUS menu. |
|
|
|
|||||
In the TEST PRINT menu, press the |
/ |
A |
In the PRINTER STATUS menu, press the |
|||||||
A button to select NOZZLE CHECK. |
|
/ |
|
button to select INK LEVEL. |
||||||
|
|
|
|
|
|
|
|
|
|
|
|
|
|
|
|
|
|
|
|
|
|
|
|
|
|
|
|
|
|
|
|
|
B item.Press the button to enter the NOZZLE CHECK |
B item.Press the |
button to enter the INK LEVEL |
||||||
|
|
|
|
|
|
|
|
|
|
|
|
|
|
|
|
|
|
|
|
|
|
|
|
|
|
|
C |
Press the |
button to execute the NOZZLE |
Confirm the remaining ink on the display. Press |
||
CHECK. |
|
C the |
/ |
button to display the remaining |
|
|
|
|
amount of each ink color. |
||
|
|
|
Example: Matte Black 84% |
||
|
|
|
|
|
|
|
|
|
|
|
|
|
|
|
|
|
|
|
|
|
|
|
|
|
|
|
|
|
|
|
|
|
|
|
|
|
|
|
|
|
|
Press the |
button to return to the previous |
||||
|
|
D level or press the |
button to exit the Menu |
||||
mode.
18

Epson Stylus Pro 9890/9908/7890/7908 User’s Guide
The Control Panel
Menu list
Menu |
Item |
Parameter |
|
|
|
|
|
“PRINTER SETUP” on |
PLATEN GAP |
NARROW, STANDARD, WIDE, WIDER, WIDEST |
|
page 21 |
|
|
|
PAGE LINE |
ON, OFF |
||
|
|||
|
|
|
|
|
ROLL PAPER MARGIN |
DEFAULT, TOP/BOTTOM 15mm, TOP 35/BOTTOM 15mm, |
|
|
|
3mm, 15mm |
|
|
|
|
|
|
PAPER SIZE CHECK |
ON, OFF |
|
|
|
|
|
|
PAPER SKEW CHECK |
ON, OFF |
|
|
|
|
|
|
REFRESH MARGIN |
ON, OFF |
|
|
|
|
|
|
AUTO NOZZLE CHECK |
ON: PERIODICALLY, ON: EVERY JOB, OFF |
|
|
|
|
|
|
PRINT NOZZLE PATTERN |
OFF, ON: EVERY PAGE, ON: EVERY 10 PAGES |
|
|
|
|
|
|
CHANGE BLACK INK |
MANUAL, AUTO |
|
|
|
|
|
|
INITIALIZE SETTINGS |
EXECUTE |
|
|
|
|
|
“TEST PRINT” on page |
NOZZLE CHECK |
||
23 |
|
|
|
STATUS SHEET |
|||
|
|||
|
|
|
|
|
NETWORK STATUS SHEET |
||
|
|
|
|
|
JOB INFORMATION |
||
|
|
|
|
|
CUSTOM PAPER |
||
|
|
|
|
“MAINTENANCE” on |
CUTTER ADJUSTMENT |
EXECUTE |
|
page 23 |
|
|
|
CUTTER REPLACEMENT |
EXECUTE |
||
|
|||
|
|
|
|
|
CLEANING |
NORMAL CLEANING, CLEAN COLOR PAIRS, POWER |
|
|
|
CLEANING |
|
|
|
|
|
|
CLOCK SETTING |
MM/DD/YY HH:MM |
|
|
|
|
|
“PRINTER STATUS” on |
VERSION |
JW0xxxx-xx.xx.IBCC or JN0xxxx-xx.xx.IBCC |
|
page 24 |
|
|
|
INK LEVEL |
(ink color) nn% |
||
|
|||
|
|
|
|
|
MAINTENANCE TANK |
LEFT nn% |
|
|
|
RIGHT nn% |
|
|
|
|
|
|
JOB HISTORY |
No. 0-No. 9 |
|
|
|
INK xxxxx.xml |
|
|
|
PAPER xxx.x cm2 |
|
|
|
|
|
|
TOTAL PRINTS |
nnnnnn PAGES |
|
|
|
|
|
|
EDM (or myEpsonPrinter) STATUS |
INITIALIZING, NOT STARTED, ENABLED, DISABLED |
|
|
|
LAST UPLOADED |
|
|
|
MM/DD/YY HH:MM GMT, (NOT UPLOADED) |
|
|
|
|
19

Epson Stylus Pro 9890/9908/7890/7908 User’s Guide
The Control Panel
“PAPER SETUP” on page |
ROLL PAPER REMAINING |
REMAINING PAPER SETUP |
|
25 |
|
ROLL PAPER LENGTH |
|
|
|
ROLL LENGTH ALERT |
|
|
|
|
|
|
PAPER TYPE |
Photo Paper |
|
|
|
Proofing Paper |
|
|
|
Fine Art Paper |
|
|
|
Matte Paper |
|
|
|
Plain Paper |
|
|
|
Others |
|
|
|
CUSTOM PAPER |
|
|
|
NO PAPER SELECTED |
|
|
|
|
|
|
CUSTOM PAPER |
PAPER NO.1 - 10 |
|
|
|
|
|
“HEAD ALIGNMENT” on |
PAPER THICKNESS |
SELECT PAPER TYPE |
|
page 28 |
|
SELECT THICKNESS |
|
|
|
|
|
|
ALIGNMENT |
AUTO, MANUAL |
|
|
|
|
|
“NETWORK SETUP” on |
NETWORK SETUP |
DISABLE, ENABLE |
|
page 28 |
|
|
|
IP ADDRESS SETTING |
AUTO, PANEL |
||
|
|||
|
|
|
|
|
IP, SM, DG SETTING |
IP ADDRESS |
|
|
|
000.000.000.000 - 255.255.255.255 |
|
|
|
SUBNET MASK |
|
|
|
000.000.000.000 - 255.255.255.255 |
|
|
|
DEFAULT GATEWAY |
|
|
|
000.000.000.000 - 255.255.255.255 |
|
|
|
|
|
|
BONJOUR |
ON, OFF |
|
|
|
|
|
|
WSD |
OFF, ON |
|
|
|
|
|
|
INIT NETWORK SETTING |
EXECUTE |
|
|
|
|
|
“OPTIONS SETUP” on |
SpectroProofer |
STATUS INFORMATION |
|
page 29 |
|
DEVICE ALIGNMENT |
|
|
|
|
|
|
TAKE UP REEL |
TAKE UP REEL VERSION |
|
|
|
|
20
Epson Stylus Pro 9890/9908/7890/7908 User’s Guide
The Control Panel
Details of Menu mode
PRINTER SETUP
Item |
Parameter |
Explanation |
|
|
|
|
|
PLATEN GAP |
NARROW |
You can adjust the distance between the print head and paper. |
|
|
|
O STANDARD: Normally, select STANDARD. |
|
|
STANDARD |
||
|
|
|
|
|
|
O When selecting other than STANDARD, the following icon |
|
|
WIDE |
||
|
|
appears on the LCD panel. |
|
|
|
|
|
|
WIDER |
|
: NARROW |
|
|
|
: WIDE |
|
WIDEST |
|
|
|
|
|
: WIDER |
|
|
|
: WIDEST |
|
|
|
|
PAGE LINE |
ON |
You can select whether to print a page line (line along which to |
|
|
|
cut) on the roll paper. Select ON if you want to print the page line, |
|
|
OFF |
||
|
or OFF otherwise. |
||
|
|
||
|
|
The vertical line may be printed when the roll paper width that is |
|
|
|
set in the printer driver is smaller than the width of the roll paper |
|
|
|
that is loaded in the printer. |
|
|
|
This setting is available for roll paper only. |
|
|
|
|
|
ROLL PAPER MARGIN |
DEFAULT |
You can select margins for roll paper. |
|
|
|
O |
DEFAULT: |
|
TOP/BOTTOM15mm |
||
|
|
The top margin of Premium Glossy Photo Paper (250), |
|
|
|
|
|
|
|
|
|
|
TOP 35/BOTTOM 15mm |
|
Premium Semigloss Photo Paper (250), and Premium Luster |
|
|
|
Photo Paper (260) are 20 mm and the bottom margin is 15 |
|
15mm |
|
|
|
|
mm. |
|
|
|
|
|
|
|
|
|
|
3mm |
O |
TOP/BOTTOM 15mm: |
|
|
|
The top and bottom margins are 15 mm and left and right |
|
|
|
margins are 3 mm. |
|
|
O |
TOP 35/BOTTOM 15mm: |
|
|
|
The top margin is 35 mm, bottom is 15 mm, and left and |
|
|
|
right are 3 mm. |
|
|
O |
15mm: |
|
|
|
The margins of all four sides are 15 mm. |
|
|
O |
3mm: |
|
|
|
The margins of all four sides are 3 mm. |
|
|
The print size does not change even when the margins are |
|
|
|
changed. |
|
|
|
|
|
PAPER SIZE CHECK |
ON |
You can select whether to check the paper width. |
|
|
|
O |
ON: |
|
OFF |
||
|
|
Check the paper width and top edge of the paper. |
|
|
|
|
|
|
|
O |
OFF: |
|
|
|
Do not check the paper width and top edge of the paper. |
|
|
|
The printer continues to print even if the paper width does |
|
|
|
not match the data width, and the printer may print beyond |
|
|
|
the paper. Because this soils the inside of the printer, we |
|
|
|
recommend you select ON. This may result in a wider blank |
|
|
|
margin at the top of each page. |
|
|
|
|
21

Epson Stylus Pro 9890/9908/7890/7908 User’s Guide
The Control Panel
Item |
Parameter |
Explanation |
|
|
|
|
|
|
|
PAPER SKEW CHECK |
ON |
O |
ON: |
|
|
|
|
If the paper is not straight, an error message appears on the |
|
|
OFF |
|
||
|
|
LCD panel and the printer stops printing. |
||
|
|
|
||
|
|
O |
OFF: |
|
|
|
|
A paper align error does not occur even if the printed data is |
|
|
|
|
out of range of the paper, and the printer continues to print. |
|
|
|
This setting is available for roll paper only. |
||
|
|
|
||
REFRESH MARGIN |
ON |
When you select ON, the printer cuts an extra print area |
||
|
|
automatically after borderless printing. |
||
|
OFF |
|||
|
|
|
|
|
|
|
|
||
AUTO NOZZLE CHECK |
ON: PERIODICALLY |
The printer performs a nozzle check and if there are missing dots, |
||
|
|
it performs cleaning automatically. |
||
|
ON: EVERY JOB |
|||
|
O |
ON: PERIODICALLY |
|
|
|
|
|
||
|
|
|
||
|
OFF |
|
Automatically performs a nozzle check periodically. |
|
|
|
O |
ON: EVERY JOB |
|
|
|
|
Performs a nozzle check before printing each job. |
|
|
|
O |
OFF |
|
|
|
|
Does not perform a nozzle check automatically, except for |
|
|
|
|
some operations. |
|
|
|
|
||
PRINT NOZZLE PATTERN |
OFF |
When you select ON, the printer prints the nozzle check pattern |
||
|
|
before printing each print job or the 10th sheet, depending on |
||
|
ON: EVERY PAGE |
|||
|
the setting you have set. |
|
||
|
|
|
||
|
|
|
||
|
ON: EVERY 10 PAGES |
This setting is available for roll paper only. |
||
|
|
|
||
CHANGE BLACK INK |
MANUAL |
This function is enabled when printing to paper that supports |
||
|
|
both matte black and photo black ink. |
||
|
AUTO |
|||
|
Select between automatically switching black ink (AUTO) or not |
|||
|
|
|||
|
|
automatically switching black ink (MANUAL) when switching the |
||
|
|
type of black ink from the printer driver. |
||
|
|
When AUTO is selected, the printer automatically switches to the |
||
|
|
type of black ink set in the printer driver, even if the type of black |
||
|
|
ink set in the printer driver and the printer itself do not match. |
||
|
|
A confirmation message is displayed when MANUAL is selected. |
||
|
|
If you choose to continue printing, the printer switches to the |
||
|
|
type of black ink specified in the printer driver, and then performs |
||
|
|
the printing operation. |
|
|
|
|
When printing to paper that has a specific type of supported |
||
|
|
black ink, you cannot set the type of black ink from the printer |
||
|
|
driver regardless of this setting. You must set the type of black ink |
||
|
|
that is compatible with your paper from the printer's control |
||
|
|
panel before printing. |
See “Changing the Black Ink” on page |
|
|
|
61 |
|
|
|
|
|
||
INITIALIZE SETTINGS |
EXECUTE |
You can return all setting values you have made in the PRINTER |
||
|
|
SETUP menu to their factory set value. |
||
|
|
|
|
|
22

Epson Stylus Pro 9890/9908/7890/7908 User’s Guide
The Control Panel
TEST PRINT
Item |
Parameter |
Explanation |
|
|
|
NOZZLE CHECK |
You can print a print head nozzle check pattern for each ink |
|
|
|
cartridge. |
|
|
See “Nozzle check” on page 77 |
|
|
|
STATUS SHEET |
You can print the current printer status. |
|
|
|
|
NETWORK STATUS SHEET |
You can print the current network status. |
|
|
|
|
JOB INFORMATION |
You can print the job information saved in the printer (up to 10 |
|
|
|
jobs.) |
|
|
|
CUSTOM PAPER |
You can print custom paper information registered in the CUSTOM |
|
|
|
PAPER menu. |
|
|
|
MAINTENANCE |
|
|
You can perform maintenance functions, such as head cleaning.
Item |
Parameter |
Explanation |
|
|
|
CUTTER ADJUSTMENT |
EXECUTE |
You can fine tune the cutting position when printing to roll paper |
|
|
with no margins in all directions. When using this function, a |
|
|
cutter position adjustment pattern is printed. You can select the |
|
|
cutter position number within a range of -120 to +120 mil (-3.0 to |
|
|
+3.0 mm) in increments of 8 mil (0.2 mm). |
|
|
|
CUTTER REPLACEMENT |
EXECUTE |
Starts the cutter replacement operation. |
|
|
See “Replacing the Cutter” on page 73 |
|
|
|
CLEANING |
NORMAL CLEANING |
You can perform normal cleaning. |
|
|
|
|
CLEAN COLOR PAIRS |
You can select the nozzles to clean from the following two-color |
|
|
combinations; C/VM, PK (MK)/LK, LLK/Y, or VLM/LC. |
|
|
|
|
POWER CLEANING |
You can clean the print head more effectively than normal head |
|
|
cleaning. |
|
|
|
CLOCK SETTING |
MM/DD/YY HH:MM |
You can set year, month, date, hour, and minute. |
|
|
|
23

Epson Stylus Pro 9890/9908/7890/7908 User’s Guide
The Control Panel
PRINTER STATUS
This menu shows the printer status.
Item |
Parameter |
Explanation |
|
|
|
VERSION |
JW0xxxx-xx.xx.IBCC or |
You can see the firmware version. |
|
JN0xxxx-xx.xx.IBCC |
|
|
|
|
INK LEVEL |
(ink color) nn% |
You can see the status of each ink cartridge. |
|
|
|
MAINTENANCE TANK |
LEFT nn% |
You can see the free space of the maintenance tank. |
|
|
|
|
RIGHT nn% |
|
|
|
|
JOB HISTORY |
No. 0 - No.9 |
You can see ink consumption (INK) in milliliters and paper size |
|
INK xxxxx.xml |
(PAPER) for each print job saved in the printer. The latest job is |
|
PAPER xxx.x cm2 |
saved as No. 0. |
|
|
|
TOTAL PRINTS |
nnnnnn PAGES |
You can see the total amount of pages you have printed. |
|
|
|
EDM (or myEpsonPrinter) |
INITIALIZING, NOT |
You can see if the EDM (or myEpsonPrinter) is enabled or |
STATUS * |
STARTED, ENABLED, |
disabled. If it is enabled, the time that the EDM status was last |
|
DISABLED |
uploaded is displayed. |
|
|
|
|
LAST UPLOADED |
|
|
MM/DD/YY HH:MM GMT, |
|
|
(NOT UPLOADED) |
|
|
|
|
*This function is not supported in some areas. For details, visit your local Epson Web site or contact your local Epson dealer/representative.
Note:
OWhen the Ink Check light flashes or remains on, you need to replace the expended ink cartridge. If you replace the cartridge correctly, the counter resets automatically.
 See “Replacing Ink Cartridges” on page 67
OYou need to replace the maintenance tank when the LCD panel instructs to do so. If you replace the tank correctly, the counter resets automatically.
 See “Replacing the Maintenance Tank” on page 72
24

Epson Stylus Pro 9890/9908/7890/7908 User’s Guide
The Control Panel
PAPER SETUP
When you use non-Epson media, be sure to make the appropriate settings for the paper.
Item |
Parameter |
Explanation |
|
|
|
|
|
||
ROLL PAPER REMAINING |
REMAINING PAPER SETUP |
You can set the paper remaining counter function only if paper is |
||
|
|
not loaded in the printer. |
|
|
|
|
O |
OFF: |
|
|
|
|
The ROLL PAPER REMAINING function is disabled. The Roll |
|
|
|
|
Paper Counter icon does not appear on the LCD panel. |
|
|
|
O |
ON: |
|
|
|
|
The remaining amount of roll paper is displayed on the LCD |
|
|
|
|
panel. When you press the |
button, the barcode |
|
|
|
(including the paper type, the roll paper length, and the roll |
|
|
|
|
length alert value information) is printed on the roll paper |
|
|
|
|
edge. When the roll paper is changed, the barcode is |
|
|
|
|
scanned and the paper type, the roll paper length, and the |
|
|
|
|
roll length alert value information are set. |
|
|
|
|
||
|
ROLL PAPER LENGTH |
These settings are available only when REMAINING PAPER SETUP |
||
|
|
is ON. |
|
|
|
ROLL LENGTH ALERT |
|
||
|
You can get a message when there is not much paper left, by |
|||
|
|
|||
|
|
setting the roll alert. |
|
|
|
|
When using roll paper, enter the length of the roll paper set in the |
||
|
|
printer and the alert value. You can set the roll paper length from |
||
|
|
5.0 to 99.5 m, and the roll length alert from 1 to 15 m. |
||
|
|
|
||
PAPER TYPE |
Photo Paper |
You can select the media type loaded in the printer. |
||
|
|
|
|
|
|
Proofing Paper |
|
|
|
|
|
|
|
|
|
Fine Art Paper |
|
|
|
|
|
|
|
|
|
Matte Paper |
|
|
|
|
|
|
|
|
|
Plain Paper |
|
|
|
|
|
|
|
|
|
Others |
|
|
|
|
|
|
|
|
|
CUSTOM PAPER |
|
|
|
|
|
|
|
|
|
NO PAPER SELECTED |
|
|
|
|
|
|
||
CUSTOM PAPER |
PAPER NO.1 - 10 |
You can select a number (between 1 to 10) to register the settings |
||
|
|
(such as Paper Type, Platen Gap, Thickness Pattern, Paper Feed |
||
|
|
Adjust, Drying Time, Paper Suction) or to recall these settings you |
||
|
|
have made. |
|
|
|
|
The number you select here is displayed on the LCD panel. |
||
|
|
|
See “CUSTOM PAPER” on page 26 |
|
|
|
|
|
|
25

Epson Stylus Pro 9890/9908/7890/7908 User’s Guide
The Control Panel
CUSTOM PAPER
When you use non-Epson media, you need to make settings suitable for the media.
After you have selected the paper number, make the following settings. Make sure to select the paper from PAPER TYPE first, and then make the PLATEN GAP setting and so on.
To set the custom paper, see the following section.
 “Printing on custom paper” on page 145
Item |
Parameter |
Explanation |
|
|
|
PAPER TYPE |
Photo Paper |
You can select the media type that is most similar to the paper |
|
|
you are using. |
|
Proofing Paper |
|
|
|
|
|
|
|
|
Fine Art Paper |
|
|
|
|
|
Matte Paper |
|
|
|
|
|
Plain Paper |
|
|
|
|
|
Others |
|
|
|
|
PLATEN GAP |
NARROW |
You can adjust the distance between the print head and paper. |
|
|
STANDARD: Normally, select STANDARD. |
|
STANDARD |
|
|
NARROW: Use this when printing on thin paper. |
|
|
|
|
|
|
WIDE or WIDER: Select this if you find that printed images are |
|
WIDE |
|
|
smeared. |
|
|
|
|
|
WIDER |
|
|
|
|
THICKNESS PATTERN |
You can print the paper thickness detection pattern. |
|
|
|
|
26

Epson Stylus Pro 9890/9908/7890/7908 User’s Guide
The Control Panel
Item |
Parameter |
Explanation |
|
|
|
|
|
|
|
|
|
|
|||
|
|
|
|
|
|
|
|
|
|
|
|||||
PAPER FEED ADJUST |
PATTERN |
Use this setting if you are unable to resolve banding (horizontal |
|||||||||||||
|
|
striped lines or uneven colors) even after cleaning or aligning the |
|||||||||||||
|
VALUE |
||||||||||||||
|
print head. |
|
|
|
|
|
|
|
|
|
|
||||
|
|
|
|
|
|
|
|
|
|
|
|
||||
|
|
O |
Pattern |
|
|
|
|
|
|
|
|
|
|
||
|
|
|
This method allows you to correct by visually checking a |
||||||||||||
|
|
|
printed pattern and entering a correction value. |
|
|
||||||||||
|
|
|
Check for the lightest colored pattern in lines A to D on the |
||||||||||||
|
|
|
printed adjustment pattern. In the following example, “3” |
||||||||||||
|
|
|
should be selected as it is the lightest. |
|
|
|
|
|
|||||||
|
|
|
1 |
|
2 |
3 |
|
|
4 |
|
|
5 |
|
||
|
|
|
|
|
|
|
|
|
|
|
|
|
|
||
|
|
|
A |
|
|
|
|
|
|
|
|
|
|
|
|
|
|
|
|
|
|
|
|
|
|
|
|
|
|
||
|
|
|
|
|
|
|
|
|
|
|
|
|
|
|
|
|
|
|
|
|
|
|
|
|
|
|
|
|
|
||
|
|
|
Enter the confirmed number for each entry screen for lines |
||||||||||||
|
|
|
A to D. |
|
|
|
|
|
|
|
|
|
|
||
|
|
O |
Value |
|
|
|
|
|
|
|
|
|
|
||
|
|
|
You can change the value based on the banding in the |
||||||||||||
|
|
|
printed material. |
|
|
|
|
|
|
|
|
|
|
||
|
|
|
The correction value (-0.70 to + 0.70%) is set at a rate of one |
||||||||||||
|
|
|
meter per paper feed. Because a black band occurs (dark |
||||||||||||
|
|
|
colored stripe) if too little paper is fed, adjust it in a + |
||||||||||||
|
|
|
direction. Because a white band occurs (a white or light |
||||||||||||
|
|
|
colored stripes) if too much paper is fed, adjust it in a - |
||||||||||||
|
|
|
direction. |
|
|
|
|
|
|
|
|
|
|
||
|
|
|
|
|
|
|
|
|
|
|
|||||
DRYING TIME |
0.0sec |
You can set the ink drying time for each print head pass. The |
|||||||||||||
|
|
range is 0 to 10 seconds. Depending on the ink density or paper |
|||||||||||||
|
0.0sec to 10.0sec |
||||||||||||||
|
type, the ink does not dry soon. In this case, set the drying time |
||||||||||||||
|
|
||||||||||||||
|
|
longer. |
|
|
|
|
|
|
|
|
|
|
|||
|
|
|
|
|
|
|
|
|
|
|
|||||
PAPER SUCTION |
STANDARD |
You can set the suction pressure used to feed the printed paper. |
|||||||||||||
|
|
|
|
|
|
|
|
|
|
|
|
|
|
|
|
|
-1 to -4 |
|
|
|
|
|
|
|
|
|
|
|
|
|
|
|
|
|
|
|
|
|
|
|
|
|
|||||
SET ROLL PAPER TENSION |
NORMAL |
When using a cloth or thin paper or when wrinkles appear in the |
|||||||||||||
|
|
paper during printing, select HIGH or EXTRA HIGH. |
|
|
|||||||||||
|
HIGH |
|
|
||||||||||||
|
|
|
|
|
|
|
|
|
|
|
|
|
|
|
|
|
|
|
|
|
|
|
|
|
|
|
|
|
|
|
|
|
EXTRA HIGH |
|
|
|
|
|
|
|
|
|
|
|
|
|
|
|
|
|
|
|
|
|
|
|
|
|
|||||
REMOVE SKEW |
ON |
You can select whether to perform this operation to reduce the |
|||||||||||||
|
|
paper skew or not. |
|
|
|
|
|
|
|
|
|
|
|||
|
OFF |
|
|
|
|
|
|
|
|
|
|
||||
|
|
|
|
|
|
|
|
|
|
|
|
|
|
|
|
|
|
|
|
|
|
|
|
|
|
|
|
|
|
|
|
27

Epson Stylus Pro 9890/9908/7890/7908 User’s Guide
The Control Panel
HEAD ALIGNMENT
You can perform print head alignment. For more details, see the following section.
 “Print head alignment” on page 83
Item |
Parameter |
Explanation |
|
|
|
PAPER THICKNESS |
SELECT PAPER TYPE |
When using Epson special media, select the paper type. If you use |
|
|
non-Epson special media, enter the paper thickness in the range |
|
SELECT THICKNESS |
|
|
of 0.1 to 1.5 mm. |
|
|
|
|
|
|
|
ALIGNMENT |
AUTO |
When you select AUTO, the adjustment pattern for output is read |
|
|
by the sensor and the optimum adjustment value is registered |
|
MANUAL |
|
|
automatically in the printer. When you select MANUAL, you need |
|
|
|
|
|
|
to check the pattern and enter the value for alignment. |
|
|
|
NETWORK SETUP
When you use the printer on the network, set the following items.
Item |
Parameter |
Explanation |
|
|
|
|
|
NETWORK SETUP |
DISABLE |
You can make the network settings using the printer’s control |
|
|
|
panel. The following items appear only when ENABLE is selected. |
|
|
ENABLE |
||
|
After setting the items, press the |
button in the NETWORK |
|
|
|
||
|
|
SETUP menu, so the network is reset and the network connection |
|
|
|
is available after 40 seconds. The NETWORK SETUP menu does not |
|
|
|
appear while resetting the network. |
|
|
|
|
|
IP ADDRESS SETTING |
AUTO |
You can select the method to set the IP address to the printer. |
|
|
|
When you select PANEL, IP,SM,DG SETTING appears. |
|
|
PANEL |
||
|
|
|
|
|
|
|
|
IP,SM,DG SETTING |
Ask your system administrator for detailed information. |
|
|
|
|
|
|
BONJOUR |
ON |
You can enable or disable the Bonjour setting. |
|
|
|
|
|
|
OFF |
|
|
|
|
|
|
WSD |
OFF |
Select whether the network interface uses WSD (ON) or not |
|
|
|
(OFF). |
|
|
ON |
|
|
|
|
|
|
|
|
|
|
INIT NETWORK SETTING |
EXECUTE |
You can return the network settings of the printer to the factory |
|
|
|
default value. |
|
|
|
|
|
28

Epson Stylus Pro 9890/9908/7890/7908 User’s Guide
The Control Panel
OPTIONS SETUP
When you use the optional equipment, set the following items.
Item |
Parameter |
Explanation |
|
|
|
SpectroProofer |
STATUS INFORMATION |
In STATUS INFORMATION, displays the status of each item of |
|
|
SpectroProofer, such as the version of SpectroProofer, the |
|
DEVICE ALIGNMENT |
|
|
product numbers of the white calibration tiles, the temperature |
|
|
|
|
|
|
of Color Measurement Device (ILS20EP), ambient air |
|
|
temperature, and the color of the backing. |
|
|
In DEVICE ALIGNMENT, perform the setup for SpectroProofer |
|
|
installed. |
|
|
|
TAKE UP REEL |
TAKE UP REEL VERSION |
Displays the version of Auto Take-up Reel Unit. |
|
|
|
29

Epson Stylus Pro 9890/9908/7890/7908 User’s Guide
The Control Panel
Maintenance Mode
You can change the language or unit used on the display or return all the setting values to their factory default.
A Turn off the printer by pressing the |
|
|
|
|
button. |
|||||
|
||||||||||
|
||||||||||
Press both the |
|
button and the |
|
|
button |
|||||
|
|
|||||||||
B at the same time |
to turn on the printer. |
|
||||||||
|
|
|
|
|
|
|
|
|
|
|
|
|
|
|
|
|
|
|
|
|
|
|
|
|
|
|
|
|
|
|
|
|
Refer to the "Maintenance mode list" on the right for details.
The setting procedures are the same as those for the Menu mode.
 See “Using the Menu mode” on page 16
C To exit the Maintenance mode, press the button to turn off the printer.
Maintenance mode list
Item |
Parameter |
Explanation |
|
|
|
|
|
LANGUAGE |
JAPANESE |
You can select the |
|
|
|
language to be |
|
|
ENGLISH |
||
|
displayed on the LCD |
||
|
|
||
|
|
panel. |
|
|
FRENCH |
||
|
|
||
|
|
|
|
|
ITALIAN |
|
|
|
|
|
|
|
GERMAN |
|
|
|
|
|
|
|
PORTUGUE |
|
|
|
|
|
|
|
SPANISH |
|
|
|
|
|
|
|
DUTCH |
|
|
|
|
|
|
|
KOREAN |
|
|
|
|
|
|
|
CHINESE |
|
|
|
|
|
|
LENGTH UNITS |
METRIC |
You can select a unit |
|
|
|
of measurement to |
|
|
FEET/INCH |
||
|
use to display length. |
||
|
|
||
|
|
|
|
TEMPERATURE |
°C |
You can select the |
|
UNITS |
|
unit of temperature |
|
F |
|||
|
displayed on the LCD |
||
|
|
||
|
|
panel. |
|
|
|
|
|
ROLL PAPER |
1 - 5 |
You can change the |
|
TENSION |
|
maximum value of |
|
|
|
Roll Paper Tension. |
|
|
|
|
|
SS CLEANING |
EXECUTE |
You can perform |
|
|
|
ultrasonic head |
|
|
|
cleaning. |
|
|
|
|
|
DEFAULT |
EXECUTE |
You can set all |
|
PANEL |
|
setting values you |
|
|
|
made in the Menu |
|
|
|
mode to their factory |
|
|
|
set value. |
|
|
|
|
|
AUTO |
1 - 3 |
The number of times |
|
CLEANING |
|
to perform auto |
|
TIMES |
|
cleaning when a clog |
|
|
|
was detected after |
|
|
|
performing an auto |
|
|
|
nozzle check. |
|
|
|
|
|
CUSTOM |
0 - 255 |
You can make |
|
|
|
custom settings. |
|
|
|
|
30
Loading...