


User’s Guide
NPD5749-01 EN

FX-890II/FX-890IIN/FX-2190II/FX-2190IIN User’s Guide
Copyrights and Trademarks
No part of this publication may be reproduced, stored in a retrieval system, or transmitted in any form or by any means, electronic, mechanical, photocopying, recording, or otherwise, without the prior written permission of Seiko Epson Corporation. The information contained herein is designed only for use with this Epson printer. Epson is not responsible for any use of this information as applied to other printers.
Neither Seiko Epson Corporation nor its affiliates shall be liable to the purchaser of this product or third parties for damages, losses, costs, or expenses incurred by the purchaser or third parties as a result of: accident, misuse, or abuse of this product or unauthorized modifications, repairs, or alterations to this product, or (excluding the U.S.) failure to strictly comply with Seiko Epson Corporation’s operating and maintenance instructions.
Seiko Epson Corporation shall not be liable for any damages or problems arising from the use of any options or any consumable products other than those designated as Original Epson Products or Epson Approved Products by Seiko Epson Corporation.
EPSON®and ESC/PR are registered trademarks, EPSON EXCEED YOUR VISION, EXCEED YOUR VISION and ESC/P2 are trademarks of Seiko Epson Corporation.
Microsoft®, Windows®, Windows Server®, and Windows Vista® are registered trademarks of Microsoft Corporation.
IBM is a registered trademark of International Business Machines Corporation.
General Notice: Other product names used herein are for identification purposes only and may be trademarks of their respective owners. Epson disclaims any and all rights in those marks.
The contents of this manual are subject to change without notice.
© 2017 Seiko Epson Corporation
Copyrights and Trademarks 2

FX-890II/FX-890IIN/FX-2190II/FX-2190IIN User’s Guide
Operating System Versions
In this manual, terms such as "Windows 10", "Windows 8.1", "Windows 8", "Windows 7", "Windows Vista", "Windows XP", "Windows Server 2012", "Windows Server 2008 R2", "Windows Server 2008", "Windows Server 2003 R2" refer to the following operating system. Additionally, "Windows" is used to refer to all versions.
Microsoft® Windows® 10 operating system
Microsoft® Windows® 8.1 operating system
Microsoft® Windows® 8 operating system
Microsoft® Windows® 7 operating system
Microsoft® Windows Vista® operating system
Microsoft® Windows® XP operating system
Microsoft® Windows Server® 2016 operating system
Microsoft® Windows Server® 2012 R2 operating system
Microsoft® Windows Server® 2012 operating system
Microsoft® Windows Server® 2008 R2 operating system
Microsoft® Windows Server® 2008 operating system
Microsoft® Windows Server® 2003 R2 operating system
Microsoft® Windows Server® 2003 operating system
Operating System Versions 3

FX-890II/FX-890IIN/FX-2190II/FX-2190IIN User’s Guide
Contents
Where to Find Information
Where to Find Information . . . . . . . . . . . . . . . . . . . . . . . . . . . . . . . . . . . . . . . . . . . . . . . . . . . . . . . . . . . . . . . 9
Safety Instructions
Safety Instructions. . . . . . . . . . . . . . . . . . . . . . . . . . . . . . . . . . . . . . . . . . . . . . . . . . . . . . . . . . . . . . . . . . . . . . 10 Warnings, Cautions, and Notes. . . . . . . . . . . . . . . . . . . . . . . . . . . . . . . . . . . . . . . . . . . . . . . . . . . . . . . 10 Hot Parts Caution Symbol. . . . . . . . . . . . . . . . . . . . . . . . . . . . . . . . . . . . . . . . . . . . . . . . . . . . . . . . . . . 10 Important Safety Instructions. . . . . . . . . . . . . . . . . . . . . . . . . . . . . . . . . . . . . . . . . . . . . . . . . . . . . . . . 10 For users in Russia, Belarus, and Kazakhstan. . . . . . . . . . . . . . . . . . . . . . . . . . . . . . . . . . . . . . . . . . . . 13 For United Kingdom users. . . . . . . . . . . . . . . . . . . . . . . . . . . . . . . . . . . . . . . . . . . . . . . . . . . . . . . . . . . 14 For Singapore users. . . . . . . . . . . . . . . . . . . . . . . . . . . . . . . . . . . . . . . . . . . . . . . . . . . . . . . . . . . . . . . . 15 For German users. . . . . . . . . . . . . . . . . . . . . . . . . . . . . . . . . . . . . . . . . . . . . . . . . . . . . . . . . . . . . . . . . . 15 For Turkish users. . . . . . . . . . . . . . . . . . . . . . . . . . . . . . . . . . . . . . . . . . . . . . . . . . . . . . . . . . . . . . . . . . 15 For Ukraine users. . . . . . . . . . . . . . . . . . . . . . . . . . . . . . . . . . . . . . . . . . . . . . . . . . . . . . . . . . . . . . . . . . 15
Chapter 1 Paper Handling
Selecting a Paper Source. . . . . . . . . . . . . . . . . . . . . . . . . . . . . . . . . . . . . . . . . . . . . . . . . . . . . . . . . . . . . . . . . 16
Printing on continuous paper. . . . . . . . . . . . . . . . . . . . . . . . . . . . . . . . . . . . . . . . . . . . . . . . . . . . . . . . 16
Printing on single sheets (cut-sheet). . . . . . . . . . . . . . . . . . . . . . . . . . . . . . . . . . . . . . . . . . . . . . . . . . . 18
Setting the Paper Release Lever. . . . . . . . . . . . . . . . . . . . . . . . . . . . . . . . . . . . . . . . . . . . . . . . . . . . . . . . . . . 19
Adjusting the Paper Thickness Lever. . . . . . . . . . . . . . . . . . . . . . . . . . . . . . . . . . . . . . . . . . . . . . . . . . . . . . 19
Loading Continuous Paper. . . . . . . . . . . . . . . . . . . . . . . . . . . . . . . . . . . . . . . . . . . . . . . . . . . . . . . . . . . . . . . 21
Positioning your continuous paper supply. . . . . . . . . . . . . . . . . . . . . . . . . . . . . . . . . . . . . . . . . . . . . . 21
Loading continuous paper with the tractor. . . . . . . . . . . . . . . . . . . . . . . . . . . . . . . . . . . . . . . . . . . . . 21
Using the tear-off function. . . . . . . . . . . . . . . . . . . . . . . . . . . . . . . . . . . . . . . . . . . . . . . . . . . . . . . . . . . 42
Loading Single Sheets. . . . . . . . . . . . . . . . . . . . . . . . . . . . . . . . . . . . . . . . . . . . . . . . . . . . . . . . . . . . . . . . . . . 44
Available paper types. . . . . . . . . . . . . . . . . . . . . . . . . . . . . . . . . . . . . . . . . . . . . . . . . . . . . . . . . . . . . . . 44
Using the sheet guide. . . . . . . . . . . . . . . . . . . . . . . . . . . . . . . . . . . . . . . . . . . . . . . . . . . . . . . . . . . . . . . 45
Loading Special Paper. . . . . . . . . . . . . . . . . . . . . . . . . . . . . . . . . . . . . . . . . . . . . . . . . . . . . . . . . . . . . . . . . . . 49
Multipart forms. . . . . . . . . . . . . . . . . . . . . . . . . . . . . . . . . . . . . . . . . . . . . . . . . . . . . . . . . . . . . . . . . . . . 49
Labels. . . . . . . . . . . . . . . . . . . . . . . . . . . . . . . . . . . . . . . . . . . . . . . . . . . . . . . . . . . . . . . . . . . . . . . . . . . . 50
Envelopes. . . . . . . . . . . . . . . . . . . . . . . . . . . . . . . . . . . . . . . . . . . . . . . . . . . . . . . . . . . . . . . . . . . . . . . . . 52
Contents 4

FX-890II/FX-890IIN/FX-2190II/FX-2190IIN User’s Guide
Cards. . . . . . . . . . . . . . . . . . . . . . . . . . . . . . . . . . . . . . . . . . . . . . . . . . . . . . . . . . . . . . . . . . . . . . . . . . . . 52 Switching Between Continuous Paper and Single Sheets. . . . . . . . . . . . . . . . . . . . . . . . . . . . . . . . . . . . . . 53 Switching to single sheets. . . . . . . . . . . . . . . . . . . . . . . . . . . . . . . . . . . . . . . . . . . . . . . . . . . . . . . . . . . . 53 Switching to continuous paper. . . . . . . . . . . . . . . . . . . . . . . . . . . . . . . . . . . . . . . . . . . . . . . . . . . . . . . 54 Using the Micro Adjust Function. . . . . . . . . . . . . . . . . . . . . . . . . . . . . . . . . . . . . . . . . . . . . . . . . . . . . . . . . 55 Adjusting the tear-off position. . . . . . . . . . . . . . . . . . . . . . . . . . . . . . . . . . . . . . . . . . . . . . . . . . . . . . . 55 Adjusting the top-of-form position. . . . . . . . . . . . . . . . . . . . . . . . . . . . . . . . . . . . . . . . . . . . . . . . . . . . 56
Chapter 2 Printer Software
About Your Printer Software. . . . . . . . . . . . . . . . . . . . . . . . . . . . . . . . . . . . . . . . . . . . . . . . . . . . . . . . . . . . . 59 Using the Printer Driver. . . . . . . . . . . . . . . . . . . . . . . . . . . . . . . . . . . . . . . . . . . . . . . . . . . . . . . . . . . . . . . . . 59 Accessing the printer driver from Windows applications. . . . . . . . . . . . . . . . . . . . . . . . . . . . . . . . . . 60 Accessing the printer driver from the Start menu. . . . . . . . . . . . . . . . . . . . . . . . . . . . . . . . . . . . . . . . 62 Changing the printer driver settings. . . . . . . . . . . . . . . . . . . . . . . . . . . . . . . . . . . . . . . . . . . . . . . . . . . 65 Printer Driver Settings Overview. . . . . . . . . . . . . . . . . . . . . . . . . . . . . . . . . . . . . . . . . . . . . . . . . . . . . . . . . . 66 Printer settings. . . . . . . . . . . . . . . . . . . . . . . . . . . . . . . . . . . . . . . . . . . . . . . . . . . . . . . . . . . . . . . . . . . . 67 Monitoring settings. . . . . . . . . . . . . . . . . . . . . . . . . . . . . . . . . . . . . . . . . . . . . . . . . . . . . . . . . . . . . . . . 69 Setting Utility. . . . . . . . . . . . . . . . . . . . . . . . . . . . . . . . . . . . . . . . . . . . . . . . . . . . . . . . . . . . . . . . . . . . . 69 Using EPSON Status Monitor 3. . . . . . . . . . . . . . . . . . . . . . . . . . . . . . . . . . . . . . . . . . . . . . . . . . . . . . . . . . . 69 Setting up EPSON Status Monitor 3. . . . . . . . . . . . . . . . . . . . . . . . . . . . . . . . . . . . . . . . . . . . . . . . . . . 70 Accessing EPSON Status Monitor 3. . . . . . . . . . . . . . . . . . . . . . . . . . . . . . . . . . . . . . . . . . . . . . . . . . . 72 Installing EPSON Status Monitor 3. . . . . . . . . . . . . . . . . . . . . . . . . . . . . . . . . . . . . . . . . . . . . . . . . . . 72 Using Bi-D Adjustment. . . . . . . . . . . . . . . . . . . . . . . . . . . . . . . . . . . . . . . . . . . . . . . . . . . . . . . . . . . . . . . . . 73 Making adjustment with Bi-D Adjustment. . . . . . . . . . . . . . . . . . . . . . . . . . . . . . . . . . . . . . . . . . . . . 73 Using Printer Setting. . . . . . . . . . . . . . . . . . . . . . . . . . . . . . . . . . . . . . . . . . . . . . . . . . . . . . . . . . . . . . . . . . . . 74 Changing printer setting. . . . . . . . . . . . . . . . . . . . . . . . . . . . . . . . . . . . . . . . . . . . . . . . . . . . . . . . . . . . 75 Setting Up Your Printer on a Network. . . . . . . . . . . . . . . . . . . . . . . . . . . . . . . . . . . . . . . . . . . . . . . . . . . . . 76 Sharing the printer. . . . . . . . . . . . . . . . . . . . . . . . . . . . . . . . . . . . . . . . . . . . . . . . . . . . . . . . . . . . . . . . . 76 Setting up your printer as a shared printer. . . . . . . . . . . . . . . . . . . . . . . . . . . . . . . . . . . . . . . . . . . . . . 76 Setting for the clients. . . . . . . . . . . . . . . . . . . . . . . . . . . . . . . . . . . . . . . . . . . . . . . . . . . . . . . . . . . . . . . 80 Cancelling Printing. . . . . . . . . . . . . . . . . . . . . . . . . . . . . . . . . . . . . . . . . . . . . . . . . . . . . . . . . . . . . . . . . . . . . 85 Uninstalling the Printer Software. . . . . . . . . . . . . . . . . . . . . . . . . . . . . . . . . . . . . . . . . . . . . . . . . . . . . . . . . 85 Uninstalling the printer driver and EPSON Status Monitor 3. . . . . . . . . . . . . . . . . . . . . . . . . . . . . . 86
Chapter 3 Control Panel
Buttons and Lights. . . . . . . . . . . . . . . . . . . . . . . . . . . . . . . . . . . . . . . . . . . . . . . . . . . . . . . . . . . . . . . . . . . . . 88
Contents 5

FX-890II/FX-890IIN/FX-2190II/FX-2190IIN User’s Guide
Selecting a Font and Pitch. . . . . . . . . . . . . . . . . . . . . . . . . . . . . . . . . . . . . . . . . . . . . . . . . . . . . . . . . . . . . . . 90
About Your Printer’s Default Settings. . . . . . . . . . . . . . . . . . . . . . . . . . . . . . . . . . . . . . . . . . . . . . . . . . . . . . 92
Default Setting mode. . . . . . . . . . . . . . . . . . . . . . . . . . . . . . . . . . . . . . . . . . . . . . . . . . . . . . . . . . . . . . . 92
Changing default settings. . . . . . . . . . . . . . . . . . . . . . . . . . . . . . . . . . . . . . . . . . . . . . . . . . . . . . . . . . . . 97
Lock-Out Mode. . . . . . . . . . . . . . . . . . . . . . . . . . . . . . . . . . . . . . . . . . . . . . . . . . . . . . . . . . . . . . . . . . . . . . . . 98
Changing the lock-out mode setting. . . . . . . . . . . . . . . . . . . . . . . . . . . . . . . . . . . . . . . . . . . . . . . . . . . 99
Chapter 4 Troubleshooting
Using the Error Indicators. . . . . . . . . . . . . . . . . . . . . . . . . . . . . . . . . . . . . . . . . . . . . . . . . . . . . . . . . . . . . . 101 Problems and Solutions. . . . . . . . . . . . . . . . . . . . . . . . . . . . . . . . . . . . . . . . . . . . . . . . . . . . . . . . . . . . . . . . 102 Power supply problems. . . . . . . . . . . . . . . . . . . . . . . . . . . . . . . . . . . . . . . . . . . . . . . . . . . . . . . . . . . . 103 Printing. . . . . . . . . . . . . . . . . . . . . . . . . . . . . . . . . . . . . . . . . . . . . . . . . . . . . . . . . . . . . . . . . . . . . . . . . 103 Paper Handling. . . . . . . . . . . . . . . . . . . . . . . . . . . . . . . . . . . . . . . . . . . . . . . . . . . . . . . . . . . . . . . . . . . 108 Network problems. . . . . . . . . . . . . . . . . . . . . . . . . . . . . . . . . . . . . . . . . . . . . . . . . . . . . . . . . . . . . . . . 110 Correcting USB Problems. . . . . . . . . . . . . . . . . . . . . . . . . . . . . . . . . . . . . . . . . . . . . . . . . . . . . . . . . . . . . . 110 Clearing a Paper Jam. . . . . . . . . . . . . . . . . . . . . . . . . . . . . . . . . . . . . . . . . . . . . . . . . . . . . . . . . . . . . . . . . . . 111 Aligning Vertical Lines in Your Printout. . . . . . . . . . . . . . . . . . . . . . . . . . . . . . . . . . . . . . . . . . . . . . . . . . 111 Cancelling Printing. . . . . . . . . . . . . . . . . . . . . . . . . . . . . . . . . . . . . . . . . . . . . . . . . . . . . . . . . . . . . . . . . . . . 112 Using the printer driver. . . . . . . . . . . . . . . . . . . . . . . . . . . . . . . . . . . . . . . . . . . . . . . . . . . . . . . . . . . . 113 Using the printer’s control panel. . . . . . . . . . . . . . . . . . . . . . . . . . . . . . . . . . . . . . . . . . . . . . . . . . . . . 113 Printing a Self Test. . . . . . . . . . . . . . . . . . . . . . . . . . . . . . . . . . . . . . . . . . . . . . . . . . . . . . . . . . . . . . . . . . . . 113 Printing Hex Dump. . . . . . . . . . . . . . . . . . . . . . . . . . . . . . . . . . . . . . . . . . . . . . . . . . . . . . . . . . . . . . . . . . . 114
Chapter 5 Where To Get Help
Technical Support Web Site. . . . . . . . . . . . . . . . . . . . . . . . . . . . . . . . . . . . . . . . . . . . . . . . . . . . . . . . . . . . . 116 Contacting Customer Support. . . . . . . . . . . . . . . . . . . . . . . . . . . . . . . . . . . . . . . . . . . . . . . . . . . . . . . . . . . 116 Before Contacting Epson. . . . . . . . . . . . . . . . . . . . . . . . . . . . . . . . . . . . . . . . . . . . . . . . . . . . . . . . . . . 116 Help for Users in Europe. . . . . . . . . . . . . . . . . . . . . . . . . . . . . . . . . . . . . . . . . . . . . . . . . . . . . . . . . . . 117 Help for Users in Indonesia. . . . . . . . . . . . . . . . . . . . . . . . . . . . . . . . . . . . . . . . . . . . . . . . . . . . . . . . . 117 Help for Users in Singapore. . . . . . . . . . . . . . . . . . . . . . . . . . . . . . . . . . . . . . . . . . . . . . . . . . . . . . . . . 117 Help for Users in Malaysia. . . . . . . . . . . . . . . . . . . . . . . . . . . . . . . . . . . . . . . . . . . . . . . . . . . . . . . . . . 117 Help for Users in India. . . . . . . . . . . . . . . . . . . . . . . . . . . . . . . . . . . . . . . . . . . . . . . . . . . . . . . . . . . . . 118 Help for Users in the Philippines. . . . . . . . . . . . . . . . . . . . . . . . . . . . . . . . . . . . . . . . . . . . . . . . . . . . 118
Contents 6

FX-890II/FX-890IIN/FX-2190II/FX-2190IIN User’s Guide
Chapter 6 Options and Consumables
Replacing the Ribbon Cartridge. . . . . . . . . . . . . . . . . . . . . . . . . . . . . . . . . . . . . . . . . . . . . . . . . . . . . . . . . . 119 Genuine Epson ribbon cartridge. . . . . . . . . . . . . . . . . . . . . . . . . . . . . . . . . . . . . . . . . . . . . . . . . . . . . 119 Replacing the ribbon cartridge. . . . . . . . . . . . . . . . . . . . . . . . . . . . . . . . . . . . . . . . . . . . . . . . . . . . . . 119 Cut-Sheet Feeder. . . . . . . . . . . . . . . . . . . . . . . . . . . . . . . . . . . . . . . . . . . . . . . . . . . . . . . . . . . . . . . . . . . . . . 123 Installing the cut-sheet feeder. . . . . . . . . . . . . . . . . . . . . . . . . . . . . . . . . . . . . . . . . . . . . . . . . . . . . . . 124 Loading paper in the single-bin cut-sheet feeder. . . . . . . . . . . . . . . . . . . . . . . . . . . . . . . . . . . . . . . . 126 Loading paper in the high-capacity cut-sheet feeder. . . . . . . . . . . . . . . . . . . . . . . . . . . . . . . . . . . . . 129 Assembling the double-bin cut-sheet feeder. . . . . . . . . . . . . . . . . . . . . . . . . . . . . . . . . . . . . . . . . . . 132 Selecting the paper path (bin 1 or bin 2). . . . . . . . . . . . . . . . . . . . . . . . . . . . . . . . . . . . . . . . . . . . . . . 133 Roll Paper Holder. . . . . . . . . . . . . . . . . . . . . . . . . . . . . . . . . . . . . . . . . . . . . . . . . . . . . . . . . . . . . . . . . . . . . 134 Assembling the roll paper holder. . . . . . . . . . . . . . . . . . . . . . . . . . . . . . . . . . . . . . . . . . . . . . . . . . . . 134 Installing the roll paper holder. . . . . . . . . . . . . . . . . . . . . . . . . . . . . . . . . . . . . . . . . . . . . . . . . . . . . . 135 Loading roll paper. . . . . . . . . . . . . . . . . . . . . . . . . . . . . . . . . . . . . . . . . . . . . . . . . . . . . . . . . . . . . . . . . 135 Removing roll paper. . . . . . . . . . . . . . . . . . . . . . . . . . . . . . . . . . . . . . . . . . . . . . . . . . . . . . . . . . . . . . . 138 Additional Tractor Unit. . . . . . . . . . . . . . . . . . . . . . . . . . . . . . . . . . . . . . . . . . . . . . . . . . . . . . . . . . . . . . . . 138 Additional Sheet Guide. . . . . . . . . . . . . . . . . . . . . . . . . . . . . . . . . . . . . . . . . . . . . . . . . . . . . . . . . . . . . . . . . 138
Chapter 7 Product Information
Printer Parts. . . . . . . . . . . . . . . . . . . . . . . . . . . . . . . . . . . . . . . . . . . . . . . . . . . . . . . . . . . . . . . . . . . . . . . . . . 139 Printer Specifications. . . . . . . . . . . . . . . . . . . . . . . . . . . . . . . . . . . . . . . . . . . . . . . . . . . . . . . . . . . . . . . . . . 141 Mechanical. . . . . . . . . . . . . . . . . . . . . . . . . . . . . . . . . . . . . . . . . . . . . . . . . . . . . . . . . . . . . . . . . . . . . . 141 Electronic. . . . . . . . . . . . . . . . . . . . . . . . . . . . . . . . . . . . . . . . . . . . . . . . . . . . . . . . . . . . . . . . . . . . . . . . 144 Electrical. . . . . . . . . . . . . . . . . . . . . . . . . . . . . . . . . . . . . . . . . . . . . . . . . . . . . . . . . . . . . . . . . . . . . . . . 145 Environmental. . . . . . . . . . . . . . . . . . . . . . . . . . . . . . . . . . . . . . . . . . . . . . . . . . . . . . . . . . . . . . . . . . . 146 Paper. . . . . . . . . . . . . . . . . . . . . . . . . . . . . . . . . . . . . . . . . . . . . . . . . . . . . . . . . . . . . . . . . . . . . . . . . . . 147 Recommended printable area. . . . . . . . . . . . . . . . . . . . . . . . . . . . . . . . . . . . . . . . . . . . . . . . . . . . . . . 151 Command Lists. . . . . . . . . . . . . . . . . . . . . . . . . . . . . . . . . . . . . . . . . . . . . . . . . . . . . . . . . . . . . . . . . . . . . . . 153 Epson ESC/P control codes. . . . . . . . . . . . . . . . . . . . . . . . . . . . . . . . . . . . . . . . . . . . . . . . . . . . . . . . . 153 IBM PPDS emulation control codes. . . . . . . . . . . . . . . . . . . . . . . . . . . . . . . . . . . . . . . . . . . . . . . . . . 154 Standards and Approvals. . . . . . . . . . . . . . . . . . . . . . . . . . . . . . . . . . . . . . . . . . . . . . . . . . . . . . . . . . . . . . . 155 Safety approvals. . . . . . . . . . . . . . . . . . . . . . . . . . . . . . . . . . . . . . . . . . . . . . . . . . . . . . . . . . . . . . . . . . . 155 Cleaning the Printer. . . . . . . . . . . . . . . . . . . . . . . . . . . . . . . . . . . . . . . . . . . . . . . . . . . . . . . . . . . . . . . . . . . 156 Transporting the Printer. . . . . . . . . . . . . . . . . . . . . . . . . . . . . . . . . . . . . . . . . . . . . . . . . . . . . . . . . . . . . . . . 157
Glossary
Contents 7

FX-890II/FX-890IIN/FX-2190II/FX-2190IIN User’s Guide
Index
Contents 8

FX-890II/FX-890IIN/FX-2190II/FX-2190IIN User’s Guide
Where to Find Information
Where to Find Information
The following manuals are supplied with your Epson printer.
Start Here (paper manual)
Provides information on setting up the printer and installing the software.
User's Guide (this manual)
Provides overall information and instructions on using the printer.
Network Guide (FX-890IIN/FX-2190IIN only)
Provides network information on management and printer settings.
Where to Find Information 9

FX-890II/FX-890IIN/FX-2190II/FX-2190IIN User’s Guide
Safety Instructions
Safety Instructions
Warnings, Cautions, and Notes
!Warningsmust be followed carefully to avoid bodily injury.
!Cautionsmust be observed to avoid damage to your equipment.
Notes
contain important information and useful tips on the operation of your printer.
Hot Parts Caution Symbol
This symbol is placed on the print head and other parts to indicate that they may be hot. Never touch those parts just after the printer has been used. Let them cool for a few minutes before touching them.
Important Safety Instructions
Read all of these safety instructions before using the printer. In addition, follow all warnings and instructions marked on the printer itself.
Some of the symbols used on your printer are to ensure safety and proper use of the printer. Visit the following Web site to learn the meaning of the symbols.
http://support.epson.net/symbols
When setting up the printer
Do not place the printer on an unstable surface or near a radiator or heat source.
Place the printer on a flat, stable surface. The printer will not operate properly if it is tilted or placed at an angle.
Safety Instructions 10
FX-890II/FX-890IIN/FX-2190II/FX-2190IIN User’s Guide
Do not place this product on a soft, unstable surface like a bed or a sofa, or a small, enclosed area, as this restricts ventilation.
Do not block or cover the slots and openings in the printer’s cabinet, and do not insert objects through the slots.
Leave adequate room around the printer for easy operation and maintenance.
Place the printer where you can easily connect it to a network interface cable, if necessary (FX-890IIN/FX-2190IIN only).
Use only the type of power source indicated on the printer’s label. If you are not sure of the power supply specifications in your area, contact your local power company or consult your dealer.
Connect all equipment to properly grounded electrical outlets. Avoid using outlets on the same circuit as photocopiers or air control systems that regularly switch on and off.
Do not use a damaged or frayed power cord.
The power cord should be placed to avoid abrasions, cuts, fraying, crimping, kinking, and other damage.
If you use an extension cord with the printer, make sure the total ampere rating of all devices plugged into the extension cord does not exceed the cord’s ampere rating. Also, make sure the total ampere of all devices plugged into the electrical outlet does not exceed the electrical outlet’s ampere rating.
Use only the power cord that comes with this product. Use of another cord may result in fire or electric shock.
This product’s power cord is for use with this product only. Use with other equipment may result in fire or electric shock.
Be sure the AC power cord meets the relevant local safety standards.
Avoid using or storing the printer in places subject to rapid changes in temperature and humidity. Also keep it away from direct sunlight, strong light, heat sources, or excessive moisture or dust.
Avoid places subject to shocks and vibrations.
Place the printer near a wall outlet where you can easily unplug the power cord.
Keep the entire computer system away from potential sources of electromagnetic interference, such as loudspeakers or the base units of cordless telephones.
Safety Instructions 11

FX-890II/FX-890IIN/FX-2190II/FX-2190IIN User’s Guide
Avoid electrical outlets controlled by wall switches or automatic timers. An interruption in power can erase information in the memory of your printer or computer. Also avoid outlets on the same circuit as large motors or other appliances that can cause voltage fluctuations.
Use a grounded power outlet; do not use an adapter plug.
If you plan to use a printer stand, follow these guidelines:
-Use a stand that can support at least twice the weight of the printer.
-Never use a stand that tilts the printer. The printer should always be kept level.
-Position your printer’s power cord and interface cable so they do not interfere with paper feeding. If possible, secure the cables to a leg of the printer stand.
When maintaining the printer
Unplug the printer before cleaning it, and always clean it with a piece of damp cloth only.
Do not spill liquid onto the printer.
Do not attempt to service the printer yourself except as specifically explained in this guide.
Unplug the printer and refer servicing to qualified service personnel under the following conditions:
i.If the power cord or plug is damaged.
ii.If liquid has entered the printer.
iii.If the printer has been dropped or the cabinet damaged.
iv.If the printer does not operate normally or exhibits a distinct change in performance.
Do not use aerosol blowers which contain flammable gas inside or around this product. Doing so may cause fire.
Adjust only those controls that are covered by the operating instructions.
If you plan to use the printer in Germany, observe the following:
To provide adequate short-circuit protection and over-current protection for this printer, the building installation must be protected by a 10or 16-amp circuit breaker.
Bei Anschluss des Druckers an die Stromversorgung muss sichergestellt werden, dass die Gebaudeinstallation mit einer 10Aoder 16 A-Sicherung abgesichert ist.
When Handling the paper
Do not leave labels loaded in the printer between jobs; they may curl around the platen and jam when you resume printing.
Do not load paper that is curled or has been folded.
Safety Instructions 12

FX-890II/FX-890IIN/FX-2190II/FX-2190IIN User’s Guide
When operating the printer
Adjust only those controls that are covered in the user documentation. Improper adjustment of other controls may result in damage requiring extensive repair by a qualified technician.
Whenever you turn off the printer, wait at least five seconds before turning it back on; otherwise, you may damage the printer.
Do not turn off the printer while it is printing the self test. Always press the Pause button to stop printing and then turn off the printer.
Do not reconnect the power cord to an electrical outlet that has the wrong voltage for your printer.
Never replace the print head yourself; you may damage the printer. Also, other parts of the printer must be checked when the print head is replaced.
You need to move the print head by hand to replace the ribbon cartridge. If you have just used the printer, the print head may be hot; let it cool for a few minutes before touching it.
Restriction of use
When this product is used for applications requiring high reliability/safety such as transportation devices related to aviation, rail, marine, automotive etc.; disaster prevention devices; various safety devices etc.; or functional/precision devices etc., you should use this product only after giving consideration to including fail-safes and redundancies into your design to maintain safety and total system reliability. Because this product was not intended for use in applications requiring extremely high reliability/safety such as aerospace equipment, main communication equipment, nuclear power control equipment, or medical equipment related to direct medical care etc., please make your own judgment on this product's suitability after a full evaluation.
For users in Russia, Belarus, and Kazakhstan
Customer information
The model complies with the Technical regulation of Customs Union "About the safety of low voltage equipment" (TP TC 004/2011); with the Technical regulation of Customs Union "On Electromagnetic Compatibility of Technical Devices" (TP TC 020/2011)
Manufacturer: SEIKO EPSON CORPORATION
Address: 3-5, Owa 3-chome, Suwa-shi, Nagano-ken 392-8502 Japan Telephone: 81-266-52-3131
Safety Instructions 13

FX-890II/FX-890IIN/FX-2190II/FX-2190IIN User’s Guide
Official representative in CIS countries:
LLC "EPSON CIS"
Address: Moscow, 129110, ul. Schepkina, 42, Bldg. 2a, Fl. 3 Business Center Chaika Plaza Telephone: +7 (495) 777-0355/56
web: http://www.epson.ru/ email: info_CIS@epson.ru
EPSON EUROPE B.V. MOSCOW REPRESENTATIVE OFFICE
Address: Moscow, 129110, ul. Schepkina, 42, Bldg. 2a, Fl. 3 Business Center Chaika Plaza Telephone: +7 (495) 777-0355/56
web: http://www.epson.ru/
Production month and year: Labeled on the product with 8 numbers: YYYY.MM.DD
Country of production: Labeled on the product
For United Kingdom users
Use of options
Epson (UK) Limited shall not be liable against any damages or problems arising from the use of any options or consumable products other than those designated as Original Epson Products or Epson Approved Products by Epson (UK) Limited.
Safety information
!Warning:This appliance must be earthed. Refer to the rating plate for voltage and check that the appliance voltage corresponds to the supply voltage.
Important:
The wires in the mains lead fitted to this appliance are coloured in accordance to the following code:
Green and yellow — Earth
Blue — Neutral
Brown — Live
Safety Instructions 14

FX-890II/FX-890IIN/FX-2190II/FX-2190IIN User’s Guide
If you have to fit a plug:
As the colours of the mains lead of this appliance may not match coloured markings used to identify the terminals in a plug, please proceed as follows:
The green and yellow wire must be connected to the terminal in the plug which is marked with the letter E or the Earth symbol (G).
The blue wire must be connected to the terminal in the plug marked with the letter N. The brown wire must be connected to the terminal in the plug marked with the letter L. If damage occurs to the plug, replace the cord set or consult a qualified electrician. Replace fuses only with a fuse of the correct size and rating.
For Singapore users
Replace fuses only with fuses of the correct size and rating.
For German users
Maschinenlärminformations-Verordnung 3. GPSGV: Der höchste Schalldruckpegel beträgt 70 dB(A) oder weniger gemäss EN ISO 7779.
Das Gerät ist nicht für die Benutzung am Bildschirmarbeitsplatz gemäß BildscharbV vorgesehen.
Importeur
EPSON EUROPE. B.V.
AMSTERDAM. THE NETHERLANDS
For Turkish users
For Ukraine users
Safety Instructions 15

FX-890II/FX-890IIN/FX-2190II/FX-2190IIN User’s Guide
Chapter 1
Paper Handling
Selecting a Paper Source
Your printer provides a variety of paper sources for printing on single sheets and continuous paper. Paper can be fed into the printer from the front, bottom, or rear. Select the paper source that best suits your current printing needs.
!Caution:Do not use paper that is folded, creased, curled, torn, stained, or stamped. Always use new, clean paper that meets the paper specifications. See “Paper” on page 147 for more details.
Printing on continuous paper
You can choose from three tractor positions (front push, rear push, and pull) and three paper entry slots (front, rear, and bottom) for continuous paper printing. This section helps you determine which paper paths and tractor positions are best for your continuous paper printing needs. See “Loading continuous paper with the tractor” on page 21 for tractor installation and paper loading instructions.
Using the push tractor positions
If you often need to tear off sheets of continuous paper (for example, if you are printing purchase orders or sales slips), it is best to use the tractor in the front or rear push position. This allows you to use the printer’s tear-off edge to easily tear off sheets of continuous paper at the perforation. Also, when continuous paper is loaded on a rear push tractor, you can print on single sheets of paper from the sheet guide without removing the continuous paper from the tractor.
There are two push tractor positions: front and rear. See the table below for details about the push positions and the corresponding paper paths.
Paper Handling 16

FX-890II/FX-890IIN/FX-2190II/FX-2190IIN User’s Guide
|
Tractor position |
|
|
|
|
|
|
Description |
||||||||||||||||
|
|
|
|
|
|
|
|
|
|
|
|
|
|
|
|
|
|
|
|
|
|
|
|
|
|
|
|
|
|
|
|
|
|
|
|
|
|
|
|
|
|
|
|
|
|
|
|
|
Load paper from the front slot. |
|
|
|
|
|
|
|
|
|
|
|
|
|
|
|
|
|
|
|
|
|
|
|
|
If you print on thick paper such as multipart forms, use the front paper slot because |
|
|
|
|
|
|
|
|
|
|
|
|
|
|
|
|
|
|
|
|
|
|
|
||
|
|
|
|
|
|
|
|
|
|
|
|
|
|
|
|
|
|
|
|
|
|
|
||
|
|
|
|
|
|
|
|
|
|
|
|
|
|
|
|
|
|
|
|
|
|
|
|
this paper path is almost straight. This reduces the chances of paper jams. |
|
|
|
|
|
|
|
|
|
|
|
|
|
|
|
|
|
|
|
|
|
|
|
|
|
|
|
|
|
|
|
|
|
|
|
|
|
|
|
|
|
|
|
|
|
|
|
|
|
|
|
|
|
|
|
|
|
|
|
|
|
|
|
|
|
|
|
|
|
|
|
|
|
|
|
|
|
|
|
|
|
|
|
|
|
|
|
|
|
|
|
|
|
|
|
|
|
|
|
|
|
|
|
|
|
|
|
front push |
|
|
|
|
|
|
|
||||||||||
|
|
|
|
|
|
|
|
|
|
|
|
|
|
|
|
|
|
|
|
|
|
|
|
|
|
|
|
|
|
|
|
|
|
|
|
|
|
|
|
|
|
|
|
|
|
|
|
|
Load paper from the rear slot. |
|
|
|
|
|
|
|
|
|
|
|
|
|
|
|
|
|
|
|
|
|
|
|
|
Caution: |
|
|
|
|
|
|
|
|
|
|
|
|
|
|
|
|
|
|
|
|
|
|
|
||
|
|
|
|
|
|
|
|
|
|
|
|
|
|
|
|
|
|
|
|
|
|
|
||
|
|
|
|
|
|
|
|
|
|
|
|
|
|
|
|
|
|
|
|
|
|
|
|
Do not load continuous paper with labels from the rear slot. Labels require a straight |
|
|
|
|
|
|
|
|
|
|
|
|
|
|
|
|
|
|
|
|
|
|
|
|
paper path; otherwise the labels may come off their backing sheets inside the printer |
|
|
|
|
|
|
|
|
|
|
|
|
|
|
|
|
|
|
|
|
|
|
|
||
|
|
|
|
|
|
|
|
|
|
|
|
|
|
|
|
|
|
|
|
|
|
|
|
and cause a paper jam. |
|
|
|
|
|
|
|
|
|
|
|
|
|
|
|
|
|
|
|
|
|
|
|
|
|
|
|
|
|
|
|
|
rear push |
|
|
|
|
|
||||||||||||
|
|
|
|
|
|
|
|
|
|
|
|
|
Note: |
|||||||||||
|
|
|
|
|
|
|
|
|
|
|
|
|
|
|
|
|
|
|
|
|
|
|
|
|
|
|
|
|
|
|
|
|
|
|
|
|
|
|
|
|
|
|
|
|
|
|
|
|
The rear slot is also not recommended when your multipart forms have 5 or 6 parts (1 |
|
|
|
|
|
|
|
|
|
|
|
|
|
|
|
|
|
|
|
|
|
|
|
|
original plus 4 or 5 copies), because paper might jam. |
|
|
|
|
|
|
|
|
|
|
|
|
|
|
|
|
|
|
|
|
|
|
|
|
|
Using the pull tractor position
If you often print on thick or heavy continuous paper, such as multipart forms or continuous paper with labels, use the tractor in the pull position. The pull tractor provides you with the best paper jam prevention, and allows you to load continuous paper from the front, rear, or bottom of the printer. However, you cannot use the tear-off feature when the tractor is in the pull position.
Note:
To use the tractor in the pull position, you can remove the tractor from the rear push position and reinstall it in the pull position, or you can purchase the optional pull tractor unit. FX-890II/FX-890IIN:
-C933761 (For worldwide users)
-C933771 (For users in India) FX-2190II/FX-2190IIN:
-C933791 (For worldwide users)
-C933801 (For users in India)
If you use a push tractor with the optional tractor in the pull position, you can create a push/pull tractor combination. This improves the performance of continuous paper, and is recommended for printing on continuous pre-printed forms. See “Using two tractors in a push/pull combination” on page 40 for more information.
You can use the front, bottom, or rear paper slot with the pull tractor.
Paper Handling 17

FX-890II/FX-890IIN/FX-2190II/FX-2190IIN User’s Guide
|
Paper slot |
|
|
|
|
|
|
|
|
|
|
Description |
||
|
|
|
|
|
|
|
|
|
|
|
|
|
|
|
|
|
|
|
|
|
|
|
|
|
|
|
|
|
If you print on thick paper such as multipart forms or continuous paper with labels, |
|
|
|
|
|
|
|
|
|
|
|
|
|
|
use the front paper slot because this paper path is nearly straight. This reduces the |
|
|
|
|
|
|
|
|
|
|
|
|
|
|
|
|
|
|
|
|
|
|
|
|
|
|
|
|
|
chances of paper jams. |
|
|
|
|
|
|
|
|
|
|
|
|
|
|
|
|
|
|
|
|
|
|
|
|
|
|
|
|
|
|
|
|
|
|
|
|
|
|
|
|
|
|
|
|
|
|
|
|
|
|
|
|
|
|
|
|
|
|
|
|
|
|
|
|
|
|
|
|
|
|
|
|
|
|
|
|
|
|
|
|
|
front |
||||||||
|
|
|
|
|
|
|
|
|
|
|
|
|
|
|
|
|
|
|
|
|
|
|
|
|
|
|
|
|
The bottom paper slot has the straightest paper path, so it is the best slot to use when |
|
|
|
|
|
|
|
|
|
|
|
|
|
|
printing on thick paper, such as multipart forms or continuous paper with labels. |
|
|
|
|
|
|
|
|
|
|
|
|
|
|
|
Note:
When loading paper from the bottom slot, be sure to use a printer stand with an opening large enough for the paper to feed through it without obstruction.
bottom
If the front or bottom paper slot is unavailable, you can also load ordinary continuous paper from the rear slot. Please note that loading paper from the rear slot results in a curved paper path, which may affect loading performance, so use the front or bottom slot whenever possible.
Caution:
rear Do not load continuous paper with labels from the rear slot. The labels may come off the backing sheets inside the printer and cause a paper jam.
Printing on single sheets (cut-sheet)
You can load ordinary single sheets and envelopes one at a time from the rear paper entry slot of the printer, using the sheet guide.
You can also load a stack of single-sheet paper using the optional cut-sheet feeder. See “Loading Single Sheets” on page 44 for more information. See “Cut-Sheet Feeder” on page 123 for information on the optional cut-sheet feeder.
Paper Handling 18

FX-890II/FX-890IIN/FX-2190II/FX-2190IIN User’s Guide
Setting the Paper Release Lever
When you load continuous paper in the printer, you need to set the paper release lever to indicate the paper source you want to use, as described in the table below.
The table below describes each paper release lever position.
Paper release |
Description |
lever position |
|
|
|
|
Single-sheet (cut-sheet) position |
|
For loading single-sheet paper from the rear or front slot. See “Loading Single Sheets” on page 44 |
|
for instructions. |
|
|
|
Rear push tractor position |
|
For loading continuous paper using the tractor installed in the rear push position. Also set the lever |
|
to this position when using the rear push and pull tractors in combination. |
|
|
|
Front push tractor position |
|
For loading continuous paper using the tractor installed in the front push position. Also set the lever |
|
to this position when using the front push and pull tractors in combination. |
|
|
|
Pull tractor position |
|
For loading continuous paper from the tractor installed on top of the printer in the pull position. |
|
When the tractor is in the pull position, you can load paper in the front, rear, or bottom slot. |
|
|
Adjusting the Paper Thickness Lever
You can get the best printing quality by adjusting the paper-thickness lever according to the thickness of the paper you are using.
Paper Handling 19

FX-890II/FX-890IIN/FX-2190II/FX-2190IIN User’s Guide
1.Turn off the printer and open the printer cover. The paper-thickness lever is located on the left side of the printer. The numbers next to the lever indicate the thickness setting.
2. Use the table below to select the appropriate paper thickness.
Paper type*1 |
|
Paper-thickness lever |
|
|
|
position |
|
|
|
|
|
Ordinary paper |
Single sheets |
0 or 1 |
|
|
|
|
|
|
Continuous paper |
0 |
|
|
|
|
|
Thin paper |
|
0 |
|
|
|
|
|
Multipart forms*2 |
2 parts (original + 1 copy) |
1 |
|
(carbonless, 40 g/m2) |
|
|
|
3 parts (original + 2 copies) |
2 |
||
|
|||
|
|
|
|
|
4 parts (original + 3 copies) |
4 |
|
|
|
|
|
|
5 parts (original + 4 copies) |
6 |
|
|
|
|
|
|
6 parts (original + 5 copies) |
7 |
|
|
|
|
|
|
7 parts (original + 6 copies)*3 |
7 |
|
Labels |
|
2 |
|
|
|
|
|
Cards |
|
3 |
|
|
|
|
|
Envelopes*2 |
20 lb |
4 |
|
|
24 lb |
5 |
|
|
|
|
*1 See the paper specifications in “Paper” on page 147 for more details.
*2 Change the lever position to one level down if the printed results are too light. Change the lever position to one level up if the printed results are dirty or smeared.
*3 Available when using a bottom pull position or front pull position.
Paper Handling 20
FX-890II/FX-890IIN/FX-2190II/FX-2190IIN User’s Guide
Loading Continuous Paper
Follow the instructions in this section to load continuous paper in the printer.
Positioning your continuous paper supply
When you load continuous paper, make sure you align your paper supply with the tractor so the paper feeds smoothly into the printer, as shown below.
Loading continuous paper with the tractor
The paper loading procedure depends on where you position the tractor which feeds paper to the printer. Follow the instructions below for your tractor position.
This section provides instructions of following:
-“Using the tractor in the rear push position” on page 21
-“Using the tractor in the front push position” on page 26
-“Using the tractor in the pull position” on page 31
-“Using two tractors in a push/pull combination” on page 40
Using the tractor in the rear push position
If your tractor is in the rear push position, skip to “Loading paper with the rear push tractor” on page 22 for instructions on loading paper.
This section provides instructions for following:
-“Installing the tractor in the rear push position” on page 22
-“Loading paper with the rear push tractor” on page 22
-“Removing the tractor from the rear push position” on page 25
Note:
Thick paper, such as continuous paper with labels or multipart forms with five or six parts, requires a relatively straight paper path to avoid paper jams. When printing on thick continuous paper, use the tractor in the front push position or the pull position.
Paper Handling 21
FX-890II/FX-890IIN/FX-2190II/FX-2190IIN User’s Guide
Installing the tractor in the rear push position
Before installing the tractor in the rear push position, remove it from its current position. If the tractor is in the front push position, remove it by pressing the tractor’s lock tabs while lifting it out. If the tractor is in the pull position, remove it as described in “Removing the tractor from the rear push position” on page 25.
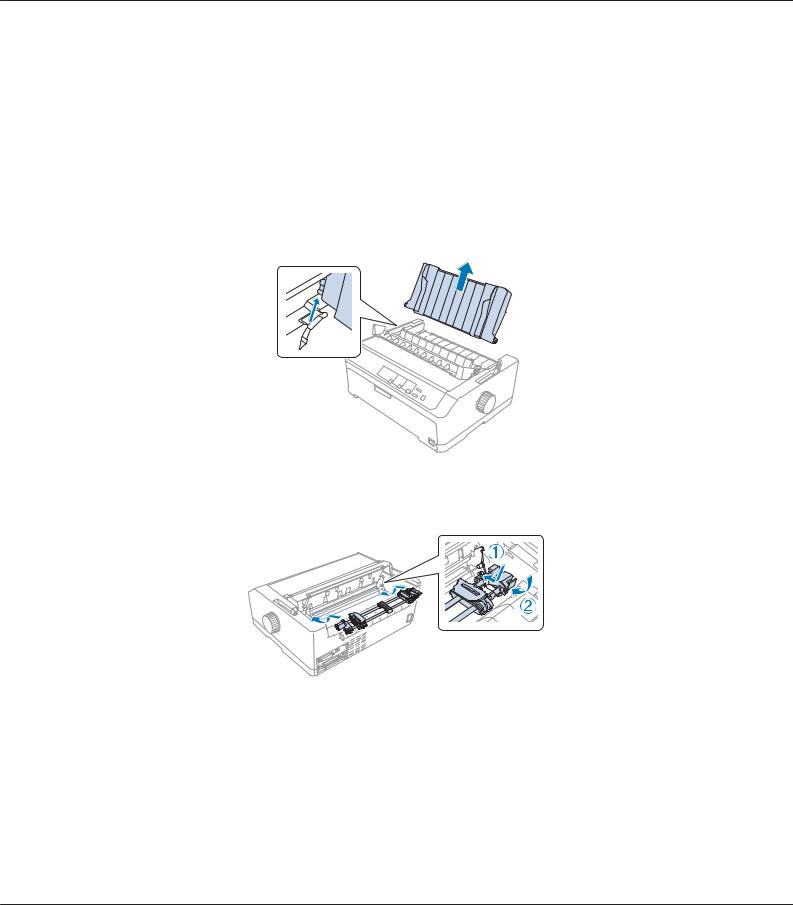
1.Make sure the printer is turned off. Then open the paper guide cover by pulling its back edge forward.
2.Slide the sheet guide along the path and lift it at an angle to remove it.
3.Lower the tractor into the printer’s mounting slots and press down both ends of the tractor to make sure that it is firmly seated.
See “Loading paper with the rear push tractor” on page 22 for instructions on loading continuous paper using the rear push tractor.
Loading paper with the rear push tractor
Follow these steps to load paper using the rear push tractor:
1. Make sure the printer is turned off.
Paper Handling 22
FX-890II/FX-890IIN/FX-2190II/FX-2190IIN User’s Guide
2.Make sure the tractor is installed in the rear push position and the sheet guide is removed from the printer.
3. Set the paper release lever to the rear push tractor position.
4. Release the left and right sprockets by pulling the blue sprocket lock levers forward.
Paper Handling 23

FX-890II/FX-890IIN/FX-2190II/FX-2190IIN User’s Guide
5.Slide the right sprocket (illustration shown below) approximately 12 mm (0.5 inch) from the far position and push the blue lever back to lock in place. Then slide the another sprocket to match the width of your paper, but do not lock it.
* approx. 12 mm (0.5 inch)
The triangle mark on top of the printer indicates the point furthest to the left where printing can begin.
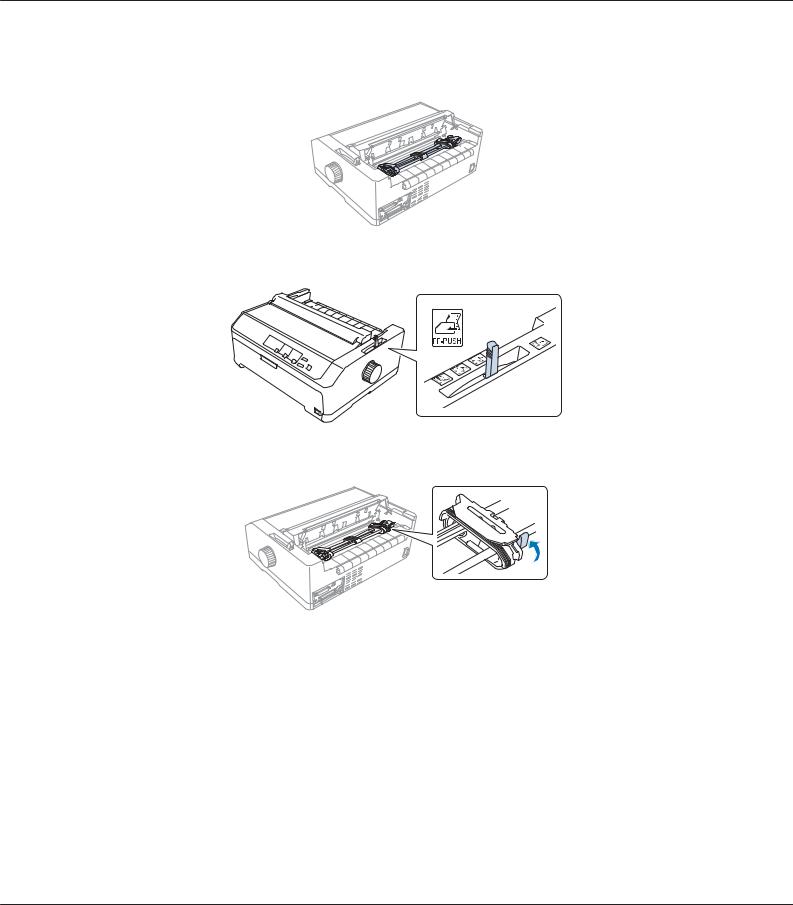
6.Make sure your paper has a clean, straight edge. Then open both sprocket covers and fit the first four holes of the paper, with the printable side down, over the tractor pins.
7.Close the sprocket covers.
8.Slide the right sprocket to remove any slack in the paper; then lock it in place by pushing the blue sprocket lock down.
Paper Handling 24

FX-890II/FX-890IIN/FX-2190II/FX-2190IIN User’s Guide
9.Attach the sheet guide and lay it flat on the printer and slide the edge guides to the middle of the sheet guide.
Note:
For your safety, Epson recommends operating the printer with the printer cover closed. The printer will function with the printer cover opened or removed, but maximum safety and print speed are achieved when the cover is closed.
10.Turn on the printer. When the printer receives data, it automatically loads the paper and starts printing.
11.After you finish printing, follow the steps in “Removing continuous paper” on page 42 to remove your printed document.
If the first line on your page appears too high or low, you can change its position using the Micro Adjust function as described in “Adjusting the top-of-form position” on page 56.
!Caution:Never use the knob to adjust the top-of-form position; this may damage the printer or cause it to lose the top-of-form position.
Removing the tractor from the rear push position
Follow these steps to remove the tractor from the rear push position:
1.Make sure the printer is turned off.
2.Remove any paper from the tractor as described in “Removing continuous paper” on page 42.
Paper Handling 25

FX-890II/FX-890IIN/FX-2190II/FX-2190IIN User’s Guide
3. Press the tractor’s lock tabs, tilt the tractor up, and lift it out of the printer.
Using the tractor in the front push position
Installing the tractor in the front push position
Before installing the tractor in the front push position, remove it from its current position. If the tractor is in the rear push position, remove the sheet guide and then press the tractor’s lock tabs while lifting it out. If the tractor is in the pull position, remove it following the instructions in “Removing the tractor from the pull position” on page 38.
1.Make sure the printer is turned off. If necessary, install the sheet guide on your printer as described in the supplied setup sheet.
2.If the sheet guide is installed in the front, remove it by grasping the fins on both sides and pulling the guide slightly up and away from the printer.
3.Insert the tractor into the printer’s mounting slots and press down both ends of the tractor to make sure that it is firmly seated.
See “Loading paper with the front push tractor” on page 27 for instructions on loading continuous paper with the front push tractor.
Paper Handling 26

FX-890II/FX-890IIN/FX-2190II/FX-2190IIN User’s Guide
Loading paper with the front push tractor
When using the push tractor, it is a good idea to set the Auto tear-off function in the Default Setting mode to On. See “About Your Printer’s Default Settings” on page 92 for more information.
Follow these steps to load paper using the front push tractor:
1.Make sure the printer is turned off.
2.Open the front cover. Make sure the tractor is installed in the front push position.
3. Remove the sub cover to insert the paper.
Paper Handling 27

FX-890II/FX-890IIN/FX-2190II/FX-2190IIN User’s Guide
4.Set the paper release lever to the front push tractor position. Also set the paper-thickness lever (located under the printer cover) to the proper position for your paper’s thickness. See “Adjusting the Paper Thickness Lever” on page 19 for instructions.
5. Release the left and right sprockets by pushing the blue sprocket lock levers backward.
6.Slide the left sprocket approximately 12 mm (0.5 inch) from the far left position and pull the blue lever forward to lock it in place. Then slide the right sprocket to match the width of your paper, but do not lock it.
* approx. 12 mm (0.5 inch)
Paper Handling 28

FX-890II/FX-890IIN/FX-2190II/FX-2190IIN User’s Guide
7. Insert the paper into the bottom slot as shown in the illustration below.
8.Make sure your paper has a clean, straight edge. Then open both sprocket covers and fit the first four holes of the paper, with printable side up, over the tractor pins. Then close the sprocket covers.
9.Slide the right sprocket to remove any slack in the paper; then lock it in place by pushing the sprocket lock down.
10.Close the front cover with the continuous paper positioned as shown below.
11.Make sure the sheet guide is lying flat on the printer and slide the edge guides to the middle of the sheet guide.
Paper Handling 29

FX-890II/FX-890IIN/FX-2190II/FX-2190IIN User’s Guide
Note:
For your safety, Epson recommends operating the printer with the printer cover closed. The printer will function with the printer cover opened or removed, but maximum safety and print speed are achieved when the cover is closed.
12.Turn on the printer. When the printer receives data, it automatically loads the paper and starts printing.
13.After you finish printing, follow the steps in “Removing continuous paper” on page 42 to remove your printed document.
If the first line on your page appears too high or low, you can change its position by using the Micro Adjust function as described in “Adjusting the top-of-form position” on page 56.
!Caution:Never use the knob to adjust the top-of-form position; this may damage the printer or cause it to lose the top-of-form position.
Removing the tractor from the front push position
Follow these steps to remove the tractor from the front push position:
1.Make sure the printer is turned off.
2.Remove any paper from the tractor as described in “Removing continuous paper” on page 42.
3.Press the tractor’s lock tabs, tilt the tractor up, and lift it out of the printer.
Paper Handling 30
 Loading...