


|
................................................ ............................................. |
||
ESL 6552RO |
EN DISHWASHER |
USER MANUAL |
2 |
|
KK ЫДЫС ЖУҒЫШ МАШИНА |
ҚОЛДАНУ ТУРАЛЫ |
18 |
|
|
НҰСҚАУЛАРЫ |
|
|
RU ПОСУДОМОЕЧНАЯ |
ИНСТРУКЦИЯ ПО |
34 |
|
МАШИНА |
ЭКСПЛУАТАЦИИ |
|
|
UK ПОСУДОМИЙНА МАШИНА |
ІНСТРУКЦІЯ |
51 |

2 www.electrolux.com
CONTENTS
1. SAFETY INFORMATION . . . . . . . . . . . . . . . . . . . . . . . . . . . . . . . . . . . . . . . . . . . . . . . . . . . 3 2. PRODUCT DESCRIPTION . . . . . . . . . . . . . . . . . . . . . . . . . . . . . . . . . . . . . . . . . . . . . . . . . 5 3. CONTROL PANEL . . . . . . . . . . . . . . . . . . . . . . . . . . . . . . . . . . . . . . . . . . . . . . . . . . . . . . . 5 4. PROGRAMMES . . . . . . . . . . . . . . . . . . . . . . . . . . . . . . . . . . . . . . . . . . . . . . . . . . . . . . . . . 6 5. OPTIONS . . . . . . . . . . . . . . . . . . . . . . . . . . . . . . . . . . . . . . . . . . . . . . . . . . . . . . . . . . . . . . 7 6. BEFORE FIRST USE . . . . . . . . . . . . . . . . . . . . . . . . . . . . . . . . . . . . . . . . . . . . . . . . . . . . . . 9 7. DAILY USE . . . . . . . . . . . . . . . . . . . . . . . . . . . . . . . . . . . . . . . . . . . . . . . . . . . . . . . . . . . . 11 8. HINTS AND TIPS . . . . . . . . . . . . . . . . . . . . . . . . . . . . . . . . . . . . . . . . . . . . . . . . . . . . . . . 13 9. CARE AND CLEANING . . . . . . . . . . . . . . . . . . . . . . . . . . . . . . . . . . . . . . . . . . . . . . . . . . . 14
10. TROUBLESHOOTING . . . . . . . . . . . . . . . . . . . . . . . . . . . . . . . . . . . . . . . . . . . . . . . . . . . . 15 11. TECHNICAL INFORMATION . . . . . . . . . . . . . . . . . . . . . . . . . . . . . . . . . . . . . . . . . . . . . . . 17 12. ENVIRONMENT CONCERNS . . . . . . . . . . . . . . . . . . . . . . . . . . . . . . . . . . . . . . . . . . . . . . 17
WE’RE THINKING OF YOU
Thank you for purchasing an Electrolux appliance. You’ve chosen a product that brings with it decades of professional experience and innovation. Ingenious and stylish, it has been designed with you in mind. So whenever you use it, you can be safe in the knowledge that you’ll get great results every time.
Welcome to Electrolux.
Visit our website for:
Get usage advice, brochures, trouble shooter, service information:
www.electrolux.com
Register your product for better service:
www.electrolux.com/productregistration
Buy Accessories, Consumables and Original spare parts for your appliance: www.electrolux.com/shop
CUSTOMER CARE AND SERVICE
We recommend the use of original spare parts.
When contacting Service, ensure that you have the following data available. The information can be found on the rating plate. Model, PNC, Serial Number.
Warning / Caution-Safety information
General information and tips
Environmental information
Subject to change without notice.
ENGLISH 3
1.  SAFETY INFORMATION
Before the installation and use of the appliance, carefully read the supplied instructions. The manufacturer is not responsible if an incorrect installation and use causes injuries and damages. Always keep the instructions with the appliance for future reference.
1.1 Children and vulnerable people safety
WARNING!
Risk of suffocation, injury or permanent disability.
•Do not let persons, children included, with reduced physical sensory, reduced mental functions or lack of experience and knowledge use the appliance. They must have supervision or instruction for the operation of the appliance by a person who is responsible for their safety. Do not let children play with the appliance.
•Keep all packaging away from children.
•Keep all detergents away from children.
•Keep children and pets away from the appliance door when it is open.
1.2 Installation
•Remove all the packaging.
•Do not install or use a damaged appliance.
•Do not install or use the appliance where the temperature is less than 0 °C.
•Obey the installation instruction supplied with the appliance.
•Make sure that the appliance is installed below and adjacent to safe structures.
Water connection
•Make sure not to cause damage to the water hoses.
•Before you connect the appliance to new pipes or pipes not used for a long time, let the water flow until it is clean.
•The first time you use the appliance, make sure that there is no leakage.
•The water inlet hose has a safety valve and a sheath with an inner mains cable.
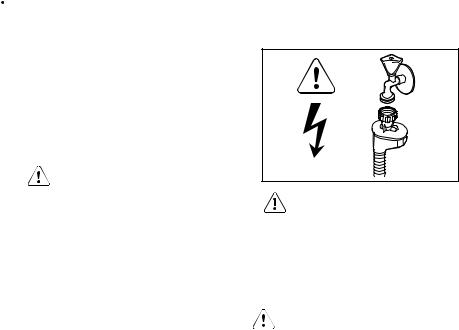
WARNING!
Dangerous voltage.
•If the water inlet hose is damaged, immediately disconnect the mains plug from the mains socket. Contact the service to replace the water inlet hose.
Electrical connection
WARNING!
Risk of fire and electrical shock.
•The appliance must be earthed.
•Make sure that the electrical information on the rating plate agrees with the power supply. If not, contact an electrician.
•Always use a correctly installed shockproof socket.
•Do not use multi-plug adapters and extension cables.
•Make sure not to cause damage to the mains plug and to the mains cable. Contact the Service or an electrician to change a damaged mains cable.
•Connect the mains plug to the mains socket only at the end of the installation. Make sure that there is access to the mains plug after the installation.
•Do not pull the mains cable to disconnect the appliance. Always pull the mains plug.
1.3 Use
•This appliance is intended to be used in household and similar applications such as:
–Staff kitchen areas in shops, offices and other working environments
4www.electrolux.com
–Farm houses
–By clients in hotels, motels and other residential type environments
–Bed and breakfast type environments.
WARNING!
Risk of injury.
•Do not change the specification of this appliance.
•Put knives and cutlery with sharp points in the cutlery basket with the points down or in a horizontal position.
•Do not keep the appliance door open without supervision to prevent to fall on it.
•Do not sit or stand on the open door.
•Dishwasher detergents are dangerous. Obey the safety instructions on the detergent packaging.
•Do not drink and play with the water in the appliance.
•Do not remove the dishes from the appliance until the programme is completed. There can be detergent on the dishes.
WARNING!
Risk of electrical shock, fire or burns.
•Do not put flammable products or items that are wet with flammable products in, near or on the appliance.
•Do not use water spray and steam to clean the appliance.
•The appliance can release hot steam if you open the door while a programme operates.
1.4 Internal light
To replace the internal light, contact the Service.
1.5 Disposal
WARNING!
Risk of injury or suffocation.
•Disconnect the appliance from the mains supply.
•Cut off the mains cable and dispose of it.
•Remove the door catch to prevent children and pets to get closed in the appliance.

ENGLISH 5
2. PRODUCT DESCRIPTION
1 2
11
10 |
9 |
8 |
7 |
6 |
5 |
4 |
3 |
1Upper spray arm
2Lower spray arm
3Filters
4Rating plate
5Salt container
6Water hardness dial
7Rinse aid dispenser
8Detergent dispenser
9Cutlery basket
10Lower basket
11Upper basket
This appliance has an internal light that comes on when you open the door and goes off when the door is closed.
2.1 Beam-on-Floor
The Beam-on-Floor is a light that shows on the floor below the appliance door.
•When the programme starts to operate, the red light comes on and stays on for all the duration of the programme.
•When the programme is completed, the green light comes on.
•When the appliance has a malfunction, the red light flashes.
The Beam-on-Floor goes off when the appliance is deactivated.
3. CONTROL PANEL
1 |
2 |
3 |
4 |
5 |
6 |
7 |
8 |
9 |
1 |
On/off button |
2 |
Display |
6 www.electrolux.com
|
3 |
Delay button |
7 |
Multitab button |
|
|
Program button |
|
EnergySaver button |
|
4 |
8 |
||
|
|
MyFavourite button |
|
Indicators |
|
5 |
9 |
||
|
|
TimeSaver button |
|
|
|
6 |
|
|
|
|
|
|
|
|
Indicators Description
Salt indicator. It is always off while the programme operates.
Rinse aid indicator. It is always off while the programme operates.
4. PROGRAMMES
Programme |
Degree of soil |
Programme |
Options |
|
|
|
Type of load |
phases |
|
P11) |
Normal soil |
Prewash |
TimeSaver |
|
|
|
Crockery and cut- |
Wash 50 °C |
EnergySaver |
|
|
lery |
Rinses |
|
50º |
|
|
Dry |
|
P22) |
All |
Prewash |
EnergySaver |
|
|
|
Crockery, cutlery, |
Wash from 45 °C to |
|
|
|
pots and pans |
70 °C |
|
|
|
|
||
45º-70º |
|
Rinses |
|
|
|
|
|
Dry |
|
P33) |
Mixed soil |
Prewash |
TimeSaver |
|
|
|
Crockery, cutlery, |
Wash 50 °C and 65 |
EnergySaver |
FlexiWash |
pots and pans |
°C |
|
|
50º-65º |
|
Rinses |
|
|
Dry
P4
70º
P54)
Heavy soil |
Prewash |
TimeSaver |
Crockery, cutlery, |
Wash 70 °C |
EnergySaver |
pots and pans |
Rinses |
|
|
Dry |
|
Fresh soil |
Wash 60 °C |
|
Crockery and cut- |
Rinse |
|
lery |
|
|
P65) |
All |
Prewash |
Rinse &
Hold
1)With this programme you have the most efficient use of water and energy consumption for crockery and cutlery with normal soil. (This is the standard programme for test institutes).
2)The appliance senses the degree of soil and the quantity of items in the baskets. It automatically adjusts the temperature and quantity of the water, the energy consumption and the programme duration.
3)With this programme you can wash different loads with different soil. A higher temperature and water pressure in the lower basket, to wash items with heavy soil (e.g. pots and pans).
ENGLISH 7
A lower temperature and water pressure in the upper basket, to wash items with normal soil (e.g. glassware).
4)With this programme you can wash a load with fresh soil. It gives good washing results in a short time.
5)Use this programme to quickly rinse the dishes. This prevents the remaining food to bond on the dishes and bad odours to come out from the appliance.
Do not use detergent with this programme.
Consumption values
Programme1) |
Duration |
Energy |
Water |
|
|
|
(min) |
(kWh) |
(l) |
P1 |
170 - 180 |
0.9 - 1.0 |
9 - 10 |
|
50º |
|
|
|
|
P2 |
40 - 150 |
0.6 - 1.4 |
7 - 14 |
|
|
|
|
|
|
|
|
|
|
|
45º-70º |
|
|
|
|
P3 |
130 - 140 |
1.3 - 1.5 |
14 - 15 |
|
FlexiWash |
|
|
|
|
50º-65º |
|
|
|
|
P4 |
150 - 160 |
1.4 - 1.6 |
13 - 15 |
|
|
|
|
|
|
|
|
|
|
|
70º |
|
|
|
|
P5 |
30 |
0.8 |
9 |
|
|
|
|
|
|
|
|
|
|
|
|
|
|
|
|
P6 |
14 |
0.1 |
4 |
|
Rinse &
Hold
1) The pressure and the temperature of the water, the variations of the mains supply, the options and the quantity of dishes can change the values.
Information for test institutes
For all the necessary information for test performance. send an email to: info.test@dishwasher-production.com
Write down the product number (PNC) that is on the rating plate.
5. OPTIONS
Activate or deactivate the options before the start of a programme. You cannot activate or deactivate the options while a programme operates.
If one or more options are set, make sure that the related indicators are on before the programme starts.

8www.electrolux.com
5.1MyFavourite
With this option you can set and memorise the programme and options that you use more frequently.
It is not possible to memorise the options Multitab and Delay.
You can only memorise 1 programme at a time. A new setting cancels the previous one.
How to memorise a programme
1.Press the on/off button to activate the appliance.
2.Set the programme and the options that you want to memorise.
3.Press and hold the MyFavourite button until the related indicator comes on with fixed light.
How to set the MyFavourite programme
1.Press the MyFavourite button.
•The related indicator comes on.
•The display shows the number and the duration of the programme.
•The option indicators come on.
5.2 TimeSaver
This option increases the water pressure, the result is that the programme duration decreases by approximately 50%.
To make sure that the washing results are the same as with the normal programme duration, the temperature of the water increases. This increases the energy consumption.
With a shorter drying phase also the drying results can decrease.
How to activate the TimeSaver option
1.Press the TimeSaver button.
•If the option is applicable to the programme, the related indicator comes on. In the display you can see the update of the programme duration.
•If the option is not applicable to the programme, the related indicator flashes quickly 3 times and then goes off.
5.3 Multitab
Activate this option only when you use the combi detergent tablets.
This option deactivates the use of rinse aid and salt. The related indicators stay off.
The programme duration can increase.
How to activate the Multitab option
1.Press the on/off button to activate the appliance.
2.Press the Multitab button, the related
indicator comes on.
The option stays on until you deactivate it. Press the Multitab button, the related indicator goes off.
If you stop to use the combi detergent tablets, before you start to use separately detergent, rinse aid and dishwasher salt, do these steps:
1.Deactivate the Multitab option.
2.Set the water softener to the highest level.
3.Make sure that the salt container and the rinse aid dispenser are full.
4.Start the shortest programme with a rinsing phase, without detergent and without dishes.
5.Adjust the water softener to the water hardness in your area.
6.Adjust the released quantity of rinse aid.
5.4 EnergySaver
This option decreases the temperature in the last rinse phase and the duration of the drying phase.
The use of this option decreases the energy consumption (up to 25%) and the programme duration.
The dishes can be wet at the end of the programme.
How to activate the EnergySaver option
1.Press the EnergySaver button.
•If the option is applicable to the programme, the related indicator comes on. In the display you can see the update of the programme duration.
•If the option is not applicable to the programme, the related indicator

flashes quickly 3 times and then goes off.
5.5 Acoustic signals
The acoustic signals operate when the appliance has a malfunction or when the adjustment of the level of the water softener occurs. It is not possible to deactivate these acoustic signals.
There is also an acoustic signal that operates when the programme is completed. By default, this acoustic signal is off but it is possible to activate it.
How to activate the acoustic signal for the end of programme
1.Press the on/off button to activate the appliance.
2.Make sure that the display shows the programme P1. If the display shows a different programme, press and hold
6.BEFORE FIRST USE
ENGLISH 9
buttons (4) and (5) until P1 shows in the display.
3.Press and hold buttons (4) and (5) at the same time until the indicators of buttons (3), (4) and (5) start to flash.
4.Press button (5),
•The indicators of buttons (3) and (4) go off.
•The indicator of button (5) continues to flash.
•The display shows the current setting.
Acoustic signal on
Acoustic signal off
5.Press button (5) to change the setting.
6.Deactivate the appliance to confirm the setting.
1.Make sure that the set level of the water softener agrees with the water hardness in your area. If not, adjust the water softener. Contact your local water authority to know the water hardness in your area.
2.Fill the salt container.
3.Fill the rinse aid dispenser.
4.Open the water tap.
5.Processing residues can stay in the appliance. Start a programme to remove them. Do not use detergent and do not load the baskets.
If you use the combi detergent tablets, activate the Multitab option.
6.1 Adjusting the water softener
|
Water hardness |
|
Water softener |
||
|
|
adjustment |
|||
|
|
|
|
||
German |
French |
mmol/l |
Clarke |
Manual |
Elec- |
degrees |
degrees |
|
degrees |
|
tronic |
(°dH) |
(°fH) |
|
|
|
|
51 - 70 |
91 - 125 |
9.1 - 12.5 |
64 - 88 |
2 1) |
10 |
43 - 50 |
76 - 90 |
7.6 - 9.0 |
53 - 63 |
2 1) |
9 |
37 - 42 |
65 - 75 |
6.5 - 7.5 |
46 - 52 |
21) |
8 |
29 - 36 |
51 - 64 |
5.1 - 6.4 |
36 - 45 |
21) |
7 |
23 - 28 |
40 - 50 |
4.0 - 5.0 |
28 - 35 |
21) |
6 |
19 - 22 |
33 - 39 |
3.3 - 3.9 |
23 - 27 |
21) |
51) |
10 www.electrolux.com
|
Water hardness |
|
Water softener |
||
|
|
adjustment |
|||
|
|
|
|
||
German |
French |
mmol/l |
Clarke |
Manual |
Elec- |
degrees |
degrees |
|
degrees |
|
tronic |
(°dH) |
(°fH) |
|
|
|
|
15 - 18 |
26 - 32 |
2.6 - 3.2 |
18 - 22 |
1 |
4 |
11 - 14 |
19 - 25 |
1.9 - 2.5 |
13 - 17 |
1 |
3 |
4 - 10 |
7 - 18 |
0.7 - 1.8 |
5 - 12 |
1 |
2 |
< 4 |
< 7 |
< 0.7 |
< 5 |
12) |
12) |
1)Factory position.
2)Do not use salt at this level.
You must adjust the water softener manually and electronically.
Manual adjustment
Turn the water hardness dial to the position 1 or 2.
Electronic adjustment
1.Press the on/off button to activate the appliance.
2.Make sure that the display shows the programme P1. If the display shows a different programme, press and hold buttons (4) and (5) until P1 shows in the display.
3.Press and hold buttons (4) and (5) at the same time until the indicators of buttons (3), (4) and (5) start to flash.
4.Press button (3).
•The indicators of buttons (4) and (5) go off.
•The indicator of button (3) continues to flash.
•The acoustic signals operate, e.g. five intermittent acoustic signals = level 5.
•The display shows the setting of the water softener, e.g. 

 = level 5.
5.Press button (3) again and again to change the setting.
6.Deactivate the appliance to confirm the setting.
ENGLISH 11
6.2 Filling the salt container
1. Turn the cap counterclockwise and open the salt container.
2. Put 1 litre of water in the salt container (only for the first time).
3. Fill the salt container with dishwasher salt.
4. Remove the salt around the opening of the salt container.
5. Turn the cap clockwise to close the salt container.
CAUTION!
Water and salt can come out from the salt container when you fill it. Risk of corrosion. To prevent it, after you fill the salt container, start a programme.
6.3 Filling the rinse aid dispenser
A |
B |
M AX |
|
3 |
21 |
4 |
- |
+ |
|
|
C |
|
D |
1.Press the release button (D) to open the lid (C).
2.Fill the rinse aid dispenser (A), no more than the mark 'max'.
3.Remove the spilled rinse aid with an absorbent cloth to prevent too much foam.
4.Close the lid. Make sure that the release button locks into position.
You can turn the selector of the released quantity (B) between position 1 (lowest quantity) and position 4 (highest quantity).
7.DAILY USE
1.Open the water tap.
2.Press the on/off button to activate the appliance.
•If the salt indicator is on, fill the salt container.
•If the rinse aid indicator is on, fill the rinse aid dispenser.
3.Load the baskets.
4.Add the detergent.
5.Set and start the correct programme for the type of load and the degree of soil.
12www.electrolux.com
7.1Using the detergent
A |
B |
|
|
|
|
1. |
Press the release button (B) to open |
|
|
|
|
|
the lid (C). |
||
|
|
|
|
|
|
|
|
|
|
|
|
|
|
2. Put the detergent in the compartment |
|
|
|
|
|
|
|
|
(A) . |
|
30 |
M AX |
3. |
If the programme has a prewash |
|||
|
20 |
+ |
3 |
2 |
|
- |
phase, put a small quantity of deter- |
|
|
4 |
|
|
1 |
|
|
|
|
|
|
|
|
||
|
|
|
|
|
|
|
gent on the inner part of the appli- |
|
|
|
|
|
|
|
ance door. |
|
|
C |
|
|
4. |
If you use detergent tablets, put the |
|
|
|
|
|
|
tablet in the compartment (A). |
||
|
|
|
|
|
|
|
|
|
|
|
|
|
|
5. Close the lid. Make sure that the re- |
|
|
|
|
|
|
|
|
lease button locks into position. |
7.2 Setting and starting a programme
The Auto Off function
To decrease the energy consumption, this function automatically deactivates the appliance after a few minutes when:
•You have not closed the door to start the programme.
•The programme is completed.
Starting a programme without delay start
1.Open the water tap.
2.Press the on/off button to activate the appliance. The display shows the number and the duration of the last set programme.
3.Press the Program button again and again to set a programme. If you want, you can set the options applicable to the programme. (If you want to set the MyFavourite programme, press the
MyFavourite button).
•The display shows intermittently the number and the duration of the programme.
4.Close the appliance door. The programme starts.
•If you open the door, the display shows the programme duration.
Starting a programme with delay start
1.Set the programme.
2.Press the Delay button again and again until the display shows the delay time you want to set (from 1 to 24 hours).
•The display shows intermittently the programme number, the programme duration and the delay time.
•The Delay indicator comes on.
3.Close the appliance door. The countdown starts.
•If you open the door, the display shows the countdown of the delay start.
•When the countdown is completed, the programme starts.
Opening the door while the appliance operates
If you open the door, the appliance stops. When you close the door, the appliance continues from the point of interruption.
Cancelling the delay start while the countdown operates
When you cancel the delay start you have to set the programme again.
Press and hold buttons (4) and (5) at the same time until the display shows the programme P1.

Cancelling the programme
Press and hold buttons (4) and (5) at the same time until the display shows the programme P1.
Make sure that there is detergent in the detergent dispenser before you start a new programme.
At the end of the programme
1.Press the on/off button or wait for the Auto Off function to automatically deactivate the appliance.
ENGLISH 13
2. Close the water tap.
• Let the dishes become cold before you remove them from the appliance. Hot dishes can be easily damaged.
•First remove the items from the lower basket, then from the upper basket.
•There can be water on the sides and on the door of the appliance. Stainless steel becomes cool more quickly than the dishes.
8. HINTS AND TIPS
8.1 The water softener
Hard water contains a high quantity of minerals that can cause damage to the appliance and bad washing results. The water softener neutralises these minerals. The dishwasher salt keeps the water softener clean and in good conditions. It is important to set the right level of the water softener. This makes sure that the water softener uses the correct quantity of dishwasher salt and water.
8.2 Loading the baskets
Refer to the supplied leaflet with examples of the load of the baskets.
•Only use the appliance to wash items that are dishwasher-safe.
•Do not put in the appliance items made of wood, horn, aluminium, pewter and copper.
•Do not put in the appliance items that can absorb water (sponges, household cloths).
•Remove remaining food from the items.
•To remove easily remaining burned food, soak pots and pans in water before you put them in the appliance.
•Put hollow items (cups, glasses and pans) with the opening down.
•Make sure that cutlery and dishes do not bond together. Mix spoons with other cutlery.
•Make sure that glasses do not touch other glasses.
•Put the small items in the cutlery basket.
•Put the light items in the upper basket. Make sure that they do not move.
•Make sure that the spray arms can move freely before you start a programme.
8.3 Using salt, rinse aid and detergent
•Only use salt, rinse aid and detergent for dishwasher. Other products can cause damage to the appliance.
•The rinse aid helps, during the last rinsing phase, to dry the dishes without streaks and stains.
•Combi detergent tablets contain detergent, rinse aid and other added agents. Be sure that these tablets are applicable to the water hardness in your area. Refer to the instructions on the packaging of the products.
•Detergent tablets do not fully dissolve with short programmes. To prevent detergent residues on the tableware, we recommend that you use the tablets with long programmes.
Do not use more than the correct quantity of detergent. Refer to the instructions on the detergent packaging.
14www.electrolux.com
8.4Before starting a programme
Make sure that:
•The filters are clean and correctly installed.
•The spray arms are not clogged.
•The position of the items in the baskets is correct.
9.CARE AND CLEANING
WARNING!
Before maintenance, deactivate the appliance and disconnect the mains plug from the mains socket.
•The programme is applicable for the type of load and for the degree of soil.
•The correct quantity of detergent is used.
•There is dishwasher salt and rinse aid (unless you use combi detergent tablets).
•The cap of the salt container is tight.
Dirty filters and clogged spray arms decrease the washing results.
Make a check regularly and, if necessary, clean them.
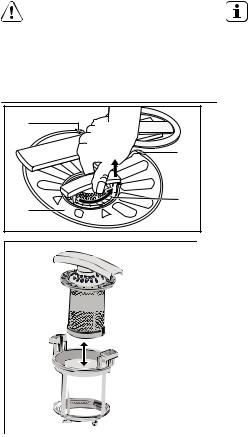
9.1 Cleaning the filters
C |
C |
A |


 A1
A1
1.Turn the filter (A) counterclockwise and remove it.
2.To disassemble the filter (A), pull apart (A1) and (A2).
3.Remove the filter (B).
4.Wash the filters with water.
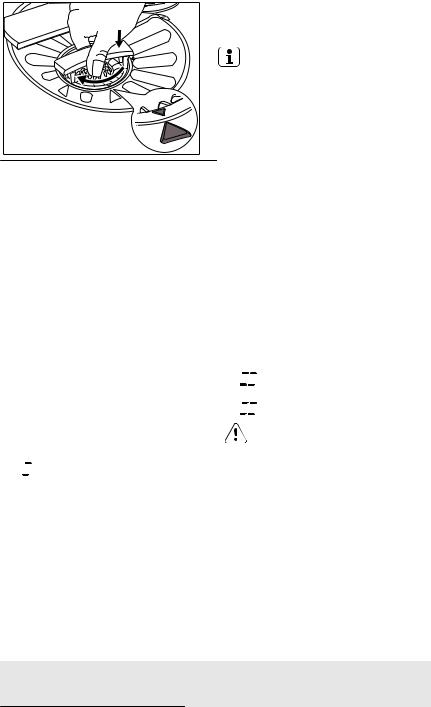
5.Put the filter (B) to its initial position. Make sure that it assembles correctly under the two guides (C).


 A2
A2
ENGLISH 15
6.Assemble the filter (A) and put it into position in filter (B). Turn it clockwise until it locks.
An incorrect position of the filters can cause bad washing results and damage to the appliance.
9.2 Cleaning the spray arms
Do not remove the spray arms.
If the holes in the spray arms are clogged, remove remaining parts of soil with a thin pointed object.
Only use neutral detergents. Do not use abrasive products, abrasive cleaning pads or solvents.
9.3 External cleaning
Clean the appliance with a moist soft cloth.
10. TROUBLESHOOTING
The appliance does not start or it stops during operation.
Before you contact the Service, refer to the information that follows for a solution to the problem.
With some problems, the display shows an alarm code:
•


 - The appliance does not fill with water.
•


 - The appliance does not drain the water.
•


 - The anti-flood device is on.
WARNING!
Deactivate the appliance before you do the checks.
Problem |
Possible solution |
You cannot activate the appli- |
Make sure that the mains plug is connected |
ance. |
to the mains socket. |
|
Make sure that there is not a damaged fuse in |
|
the fuse box. |
The programme does not start. |
Make sure that the appliance door is closed. |
|
If the delay start is set, cancel the setting or |
|
wait for the end of the countdown. |
The appliance does not fill with |
Make sure that the water tap is open. |
water. |
|
|
|
Make sure that the pressure of the water supply is not too low. For this information, contact your local water authority.

16 www.electrolux.com
Problem |
Possible solution |
|
Make sure that the water tap is not clogged. |
|
Make sure that the filter in the inlet hose is not |
|
clogged. |
|
Make sure that the inlet hose has no kinks or |
|
bends. |
The appliance does not drain the |
Make sure that the sink spigot is not clogged. |
water. |
|
|
Make sure that the drain hose has no kinks or |
|
bends. |
The anti-flood device is on. |
Close the water tap and contact the Service. |
|
|
After the checks are completed, activate the appliance. The programme continues from the point of interruption.
If the problem occurs again, contact the Service.
If the display shows other alarm codes, contact the Service.
10.1 If the washing and drying results are not satisfactory
Whitish streaks or bluish layers on glasses and dishes
•The released quantity of rinse aid is too much. Adjust the rinse aid selector to a lower position.
•The quantity of detergent is too much.
Stains and dry water drops on glasses and dishes
•The released quantity of rinse aid is not sufficient. Adjust the rinse aid selector to a higher position.
•The quality of the detergent can be the cause.
Dishes are wet
10.2 How to activate the rinse aid dispenser
The activation of the rinse aid dispenser can occur only with the Multitab option activated.
1.Press the on/off button to activate the appliance.
2.Make sure that the display shows the programme P1. If the display shows a different programme, press and hold buttons (4) and (5) until P1 shows in the display.
3.Press and hold buttons (4) and (5) at the same time until the indicators of buttons (3), (4) and (5) start to flash.
4.Press button (4).
•The indicators of buttons (3) and (5) go off.
•The indicator of button (4) continues to flash.
•The display shows the current setting.
Rinse aid dispenser off
•The programme is without a drying phase or with a low temperature drying phase.
•The rinse aid dispenser is empty.
•The quality of the rinse aid can be the cause.
•The quality of the combi detergent tablets can be the cause. Try a different brand or activate the rinse aid dispenser and use rinse aid together with the combi detergent tablets.
Refer to ‘HINTS AND TIPS’ for other possible causes.
Rinse aid dispenser on
5.Press button (4) to change the setting.
6.Deactivate the appliance to confirm the setting.
7.Adjust the released quantity of rinse aid.
8.Fill the rinse aid dispenser.
ENGLISH 17
11. TECHNICAL INFORMATION
Dimensions |
Width / Height / Depth (mm) |
596 / 818 - 898 / 550 |
Electrical connection |
Refer to the rating plate. |
|
|
Voltage |
220-240 V |
|
Frequency |
50 Hz |
Water supply pressure |
Min. / max. (bar / MPa) |
(0.5 / 0.05 ) / (8 / 0.8 ) |
Water supply 1) |
Cold water or hot water2) |
max. 60 °C |
Capacity |
Place settings |
12 |
Power consumption |
Left-on mode |
0.10 W |
|
Off-mode |
0.10 W |
|
|
|
1)Connect the water inlet hose to a water tap with a 3/4'' thread.
2)If the hot water comes from alternative sources of energy, (e.g. solar panels, aeolian energy), use the hot water supply to decrease energy consumption.
12.ENVIRONMENT CONCERNS
Recycle the materials with the symbol 
. Put the packaging in applicable containers to recycle it.
Help protect the environment and human health and to recycle waste of electrical
and electronic appliances. Do not dispose appliances marked with the symbol 
with the household waste. Return the product to your local recycling facility or contact your municipal office.

18 www.electrolux.com
МАЗМҰНЫ
1. ҚАУІПСІЗДІК ТУРАЛЫ МАҒЛҰМАТТАР . . . . . . . . . . . . . . . . . . . . . . . . . . . . . . . . . . . . . . . . . . . . . . . . . . 19 2. БҰЙЫМ СИПАТТАМАСЫ . . . . . . . . . . . . . . . . . . . . . . . . . . . . . . . . . . . . . . . . . . . . . . . . . . . . . . . . . . . . . . 21 3. БАСҚАРУ ПАНЕЛІ . . . . . . . . . . . . . . . . . . . . . . . . . . . . . . . . . . . . . . . . . . . . . . . . . . . . . . . . . . . . . . . . . . . . 21 4. БАҒДАРЛАМАЛАР . . . . . . . . . . . . . . . . . . . . . . . . . . . . . . . . . . . . . . . . . . . . . . . . . . . . . . . . . . . . . . . . . . . 22 5. ФУНКЦИЯЛАР . . . . . . . . . . . . . . . . . . . . . . . . . . . . . . . . . . . . . . . . . . . . . . . . . . . . . . . . . . . . . . . . . . . . . . . 24 6. БІРІНШІ ҚОЛДАНҒАНҒА ДЕЙІН . . . . . . . . . . . . . . . . . . . . . . . . . . . . . . . . . . . . . . . . . . . . . . . . . . . . . . . . . 25 7. ӘРКҮНДІК ҚОЛДАНУ . . . . . . . . . . . . . . . . . . . . . . . . . . . . . . . . . . . . . . . . . . . . . . . . . . . . . . . . . . . . . . . . . 27 8. АҚЫЛ-КЕҢЕС . . . . . . . . . . . . . . . . . . . . . . . . . . . . . . . . . . . . . . . . . . . . . . . . . . . . . . . . . . . . . . . . . . . . . . . 29 9. КҮТУ МЕНЕН ТАЗАЛАУ . . . . . . . . . . . . . . . . . . . . . . . . . . . . . . . . . . . . . . . . . . . . . . . . . . . . . . . . . . . . . . . 30 10. АҚАУЛЫҚТЫ ТҮЗЕТУ . . . . . . . . . . . . . . . . . . . . . . . . . . . . . . . . . . . . . . . . . . . . . . . . . . . . . . . . . . . . . . . . . 31 11. ТЕХНИКАЛЫҚ АҚПАРАТ . . . . . . . . . . . . . . . . . . . . . . . . . . . . . . . . . . . . . . . . . . . . . . . . . . . . . . . . . . . . . . 33 12. ҚОРШАҒАН ОРТАҒА ЗИЯН КЕЛДІРМЕУ ТУРАЛЫ МАҒЛҰМАТТАР . . . . . . . . . . . . . . . . . . . . . . . . . . . 33
СІЗ ОЙЫМЫЗДА БОЛДЫҢЫЗ
Electrolux құрылғысын сатып алғаныңызға рахмет. Сіз ондаған жылдар бойғы кәсіби тәжірибе мен инновацияға сүйеніп жасалған құрылғыны таңдадыңыз. Тапқырлықтың туындысы болған, көз тартарлық бұл құрылғыны жасау барысында сіз ойымызда болдыңыз. Сондықтан, қолданған сайын тамаша нәтижеге қол жеткізе алатыныңызға сенімді болыңыз.
Electrolux әлеміне қош келдіңіз.
Біздің веб-сайтқа барып келесіні қараңыз:
Қолдануға қатысты кеңестер, кітапшалар, ақаулықты түзету, қызмет көрсету туралы ақпарат: www.electrolux.com
Сізге барынша жақсы қызмет көрсету үшін өніміңізді мына жерге тіркеңіз: www.electrolux.com/productregistration
Құрылғыңызға қажетті керек-жарақтарды, шығынды материалдарды және фирмалық қосалқы бөлшектерді сатып алу үшін:
www.electrolux.com/shop
ТҰТЫНУШЫҒА КӨМЕК, ҚЫЗМЕТ КӨРСЕТУ
Фирмалық заттарды қолдануды ұсынамыз.
Қызмет көрсету орталығына хабарласқанда келесі деректердің дайын болуын қамтамасыз етіңіз. Деректерді техникалық ақпарат тақтайшасынан табуға болады. Үлгісі, Өнім нөмірі, Сериялық нөмірі
 Ескерту / Абайлаңыз - Қауіпсіздік туралы маңызды мағлұмат.
 Жалпы мағлұматтар менен кеңестер
 Қорғаған ортаға зиян келдірмей пайдалану туралы нұсқаулар Өндіруші ескертусіз өзгеріс енгізу құқығына ие.

ҚАЗАҚ 19
1. ҚАУІПСІЗДІК ТУРАЛЫ МАҒЛҰМАТТАР
Құрылғыны орнатып іске қолданар алдында бірге жеткізілген нұсқауларды мұқият оқып шығыңыз. Құрылғыны дұрыс орнатпау мен дұрыс пайдаланбау нәтижесінде адам жарақат алса және ақаулық орын алса өндіруші жауапты емес. Нұсқаулықты келешекте қарап жүру үшін үнемі сақтап қойыңыз.
1.1 Балалар мен дәрменсіз адамдардың қауіпсіздігі
Назарыңызда болсын!
Тұншығып қалу, жарақат алуы немесе мүгедек болып қалу қаупі бар.
•Кембағал, сезім мүкістігі бар немесе ақылесі кем, құрылғыны қолдану тәжірибесі жоқ немесе қолдана білмейтін адамдарға, балаларға оны іске қосуға рұқсат бермеңіз. Олар осы құрылғыны өз қауіпсіздігін қамтамасыз ететін адамның нұсқауы немесе қадағалауы бойынша пайдалануға тиіс. Балаларға құрылғымен ойнауға рұқсат бермеңіз.
•Орам материалдарының барлығын балалардан алыс ұстаңыз.
•Жуғыш заттардың барлығын балалардан алыс ұстаңыз.
•Құрылғының есігі ашық тұрғанда, балалар мен үй жануарларын алыс ұстаңыз.
1.2 Орнату
•Орам материалдарының барлығын алыңыз.
•Бүлінген құрылғыны орнатпаңыз немесе іске қоспаңыз.
•Құрылғыны температурасы 0 °C градустан төмен жерге орнатпаңыз немесе қолданбаңыз.
•Құрылғымен бірге берілген орнату бойынша нұсқауларды орындаңыз.
•Құрылғының үсті мен жан-жағын қоршаған конструкциялардың қауіпсіз болуын қамтамасыз етіңіз.
Суға қосу
•Құрылғыны жаңа құбырларға немесе ұзақ уақыт қолданылмаған құбырларға жалғамай тұрып, суын тазарғанша ағызыңыз.
•Құрылғыны алғаш рет қолданған кезде еш жерінен су ақпай тұрғанына көз жеткізіңіз.
•Су құятын түтік, ішіне сым өткізілген екі қабат қаптамадан тұрады және қауіпсіздік клапанымен жабдықталған.
Назарыңызда болсын! Қатерлі кернеу.
•Егер су құятын түтік бүлінсе, ашаны дереу розеткадан суырыңыз. Су құятын түтікті ауыстыру үшін қызмет көрсету орталығына хабарласыңыз.
Электртоғына қосу
Назарыңызда болсын!
Өрт шығу және электр қатеріне ұшырау қаупі бар.
•Құрылғыны міндетті түрде жерге тұйықтау қажет.
•Техникалық ақпарат тақтайшасындағы электр параметрлерінің электр желісіндегі параметрлерге сай келетініне көз жеткізіңіз. Сай келмесе, электршіге хабарласыңыз.
•Әрқашан дұрыс орнатылған, қатерден сақтандырылған розетканы қолданыңыз.
•Көп тармақты адаптерлер мен ұзартқыш сымдарды қолданбаңыз.
•Құрылғының ашасына және сымына зақым келтірмеңіз. Зақым келген электр сымын ауыстырту үшін қызмет көрсету орталығына немесе электршіге хабарласыңыз.
• Су қосылымы түтіктеріне ешбір зақым |
• Құрылғының ашасын розеткаға тек |
құрылғыны орнатып болғаннан кейін ғана |
|
келтірмеңіз. |
жалғаңыз. Орнатып болғаннан кейін |
20 www.electrolux.com
ашаның қол жететін жерде тұрғанына көз жеткізіңіз.
•Құрылғыны тоқтан ажырату үшін сымынан тартпаңыз. Әрқашан ашасынан тартып суырыңыз.
1.3 Пайдалану
•Бұл құрылғы үйде және сол сияқты төменде аталған жерлерде қолдануға арналған:
–Дүкендердің, кеңселердің және басқа жұмыс орындарының қызметкерлерге арналған ас бөлмелерінде
–Фермадағы үйлерде
–Қонақ үйлерде, мотельдер мен басқа да тұрғынды жерлерде
–Төсек және таңғы аспен қамтамасыз ететін жерлерде.
Назарыңызда болсын! Жарақат алу қауіпі бар.
•Бұл құрылғының техникалық сипаттамасын өзгертпеңіз.
•Өткір ұшты пышақтар мен ас құралдарының ұштарын төмен қаратып немесе көлденеңінен қойып ас құралдарына арналған себетке салыңыз.
•Құрылғының есігі ашық тұрған кезде соғылып қалмас үшін қараусыз қалдырмаңыз.
•Ашық тұрған есікке отырмаңыз немесе үстіне шықпаңыз.
•Ыдыс жуғыш машинаға арналған жуғыш заттар қауіпті. Жуғыш заттың орамында көрсетілетін нұсқауларды орындаңыз.
•Құрылғыдағы сумен ойнауға немесе ішуге болмайды.
•Ыдыстарды бағдарлама аяқталғанша құрылғыдан алмаңыз. Ыдыстарда жуғыш зат болуы мүмкін.
Назарыңызда болсын! Электр, өрт қатері пайда болуы
немесе адам күйіп қалуы мүмкін.
•Тұтанғыш заттарды немесе ішіне тұтанғыш зат салынған дымқыл заттарды құрылғының ішіне, қасына немесе үстіне қоймаңыз.
•Құрылғыны тазалау үшін сулы спрейді және буды қолданбаңыз.
•Бағдарлама орындалып тұрғанда құрылғы есігін ашсаңыз, ыстық бу шығуы мүмкін.
1.4 Ішкі жарық шамы
Ішкі жарықтама шамын ауыстыру үшін қызмет көрсету орталығына хабарласыңыз.
1.5 Құрылғыны тастау
Назарыңызда болсын!
Жарақат алу немесе тұншығып қалу қаупі бар.
•Құрылғыны электр желісінен ажыратыңыз.
•Қуат сымын кесіп алыңыз да, қоқысқа тастаңыз.
•Балалар мен жануарлар құрылғыға қамалып қалмас үшін есіктің бекітпесін алыңыз.
ҚАЗАҚ 21
2. БҰЙЫМ СИПАТТАМАСЫ
1 2
11
10 |
9 |
8 |
7 |
6 |
5 |
4 |
3 |
1Үстіңгі бүріккіш түтік
2Астыңғы бүріккіш түтік
3Сүзгілер
4Техникалық ақпарат тақтайшасы
5Тұз сауыты
6Су кермектігі тетігі
7Шайғыш зат үлестіргіші
8Жуғыш зат үлестіргіші
9Ас құралдары себеті
10Астыңғы себет
11Үстіңгі себет
2.1 Beam-on-Floor
Beam-on-Floor - құрылғы есігінің астыңғы жағындағы еденнен көрінетін жарық.
•Бағдарлама жұмыс істей бастаған кезде, қызыл жарық пайда болады да, бағдарламаның соңына дейін жанып тұрады.
•Бағдарлама аяқталған кезде, жасыл жарық жанады.
•Құрылғыда ақаулық пайда болған кезде, қызыл жарық жыпылықтайды.
Құрылғыны сөндірген кезде Beam-on- Floor сөнеді.
Бұл құрылғының есікті ашқан кезде жанып, есікті жапқан кезде сөнетін ішкі жарық шамы бар.
3. БАСҚАРУ ПАНЕЛІ
1 |
2 |
3 |
4 |
5 |
6 |
7 |
8 |
9 |
|
Қосу/өшіру түймешігі |
|
Бейнебет |
1 |
2 |
 Loading...