


Electrolux EVE633SA, EVE623SA, EVE613SA, EVE611SA, EVE616BA User Manual
...User manual |
Cooker |
EVE611SA built in ovens 1
EVE611SA EVE616BA EVEP611SA EVEP616BA EVE613SA EVEP618BA EVEP613SA EVE623SA EVE614BA EVEP623SA EVEP614BA EVEP626BA EVEP615SA EVE633SA

2
WE’RE THINKING OF YOU
Thank you for purchasing an Electrolux appliance. You’ve chosen a product that brings with it decades of professional experience and innovation. Ingenious and stylish, it has been designed with you in mind. So whenever you use it, you can be safe in the knowledge that you’ll get great results every time.
Welcome to Electrolux.
LEGEND
The symbols you will see in this booklet have these meanings:
 Warning!
This symbol indicates information concerning your personal safety
 Caution!
This symbol indicates information on how to avoid damaging the cooker or cabinet
 Important!
This symbol indicates tips and information about use of the cooker
 ENVIRONMENT!
This symbol indicates tips and information about economical and ecological use of the cooker
Conditions of use
This appliance is intended to be used in household and similar applications such as:
•Staff kitchen areas in shops, offices and other working environments
•Farm houses
•By clients in hotels, motels and other residential type environments
•Bed and breakfast type environments.
•Catering and similar non-retail applications
Record model and serial number here:
Model:
Serial No:
Contents
3Before using your appliance
3Important safety instructions
4General cautions
5Identifying the appliance
6EVE611SA, EVE614BA
7- Before using the appliance
9- Cooking functions
10- Operating sequence
11- Using the appliance
13- Getting to know the oven
14EVEP611SA, EVEP614BA
15- Before using the appliance
17- Cooking functions
18- Operating sequence
19- Using the appliance
21- Getting to know the oven
22- Cleaning the oven
23EVE613SA, EVE616BA
24EVE623SA, EVE633SA
25- Before using the appliance
27- Cooking functions
28- Operating sequence
29- Using the appliance
32- Getting to know the oven
33EVEP613SA, EVEP615SA, EVEP616BA, EVEP618BA
34- Before using the appliance
36- Cooking functions
38- Operating sequence
39- Using the appliance
44- Cleaning the oven
46- Getting to know the oven
47Cooking guide
52Dealing with cooking problems
53Cleaning the appliance
54- Cleaning the accessories
56- Cleaning the oven door
59Tips and troubleshooting
61Installation of the appliance
63Technical specifications
67Warranty

BEFORE USING YOUR APPLIANCE
Before you use the appliance, we recommend that you read through the relevant sections of this manual, which provides the description of your appliance and
its functions.
To avoid the risks that are always present when you use an appliance, it is important that the appliance is installed correctly and that you read the safety instructions carefully to avoid misuse and hazards.
We recommend that you keep this instruction booklet for future reference and pass it on to any future owners.
This appliance complies with the requirements of Australian Standards AS/NZS 60335.2.6
 Important!
Check for any damage or marks
If you find the appliance is damaged or marked, you must report it within 7 days if you wish to claim for damage/marks under the manufacturer’s warranty. This does not affect your statutory rights.
Information on disposal for users
 ENVIRONMENT!
•Most of the packing materials are recyclable. Please dispose of those materials through your local recycling depot or by placing them in appropriate collection containers.
•If you wish to discard this appliance, please contact your local authorities and ask for the correct method of disposal.
3
Important safety instructions
 Warning!
These warnings have been provided in the interest of safety. You MUST read them carefully before installing or using the appliance.
•An authorised person must install this appliance. (Certificate of Compliance to be retained)
•Before using the appliance, ensure that all packing materials are removed from the appliance.
•In order to avoid any potential hazard, the enclosed installation instructions must be followed.
•Ensure that all specified vents, openings and air spaces are not blocked.
•Where the appliance is built into a cabinet, the cabinet material must be capable of withstanding 70°C. If adjacent to vinyl-wrapped surfaces, use installation kit from vinyl wrap supplier.
•Only authorised personnel should carry out servicing. (Certificate of Compliance to be retained)
•Always ensure the appliance is switched off before cleaning or replacing parts.
•Do not open the oven door during steam cooking. Steam can be released. There is a risk of skin burns. There is a risk that steam causes moisture damage to cabinets.
•Allow the oven to cool down for 30mins before you drain the water tank in a steam oven. Scalding water may be released.
•In order to avoid fire, the appliance must be kept clean and vents kept unobstructed
•Do not spray flammable materials in or under the appliance, e.g. aerosols.
•Always use gloves when handling hot items inside the oven.
•Always turn the grill off immediately after use as fat left behind may catch fire.
•Do not cover the grill insert with foil, as fat left there may catch fire.
•Always keep the grill dish clean as any fat residue may catch fire.
•Do not leave the grill on unattended.
•To avoid fire, ensure that the grill trays and fittings are always inserted into the appliance in accordance with the instructions.
•Switch the appliance off before removing the oven light glass for globe replacement.
•To avoid an accident, ensure that the oven shelves and fittings are always inserted into the appliance in accordance with the instructions.
•This appliance must be earthed.

4
Important safety instructions
Child safety
•This appliance is not intended for use by persons (including children) with reduced physical, sensory or mental capabilities, or lack of experience and knowledge, unless they have been given supervision or instruction concerning use of the appliance by a person responsible for their safety.
•Children should be supervised to ensure that they do not play with the appliance.
•During use this appliance becomes hot. Care should be taken to avoid touching hot surfaces, e.g. oven door, heating elements.
•Accessible parts will also become hot when in use. To avoid burns and scalds children should be kept away.
General CAUTIONS
Read the following carefully to avoid damage or injury
 This symbol indicates never to do this
 This symbol indicates always do this
It is important to use the appliance safely.
Check these safety points before using the appliance.
This appliance must not be used as a space heater.
Do not place thick portions of food under the grill. Foods may curl, catch and ignite.
Do not use the door as a shelf.
Do not push down on the open oven door.
New appliances can have an odour during the first operation. It is recommended to ‘run in’ the oven before you cook. Run the oven at 180°C for 2 hours and ensure the room is well ventilated.
Do not use harsh abrasive cleaners or sharp metal scrapers to clean the oven door glass since they can scratch the surface, and may result in shattering of the glass.
Do not use steam cleaners, as this may cause moisture build-up.
Always clean the appliance immediately after any food spills.
 WARNING!
To maintain safe operation, it is recommended that the product be inspected every five years by an authorised service person.
 ENVIRONMENT!
To save energy and to help protect the environment, we recommend these hints:
•Use the oven efficiently, by cooking many trays of food at the same time. Cook 2 trays of scones, small cakes or sausage rolls at the same time.
•Select the correct shelf location for food being cooked.
•Do not open the oven door more than necessary.
Note: You must read these warnings carefully before installing or using the appliance. If you need assistance, contact your Customer Care Centre. The manufacturer will not accept liability, should these instructions or any other safety instructions incorporated
in this book be ignored.

5
IDENTIFYING THE APPLIANCE
Confirm the model number. The model number is shown on the data plate which is visible when the oven or grill door is open.
Control panel used on:
EVE611SA EVE614BA
Control panel used on:
EVEP611SA EVEP614BA
Control panel used on: |
|
See page 23 |
|
EVE613SA |
EVE616BA |
EVE623SA |
EVE633SA |
Control panel used on: |
|
See page 33 |
|
|
|
|
|
EVEP613SA |
EVEP616BA |
EVEP615SA |
EVEP618BA |

6 EVE611SA, EVE614BA
Eve611sa, Eve614Ba COMPONENTS
|
|
|
|
|
|
|
|
|
|
|
|
|
|
|
|
|
|
|
|
|
|
|
|
|
|
|
|
|
|
|
|
|
|
|
|
|
|
|
|
|
|
|
|
|
|
|
|
|
|
|
|
|
|
|
|
|
|
|
|
|
|
|
|
|
|
|
|
|
|
|
|
|
|
|
|
|
|
|
|
|
|
|
|
|
|
|
|
|
|
|
|
|
|
|
|
|
|
|
|
|
|
|
|
|
|
|
|
|
|
|
|
|
|
|
|
|
|
|
|
|
|
|
|
|
|
|
|
|
|
|
|
|
|
|
|
|
|
|
|
|
|
|
|
|
|
|
|
|
|
|
|
|
|
|
|
|
|
|
|
|
|
|
|
|
|
|
|
|
|
|
|
|
|
|
|
|
|
|
|
|
|
|
|
|
|
|
|
|
|
|
|
|
|
|
|
|
|
|
|
|
|
|
|
|
|
|
|
|
|
|
|
|
|
|
|
|
|
|
|
|
|
|
|
|
|
|
|
|
|
|
|
|
|
|
|
|
|
|
|
|
|
|
|
|
|
|
|
|
|
|
|
|
|
|
|
|
|
|
|
|
|
|
|
|
|
|
|
|
|
|
|
|
|
|
|
|
|
|
|
|
|
|
|
|
|
|
|
|
|
|
|
|
|
|
|
|
|
|
|
|
|
|
|
|
|
|
|
|
|
|
|
|
|
|
|
|
|
|
|
|
|
|
|
|
|
|
|
|
|
|
|
|
|
|
|
|
|
|
|
|
|
|
|
|
|
|
|
|
|
|
|
|
|
|
|
|
|
|
|
|
|
|
|
|
|
|
|
|
|
|
|
|
|
|
|
|
|
|
|
|
|
|
|
|
|
|
|
|
|
|
|
|
|
|
|
|
|
|
|
|
|
|
|
|
|
|
|
|
|
|
|
|
|
|
|
|
|
|
|
|
|
|
|
|
|
|
|
|
|
|
|
|
|
|
|
|
|
|
|
|
|
|
|
|
|
|
|
|
|
|
|
|
|
|
|
|
|
|
|
|
|
|
|
|
|
|
|
|
|
|
|
|
|
|
|
|
|
|
|
|
|
|
|
|
|
|
|
|
|
|
|
|
|
|
|
|
|
|
|
|
|
|
|
|
|
|
|
|
|
|
|
|
|
|
|
|
|
|
|
|
|
|
|
|
|
|
|
|
|
|
|
|
|
|
|
|
|
|
|
|
|
|
|
|
|
|
|
|
|
|
|
|
|
|
|
|
|
|
|
|
|
|
|
|
|
|
|
|
|
|
|
|
|
|
|
|
|
|
|
|
|
|
|
|
|
|
|
|
|
|
|
|
|
|
|
|
|
|
|
|
|
|
|
|
|
|
|
|
|
|
|
|
|
|
|
|
|
|
|
|
|
|
|
|
|
|
|
|
|
|
|
|
|
|
|
|
|
|
|
|
|
|
|
|
|
|
|
|
|
|
|
|
|
|
|
|
|
|
|
|
|
|
|
|
|
|
|
|
|
|
|
|
|
|
|
|
|
|
|
|
|
|
|
|
|
|
|
|
|
|
|
|
|
|
|
|
|
|
|
|
|
|
|
|
|
|
|
|
|
|
|
|
|
|
|
|
|
|
|
|
|
|
|
|
|
|
|
|
|
|
|
|
|
|
|
|
|
|
|
|
|
|
|
|
|
|
|
|
|
|
|
|
|
|
|
|
|
|
|
|
|
|
|
|
|
|
|
|
|
|
|
|
|
|
|
|
|
|
|
|
|
|
|
|
|
|
|
|
|
|
|
|
|
|
|
|
|
|
|
|
|
|
|
|
|
|
|
|
|
|
|
|
|
|
Oven ‘ON’ light |
|
Function selector knob |
|
|
|
||||||||||||||||||||||||||||||||||
|
|
|
|
|
|
|
|
|
|
|
|
|
|
|
|
|
|
|
|
|
||||||||||||||||||||||||||||||||||||
|
|
|
|
|
|
|
|
|
|
|
|
|
|
|
|
|
|
|
|
|
||||||||||||||||||||||||||||||||||||
|
|
|
|
|
|
|
|
|
|
|
|
|
|
|
|
|
Timer display |
|
Touch pad |
|
|
|
||||||||||||||||||||||||||||||||||
|
|
|
|
|
|
|
|
|
|
|
|
|
|
|
|
|
|
|
|
|
||||||||||||||||||||||||||||||||||||
|
|
|
|
|
|
|
|
|
|
|
|
|
|
|
|
|
‘Heating’ light |
|
Temperature selector knob |
|
|
|
||||||||||||||||||||||||||||||||||
|
|
|
|
|
|
|
|
|
|
|
|
|
|
|
|
|
|
|
|
|
||||||||||||||||||||||||||||||||||||
|
|
|
|
|
|
|
|
|
|
|
|
|
|
|
|
|
|
|
|
|
|
|
|
|
|
|
|
|
|
|
|
|
|
|
|
|
|
|
|
|
|
|
|
|
|
|
|
|
|
|
|
|
|
|
|
|
|
|
|
|
|
|
|
|
|
|
|
|
|
|
|
|
|
|
|
|
|
|
|
|
|
|
|
|
|
|
|
|
|
|
|
|
|
|
|
|
|
|
|
|
|
|
|
|
|
|
|
|
|
|
|
|
|
|
|
|
|
|
|
|
|
|
|
|
|
|
|
|
|
|
|
|
|
|
|
|
|
|
|
|
|
|
|
|
|
|
|
|
|
|
|
|
|
|
|
|
|
|
|
|
|
|
|
|
|
|
|
|
|
|
|
|
|
|
|
|
|
|
|
|
|
|
|
|
|
|
|
|
|
|
|
|
|
|
|
|
|
|
|
|
|
|
|
|
|
|
|
|
|
|
|
|
|
|
|
|
|
|
|
|
|
|
|
|
|
|
|
|
|
|
|
|
|
|
|
|
|
|
|
|
|
|
|
|
|
|
|
|
|
|
|
|
|
|
|
|
|
|
|
|
|
|
|
|
|
|
|
|
|
|
|
|
|
|
|
|
|
|
|
|
|
|
|
|
|
|
|
|
|
|
|
|
|
|
|
|
|
|
|
|
|
|
|
|
|
|
|
|
|
|
|
|
|
|
|
|
|
|
|
|
|
|
|
|
|
|
|
|
|
|
|
|
|
|
|
|
|
|
|
|
|
|
|
|
|
|
|
|
|
|
|
|
|
|
|
|
|
|
|
|
|
|
|
|
|
|
|
|
|
|
|
|
|
|
|
|
|
|
|
|
|
|
|
|
|
|
|
|
|
|
|
|
|
|
|
|
|
|
|
|
|
|
|
|
|
|
|
|
|
|
|
|
|
|
|
|
|
|
|
|
|
|
|
|
|
|
|
|
|
|
|
|
|
|
|
|
|
|
|
|
|
|
|
|
|
|
|
|
|
|
|
|
|
|
|
|
|
|
|
|
|
|
|
|
|
|
|
|
|
|
|
|
|
|
|
|
|
|
|
|
|
|
|
|
|
|
|
|
|
|
|
|
|
|
|
|
|
|
|
|
|
|
|
|
|
|
|
|
|
|
|
|
|
|
|
|
|
|
|
|
|
|
|
|
|
|
|
|
|
|
|
|
|
|
|
|
|
|
|
|
|
|
|
|
|
|
|
|
|
|
|
|
|
|
|
|
|
|
|
|
|
|
|
|
|
|
|
|
|
|
|
|
|
|
|
|
|
|
|
|
|
|
|
|
|
|
|
|
|
|
|
|
|
|
|
|
|
|
|
|
|
|
|
|
|
|
|
|
|
|
|
|
|
|
|
|
|
|
|
|
|
|
|
|
|
|
|
|
|
|
|
|
|
|
|
|
|
|
|
|
|
|
|
|
|
|
|
|
|
|
|
|
|
|
|
|
|
|
|
|
|
|
|
|
|
|
|
|
|
|
|
|
|
|
|
|
|
|
|
|
|
|
|
|
|
|
|
|
|
|
|
|
|
|
|
|
|
|
|
|
|
|
|
|
|
|
|
|
|
|
|
|
|
|
|
|
|
|
|
|
|
|
|
|
|
|
|
|
|
|
|
|
|
|
|
|
|
|
|
|
|
|
|
|
|
|
|
|
|
|
|
|
|
|
|
|
|
|
|
|
|
|
|
|
|
|
|
|
|
|
|
|
|
|
|
|
|
|
|
|
|
|
|
|
|
|
|
|
|
|
|
|
|
|
|
|
|
EVE611SA |
|
EVE614BA |
||
stainless steel model |
|
black model |
||
|
|
Control panel |
|
Triple glazed door |
|
|
|
||
|
|
|
||
|
|
Warm air exhaust |
|
|
|
|
|
|
|
Before using THE APPLIANCE
Preparing the oven
1.Please remove all stickers, leaflets and boxes from the door and from the floor of the oven before operation.
2.Please wipe out the oven interior prior to operation with warm soapy water and polish dry with a soft clean cloth. Do not close the oven door until the oven is completely dry.
3.Do not line the oven with foil. It will damage the enamel.
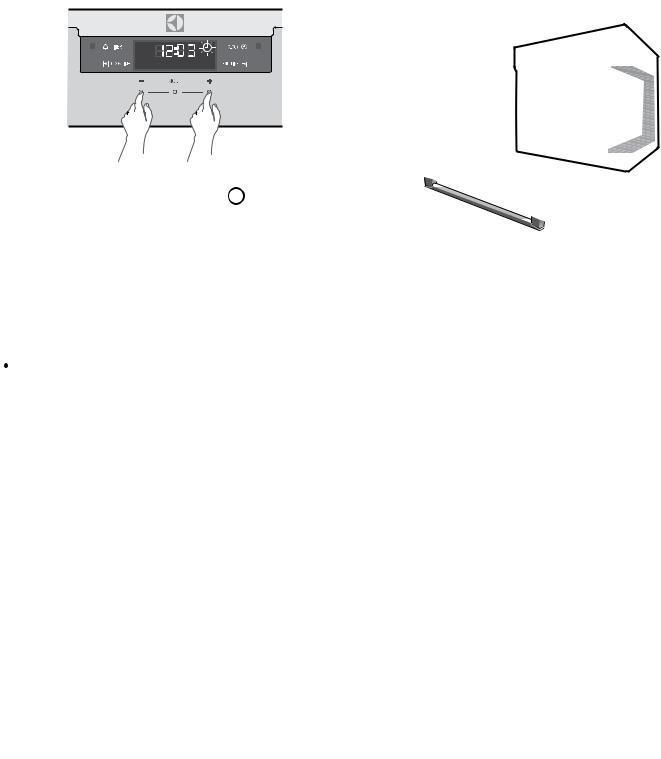
Setting the time
Before the appliance, can be used, the time must be set.
•After the appliance has been electrically connected ‘12:00’ will be displayed and the  clock icon
will flash.
•To set the time of day in hours and minutes touch the + or – symbols. Refer to the diagram above.
•5 seconds after the last change, the clock ‘symbol will disappear, confirming the time has been set. Once the time has been entered, the clock advances minute by minute.
Note: The clock has a 24 hour display.
 Important!
New appliances can have a smell during first use. It is recommended to ‘run in’ the oven before cooking for the first time. Operate the oven, empty, at a temperature of 180°C for approximately 2 hours Please ensure the room is well ventilated during this process.
EVE611SA, EVE614BA 7
Installing the oven accessories
• Catalytic liners
The oven will arrive with a catalytic fan baffle and top panel already fitted. Optional side panels are also supplied and may be fitted before installing the side racks. The sole purpose of the side panels is to make cleaning the oven easier. Omitting them will have no effect on the cooking performance of the oven. They can be fitted at any time by removing the side racks.
The catalytic liners supplied attach to the left and right sides of the oven. Please note that there is a different version for each side. They are marked ‘LH’ or ‘RH’.
1.Position the first liner as per the diagram. The black, shiny side of the liner should be facing the oven wall with the hooks pointing down. Note that the diagram shows the left hand liner. The right hand side will be a mirror image of this.
2.Line the hooks up with the slots provided in the oven wall, push them in and then allow the liner to slide down to its final position. All four hooks MUST be engaged in the slots.
3.The access hole for the side racks should be visible when the liner is correctly positioned – see diagram.
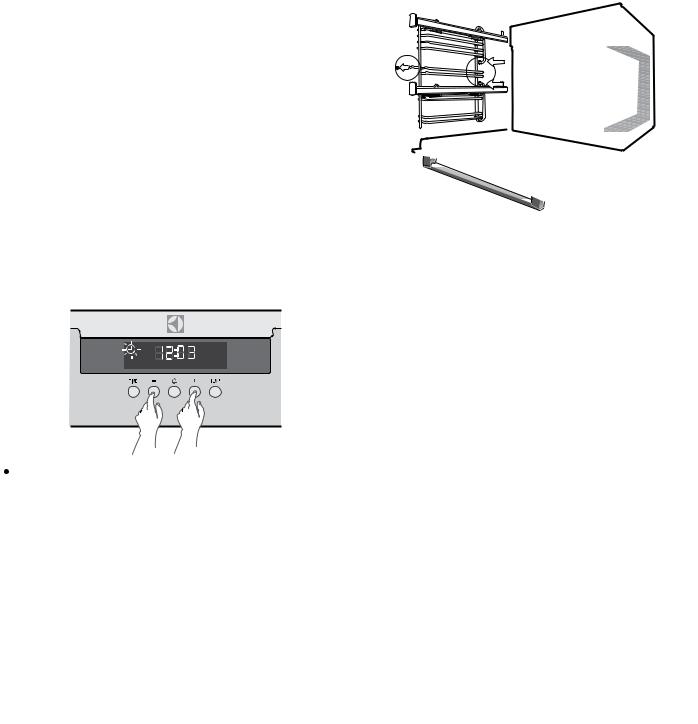
•Side racks
1.Insert the twin pegged side into the rear access holes provided, ensuring pegs are fully inserted.
2.Then locate the front peg into the front access hole and push in firmly.

8 EVE611SA, EVE614BA
Before using THE APPLIANCE
• Shelves and trays
The shelves are designed so that they have maximum extension but cannot be accidentally pulled right out. The trays are designed the same way and slot straight into the side racks.
To fit a shelf or tray to side racks:
1.Locate the rear edge of the shelf/tray in between the guide rails of the side rack – see diagram. Ensure the same rail positions on both sides of the oven are being engaged.
2.With the front edge raised, begin to slide the shelf into the oven.
3.Once the detents have passed the front edge of the side rack, the shelf can be pushed completely in.
4.When fully inserted the shelf/tray should not interfere with the closed oven door.
To fit a shelf or tray to telescopic slides:
1.With the slides fully pushed in, push the shelf or tray along the top of the slide until it hits the back post.
2.Drop the front of the shelf or tray onto the slide ensuring it sits behind the front post of the slide.
3.When fully inserted the shelf/tray should not interfere with the closed oven door.

EVE611SA, EVE614BA 9
COOKING FUNCTIONS
Symbol |
Function description |
||
|
|
|
|
Rapid heat |
Heat comes from the element surrounding the fan as well as the smaller element above the food. This allows you |
||
|
|
|
to preheat your oven 30% quicker than on standard ‘Bake/Pizza’. ‘Rapid Heat’ is ideal for cooking frozen pre- |
|
|
|
cooked foods such as savoury pastries, pizzas, mini meals (TV dinners), meat pies and fruit pies. Simply place |
|
|
|
the food in the oven straight from the freezer and heat. Cook in the upper half of the oven for best results. |
|
|
|
|
Fan cook |
Heat comes from the element surrounding the fan. This fan circulates the hot air around the oven cavity so that |
||
|
|
|
you can put your food in different places in the oven and still cook them at the same time. You can use ‘Fan |
|
|
|
cook’ function for multi-shelf cooking, reheating cooked foods, pastries and complete oven meals. It will cook at |
|
|
|
a lower temperature and be faster than baking. Please note that some variation in browning is normal. |
|
|
|
|
Bake/pizza |
Heat comes from two elements, one above and one below the food. The bottom element is a clean heat element |
||
|
|
|
and is below the floor of the oven. Both elements are controlled by the thermostat and will turn on and off to |
|
|
|
|
|
|
|
maintain set temperature. You can use the ‘Bake/pizza’ function for single trays of biscuits, scones, muffins, |
|
|
|
cakes, slices, casseroles, baked puddings, roasts and delicate egg dishes. |
|
|
|
|
|
|
|
|
Pastry |
Heat comes from the clean heat element below the food. The element is controlled by the thermostat and will |
||
|
|
|
turn on and off to maintain the set temperature. The ‘Pastry’ function can be used to add extra browning to the |
|
|
|
bases of pizzas, pies, and pastries. Cook in the lower half of the oven when you are using only one shelf. |
|
|
|
|
|
|
|
|
Defrost |
The ‘Defrost’ function uses low temperature air that is circulated by the fan. You can defrost (thaw) your food |
||
|
|
|
before you cook it. You can also use ‘Defrost’ to raise your yeast dough and to dry fruit, vegetables and herbs. |
|
|
|
|
Fan Grill |
‘Fan Grill’ offers you the benefits of both ‘Fan Cook’ and traditional ‘Grill’ functions. The grill element turns on and |
||
|
|
|
off to maintain set temperature while the fan circulates the heated air. |
|
|
|
Fan grill with the oven door closed. |
|
|
|
You can use ‘Fan Grill’ for large cuts of meat, which gives you a result that is similar to ‘rotisserie’ cooked meat. |
|
|
|
Put your food on a shelf in the second lowest shelf position. Put you grill dish on the lowest shelf to catch any spills. |
|
|
|
When using ‘Fan Grill’ it is not necessary to turn food over during the cooking cycle. Set temperature to 180°C. |
|
|
|
|
|
Grill |
‘Grill’ function directs radiant heat from the powerful upper element onto the food. You can use the ‘Grill’ function |
|
|
|
|
for tender cuts of meat steak, chops, sausages, fish, cheese toasties and other quick cooking foods. |
|
|
|
Grill with the oven door closed. |
|
|
|
Preheat your grill for 3 minutes to get the best results. This will help seal in the natural juices of steak, chops etc |
|
|
|
for better flavour. You can slide your grill dish into either of the 2 spaces within the uppers pairs of support rails. |
|
|
|
|
Maxi Grill |
‘Maxi Grill’ directs radiant heat from 2 powerful upper elements onto the food. You can use the ‘Maxi Grill’ function |
||
|
|
|
for tender cuts of meat, steak, chops, sausages, fish, cheese toasties and other quick cooking foods. |
|
|
|
|
|
|
|
Grill with the oven door closed. |
|
|
|
‘Maxi Grill’ allows you to take full advantage of the large grill dish area and will cook faster than normal ‘Grill’. For |
|
|
|
best results it is recommended to preheat your grill for 3 minutes. This will help seal in the natural juices of steak, |
|
|
|
chops etc for a better flavour. You can slide your grill dish into either of the 2 spaces within the upper pairs of |
|
|
|
support rails. |
|
|
|
|

10 EVE611SA, EVE614BA
OPERATING SEQUENCE
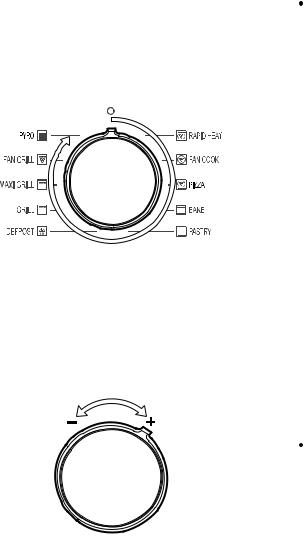
Select the cooking function
•Turn the function selector in any direction to the desired cooking function. The oven cavity light will come on.
Select the temperature
•To set the temperature, turn the temperature selector in a clockwise direction to the desired setting. An indicator light in the display will come on.
•A thermostat controls the temperature in your oven. When the temperature is reached, the heating source switches itself off and the indicator light goes out. When the oven temperature falls below the desired setting, the heating source switches on and the indicator light comes on again.
•Once the food is cooked, turn the temperature selector back in an anti-clockwise direction. Do not force it right round in a clockwise direction as this will result in damage to the thermostat.
Note: The desired cooking function must be selected before the oven will operate.
 Important!
Pre-heating
For best cooking results pre-heat the oven. Pre-heating allows the oven to reach the required temperature quickly and efficiently as well as cook food at the correct temperature for the entire cook time.
1.With ‘Rapid Heat’ function
This function allows the oven to reach preset temperature quicker than any other cooking function. Turn the function selector to ‘Rapid Heat’, then set the desired temperature, by rotating the oven temperature selector.
When the heating light goes out, the oven has reached the desired temperature. Select the oven function required and place the food in the oven.
2.With other oven functions
Set the desired temperature by rotating your oven temperature selector. When the indicator light goes out the oven has reached the desired preset temperature, place your food in the oven, close the door and set the timer if you desire.
3.With ‘Grill’ function
Pre-heat the grill for at least 3 minutes to obtain best results. This will help to seal the natural juices of steak, chops and other meats for a better flavour.
Using THE appliance
 Important!
Cooling / Vent fan
The built-in appliance is fitted with a cooling fan. This prevents the kitchen cabinet from overheating and reduces the condensation inside the oven. It will operate whenever the oven is in use and blow warm air across the top of the oven door.
Note: If the oven is still hot from cooking, the cooling fan will keep running to cool the oven down and will switch off by itself once cool.
Condensation
•Excess condensation may fog the oven door. This may happen when cooking large quantities of food from a cold start. Minimise condensation by:
–Keeping the amount of water used whilst cooking to a minimum.
–Making sure the oven door is firmly closed.
–Baking custard in a baking dish that is slightly smaller than the water container.
–Cooking casseroles with the lid on.
Note: If using water in cooking, this will turn to steam and may condense outside your appliance. This is not a problem or fault with your oven.
Cooking with the timer
The appliance is equipped with a timer that has the following features:
•Timer – sets a countdown time that will beep when the set time has elapsed.
•Cook time – sets cooking duration. A timer will count down the preset cooking time, beep when the time has elapsed and turn the appliance off.
•End time – instead of setting a cooking duration, a cooking finish time can be set. When the finish time has been reached the timer will beep and turn the appliance off.
•Delayed start cooking time – combines the cooking time and end cooking time to switch oven on and off at a specific time during the day.
EVE611SA, EVE614BA 11
Selecting the timer
•Touch the MODE symbol until the timer  icon begins flashing.
•Set the countdown time you want by using the
+and – symbols. 5 seconds after the last change the timer ‘icon will stop flashing and the countdown will start in minutes.
•To stop the beeper, touch any symbol.
•Maximum countdown time is 2hrs 30mins.
Setting the cooking duration
•Select the desired oven function and temperature.
•The oven indicator light will glow and the heating source will come on.
•Touch the MODE symbol until the cook time icon  begins flashing.
•Set the cooking duration you want by using the + and – symbols. Five seconds after the last change the cook time icon will stop flashing, and the time of day will be displayed. The oven will automatically shut off once the set duration is reached. To check how much time remains, press MODE until the cook time icon is lit. The remaining time will be displayed.
•When the oven shuts off an alarm will beep. To stop the beeper, touch any symbol.
Note: Remember to add pre-heating time if necessary.

12 EVE611SA, EVE614BA
Using THE appliance
Setting the cooking end time
•Check that the clock displays the correct time of day.
•Select the desired oven function and temperature. The oven indicator light will glow and the heating source will come on.
•Touch the MODE Symbol until the end time  icon begins flashing.
•Enter the time of day you want the cooking to finish by using the + and – symbols. Five seconds after the last change, the end time icon will stop flashing and the current time will be displayed.
•To stop the beeper, touch any symbol.
Setting the delayed start cooking time
•Set the cook time and end time as described in the previous sections.
•Once both the cook time and end time have been set, both icons will stop flashing and the current time will be displayed.
•To check or cancel settings:
To check settings, touch the MODE symbol until the desired setting is displayed. The relevant icon will flash.
To cancel ‘delayed start’ touch the MODE symbol until the end time icon flashes. Touch and hold the – symbol until the clock no longer reverses (a beep will
be heard). If temperature and function knobs are still at a setting, the oven will start once the end time icon stops flashing.
•To cancel ‘auto shut off’ touch the MODE symbol until
the cook time  icon flashes. Touch and hold the
– button until the clock no longer reverses (at 0:00 a beep will be heard). This automatically cancels ‘auto shut off’. If the temperature and function knobs are still
at a setting, the oven will start once the cook time  icon stops flashing. Because ‘auto off’ is cancelled the oven will continue to heat until it is manually turned off.
On completion of cooking
•The heat source will turn off, the timer will beep and the end time and/or cook time ‘icons’ will flash.
•Even though the heating element turns off the oven will still retain substantial heat. This will continue to cook the food until it is removed or the oven cools down.
If you do not plan on being present when the oven turns off, you should take this extra heating time into account.
•Turn the function and temperature controls to the off position.
•Touch any button to stop the timer beeping.
Adjusting the clock
•Touch the MODE symbol until the  clock icon begins flashing.
•Touch the + and – symbols to change the time of day. 5 seconds after the last change, the clock icon will disappear, confirming the time has been adjusted.
EVE611SA, EVE614BA 13
GetTING to know THE oven
Get to know your new oven with this ‘Simple Test Cake’
Although we strive for a perfect performing oven, it’s possible that there will be some variation in colour when baking. Therefore, we suggest this simple, easy and delicious to make Simple Test Cake, it can help you understand your new oven. All ovens do sometimes have hot or cold spots, therefore it is important to judge with your eye as you may require to rotate during baking.
‘Simple Test Cake’
125g butter, softened to room temperature
1 cup caster sugar
1 teaspoon pure vanilla essence
4 large eggs
2 cups self-raising flour pinch of salt
4 tablespoons (80mL) full-cream milk
Method:
1.Butter base and sides of two, 20cm straight-sided round or square cake pans. Then line the base with grease proof or baking paper.
2.Preheat oven to moderate ‘180ºC’ (170ºC fan forced) and ensure oven shelf is in the centre position of oven.
3.Cream softened butter and sugar until light in colour.
4.Add vanilla essence.
5.Then eggs one at a time, beating well after each addition.
6.Sift flour and salt into the mixture and beat until well combined.
7.Add milk and beat or stir to combine.
8.Spoon mixture equally between prepared cake pans.
9.Bake in preheated oven, middle shelf for about 25 to 35 minutes or until when tested with a fine cake skewer it comes out clean or the edges of the cakes have come away slightly from the sides of the cake pans.
10.Remove from oven to wire cake rack and rest for 5 minutes before removing from cake pans.
Cool completely.
To Serve: sandwich together with your favourite jam or conserve, and dust top with pure icing sugar.
NOTE: if desired substitute butter for either margarine or olive oil spread. Recipe is based on the Australian standard metric 250mL cup and 20mL tablespoon sets.

14 EVEP611SA, EVEP614BA
EVEP611SA, EVEP614BA COMPONENTS
|
|
|
|
|
|
|
|
|
|
|
|
|
|
|
|
|
|
|
|
|
|
|
|
|
|
|
|
|
|
|
|
|
|
|
|
|
|
|
|
|
|
|
|
|
|
|
|
|
|
|
|
|
|
|
|
|
|
|
|
|
|
|
|
|
|
|
|
|
|
|
|
|
|
|
|
|
|
|
|
|
|
|
|
|
|
|
|
|
|
|
|
|
|
|
|
|
|
|
|
|
|
|
|
|
|
|
|
|
|
|
|
|
|
|
|
|
|
|
|
|
|
|
|
|
|
|
|
|
|
|
|
|
|
|
|
|
|
|
|
|
|
|
|
|
|
|
|
|
|
|
|
|
|
|
|
|
|
|
|
|
|
|
|
|
|
|
|
|
|
|
|
|
|
|
|
|
|
|
|
|
|
|
|
|
|
|
|
|
|
|
|
|
|
|
|
|
|
|
|
|
|
|
|
|
|
|
|
|
|
|
|
|
|
|
|
|
|
|
|
|
|
|
|
|
|
|
|
|
|
|
|
|
|
|
|
|
|
|
|
|
|
|
|
|
|
|
|
|
|
|
|
|
|
|
|
|
|
|
|
|
|
|
|
|
|
|
|
|
|
|
|
|
|
|
|
|
|
|
|
|
|
|
|
|
|
|
|
|
|
|
|
|
|
|
|
|
|
|
|
|
|
|
|
|
|
|
|
|
|
|
|
|
|
|
|
|
|
|
|
|
|
|
|
|
|
|
|
|
|
|
|
|
|
|
|
|
|
|
|
|
|
|
|
|
|
|
|
|
|
|
|
|
|
|
|
|
|
|
|
|
|
|
|
|
|
|
|
|
|
|
|
|
|
|
|
|
|
|
|
|
|
|
|
|
|
|
|
|
|
|
|
|
|
|
|
|
|
|
|
|
|
|
|
|
|
|
|
|
|
|
|
|
|
|
|
|
|
|
|
|
|
|
|
|
|
|
|
|
|
|
|
|
|
|
|
|
|
|
|
|
|
|
|
|
|
|
|
|
|
|
|
|
|
|
|
|
|
|
|
|
|
|
|
|
|
|
|
|
|
|
Function selector knob |
|
Temperature selector knob |
|
|
|
|||||||||||||||||
|
|
|
|
|
|
|
|
|
|
|
|
|
|
|
|
|
|
|
|||||||||||||||||||
|
|
|
|
|
|
|
|
|
|
|
|
|
|
|
|
|
|
|
|||||||||||||||||||
|
|
|
|
|
|
|
|
|
|
|
|
|
|
|
Timer display |
|
5 Button Controller |
|
|
|
|||||||||||||||||
|
|
|
|
|
|
|
|
|
|
|
|
|
|
|
|
|
|
|
|||||||||||||||||||
|
|
|
|
|
|
|
|
|
|
|
|
|
|
|
|
|
|
|
|
|
|
|
|
|
|
|
|
|
|
|
|
|
|
|
|
|
|
|
|
|
|
|
|
|
|
|
|
|
|
|
|
|
|
|
|
|
|
|
|
|
|
|
|
|
|
|
|
|
|
|
|
|
|
|
|
|
|
|
|
|
|
|
|
|
|
|
|
|
|
|
|
|
|
|
|
|
|
|
|
|
|
|
|
|
|
|
|
|
|
|
|
|
|
|
|
|
|
|
|
|
|
|
|
|
|
|
|
|
|
|
|
|
|
|
|
|
|
|
|
|
|
|
|
|
|
|
|
|
|
|
|
|
|
|
|
|
|
|
|
|
|
|
|
|
|
|
|
|
|
|
|
|
|
|
|
|
|
|
|
|
|
|
|
|
|
|
|
|
|
|
|
|
|
|
|
|
|
|
|
|
|
|
|
|
|
|
|
|
|
|
|
|
|
|
|
|
|
|
|
|
|
|
|
|
|
|
|
|
|
|
|
|
|
|
|
|
|
|
|
|
|
|
|
|
|
|
|
|
|
|
|
|
|
|
|
|
|
|
|
|
|
|
|
|
|
|
|
|
|
|
|
|
|
|
|
|
|
|
|
|
|
|
|
|
|
|
|
|
|
|
|
|
|
|
|
|
|
|
|
|
|
|
|
|
|
|
|
|
|
|
|
|
|
|
|
|
|
|
|
|
|
|
|
|
|
|
|
|
|
|
|
|
|
|
|
|
|
|
|
|
|
|
|
|
|
|
|
|
|
|
|
|
|
|
|
|
|
|
|
|
|
|
|
|
|
|
|
|
|
|
|
|
|
|
|
|
|
|
|
|
|
|
|
|
|
|
|
|
|
|
|
|
|
|
|
|
|
|
|
|
|
|
|
|
|
|
|
|
|
|
|
|
|
|
|
|
|
|
|
|
|
|
|
|
|
|
|
|
|
|
|
|
|
|
|
|
|
|
|
|
|
|
|
|
|
|
|
|
|
|
|
|
|
|
|
|
|
|
|
|
|
|
|
|
|
|
|
|
|
|
|
|
|
|
|
|
|
|
|
|
|
|
|
|
|
|
|
|
|
|
|
|
|
EVEP611SA |
|
EVEP614BA |
||
stainless steel model |
|
black model |
||
|
|
Control panel |
|
Quad glazed door |
|
|
|
||
|
|
|
||
|
|
Warm air exhaust |
|
|
|
|
|
|
|
Before using THE APPLIANCE
Preparing your oven
1.Please remove all stickers, leaflets and boxes from the door and from the floor of the oven before operation.
2.Please wipe out the oven interior prior to operation with warm soapy water and polish dry with a soft clean cloth. Do not close the oven door until the oven is completely dry.
3.Do not line the oven with foil. It will damage the enamel.
Setting the time
When power is supplied to the oven the  clock icon will be displayed. Along with the clock symbol the ‘12’ will be flashing. This indicates that ‘hour’ portion of the time is ready to be changed.
•Press + or – , then press ‘TIME’ when you have the right hour.
•The minutes will flash and can be set in the same manner.
•5 seconds after the last change, the clock display will stop flashing, confirming that the time has been set.
Note: The clock has a 24 hour display.
 Important!
New appliances can have a smell during first use. It is recommended to ‘run in’ the oven before cooking for the first time. Operate the oven, empty, at a temperature of 180°C for approximately 2 hours.
Please ensure the room is well ventilated during this process.
EVEP611SA, EVEP614BA 15
Installing your oven accessories
• Side racks
1.Insert the twin pegged side into the rear access holes provided, ensuring pegs are fully inserted.
2.Then locate the front peg into the front access hole and push in firmly.
• Shelves and trays
The shelves are designed so that they have maximum extension but cannot be accidentally pulled right out. The trays are designed the same way and slot straight into the side racks.
To fit a shelf or tray to side racks:
1.Locate the rear edge of the shelf/tray in between the guide rails of the side rack – see diagram. Ensure the same rail positions on both sides of the oven are being engaged.
2.With the front edge raised, begin to slide the shelf into the oven.
3.Once the detents have passed the front edge of the side rack, the shelf can be pushed completely in.
4.When fully inserted the shelf/tray should not interfere with the closed oven door.

16 EVEP611SA, EVEP614BA
Before using THE APPLIANCE
To fit a shelf or tray to telescopic slides:
1.With the slides fully pushed in, push the shelf or tray along the top of the slide until it hits the back post.
2.Drop the front of the shelf or tray onto the slide ensuring it sits behind the front post of the slide.
3.When fully inserted the shelf/tray should not interfere with the closed oven door

EVEP611SA, EVEP614BA 17
COOKING FUNCTIONS
Symbol |
Function description |
||||||
|
|
|
|
|
|
|
|
Rapid heat |
Heat comes from the element surrounding the fan as well as the smaller element above the food. This allows you |
||||||
|
|
|
|
|
|
|
to preheat your oven 30% quicker than on standard ‘Bake’. ‘Rapid Heat’ is ideal for cooking frozen pre-cooked |
|
|
|
|
|
|
|
foods such as savoury pastries, pizzas, mini meals (TV dinners), meat pies and fruit pies. Simply place the food in |
|
|
|
|
|
|
|
the oven straight from the freezer and heat. Cook in the upper half of the oven for best results. |
|
|
|
|
|
|
|
|
Fan cook |
Heat comes from the element surrounding the fan. This fan circulates the hot air around the oven cavity so that |
||||||
|
|
|
|
|
|
|
you can put your food in different places in the oven and still cook them at the same time. You can use ‘Fan |
|
|
|
|
|
|
|
cook’ function for multi-shelf cooking, reheating cooked foods, pastries and complete oven meals. It will cook at |
|
|
|
|
|
|
|
a lower temperature and be faster than baking. Please note that some variation in browning is normal. |
|
|
|
|
|
|
|
|
|
Pizza |
‘Pizza’ is a combination of ‘Pastry’ and ‘Fan Cook’ and offers you the combined benefits of both functions. Heat |
|||||
|
|
|
|
|
|
|
comes from the element surrounding the fan as well as the clean heat element below the oven floor. The ‘pizza’ |
|
|
|
|
|
|
|
function is ideal for foods that require cooking and browning of the base. It is great for foods such as pizzas, |
|
|
|
|
|
|
|
quiches, meat pies and fruit pies. Simply put the food in the middle of the oven and select the desired temperature. |
|
|
|
|
|
|
|
|
|
|
|
|
|
|
|
|
|
Bake |
Heat comes from two elements, one above and one below the food. The bottom element is a clean heat element |
|||||
|
|
|
|
|
|
|
and is below the floor of the oven. Both elements are controlled by the thermostat and will turn on and off to |
|
|
|
|
|
|
|
maintain set temperature. You can use the ‘Bake’ function for single trays of biscuits, scones, muffins, |
|
|
|
|
|
|
|
cakes, slices, casseroles, baked puddings, roasts and delicate egg dishes. |
|
|
|
|
|
|
|
|
|
|
|
|
|
|
|
|
Pastry |
Heat comes from the clean heat element below the food. The element is controlled by the thermostat and will |
||||||
|
|
|
|
|
|
|
turn on and off to maintain the set temperature. The ‘Pastry’ function can be used to add extra browning to the |
|
|
|
|
|
|
|
bases of pizzas, pies, and pastries. Cook in the lower half of the oven when you are using only one shelf. |
|
|
|
|
|
|
|
|
|
|
|
|
|
|
|
|
Defrost |
The ‘Defrost’ function uses low temperature air that is circulated by the fan. You can defrost (thaw) your food |
||||||
|
|
|
|
|
|
|
before you cook it. You can also use ‘Defrost’ to raise your yeast dough and to dry fruit, vegetables and herbs. |
|
|
|
|
|
|
|
|
|
Grill |
‘Grill’ function directs radiant heat from the powerful upper element onto the food. You can use the ‘Grill’ function |
|||||
|
|
|
|
|
|
|
for tender cuts of meat steak, chops, sausages, fish, cheese toasties and other quick cooking foods. |
|
|
|
|
|
|
|
Grill with the oven door closed. |
|
|
|
|
|
|
|
Preheat your grill for 3 minutes to get the best results. This will help seal in the natural juices of steak, chops etc |
|
|
|
|
|
|
|
for better flavour. You can slide your grill dish into either of the 2 spaces within the uppers pairs of support rails. |
|
|
|
|
|
|
|
|
Maxi Grill |
‘Maxi Grill’ directs radiant heat from 2 powerful upper elements onto the food. You can use the ‘Maxi Grill’ function |
||||||
|
|
|
|
|
|
|
for tender cuts of meat, steak, chops, sausages, fish, cheese toasties and other quick cooking foods. |
|
|
|
|
|
|
|
|
|
|
|
|
|
|
|
Grill with the oven door closed. |
|
|
|
|
|
|
|
‘Maxi Grill’ allows you to take full advantage of the large grill dish area and will cook faster than normal ‘Grill’. For |
|
|
|
|
|
|
|
best results it is recommended to preheat your grill for 3 minutes. This will help seal in the natural juices of steak, |
|
|
|
|
|
|
|
chops etc for a better flavour. You can slide your grill dish into either of the 2 spaces within the upper pairs of |
|
|
|
|
|
|
|
support rails. |
|
|
|
|
|
|
|
|
Fan Grill |
‘Fan Grill’ offers you the benefits of both ‘Bake’ and traditional ‘Grill’ functions. The grill element turns on and off to |
||||||
|
|
|
|
|
|
|
maintain set temperature while the fan circulates the heated air. |
|
|
|
|
|
|
|
Fan grill with the oven door closed. |
|
|
|
|
|
|
|
You can use ‘Fan Grill’ for large cuts of meat, which gives you a result that is similar to ‘rotisserie’ cooked meat. |
|
|
|
|
|
|
|
Put your food on a shelf in the second lowest shelf position. Put you grill dish on the lowest shelf to catch any spills. |
|
|
|
|
|
|
|
When using ‘Fan Grill’ it is not necessary to turn food over during the cooking cycle. Set temperature to 180°C. |
|
|
|
|
|
|
|
|
|
Pyro |
The ‘pyrolytic cleaning’ function cleans by burning off the spatters and accumulated dirt and grease from the |
|||||
|
|
|
|
|
|
|
oven liner, at high temperature. This process produces ash which can be wiped out of the oven cavity. |
|
|
|
|
|
|
|
|
|
|
|
|
|
|
|
|
|
|
|
|
|
|
|
|
|
|
|
|
|
|
|
|
|
|
|
|
|
|
|
|
|
|
|
|
|
|
|
|
18 EVEP611SA, EVEP614BA
OPERATING SEQUENCE
Select the oven function
•Turn the oven function selector clockwise to select the desired oven function.
Note: each oven function has a default temperature which can then be adjusted as outlined below.
Selecting the oven temperature
•Toggle the temperature selector (left – or right +) as required to set the desired cooking temperature in °C.
Note: the temperature can be adjusted at any time throughout the cooking time.
 Important!
Pre-heating
For best cooking results , pre-heat the oven. Pre-heating allows the oven to reach the required temperature quickly and efficiently as well as cook food at the correct temperature for the entire cook time.
1.With ‘Rapid Heat’ function
This function allows the oven to reach preset temperature quicker than any other cooking function. Turn the function selector to ‘Rapid Heat’, then set the desired temperature, by rotating the oven temperature selector. When the heating light goes out, the oven has reached the desired temperature. Select the oven function required and place the food in the oven.
2.With other oven functions
Set the desired temperature by rotating the oven temperature selector. When the indicator light goes out the oven has reached the desired preset temperature, place the food in the oven, close the door and set the timer if you desire.
3.With ‘Grill’ function
Pre-heat the grill for at least 3 minutes to obtain best results. This will help to seal the natural juices of steak, chops and other meats for a better flavour.
 Important!
Cooling / Vent fan
The appliance is fitted with a cooling fan. This prevents the kitchen cabinet from overheating and reduces the condensation inside the oven. It will operate whenever the oven is in use and blow warm air across the top of the oven door.
Note: If the oven is still hot from cooking, the cooling fan will keep running to cool the oven down and will switch off by itself once cool.
Condensation
Excess condensation may fog the oven door. This may happen when cooking large quantities of food from a cold start. Minimise condensation by:
–Keeping the amount of water used whilst cooking to a minimum.
–Making sure the oven door is firmly closed.
–Baking custard in a baking dish that is slightly smaller than the water container.
–Cooking casseroles with the lid on.
Note: If using water in cooking, this will turn to steam and may condense outside the appliance. This is not a problem or fault with the oven.
Using THE appliance
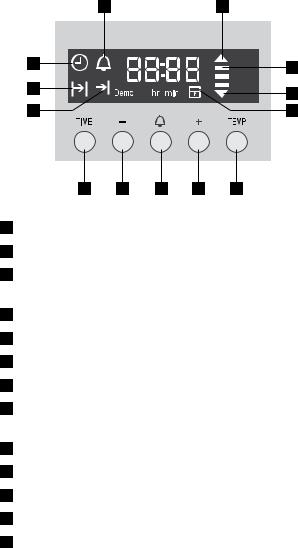
Cooking with the timer
On when the timer is set On when oven warming up
3 bars displayed when oven reaches set temperature
On when oven cooling down Oven door locked
Press to display current oven temperature Press to increase hours/mins
Press to start timer mode. Hold to turn oven light on/off.
Press to decrease hours/mins
Press to toggle through the timer modes End time icon
Cook time icon Time of day icon
Adjusting the clock
To change the time, press and hold the ‘TIME’ button  until the clock symbol begins to flash. The hour
display will be ready to change.
•Press + or – , then press ‘TIME’ when you have the right hour.
•The minutes will flash and can be set in the same manner.
•5 seconds after the last change, the clock display will stop flashing, confirming that the time has been set.
Note: The clock has a 24 hour display.
The timer can be used to turn the oven off in two ways by setting the cooking time (duration) or by setting the end time (time of day you want the oven off).
EVEP611SA, EVEP614BA 19
Setting the cook time
1.Use the knobs to select the desired oven function and cooking temperature.
2.Press the ‘TIME’ button as often as necessary, until the ‘cook time’ 
 symbol appears.
3.Set the desired cooking time commencing with minutes by using the + or – buttons, whilst the 
 symbol is flashing, then press the ‘TIME’ button again and set the hours by using the + or – buttons. After 5 seconds from the last time adjustment the

 symbol will stop flashing. The appliance is now programmed and the display will countdown to zero.
4.When the set time has elapsed, a signal will sound and the appliance will turn off. To stop the signal, press any button on the clock and then turn the oven function selector to OFF.
Note: Cooking time cannot be set for the Rapid Heat function. The feature can be cancelled at any time by returning the function selector to off.
Setting the end time
1.Use the knobs to select the desired oven function and cooking temperature.
2.Press the ‘TIME’ button as often as necessary, until the ‘end time’  symbol appears.
3.Set the desired end time commencing with hours using the + or – buttons whilst the  symbol is flashing, then press the ‘TIME’ button again and set the minutes by using the + or – buttons. After 5 seconds from the
last time adjustment the  symbol will stop flashing and the appliance is now programmed.
4.When the set time has elapsed, a signal will sound and the appliance will turn off. To stop the signal, press any button on the clock and then turn the oven function selector to OFF.
Note: Stop time cannot be set for the Rapid Heat function.
Setting the delayed start cooking time
The ‘cook time’ and ‘end time’ functions can be combined to switch the oven on and off at a specific time during the day.
1.Select the desired oven function and cooking temperature.
2.Press the ‘TIME’ button as often as necessary, until the ‘cook time’ 
 symbol appears.
3.Set the desired cooking time by using + or – buttons, whilst the 
 symbol is flashing.
4.Press the ‘TIME’ button as often as necessary, until the ‘end time’  symbol appears flashing
5.Set the desired switch-off time using the + or – whilst the ‘end time’  symbol is flashing.
6.5 seconds after the last change the ‘cook time’ and ‘end time’ arrows are lit to confirm that the oven has been programmed.
7.When the delayed start cooking time has elapsed, a signal will sound and the appliance will turn off. To stop the signal, press any button on the clock and then turn the oven function selector to OFF.
Note: Delayed start cooking time cannot be set for the Rapid Heat function. The feature can be cancelled at any time by returning the function selector to off.
20 EVEP611SA, EVEP614BA
Using THE appliance
Additional Functionality
Setting the countdown timer
Use this for timing any activity. For example boiling eggs.
1.Press the  button, the display will flash.
2.Set the countdown time you want by using + and
–. Commence with setting the number of seconds
first. The minutes and hours can then be set by subsequently pressing the  button again and adjusting using the + or – buttons. 5 seconds after the last change the timer will stop flashing, confirming the timer has been set.
3.To cancel the timer press the  button, the display will flash. Then press and hold + and – buttons until the timer is cleared.
4.To stop the beeper, press any button.
Note: The clock display cannot be selected when the timer is operating.
Elapsed Time
When an oven function is selected (other than pyrolytic clean) an elapsed timer commences on the display.
To reset this timer press and hold both the + and – buttons until the timer is reset.
Displaying the cavity temperature
During operation of the oven the current oven temperature during pre-heating of the oven can be displayed by pressing the TEMP button. During normal operation the set temperature can be reviewed by pressing the TEMP button.
Note: this temperature will only be displayed for approximately 5 seconds.
Light operation
During operation of the oven the light can be switched off by pressing and holding the  button until the light turns off. Also the light can be turned on from the standby state by pressing and holding the
  button until the light comes on.
Activating the child-proof lock
When the child lock is engaged, the oven cannot be operated and the door cannot be opened
1.Switch off the appliance using the function selector switch.
2.Press and hold the TIME and + buttons at the same time until the word ‘SAFE’ is displayed and a double beep is sounded. The word safe will be replaced by a padlock symbol on the display after 5 seconds.
Releasing the child-proof lock
Press and hold the TIME and + buttons at the same time until a double beep is sounded. This will
commence to unlock the door and after 5 seconds the oven is ready for use.
Switching the clock display ON and OFF
1.Press together + and – for 2 seconds to switch ‘off’ the display.
2.Press together + and – for 2 seconds to switch the clock display ‘on’ again.
3.When the display is set to the ‘off’ state pressing the + and – button momentarily will display the time for 5 seconds then turn off the display.
4.When the display is set to the ‘off’ state, turning on the oven will turn the display ‘on’ for the duration of oven operation. Once the function is turned ‘off’ the display will turn off after 5 seconds.
Note: if a timer mode is set or the oven is operating, then it is not possible to switch the display off.
Safety Cut-out feature
The oven automatically switches itself off if the temperature is not adjusted or the appliance is left operating after a period of time. The oven switches itself off after:
•12.5 hours when the temperature is set less than 120°C.
•8.5 hours when the temperature is set to 120°C or above, and below 200°C.
•5.5 hours when the temperature is set to 200°C or above, and below 250°C
•3.0 hours when the temperature is set at 250°C.
DEMO Mode
The oven can be set to operate in a demo mode (eg in a retail store). In this mode the display works and functions can be set but the oven does not actually heat. When in this mode the text ‘DEMO’ will be lit. The following instructions show how to enter and exit ‘Demo’ mode.
1.Ensure the oven is in the off state. Press and hold the + button until a beep sounds. The ‘Demo’ text will begin to flash.
2.While holding the + button turn the function selector to the first oven function until another beep is heard.
3.Then turn the function selector to the ‘off’ position.
4.Release the + button.
5.Toggle and hold the temperature selector to the right (+) until 3 beeps sound.
EVEP611SA, EVEP614BA 21
GetTING to know THE oven
Get to know your new oven with this ‘Simple Test Cake’
Although we strive for a perfect performing oven, it’s possible that there will be some variation in colour when baking. Therefore, we suggest this simple, easy and delicious to make Simple Test Cake, it can help you understand your new oven. All ovens do sometimes have hot or cold spots, therefore it is important to judge with your eye as you may require to rotate during baking.
‘Simple Test Cake’
125g butter, softened to room temperature
1 cup caster sugar
1 teaspoon pure vanilla essence
4 large eggs
2 cups self-raising flour pinch of salt
4 tablespoons (80mL) full-cream milk
Method:
1.Butter base and sides of two, 20cm straight-sided round or square cake pans. Then line the base with grease proof or baking paper.
2.Preheat oven to moderate ‘180ºC’ (170ºC fan forced) and ensure oven shelf is in the centre position of oven.
3.Cream softened butter and sugar until light in colour.
4.Add vanilla essence.
5.Then eggs one at a time, beating well after each addition.
6.Sift flour and salt into the mixture and beat until well combined.
7.Add milk and beat or stir to combine.
8.Spoon mixture equally between prepared cake pans.
9.Bake in preheated oven, middle shelf for about 25 to 35 minutes or until when tested with a fine cake skewer it comes out clean or the edges of the cakes have come away slightly from the sides of the cake pans.
10.Remove from oven to wire cake rack and rest for 5 minutes before removing from cake pans.
Cool completely.
To Serve: sandwich together with your favourite jam or conserve, and dust top with pure icing sugar.
NOTE: if desired substitute butter for either margarine or olive oil spread. Recipe is based on the Australian standard metric 250mL cup and 20mL tablespoon sets.
 Loading...