


 Loading...
ESL4300LO |
EN |
DISHWASHER |
USER MANUAL |
2 |
ESL4300LA |
FR |
LAVE-VAISSELLE |
NOTICE D'UTILISATION |
18 |
|
DE |
GESCHIRRSPÜLER |
BENUTZERINFORMATION |
37 |
|
IT |
LAVASTOVIGLIE |
ISTRUZIONI PER L’USO |
55 |
|
|
|
|
|

2www.electrolux.com
CONTENTS
1. |
SAFETY INFORMATION...................................................................................... |
3 |
|
2. |
SAFETY INSTRUCTIONS..................................................................................... |
4 |
|
3. |
PRODUCT DESCRIPTION................................................................................... |
5 |
|
4. |
CONTROL PANEL............................................................................................... |
6 |
|
5. |
PROGRAMMES................................................................................................... |
6 |
|
6. |
SETTINGS........................................................................................................... |
7 |
|
7. |
OPTIONS........................................................................................................... |
10 |
|
8. |
BEFORE FIRST USE.......................................................................................... |
10 |
|
9. |
DAILY USE........................................................................................................ |
11 |
|
10. |
HINTS AND TIPS............................................................................................. |
13 |
|
11. |
CARE AND CLEANING.................................................................................... |
14 |
|
12. |
TROUBLESHOOTING...................................................................................... |
16 |
|
13. |
TECHNICAL INFORMATION............................................................................ |
17 |
|
WE’RE THINKING OF YOU
Thank you for purchasing an Electrolux appliance. You’ve chosen a product that brings with it decades of professional experience and innovation. Ingenious and stylish, it has been designed with you in mind. So whenever you use it, you can be safe in the knowledge that you’ll get great results every time.
Welcome to Electrolux.
Visit our website for:
Get usage advice, brochures, trouble shooter, service information: www.electrolux.com
Register your product for better service:
www.registerelectrolux.com
Buy Accessories, Consumables and Original spare parts for your appliance:
www.electrolux.com/shop
CUSTOMER CARE AND SERVICE
Always use original spare parts.
When contacting our Authorised Service Centre, ensure that you have the following data available: Model, PNC, Serial Number.
The information can be found on the rating plate.  Warning / Caution-Safety information
 General information and tips
  Environmental information
Subject to change without notice.
ENGLISH 3
1.  SAFETY INFORMATION
Before the installation and use of the appliance, carefully read the supplied instructions. The manufacturer is not responsible if an incorrect installation and use causes injuries and damages. Always keep the instructions with the appliance for future reference.
1.1 General Safety
•This appliance is intended to be used in household and similar applications such as:
–farm houses; staff kitchen areas in shops, offices and other working environments;
–by clients in hotels, motels, bed & breakfast and other residential type environments.
•Do not change the specification of this appliance.
•The operating water pressure (minimum and maximum) must be between 0.5 (0.05) / 8 (0.8) bar (Mpa)
•Obey the maximum number of 9 place settings.
•If the supply cord is damaged, it must be replaced by the manufacturer, its Authorised Service Centre or similarly qualified persons in order to avoid a hazard.
•Put knives and cutlery with sharp points in the cutlery basket with the points down or in a horizontal position.
•Do not keep the appliance door open without supervision to prevent to fall on it.
•Before maintenance, deactivate the appliance and disconnect the mains plug from the mains socket.
•Do not use water spray and steam to clean the appliance.
•The appliance is to be connected to the water mains using the new supplied hose-sets. Old hose sets must not be reused.
1.2Children and vulnerable people safety
•This appliance can be used by children aged from 8 years and above and persons with reduced physical, sensory or mental capabilities or lack of experience and
4www.electrolux.com
knowledge if they have been given supervision or instruction concerning use of the appliance in a safe way and understand the hazards involved.
•Do not let children play with the appliance.
•Keep all detergents away from children.
•Keep children and pets away from the appliance door when it is open.
•Cleaning and user maintenance shall not be made by children without supervision.
2.SAFETY INSTRUCTIONS
2.1 Installation
•Remove all the packaging.
•Do not install or use a damaged appliance.
•Do not install or use the appliance where the temperature is less than 0 °C.
•Obey the installation instruction supplied with the appliance.
•Make sure that the appliance is installed below and adjacent to safe structures.
2.2 Electrical connection
WARNING!
Risk of fire and electrical shock.
•The appliance must be earthed.
•Make sure that the electrical information on the rating plate agrees with the power supply. If not contact an electrician.
•Always use a correctly installed shockproof socket.
•Do not use multi-plug adapters and extension cables.
•Make sure not to cause damage to the mains plug and to the mains cable. Should the mains cable need to be replaced, this must be carried out by our Authorised Service Centre.
•Connect the mains plug to the mains socket only at the end of the installation. Make sure that there is access to the mains plug after the installation.
•Do not pull the mains cable to disconnect the appliance. Always pull the mains plug.
•This appliance complies with the E.E.C. Directives.
•Only for UK and Ireland. The appliance has a 13 amp mains plug. If it is necessary to change the fuse in the mains plug, use a 13 amp ASTA (BS 1362) fuse.
2.3 Water connection
•Make sure not to cause damage to the water hoses.
•Before you connect the appliance to new pipes or pipes not used for a long time, let the water flow until it is clean.
•The first time you use the appliance, make sure that there is no leakage.
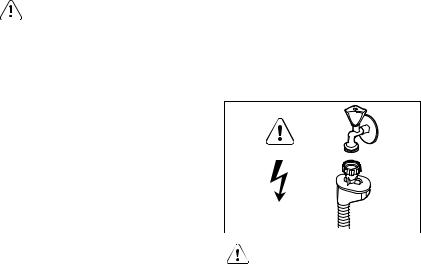
•The water inlet hose has a safety valve and a sheath with an inner mains cable.
WARNING!
Dangerous voltage.
•The water inlet hose has an external transparent sheath. If the hose is

damaged, the water in the hose becomes dark.
•If the water inlet hose is damaged, immediately disconnect the mains plug from the mains socket. Contact the Authorised Service Centre to replace the water inlet hose.
2.4 Use
•Do not sit or stand on the open door.
•Dishwasher detergents are dangerous. Obey the safety instructions on the detergent packaging.
•Do not drink and play with the water in the appliance.
•Do not remove the dishes from the appliance until the programme is completed. There can be detergent on the dishes.
•The appliance can release hot steam if you open the door while a programme operates.
•Do not put flammable products or items that are wet with flammable products in, near or on the appliance.
ENGLISH 5
2.5 Service
•Contact the Authorised Service Centre to repair the appliance. We recommend only the use of original spare parts.
•When you contact the Authorised Service Centre, ensure that you have the following information that is available on the rating plate.
Model : PNC :
Serial Number :
2.6 Disposal
WARNING!
Risk of injury or suffocation.
•Disconnect the appliance from the mains supply.
•Cut off the mains cable and discard it.
•Remove the door catch to prevent children and pets to get closed in the appliance.
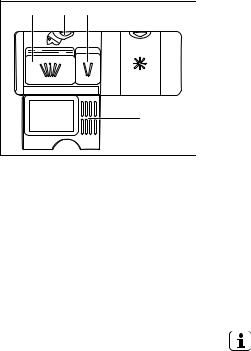
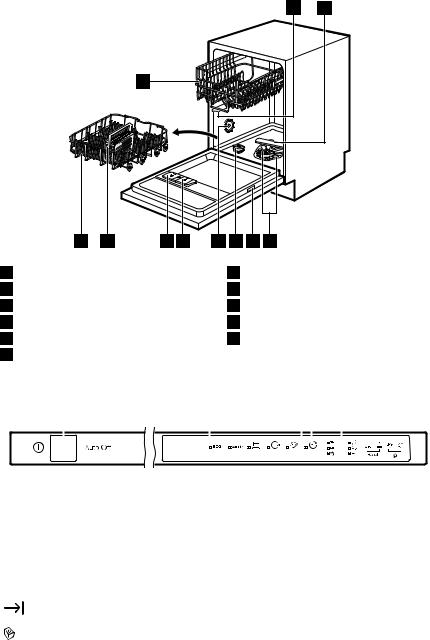
3. PRODUCT DESCRIPTION
1 2
11
10 |
9 |
8 |
7 |
6 |
5 |
4 |
3 |
Upper spray arm
Lower spray arm
Filters
Rating plate

6 www.electrolux.com |
|
|
|
|
|
|
|
|
|
|
|
|
|
|
|
|
|
|
|||||||
|
|
Salt container |
|
|
Cutlery basket |
|
|
|
|||||||||||||||||
|
|
|
|
|
|
||||||||||||||||||||
|
|
Air vent |
|
|
Lower basket |
|
|
|
|||||||||||||||||
|
|
|
|
|
|
||||||||||||||||||||
|
|
Rinse aid dispenser |
|
|
Upper basket |
|
|
|
|||||||||||||||||
|
|
|
|
|
|
||||||||||||||||||||
|
|
Detergent dispenser |
|
|
|
|
|
|
|
|
|
|
|
|
|
|
|
|
|
|
|||||
|
|
|
|
|
|
|
|
|
|
|
|
|
|
|
|
|
|
|
|
||||||
4. CONTROL PANEL |
|
|
|
|
|
|
|
|
|
|
|
|
|
|
|
|
|
|
|||||||
|
|
|
|
|
|
|
|
|
|
|
|
|
|
|
|||||||||||
|
1 |
|
|
|
|
2 |
|
|
|
|
3 |
|
|
|
4 |
||||||||||
|
|
|
|
|
|
|
|
|
|
|
|
|
|
|
|
|
|
|
|
|
|
|
|
|
|
|
|
|
|
|
|
|
|
|
|
|
|
|
|
|
|
|
|
|
|
|
|
|
|
|
|
|
|
|
|
|
|
|
|
|
|
|
|
|
|
|
|
|
|
|
|
|
|
|
|
|
|
|
On/off button |
|
Indicators |
|
|
|
|||
|
Programme buttons |
|
|
|
|
|
|
||
|
Delay button |
|
|
|
|
|
|
||
4.1 Indicators |
|
|
||
|
|
|
|
|
Indicator |
Description |
|
|
|
|
|
|
|
|
|
|
End indicator. |
|
|
|
|
|
|
|
|
|
Multitab indicator. |
|
|
|
|
|
||
|
|
Salt indicator. It is always off while the programme operates. |
||
|
|
|
||
|
|
Rinse aid indicator. It is always off while the programme operates. |
||
|
|
|
|
|
5. PROGRAMMES
Programme |
Degree of soil |
Programme pha- |
Options |
|||
|
Type of load |
ses |
|
|
||
|
|
|
|
|
|
|
1) |
• |
Normal soil |
• |
Prewash |
• |
Multitab |
• |
Crockery and |
• |
Wash 50 °C |
|
|
|
|
|
|
||||
|
|
cutlery |
• |
Rinses |
|
|
|
|
|
• |
Dry |
|
|
|
|
|
|
|
|
|
2) |
• |
All |
• |
Prewash |
• |
Multitab |
• |
Crockery, cut- |
• Wash from 45 °C |
|
|
||
|
|
|
||||
|
|
lery, pots and |
|
to 70 °C |
|
|
|
|
pans |
• |
Rinses |
|
|
|
|
|
• |
Dry |
|
|
|
|
|
|
|
|
|
|
• |
Heavy soil |
• |
Prewash |
• |
Multitab |
|
• |
Crockery, cut- |
• |
Wash 70 °C |
|
|
|
|
lery, pots and |
• |
Rinses |
|
|
|
|
pans |
• |
Dry |
|
|
|
|
|
|
|
|
|

ENGLISH 7
Programme |
Degree of soil |
Programme pha- |
Options |
||
|
Type of load |
ses |
|
||
|
|
|
|
|
|
3) |
• |
Fresh soil |
• |
Wash 60 °C or 65 |
• Multitab |
• |
Crockery and |
|
°C |
|
|
|
|
|
|||
|
|
cutlery |
• |
Rinses |
|
|
|
|
|
|
|
4) |
• |
All |
• |
Prewash |
|
|
|
|
|
|
|
1)With this programme you have the most efficient use of water and energy consumption for crockery and cutlery with normal soil. (This is the standard programme for test institutes).
2)The appliance senses the degree of soil and the quantity of items in the baskets . It automatically adjusts the temperature and the quantity of water, the energy consumption and the programme duration.
3)With this programme you can wash a load with fresh soil. It gives good washing results in a short time.
4)With this programme you can quickly rinse dishes to prevent remains of food to bond on dishes and odours to form in the appliance. Do not use detergent with this programme.
5.1 Consumption values
Programme 1) |
Water |
Energy |
Duration |
|
(l) |
(kWh) |
(min) |
|
|
|
|
|
9.5 |
0.889 |
225 |
|
|
|
|
|
6 - 11 |
0.5 - 1.2 |
40 - 140 |
|
|
|
|
|
11 - 13 |
1.0 - 1.2 |
130 - 150 |
|
|
|
|
|
8 |
0.8 |
30 |
|
|
|
|
|
4 |
0.1 |
14 |
1) The pressure and the temperature of the water, the variations of the mains supply, the options and the quantity of dishes can change the values.
5.2 Information for test institutes
For all the necessary information for test performance, send an email to:
info.test@dishwasher-production.com
6.SETTINGS
6.1Programme selection mode and user mode
When the appliance is in programme selection mode it is possible to set a programme and to enter the user mode.
In user mode, the following settings can be changed:
Write down the product number (PNC) that is on the rating plate.
•The level of the water softener according to the water hardness.
•The activation or the deactivation of the acoustic signal for end of programme.
•The deactivation of the rinse aid dispenser when you want to use the Multitab option without rinse aid.

8www.electrolux.com
These settings will be saved until you change them again.
How to set the programme selection mode
The appliance is in programme selection mode when only the indicator of the
programme 
 is on.
When you activate the appliance, usually it is in programme selection mode. However, if this does not happen, you can set the programme selection mode in the following way:
Press and hold simultaneously 

and  until the appliance is in programme selection mode.
Water hardness
6.2 The water softener
The water softener removes minerals from the water supply, which would have a detrimental effect on the washing results and on the appliance.
The higher the content of these minerals, the harder your water is. Water hardness is measured in equivalent scales.
The water softener should be adjusted according to the hardness of the water in your area. Your local water authority can advise you on the hardness of the water in your area. It is important to set the right level of the water softener to assure good washing results.
German de- |
French de- |
mmol/l |
Clarke de- |
Water softener |
grees (°dH) |
grees (°fH) |
|
grees |
level |
|
|
|
|
|
47 -50 |
84 - 90 |
8.4 - 9.0 |
58 - 63 |
10 |
|
|
|
|
|
43 - 46 |
76 - 83 |
7.6 - 8.3 |
53 - 57 |
9 |
|
|
|
|
|
37 - 42 |
65 - 75 |
6.5 - 7.5 |
46 - 52 |
8 |
|
|
|
|
|
29 - 36 |
51 - 64 |
5.1 - 6.4 |
36 - 45 |
7 |
|
|
|
|
|
23 - 28 |
40 - 50 |
4.0 - 5.0 |
28 - 35 |
6 |
|
|
|
|
|
19 - 22 |
33 - 39 |
3.3 - 3.9 |
23 - 27 |
5 1) |
|
|
|
|
|
15 - 18 |
26 - 32 |
2.6 - 3.2 |
18 - 22 |
4 |
|
|
|
|
|
11 - 14 |
19 - 25 |
1.9 - 2.5 |
13 - 17 |
3 |
|
|
|
|
|
4 - 10 |
7 - 18 |
0.7 - 1.8 |
5 - 12 |
2 |
|
|
|
|
|
<4 |
<7 |
<0.7 |
< 5 |
1 2) |
1)Factory setting.
2)Do not use salt at this level.
How to set the water softener level
The appliance must be in programme selection mode:
1.To enter the user mode, press and hold simultaneously 


 and
and
 until the indicators

 ,
, 


 and
and  start to flash.
2.Press 

 .
.
•The indicators 


 and
and  go off.
•The indicator 

 continues to flash.
•The indicator  starts to flash. The number of flashes indicates the level.
–E.g. 5 flashes + pause + 5 flashes = level 5.
3.Press 
 again and again to change the setting. Each time you
press 
 the level number increases. After level 10 you will start again from level by 1.
4.Press the on/off button to confirm the setting.
6.3 The rinse aid dispenser
The rinse aid helps to dry the dishes without streaks and stains.
The rinse aid is automatically released during the hot rinse phase.
Use of rinse aid and multi-tablets
When you activate the option Multitab, the rinse aid dispenser continues to release rinse aid. However you can deactivate the rinse aid dispenser. In this case the drying results may not be satisfactory.
With the rinse aid dispenser deactivated, the rinse aid indicator is always off.
How to deactivate the rinse aid dispenser
The appliance must be in programme selection mode.
1.To enter the user mode, press and hold simultaneously 
 and
and  until the indicators
 ,
, 
 and
and  start to flash.
2.Press 
 .
.
•The indicators 
 and
and  a go off.
•The indicator 
 continues to flash.
ENGLISH 9
•The end indicator indicates the current setting: End indicator on = rinse aid dispenser activated.
3.Press 
 to change the setting. End indicator off = rinse aid dispenser deactivated.
The rinse aid indicator goes off.
4.Press the on/off button to confirm the setting.
6.4 Acoustic signals
Acoustic signals sound when a malfunction of the appliance occurs. It is not possible to deactivate these acoustic signals.
There is also an acoustic signal that sounds when the programme is completed. By default this acoustic signal is deactivated but it is possible to activate it.
How to activate the acoustic signal for the end of programme
The appliance must be in programme selection mode.
1.To enter the user mode press and hold simultaneously 
 and
and  until the indicators
 ,
, 
 and
and  start to flash.
2.Press  .
.
•The indicators 
 and
and 
 go off.
•The indicator  continues to flash.
•The indicator  is off.
3.Press  to change the setting.
•The indicator  comes on. The acoustic signal for the end of programme is activated.
4.Press the on/off button to confirm the setting.

10www.electrolux.com
7.OPTIONS
Desired options must be activated every time before you start a programme. It is not possible to activate or deactivate options while a programme is running.
Not all options are compatible with each other. If you have selected non compatible options, the appliance will automatically deactivate one or more of them. Only the indicators of the options still active will stay on.
7.1 Multitab
Activate this option when you use multitablets that integrate the salt, rinse aid and
8.BEFORE FIRST USE
1.Make sure that the current level of the water softener agrees with the hardness of the water supply. If not, adjust the level of the water softener.
2.Fill the salt container.
3.Fill the rinse aid dispenser.
4.Open the water tap.
5.Start a programme to remove any processing residuals that can still be inside the appliance. Do not use detergent and do not load the baskets.
When you start a programme, the appliance can take up to 5 minutes to recharge the resin in the water softener. It seems that the appliance is not working. The washing phase starts only after this procedure is completed. The procedure will be repeated periodically.
8.1 The salt container
CAUTION!
Only use salt specifically designed for dishwashers.
The salt is used to recharge the resin in the water softener and to assure good washing results in the daily use.
detergent functions. They can also contain other cleaning or rinsing agents.
This option deactivates the release of salt. The salt indicator does not come on.
With the use of this option the programme duration is prolonged to increase the cleaning and drying results with the use of multi-tablets.
Multitab is not a permanent option and must be selected at every cycle.
How to activate Multitab
Press and hold simultaneously  and
and  until the indicator
  comes on.
How to fill the salt container
1.Turn the cap of the salt container counterclockwise and remove it.
2.Put 1 litre of water in the salt container (Only for the first time).
3.Fill the salt container with dishwasher salt.
4.Remove the salt around the opening of the salt container.
5.Turn the cap of the salt container clockwise to close the salt container.
Water and salt can come out from the salt container when you fill it. Risk of corrosion. To prevent it, after you fill the salt container, start a programme.
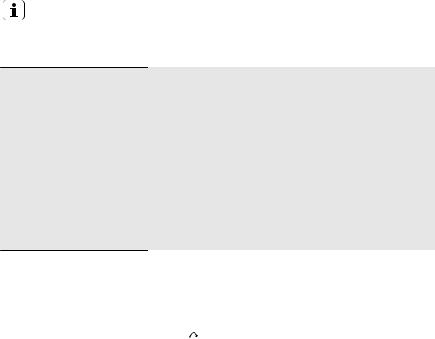
8.2 How to fill the rinse aid dispenser
A D |
B |
|
C |
9.DAILY USE
1.Open the water tap.
2.Press the on/off button to activate the appliance.
Make sure that the appliance is in user mode.
•If the salt indicator is on, fill the salt container.
•If the rinse aid indicator is on, fill the rinse aid dispenser.
3.Load the baskets.
4.Add the detergent. If you use multitablets, activate the option Multitab.
5.Set and start the correct programme for the type of load and the degree of soil.
ENGLISH 11
A B
M |
A |
X |
|
+4 |
3 |
21 |
|
|
|
- |
|
C
D
CAUTION!
Only use rinse aid specifically designed for dishwashers.
1.Press the release button (D) to open the lid (C).
2.Pour the rinse aid in the dispenser (A) until the liquid reaches the fill level 'max'.
3.Remove the spilled rinse aid with an absorbent cloth to prevent too much foam.
4.Close the lid. Make sure that the release button locks into position.
You can turn the selector of the released quantity (B) between position 1 (lowest quantity) and position 4 or 6 (highest quantity).
9.1 Using the detergent
D A |
B |
|
30 |
|
20 |
|
C |
12 |
www.electrolux.com |
|
|
|
A |
B |
D |
|
30 |
20 |
|
|
|
|
|
|
|
|
C |
1.Press the release button (B) to open the lid (C).
2.Put the detergent, in powder or tablets, in the compartment (A).
3.If the programme has a prewash phase, put a small quantity of detergent in the compartment (D).
4.Close the lid. Make sure that the release button locks into position.
9.2 Setting and starting a programme
The Auto Off function
This function decreases energy consumption by deactivating automatically the appliance when it is not operating.
The function comes into operation:
•5 minutes after the completion of the programme.
•After 5 minutes if the programme has not started.
Starting a programme
1.Keep the appliance door ajar.
2.Press the on/off button to activate the appliance. Make sure that the appliance is in programme selection mode.
3.Press the button related to the programme you want to start.
The related programme indicator comes on.
4.Close the appliance door to start the programme.
Starting a programme with delay start
1.Set a programme.
2.Press  again and again until the indicator related to the number of hours want to set comes on (3 or 6).
The delay indicator comes on.
3.Close the appliance door to start the countdown.
While a countdown is running it is possible to increase the delay time but not to change the selection of the programme.
When the countdown is completed, the programme starts.
Opening the door while the appliance operates
If you open the door while a programme is running, the appliance stops. When you close the door, the appliance continues from the point of interruption.
If the door is opened for more than 30 seconds during the drying phase, the running programme will end.
Cancelling the delay start while the countdown operates
When you cancel the delay start you have to set the programme and options again.
Press and hold simultaneously 

and  until the appliance is in programme selection mode.
Cancelling the programme
Press and hold simultaneously 

and  until the appliance is in programme selection mode.
Make sure that there is detergent in the detergent dispenser before you start a new programme.
End of the programme
When the programme is completed the
indicator  comes on. If you do not deactivate the appliance within 5 minutes all indicators goes off. This helps to decrease energy consumption.
10. HINTS AND TIPS
10.1 General
The following hints will ensure optimal cleaning and drying results in daily use and also help to protect the environment.
•Remove larger residues of food from the dishes into the waste bin.
•Do not pre-rinse dishes by hand. When needed, use the prewash programme (if available) or select a programme with a prewash phase.
•Always use the whole space of the baskets.
•When loading the appliance, make sure that the dishes can be completely reached and washed by the water released from the spray arm nozzles. Make sure that items do not touch or cover each other.
•You can use dishwasher detergent, rinse aid and salt separately or you can use the multi-tablets (e.g. ''3in1'', ''4in1'', ''All in 1''). Follow the instructions written on the packaging.
•Select the programme according to the type of load and degree of soil. With the ECO programme you have the most efficient use of water and energy consumption for crockery and cutlery with normal soil.
10.2 Using salt, rinse aid and detergent
•Only use salt, rinse aid and detergent for dishwasher. Other products can cause damage to the appliance.
•Multi-tablets are usually suitable in areas with a water hardness up to 21 °dH. In areas exceeding this limit, rinse aid and salt must be used in addition to the multi-tablets. However, in areas with hard and very hard water we recommend to use solo-detergent
ENGLISH 13
1.To deactivate the appliance press the on/off button or wait for the Auto Off function to automatically deactivate the appliance.
2.Close the water tap.
(powder, gel, tablets without additional functions), rinse aid and salt separately for optimal cleaning and drying results.
•If you use multi-tablets you can select the Multitab option (if available). This option increases the cleaning and drying results with the use of multitablets.
•Detergent tablets do not fully dissolve with short programmes. To prevent detergent residues on the tableware, we recommend that you use the tablets with long programmes.
•Do not use more than the correct quantity of detergent. Refer to the instructions on the detergent packaging.
10.3 What to do if you want to stop using multi-tablets
Before you start to use separately detergent, salt and rinse aid do the following procedure.
1.Set the highest level of the water softener.
2.Make sure that the salt and rinse aid containers are full.
3.Start the shortest programme with a rinsing phase. Do not add detergent and do not load the baskets.
4.When the programme is completed, adjust the water softener according to the water hardness in your area.
5.Adjust the released quantity of rinse aid.
10.4 Loading the baskets
•Only use the appliance to wash items that are dishwasher-safe.
•Do not put in the appliance items made of wood, horn, aluminium, pewter and copper.
14www.electrolux.com
•Do not put in the appliance items that can absorb water (sponges, household cloths).
•Remove remaining food from the items.
•Make soft the remaining burned food on the items.
•Put hollow items (cups, glasses and pans) with the opening down.
•Make sure that cutlery and dishes do not bond together. Mix spoons with other cutlery.
•Make sure that glasses do not touch other glasses.
•Put small items in the cutlery basket.
•Put light items in the upper basket. Make sure that the items do not move.
•Make sure that the spray arm can move freely before you start a programme.
10.5 Before starting a programme
Make sure that:
•The filters are clean and correctly installed.
11.CARE AND CLEANING
WARNING!
Before maintenance, deactivate the appliance and disconnect the mains plug from the main socket.
Dirty filters and clogged spay arms decrease the washing results. Make a check regularly and, if necessary, clean them.
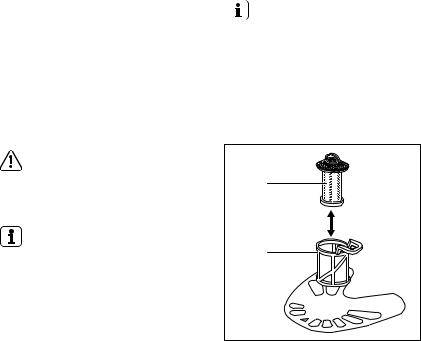
11.1 Cleaning the filters
The filter system is made of 3 parts.
•The cap of the salt container is tight.
•The spray arms are not clogged.
•There is dishwasher salt and rinse aid (unless you use combi detergent tablets).
•The position of the items in the baskets is correct.
•The programme is applicable for the type of load and for the degree of soil.
•The correct quantity of detergent is used.
10.6 Unloading the baskets
1.Let the tableware cool down before you remove it from the appliance. Hot items can be easily damaged.
2.First remove items from the lower basket, then from the upper basket.
At the end of the programme water can still remain on the sides and on the door of the appliance.
C
B
A


1.Turn the filter (B) counterclockwise and remove it.

ENGLISH 15
2. |
Remove the filter (C) out of filter (B). |
3. |
Remove the flat filter (A). |
4. |
Wash the filters. |
5.Make sure that there are no residues of food or soil in or around the edge of the sump.
6.Put back in place the flat filter (A). Make sure that it is correctly positioned under the 2 guides.
7.Reassemble the filters (B) and (C).
8.Put back the filter (B) in the flat filter (A). Turn it clockwise until it locks.
CAUTION!
An incorrect position of the filters can cause bad washing results and damage to the appliance.
11.2 Cleaning the spray arms
Do not remove the spray arms. If the holes in the spray arms are clogged, remove remaining parts of soil with a thin pointed object.
11.3 External cleaning
•Clean the appliance with a moist soft cloth.
•Only use neutral detergents.
•Do not use abrasive products, abrasive cleaning pads or solvents.
11.4 Internal cleaning
•Carefully clean the appliance, including the rubber gasket of the door, with a soft moist cloth.

16www.electrolux.com
•If you regularly use short duration programmes, these can leave deposits of grease and limescale inside the appliance. To prevent this, we
12. TROUBLESHOOTING
recommend to run long duration programmes at least 2 times per month.
If the appliance does not start or it stops during operation, before you contact an Authorised Service Centre, check if you can solve the problem by yourself with the help of the information in the table.
With some problems the end indicator flashes intermittently indicating a malfunction.
Problem and alarm code |
Possible solution |
|
|
|
|
You cannot activate the appliance. |
• |
Make sure that the mains plug is connected |
|
|
to the mains socket. |
|
• |
Make sure that there is no a damage fuse in |
|
|
the fuse box. |
The programme does not start.
•Make sure that the appliance door is closed.
•If the delay start is set, cancel the setting or wait for the end of the countdown.
•The appliance has started the procedure to recharge the resin inside the water softener. The duration of the procedure is approximately 5 minutes.
The appliance does not fill with water.
•The end indicator flashes 1 time intermittently.
•Acoustic signal sounds 1 time intermittently.
•Make sure that the water tap is open.
•Make sure that the pressure of the water supply is not too low. For this information, contact your local water authority.
•Make sure that the water tap is not clogged.
•Make sure that the filter in the inlet hose is not clogged.
•Make sure that the inlet hose has no kinks or bends.
The appliance does not drain the wa- |
• |
Make sure that the sink spigot is not clog- |
ter. |
|
ged. |
• The end indicator flashes 2 times |
• |
Make sure that the drain hose has no kinks |
intermittently. |
|
or bends. |
•Acoustic signal sounds 2 times intermittently.
The anti-flood device is on. |
• Close the water tap and contact an Author- |
• The end indicator flashes 3 times |
ised Service Centre. |
intermittently. |
|
•Acoustic signal sounds 3 times intermittently.
Once you have checked the appliance, deactivate and activate the appliance. If the problem occurs again, contact an Authorised Service Centre.
For alarm codes not described in the table, contact an Authorised Service Centre.
|
ENGLISH 17 |
12.1 The washing and drying results are not satisfactory |
|
|
|
Problem |
Possible solution |
|
|
There are whitish streaks or |
• The release quantity of rinse aid is too much. Adjust |
bluish layers on glasses and |
the rinse aid selector to a lower position. |
dishes. |
• The quantity of detergent is too much. |
|
|
There are stains and dry wa- |
• The released quantity of rinse aid is not sufficient. |
ter drops on glasses and |
Adjust the rinse aid selector to a higher position. |
dishes. |
• The quality of the rinse aid can be the cause. |
|
|
The dishes are wet. |
• The programme does not have a drying phase or |
|
has a drying phase with low temperature. |
|
• The rinse aid dispenser is empty. |
|
• The quality of the rinse aid can be the cause. |
|
• The quality of the multi-tablets can be the cause. Try |
|
a different brand or activate the rinse aid dispenser |
|
and use rinse aid and multi-tablets together. |
|
|
Refer to "Hints and tips" for other possible causes.
13. TECHNICAL INFORMATION
Dimensions |
Width / height / depth |
446 / 818-898 / 550 |
|
(mm) |
|
|
|
|
Electrical connection 1) |
Voltage (V) |
220-240 |
|
|
|
|
Frequency (Hz) |
50 |
|
|
|
Water supply pressure |
Min. / max. bar (MPa) |
0.5 (0.05) / 8 (0.8) |
|
|
|
Water supply |
Cold water or hot water 2) |
max 60 °C |
|
|
|
Capacity |
Place settings |
9 |
|
|
|
Power consumption |
Left-on mode (W) |
0.99 |
|
|
|
Power consumption |
Off-mode (W) |
0.10 |
1)Refer to the rating plate for other values.
2)f the hot water comes from alternative source of energy, (e.g. solar panels, aeolian energy), use the hot water supply to decrease energy consumption.
14.ENVIRONMENTAL CONCERNS
Recycle the materials with the symbol  . Put the packaging in applicable containers to recycle it. Help protect the environment and human health and to recycle waste of electrical and electronic appliances. Do not dispose appliances marked with the
symbol  with the household waste.
Return the product to your local recycling facility or contact your municipal office.

18 www.electrolux.com
TABLE DES MATIÈRES
1. |
CONSIGNES DE SÉCURITÉ.............................................................................. |
19 |
|
2. |
INSTRUCTIONS DE SÉCURITÉ......................................................................... |
20 |
|
3. |
DESCRIPTION DE L'APPAREIL......................................................................... |
22 |
|
4. |
BANDEAU DE COMMANDE.............................................................................. |
22 |
|
5. |
PROGRAMMES................................................................................................. |
23 |
|
6. |
RÉGLAGES....................................................................................................... |
24 |
|
7. |
OPTIONS........................................................................................................... |
27 |
|
8. |
AVANT LA PREMIÈRE UTILISATION.................................................................. |
27 |
|
9. |
UTILISATION QUOTIDIENNE............................................................................. |
28 |
|
10. |
CONSEILS....................................................................................................... |
30 |
|
11. |
ENTRETIEN ET NETTOYAGE.......................................................................... |
32 |
|
12. |
EN CAS D'ANOMALIE DE FONCTIONNEMENT.............................................. |
34 |
|
13. |
CARACTÉRISTIQUES TECHNIQUES............................................................... |
35 |
|
NOUS PENSONS À VOUS
Merci d'avoir choisi ce produit Electrolux. Avec ce produit, vous bénéficiez de dizaines d'années d'expérience professionnelle et d'innovation. Ingénieux et élégant, il a été conçu sur mesure pour vous. Grâce à cet appareil, vous savez que chaque utilisation vous apportera satisfaction.
Bienvenue chez Electrolux.
Visitez notre site Internet pour :
Obtenir des conseils d'utilisation, des brochures, de l'aide, des informations : www.electrolux.com
Enregistrez votre produit pour obtenir un meilleur service :
www.registerelectrolux.com
Acheter des accessoires, consommables et pièces de rechange d'origine pour votre appareil :
www.electrolux.com/shop
SERVICE APRÈS-VENTE
Utilisez toujours des pièces d'origine.
Avant de contacter le service, assurez-vous de disposer des informations suivantes : Modèle, PNC, numéro de série.
Vous trouverez ces informations sur la plaque signalétique.  Avertissement/Consignes de sécurité
 Informations générales et conseils
 Informations en matière de protection de l'environnement
Sous réserve de modifications.
FRANÇAIS 19
1.  CONSIGNES DE SÉCURITÉ
Avant d'installer et d'utiliser cet appareil, lisez soigneusement les instructions fournies. Le fabricant ne peut être tenu pour responsable des dommages et blessures liés à une mauvaise installation ou utilisation. Conservez toujours cette notice avec votre appareil pour vous y référer ultérieurement.
1.1 Consignes générales de sécurité
•Cet appareil est conçu uniquement pour un usage domestique et des situations telles que :
–bâtiments de ferme, cuisines réservées aux employés dans les magasins, bureaux et autres lieux de travail ;
–pour une utilisation privée, par les clients, dans des hôtels et autres lieux de séjour.
•Ne modifiez pas les caractéristiques de cet appareil.
•La pression de l'eau en fonctionnement (minimale et maximale) doit se situer entre 0.5 (0.05) / 8 (0.8) bar (Mpa)
•Respectez le nombre maximum de 9 couverts.
•Si le câble d'alimentation est endommagé, il doit être remplacé par le fabricant, son atelier d'entretien ou un technicien qualifié afin d'éviter tout danger.
•Placez les couteaux et les couverts avec des bouts pointus dans le panier à couverts avec les pointes tournées vers le bas ou en position horizontale.
•Ne laissez pas la porte de l'appareil ouverte sans surveillance pour éviter tout risque de chute.
•Avant toute opération d'entretien, éteignez l'appareil et débranchez la prise secteur.
•Ne pulvérisez pas d'eau ni de vapeur pour nettoyer l'appareil.
•L'appareil doit être raccordé au circuit d'eau à l'aide des tuyaux neufs fournis. N'utilisez pas de tuyaux provenant d'anciens appareils.

20www.electrolux.com
1.2Sécurité des enfants et des personnes vulnérables
•Cet appareil peut être utilisé par des enfants de plus de 8 ans, ainsi que des personnes dont les capacités physiques, sensorielles et mentales sont réduites ou dont les connaissances et l'expérience sont insuffisantes, à condition d'être surveillés ou d'avoir reçu des instructions concernant l'utilisation sécurisée de l'appareil et de comprendre les risques encourus.
•Ne laissez pas les enfants jouer avec l'appareil.
•Ne laissez pas les détergents à la portée des enfants.
•Tenez les enfants et les animaux éloignés de la porte de l'appareil lorsque celle-ci est ouverte.
•Les enfants ne doivent pas nettoyer ni entreprendre une opération de maintenance sur l'appareil sans surveillance.
2.INSTRUCTIONS DE SÉCURITÉ
2.1 Installation
•Retirez l'intégralité de l'emballage.
•N'installez pas et ne branchez pas un appareil endommagé.
•N'installez pas l'appareil ou ne l'utilisez pas dans un endroit où la température ambiante est inférieure à 0 °C.
•Suivez scrupuleusement les instructions d'installation fournies avec l'appareil.
•Vérifiez que l'appareil est installé sous et à proximité de structures sûres.
2.2 Branchement électrique
AVERTISSEMENT!
Risque d'incendie ou d'électrocution.
•L'appareil doit être relié à la terre.
•Vérifiez que les données électriques figurant sur la plaque signalétique correspondent à celles de votre réseau. Si ce n'est pas le cas, contactez un électricien.
•Utilisez toujours une prise antichoc correctement installée.
•N'utilisez pas d'adaptateurs multiprises ni de rallonges.
•Veillez à ne pas endommager la fiche secteur ni le câble d'alimentation. Le remplacement du cordon d'alimentation de l'appareil doit être effectué par notre service après-vente.
•Ne branchez la fiche d'alimentation à la prise de courant qu'à la fin de l'installation. Assurez-vous que la prise de courant est accessible une fois l'appareil installé.
•Ne tirez jamais sur le câble d'alimentation pour débrancher l'appareil. Tirez toujours sur la fiche.
•Cet appareil est conforme aux directives CEE.
•Pour le Royaume-Uni et l'Irlande uniquement. L'appareil est livré avec une fiche secteur de 13 ampères. Si vous devez changer le fusible de la fiche secteur, utilisez un fusible 13 A approuvé ASTA (BS 1362).
2.3 Raccordement à l'arrivée d'eau
•Veillez à ne pas endommager les tuyaux de circulation d'eau.
•Avant de brancher l'appareil à des tuyaux neufs ou n'ayant pas servi depuis longtemps, laissez couler l'eau jusqu'à ce qu'elle soit propre.
•Avant d'utiliser l'appareil pour la première fois, assurez-vous de l'absence de fuites.
•Le tuyau d'arrivée d'eau comporte une vanne de sécurité et une gaine avec un câble d'alimentation intérieur.
AVERTISSEMENT!
Tension dangereuse.
•Le tuyau d'arrivée d'eau dispose d'une gaine externe transparente. Si le tuyau est endommagé, l'eau s'y trouvant devient sombre.
•Si le tuyau d'arrivée d'eau est endommagé, débranchez immédiatement la fiche de la prise secteur. Contactez le service aprèsvente pour remplacer le tuyau d'arrivée d'eau.
2.4 Utilisation
•Ne montez pas sur la porte ouverte de votre appareil ; ne vous asseyez pas dessus.
FRANÇAIS 21
•Les produits de lavage pour lavevaisselle sont dangereux. Suivez les consignes de sécurité figurant sur l'emballage du produit de lavage.
•Ne buvez pas l'eau de l'appareil ; ne jouez pas avec.
•N'enlevez pas la vaisselle de l'appareil avant la fin du programme. Il peut rester du produit de lavage sur la vaisselle.
•De la vapeur chaude peut s'échapper de l'appareil si vous ouvrez la porte pendant le déroulement d'un programme.
•Ne placez pas de produits inflammables ou d'éléments imbibés de produits inflammables à l'intérieur ou à proximité de l'appareil, ni sur celui-ci.
2.5 Maintenance
•Contactez votre service après-vente pour faire réparer l'appareil. N'utilisez que des pièces de rechange d'origine.
•Avant de contacter le service, assurezvous de disposer des informations suivantes (qui se trouvent sur la plaque signalétique).
Modèle : PNC :
Numéro de série :
2.6 Mise au rebut
AVERTISSEMENT!
Risque de blessure ou d'asphyxie.
•Débranchez l'appareil de l'alimentation électrique.
•Coupez le câble d'alimentation et mettez-le au rebut.
•Retirez le dispositif de verrouillage de la porte pour empêcher les enfants et les animaux de s'enfermer dans l'appareil.
22www.electrolux.com
3.DESCRIPTION DE L'APPAREIL
1 2
11
10 |
9 |
8 |
7 |
6 |
5 |
4 |
3 |
Bras d'aspersion intermédiaire Bras d'aspersion inférieur Filtres
Plaque de calibrage Réservoir de sel régénérant Fente d'aération
Distributeur de liquide de rinçage Distributeur de produit de lavage Panier à couverts
Panier du bas Panier du haut
4. BANDEAU DE COMMANDE
1 |
|
|
2 |
|
|
|
|
3 |
|
|
|
4 |
|||||||||
|
|
|
|
|
|
|
|
|
|
|
|
|
|
|
|
|
|
|
|
|
|
|
|
|
|
|
|
|
|
|
|
|
|
|
|
|
|
|
|
|
|
|
|
|
|
|
|
|
|
|
|
|
|
|
|
|
|
|
|
|
|
|
|
|
|
|
Touche Marche/Arrêt |
|
Voyants |
|
|
|
|||
|
Touches de programme |
|
|
|
|
|
|
||
|
Touche Delay |
|
|
|
|
|
|
||
4.1 Voyants |
|
|
|
|
|
|
|
|
|
Voyant |
Description |
|
|
|
|
|
|
|
|
|
|
Voyant de fin. |
|
|
|
|
|
|
|
|
|
Voyant Multitab. |
|
|
|
|
|
|
|

FRANÇAIS 23
Voyant Description
Voyant du réservoir de sel régénérant. Ce voyant est toujours éteint pendant le déroulement du programme.
Voyant du réservoir de liquide de rinçage. Ce voyant est toujours éteint pendant le déroulement du programme.
5. PROGRAMMES
Programme |
Degré de salissure |
Phases du pro- |
Options |
|||
|
Type de vaisselle |
gramme |
|
|
||
|
|
|
|
|
|
|
1) |
• |
Normalement |
• |
Prélavage |
• |
Multitab |
|
sale |
• Lavage à 50 °C |
|
|
||
|
|
|
|
|||
|
• |
Vaisselle et cou- |
• |
Rinçages |
|
|
|
|
verts |
• |
Séchage |
|
|
|
|
|
|
|
|
|
2) |
• |
Tous |
• |
Prélavage |
• |
Multitab |
• |
Vaisselle, cou- |
• Lavage de 45 °C |
|
|
||
|
|
|
||||
|
|
verts, plats et |
|
à 70 °C |
|
|
|
|
casseroles |
• |
Rinçages |
|
|
|
|
|
• |
Séchage |
|
|
|
|
|
|
|
|
|
|
• |
Très sale |
• |
Prélavage |
• |
Multitab |
|
• |
Vaisselle, cou- |
• Lavage à 70 °C |
|
|
|
|
|
verts, plats et |
• |
Rinçages |
|
|
|
|
casseroles |
• |
Séchage |
|
|
|
|
|
|
|
|
|
3) |
• |
Vaisselle fraîche- |
• |
Lavage de 60 °C |
• |
Multitab |
|
ment salie |
|
à 65 °C |
|
|
|
|
|
|
|
|
||
|
• |
Vaisselle et cou- |
• |
Rinçages |
|
|
|
|
verts |
|
|
|
|
|
|
|
|
|
|
|
4) |
• |
Tous |
• |
Prélavage |
|
|
|
|
|
|
|
|
|
1)Ce programme vous permet d'optimiser votre consommation d'eau et d'énergie pour la vaisselle et les couverts normalement sales. (Il s'agit du programme standard pour les instituts de tests.)
2)L'appareil détecte le degré de salissure et la quantité de vaisselle dans les paniers. Il règle automatiquement la température ainsi que le volume d'eau, la consommation d'énergie et la durée du programme.
3)Ce programme permet de laver une charge de vaisselle fraîchement salie. Il offre de bons résultats de lavage en peu de temps.
4)Avec ce programme, vous pouvez rincez rapidement les plats pour éviter aux résidus alimentaires d'accrocher aux plats, et aux odeurs d'envahir l'appareil N'utilisez pas de produit de lavage avec ce programme.
Loading...