


EVEP916
EFEP955
EFEP915
90cm Cooker |
Installation & User manual |

2 electrolux.com.au
CONGRATULATIONS
Thank you for purchasing an Electrolux cooker. You’ve chosen a product that brings with it decades of professional experience and innovation. Ingenious and stylish, it has been designed with you in mind. So whenever you use it, you can be safe in the knowledge that you’ll get great results every time.
Welcome to Electrolux.
BEFORE USING YOUR APPLIANCE
Check for any damage or marks. If you find the appliance damaged or marked you must report it within 7 days to claim for damages under the manufacturers warranty.
Before you use the appliance, we recommend that you read through the whole user manual which provides the description of the product and its functions.
To avoid the risks that are always present when you use a gas appliance, it is important that the product is installed correctly and that you read the safety instructions carefully to avoid misuse and hazards.
For future reference, please store this booklet in a safe place.
This appliance complies with the requirements of Australian Standard AS/NZS 60335.2.6.
CONDITIONS OF USE
This appliance is intended to be used in household and similar applications such as:
•Staff kitchen areas in shops, offices and other working environments
•Farm houses
•By clients in hotel/motel rooms and other residential type environments
•Bed and breakfast type environments
BEFORE YOU CALL
Please ensure you read the instruction manual fully before you call for service, or a full service fee could be applicable.
RECORD MODEL AND SERIAL
NUMBER HERE:
Model number:_____________________________________
Serial number:______________________________________
CONTENTS
General warnings______________________________ 3
Important safety instructions____________________ 4
EVEP916 components_ ________________________ 5 EFEP955 components__________________________ 6 EFEP915 components__________________________ 7
Before using your appliance____________________ 8 Before using your appliance – gas hob model____ 11 Using the oven_______________________________ 12
Steam assisted cooking_ __________________ 16 Using the food probe______________________ 17 Oven cooking functions____________________ 20 Oven baking guide________________________ 22 Steam cooking___________________________ 23 Oven cooking guide_______________________ 24 Dealing with cooking problems_____________ 25 Oven cooking tips________________________ 26 Oven troubleshooting_____________________ 27
Using the induction hob_______________________ 28
Induction hob troubleshooting______________ 34
Using the gas hob____________________________ 36
Gas hob troubleshooting___________________ 37
Cleaning your appliance_______________________ 38
Cleaning oven accessories____________________ 40
Installation of EFEP955 & EFEP915_____________ 42 Installation of EVEP916________________________ 47
Wiring requirements_______________________ 49 Electrical and gas connections______________ 50 LPG conversion model EFEP915____________ 51 Testing the operation of the gas cooker_ _____ 52
Warranty____________________________________ 53
Notes_______________________________________ 54
Important Information that may impact your Manufacturer’s Warranty
Adherence to the directions for use in this manual is extremely important for health and safety. Failure to strictly adhere to the requirements in this manual may result in personal injury, property damage and affect your ability to make a claim under the Westinghouse manufacturer’s warranty provided with your product. Products must be used, installed and operated in accordance with this manual. You may not be able to claim on the Westinghouse manufacturer’s warranty in the event that your product fault is due to failure to adhere this manual.
GENERAL WARNINGS
Please read the user manual carefully and store in a handy place for later reference. Pass the user manual on to possible new owners of the appliance.
Read the following carefully to avoid damage or injury.
NOTE: You must read these warnings carefully before installing or using the appliance. If you need assistance, contact your Customer Care Department. The manufacturer will not accept liability, should these
instructions or any other safety instructions incorporated in this book be ignored.
SYMBOLS
 WARNING!
This symbol indicates information concerning your personal safety.
 CAUTION!
This symbol indicates information on how to avoid damaging the appliance.
 IMPORTANT!
This symbol indicates tips and information about use of the appliance.
 ENVIRONMENT!
This symbol indicates tips and information about economical and ecological use of the appliance.
 WARNING!
•This appliance must not be used as a space heater.
•In order to avoid fire, the appliance must be kept clean and vents kept unobstructed.
•Do not spray aerosols in the vicinity of this appliance whilst it is in operation.
•Do not use or store flammable materials in this appliance storage compartment or near this appliance.
•Do not line the bottom of the oven with foil or cookware.
•Always use gloves when handling hot items inside the oven.
•Always turn the grill off immediately after use as fat left behind may catch fire.
•Do not hang any objects from the hob as it may block the air vents.
•Do not modify this appliance.
•To maintain safe operation, it is recommended that the product be inspected every 5 years by an authorised service person.
3
•Do not install an aftermarket lid or cover over this appliance.
•The appliance must be earthed.
•Switch the appliance off at the isolation switch before attempting to change the light globe.
•The cooking process must be supervised.
A short term cooking process must be supervised continuously.
 CAUTION!
Read the following carefully to avoid an electric shock or fire.
It is important to use your appliance safely. Check these safety points before using your appliance.
Installation, cleaning and servicing
•An authorised person must install this appliance. (Certificate of Compliance to be retained).
•Before using the appliance, ensure that all packing materials are removed from the appliance.
•In order to avoid any potential hazard, the enclosed installation instructions must be followed.
•Ensure that all specified vents, openings and airspaces are not blocked.
•Where the appliance is built into a cabinet, the cabinet material must be capable of withstanding 85°C.
•Only authorised personnel should carry out servicing. (Certificate of Compliance to be retained).
•Always ensure the appliance is switched off before cleaning or replacing parts.
•Do not use steam cleaners, as this may cause moisture build up.
•Always clean the appliance immediately after any food spillage.
•This appliance must be earthed.
•Due to the weight (freestanding 95-100kg, built in 70kg) and size of cookers, 2 persons are required to manually manoeuvre them. Remove loose items such as trivets, oven racks and trays to minimise weight.
•Do not use the oven door handle to lift the cooker, instead open the oven door and lift the roof of the oven cavity.
•Take care when lifting to avoid any sharp edges not intended for lifting.
4 electrolux.com.au
IMPORTANT SAFETY INSTRUCTIONS
INFORMATION ON DISPOSAL FOR USERS
 ENVIRONMENT!
•Most of the packaging materials are recyclable. Please dispose of these materials through your local recycling depot or by placing them in appropriate collection containers.
•If you wish to discard this product, please contact your local authorities and ask for the correct method of disposal.
 WARNING!
OVEN
•During use the appliance becomes hot. Care should be taken to avoid touching the hot surfaces inside the oven.
•Always use gloves when handling hot items inside the oven.
•Switch the appliance off before removing the oven light glass for globe replacement.
•To avoid an accident, ensure that oven shelves and fittings are always inserted into the appliance in accordance with the instructions.
•Do not use the door as a shelf.
•Do not push down on the open oven door.
•Do not cover the grill insert with foil, as fat left there may catch fire.
•Always keep the grill dish clean as any fat there may catch fire.
•Always turn the grill off immediately after use, as fat left there may catch fire.
•Do not leave the grill on unattended.
•To avoid a fire, ensure the grill tray and fittings are always inserted into the appliance in accordance with the instructions.
GAS HOB MODEL
•Do not allow pots to boil dry, as damage to both pan and hob may result.
•Do not operate the cooktop for an extended period of time without a pot or pan on the burner.
•Do not allow large cookware to overhang the hob onto the adjacent benchtop. This will cause scorching to the benchtop surface.
•Ensure burner bodies and trivets are properly located.
•Unattended cooking with oil or fat on a hob can be dangerous and result in fire.
•In order to avoid a fire do not store items on the cooking surface.
INDUCTION HOB MODEL
•In order to avoid a fire do not store items on the cooking surface.
•Do not place heat resistant mats, wire mats or aluminium foil under pots and pans.
•Do not allow pots to boil dry, as damage to both pan and hob may result.
•Do not use the hob as extra bench space or as a cutting board.
•Do not allow large cookware to overhang the hob onto the adjacent benchtop. This will cause scorching to the benchtop surface.
•Do not slide pans across the surface of the ceramic glass as it could result in scratching of the surface.
•The induction hob is not intended to be operated by means of an external timer or separate remotecontrol system.
•Use only induction specific cookware.
•If the hob surface is cracked, switched off the appliance to avoid the possibility of electric shock.
•Metallic objects such as knives, forks, spoons and lids should not be placed on the hob surface since they can get hot.
•After use, switch off the hob element by its control and do not rely on automatic switch off.
•Unattended cooking with oil or fat on a hob can be dangerous and result in fire.
•The appliance is not intended to be operated by means of an external timer or remote control system.
•Users with an implanted pacemaker must keep their upper body minimum 30cm from induction cooking zones that are switched on.
 WARNING!
CHILD SAFETY
•This appliance is not intended for use by persons (including children) with reduced physical, sensory or mental capabilities, or lack of experience and knowledge, unless they have been given supervision or instruction concerning use of the appliance by a person responsible for their safety.
•Children should be supervised to ensure that they do not play with the appliance.
•During use this appliance becomes hot. Care should be taken to avoid touching hot surfaces, eg. Oven door, heating elements, hobs or trivets.
•Accessible parts will also become hot when in use. To avoid burns and scalds children should be kept away.
•Always turn pan handles to the side or rear to prevent accidental knocking and to keep out of reach of children.
5
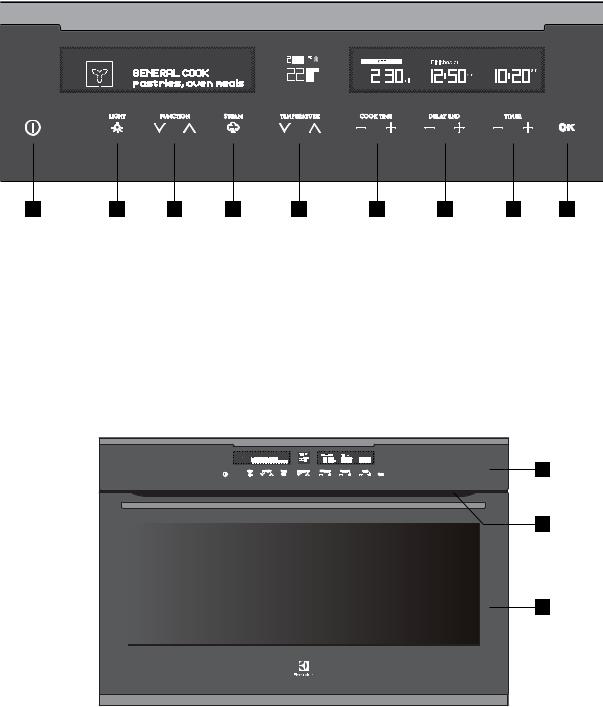
EVEP916 COMPONENTS
Multi function electric oven and programmable controller
|
10 |
|
|
11 |
|
|
12 |
|
13 |
|
14 |
|
|||||
|
|
|
|
|
|
|
|
|
|
|
|
|
|
|
|
|
|
|
|
|
|
|
|
|
|
|
|
|
|
|
|
|
|
|
|
|
|
|
|
|
|
|
|
|
|
|
|
|
|
|
|
|
|
|
|
|
|
|
|
|
|
|
|
|
|
|
|
|
|
|
|
|
|
|
|
|
|
|
|
|
|
|
|
|
|
|
|
|
|
1 2 3 4 5 6 7 8 9
1 |
ON/OFF |
6 |
Cook time control |
11 |
|
|
Temperature display |
|
|
Light on/off |
|
Delay end control |
|
|
|
|
Cook time display |
2 |
7 |
|
12 |
|||||
|
Cooking function selector |
|
Set clock and timer control |
|
|
|
Delay end display |
|
3 |
8 |
13 |
|
|||||
|
Steam cooking option |
|
Instant confirm |
|
|
|
Clock/timer display |
|
4 |
9 |
14 |
|
|
||||
|
Temperature control |
|
Cooking function display |
|
|
|
|
|
5 |
10 |
|
|
|
|
|||
15
16
17
15 |
Control panel (see above) |
16 |
Exhaust air outlet |
17 |
Quadruple glazed door |

6 |
electrolux.com.au |
7 |
EFEP955 COMPONENTS
Induction hob, multi function electric oven and programmable controller
|
10 |
|
|
11 |
|
|
12 |
|
13 |
|
14 |
|
|||||
|
|
|
|
|
|
|
|
|
|
|
|
|
|
|
|
|
|
|
|
|
|
|
|
|
|
|
|
|
|
|
|
|
|
|
|
|
|
|
|
|
|
|
|
|
|
|
|
|
|
|
|
|
|
|
|
|
|
|
|
|
|
|
|
|
|
|
|
|
|
|
|
|
|
|
|
|
|
|
|
|
|
|
|
|
|
|
|
|
|
|
1 |
|
2 |
|
3 |
|
|
4 |
|
5 |
|
6 |
|
|
|
7 |
|
8 |
|
9 |
|||
|
|
ON/OFF |
|
|
|
|
|
Cook time control |
|
|
|
|
|
|
Temperature display |
|
|||||||
1 |
|
|
|
6 |
|
|
|
|
11 |
|
|||||||||||||
|
|
Light on/off |
|
|
|
|
|
Delay end control |
|
|
|
|
|
|
Cook time display |
|
|||||||
2 |
|
|
|
7 |
|
|
|
|
12 |
|
|||||||||||||
|
|
Cooking function selector |
|
|
|
Set clock and timer control |
|
|
|
|
Delay end display |
|
|||||||||||
3 |
|
8 |
|
|
13 |
|
|
||||||||||||||||
|
|
Steam cooking option |
|
|
|
|
|
Instant confirm |
|
|
|
|
|
|
Clock/timer display |
|
|||||||
4 |
|
|
|
9 |
|
|
|
|
14 |
|
|
|
|||||||||||
|
|
Temperature control |
|
|
|
|
|
Cooking function display |
|
|
|
|
|
|
|
|
|
||||||
5 |
|
|
|
10 |
|
|
|
|
|
|
|
|
|
|
|
||||||||
15
16
17
18
19
20
|
|
|
|
|
|
|
|
|
|
|
|
|
|
Induction hob |
|
Exhaust air outlet |
|
|
|
Storage compartment |
|||
15 |
17 |
19 |
|||||||||
|
|
Control panel (see above) |
|
|
Quadruple glazed door |
|
|
|
Kick panel |
||
16 |
|
|
18 |
20 |
|||||||
EFEP915 COMPONENTS
Gas hob, multi function electric oven and programmable controller
|
10 |
|
|
11 |
|
|
12 |
|
13 |
|
14 |
|
|||||
|
|
|
|
|
|
|
|
|
|
|
|
|
|
|
|
|
|
|
|
|
|
|
|
|
|
|
|
|
|
|
|
|
|
|
|
|
|
|
|
|
|
|
|
|
|
|
|
|
|
|
|
|
|
|
|
|
|
|
|
|
|
|
|
|
|
|
|
|
|
|
|
|
|
|
|
|
|
|
|
|
|
|
|
|
|
|
|
|
|
1 |
2 |
3 |
4 |
5 |
6 |
|
|
7 |
8 |
9 |
1 |
ON/OFF |
|
6 |
Cook time control |
|
|
11 |
Temperature display |
|
|
2 |
Light on/off |
|
7 |
Delay end control |
|
|
12 |
Cook time display |
|
|
3 |
Cooking function selector |
8 |
Set clock and timer control |
|
13 |
Delay end display |
|
|||
4 |
Steam cooking option |
|
9 |
Instant confirm |
|
|
14 |
Clock/timer display |
|
|
5 |
Temperature control |
|
10 |
Cooking function display |
|
|
|
|
|
|
|
|
15 |
16 |
|
17 |
18 |
19 |
|
|
|
|
|
|
|
|
|
|
|
|
20 |
|
|
|
|
|
|
|
|
|
|
21 |
|
22
23
24
25
|
|
|
|
|
|
|
Rapid burner control |
|
|
Quadruple glazed door |
|
|
|
|
|
|
|
|
|
|
|||
15 |
|
Semi rapid burner control |
19 |
23 |
|||||||
|
|
|
|
||||||||
|
|
|
|
|
|
Gas hob |
|
|
Storage door |
||
|
|
Auxiliary burner control |
|
20 |
24 |
||||||
16 |
|||||||||||
|
|
|
|
|
|||||||
|
|
|
|
|
|
Control panel (see above) |
|
|
Kick panel |
||
|
|
Wok burner control |
|
21 |
25 |
||||||
17 |
|||||||||||
|
|
|
|
|
|
Exhaust air outlet |
|
|
|
||
|
|
Semi rapid burner control |
|
22 |
|
|
|
||||
18 |
|
|
|
|
|||||||
|
|
|
|
|
|
||||||

8 electrolux.com.au
BEFORE USING THE APPLIANCE
Preparing the appliance
1.Please remove all stickers, leaflets and boxes from the door and from the floor of the oven before operation.
2.Please wipe out the oven interior prior to operation with warm soapy water and polish dry with a soft clean cloth. Do not close the oven door until the oven is completely dry.
3.Do not line the oven with foil. It will damage the enamel.
Setting the time
The time of day must be set before the appliance can operate.
After the appliance has been electrically connected “Set Clock” will illuminate under the clock display and the Hour digits will flash.
1.Use the timer + and - to set the hour portion of the current time (including AM/PM).
2.Press OK when the hours are set correctly. The Minute digits will flash.
3.Use the timer + and - to set the minutes portion of the current time.
4.Press OK when the minutes are set correctly. You can turn off the oven or it will do so after 8 seconds. Once the time has been entered, the clock advances minute by minute.
 IMPORTANT!
•The clock will remember the time for 24 hours without power.
•The display has 2 levels of brightness.
•Brightest illumination: whenever the oven is in use.
•Medium illumination: whenever the oven is not in use.
 IMPORTANT!
New appliances can have a smell during first use. It is recommended to ‘run in’ the oven before you cook for the first time. Operate the oven, empty, at a temperature of 180ºC for approximately 1 hour. Please ensure the room is well ventilated during this process.
9
BEFORE USING THE APPLIANCE (CONTINUED)
Slides (Telescopic runners) |
Installing the side racks |
1.The oven is supplied with a set of slides and instructions on how to assemble. Ensure the rack and slides are of the same hand. E.g. left hand slide should be fitted on the left hand rack.
2.The instructions also show recommended slide positions on the rack.
Installing the slides (telescopic runners)
1.Obtain left hand side rack and left hand slide – see image to identify.
L = Left hand side
R = Right hand side
2.The shaded wires indicate the wire the slide can be mounted on. Fit slide rear clips to the rear of wire at an angle as shown below.
1 |
2 |
|
3.Push slide front clip over wire until secured.
 3
3
CLICK!
1.Insert the rear peg into the rear access hole provided, ensuring peg is fully inserted.
2.Then locate the front peg into the front access hole and push in firmly.
Fitting the shelves and grill dish carrier between the side rack wires
The shelves are designed so that they have maximum extension but cannot be accidentally pulled right out. The grill dish carrier is designed the same way and can slot straight into the side racks.
To fit a shelf or grill dish carrier to side racks:
1.Locate the rear edge of the shelf/carrier in between guide rails of the side rack - see diagram.
2.Ensure the same rail positions on both sides of the oven are being engaged. With the front edge raised, begin to slide the shelf into the oven.
3.Once the detents have passed the front edge of the side rack, the shelf can be pushed completely in. When fully inserted the shelf/carrier should not interfere with the closed oven door.

10 electrolux.com.au
Positioning the dishes on the grill dish carrier
Fitting the shelves and grill dish carrier onto telescopic slides
To fit a shelf or grill dish carrier to telescopic slides:
1.With the slides fully pushed in, push the shelf/carrier along the top of the slide until it hits the back post.
2.Drop the front of the shelf/carrier ensuring it sits behind the front post of the slide (see illustration). When fully inserted the shelf/carrier should not interfere with the closed oven door.
11
BEFORE USING THE APPLIANCE - GAS HOB MODEL
Installing the trivets |
2. |
Position the middle trivet ensuring the trivet fingers |
|||||||||||
1. Position the 2 side trivets onto the hob first, ensuring |
|
|
|
are aligned with the side trivet fingers. |
|||||||||
|
|
|
|
|
|
|
|
|
|
||||
the 2 corner location recesses are to the back of the |
3. |
The wok support sits on top of the trivet above the |
|||||||||||
hob. |
|
|
|
wok burner. |
|
|
|
||||||
|
|
|
|
|
|
|
|
|
|
|
|
|
|
|
1 |
|
2 |
|
|
3 |
|
4 |
|
||||
|
|
|
|
|
|
|
|
|
|
|
|
|
|
|
|
|
|
|
|
|
|
|
|
|
|
|
|
|
|
|
|
|
|
|
|
|
|
|
|
|
|
|
|
|
|
|
|
|
|
|
|
|
|
|
|
5 |
|
|
|
|
|
|
|
|
|
|
|
|
|
|
|
|
|
|
|
|
12 |
||
|
|
|
|
|
|
|
|
|
|
|
|
|
|
|
|
|
|
|
|
|
|
||
|
|
|
|
|
|
|
|
|
|
|
|
|
|
|
|
|
|
|
|
|
|
|
|
|
|
|
|
|
|
|
|
|
|
|
|
|
|
|
|
|
|
|
|
|
|||
6 |
|
|
|
|
|
|
|
|
|
|
|
|
|
|
|
|
|
|
|
|
|
|
13 |
|
|
|
|
|
|
|
|
|
|
|
|
|
|
|
|
|
|
|
|
|
|
||
|
|
|
|
|
|
|
|
|
|
|
|
|
|
|
|
|
|
|
|
|
|
||
|
|
|
|
|
|
|
|
|
|
|
|
|
|
|
|
|
|
|
|
|
|
|
|
|
|
|
|
|
|
|
|
|
|
|
|
|
|
|
|
|
|
|
14 |
||||
|
|
|
|
|
|
|
|
|
|
|
|
|
|
|
|
|
|
|
|
|
|
|
|
|
|
|
|
|
|
|
|
|
|
|
|
|
|
|
|
|
|
|
|
|
|
|
|
7 |
|
|
|
|
|
|
|
|
|
|
|
|
|
|
|
|
|
|
|
|
|
|
|
|
|
|
|
|
|
|
|
|
|
|
|
|
|
|
|
|
|
|
|
|
|
|
|
|
|
|
|
|
|
|
|
|
|
|
|
|
|
|
|
|
|
|
|
|
|
15 |
|
|
|
|
|
|
|
|
|
|
|
|
|
|
|
|
|
|
|
|
|
|
|
||
|
|
|
|
|
|
|
|
|
|
|
|
|
|
|
|
|
|
|
|
|
|
|
|
|
|
|
|
|
|
|
|
|
|
|
|
|
|
|
10 |
|
11 |
|
|
|
|||
|
|
|
|
|
|
|
8 |
|
9 |
|
|
|
|
|
|
|
|
|
|||||
|
|
|
Side trivet |
|
|
|
Standard burner cup |
|
Wok burner inner cap |
||||||||||||||
|
|
1 |
|
|
7 |
12 |
|||||||||||||||||
|
|
Wok support |
|
Standard burner spark plug |
|
Wok burner outer cap |
|||||||||||||||||
|
|
2 |
8 |
13 |
|||||||||||||||||||
|
|
Middle trivet |
|
Standard burner flame |
|
Wok burner crown |
|||||||||||||||||
|
|
3 |
9 |
14 |
|||||||||||||||||||
|
|
|
Side trivet |
|
|
|
safeguard sensor |
|
Wok burner body |
||||||||||||||
|
|
4 |
|
|
|
15 |
|||||||||||||||||
|
|
|
|
|
|
||||||||||||||||||
|
|
|
Standard burner cap |
10 |
Wok burner flame safeguard sensor |
|
|
|
|
|
|
|
|
|
|
|
|||||||
|
|
5 |
|
|
|
|
|
|
|
|
|
|
|
||||||||||
|
|
|
Wok burner spark plug |
|
|
|
|
|
|
|
|
|
|
|
|||||||||
|
|
|
|
|
|
|
|
|
|
|
|
|
|
|
|
|
|
|
|
|
|
|
|
|
|
|
Standard burner crown |
11 |
|
|
|
|
|
|
|
|
|
|
|
||||||||
|
|
6 |
|
|
|
|
|
|
|
|
|
|
|
||||||||||
|
|
|
|
|
|
|
|
|
|
|
|
|
|
|
|||||||||
Installing the standard burners
1.The burner crown must be fitted correctly onto the burner cup or damage will occur during operation.
2.To do this, align the outer hole and outer recess of the burner crown around the spark plug and flame safeguard sensor. Drop down ensuring the location ribs on the bottom of the crown drop into the location recesses.
3.Burner cap and burner crown must be clean and located correctly for the burner to light.
Installing the wok burners
1.The wok burner crowns must also be fitted correctly onto the wok burner cups.
2.To do this, align the sausage shaped cutouts on the burner crown with the sausage shaped cutouts on the burner body. Drop down ensuring the centre location pin of the crown has dropped into the corresponding recess in the body.
3.The 2 burner caps are simply positioned over the top of the burner crown.
NOTE: When the burners are correctly fitted they will sit level on the hob.

12 electrolux.com.au
USING THE OVEN
Turning the oven on
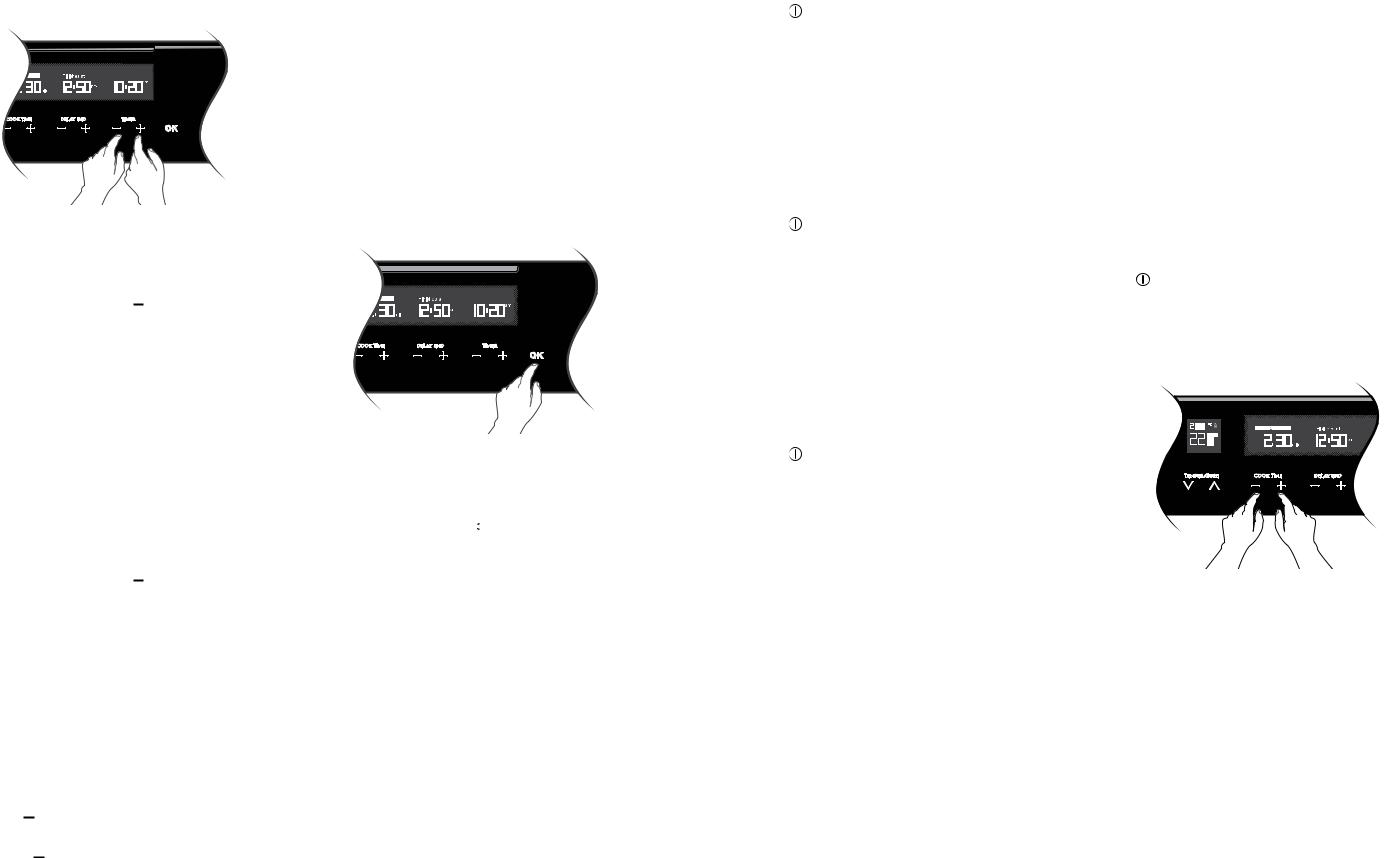
•Switch on the oven by touching the  ON/OFF symbol. The LCD control panel will come on and inform you that you need to select a cooking function.
•If you do not select a function within 20 seconds the oven will turn off.
Select a cooking function
Your oven will have a selection of functions. Press the function  or function
  symbols as many times as necessary until the desired function appears.
Cooking suggestions will appear under the function name and suggested cooking temperatures will appear above the temperature selector.
If no other symbol is touched within 8 seconds the oven will switch on and begin to heat up to the displayed temperature.
Selecting a temperature
The temperature is electronically controlled.
The temperature can be selected within the range of 30ºC to 250ºC and can be adjusted at any time. To set the temperature, press the temperature  and temperature
  symbols to reach the desired setting.
Press OK, or if no further changes are made within 8 seconds the oven begins to heat up to the set temperature. The current oven temperature will appear above set temperature.
When the temperature is reached, “Set temperature reached” will appear, only the target temperature will be displayed.
Turning the oven off
Touch the  ‘ON/OFF’ symbol to switch off the oven.
 IMPORTANT!
Pre-heating
Pre-heating your oven is recommended in several cooking and grilling functions. Pre-heating your appliance allows it to reach the required temperature quickly and efficiently as well as cook your food at the correct temperature for the entire cook time.
These models are equipped with a built-in rapid heat-up that activates each time you start an oven function. During the rapid heat-up phase the heat comes from the element surrounding the fan as well as the grill elements above the food. This combination will heat up your oven 30% quicker than it would on standard “Bake”. The oven will automatically revert to the set cooking function once the preset temperature is reached.
Cooling / Vent fan
The appliance is fitted with a cooling fan. This prevents the kitchen cabinet from overheating and reduces the condensation inside the oven. It will operate whenever the oven is in use and blow warm air across the top of the oven door.
NOTE: If the oven is still hot from cooking, the cooling fan will keep running to cool the oven down and will switch off by itself once cool.
Condensation
Excess condensation may fog the oven door. This may happen when cooking large quantities of food from a cold start. Minimise condensation by:
Keeping the amount of water used whilst cooking to a minimum.
Making sure the oven door is firmly closed.
Baking custard in a baking dish that is slightly smaller than the water container.
Cooking casseroles with the lid on.
NOTE: If using water in cooking, this will turn to steam and may condense outside your appliance. This is not a
USING THE OVEN (CONTINUED)
problem or fault with your oven.
Cooking with the timer
Your oven is equipped with a programmable controller that can be used to turn the oven on and off automatically. The ‘cook time’ controls are used to automatically turn the oven off after a set amount of time. The ‘Delay End’ controls are used to set the time of day that you want the cooking cycle to finish at.
Setting the cook time
1.Select the desired oven function and cooking temperature.
2.Touch the cook time  symbol as often as necessary (or hold), until the desired cook time has been set.
3.Press ‘OK’ or after 8 seconds from the last time adjustment the oven will start cooking and the ‘cook time’ display will countdown to zero.
4.The oven will turn off and beep when the ‘cook time’ display reaches zero.
 IMPORTANT!
•When you use the ‘cook time’ function, the ‘Finishes at’ display activates and tells you what time of day the oven will turn off (based on the set cook time).
•During cooking, you can adjust the cook time with
the Cook time or  symbols.
•When the cook time has elapsed, an audible signal will sound for two minutes, the oven will switch off and COOKING FINISHED will be displayed.
•To stop the audible signal, press any of the symbols on the control panel.
•If you wish to cook a bit longer, press the cook time  symbol for each additional minute you require. The oven automatically reverts to the function and temperature previously programmed. This feature is available for 5 minutes after cooking has finished. After that, the oven automatically switches off.
13
Setting the delay end time
The delay end function can be used to switch the oven on and off at a specific time during the day.
1.Check the clock displays the correct time of day.
2.Select the desired oven function and cooking temperature.
3.Set the required cook time.
4.Press the ‘delay end’ symbol  to move the end time.
5.Touch ‘OK’ or after 8 seconds from the last time adjustment the SET icon will light and your oven is now programmed. The oven will start its cooking cycle to finish at the set ‘end time’.
6.When the oven has finished cooking, cook time can be extended or the beeper turned off just as in ‘cook time’ mode.
7.Touch the ‘delay end’  symbol to move the end time forward.
8.Touch ‘OK’ or after 8 seconds from the last time adjustment the SET icon will light and the oven is now programmed.
The oven will commence its cooking cycle to finish at the set ‘end time’.
 IMPORTANT!
•30 seconds after a cooking function has started, it is no longer possible to delay the start time.
•In order to delay a cooking function that has already started, the oven needs to be switched off then switched on again and re-programmed.
•Even though the heating element turns off, the oven will still retain substantial heat. This will continue to cook food until it is removed or the oven cools down. If you do not plan on being present when the oven turns off, you should take this extra heating time
into account.
14 electrolux.com.au
USING THE OVEN (CONTINUED)
Timers
The appliance has two timers which can be used one at a time. The count up timer can be used to measure a period of time. The count down timer beeps at the end of a preset time.
Setting the count up timer
The timer can be used independently of the oven for measuring a count up period. There is no alert provided with this timer.
1. Touch either ‘timer’  or .
or .
2.00min will be displayed along with a bell and the up arrow will flash.
3.To begin the count up timer press OK or wait 8 seconds.
4. |
To reset the count up timer, press ‘timer’ |
|
|
once to |
|
|
|
||||
|
show 00min. Press OK to restart or wait 8 seconds. |
||||
5. |
To cancel the count up timer press ‘timer’ |
|
|
twice. |
|
|
|
||||
Setting the count down timer
The timer can be used independently of the oven for setting a count down period. When the period of time has elapsed, an audible signal sounds.
1. Touch either ‘timer’  or .
or .
2.00min will be displayed along with a bell and the up arrow will flash.
3.Touch the ‘timer’  to set the countdown period.
4.The timer bell icon will flash.
5.To begin the count down timer press OK or wait 8 seconds. When the timer starts, the bell will stop flashing and the timer will begin to count down.
6.When the set time has elapsed, an audible signal will sound for 2 minutes. The time indication ‘00min’ and the timer bell will flash on the display.
7.To stop the signal, touch either of the ‘timer’
 or symbols.
8.To cancel the count down timer, continue to touch
‘timer’ until zero is reached.
Adjusting the clock
1.Switch on the oven by touching  ‘ON/OFF’ symbol.
2.Select ‘SETTINGS’ from the function list and touch OK.
3.Select ‘SET CLOCK’ from the list and touch OK.
4.‘Set Clock’ will illuminate under the clock display.
5. Use the timer and to set the hour portion of the current time (including AM/PM).
6.Touch ‘OK’ when the hours are set correctly.
7. Use the timer and to set the minutes portion of the current time.
8.Touch ‘OK’ when the minutes are set correctly. TIME SAVED will be displayed and then the function display will revert to the ‘set clock’ menu. Turn off the oven or it will do so after 8 seconds.
Additional functionality
Light on/off
Turn the oven lamps off and on when in any cooking mode by simply touching the symbol
 .
.
USING THE OVEN (CONTINUED)
Activating the child-proof lock
When the child lock is engaged, the oven cannot be switched on.
1.Switch on the oven by touching the ‘ON/OFF’ symbol.
2.Select ‘SETTINGS’ from the function list and touch ‘OK’.
3.Select ‘ACTIVATE LOCK’ from the list and touch ‘OK’.
4.The words LOCKED are displayed, a single beep will sound to confirm the operation. The child lock is now engaged.
De-activating the child lock
1. Touch any symbol on the control panel (including the ‘ON/OFF’ symbol). ‘Locked’ will appear on the
display.
2.Touch any symbol again. The display will instruct you to touch both ‘cook time’ symbols for
2 seconds.
3.Hold until a beep sounds. The child lock is now released and the oven is ready to use.
Other settings
The ‘Settings’ function gives the opportunity to change oven functionality.
1.Switch on the oven by touching the
‘ON/OFF’ symbol.
2.Select ‘SETTINGS’ from the function list and touch OK.
3.Select ‘SET CLOCK’ to change the time of day.
4.Select ‘TIME OF DAY’ to have the time permanently displayed or not.
5.Select ‘BUZZER VOLUME’ to adjust the ‘beep on touch’ and alarm loudness.
6.Select ‘KEY TONE’ to turn the ‘beep on touch’ on or off.
7.Select ‘SCREEN BRIGHTNESS’ to adjust the brightness of the display.
8.Select ‘SCREEN CONTRAST’ to adjust the contrast of the display.
9.Select ‘TEMPERATURE UNITS’ to change between Celsius and Fahrenheit units.
10.Select ‘ACTIVATE LOCK’ to turn child lock on.
11.Touch ‘OK’ to go into each selection to change its settings.
15
Safety cut-out features
The oven automatically switches itself off if the temperature is not adjusted or the appliance is left operating after a period of time. The oven switches itself off after:
•12.5 hours when the temperature is set between 30°C and 120°C.
•8.5 hours when the temperature is set between 120°C and 200°C.
•5.5 hours when the temperature is set between 200°C and 250°C.
Demo mode
This mode is intended to be used in retail shops to demonstrate the oven functionality without any power consumption except to the oven lights.
The following instructions demonstrate how to enter and exit ‘DEMO’ mode.
1.Ensure the oven is off by touching the ‘ON/OFF’ symbol.
2.Touch and hold the ‘ON/OFF’ symbol until the display turns ON then OFF. Immediately after, touch both the cooktime symbols simultaneously. Hold until a triple beep sounds.
Condensation
Excess condensation may fog the oven door. This may happen when cooking large quantities of food from a cold start. Minimise condensation by:
•Keeping the amount of water used whilst cooking to a minimum.
•Making sure the oven door is firmly closed.
•Baking custard in a baking dish that is slightly smaller than the water container.
•Cooking casseroles with the lid on.
NOTE: If using water in cooking, this will turn to steam and condense outside your appliance. This is not a problem or fault with your oven.

16 electrolux.com.au
STEAM ASSISTED COOKING
All Electrolux range of ovens have the ability to add steam while baking.
Cooking with steam is a great addition to straight ‘hot air’ cooking. Steam brings out all the natural flavours and
goodness in the food, cooks evenly from surface to centre and retains more nutrients and vitamins. Steam assisted cooking consistently produces juicy, succulent interiors with crisp, golden exteriors.
 WARNING!
Risk of burns and damage to the appliance
•Do not open the appliance door when the steam function operates, with the exception of preheating.
•Open the appliance door with care after the steam function stops.
•Refer to cleaning the appliance for cleaning after the steam function operates.
1.Open the oven door.
2.Fill the cavity well with 200ml of water (only when the oven is cold).
3.Set the ‘Fan cooking’ function.
4.Activate the Steam button by touching  . The steam control works only with the ‘Fan cooking’ function.
5.The indicator turns on.
6.Set the temperature using the  and
and  temperature symbols.
7.Preheat the oven for 10 minutes or according to the recipe suggestions.
8.Place food in the appliance and close the oven door.
 CAUTION
Do not refill the cavity well with water during cooking or when the oven is hot to avoid damage to enamel.
 WARNING!
Make sure that the appliance is cool before you remove the remaining water from the cavity well.
17
USING THE FOOD PROBE
The Food Probe measures the core temperature of the food. When the food reaches the desired set core temperature, the oven turns off. The Food Probe has a core temperature range of 50 – 99°C.
There are two temperatures to set:
•The oven temperature
•The core temperature of the food
 WARNING!
Only use the Food Probe supplied or the correct replacement parts.
 CAUTION
Always check if food is cooked throughout before eating.
 WARNING!
After use, always remove the Food Probe from the oven cavity.
 WARNING!
The food probe is hot. There is a risk of burns.
Be careful when you remove the tip and plug of the Food Probe.
NOTE: Food must be completely defrosted when inserting the Food Probe. If the food is too cold, the Food Probe function will not work.
Using the Food probe:
1. Switch on the oven by touching the  symbol.
2.Select a cooking function by pressing the  function or
  function as many times as necessary until the desired function appears.
NOTE: When using the Food Probe, the duration and end time functions do not operate.
3.Select the oven temperature by pressing the temperature  or temperature
  to reach the desired setting. Allow oven to preheat.
4.Put the tip of the Food Probe into the centre of the food, with at least 75% of the probe inserted into the food.
Meat
For large pieces of meat, insert the tip of the Food Probe into the centre of the meat, with at least 75% of the probe inserted into the meat.
 Loading...