


CAUTIONS: |
OBS! |
|
|
|
|
|
|
|
|
|
|
|
|
|
This appliance contains a laser system |
Apparaten innehåller laserkomponenten |
||||||||||||||||||
|
|
|
|
|
|
|
|
|
|
|
|
|
and is classified as a “CLASS 1 LASER |
som avger laserstrålning överstigande |
||||||||||||||||||
|
|
|
|
|
|
|
|
|
|
|
|
|
||||||||||||||||||||
|
|
|
|
|
|
|
|
|
|
|
|
|
PRODUCT”. To use this model properly, |
gränsen för laserklass 1. |
||||||||||||||||||
|
|
|
|
|
|
|
|
|
|
|
|
|
read this Owner’s Manual carefully and |
|
|
|
|
|
|
|
|
|
|
|
|
|
|
|
|
|||
|
|
|
|
|
|
|
|
|
|
|
|
|
keep this manual for your future |
|
|
|
|
|
|
|
|
|
|
|
|
|
|
|
|
|||
Owner’s manual |
reference. In case of any trouble with |
VAROITUS |
|
|
|
|
|
|
|
|
||||||||||||||||||||||
this player, please contact your nearest |
|
|
|
|
|
|
|
|
||||||||||||||||||||||||
Mode d’emploi |
Suojakoteloa si saa avata. Laite sisältää |
|||||||||||||||||||||||||||||||
“AUTHORIZED service station”. To |
||||||||||||||||||||||||||||||||
Bedienungsanleitung |
prevent direct exposure to the laser |
laserdiodin, joka lähettää näkymätöntä |
||||||||||||||||||||||||||||||
Istruzioni per l’uso |
beam, do not try to open the enclosure. |
silmille vaarallista lasersäteilyä. |
||||||||||||||||||||||||||||||
|
|
|
|
|
|
|
|
|
|
|
|
|
|
|
|
|||||||||||||||||
Gebruiksaanwijzing |
|
|
|
|
|
|
|
|
|
|
|
|
|
|
|
|
|
|
|
|||||||||||||
Manual de instrucciones |
|
|
|
|
|
|
|
|
|
|
|
|
|
|
|
|
|
|
|
|
||||||||||||
|
!CAUTION |
|
|
|
|
|
|
|
|
|
|
|
|
|
|
|
|
|
|
|||||||||||||
Bruksanvisning |
|
|
|
|
|
|
|
|
|
|
|
|
|
|
|
|
|
|
||||||||||||||
|
USE OF CONTROLS OR |
|
|
|
|
|
|
|
|
|
|
|
|
|
|
|
|
|||||||||||||||
Manual de instruções |
|
|
|
|
|
|
|
|
|
|
|
|
|
|
|
|
||||||||||||||||
ADJUSTMENTS OR PERFORMANCE OF |
|
|
|
|
|
|
|
|
|
|
|
|
|
|
|
|
||||||||||||||||
|
|
|
|
|
|
|
|
|
|
|
|
|
PROCEDURES OTHER THAN THOSE |
|
|
|
|
|
|
|
|
|
|
|
|
|
|
|
|
|||
DXZ378RMP |
SPECIFIED IN THE OWNER’S MANUAL |
|
|
|
|
|
|
|
|
|
|
|
|
|
|
|
|
|||||||||||||||
|
|
|
|
|
|
|
|
|
|
|
|
|
|
|
|
|||||||||||||||||
|
|
|
|
|
|
|
|
|
|
|
|
|
|
|
|
|||||||||||||||||
MAY RESULT IN HAZARDOUS |
|
|
|
|
|
|
|
|
|
|
|
|
|
|
|
|
||||||||||||||||
|
|
|
|
|
|
|
|
|
|
|
|
|
|
|
|
|
|
|
|
|
|
|
|
|
|
|
|
|
||||
|
|
|
|
|
|
|
|
|
|
|
|
|
RADIATION EXPOSURE. |
|
|
|
|
|
|
|
|
|
|
|
|
|
|
|
|
|||
|
|
|
|
|
|
|
|
|
|
|
|
|
|
|
|
|
|
|
|
|
|
|
|
|
|
|
|
|
|
|||
|
|
|
|
|
|
|
|
|
|
|
|
|
|
|
|
|
|
|
|
|
||||||||||||
DXZ379RMP |
|
|
anbragt udvendigt |
|
|
|
|
|
|
|
|
|
|
|
|
|
|
|
|
|||||||||||||
Denne mærking er |
|
|
|
|
|
|
|
|
|
|
|
|
|
|
|
|
||||||||||||||||
|
|
|
|
|
|
|
|
|
|
|
|
|
ADVARSEL. |
|
|
|
|
|
|
|
|
|
|
|
|
|
|
|
|
|
||
|
|
|
|
|
|
|
|
|
|
|
|
|
på apparatet og indikerer, at apparatet |
|
|
|
|
|
|
|
|
|
|
|
|
|
|
|
|
|||
|
|
|
|
|
|
|
|
|
|
|
|
|
|
|
|
|
|
|
|
|
|
|
|
|
|
|
|
|
||||
|
|
|
|
|
|
|
|
|
|
|
|
|
|
|
|
|
|
|
|
|
|
|
|
|
|
|
|
|
||||
|
|
|
|
|
|
|
|
|
|
|
|
|
|
|
|
|
|
|
|
|
|
|
|
|
|
|
|
|
||||
|
|
|
|
|
|
|
|
|
|
|
|
|
|
|
|
|
|
|
|
|
|
|
|
|
|
|
|
|
||||
|
|
|
|
|
|
|
|
|
|
|
|
|
arbejder med laserstråler af klasse 1, |
|
|
|
|
|
|
|
|
|
|
|
|
|
|
|
|
|||
|
|
|
|
|
|
|
|
|
|
|
|
|
hvilket betyder, at der anvendes |
|
|
|
|
|
|
|
|
|
|
|
|
|
|
|
|
|||
|
|
|
|
|
|
|
|
|
|
|
|
|
laserstråler af svageste klasse, og at |
|
|
|
|
|
|
|
|
|
|
|
|
|
|
|
|
|||
|
|
|
|
|
|
|
|
|
|
|
|
|
man ikke på apparatets yderside kan |
|
|
|
|
|
|
|
|
|
|
|
|
|
|
|
|
|||
|
|
|
|
|
|
|
|
|
|
|
|
|
blive udsat for utilladelig kraftig |
|
|
|
|
|
|
|
|
|
|
|
|
|
|
|
|
|||
|
|
|
|
|
|
|
|
|
|
|
|
|
stråling. |
|
|
|
|
|
|
|
|
|
|
|
|
|
|
|
|
|||
|
|
|
|
|
|
|
|
|
|
|
|
|
|
|
|
|
|
|
|
|
|
|
|
|
|
|
|
|
||||
|
|
|
|
|
|
|
|
|
|
|
|
|
APPARATET BØR KUN ÅBNES AF |
|
|
|
|
|
|
|
|
|
|
|
|
|
|
|
|
|||
|
|
|
|
|
|
|
|
|
|
|
|
|
|
|
|
|
|
|
|
|
|
|
|
|
|
|
|
|
||||
|
|
|
|
|
|
|
|
|
|
|
|
|
|
|
|
|
|
|
|
|
|
|
|
|
|
|
|
|
||||
|
|
|
|
|
|
|
|
|
|
|
|
|
|
|
|
|
|
|
|
|
|
|
|
|
|
|
|
|
||||
|
|
|
|
|
|
|
|
|
|
|
|
|
FAGFOLK MED SÆRLIGT KENDSKAB |
|
|
|
|
|
|
|
|
|
|
|
|
|
|
|
|
|||
|
|
|
|
|
|
|
|
|
|
|
|
|
TIL APPARATER MED |
|
|
|
|
|
|
|
|
|
|
|
|
|
|
|
|
|||
|
|
|
|
|
|
|
|
|
|
|
|
|
LASERSTRÅLER! |
|
|
|
|
|
|
|
|
|
|
|
|
|
|
|
|
|||
Indvendigt i apparatet er anbragt den her gengivne advarselsmækning, som advarer imod at foretage sådanne indgreb i apparatet, at man kan komme til at udsaætte sig for laserstråling.
CD/MP3/WMA RECEIVER WITH CeNET CONTROL AUTORADIO CD/MP3/WMA / AVEC COMMANDE CeNET CD/MP3/WMA-RECEIVER MIT CeNET-STEUERUNG SINTOLETTORE CD/MP3/WMA CON CONTROLLO CeNET CD/MP3/WMA-RADIO-COMBINATIE MET CeNET-BEDIENING RECEPTOR CD/MP3/WMA CON CONTROL CeNET CD/MP3/WMA-RADIO MED CeNET-KONTROLL
RECEPTOR CD/MP3/WMA COM CONTROLO CeNET
Be sure to unfold and read the next page. / Veuillez déplier et vous référer à la page suivante.
Bitte ausbreiten und die nächste Seite lesen. / Assicurarsi di aprire e leggere la pagina successiva.
Volgende pagina uitvouwen en doorlezen a.u.b. / Cerciórese de desplegar y de leer la página siguiente.
Glöm inte att vika ut och läsa nästa sida. / Não deixe de abrir e ler a próxima página.
DXZ378RMP/DXZ379RMP i
Português Svenska Español Nederlands Italiano Deutsch Français English

|
|
|
|
|
|
English |
CONTROLS/LES COMMANDES/BEDIENELEMENTE/CONTROLLI |
|
|
||
BEDIENINGSORGANEN/CONTROLES/KONTROLLER/CONTROLOS |
|
|
|||
|
|
|
|||
|
|
|
|
|
|
|
Main unit / Appareil principal / Hauptgerät / Apparecchio principale |
|
|
||
Français |
Hoofdapparaat / Unidad principal / Huvudenhet / Unidade principal |
|
|
||
|
|
||||
[DIRECT] (1-3) |
[IR RECEIVER] |
||||
|
[SRC] |
||||
|
[SCN], [RPT], [RDM] |
[ |
] |
|
|
[AUX]
Deutsch |
[OPEN] |
|
Italiano |
|
[TA] |
[ROTARY] |
|
|
|
|||
|
|
[DIRECT] (4-6) |
[BND] |
|
Nederlands |
|
|
||
With the FLIP DOWN PANEL opened / Ouvrez le PANNEAU INCLINABLE |
||||
|
|
[ |
] (SOUND) |
|
|
|
[DISP] |
||
Español |
Bei geöffnetem KLAPPBILDSCHIRM / A CONSOLE APRIBILE aperta |
|||
Met het KANTELEND BEDIENINGSPANEEL geopend / Apertura del PANEL ABATIBLE |
||||
|
||||
|
Med den NEDFÄLLBARA KONSOLEN öppen / Com a CONSOLA RECLINÁVEL aberta |
|||
|
|
[ ] (EJECT) |
[CD SLOT] |
|
Svenska |
|
|
|
|
Português |
Note: Be sure to unfold this page and refer to the front diagrams as you read each chapter. |
|||
|
||||
|
Remarque: Veuillez déplier cette page et vous référer aux schémas quand vous lisez chaque chapitre. |
|||
|
Hinweis: Bitte diese Seite ausfalten und beim Lesen der einzelnen Kapitel die Frontdiagramme beachten. |
|||
|
Nota: Assicurarsi di aprire questa pagina e fare riferimento a questi diagrammi quando si legge ciascun capitolo. |
|||
|
Opmerking: Vouw deze pagina uit en zie tevens de afbeeldingen van het voorpaneel tijdens het doorlezen van de volgende hoofdstukken. |
|||
|
Nota: Cuando lea los capítulos, despliegue esta página y consulte los diagramas. |
|||
|
Observera: Vik ut denna sida för att kunna se bilderna över bilstereons framsida, medan du läser de olika kapitlen. |
|||
|
Nota: Certifique-se de abrir esta página e consulte os diagramas frontais conforme realiza a leitura de cada capítulo. |
|||
|
ii |
DXZ378RMP/DXZ379RMP |
|
|
English
Thank you for purchasing this Clarion product.
Please read this owner’s manual in its entirety before operating this equipment.
After reading this manual, be sure to keep it in a handy place (e.g., glove compartment).
Check the contents of the enclosed warranty card and keep it carefully with this manual.
This manual includes the operating procedures of the iPod® interface, CD/DVD changer, DAB and TV tuner connected via the CeNET cable. The iPod interface, CD/DVD changer and TV tuner have their own manuals, but no explanations for operating them are described.
“iPod” is a trademark of Apple Computer, Inc., registered in the U.S. and other countries.
Contents
CONTROLS .................................................................................................................................. |
ii |
|
1. |
PRECAUTIONS...................................................................................................................... |
3 |
|
Flip Down Panel..................................................................................................................... |
3 |
|
Handling Compact Discs........................................................................................................ |
4 |
2. |
NOMENCLATURE ................................................................................................................. |
5 |
|
Names of the Buttons and Their Functions............................................................................ |
5 |
|
Display Items ......................................................................................................................... |
6 |
|
LCD Screen ........................................................................................................................... |
6 |
3. |
DCP ........................................................................................................................................ |
7 |
4. |
REMOTE CONTROL.............................................................................................................. |
8 |
|
Functions of Remote Control Unit Buttons............................................................................. |
8 |
|
Inserting the Battery............................................................................................................. |
10 |
5. |
OPERATIONS ...................................................................................................................... |
11 |
|
Basic Operations.................................................................................................................. |
11 |
|
Radio Operations ................................................................................................................. |
14 |
|
RDS Operations................................................................................................................... |
16 |
|
CD/MP3/WMA Operations ................................................................................................... |
20 |
|
Operations Common to Each Mode..................................................................................... |
24 |
6. |
OPERATIONS OF ACCESSORIES..................................................................................... |
27 |
|
iPod BB Operations ............................................................................................................. |
27 |
|
CD Changer Operations ...................................................................................................... |
29 |
|
DVD Changer Operations .................................................................................................... |
30 |
|
TV Operations...................................................................................................................... |
31 |
|
Digital Radio / DAB Operations............................................................................................ |
32 |
7. |
IN CASE OF DIFFICULTY ................................................................................................... |
35 |
8. |
ERROR DISPLAYS.............................................................................................................. |
36 |
9. |
SPECIFICATIONS................................................................................................................ |
37 |
2 DXZ378RMP/DXZ379RMP

1. PRECAUTIONS
1. This unit is applicable for on-road 4 wheel |
Flip Down Panel |
|
|
||
vehicle purpose only. Use for tractor, fork |
|
|
truck, bulldozer, off road vehicle, 2 or 3 |
This unit uses a flip-down structure that makes |
|
wheel motor bicycle, marine boat or other |
||
possible large-size displays. |
||
special purpose vehicle is not appropriate. |
||
|
2.When the inside of the car is very cold and the player is used soon after switching on the heater moisture may form on the disc or the optical parts of the player and proper playback may not be possible. If moisture forms on the disc, wipe it off with a soft cloth. If moisture forms on the optical parts of the player, do not use the player for about one hour. The condensation will disappear naturally allowing normal operation.
3.Driving on extremely bumpy roads which cause severe vibration may cause the sound to skip.
INFORMATION FOR USERS:
CHANGES OR MODIFICATIONS TO THIS PRODUCT NOT APPROVED BY THE MANUFACTURER WILL VOID THE WARRANTY.
 CAUTION
When opening and closing the FLIP DOWN PANEL, be careful not to catch your fingers. They could be injured.
1.Always use this unit with the FLIP DOWN PANEL closed.
2.Do not force operations or use this device abnormally when opening or closing the FLIP DOWN PANEL.
3.Do not use the FLIP DOWN PANEL as a tray to place objects on when it is open.
4.When closing the FLIP DOWN PANEL, do not press the [OPEN] button.
5.Strong impacts to the operating or display section can cause damage or deformation.
6.If the FLIP DOWN PANEL does not open fully, gently open it with your hand.
English
DXZ378RMP/DXZ379RMP 3

English
Handling Compact Discs
Use only compact discs bearing the 
 or
or 
 mark.
mark.
Do not play heart-shaped, octagonal, or other specially shaped compact discs.
Some CDs recorded in CD-R/CD-RW mode may not be usable.
Storage
•Do not expose compact discs to direct sunlight or any heat source.
•Do not expose compact discs to excess humidity or dust.
•Do not expose compact discs to direct heat from heaters.
Handling
•Compared to ordinary music CDs, CD-R and CD-RW discs are both easily affected by high temperature and humidity and some of CD-R and CD-RW discs may not be played.
Therefore, do not leave them for a long time in the car.
• New discs may |
Ball-point pen |
have some |
|
roughness |
Roughness |
around the |
|
edges. If such |
|
discs are used, |
|
the player may |
|
not work or the |
|
sound may |
|
skip. Use a ball-point pen or the like to remove any roughness from the edge of the disc.
•Never stick labels on the surface of the compact disc or mark the surface with a pencil or pen.
•Never play a compact disc with any cellophane tape or other glue on it or with peeling off marks. If you try to play such a compact disc, you may not be able to get it back out of the CD player or it may damage the CD player.
•Do not use compact discs that have large scratches, are misshapen, cracked, etc. Use of such discs may cause misoperation or damage.
•To remove a compact disc from its storage case, press down on the center of the case and lift the disc out, holding it carefully by the edges.
•Do not use commercially available CD protection sheets or discs equipped with stabilizers, etc. These may damage the disc or cause breakdown of the internal mechanism.
Cleaning
•To remove fingermarks and dust, use a soft cloth and wipe in a straight line from the center of the compact disc to the circumference.
•Do not use any solvents, such as commercially available cleaners, anti-static spray, or thinner to clean compact discs.
•After using special compact disc cleaner, let the compact disc dry off well before playing it.
4 DXZ378RMP/DXZ379RMP

2. NOMENCLATURE
Note:
• Be sure to read this chapter referring to the front diagrams of chapter “CONTROLS” on page ii (unfold).
Names of the Buttons and Their Functions
[OPEN] button
•Deeply push in [OPEN] button to unlock the flip down panel.
[DIRECT] buttons
•Store a station into memory or recall it directly while in the radio mode.
[SCN] button
•Perform scan play for 10 seconds of each track while in the CD/MP3/WMA mode.
•Press and hold the button for 1 second or longer to perform folder scan play while in the MP3/WMA mode.
[RPT] button
•Perform repeat play while in the CD/MP3/ WMA mode.
•Press and hold the button for 1 second or longer to perform folder repeat play while in the MP3/WMA mode.
[RDM] button
•Perform random play while in the CD/MP3/ WMA mode.
•Press and hold the button for 1 second or longer to perform folder random play while in the MP3/WMA mode.
[SRC] button
•Press the button to turn on the power.
•Press and hold the button for 1 second or longer to turn off the power.
•Switch the operation mode among the radio mode, etc.
[

 ] button
•Perform preset scan while in the radio mode. When the button is pressed and held, auto store is performed.
•Play or pause a track while in the CD/MP3/ WMA mode.
•Confirm various settings.
[IR RECEIVER]
•Receiver for remote control unit. (Operating range: 30° in all directions)
[AUX] input jack
•The input jack for connecting an external device.
[ROTARY] knob
•Adjust the volume by turning the knob clockwise or counterclockwise.
[BND] button
•Switch the band, or seek tuning or manual tuning while in the radio mode.
•Play a first track while in the CD/MP3/WMA mode.
•Press the button to change the character.
[ ] (SOUND) button
•Use the button to switch to the sound adjust mode.
•Press and hold the button for 1 second or longer to turn on or off the MAGNA BASS EXTEND mode.
[DISP] button
•Switch the display indication.
•Press and hold the button for 1 second or longer to enter the adjust mode.
[TA] button
•Use the button to set the TA (Traffic Announcement) standby mode.
[x], [v] buttons
•Select a station while in the radio mode or select a track while in the CD/MP3/WMA mode.
This button is used to make various settings.
•Press and hold the button for 1 second or longer to enter the fast-forward or fastbackward mode.
[w] (UP), [z] (DN) buttons
•Select the folder while in the MP3/WMA mode.
•Use the buttons to perform various settings.
[Q] (EJECT) button
•Eject a disc when it is loaded into the unit.
[CD SLOT]
• CD insertion slot.
English
DXZ378RMP/DXZ379RMP 5

English
Display Items
Operation status indication
Titles, band, preset channel, track No., disc No., folder No., etc. are displayed.
Operation status indication
Source, Titles, CT (clock time) are displayed.
|
|
|
|
|
|
|
|
|
|
|
|
|
|
|
|
|
|
Z-ENHANCER 1, 2, 3 indication |
|
|
|
|
|
|
|
|
|
||
|
|
|
|
|
|
|
|
||
|
|
|
|
|
|
|
|
||
|
|
|
|
|
|
|
|
||
|
: Manual indication |
|
|
|
|
: Alternative frequency indication |
|||
|
|
|
|
|
|||||
|
|
|
|
|
|||||
|
: Enter indication |
|
|
|
|
||||
|
|
|
|
|
: Regional indication |
||||
|
: Disc No. indication |
|
|
|
|
||||
|
|
|
|
|
: Traffic announcement indication |
||||
|
|
|
|
||||||
|
Preset channel |
|
|
|
|
||||
|
|
|
|
|
: Traffic programme indication |
||||
|
indication (1 to 6) |
|
|
|
|
||||
|
|
|
|
|
: Programme type indication |
||||
|
: MP3 indication |
|
|
|
|
||||
|
|
|
|
|
: Information indication for DAB |
||||
|
|
|
|
||||||
|
: WMA indication |
|
|
|
|
||||
|
|
|
|
|
: DAB indication |
||||
|
|
|
|
|
|
|
|
||
|
|
|
|
|
|
|
|
: Stereo indication for DAB |
|
|
|
|
|
|
|
|
|
: Disc or folder random/repeat/scan indication |
|
|
|
|
|
|
|
|
|
: Random indication |
|
|
|
|
|
|
|
|
|
: Repeat indication |
|
|
|
|
|
|
|
|
|
: Scan indication |
|
|
|
|
|
|
|
|
|
: MAGNA BASS EXTEND indication |
|
|
|
|
|
|
|
|
|
: Mute indication |
|
|
|
|
|
|
|
|
|
|
|
LCD Screen
In extreme cold, the screen movement may slow down and the screen may darken, but this is normal. The screen will recover when it returns to normal temperature.
6 DXZ378RMP/DXZ379RMP

3. DCP
The control panel can be detached to prevent theft. When detaching the control panel, store it in the DCP (DETACHABLE CONTROL PANEL) case to prevent scratches.
We recommend taking the DCP with you when leaving the car.
Attaching the DCP
1.Insert the right side of the DCP into the main unit.
2.Insert the left side of the DCP into the main unit.
2.
Removing the DCP
1.Press the [SRC] button for 1 second or longer to turn off the power.
2.Deeply push in [OPEN] button to unlock the flip down panel.
If the flip down panel does not open fully, gently open it with your hand.
[OPEN] button
DCP
3. Pull the DCP toward you and remove it.
DCP |
4. Close the HOLD FLAP.
HOLD FLAP
 CAUTION
Be sure to close the HOLD FLAP for safety when removing the DCP.
DCP |
1. |
|
Storing the DCP in the DCP Case
Hold the DCP, in the orientation as shown in the figure below, and put it into the supplied DCP case. (Ensure the DCP is in the correct orientation.)
DCP 
DCP case 
 CAUTION
•The DCP can easily be damaged by shocks. After removing it, be careful not to drop it or subject it to strong shocks.
•If the FLIP DOWN PANEL is kept open, the DCP may drop due to vibration of the car.
This results in damage to the DCP. So close the FLIP DOWN PANEL or remove the DCP to store into the case.
•The connector connecting the source unit and the DCP is an extremely important part. Be careful not to damage it by pressing on it with fingernails, screwdrivers, etc.
Note:
•If the DCP is dirty, wipe off the dirt with a soft, dry cloth only.
English
DXZ378RMP/DXZ379RMP 7

English
4. REMOTE CONTROL
Functions of Remote Control Unit Buttons
Some buttons on the remote control unit have different functions from the corresponding buttons on the main unit.
Signal transmitter
[SRC] |
[BND] |
|
|
|
[ |
] |
|
[ ], [ ] |
[ |
], [ |
] |
|
|||
[MUTE] |
[DISP] |
|
|
[TA] |
[PTY] |
|
|
[PS/AS] |
[AF] |
|
|
● Shared modes
[SRC] button
•Use to alternate operation mode among the various modes.
•Press to cancel a traffic announcement broadcast, an emergency broadcast, and a PTY broadcast during a TA, ALARM or PTY interrupt.
[w], [z] buttons
•Increases and decreases volume.
[MUTE] button
•Turns mute function on and off.
[TA] button
•TA on and off.
•Press to cancel a traffic announcement broadcast during a TA interrupt.
[AF] button
•Press to cancel an emergency broadcast during an ALARM interrupt.
[PTY] button
•Press to cancel a PTY broadcast during a PTY interrupt.
[DISP] button
•Press to alternate among main display, title display and CT (clock time) display.
● Radio (RDS) / DAB modes
[BND] button
•Switches reception band.
[x], [v] buttons
•Moves preset channels up and down.
[PS/AS] button
•Press to perform preset scan.
•Press and hold the button for 2 seconds or longer to perform auto store.
8 DXZ378RMP/DXZ379RMP

Functions of Remote Control Unit Buttons
[AF] button
•AF function on and off.
•Press and hold the button for 1 second or longer to perform REG function on and off.
[PTY] button
• PTY mode on and off.
● CD/MP3/WMA modes
[BND] button
•Press to play the first track.
[x], [v] buttons
•Press to move the tracks up and down.
•Press and hold the button for 1 second or longer to perform fast-forward/fast-backward.
[ ] button
•Switches between playback and pause.
[PS/AS] button
•Press to perform scan play.
•When in MP3/WMA mode, press and hold the button for 1 second or longer to perform folder scan play.
[AF] button
•Press to perform repeat play.
•When in MP3/WMA mode, press and hold the button for 1 second or longer to perform folder repeat play.
[PTY] button
•Press to perform random play.
•When in MP3/WMA mode, press and hold the button for 1 second or longer to perform folder random play.
● CD changer/DVD changer modes
[BND] button
•Press to switch to next disc in ascending order.
[x], [v] buttons
•Press to move the tracks up and down.
•Press and hold the button for 1 second or longer to perform fast-forward/fast-backward.
[ ] button
•Switches between playback and pause.
[PS/AS] button
•Press to perform scan play.
•Press and hold the button for 1 second or longer to perform disc scan play.
[AF] button
• Press to perform repeat play.
•Press and hold the button for 1 second or longer to perform disc repeat play.
[PTY] button
•Press to perform random play.
•Press and hold the button for 1 second or longer to perform disc random play.
● iPod BB mode
[x], [v] buttons
•Press to move the tracks up and down.
•Press and hold the button for 1 second or longer to perform fast-forward/fast-backward.
[ ] button
•Switches between playback and pause.
[AF] button
•Press to perform repeat play.
•Press and hold the button for 1 second or longer to perform all repeat play.
[PTY] button
•Press to perform random play.
•Press and hold the button for 1 second or longer to perform all random play.
● TV mode
[BND] button
•Switches reception band.
[x], [v] buttons
•Moves preset channels up and down.
[PS/AS] button
•Press to perform preset scan.
•Press and hold the button for 2 seconds or longer to perform auto store.
[PTY] button
• Press to alternate between TV and VTR.
English
DXZ378RMP/DXZ379RMP 9
English
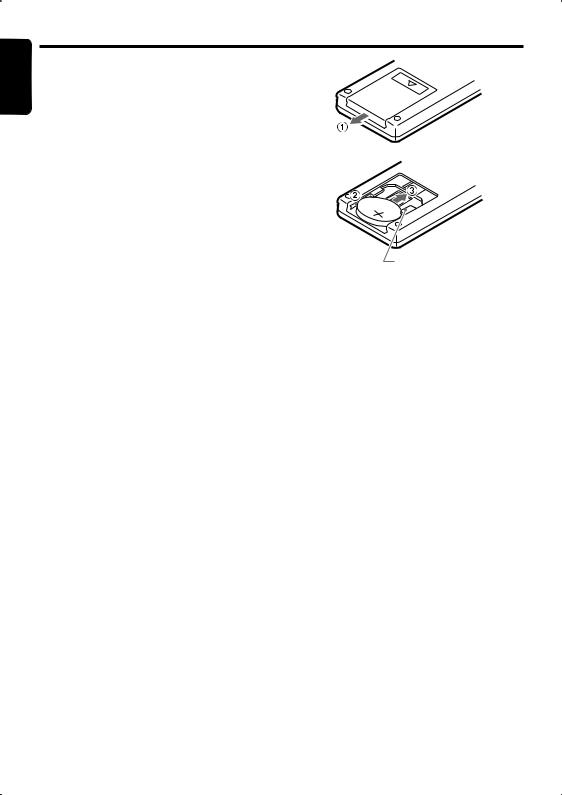
Inserting the Battery
1Turn over the remote control unit and slide the cover in the direction indicated by the arrow in the illustration.
2Insert the battery (CR2025) into the insertion guides, with the printed side (+) facing upwards.
3Press the battery in the direction indicated by the arrow so that it slides into the compartment.
4Replace the cover and slide in until it clicks into place.
Notes:
Misuse may result in rupture of the battery, producing leakage of fluid and resulting in personal injury or damage to surrounding materials. Always follow these safety precautions:
•Use only the designated battery.
•When replacing the battery, insert properly, with +/– polarities oriented correctly.
•Do not subject battery to heat, or dispose of in fire or water. Do not attempt to disassemble the battery.
•Dispose of used batteries properly.
R |
|
|
C 2 |
|
|
|
0 |
|
|
|
2 |
|
|
5 |
Insertion guide
10 DXZ378RMP/DXZ379RMP
5. OPERATIONS
Note:
• Be sure to read this chapter referring to the front diagrams of chapter “CONTROLS” on page ii (unfold).
Basic Operations
 CAUTION
Be sure to lower the volume before switching off the unit power or the ignition key. The unit remembers its last volume setting. If you switch the power off with the volume up, when you switch the power back on, the sudden loud volume may hurt your hearing and damage the unit.
Turning on/off the power
Note:
•Be careful about using this unit for a long time without running the engine. If you drain the car’s battery too far, you may not be able to start the engine and this can reduce the service life of the battery.
1.Press the [SRC] button.
2.The illumination and display on the unit light up. The unit automatically remembers its last operation mode and will automatically switch to display that mode.
3.Press and hold the [SRC] button for 1 second or longer to turn off the power for the unit.
Note:
•The first time this unit is turned on after the wire connections are completed, it must be checked what equipment is connected. When the power is turned on, the “SYSTEM CHECK” appears in the display. The system check starts within the unit. When the system check is complete, press the [SRC] button again.
Selecting a mode
1.Press the [SRC] button to change the operation mode.
2.Each time you press the [SRC] button, the operation mode changes in the following order:
Radio (DAB) CD/MP3/WMA (iPod BB) (CD changer) (DVD changer) (TV) AUX Radio...
External equipment not connected with CeNET is not displayed.
Adjusting the volume
1.Turning the [ROTARY] knob clockwise increases the volume; turning it counterclockwise decreases the volume.
The volume level is from 0 (minimum) to 33 (maximum).
Switching the display
Press the [DISP] button to select the desired display.
Once selected, the preferred display becomes the display default. When a function adjustment such as volume is made, the screen will momentarily switch to that function’s display, then revert back to the preferred display several seconds after the adjustment.
For information on how to enter a title, refer to the subsection “Entering titles” in section “Operations Common to Each Mode”.
When CT data is not received, “CT– –:– –” appears in the display.
English
DXZ378RMP/DXZ379RMP 11
English
Basic Operations
Sound Adjustment |
When “IMPACT” is set: |
||||||
|
3-2. |
Press the [ |
|
|
|
] button. |
|
You can adjust a sound effect or tone quality to |
|||||||
|
|
||||||
3-3. |
Press the [w] or [z] button to adjust the |
||||||
your preference. |
|||||||
|
|
|
|
|
|
||
bass and treble in the range of +3 to –3.
To change sound setting
1.Press the [ ] button to switch to the sound adjustment selection display.
The factory default sound setting is “Z- EHCR”.
2.Then press the [x] or [v] button to select the sound adjustment mode. Each time you press the [x] or [v] button, the sound adjustment mode changes as following order:
“Z-EHCR” ↔ “BASS” ↔ “TREBLE” ↔ “BALANCE” ↔ “FADER”
In the case of display blinking “ENT”, you
can press the [
 ] button to adjust the setting value.
3.Press the [w] or [z] button to adjust the selected audio mode.
4.After completing settings, press the [ ] button to return to the previous mode.
●Setting the Z-Enhancer
This unit are provided with 3 types of sound tone effects stored in memory.
Select the one you prefer.
The factory default setting is “OFF”.
2-1. Select “Z-EHCR”.
3-1. Each time you press the [w] or [z] button, the tone effect changes in the following order:
“EXCITE” ↔ “IMPACT” ↔ “B-BOOST” ↔ “OFF”
EXCITE : bass and treble emphasized mid deemphasized
IMPACT : bass and treble emphasized
B-BOOST : bass emphasized
OFF : no sound effect
When “EXCITE” is set:
3-2. Press the [
 ] button.
3-3. Press the [w] or [z] button to adjust the bass and treble in the range of +3 to –3.
The factory default setting is “0”.
3-4. Press the [
 ] button to return to previous mode.
The factory default setting is “0”.
3-4. Press the [
 ] button to return to previous mode.
When “B-BOOST” is set:
3-2. Press the [
 ] button.
3-3. Press the [w] or [z] button to adjust the bass in the range of +3 to –3.
The factory default setting is “0”.
3-4. Press the [
 ] button to return to previous mode.
● Adjusting the bass
This adjustment can be performed only when the Z-Enhancer is set to “OFF”.
2-1. Select “BASS”.
3-1. Press the [w] or [z] button to adjust the bass.
The factory default setting is “0”. (Adjustment range: +8 to –8)
●Adjusting the treble
This adjustment can be performed only when the Z-Enhancer is set to “OFF”.
2-1. Select “TREBLE”.
3-1. Press the [w] or [z] button to adjust the treble.
The factory default setting is “0”. (Adjustment range: +7 to –7)
●Adjusting the balance
2-1. Select “BALANCE”.
3-1. Press the [w] or [z] button to adjust the balance of the right and left speakers.
The factory default setting is “CENTER” (center). (Adjustment range: RIGHT12 to LEFT12 (right 12 to left 12))
●Adjusting the fader
2-1. Select “FADER”.
3-1. Press the [w] or [z] button to adjust the balance of the rear and front speakers.
The factory default setting is “CENTER” (center). (Adjustment range: FRONT12 to REAR12 (front 12 to rear 12))
Note:
•During SOUND adjustment mode, if no operation is performed for more than 10 seconds, this mode can be cancelled and return to previous mode.
12 DXZ378RMP/DXZ379RMP
 Loading...