


DB279USB
BEFORE
TO
READ
ANTES
DE
TO
THIS
USAR
USE
THIS
MANUAL
SU
SOUND
EQUIPO
EQUIPMENTISIMPORTANT
DE
SONIDO
ES
IMPORTANTE
LEER
Owner's manual
Manual de instrucciones
ESTE
MANUAL
DB 179MP
DB279
USB
CD/MP3IWMA
RECEPTOR
CD/MP3IWMA
RECEIVER

CLARION PRODUCT REGISTRATION INFORMATION
Dear Customer:
Congratulations on your purchase of a Clarion mobile electronic products. We are confident that
you'll enjoy your Clarion experience.
There
clarion.com
We
is short and easy to complete. Once you're registered, we can keep you informed of important
product information.
Register at
are
have
many
benefits to registering your product. We invite you to visit
to register your Clarion product.
made
product registration simple with
www.clarion.com - it's easy to keep
www.clarion.com
our
easy to use website. The registration form
your
Clarion product up to date.
our
website
at
www.
Contents
1. FEATURES 2
2. CONTROLS 3
MAIN
UNIT
3. NOMENCLATURE 4
Namesofthe Buttons and Their Functions 4
Display Items 5
LCD Screen 5
4. PRECAUTIONS 6
5. HANDLING COMPACT DISCS 7
6. DCP (Detachable Control Panel) 8
7. OPERATIONS 9
Basic Operations 9
Mode
Radio
CD/MP3/WMA
8. OTHER OPERATIONS 19
9. TROUBLESHOOTING
10. ERROR DISPLAYS 22
11.
SPECIFICATIONS 23
Operations 12
Mode Operations 13
21
3
, " 0
'1.
• High Visibility Single Line Display
• 2ch/2V
• Front Panel 3.5mm Auxiliary Input
• Front Panel
Note:
Only for the model
FBAJIElBS
RCA
Output
USB
Input
DB279USB
WDO~~
DIGITAL
AUDIO
2
Be
so,"toonfold
Cerciorese de despJegary de Jeer la paginasi.
and
,..d
the
next
~
teo
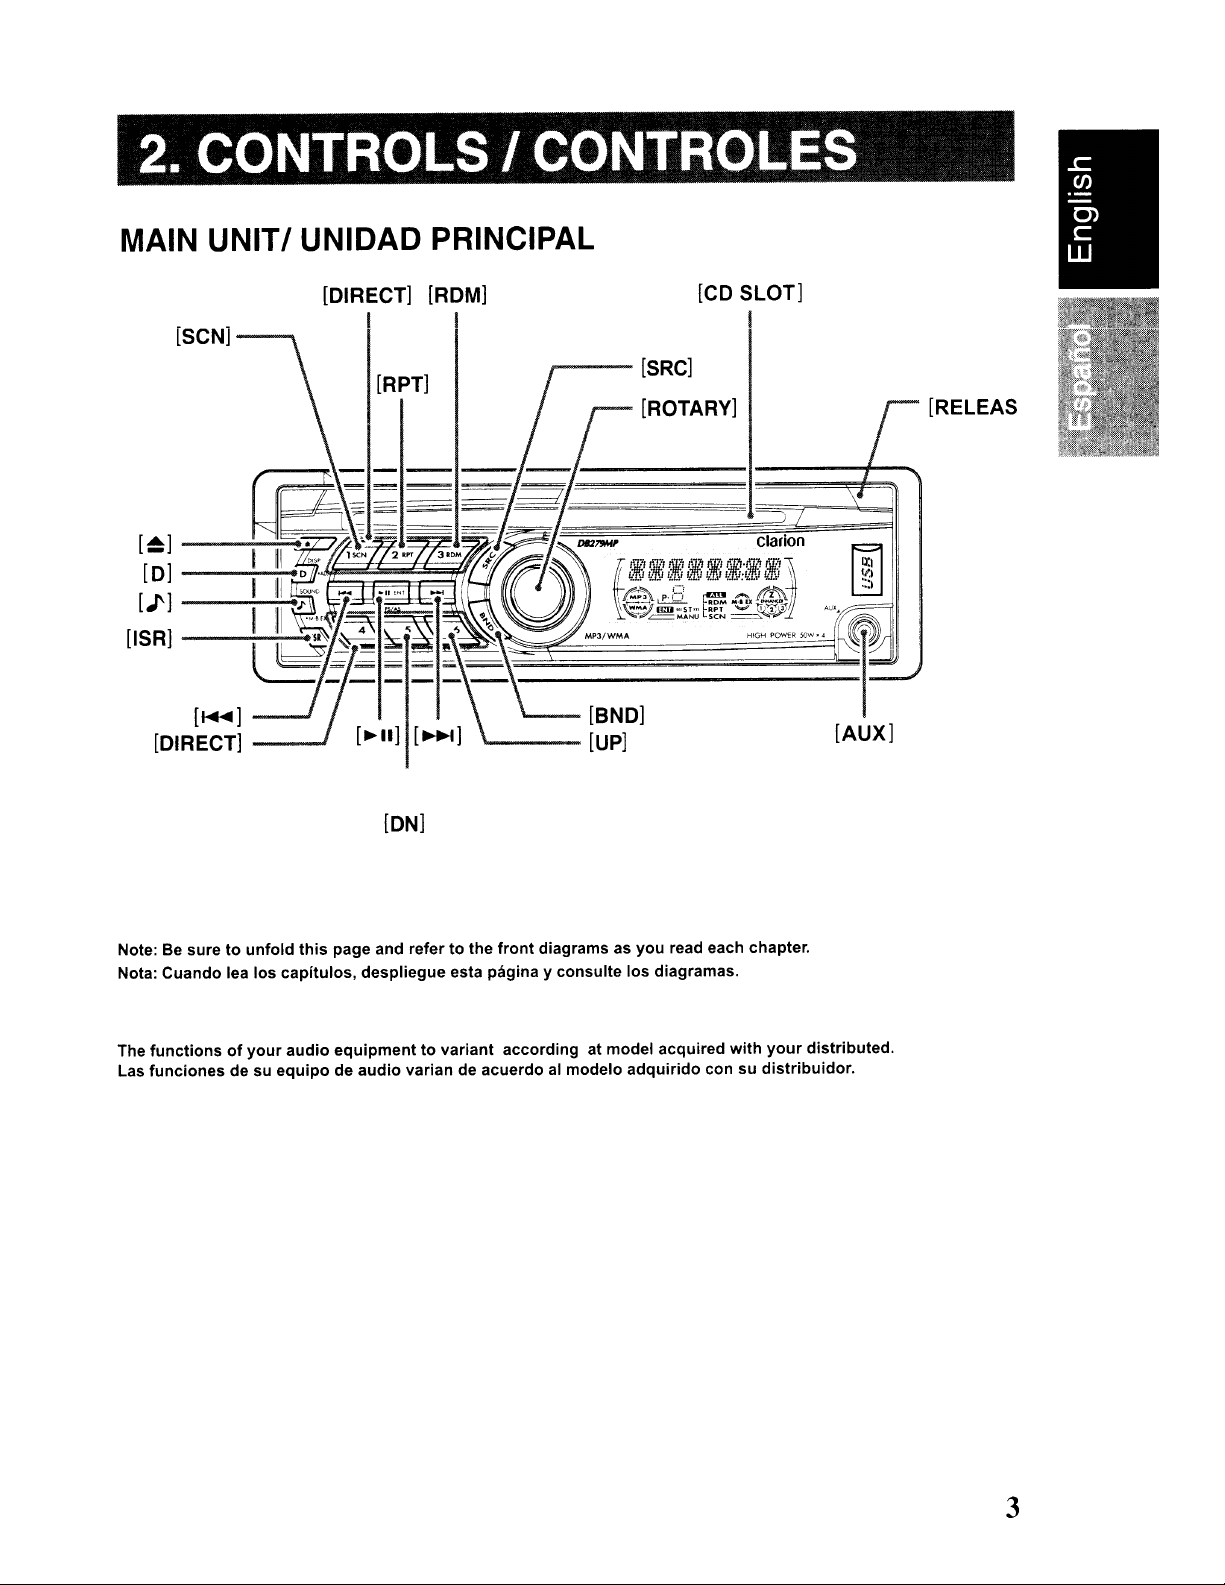
2.CONTROLS/CONTROLES
MAIN UNIT! UNlOAD PRINCIPAL
[CD
SLOT]
I
[SCN]
[~]---:-~
[O]----.;~
[J']----:~
[ISR]-~~
[DIRECT] [ROM]
I I
..----[SRC]
[RPT]
[ROTARY]
[RELEAS
[ON]
Note:Besuretounfold
Nota: Cuando lea los capitulos, despliegue esta pagina y consulte los diagramas.
The
functionsofyour
Las funciones de su
this
page and refertothe
audio
equipmenttovariant according at model acquired
equipodeaudio
varian de acuerdo al modelo
front
diagrams as you read each chapter.
adquirido
con su
with
your
distribuidor.
distributed.
3
3.
NOMENGLATURE
Note:
Be
suretoread
this
chapter referringtothe
front diagramsofchapter
"2.
CONTROLS"
•
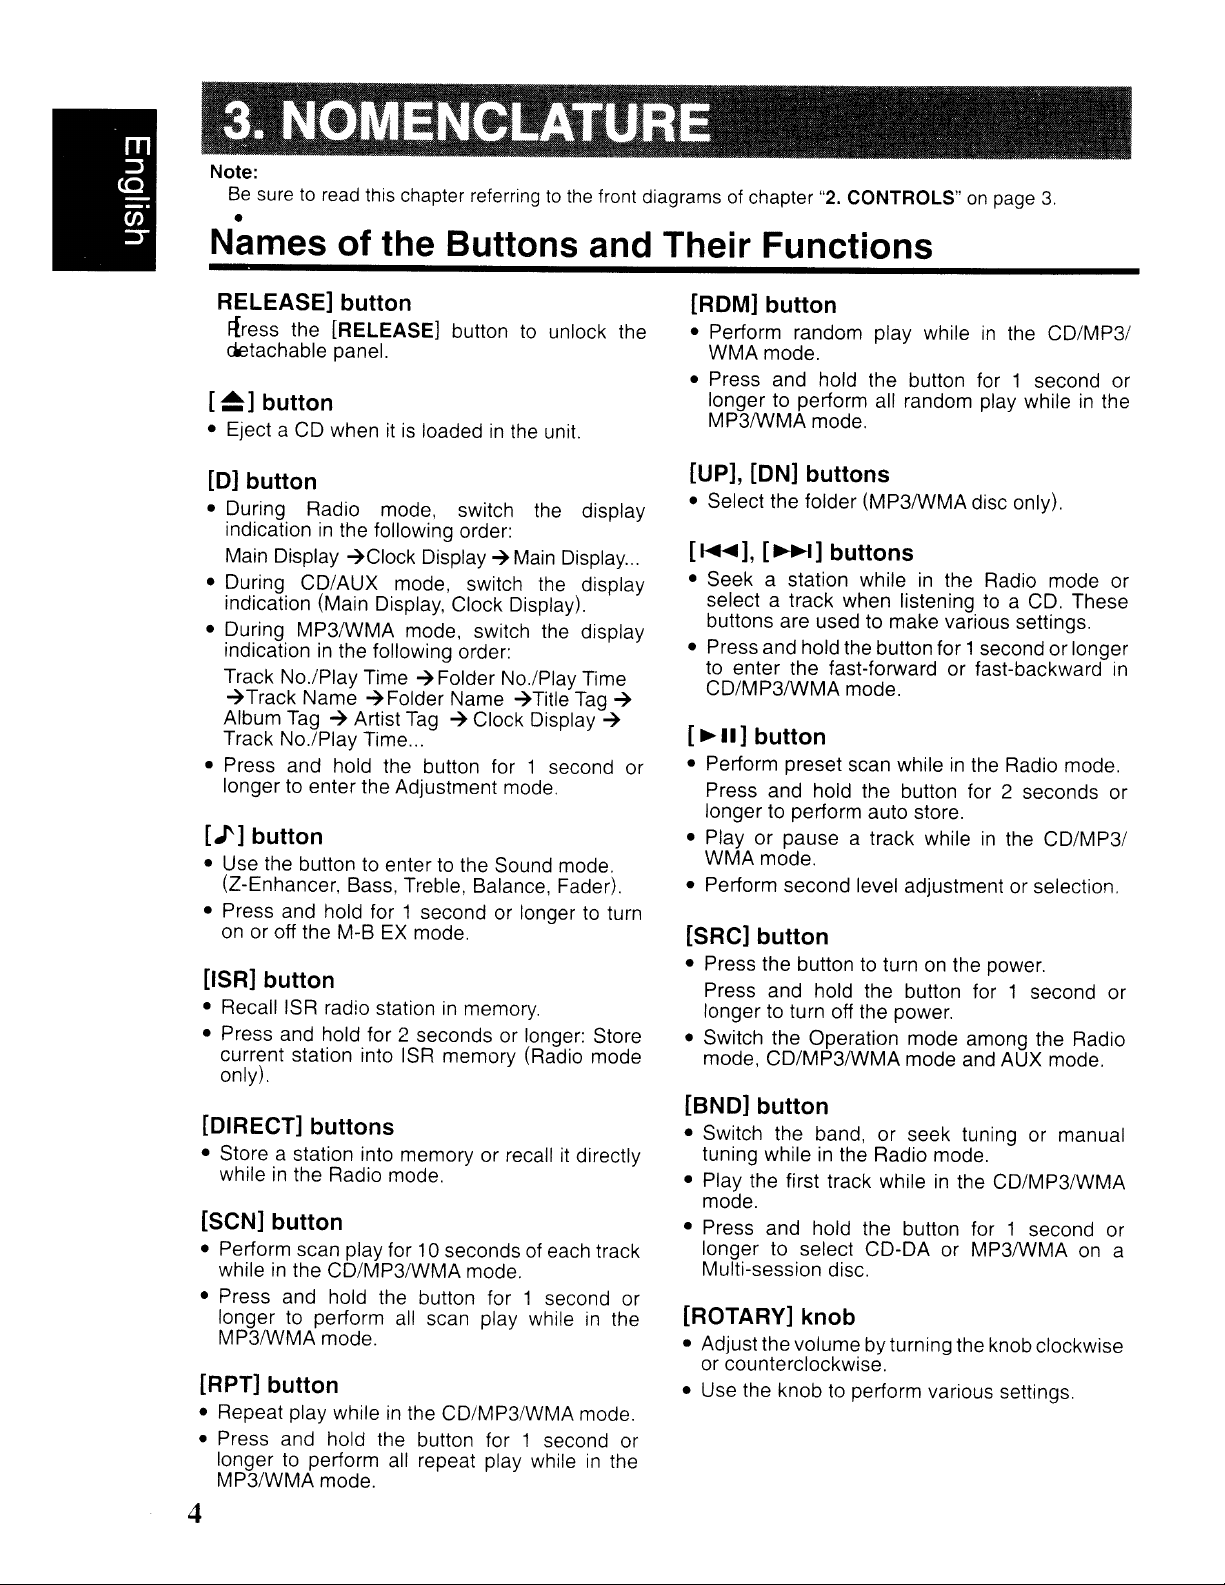
Names of the Buttons and Their Functions
on
page
3.
RELEASE] button
Rress the [RELEASE] button
detachable panel.
[~]
button
• Eject a CD whenitis
[0]
button
• During Radio mode, switch
indication
Main Display
• During CD/AUX mode, switch the display
indication (Main Display, Clock Display).
• During MP3IWMA mode, switch the display
indication
Track No./Play Time
~Track
Album
Track No.lPlay Time
• Press and hold the button for 1 second or
longer
[J']
button
• Use the button to enter to the Sound mode.
(Z-Enhancer, Bass, Treble, Balance, Fader).
• Press and hold for 1 second or longertoturn
on
or off the M-BEXmode.
[ISR]
• Recall ISR radio stationinmemory.
• Press and hold for 2 seconds or longer: Store
current station into ISR memory (Radio mode
only).
in
the following order:
~Clock
in
the following order:
Name
Tag~Artist
to
enter the Adjustment mode.
button
loadedinthe
Display~Main
~
Folder No.lPlay Time
~Folder
Name
Tag~Clock Display
...
to
unlock the
unit.
the
display
Display
~Title
Tag
...
~
~
[DIRECT] buttons
• Store a station into memory or recallitdirectly
while
in
the Radio mode.
[SCN] button
• Perform scan play for 10 secondsofeach track
while
in
the CD/MP3IWMA mode.
• Press and hold the button for 1 second or
longer
MP3IWMA mode.
to
perform
all
scan play whileinthe
[RPT] button
• Repeat play whileinthe CD/MP3/WMA mode.
• Press and hold the button for 1 second or
to
longer
MP3/WMA mode.
perform
all
repeat play whileinthe
[ROM] button
• Perform random play whileinthe
WMA mode.
• Press and hold the button for 1 second or
longer to perform all random play while
MP3IWMA mode.
CD/MP31
in
the
[UP], [ON] buttons
• Select the folder (MP3IWMA disc only).
[
.....
],
[~I]
• Seek a station whileinthe Radio mode or
select a track when listening
buttons are used
• Press and hold the button for 1second orlonger
to
enter the fast-forward or fast-backward
CD/MP3IWMA mode.
[~II]
• Perform preset scan whileinthe
• Play or pause a track while
• Perform second level adjustment or selection.
button
Press and hold the button for 2 seconds or
longer to perform auto store.
WMA mode.
buttons
to
make various settings.
to
a CD. These
Radio mode.
in
the CD/MP31
[SRC] button
• Press the buttontoturnonthe power.
Press and hold the button for 1 second or
longer to turn off the power.
• Switch the Operation mode among the Radio
mode, CD/MP3IWMA mode and AUX mode.
[BND] button
• Switch the band, or seek tuning or manual
tuning while
• Play the first track while
mode.
• Press and hold the button for 1 second or
longer to select CD-DA or MP3IWMA on a
Multi-session disc.
in
the Radio mode.
in
the CD/MP3IWMA
[ROTARY] knob
• Adjust the volume by turning the knob clockwise
or counterclockwise.
• Use the knob to perform various settings.
in
4

Names of the Buttons and Their Functions
CD SLOT]
CD
insertion slot.
Display Items
[AUX] input
• Auxiliary jack insertion.
Operation status indication
Main Display, Clock, etc. are displays
Preset channel
indication
(1to6)
:WMA indication
:
Z-
Enhancer indication
USB
mIJ
III
STili:
MANU
VII.
USB
indication
Enter indication
Stereo indication
:Manual indication
:All tracks indication
ROM: Random indication
RPT
SeN:
:Repeat indication
Scan indication
LCD Screen
In
extreme cold, the screen movement may slow down and the screen may darken, but thisisnormal.
it
The screen will recover when
returnstonormal temperature.
5

4. PRECAUTIONS
1.
When the insideofthe carisvery
the playerisused soon after switchingonthe
heater moisture may form
of
optical parts
may notbepossible.Ifmoisture formsonthe
disc, wipe
forms
not use the player for about one
condensation will disappear naturally allowing
normal operation.
on
the player and proper playback
it
off with a soft cloth.Ifmoisture
the optical parts of the player,
on
cold
the discorthe
hour.
and
do
The
2.
Driving on extremely bumpy roads which
cause severe vibration may cause
to
skip.
3.
This
unit
uses a
Eveninthe event that trouble arises, never
open the case, disassemble the unit, or
lubricate the rotating parts.
precision
the
mechanism.
sound
This equipment has been tested and found
comply with the limits for a Class B digital device,
pursuanttoPart 15 of the FCC Rules.
These limits are designed to provide reasonable
protection against harmful interference
dential installation.
This equipment generates, uses, and
if
radio frequency energy and,
usedinaccordance with the instructions, may
cause harmful interference to radio communications. However, there
ference will not occur
If this equipment does cause harmful interfer-
ence to radio or television reception, which can
be
determined by turning the equipment
on,
the user is encouraged to consult the dealer
an
experienced radiolTV technician for help.
or
isnoguarantee that inter-
in
a particular installation.
not installed and
in
can
a resi-
radiate
off
and
to
USE
OR PERFORMANCE OF PROCEDURES
OTHER THAN THOSE SPECIFIED HEREIN,
MAY RESULT IN HAZARDOUS RADIATION
EXPOSURE.
THECOMPACTDISCPLAYERSHOULD NOT
BE ADJUSTED OR REPAIRED BY ANYONE
EXCEPT PROPERLY QUALIFIED SERVICE
PERSONNEL.
CHANGES OR MODIFICATIONS TO THIS
PRODUCTNOTAPPROVEDBYTHEMAN~
FACTURER WILL VOID THE WARRANTY
AND WILL VIOLATE FCC APPROVAL.
OF
CONTROLS, ADJUSTMENTS,
6
5.
HANDLING COMPACT DISCS
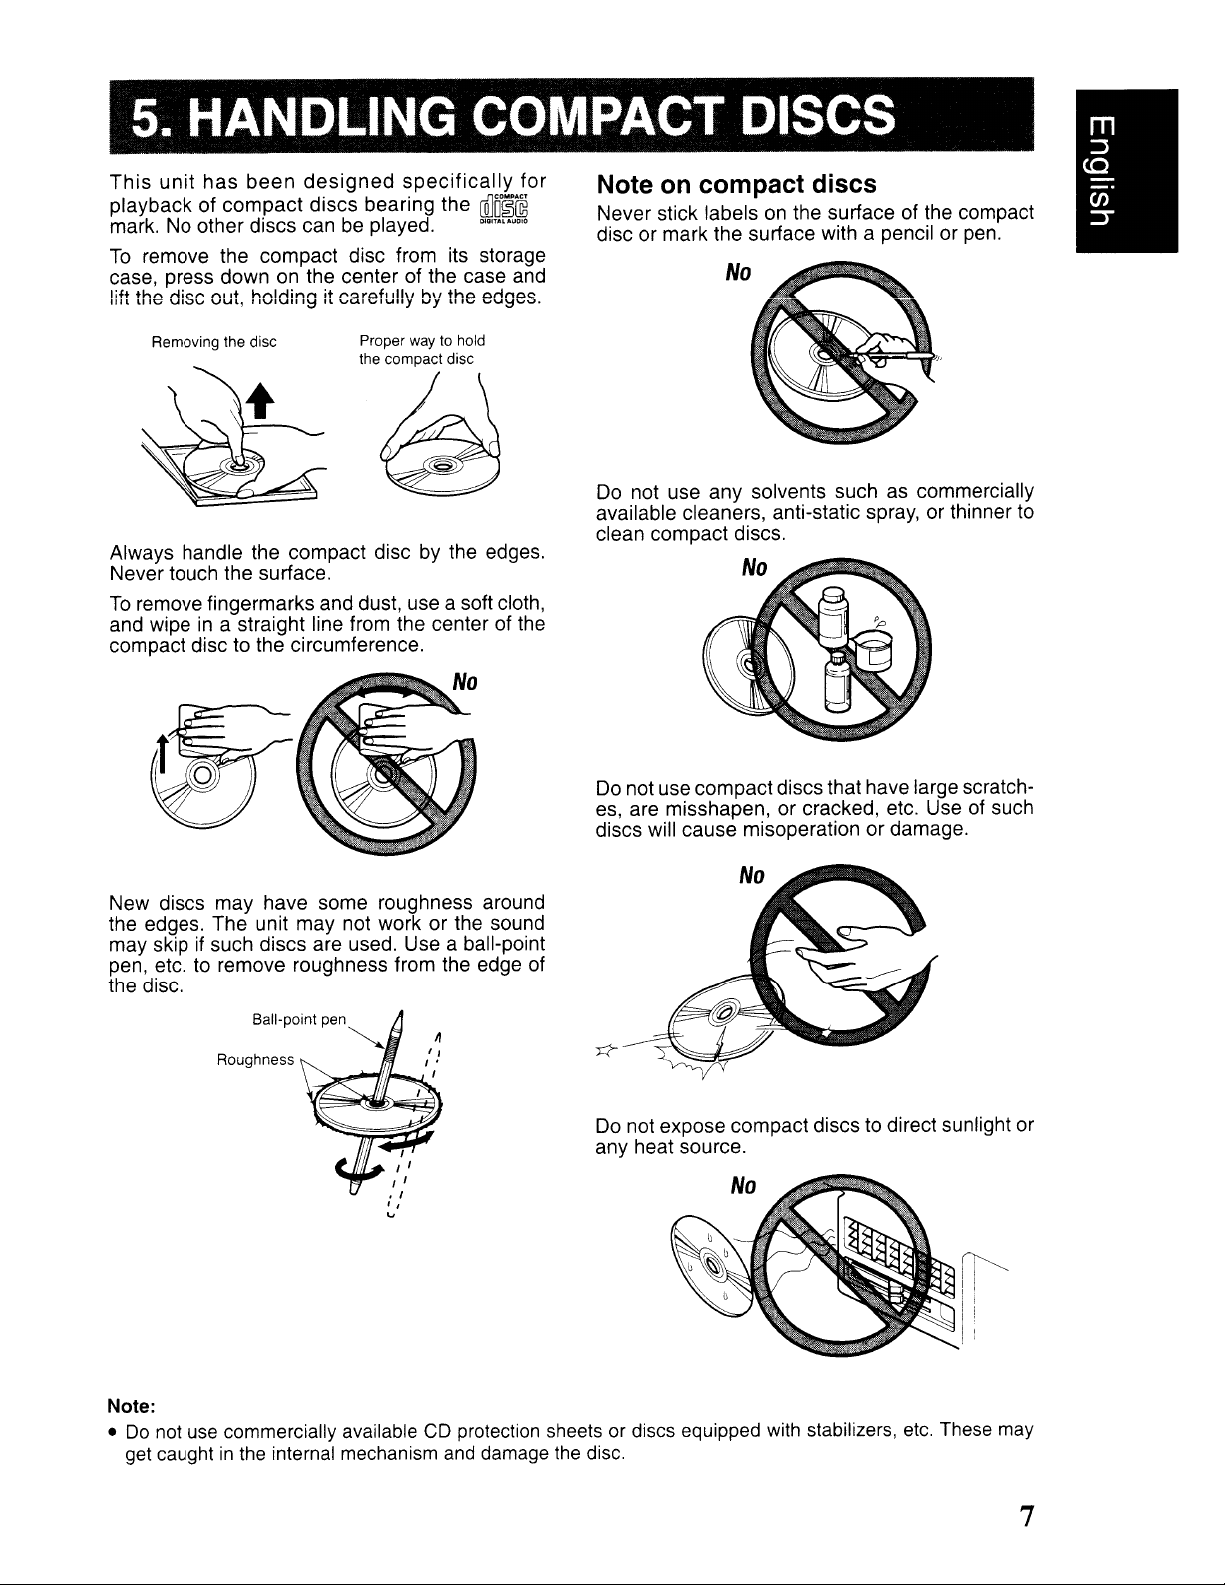
This
unit
has
been
designed
playback of compact discs bearing the
mark. No other discs canbeplayed.
To
remove the compact disc from its storage
case, press down
lift the disc out, holding it carefully by the edges.
on
the center of the case and
specifically
ru'JO~@
DOG,,,,,",,.
for
Note on compact discs
Never stick labelsonthe surface of the compact
disc or mark the surface with a pencil or pen.
Removing the disc
Always handle the compact disc by the edges.
Never touch the surface.
To
remove fingermarks and dust, use a soft cloth,
and wipe
compact disc to the circumference.
New discs may have some roughness around
the edges. The unit may not work or the sound
may skip
pen, etc. to remove roughness from the edge of
the disc.
in
a straight line from the center of the
if
such discs are used. Use a ball-point
Ball-point pen
Roughness
Proper waytohold
the compact disc
II
Do not use any solvents such as commercially
available cleaners, anti-static spray, or thinner to
clean compact discs.
No
Do not use compact discs that have large scratch-
es, are misshapen, or cracked. etc. Use of such
discs will cause misoperation or damage.
Do not expose compact discs to direct sunlight or
any heat source.
Note:
• Do not use commercially available CD protection sheets or discs equipped with stabilizers, etc. These may
get caught
in
the internal mechanism and damage the disc.
7
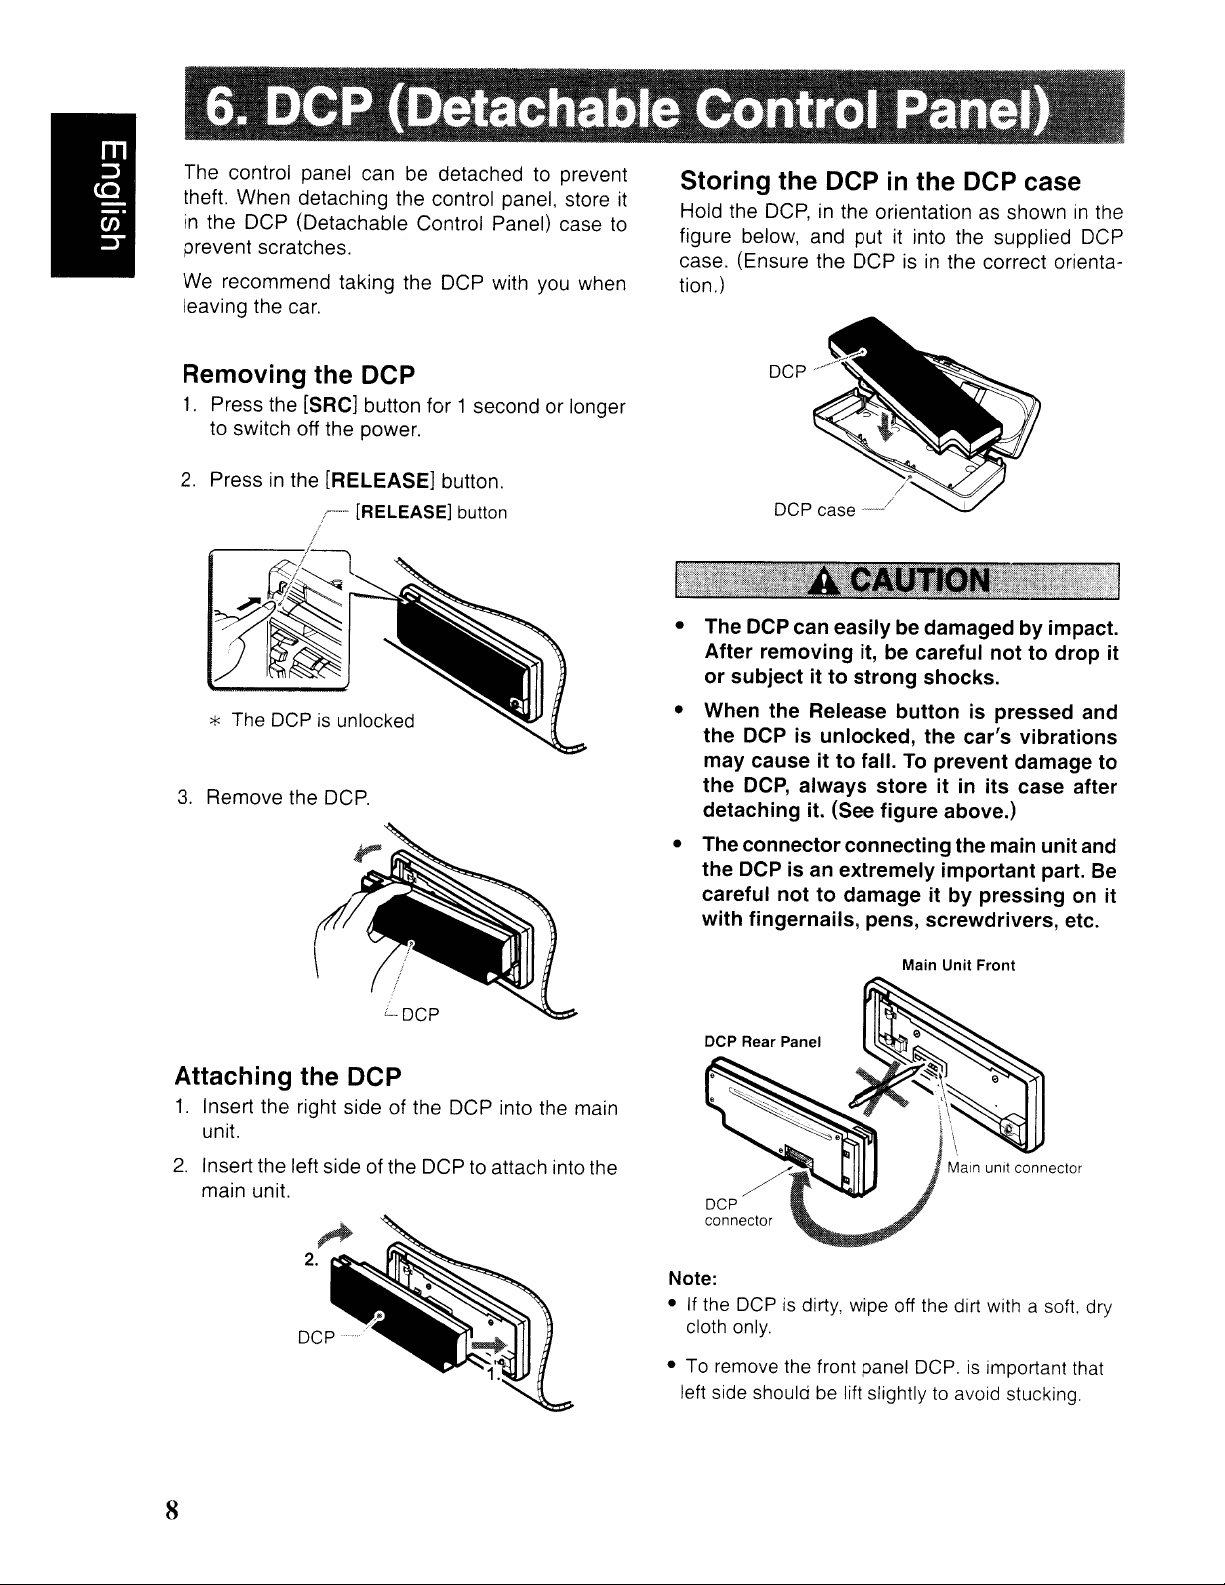
The control panel can
theft. When detaching the control panel, store
in
the DCP (Detachable Control Panel) case
prevent scratches.
We
recommend taking the
leaving the
car.
be
detachedtoprevent
OCP
with
you
when
Removing the DCP
1.
Press the [SRC] button for 1 second or longer
to
switch off the power.
it
to
Hold the
figure below, and put it into the supplied
case. (Ensure the
tion
OCP,inthe orientation as showninthe
OCPisin
.)
the correct orienta-
OCP
Storing the DCP in the DCP case
2.
Pressinthe [RELEASE] button.
/,
...
[RELEASE] button
!
~'-~L~l
i~
* The OCP is unlocked
3.
Remove the
OCP.
.?'
OCP
case.._.../
• The DCP can easily be damagedbyimpact.
After
removing
or
subjectitto
• When the Release
the
DCP is unlocked,
may causeitto
the
DCP,
always
detaching it. (See
• The
connector
the
DCP is an extremely
careful
with
DCP Rear Panel
nottodamageitby
fingernails, pens, screwdrivers, etc.
/
it, be careful
strong
fall.Toprevent damage
connecting the main unitand
shocks.
button
the
storeitin
figure
Main Unit
nottodrop
is pressed and
car's
vibrations
its
case after
above.)
important
pressing
Front
part. Be
on
it
to
it
Attaching
1.
Insert the right side of the DCP into the main
unit.
2.
Insert the left side of the
main unit.
the DCP
OCPtoattach into the
8
Note:
• If the
• To remove the front panel OCP. is important that
OCP
is dirty, wipe off the dirt with a soft. dry
cloth only.
left side should be lift slightly to avoid stucking.
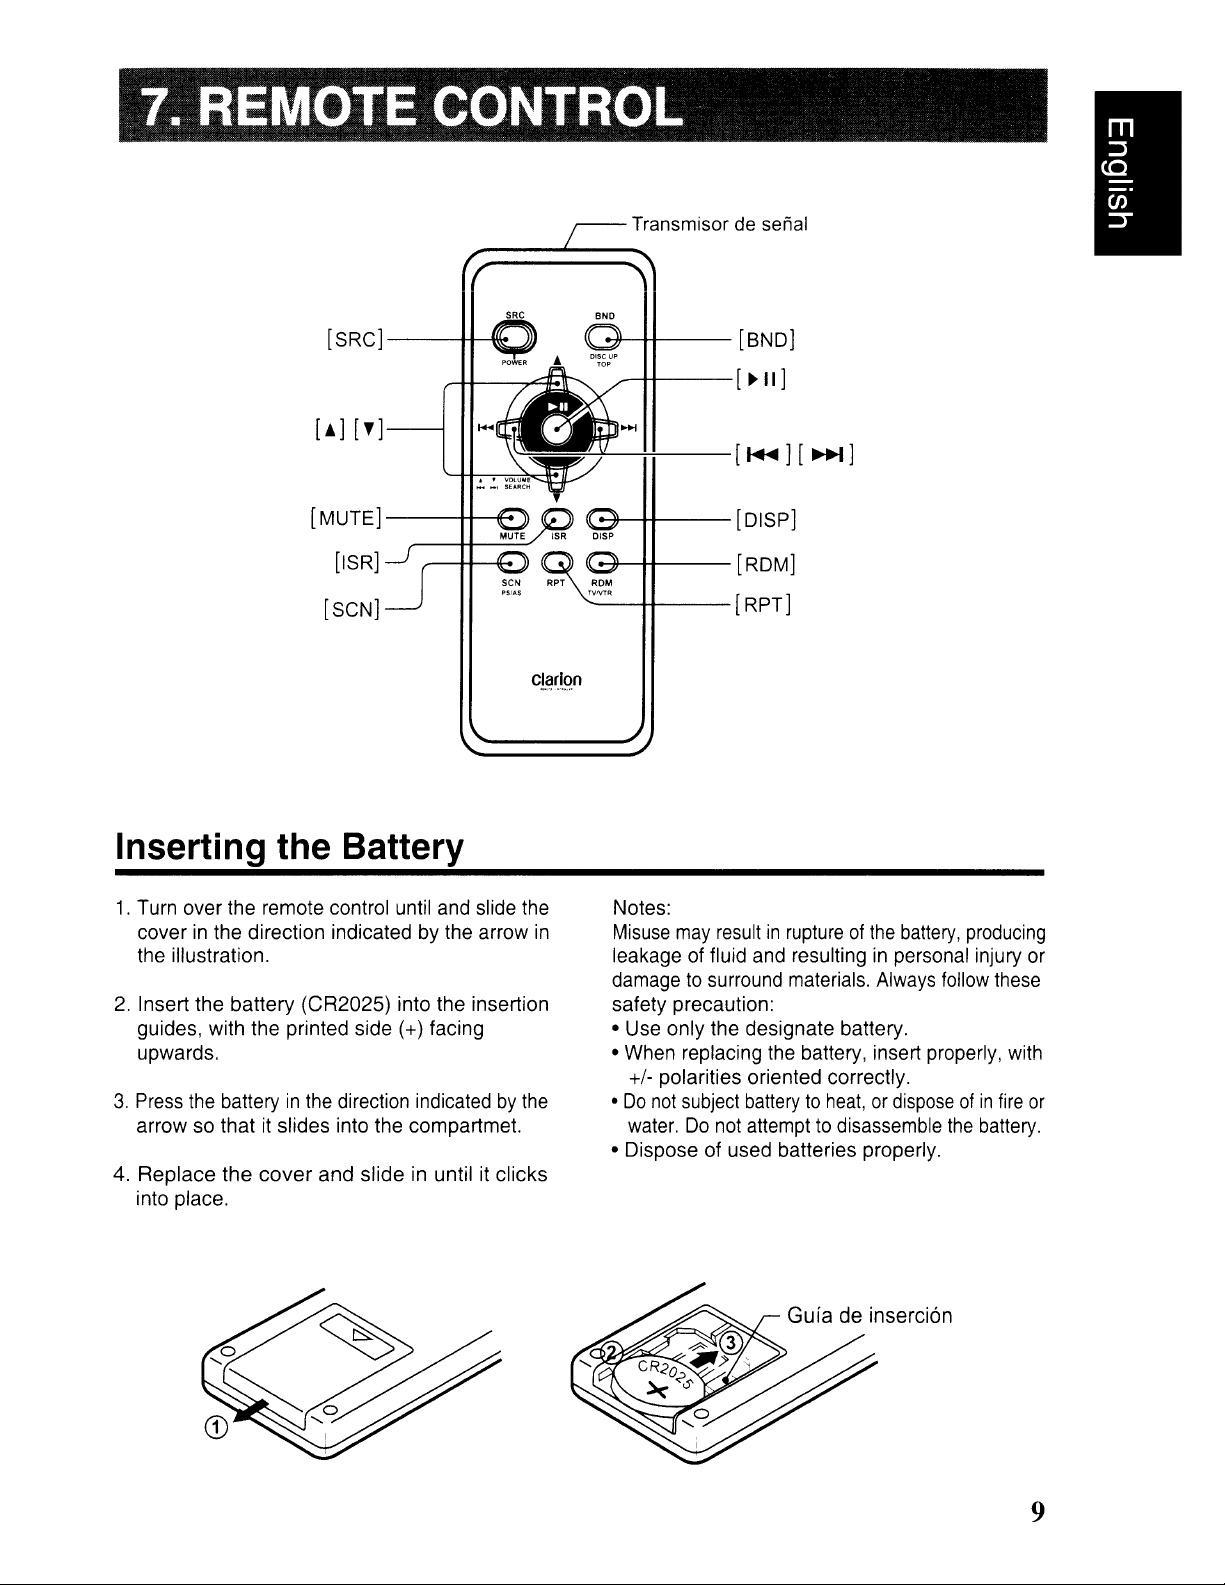
SRC
[SRCJ--+t-~
Transmisor de senal
-7f-tt---
[ BNDJ
[MUTEJ
---++----ff-e
[ISR]
[SCN]
Inserting the Battery
1.
Turn over the remote control until and slide the
cover
in
the direction indicated by the arrow
the illustration.
2. Insert the
guides, with the printed side (+) facing
upwards.
3.
Press the batteryinthe direction indicatedbythe
arrow so that it slides into the compartmet.
Replace
4.
into place.
battery
the
(CR2025) into the insertion
cover
and
slide
in until it
Clarion
clicks
in
..----f+----
~-++---[DISpJ
~-++---[RDMJ
------++----
Notes:
Misuse
leakage of fluid and resulting
damage to surround materials. Always follow these
safety precaution:
• Use
• When replacing the battery, insert properly, with
may
only
[ ., II J
[RPTJ
resultinruptureofthe
in
the designate battery.
battery, producing
personal injury or
+/- polarities oriented correctly.
•
Do
not
subject batterytoheat,ordisposeofin
water.Donot attempt to disassemble the battery.
• Dispose
of
used batteries properly.
fire
or
9
 Loading...