


 Loading...
1 ZoomBrowser EX Software User Guide

Table of Contents (1/2)
Chapter 1 Try It! ZoomBrowser EX |
|
Starting ZoomBrowser EX ........................................................ |
4 |
Downloading Images to a Computer ....................................... |
8 |
Printing Images ....................................................................... |
12 |
Supplementary Information .................................................... |
18 |
Chapter 2 What is ZoomBrowser EX? |
|
What Can ZoomBrowser EX Do? ............................................. |
19 |
Finding Images and Folders ..................................................... |
21 |
Main Window ......................................................................... |
23 |
Camera Window ..................................................................... |
28 |
Using the Right-Click in Operations ......................................... |
30 |
Chapter 3 Viewing Images |
|
Selecting Folders - Folder Area ................................................ |
31 |
Selecting Folders - Browsing Area ........................................... |
32 |
Opening Images ...................................................................... |
37 |
Zooming .................................................................................. |
38 |
Editing Images ......................................................................... |
39 |
Editing Images with Other Programs ...................................... |
43 |
2 ZoomBrowser EX Software User Guide
Chapter 4 Organizing Images |
|
Creating Folders ...................................................................... |
44 |
Selecting Images ...................................................................... |
45 |
Moving or Copying Images ..................................................... |
46 |
Deleting Images ...................................................................... |
50 |
Rotating Images ...................................................................... |
52 |
Renaming Images .................................................................... |
53 |
Sorting Images ........................................................................ |
54 |
Searching Images .................................................................... |
55 |
Refreshing Folders ................................................................... |
58 |
Deleting Folders ...................................................................... |
59 |
Renaming Folders .................................................................... |
60 |
Finding Folder Locations ......................................................... |
61 |
Viewing Image Properties ....................................................... |
62 |
Chapter 5 Using the Camera Window |
|
Opening the Camera Window ................................................ |
64 |
Downloading Images .............................................................. |
66 |
Deleting Images in the Camera ............................................... |
69 |
Rotating Images in the Camera ............................................... |
70 |
Adding Computer Images to the Camera ................................ |
71 |
Using the Task Buttons ............................................................ |
73 |
Other Functions of the Camera Window ................................. |
75 |

Table of Contents (2/2)
Chapter 6 Using Supplementary Features |
|
Sending Images by E-mail ........................................................ |
76 |
Adding Computer Images to the Camera ................................ |
78 |
Exporting Images .................................................................... |
80 |
Running a Slide Show .............................................................. |
82 |
Adding Sounds to Images ........................................................ |
84 |
Checking and Changing Camera Settings ............................... |
85 |
Saving the “My Camera Settings” to the Camera .................... |
86 |
Creating a My Camera Sound .................................................. |
93 |
Playing Movies ........................................................................ |
95 |
Editing Movies ......................................................................... |
96 |
Exporting Movies .................................................................. |
100 |
Converting RAW Images ....................................................... |
102 |
Operating the Camera Shutter from the Computer .............. |
107 |
Stitching Panoramic Images - PhotoStitch ............................. |
111 |
Saving Images to CD-R/RW Disks (Windows XP Only) ............ |
112 |
3 ZoomBrowser EX Software User Guide
Appendices |
|
Supported File Formats ......................................................... |
113 |
Auto-Download Settings ....................................................... |
114 |
Customizing Preferences ....................................................... |
117 |
Customizing Menus ............................................................... |
120 |
Setting up Slide Shows on the Camera .................................. |
121 |
Print Settings ......................................................................... |
122 |
Troubleshooting .................................................................... |
124 |
Index |
|
Index ..................................................................................... |
128 |
NOTE
•This manual uses Windows XP screen shots and procedures in the explanations. The screen shots and procedures may appear slightly different if you are using another version of Windows.
•In this manual, the term “memory card” is used for CF cards, SD cards and PC cards.

Chapter 1
Try It! ZoomBrowser EX
Starting ZoomBrowser EX (1/4)
This chapter covers the ZoomBrowser EX basics, such as starting the program, downloading images from the camera and printing them. It begins with the procedures for starting the program.
IMPORTANT
•This guide assumes that all the relevant software programs and drivers have been correctly installed on your computer. If they have not been installed yet, read the guides that accompanied your camera and install them before proceeding further.
Starting Methods
There are two ways to start ZoomBrowser EX: “Starting by Connecting the Camera to the Computer” and “Starting by Clicking an Icon or Menu.”
It is generally easier and more convenient to start it by connecting the camera to the computer.
However, you may wish to click an icon or menu to start it under the following circumstances.
•When you are using a memory card reader.
•When you wish to use ZoomBrowser EX without connecting a camera.
•When you are restarting ZoomBrowser EX with the camera still connected after the program has been closed once.
IMPORTANT
•With some versions of Windows, you may not be able to use the “Starting by Connecting the Camera to the Computer” method the very first time the camera is connected to the computer after it is booted up (owing to a limitation of Windows). In this case, start ZoomBrowser EX with the “Starting by Clicking an Icon or Menu” method. You may use the camera connection method from the second time onward.
4 ZoomBrowser EX Software User Guide
Chapter 1
Try It! ZoomBrowser EX
Starting ZoomBrowser EX (2/4)
Starting by Connecting the Camera to the Computer
You can start ZoomBrowser EX with this method by attaching the camera to the computer and preparing it to transfer data. Set the following Auto Start Settings the first time (only) that you connect the camera to a computer. If you have already set them, proceed to the steps on the next page.
IMPORTANT
• This method can only be used when the camera is connected to the computer with the interface cable.
■ Settings for the First Connection to a Computer
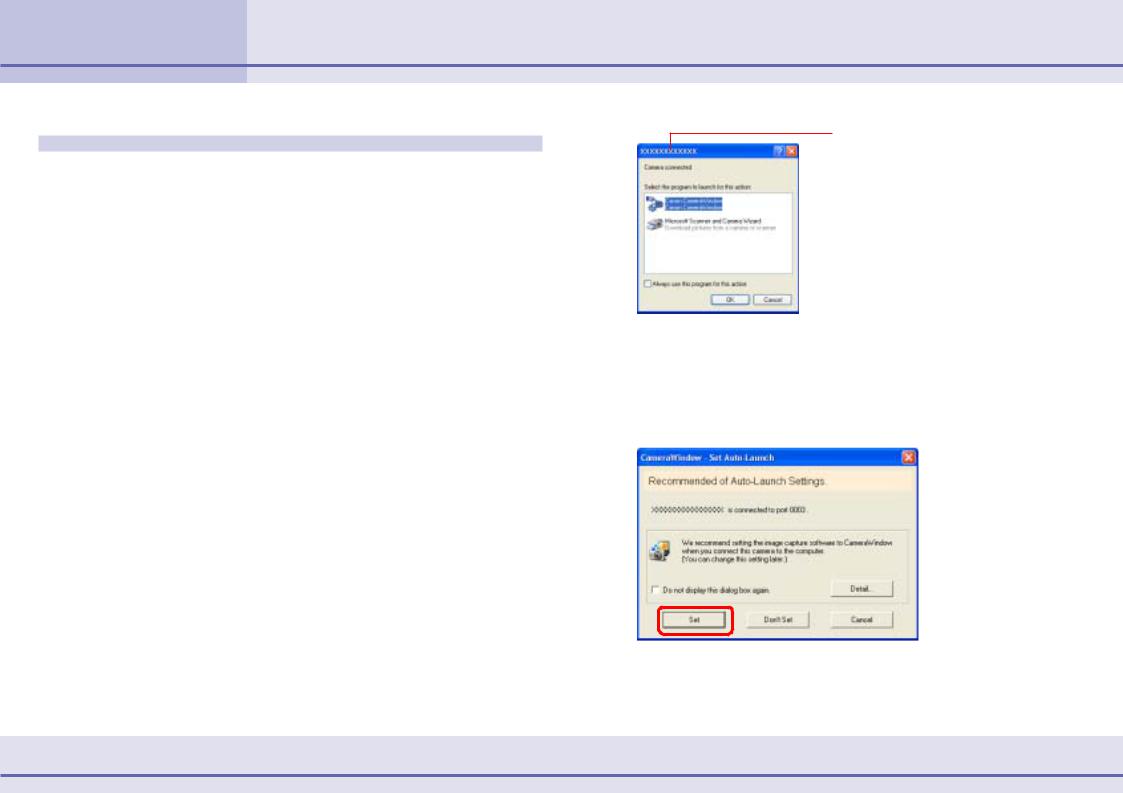
2.
3.
1. Use the interface cable to connect the camera to the computer.
Please see the manual supplied with your camera for connection instructions.
With some models, the camera may need to be set to the playback mode to communicate with a computer. Consult the manual for these models to set the camera to the correct mode for communication.
A dialog similar to the following one (Events dialog) will appear. If it does not, read the Troubleshooting section in the
Appendices.
Your camera model name or “Canon Camera” will appear here.
Select [Canon CameraWindow] and click [OK].
Click [Set].
Once you click the Set button, this dialog will no longer appear when the camera is connected.
The dialog for Step 1 shown on the next page will now appear.
5 ZoomBrowser EX Software User Guide
Chapter 1
Try It! ZoomBrowser EX
Starting ZoomBrowser EX (3/4)
■Procedures for Subsequent Connections to a Computer
IMPORTANT
•With some versions of Windows, you may not be able to use this method of starting ZoomBrowser EX the very first time the camera is connected to the computer after it is booted up. (The dialog shown to the right will not display even if you connect the camera to the computer correctly.)
In this case, start the program with the Starting by Clicking an Icon or Menu method.
REFERENCE
•If the Scanners and Cameras Wizard displays, close it and use the Starting by Clicking an Icon or Menu method to start ZoomBrowser EX.
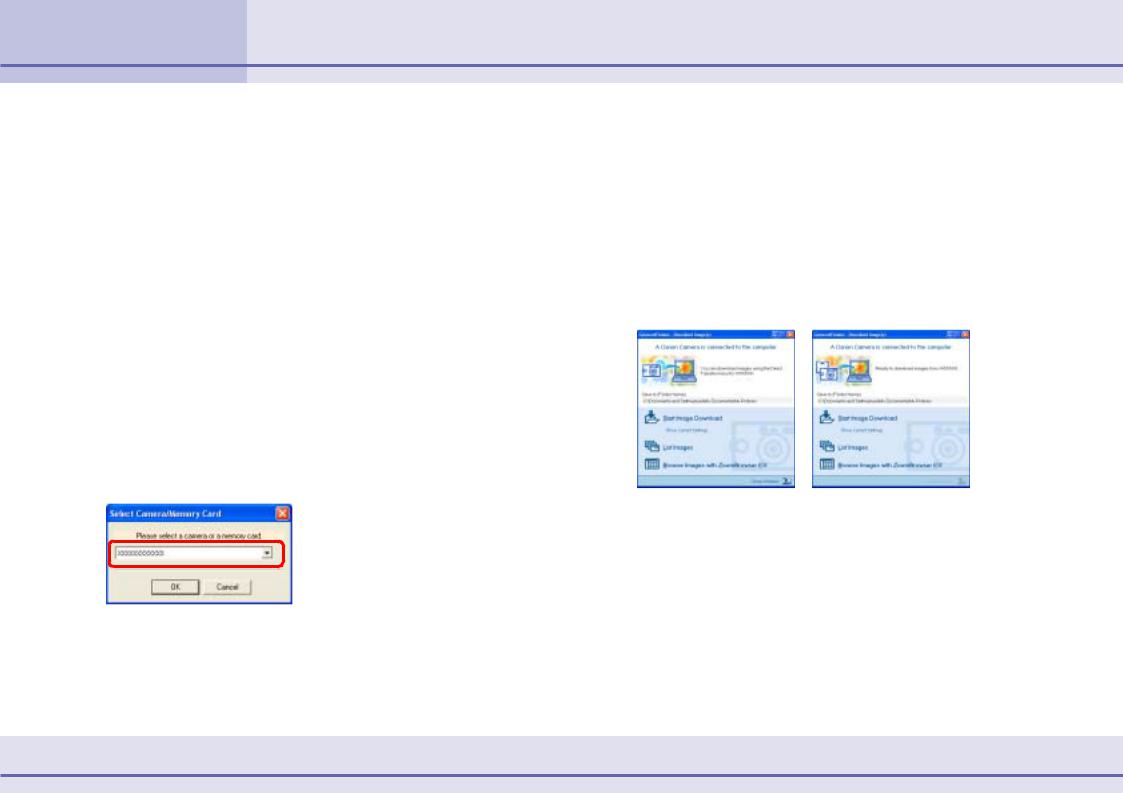
•A device selection dialog will display if you have both a camera and a memory card reader connected at the same time. Confirm that your camera model name or [Canon Camera] appears in the list box and click [OK].
1. Use the interface cable to connect the camera to the computer.
Please see the manual supplied with your camera for connection instructions.
With some models, the camera may need to be set to the playback mode to communicate with a computer. Consult the manual for these models to set the camera to the correct mode for communication.
A dialog like the ones below will display.
The procedures from this point onward are described in the next topic, “Downloading Images to a Computer”.
Click [Browse Images with ZoomBrowser EX] if you wish to proceed to ZoomBrowser EX’s main window and do not wish to download images.
The explanation about which method is used to download images after ZoomBrowser EX starts up automatically is contained in the “Auto-Download Settings” section of the
Appendices.
6 ZoomBrowser EX Software User Guide
Chapter 1
Try It! ZoomBrowser EX
Starting ZoomBrowser EX (4/4)
Starting by Clicking an Icon or Menu
Use the following methods to start ZoomBrowser EX using its desktop icon or a menu.
■The Icon Method
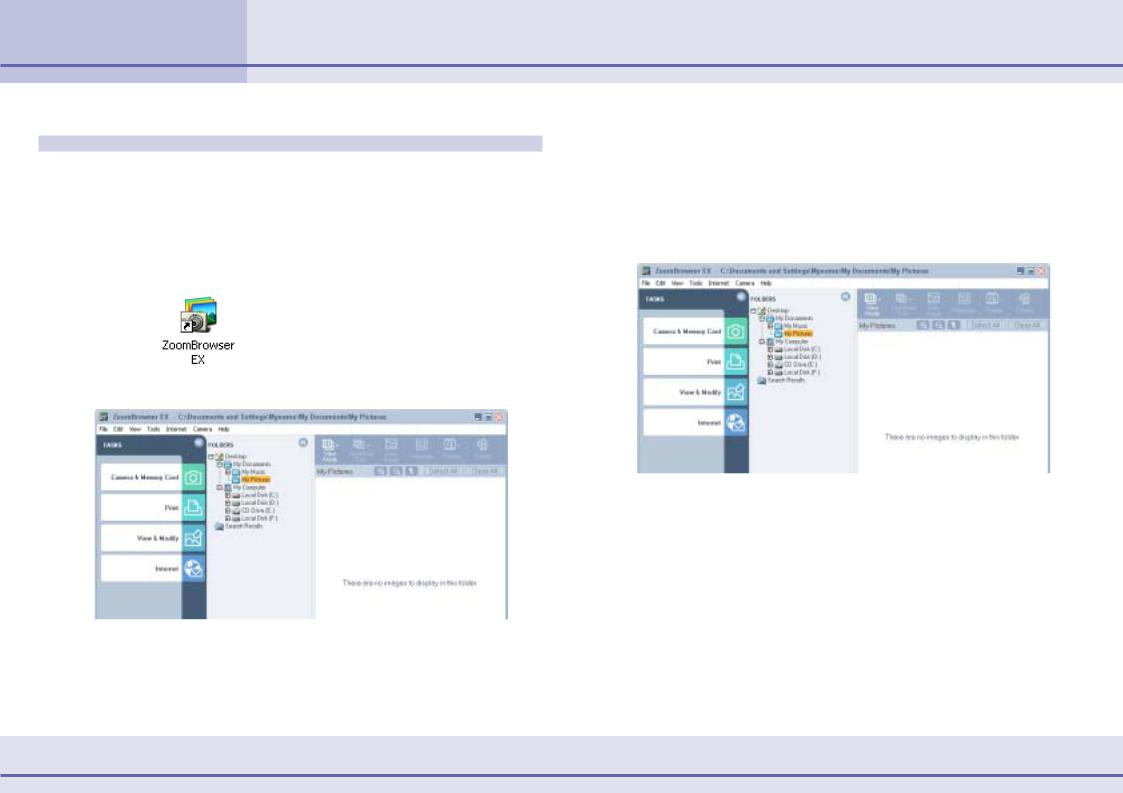
1.Double-click the [ZoomBrowser EX] icon on the desktop.
ZoomBrowser EX will start and open its main window.
■The Menu Method
1.Click the [Start] menu and select [All Programs] or [Programs], followed by [Canon Utilities], [ZoomBrowser EX] and [ZoomBrowser EX].
ZoomBrowser EX will start and open its main window.
Main Window
The procedures for downloading images are described in the next topic, “Downloading Images to a Computer.”
Main Window
The procedures for downloading images are described in the next topic, “Downloading Images to a Computer.”
7 ZoomBrowser EX Software User Guide
Chapter 1
Try It! ZoomBrowser EX
Downloading Images to a Computer (1/4)
This section describes two methods for downloading images shot with a camera to a computer.
■Downloading Images with Computer Commands
This method uses commands entered on the computer to download images from a memory card in a camera or in a memory card reader. This method can be used regardless of whether your camera supports the direct transfer function or not.
■Downloading Images with Camera Commands
You can use this method to download images with cameras that support the direct transfer function.
Check to ensure that the computer and the camera or memory card reader are in the correct state for communication.
Using Computer Commands to Download Images
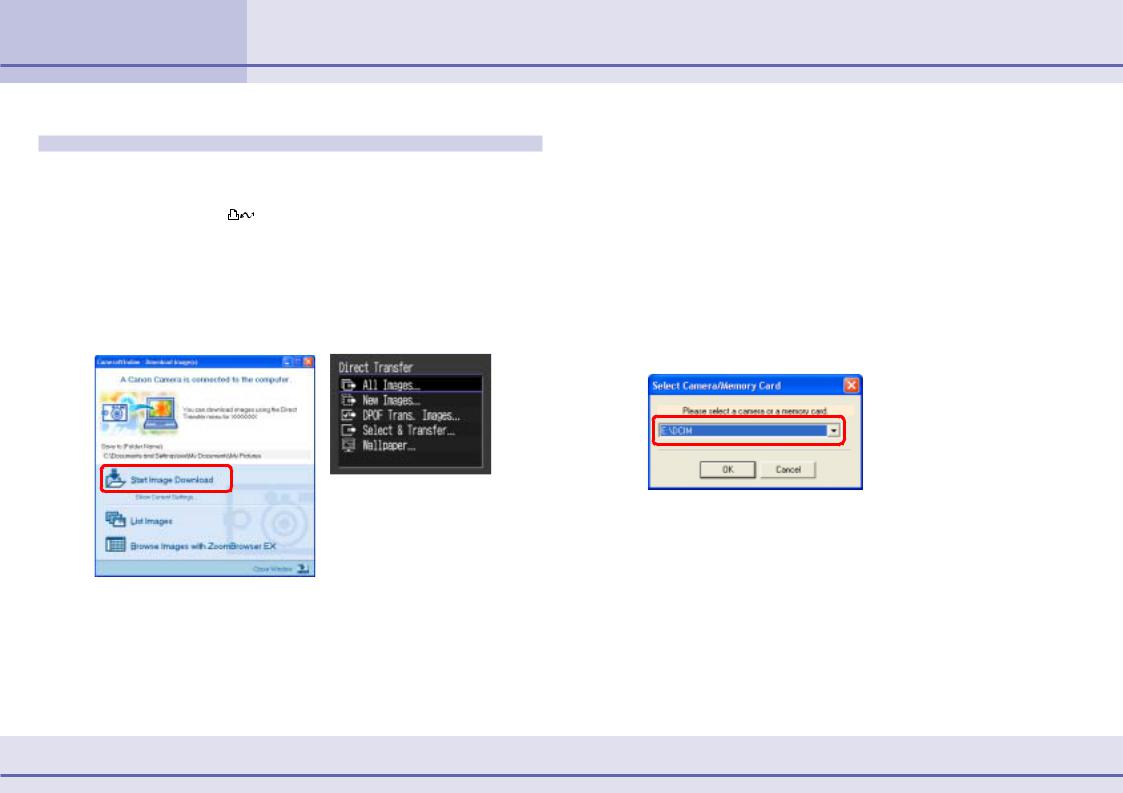
1. Read the dialog that displays.
If a dialog similar to the one below appears, proceed to Step 4.
*The dialog will vary slightly according to your camera model.
2.
3.
Proceed to Step 2 if ZoomBrowser EX’s main window displays.
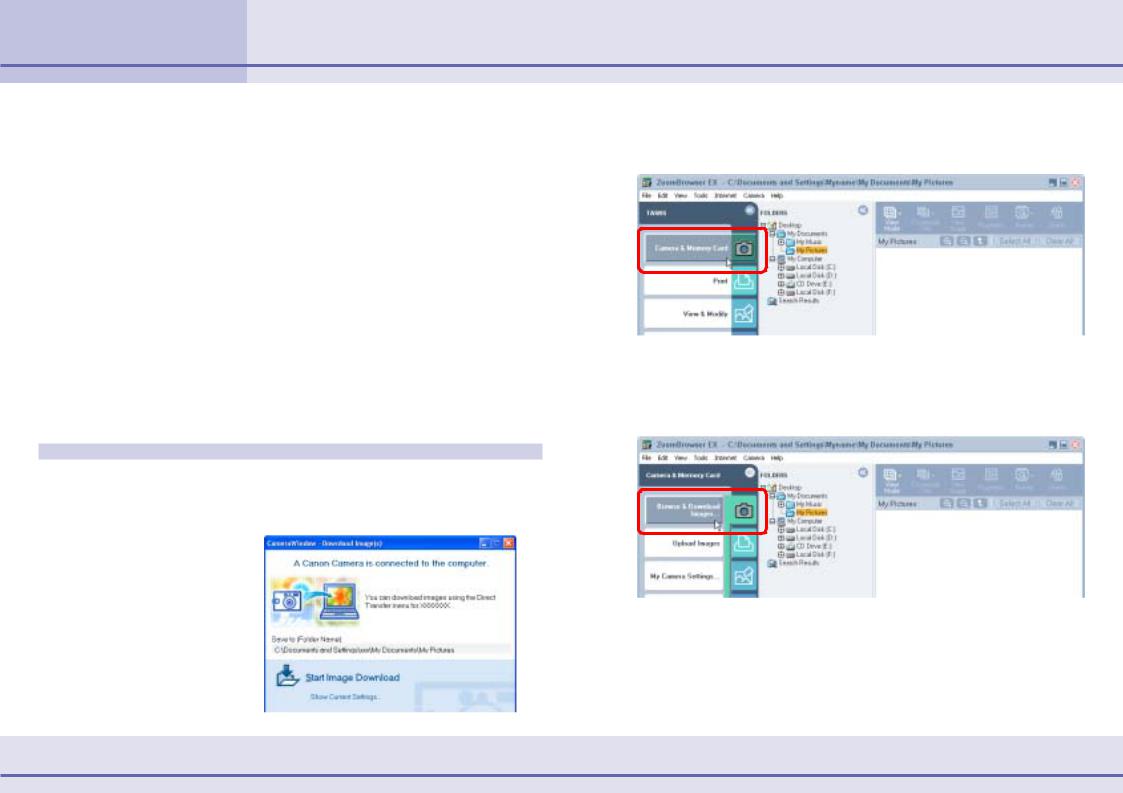
Click [Camera & Memory Card].
If you are using a memory card reader, check to ensure that the card is correctly inserted in the reader.
Click [Browse & Download Images].
8 ZoomBrowser EX Software User Guide

Chapter 1
Try It! ZoomBrowser EX
Downloading Images to a Computer (2/4)
REFERENCE
•A dialog will appear if multiple memory card readers are connected and loaded with memory cards, or if a camera and a memory card are connected concurrently, to allow you to select which images are shown from which device. In that case, select the desired device from the list box and click [OK].
4. Click [Start Image Download].
REFERENCE
•You can view information such as the destination folder for images by clicking [Show Current Settings] in the window.
•By the default setting, the program downloads all the images that have not yet been downloaded.
The images will begin to download. The downloaded images will be saved into folders according to their creation dates. When the download is complete, the downloaded images will appear in the main window.
Downloaded images
9 ZoomBrowser EX Software User Guide
Chapter 1
Try It! ZoomBrowser EX
Downloading Images to a Computer (3/4)
Using Camera Commands to Download Images
You can download images using camera commands if your camera supports the direct transfer function (camera has a Print/Share button ).
1. Read the dialog that displays.
If a dialog similar to the one below appears, proceed to Step 2. The Print/Share button will light up at this point and a direct transfer menu like the one shown at the lower right will appear in the camera’s LCD monitor.
IMPORTANT
•The camera’s Print/Share button cannot be used to download images if it is not lighted.
REFERENCE
•The dialog in step 1 will not display if the Camera Window or RemoteCapture Task window is open. Please close these windows.
•A dialog will appear if a camera and a memory card reader are connected concurrently to allow you to select the device from which images are shown. Select the desired device from the list box and click [OK].
10 ZoomBrowser EX Software User Guide
Chapter 1
Try It! ZoomBrowser EX
Downloading Images to a Computer (4/4)
2. The image transfer will commence after you set the direct transfer setting on the camera.
REFERENCE
•See the Camera User Guide for the settings and procedures related to the Direct Transfer menu shown on the camera’s LCD monitor.
•You can also download images by clicking the [Start Image Download] button on the program window on the computer instead of clicking the camera’s Print/Share button.
•You can view information such as the destination folder for images by clicking [Show Current Settings] in the program window on the computer.
•By the default setting, the program downloads all the images that have not yet been downloaded.
The images will begin to download. The downloaded images will be saved into folders according to the shooting date. The images will display in the main window when the download is complete.
Downloaded images
11 ZoomBrowser EX Software User Guide
Chapter 1
Try It! ZoomBrowser EX
Printing Images (1/6)
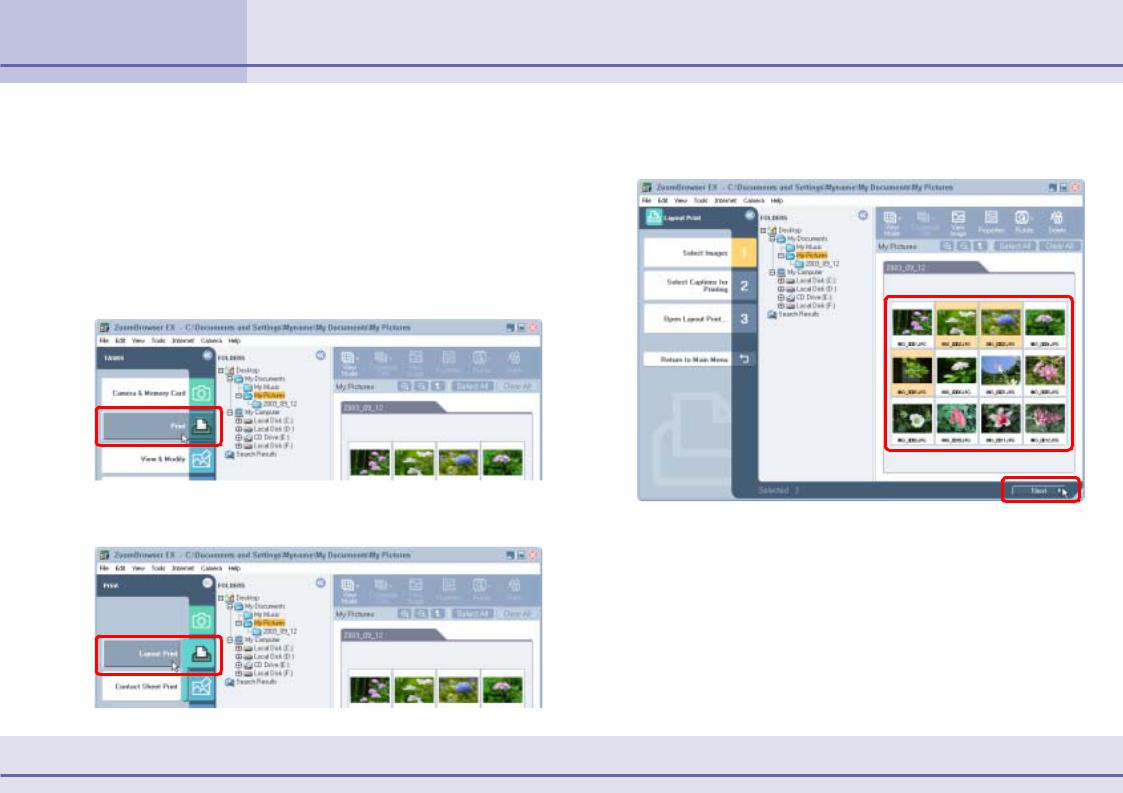
You will use the PhotoRecord printing utility to print. |
3. Select the images you wish to print and click [Next]. |
|
REFERENCE |
||
The background of the selected images will turn orange. |
•Images recorded in the Adobe RGB color space will appear unsaturated when printed using PhotoRecord. (Color space settings are only available on select camera models.)
•Please see the PhotoRecord Help menu for more details on using this program.
1.Click [Print].
2. Click [Layout Print] in the next menu.
REFERENCE
•More than one image can be selected by clicking on successive images. To deselect an image, click it a second time.
12 ZoomBrowser EX Software User Guide
Chapter 1
Try It! ZoomBrowser EX
Printing Images (2/6)
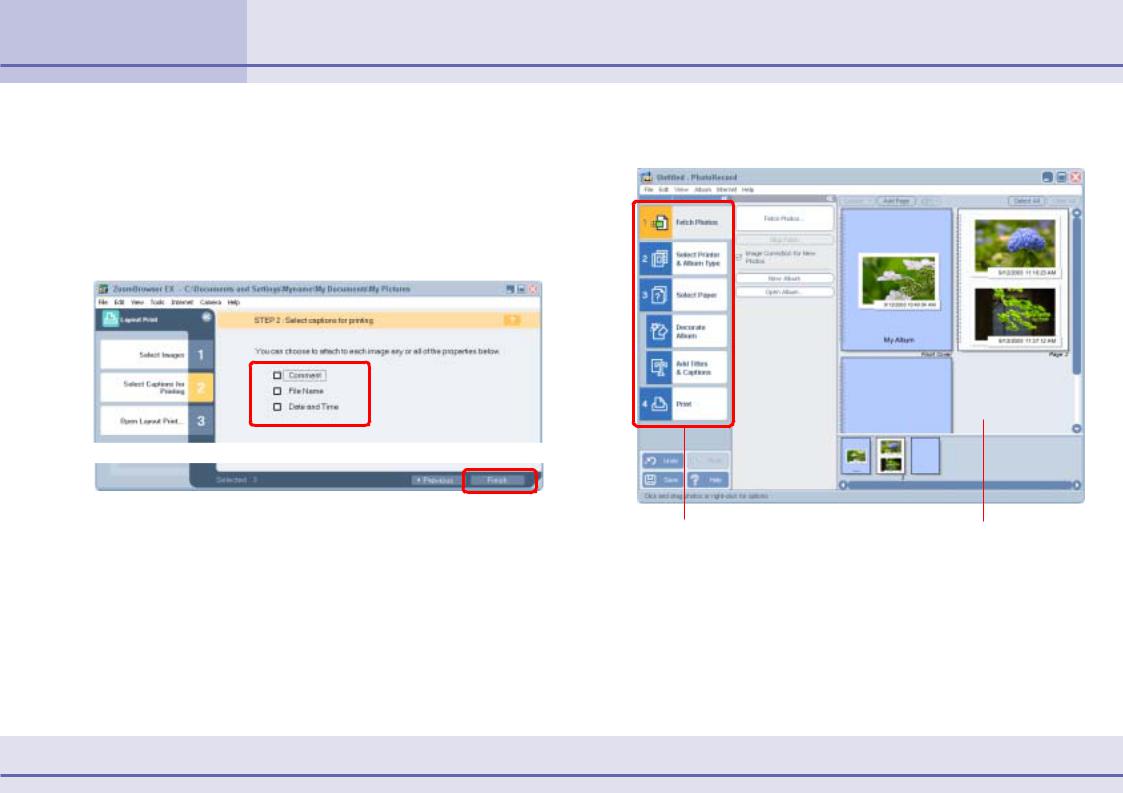
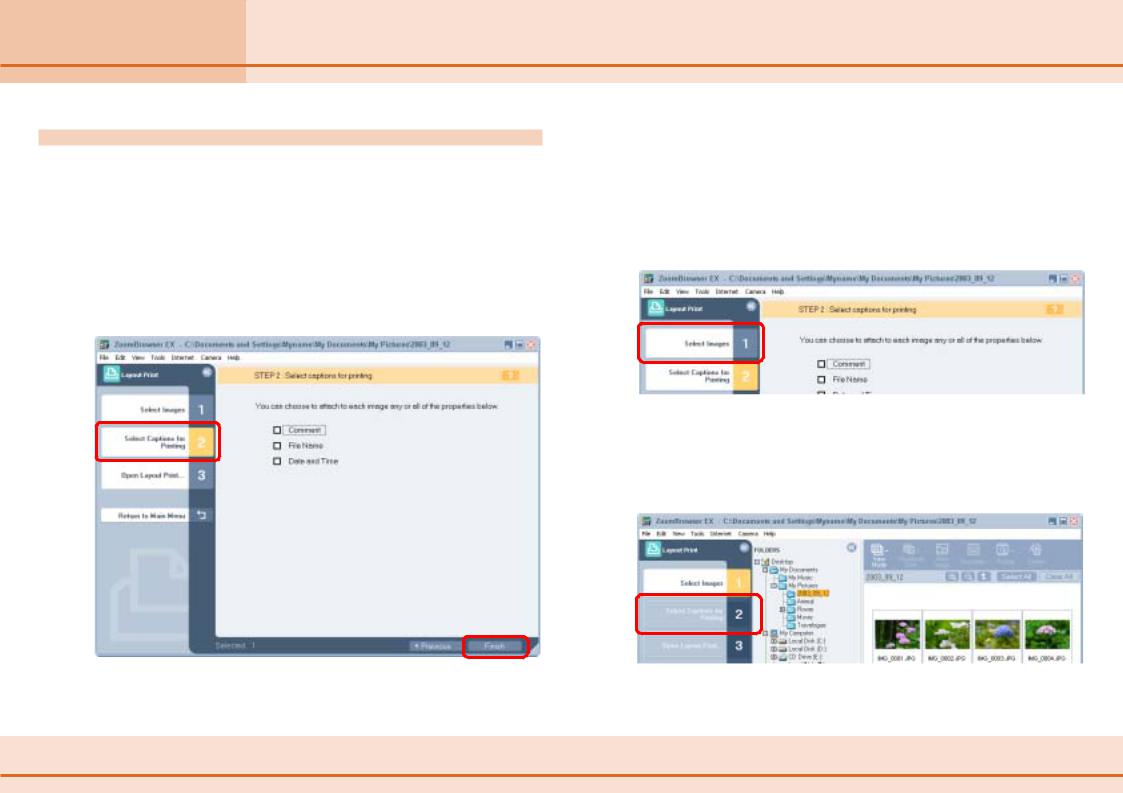
4. Place a check mark in the boxes of the data you wish to include with the print (multiple selections are possible) and click [Finish].
REFERENCE
•See Viewing Image Properties in Chapter 4 to learn how to append comments to images.
To operate PhotoRecord, follow the procedures displayed at the window’s left.
This will start PhotoRecord and display the print image in the album window.
REFERENCE
•If the PhotoRecord Guide displays at startup, read it as necessary.
The Steps in Order |
Album Window |
13 ZoomBrowser EX Software User Guide
Chapter 1
Try It! ZoomBrowser EX
Printing Images (3/6)
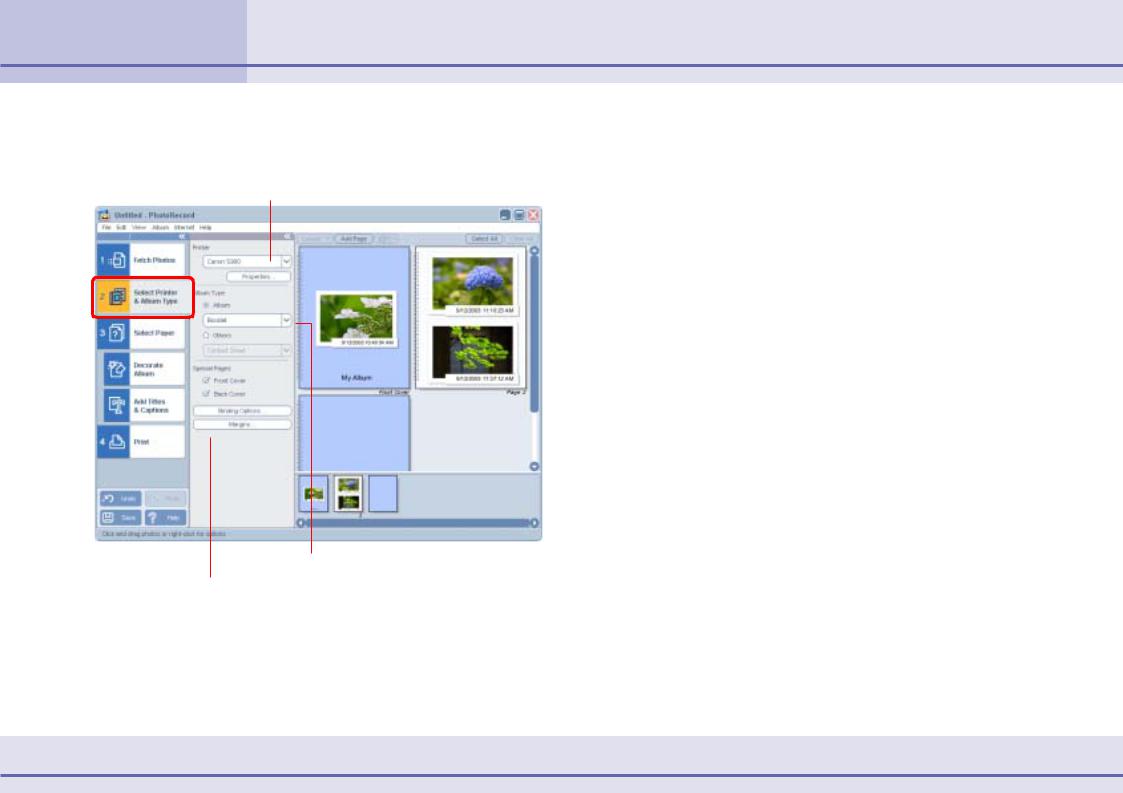
5. Click [2 Select Printer & Album Type] and select a printer and an album type.
Select a printer
Select an album type
Detailed settings for each album type
REFERENCE
•Select among the following album types.
•Album—Booklet
Arranges pages with a margin for binding multiple printed pages together and white spaces at the left or top.
•Album—Simple Album
Creates margins of equal size at the top, bottom and sides.
•Other—Contact Sheet
Prints the images in a table format.
•Other—One Photo Per Page Prints one image on each page.
•Other—Fixed Size Photo Prints images at a set size.
•Other—Mosaic
Prints a specified number of images in a spread.
•After you have selected the album type, you can set the detailed parameters for each album type in the area below, such as the margin placement and width and the number of images in an arrangement.
14 ZoomBrowser EX Software User Guide
Chapter 1
Try It! ZoomBrowser EX
Printing Images (4/6)
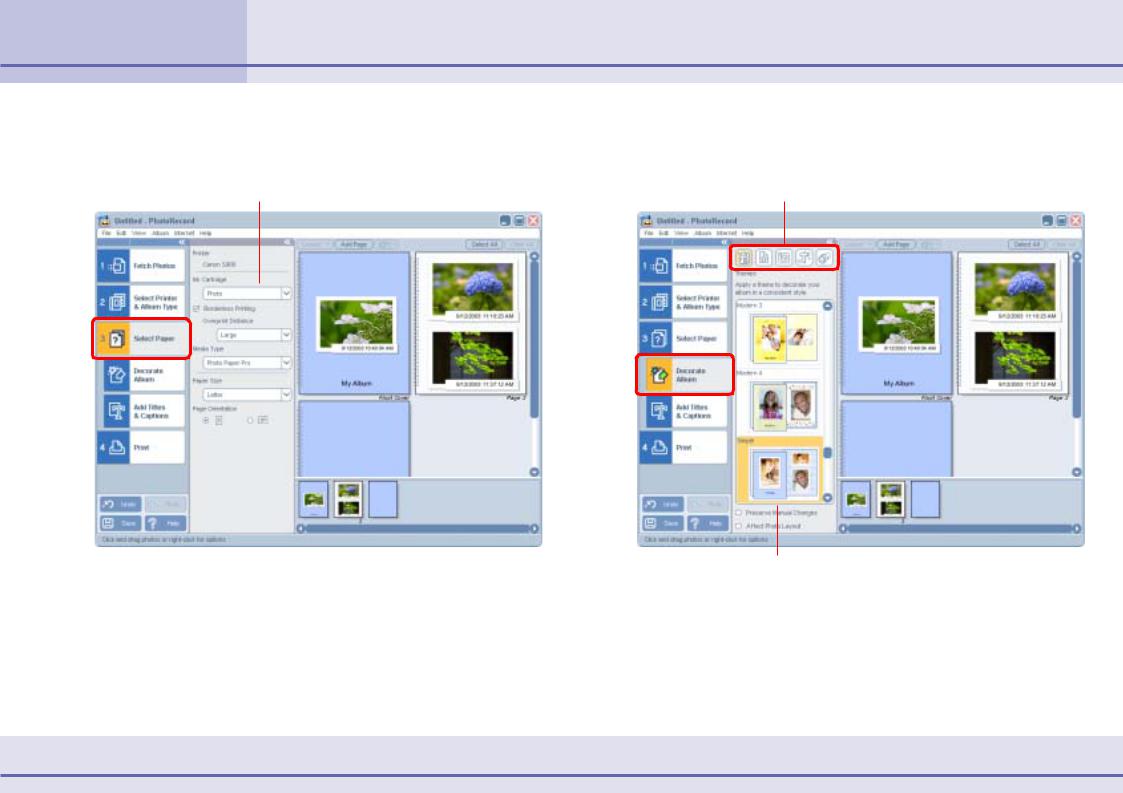
6. Click [3 Select Paper] and choose the media type, paper size and paper orientation.
Media Type and Paper Size Settings
7. Click [Decorate Album] and change the image background, frame and other design elements as desired.
Select an item to change
REFERENCE
•The settings categories shown in this window may vary according to the printer in use.
Select a design
REFERENCE
•The items that can be changed include the themes (a unified design for the background, photo frames and text frames, etc.) backgrounds, photo frames, text frames, and clip art.
•Select the target page, image or text first when choosing a background, photo frame or text frame.
15 ZoomBrowser EX Software User Guide
Chapter 1
Try It! ZoomBrowser EX
Printing Images (5/6)
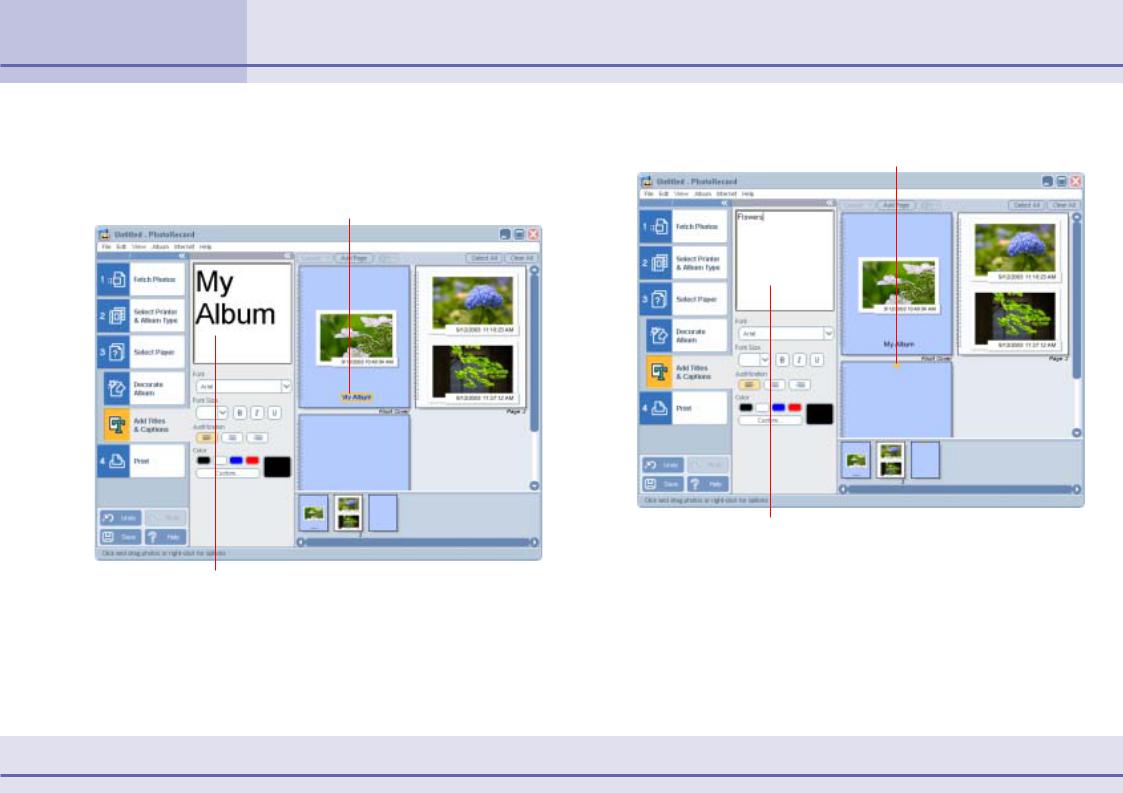
8. Click [Add Titles & Captions] and change or add titles and text as desired.
Click on text that is already displayed to change it.
Select the text.
Edit it here.
To add new text, click the target page and input the text.
Select the page
Input the text
REFERENCE
•You can also adjust the font, font size, justification and color as desired.
16 ZoomBrowser EX Software User Guide
Chapter 1
Try It! ZoomBrowser EX
Printing Images (6/6)
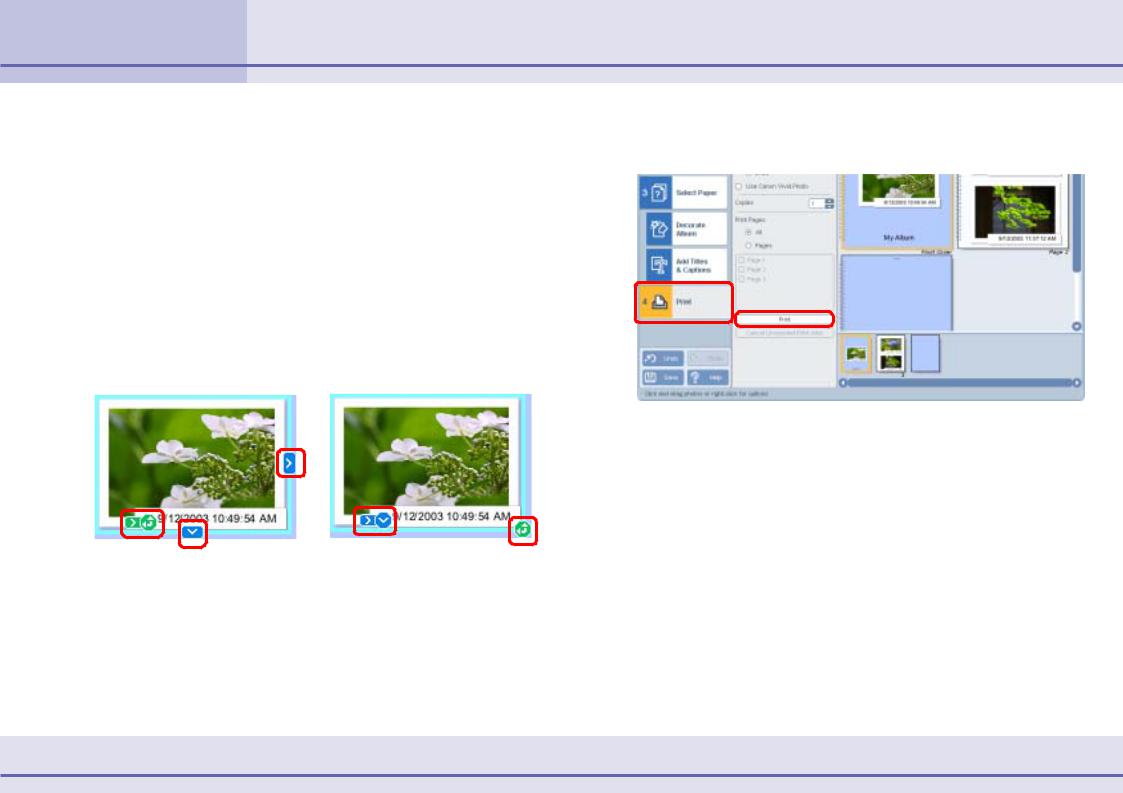
9. Change the size and rotation angle of the image, text or clip art as desired.
The following operations can be performed in the album window.
■Move Items
You can move images, text or clip art by dragging them.
■Change Size or Rotation Angle
You can change the size or rotation angle of images, text or clip art by dragging the following points on them.
|
|
|
|
|
|
|
|
|
|
|
|
|
|
|
|
|
|
|
|
|
|
You can change the |
Sets it to the state at the left |
|
|||
|
size by dragging |
(sizing mode) |
|
|||
|
one of these points. |
|
|
|
||
Sets it to the state at the right |
|
You can change the rotation |
||||
(rotation mode). |
|
angle by dragging this point. |
||||
10.Click [4 Print], confirm the number of copies and other print settings and click [Print].
This starts the printing process.
To close PhotoRecord, click the  (close box), or click the [File] menu and select [Exit].
REFERENCE
•Images captured by cameras that support the Exif 2.2 standard (nicknamed the “Exif Print” function) have the shooting settings data, such as the shooting conditions and shooting mode, embedded in them. You can obtain better prints by using this data to correct and print the images.
•PhotoRecord automatically performs image correction (default setting) on images shot by cameras that support the Exif 2.2 standard and on other image types, providing you with better print results.
17 ZoomBrowser EX Software User Guide
Chapter 1
Try It! ZoomBrowser EX
Supplementary Information
In this section, we explain information that you should know to use ZoomBrowser EX.
If You Have a Problem
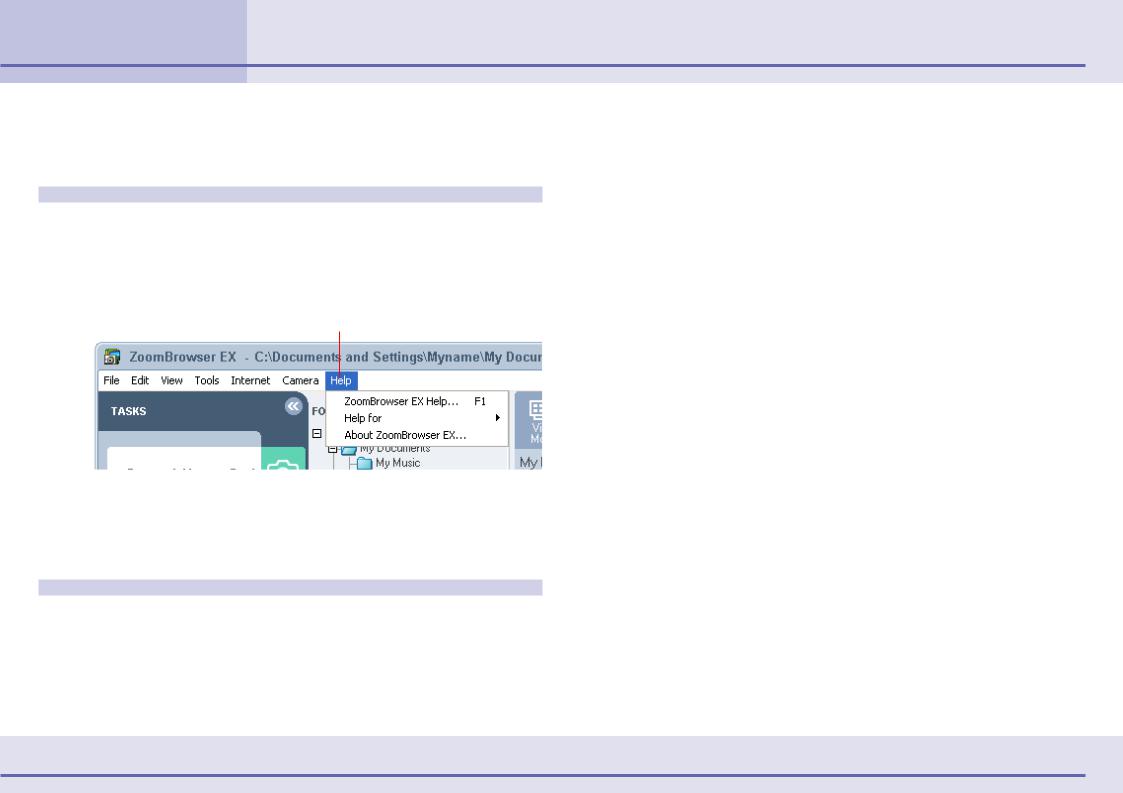
ZoomBrowser EX comes with a Help file. Use it when you want to learn how to do an operation, or when you want to know about the features of the program.
You can access Help from the [Help] menu or the [?] (Help) button.
Help menu
 Help button
Exiting ZoomBrowser EX
You can exit ZoomBrowser EX by clicking  (Close button) on the Browser Window. Alternatively, select [Exit] from the [File] menu.
18 ZoomBrowser EX Software User Guide

Chapter 2
What is ZoomBrowser EX? What Can ZoomBrowser EX Do? (1/2)
This chapter explains the basic skills required to master ZoomBrowser EX. Let’s begin with an overview of the main features.
Connect the camera to your computer to:
•Download images from the camera to your computer in an easy procedure.
•View an index of the images from the camera on the computer monitor.
•View information (shooting date and camera settings) about images stored in the camera.
•Use your computer to set up slide shows or DPOF print settings (not available on some models).
•Save computer images onto your camera.
•Operate the shutter of a camera connected to a computer via an interface cable to take pictures remotely, or to perform interval timer shooting after specifying an interval and the number of images to be taken (only on models supporting remote shooting).
•Convert RAW format images (change them to the TIFF or JPEG format and resave them). Adjust the brightness, contrast, color and other settings as you convert them. (Some camera models do not support RAW images.)
Use the file management features to:
•Categorize, sort and manage image files on your computer with easy procedures.
•Move or copy images.
•Perform simple editing such as cropping images or adjusting their colors.
•Create and edit movies, adding various effects: link movies and still images, superimpose titles and other text, and add background music.
•Run a slide show displaying the images in sequence in the full-screen mode.
Use the My Camera Settings function to:
•Save the My Camera Settings in the computer to the camera or vice versa.
•Handle newly created images and sounds as My Camera Settings.
REFERENCE
•The start-up image, start-up sound, shutter sound, operating sounds and self-timer sound are collectively called the My Camera Settings.
•The Canon CD-ROM supplied with your product contains several prepared My Camera Settings files. These files are automatically copied to your computer when you install ZoomBrowser EX.
19 ZoomBrowser EX Software User Guide

Chapter 2
What is ZoomBrowser EX? What Can ZoomBrowser EX Do? (2/2)
By using other programs:
ZoomBrowser EX gives you additional power when you use it together with the following programs. (You can start these programs from within ZoomBrowser EX.)
■PhotoRecord
•You can use this program to create and print beautiful layouts consisting of multiple images.
•You can select frames and backgrounds with a variety of designs.
•You can add text to images or pages.
•You can create original image albums.
■PhotoStitch
•You can stitch multiple images (which were split and shot individually using functions like the camera’s Stitch Assist mode) together to form a single, large size, panoramic picture.
•You can stitch images horizontally or vertically.
•If you shoot the surroundings in 360 degrees, you can later stitch the images to form a 360-degree cylinder. By saving this stitched image in QuickTime VR format, you can then get a virtual view of the various parts of the image.
20 ZoomBrowser EX Software User Guide
Chapter 2
What is ZoomBrowser EX? Finding Images and Folders (1/2)
It is important to understand how folders are used in ZoomBrowser EX to store images.
Where Are Images Stored?
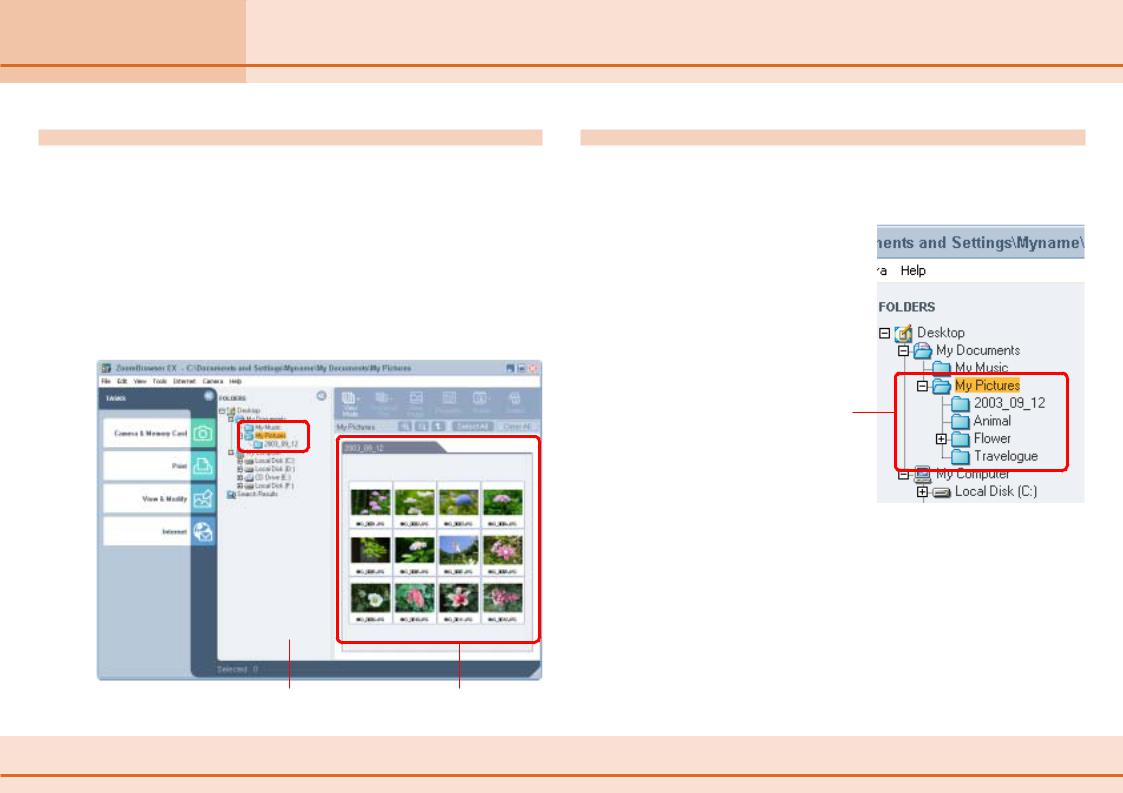
Use the following procedures to find out where image files are stored on your computer when they are downloaded from the camera.
1. Click the Windows [Start] menu and select [My Pictures].
Windows 2000/Windows Me/Windows 98 users should doubleclick the [My Documents] folder, followed by [My Pictures].
The images that you downloaded in Chapter 1, Downloading Images to a Computer, should be contained in the My Pictures folder. As you will note, the folders mentioned above also appear at the right of the ZoomBrowser EX window.
If you double-click the folders appearing in the Windows screen shot at the left, you will find image files and folders with the same names as those displayed in the ZoomBrowser EX window.
As this demonstrates, when you open a particular folder in ZoomBrowser EX and download images to it, or move images between folders, these changes are also happening in the corresponding folders shown by the Windows operating system.
21 ZoomBrowser EX Software User Guide
Chapter 2
What is ZoomBrowser EX? Finding Images and Folders (2/2)
Folders in the Browsing Area and Folder Area
Image thumbnails (tiny versions) are shown in the right-hand side of the ZoomBrowser EX window. This area is called the Browsing Area. The area in the middle, called the Folder Area, shows the folder directory much as it is shown in Windows Explorer.
The Folder Area shows all the folders on the computer. The orange colored folder is the currently selected folder. The images inside this folder are what are shown in the Browsing Area.
Folder Area |
Browsing Area |
Folders within Folders
You can create folders within folders, adding successive levels to provide detailed categories that make it easy to find and use your images.
Example of folders within folders for categorizing images
REFERENCE
• Instructions for creating folders are included in Chapter 4.
IMPORTANT
•In ZoomBrowser EX 4, image files in folders within the Program Files folder (saved using ZoomBrowser EX 2 or 3) will not display. To display these images, follow the procedures in If You Were Using ZoomBrowser EX Version 2 or 3 of the Troubleshooting (2/ 4) section.
22 ZoomBrowser EX Software User Guide
Chapter 2 |
Main Window (1/5) |
What is ZoomBrowser EX? |
This window is designed for managing images downloaded to the computer. It can also be used for various functions, such as printing and sending images by e-mail.
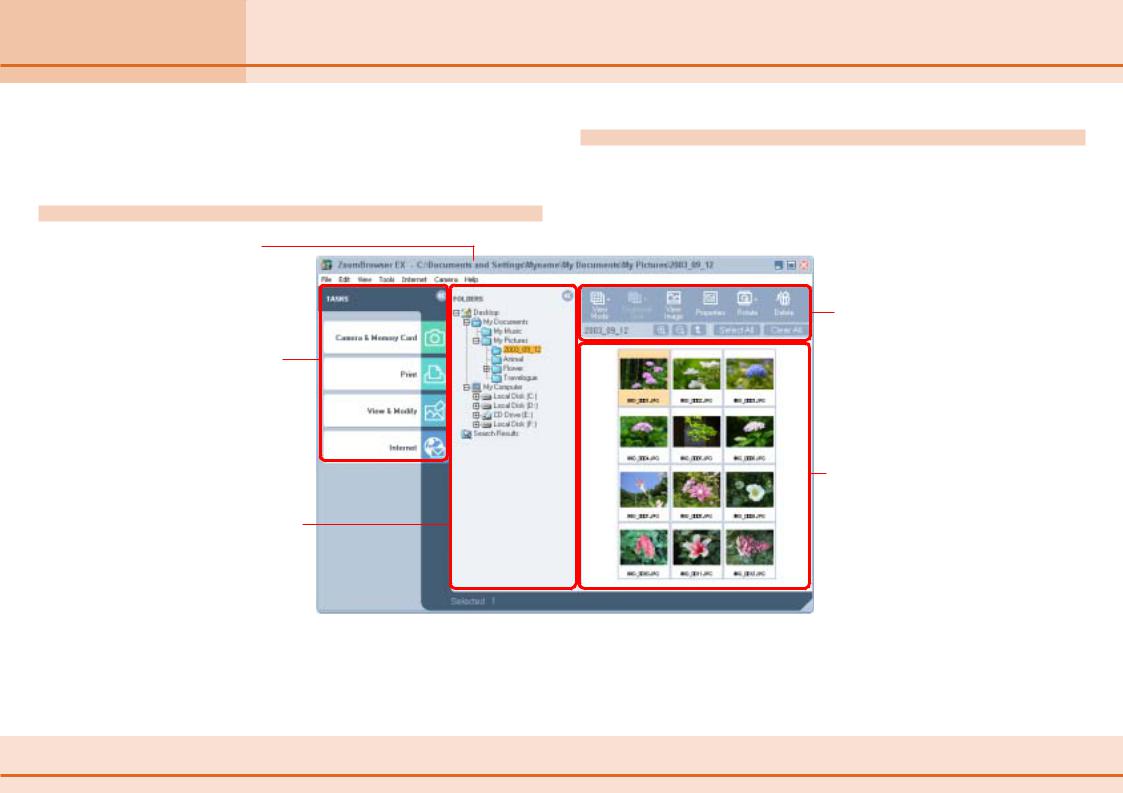
Main Window Components
Path of the selected folder
(word string describing the location)
Task Area
Contains the buttons for frequently used tasks.
Folder Area
Displays all the folders in the computer. Use this area to select folders that contain images.
Switching to the Camera Window
To switch to the Camera Window, click the [Camera & Memory Card] task button, followed by [Browse & Download Images] in the next menu.
Function Buttons
Buttons that perform various functions on the images in the Browser Area.
Browsing Area
Displays the image thumbnails (tiny versions) and folders contained within the folder selected in the Folder Area.
REFERENCE
•Images recorded in the Adobe RGB color space will appear unsaturated when displayed in ZoomBrowser EX. (Color space settings are only available on select camera models.)
23 ZoomBrowser EX Software User Guide
Chapter 2 |
Main Window (2/5) |
What is ZoomBrowser EX? |
Task Area and Task Buttons
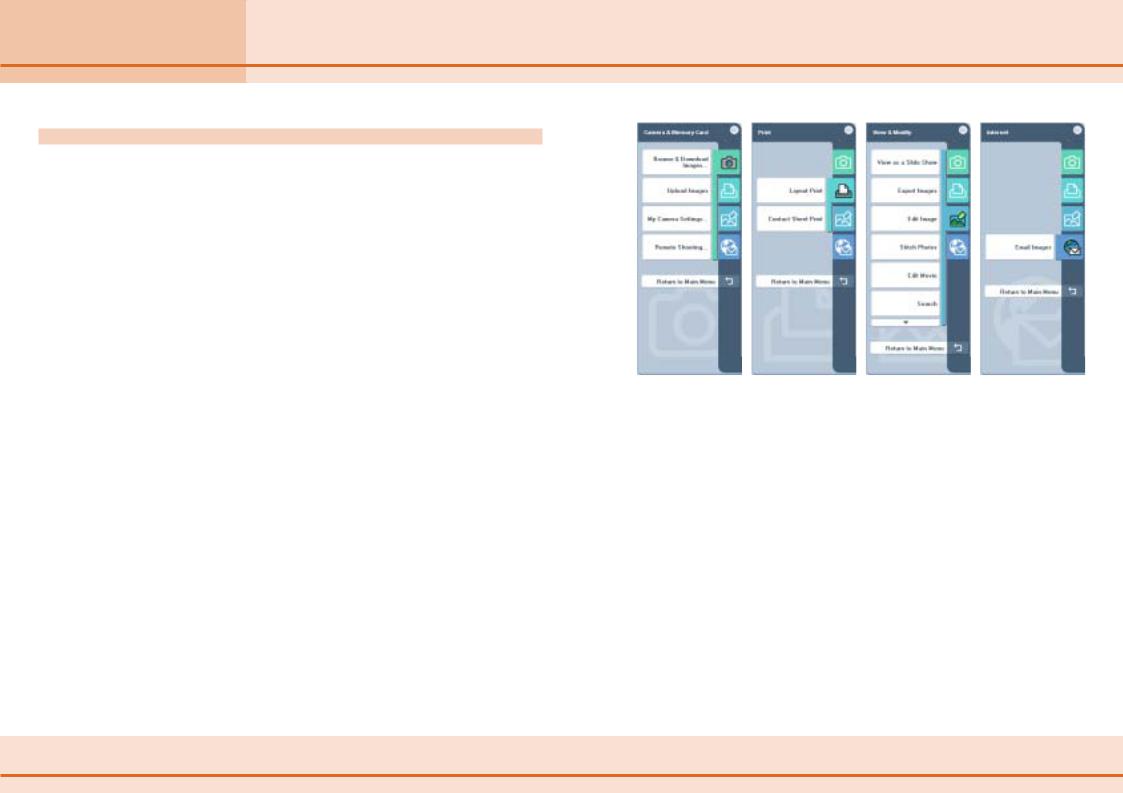
The Task Area contains the four task buttons: Camera & Memory Card, Print, View & Modify and Internet. Click one of these buttons to perform the related task.
■Camera & Memory Card
Click this to open the Camera Window or perform remote shooting.
Click this to print images.
■View & Modify
Click this to display images in a slide show or edit them.
■Internet
Click this to attach images to e-mail messages.
When you click one of these buttons, the corresponding submenu to the right displays.
REFERENCE
•To return to the main window, click [Return to Main Menu] at the bottom of the menu.
•To switch from one task to another, click the appropriate icon 


 to the right of the task button.
24 ZoomBrowser EX Software User Guide
Chapter 2 |
Main Window (3/5) |
What is ZoomBrowser EX? |
Using the Task Windows
When you select a task from the menu, all of the steps in that task display in the task area.
■Orange Button
This color marks the current step. Follow the instructions in the right-hand side of the window to proceed. When you have completed the step, click the [Next] or [Finish] button at the bottom right of the window to proceed to the next step.
REFERENCE
• Click [Previous] to return to the prior step.
■Gray Buttons
Tasks that are selectable at the time are colored gray. The button turns dark gray when the mouse cursor is placed over it. You can switch between tasks by clicking another task button. However, if you have already finished selecting an image and you switch to the [Select Captions for Printing] task, you must click [Select Images] again to reselect the image.
■Grayed Out Buttons
Grayed out buttons indicate tasks that are not available at the time. When you finish the task underway, the buttons will once again become selectable.
25 ZoomBrowser EX Software User Guide
Chapter 2 |
Main Window (4/5) |
What is ZoomBrowser EX? |
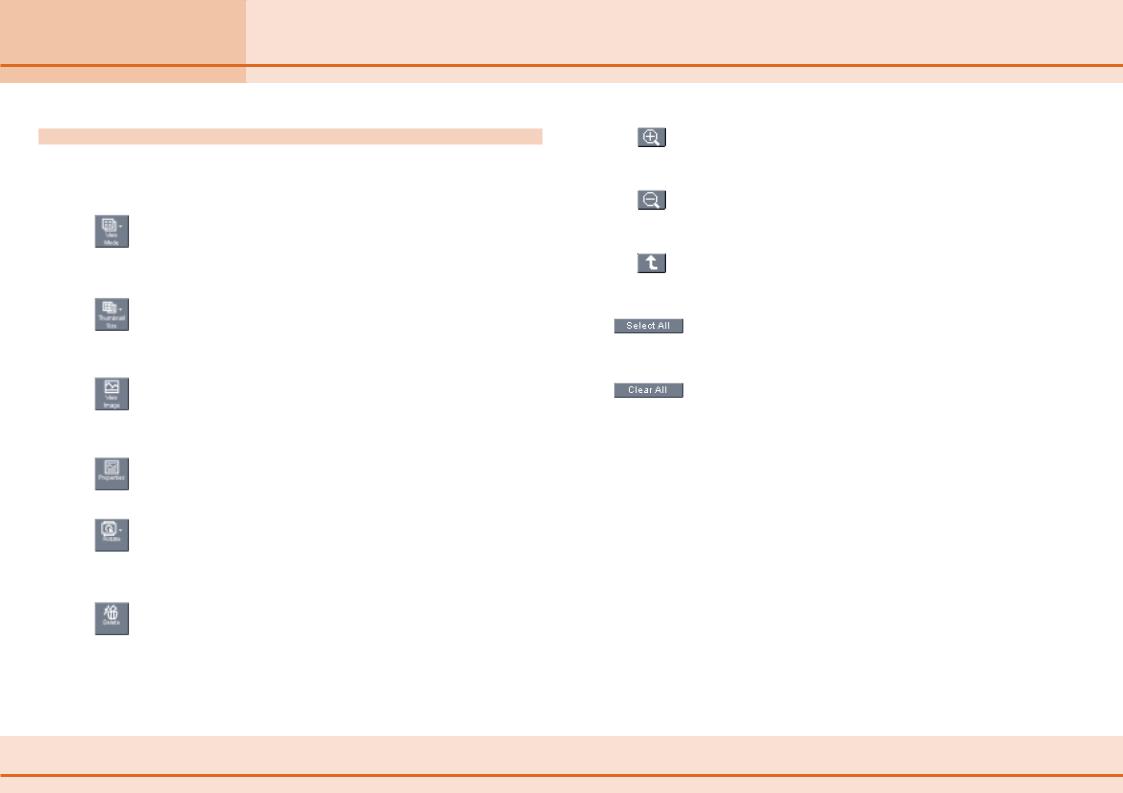
Function Buttons
The following buttons are available in the main window.
View Mode Button
Switches between the zoom mode, scroll mode and preview mode according to the context.
Thumbnail Size Button (scroll mode only)
Selects the size of images displayed in the Browser
Area.
View Image Button
Displays the selected image at a larger size in the View window.
Properties Button
Displays information about the selected image.
Rotate Button
Rotates the selected image. Choose between 90° left, 90° right or 180°.
Delete Button
Deletes the selected image from the computer.
Zoom-In Button (zoom mode only)
Zooms in on images or folders in the Browser Area.
Zoom-Out Button (zoom mode only)
Zooms out from images or folders in the Browser Area.
Up Button
Advances one step up from a lower level folder.
Select All Button
Selects all the images and folders in the Browser Area.
Clear All Button
Deselects any images or folders selected in the Browser Area.
Chapters 3 and 4 explain more about the task and function buttons.
26 ZoomBrowser EX Software User Guide
Chapter 2 |
Main Window (5/5) |
What is ZoomBrowser EX? |
Changing the Display
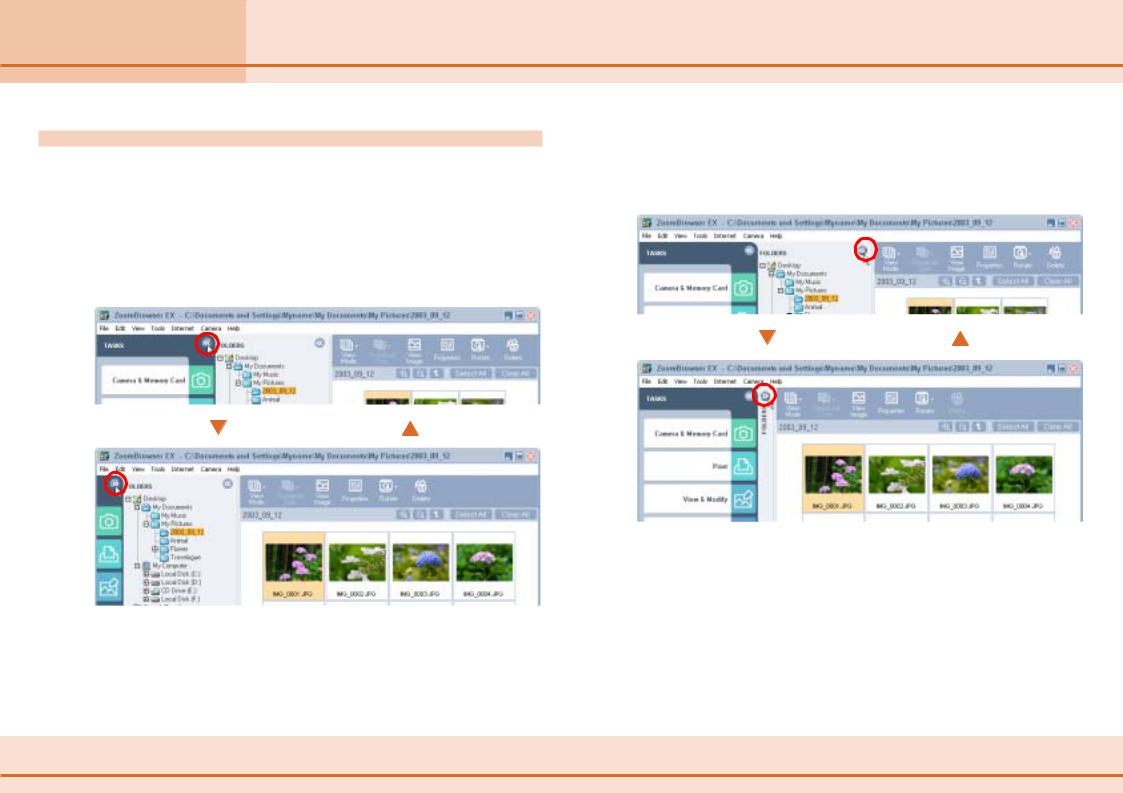
You can hide the Task Area and Folder Area to make the Browsing Area larger.
■Hiding the Task Area
Click the  button in the upper right of the Task Area to hide it and make the Browsing Area larger. Click the
  button to redisplay the Task Area.
REFERENCE
•You can also hide the Task Area by clicking the [View] menu, selecting [Task Area] and removing the check mark beside it.
■Hiding the Folder Area
Click the  button in the upper right of the Folder Area to hide it and make the Browsing Area larger. Click the
  button to redisplay the Folder Area.
REFERENCE
•You can also hide the Folder Area by clicking the [View] menu, selecting [Folder Area] and removing the check mark beside it.
•Both the Task Area and Folder Area can be hidden at the same time.
27 ZoomBrowser EX Software User Guide
Chapter 2 |
Camera Window (1/2) |
What is ZoomBrowser EX? |
The Camera Window is used to view images contained in the camera (memory card) and to select and download images to a computer.
REFERENCE
•Images recorded in the Adobe RGB color space will appear unsaturated when displayed in ZoomBrowser EX. (Color space settings are only available on select camera models.)
•Methods for displaying and using the Camera Window are explained in Chapter 5.
Camera Window Components
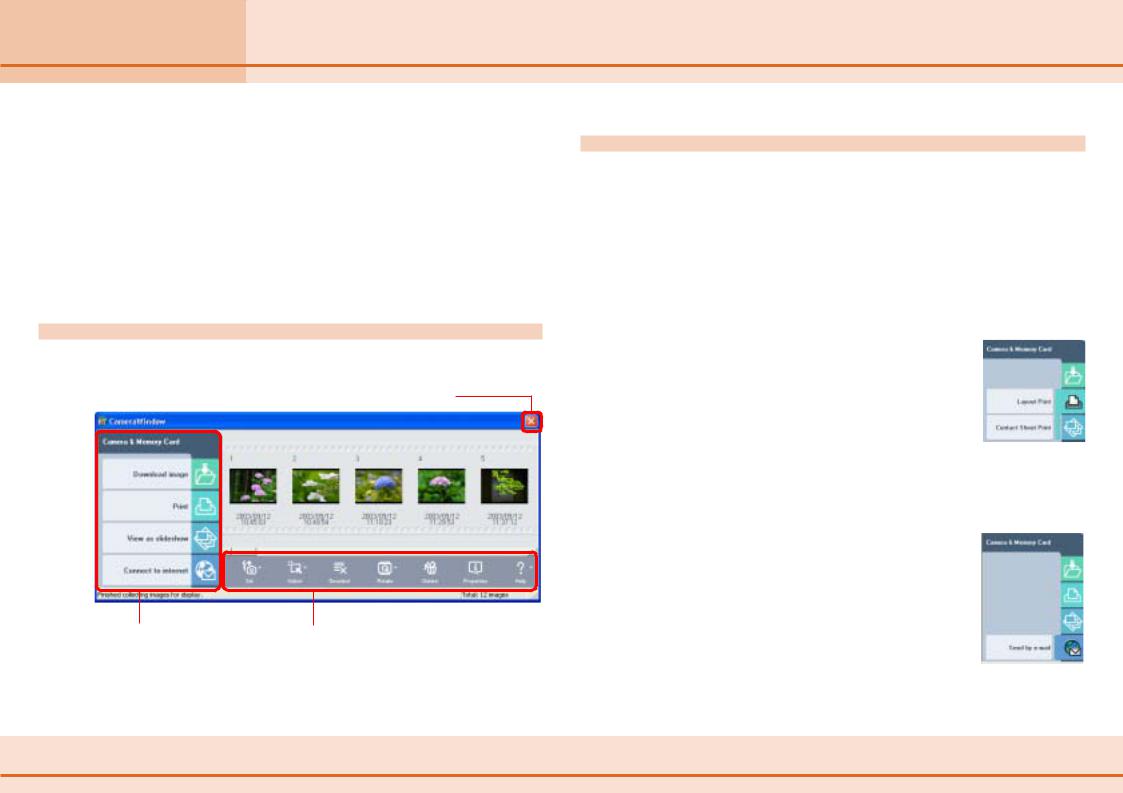
Close button
Click  to switch back to the main window.
Task Area |
Function Buttons |
Contains buttons for |
Buttons that perform various functions on the |
frequently used tasks. |
images in the Camera Window. |
Task Area and Task Buttons
The Task Area contains the four task buttons: Download images, Print, View as slideshow and Connect to internet. Click one of these buttons to perform the related task.
■Download Image
Downloads the selected images to the computer.
After the selected images have been downloaded to the computer, this button starts the printing process. A submenu like the one to the right appears when you click this button.
■View as Slideshow
After the selected images have been downloaded to the computer, this button starts an automated slide show.
■Connect to Internet
After the selected images have been downloaded to the computer, this button starts the process for creating e-mail attachments. A submenu like the one to the right appears when you click this button.
28 ZoomBrowser EX Software User Guide

Chapter 2 |
Camera Window (2/2) |
What is ZoomBrowser EX? |
REFERENCE
•To switch from one task to another, click the appropriate icon 


 at the right of the task button.
Function Buttons
The following buttons are available in the Camera Window.
Set Button
Sets various settings, such as those for connecting to a camera. The following items are included in the submenu.
Select Button
Selects images for further processing with other functions. Various selection methods can be chosen from the submenu.
Deselect Button
Deselects a selected image.
Rotate Button
Rotates the selected image. Choose between 90° left, 90° right or 180°.
Delete Button
Deletes the selected image from the camera (memory card).
Properties Button
Displays information about the selected image.
Help Button
Displays the help dialog.
Chapter 5 explains more about the task and function buttons.
29 ZoomBrowser EX Software User Guide

Chapter 2
What is ZoomBrowser EX? Using the Right-Click in Operations
With ZoomBrowser EX you can access many useful functions by using the right mouse button (right-click).
For example, if you right-click a thumbnail, the following shortcut menu appears.
The right-click allows you to use ZoomBrowser EX more efficiently. After you become familiar with ZoomBrowser EX, try right-clicking in many situations and you will be impressed with its convenience.
Note that, in general, this manual does not cover operations using the right-click. (This is because explaining many shortcut menu variations would take too many pages of this manual.) However, there are a few operations that are only accessible by right-clicking. These operations are described on the corresponding pages.
Right-click anywhere on the image to display a shortcut menu.
A shortcut menu is a convenient collection of the most common window buttons and menu commands that apply to a given situation.
30 ZoomBrowser EX Software User Guide
Loading...