


 Loading...
Printer
|
Clicking the |
|
|
|
icon |
|
|
|
|
|
this button |
|
|
|
Print All |
|
|
|
|
|
|
|
|
||||||||
|
|
|
|
|
|
|
|
|
|
|
|||||
|
|
|
|
|
|
|
|
|
|
|
the entire guide. |
|
|
||
|
prints the entire chapter. |
|
|
|
|
|
|
|
|||||||
|
|
|
|
|
|
|
|
|
|
|
|
|
|
|
|
Component Guide and Functions


 Overview
Other Accessories
Ink Cassette Preparations


 Getting Ready
Printing from Memory Cards


 Printing
Wireless Printing
Battery Instructions (CP730 Only)


 Appendices
Specifications
Having Difficulty? |
Index |
Troubleshooting |
Next

Return to Cover Page |
Overview |
Getting Ready |
Printing |
Appendices |
Introduction
Before using your printer for “Safety Precautions” (p. 40)
Symbols Used in
This mark denotes operation.
This mark denotes
basic operating procedures
This printer supports a variety cards to MultiMediaCards**. memory cards that are supported
*SD is an acronym for Secure
**Reduced-Size MultiMediaCard In this guide, all these card
In addition, “camera” in this and digital video cameras
.
Illustrations and
This guide primarily uses monitor. Unless otherwise noted, CP720 model.
Similarly, the screen shots from Postcard-Size ink cassette. The digital still cameras.
Copyright Infringement
of images produced by SELPHY CP730/ personal entertainment may be
effective in the country of sale. If a
is in use abroad, please convey it back with a warranty claim to a
.
Cameras
camera, it may be necessary to prior to connecting the camera to
20D, EOS 30D, EOS 300D/DIGITAL Rebel XT cameras, set [Communication] in or [Print/PTP] or [Print/PC]. See the user
for details.
the user guide supplied with the settings.
Troubleshooting |
Tasks and Index |
2 |
Back |
Next |

Return to Cover Page |
Overview |
Getting Ready |
Printing |
Appendices |
Printer Features
You can enjoy printing with ways.
A Choice of Printing
Print from Memory
You can print from memory camera or mobile telephone.
Connected to a Camera
You can print from a camera cable or via a USB cable supplied
Connected to a Computer
You can print from a computer
Bluetooth or IrDA (infrared) enabled Digital Assistants).
(BU-20) is required for Bluetooth connections. connections.
SD430 Digital ELPH Wireless/Digital Print Adapter WA-1N/WA-1E, you can
to a computer, ensure that you install the programs. Install the software from
Photo Printer Solution Disk.
|
|
|
|
|
|
|
|
|
|
|
|
|
|
|
|
|
|
|
|
|
|
|
|
|
|
|
|
|
|
|
|
|
|
|
|
|
|
|
|
Troubleshooting |
Tasks and Index |
3 |
Back |
Next |
|||||

Return to Cover Page Overview Getting Ready Printing Appendices
|
Size Sheets) |
|
Paper Media and |
||
on large, 100 x 200 mm (4 x 8 in.) |
||
|
||
Perfect for Albums |
||
cassette (PCW-CP100) is required. |
||
|
Prints a standard size photo and borders appear on the print
Stitch Assist mode and use the supplied
you can create prints with a
Postcard Size Paper
Print postcards bearing your
-Image Layouts
photos or layouts with more than one
Using your computer, it is easy cards. Always use SELPHY-specific paper).
Smaller Sizes (Card Size |
|
Credit card sized sheets make |
|
notebook or wallet. |
the CP730 |
can zoom in on and print a single and apply My Colors color effects.
Expand the potential for your |
Troubleshooting |
Tasks and Index |
4 |
Back |
Next |
Return to Cover Page |
Overview |
Getting Ready |
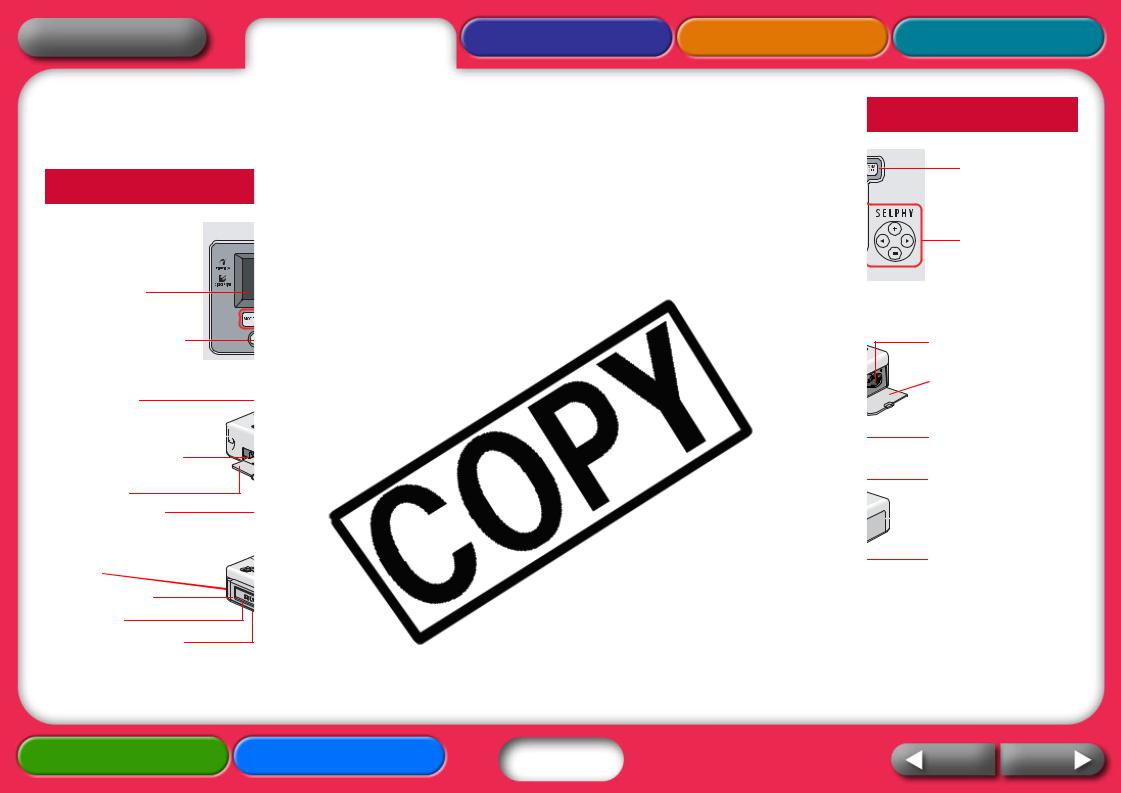
Component
This section indicates the co
SELPHY CP730
LCD Monitor |
PRINT/STOP Button |
IrDA Sensor |
Retractable USB
Cable for Cameras 
Paper Cassette Slot |
Paper Cassette |
Slot Cover |
Access Indicator |
Battery Cover Eject
Lever
Battery Cover
Air Vents
Paper Ejection Slot
Printing |
Appendices |
Power Button |
Control Buttons |
Ink Cassette |
Compartment |
Ink Cassette
Compartment
Cover
Memory Card Slots
USB Connector for
Camera

 USB Connector for
Computers
DC IN Terminal
(Power Connector)
Troubleshooting |
Tasks and Index |
5 |
Back |
Next |

Return to Cover Page |
Overview |
Getting Ready |
Printing |
Appendices |
Paper and
Select the correct size for the
Some items are not sold in some
Postcard Size
Paper Cassette*:
Supplied Postcard
Standard Paper + Ink*:
Color Ink/Paper Set
Color Ink/Paper Set
Color Ink/Paper Set
*Depending on the the printer.
Card Size
Paper Cassette:
Separately sold Card PCC-CP100
Standard Paper + Ink:
Color Ink/Paper Set
Full-Page Labels + Ink:
Color Ink/Full-Size
8-Label Sheets + Ink:
Color Ink/Label Set
Paper Cassette
L SIZE
KL-36IP (36 Sheets)
Size Paper Cassette
WIDE
KW-24IP (24 Sheets)
cassette or ink cassette that is not specified for
. L Size: 89 x 119 mm (3.5 x 4.7 in.). Card Size: Size: 100 x 148 mm (4 x 6 in.). Wide:
Troubleshooting |
Tasks and Index |
6 |
Back |
Next |
Return to Cover Page |
Overview |
Getting Ready |
Printing |
Appendices |
Other Accessories
This section identifies the
the capabilities of the SELPHY
Battery Pack (CP730
If you install the battery pack can print while traveling and in available.
See “Battery Instructions” in installing and charging the
(BU-20), you can print without a cable telephones and PDAs.
BU-20
“Printing” section for information on
.
Troubleshooting |
Tasks and Index |
7 |
Back |
Next |

Return to Cover Page |
Overview |
Getting Ready |
Printing |
Appendices |
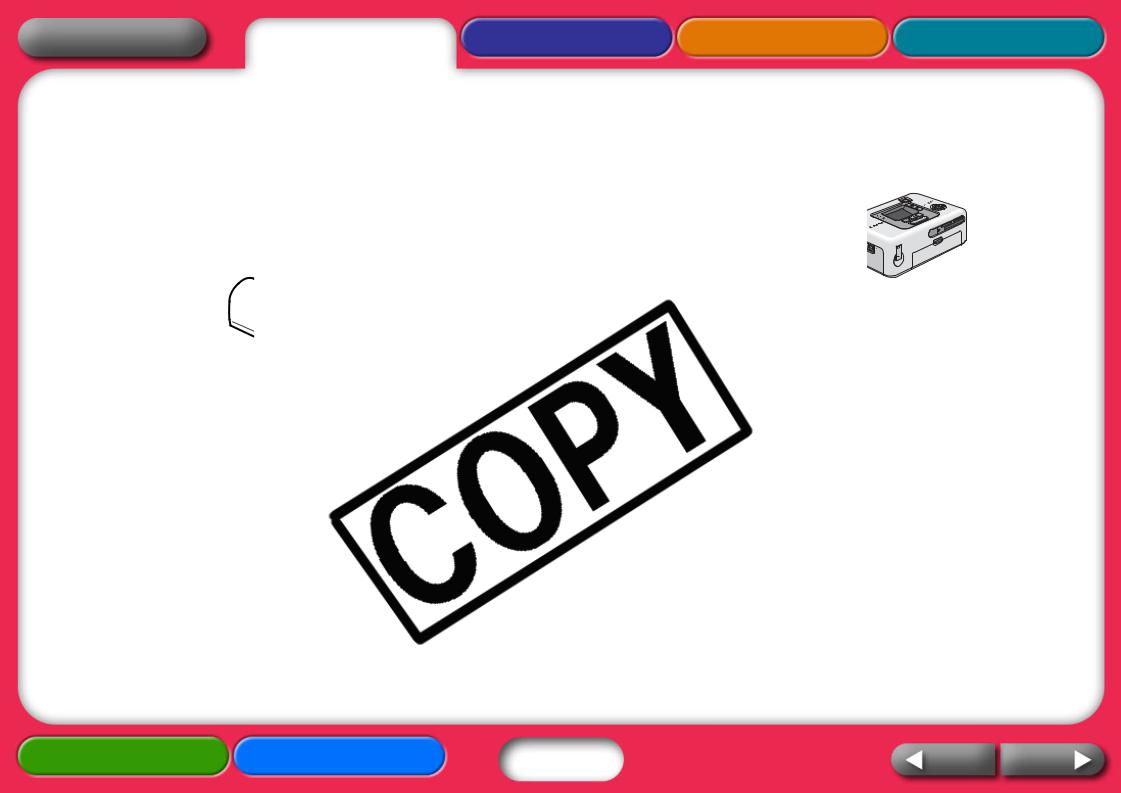
Setup
Set up your SELPHY printer
Compact Power Adapter
Power Cord
To a power outlet
15 cm
Situate (6 in and on
•Do not set the printer upon
•Keep the printer at least 1 electromagnetic waves or
•Do not obstruct the air vents
The CP730 model can also be
Troubleshooting |
Tasks and Index |
8 |
Back |
Next |
Return to Cover Page Overview Getting Ready Printing Appendices
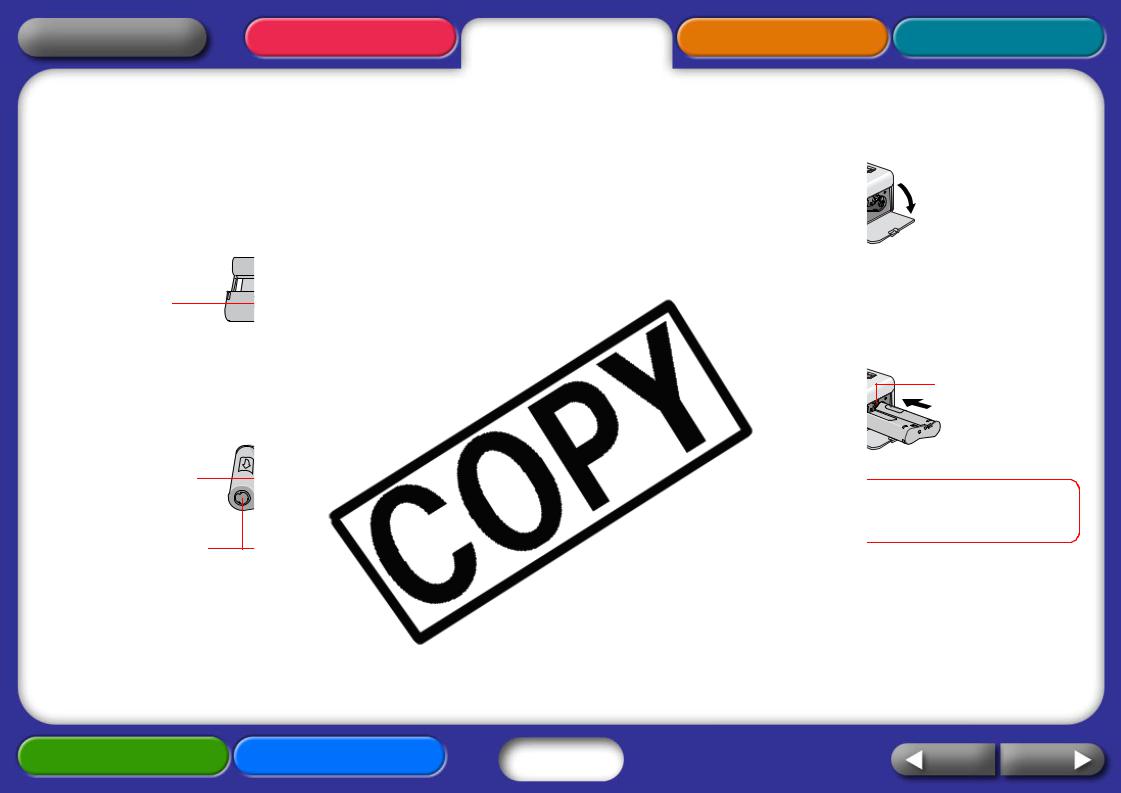
Ink Cassette |
compartment. |
Install ink cassettes using the |
|
1 Confirm the ink cassette |
|
Confirm a match between |
|
paper. |
|
Size Notation |
until it clicks into place and close |
|
|
|
move the tab to the top. |
2 Confirm that the ink |
|
Take up any slack by gently |
Tab |
portion of ink sheet. If you |
|
equivalent number of prints |
|
If it is slack here… |
|
|
ink cassette’s ink sheet. The damaged or |
|
be available for printing photos. |
Push and turn here |
. It will lead to malfunctions or damage. |
|
|
to take up the slack |
|
Troubleshooting |
Tasks and Index |
9 |
Back |
Next |
Return to Cover Page Overview Getting Ready Printing Appendices
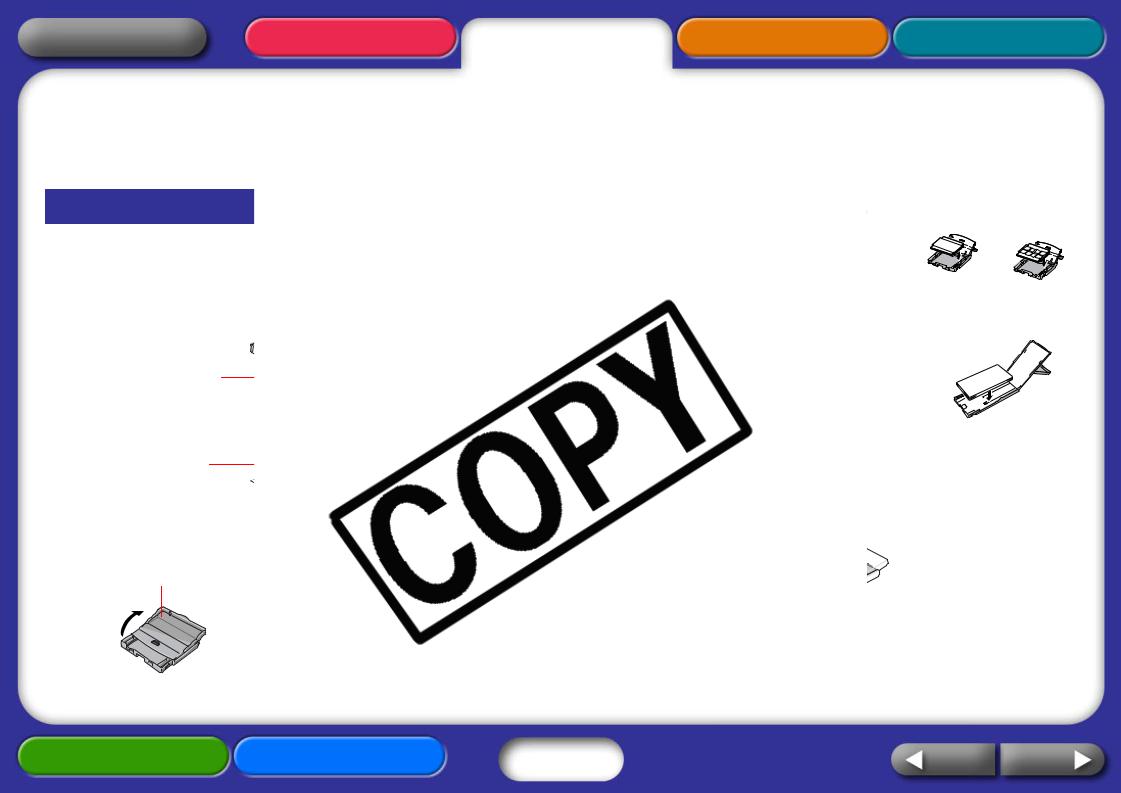
Paper Cassette |
paper, set it in the cassette with |
||
The following procedures |
|
|
|
cassette and install it in the |
from the paper. Be careful not to touch |
||
|
. |
|
|
Setting Paper in |
|
|
|
1 Confirm that you have |
SIZE |
|
|
Prepare the correct size of |
CARD SIZE |
||
using. |
the paper |
||
|
|||
|
the tabs. |
|
|
Size Notation |
|
|
|
2 Open the lid of the |
L Size |
WIDE |
|
|
|||
Push back a little |
the paper |
|
|
the tabs. |
|
||
before lifting upward. |
|
||
|
|
||
|
lid should overhang the end slightly. |
||
Use the following procedures |
|
|
|
Outer Lid |
|
|
|
|
close only the inner lid before inserting |
||
|
slot until it clicks into place. |
||
Troubleshooting |
Tasks and Index |
10 |
Back |
Next |
Return to Cover Page |
Overview |
Getting Ready |
Printing |
Appendices |
• |
Use paper specified for use |
Cassette |
|
standard copy paper or |
|
• |
Placing 19 or more sheets |
slot cover. |
|
sheets) will lead to mis-feeds |
|
• |
Mistakenly reversing the |
|
|
and may lead to malfunctions |
|
• |
Do not bend the paper at |
|
• |
Do not use label sheets that |
|
|
portions peeled back. |
|
• |
Do not reprint a sheet that |
|
• |
Do not write on a sheet |
|
|
malfunction. |
|
|
|
as illustrated and insert it all the |
Hold it here
Troubleshooting |
Tasks and Index |
11 |
Back |
Next |

Return to Cover Page |
Overview |
Getting Ready |
Printing |
Appendices |
Printing
This section explains the when printing.
These precautions are applicable including “Printing from Memory “Printing from Computers” and
•Do not pull out the paper printing is in progress. This
•During printing, the paper pull on the paper during malfunctions.
•Placing 19 or more sheets sheets) will lead to mis-feeds
•Printing temporarily ceases temperature. Since printing temperature lowers, please ambient temperature is high continuously.)
Troubleshooting |
Tasks and Index |
12 |
Back |
Next |
Return to Cover Page Overview Getting Ready Printing Appendices
Printing from |
SD Slot |
||
|
|||
|
• |
SD Memory Card |
|
These procedures are for |
• |
SDHC Memory Card |
|
taken from cameras or mobile |
• |
miniSD Memory Card* |
|
• |
miniSDHC Memory Card* |
||
|
|||
|
• |
MultiMedia Card |
|
• SELPHY printers support |
• RS-MMC |
||
|
* Align the card with the |
||
Camera File system (Exif |
|
||
|
guides on the lower portion |
||
• Use memory cards that have |
|
||
|
of the slot and insert. |
||
not be recognized on memory |
|
||
|
|
||
Inserting Memory |
|
|
|
1 Press the printer’s power |
Slot |
|
|
CompactFlash Card |
|||
appears on the LCD |
|||
Microdrive |
|
||
|
xD-Picture Card (insert with specialized |
||
|
adapter**) |
|
|
|
** Purchase the CF card adapter for xD-Picture |
||
|
Card separately. |
||
2 Insert the memory card |
Cards |
|
|
|
|
||
side up. |
of the card |
||
The memory card will project |
|||
|
|
||
indicator will blink green |
|
|
|
will appear in the LCD |
|
|
|
Do not insert more than one |
out or switch the printer |
||
|
|||
|
is blinking. |
||
Troubleshooting |
Tasks and Index |
13 |
Back |
Next |

Return to Cover Page |
Overview |
Getting Ready |
Printing |
Appendices |
LCD Monitor |
|
|
|
The following types of information |
Display Button |
||
CP730 |
|
Displays images at |
|
|
full size on the |
||
Image |
|
monitor. |
|
Number |
|
Trim Button |
|
|
|
Enlarges and |
|
|
|
prints a portion of |
|
Displayed |
|
the image (CP730 |
|
Image |
|
only) |
|
Printing Mode |
|
Buttons |
|
Print Layout |
Date |
Switches between |
|
images and sets |
|||
|
|
||
CP720 |
|
the number of |
|
|
prints. |
||
Image |
|
(CP730 only). |
|
|
|
||
Number |
|
|
|
Displayed
Image
Installed Ink |
|
|
|
|
|
|
hide the image data and show the |
||
|
|
|
|
||||||
|
|
|
|
|
|||||
Cassette |
|
|
|
|
|
|
. Use this feature when you wish to |
||
|
|
|
|
|
|||||
Type |
|
|
|
|
|
|
. |
||
|
|
|
Date |
||||||
|
|
|
|
|
|
|
|||
Printing Mode |
Print Layout |
. |
|||||||
|
|
|
|
|
|
|
|
|
|
Although there are some CP730 and CP720 models as the same. Therefore, the
to explain the procedures.
restores the standard view.
Troubleshooting |
Tasks and Index |
14 |
Back |
Next |

Return to Cover Page |
Overview |
Getting Ready |
Printing |
Appendices |
Selecting Modes
Select a mode to set the print
|
|
|
|
(Single) |
Prints one copy |
|
|
|
|
|
|
|
(Select) |
Prints the |
|
|
|
|
|
|
|
|
|
|
||
|
|
|
|
|
images. |
|
|
|
|
|
|
|
|
|
|
|
|
|
|
|
|
(All) |
Prints one copy |
|
|
|
|
|
|
|
|
|
|
||
|
|
|
|
(DPOF) |
Prints according |
|
|
|
|
|
|
|
|
|
|
||
|
|
|
|
|
|
|
||
|
|
|
|
|
Format) settings |
|
|
|
|
|
|
|
|
|
|
|
|
|
|
|
|
|
camera user |
|
|
|
|
|
|
|
|
settings. |
|
|
|
|
|
|
|
|
|
|
|
|
|
|
|
|
|
|
|
|
|
|
|
|
|
|
|
|
|
|
|
|
|
|
|
|
|
|
|
SELPHY printers use the shooting print a finer quality print. To
and hold the DATE button printing.
Displayed Image (Single
mode is selected in the LCD
press the MODE button to switch to the
an image to print.
advances the images more quickly.
date imprint, trimming and desired.
settings are only available on the CP730
.
Troubleshooting |
Tasks and Index |
15 |
Back |
Next |

Return to Cover Page Overview Getting Ready Printing Appendices
Printing the Specified |
|
|
|
|
|
|
date imprint and My Colors |
||||||||||||||||
Selected Images |
|
|
|
|
|
|
|||||||||||||||||
|
|
|
|
|
|
as desired. |
|||||||||||||||||
1 Switch the mode to |
|
|
|
|
|
|
|
||||||||||||||||
|
|
|
|
|
|
|
of the images selected in Steps 3 and 4. |
||||||||||||||||
|
|||||||||||||||||||||||
|
|
|
|
|
|
|
|
|
|
|
|
|
|
|
|
|
|
|
|
available on the CP730 model. |
|||
|
|
|
|
|
|
|
|
|
|
|
|
|
|
||||||||||
|
|
|
|
|
|
|
|
|
|
|
|
|
|
|
|
||||||||
|
|
|
|
|
|
|
|
|
|
|
|
|
|
|
|
|
|
|
|
layed on the LCD monitor. |
|||
|
|
|
|
|
|
|
|
|
|
|
|
|
|
|
|
|
|
|
|
number of sheets is in the paper cassette. |
|||
2 Press |
|
|
|
|
|
|
|
|
|
|
|
|
|
|
|
|
|
|
|
|
|
|
|
|
|
|
|
|
|
|
|
|
|
|
|
|
|
|
|
|
|
|
|
|
|
|
|
|
|
|
|
|
or |
|
|
|
to select |
|
|
|
|
|
|
|
|
|
Total Number of Prints |
||||
|
|
|
|
|
|
|
|
|
|
|
|
|
|
|
|
|
|||||||
|
|
|
|
|
|
|
|
|
|
|
|
|
|
|
|
|
|||||||
Keeping the button pressed |
|
|
|
|
|
|
|
|
|
to Be Printed |
|||||||||||||
3 Press |
|
|
|
|
|
or |
|
|
|
|
to select |
|
|
|
|
|
|
|
|
|
|
||
|
|
|
|
|
|
|
|
|
|
|
|
|
|
|
|
|
|
|
|||||
|
|
|
|
|
|
|
|
|
|
|
|
|
|
|
|
|
|
|
|||||
|
|
|
|
|
|
|
|
|
|
|
|
|
|
|
|
|
|
|
|||||
Keeping the button pressed |
|
|
|
|
|
|
. When the printing is complete, all of |
||||||||||||||||
|
|
|
|
|
|
||||||||||||||||||
|
|
|
|
|
|
|
|
|
|
|
|
|
|
|
|
|
|
|
|
||||
|
|
|
|
|
|
|
|
|
|
|
|
|
|
|
|
|
|
|
|
to zero. |
|||
|
|
|
|
|
|
|
|
|
|
|
|
|
|
|
|
|
|
|
|
|
|
|
|
|
|
|
|
|
|
|
|
|
|
|
|
|
|
|
|
|
|
|
|
|
|
|
|
4 Repeat Steps 2 and 3
copies for the desired
Troubleshooting |
Tasks and Index |
16 |
Back |
Next |
Loading...