


 Loading...
MULTIMEDIA PROJECTOR
LV-WX300ST/LV-X300ST User’s Manual

Table of Contents
Table of Contents ........................... |
2 |
Safety instructions ......................... |
3 |
Contents of package ..................... |
13 |
Projector exterior view ................ |
14 |
Controls and functions ................ |
15 |
Positioning your projector .......... |
19 |
Choosing a location ......................... |
19 |
Obtaining a preferred projected |
|
image size ........................................ |
20 |
Connection .................................... |
23 |
Connecting a computer or monitor .23 |
|
Connecting Video source devices ... |
24 |
Operation ...................................... |
28 |
Starting up the projector .................. |
28 |
Using the menus .............................. |
29 |
Utilizing the password function ...... |
30 |
Switching input signal ..................... |
32 |
Adjusting the projected image .... |
33 |
Magnifying and searching for |
|
details .............................................. |
35 |
Selecting the aspect ratio ................ |
35 |
Useful functions available |
|
during a presentation .................. |
37 |
Setting the presentation timer ......... |
40 |
Hiding the image ............................. |
41 |
Locking control keys ....................... |
41 |
Freezing the image .......................... |
41 |
Adjusting the sound ........................ |
42 |
Personalizing the projector menu |
|
display ............................................. |
42 |
Shutting down the projector ............ |
42 |
Direct power off .............................. |
43 |
Watching 3D content ................... |
44 |
Supervising and controlling by |
|
computer ....................................... |
46 |
Configuring the LAN Settings ....... |
46 |
Controlling the projector remotely |
|
through a web browser |
|
(e-Control™) .................................. |
47 |
Controlling the projector using |
|
PJLink™ application ...................... |
49 |
Menu operation ............................. |
52 |
Maintenance .................................. |
59 |
Care of the projector ....................... |
59 |
Lamp information ........................ |
60 |
Indicators ...................................... |
65 |
Troubleshooting ............................ |
66 |
Specifications ................................ |
67 |
Projector specifications .................. |
67 |
Dimensions ..................................... |
69 |
Timing chart ................................... |
70 |
Control Commands ......................... |
73 |
System Requirement ....................... |
73 |
2

Safety instructions
Before installing and operating the projector, read this manual thoroughly.
This projector provides many convenient features and functions. Operating the projector properly enables you to manage those features and maintain it in good condition for many years to come.
Improper operation may result in not only shortening the product life, but also malfunctions, fire hazards, or other accidents.
If your projector does not seem to be operating properly, read this manual again, check operations and cable connections, and try the solutions in the “Troubleshooting” section in the user’s manual. If the problem still persists, contact the Canon Customer Support Center.
CAUTION
RISK OF ELECTRIC SHOCK
DO NOT OPEN
CAUTION: TO REDUCE THE RISK OF ELECTRIC SHOCK, DO NOT REMOVE COVER (OR BACK). REFER SERVICING TO QUALIFIED SERVICE PERSONNEL.
THIS SYMBOL INDICATES THAT DANGEROUS VOLTAGE CONSTITUTING A RISK OF ELECTRIC SHOCK IS PRESENT WITHIN THIS UNIT.
THIS SYMBOL INDICATES THAT THERE ARE IMPORTANT OPERATING AND MAINTENANCE INSTRUCTIONS FOR THIS UNIT IN THE USER’S MANUAL.
CAUTION
Not for use in a computer room as defined in the Standard for the Protection of Electronic Computer / Data Processing Equipment, ANSI / NFPA 75.
Copyright notice
Please note that enlarging or reducing the size of an image for commercial purposes or public presentation any infringe on the legally protected copyright or the copyright holder of the original material
About Trademarks
•Ethernet is a registered trademark of Xerox Corporation.
•Microsoft, Windows, Windows XP, Windows Vista, Windows 7, Windows 8 and Aero are registered trademarks or trademarks of Microsoft Corporation in the United States and / or other countries.
•Mac, Mac OS and Macintosh are trademarks of Apple Inc., registered in the United States and / or other countries.
•HDMI, the HDMI logo and High-Definition Multimedia Interface are trademarks or registered trademarks of HDMI Licensing, LLC.
•PJLink is a registered trademark, or an application has been submitted for trademark, in Japan, the United States and / or other countries or regions.
•Crestron®, Crestron RoomView®, and Crestron Connected™ are registered trademarks of Crestron Electronics, Inc.
3

 Safety Precautions
WARNING:
•THIS APPARATUS MUST BE GROUNDED.
•TO REDUCE THE RISK OF FIRE OR ELECTRIC SHOCK, DO NOT EXPOSE THIS APPLIANCE TO RAIN OR MOISTURE.
•This projector produces intense light from the projection lens. Do not stare directly into the lens, otherwise eye damage could result. Be especially careful that children do not stare directly into the beam.
•Install the projector in a proper position. Otherwise it may result in a fire hazard.
•Allowing the proper amount of space on the top, sides, and rear of the projector cabinet is critical for proper air circulation and cooling of the unit. The diagram shown here indicates the minimum space required. If the projector is to be built into a compartment or similarly enclosed, these minimum distances must be maintained.
SIDE and TOP |
REAR |
50 cm (1.6')
50 cm (1.6') |
50 cm (1.6') |
50 cm (1.6') |
•Do not cover the ventilation slots on the projector. Heat build-up can reduce the service life of your projector, and can also be dangerous.
•If the projector is unused for an extended time, unplug the projector from the power outlet.
•Do not project the same image for a long time.
An afterimage may remain on the DMD panel due to the characteristics of the panel of the projector.
 CAUTION ON HANGING FROM THE CEILING
When hanging the projector from the ceiling, clean the air intake vents and top of the projector periodically with a vacuum cleaner. If you leave the projector unclean for a long time, the cooling fans can be clogged with dust, and it may cause a breakdown or a disaster.
DO NOT SET THE PROJECTOR IN GREASY, WET, OR SMOKY CONDITIONS SUCH AS IN A KITCHEN TO PREVENT A BREAKDOWN OR A DISASTER. IF THE PROJECTOR COMES IN CONTACT WITH OIL OR CHEMICALS, IT MAY BECOME DETERIORATED.
 READ AND KEEP THIS MANUAL FOR LATER USE.
All the safety and operating instructions should be read before beginning to operate the product.
Read all of the instructions given here and retain them for later use. Unplug this projector from the AC power supply before cleaning. Do not use liquid or aerosol cleaners on the projector. Use a damp cloth for cleaning.
Follow all warnings and instructions marked on the projector.
For added protection of the projector during a lightning storm, or when it is left unattended or unused for long periods of time, unplug it from the wall outlet. This will prevent damage due to lightning and power surges.
Do not expose this unit to rain or use near water. For example, in a wet basement, near a swimming pool..., etc.
Do not use attachments not recommended by the manufacturer as they may result in hazards.
4

Do not place this projector on an unstable cart, stand, or table. The projector may fall, causing serious injury to a child or adult, and serious damage to the projector. Use only with a cart or stand recommended by the manufacturer, or sold with the projector. For wall or shelf mounting, use a tool such as a mounting kit to secure the projector.
An appliance and cart combination should be moved with care.
Sudden stops, excessive force, and uneven surfaces may cause the appliance and cart combination to overturn.
Slots and openings in the rear and front of the cabinet are provided for ventilation, to
insure reliable operation of the equipment and to protect it from overheating.
The openings should never be covered with cloth or other materials, and the bottom
opening should not be blocked by placing the projector on a bed, sofa, rug, or other similar surface. This projector should never be placed near or over a radiator or heat register.
This projector should not be placed in a built-in installation such as a book case unless proper ventilation is provided.
Never push objects of any kind into this projector through cabinet slots as they may touch dangerous voltage points or short out parts that could result in a fire or electric shock. Never spill liquid of any kind onto the projector.
Do not install the projector near the ventilation duct of air-conditioning equipment.
This projector should be operated using only the type of power source indicated on the marking label. If you are not sure of the type of power supplied, contact the Canon Customer Support Center or local power company.
Do not overload wall outlets and extension cords as this can result in fire or electric shock. Do not allow anything to rest on the power cord. Do not locate this projector where the cord may be damaged by people walking on it.
Do not attempt to service this projector yourself as opening or removing covers may expose you to dangerous voltages or other hazards. Refer all servicing to qualified service personnel.
Unplug this projector from the wall outlet and refer servicing to qualified service personnel under the following conditions:
aWhen the power cord or plug is damaged or frayed.
bIf liquid has been spilled into the projector.
cIf the projector has been exposed to rain or water.
dIf the projector does not operate normally after following the operating instructions. Adjust only those controls that are covered in the operating instructions as improper adjustment of other controls may result in damage and will often require extensive work by a qualified technician to restore the projector to normal operating condition.
eIf the projector has been dropped or the cabinet has been damaged.
fWhen the projector exhibits a distinct change in performance-this indicates a need for servicing.
When replacement parts are required, be sure the service technician uses replacement parts specified by the manufacturer that have the same characteristics as the original parts. Unauthorized substitutions may result in fire, electric shock, or injury.
Upon completion of any service or repairs to this projector, ask the service technician to perform routine safety checks to determine that the projector is in safe operating condition.
5

AC Power Cord Requirement
The AC Power Cord supplied with this projector meets the requirements for use in the country you purchased it.
AC Power Cord for the United States and Canada:
The AC Power Cord used in the United States and Canada is listed by the
Underwriters Laboratories (UL) and certified by the Canadian Standard
Association (CSA).
The AC Power Cord has a grounding-type AC line plug. This is a safety feature |
Ground |
|
|
to ensure the plug fits into the power outlet. Do not try to tamper with this safety |
|
feature. Should you be unable to insert the plug into the outlet, contact your |
|
electrician. |
|
THE SOCKET-OUTLET SHOULD BE INSTALLED NEAR THE EQUIPMENT AND EASILY ACCESSIBLE.
NOTE FOR CUSTOMERS IN THE US
 LAMP(S) INSIDE THIS PRODUCT CONTAIN MERCURY AND MUST BE RECYCLED OR DISPOSED OF ACCORDING TO LOCAL, STATE OR FEDERAL LAWS.
Only for European Union and EEA (Norway, Iceland and Liechtenstein)
These symbols indicate that this product is not to be disposed of with your household waste, according to the WEEE Directive (2012/19/EU), the Battery Directive (2006/66/ EC) and/or national legislation implementing those Directives.
If a chemical symbol is printed beneath the symbol shown above, in accordance with the Battery Directive, this indicates that a heavy metal (Hg = Mercury, Cd = Cadmium, Pb = Lead) is present in this battery or accumulator at a concentration above an applicable threshold specified in the Battery Directive.
This product should be handed over to a designated collection point, e.g., on an authorized one-for-one basis when you buy a new similar product or to an authorized collection site for recycling waste electrical and electronic equipment (EEE) and batteries and accumulators. Improper handling of this type of waste could have a
possible impact on the environment and human health due to potentially hazardous substances that are generally associated with EEE. Your cooperation in the correct disposal of this product will contribute to the effective usage of natural resources.
For more information about the recycling of this product, please contact your local city office, waste authority, approved scheme or your household waste disposal service or visit www.canon-europe.com/weee, or www.canon-europe.com/battery.
For CA, USA only
Included lithium battery contains Perchlorate Material - special handing may apply.
See www.dtsc.ca.gov/hazardouswaste/perchlorate/ for details.
6
Federal Communication Commission Notice
Multimedia Projector, Model: LV-WX300ST / LV-X300ST
This device complies with Part 15 of the FCC Rules. Operation is subject to the following two conditions:
(1)This device may not cause harmful interference, and
(2)this device must accept any interference received, including interference that may cause undesired operation.
Note: This equipment has been tested and found to comply with the limits for a Class B digital device, pursuant to Part 15 of the FCC Rules. These limits are designed to provide reasonable protection against harmful interference in a residential installation. This equipment generates, uses and can radiate radio frequency energy and, if not installed and used in accordance with the instructions, may cause harmful interference to radio communications. However, there is no guarantee that interference will not occur in a particular installation. If this equipment does cause harmful interference to radio or television reception, which can be determined by turning the equipment off and on, the user is encouraged to try to correct the interference by one or more of the following measures:
•Reorient or relocate the receiving antenna.
•Increase the separation between the equipment and receiver.
•Connect the equipment into an outlet on a circuit different from that to which the receiver is connected.
•Consult the dealer or an experienced radio / TV technician for help.
The cable with a ferrite core provided with the projector must be used with this equipment in order to comply with Class B limits in Subpart B of Part 15 of the FCC Rules.
Use of a shielded cable is required to comply with class B limits in Subpart B of Part 15 of FCC Rules.
Do not make any changes or modifications to the equipment unless otherwise specified in the instructions. If such changes or modifications should be made, you could be required to stop operation of the equipment.
Canon U.S.A. Inc.
One Canon Park, Melville, New York 11747, U.S.A. Tel No. 1-800-OK-CANON (1-800-652-2666)
Safety Symbols in this Manual
This section describes the safety symbols used in this manual. Important projector safety information is identified by the following symbols. Always observe the safety information by these symbols.
Warning |
Denotes the risk of death or serious injury from improper handling if the |
information is not observed. To ensure safe use, always observe this |
|
|
information. |
|
|
Caution |
Denotes the risk of injury from improper handling if the information is not |
observed. To ensure safe use, always observe this information. |
|
|
|
7
Precautions for Use
As this section contains important safety-related information, be sure to read the following carefully beforehand in order to use your projector correctly and safely.
 Warning
If the following situations occur, turn the power off, remove the power plug from the power outlet and contact the Canon Customer Support Center. Failure to do so could cause a fire or result in an electric shock.
•If smoke is emitted
•If an unusual smell or noise is emitted
•If a loud noise is heard and the light source turns off
•If water or other liquid has entered the projector
•If metal or any other foreign material has entered the projector
•If the projector is knocked over or dropped and the cabinet is damaged
 Warning
Pay attention to the following points for handling the power cord. Failure to pay attention to these points could cause a fire, electric shock or personal injury.
•Do not place any objects on the power cord and do not allow it to become trapped under the projector. The power cord may be damaged.
•Do not cover the power cord with a carpet.
•Do not excessively bend, twist, pull or make modifications to the power cord.
•Keep the power cord away from heaters and other sources of heat.
•Do not use the power cord when it is bent finely, coiled or bundled.
•Do not use a damaged power cord. If your power cord is damaged, contact the Canon Customer Support Center.
•Do not use any power cord other than the type that is included with this projector.
•Be sure to connect the ground wire of the power cord to ground. Failure to do so could result in an electric shock.
•Be sure to connect the ground wire before connecting the power plug to the outlet. Also when you disconnect the ground wire, be sure to unplug the power plug from the outlet beforehand.
 Warning
Pay attention to the following point to prevent the small parts from being accidentally swallowed by children.
•Small parts such as the remote control battery, battery holder and adjustable feet that were detached may be accidentally swallowed by small children, which may result in choking. Parents/Guardians should keep them out of reach of children. If swallowed, consult a doctor immediately.
8

 Warning
Pay attention to the following points regarding the power source, power plug and handling of the connector. Failure to do so could result in a fire, electric shock or personal injury.
•Do not use any power source with a voltage other than the voltage indicated (AC 100 – 240 V).
•Do not pull the power cord and be sure to hold the power plug or connector when removing. The cord could be damaged as a result.
•Do not insert any metal objects into the contact parts of the power plug or connector.
•Remove the power plug from the outlet before performing cleaning or maintenance of the projector.
•Do not remove the power plug or connector with wet hands.
•Insert the power plug and connector securely up to the base. Additionally, do not use a damaged power plug or an outlet that is loose.
•If using an extension cord attached to the outlet, make sure that the total electric power consumption of connected devices does not exceed the rated capacity.
•Periodically inspect the power plug and outlet and remove any dust or dirt from between the plug and the outlet.
Precautions for Installation
 Warning
Pay attention to the following points regarding installation and handling of the projector. Failure to do so may cause a fire, electric shock or personal injury.
•Do not use the projector in a bathroom or shower room.
•Do not use the projector in rain or snow, by the sea, or in close proximity to a body of water.
•Do not place containers containing a liquid on top of the projector.
•Do not place the projector in any location where it will be exposed to oily smoke or steam, such as a kitchen work surface or table etc.
•Do not touch the projector itself, the power cord, or the cable if lightening strikes.
 Warning
Pay attention to the following points regarding installation and handling of the projector. Failure to do so may cause a fire, electric shock or personal injury.
•Do not move the projector until you have switched off the power, removed the power plug from the power outlet and unplugged any other cables.
•Do not remove the cabinet from the projector or disassemble it. The interior of the projector contains high-voltage components as well as parts that are hot. These could cause an electric shock or burn. If inspection, maintenance or repair is required, contact the Canon Customer Support Center.
•Do not disassemble or modify the projector (including consumable parts) or the remote control.
•Do not insert any object into vents in the projector, such as the air intake vent or exhaust vents.
•Do not place a pressurized can in front of the exhaust vents. The pressure of the contents of the can may increase due to heat from the exhaust vents and this could result in an explosion.
•As strong light beams are emitted while the projector is in use, do not look directly into the projector lens. Doing so could cause an eye injury. Pay particular attention in preventing young children to do so.
•When giving a presentation in front of the projector while it is projecting an image, conduct your presentation from a position where your shadow will not be cast on the screen and where you do not feel blinded by light from the projector.
9

 Caution
Pay attention to the following points regarding installation and handling of the projector.
•If the projector will not be used for a long period of time, be sure to remove the power plug from the power outlet to ensure safety. Failure to do so could cause a fire.
•The temperature of the cabinet around and above the exhaust vents can become hot during projector operation. Touching these areas during operation could cause burns to the hands.
Do not touch these areas. Doing so may cause burns. Pay particular attention in preventing young children from touching these parts. Additionally, do not place any metal objects on these areas. Due to the heat from the projector, doing so could cause an accident or personal injury.
 Caution
Pay attention to the following points regarding installation and handling of the projector.
•Do not place any heavy objects on top of the projector or sit/stand on it. Pay particular attention to prevent small children from doing so. The projector may be knocked over and this could result in damage or a personal injury.
•Do not place the projector on an unstable or slanted surface. Doing so may cause the projector to fall or be knocked over and could result in a personal injury.
•Do not place any objects in front of the lens while the projector is operating. Doing so could cause a fire.
•When cleaning off dust or dirt from the projector lens etc., do not use any kind of spray that is flammable. As the temperature of the lamp inside the projector is high, it could ignite, causing a fire.
•If the projector is used for a long period of time, dust could accumulate inside the projector. This could cause a fire or malfunction. It is recommended that periodic maintenance of the projector be performed. For details of maintenance costs, contact the Canon Customer Support Center.
Precautions on the lamp
This projector uses a high-pressure mercury lamp, which must be handled carefully and correctly as described below.
The mercury lamp has the following characteristics.
•Impact, abrasion, or use after the lamp’s useful life has expired may damage lamps (which may be accompanied by a loud noise) or cause them to burn out.
•Useful life of lamps varies widely from lamp to lamp and depending on the environment of use.
Lamps are not guaranteed to last for the same amount of time, and some lamps may fail sooner than others.
•The lamp will gradually become darker over time.
 Warning
When replacing the lamp, or when the lamp is damaged, pay attention to the following points. Failure to do so could result in an electric shock or personal injury.
•Be sure to remove the power plug from the power outlet before replacing the lamp.
•When the lamp is damaged, shards of glass may be scattered inside the projector. Contact the Canon Customer Support Center for cleaning and inspection of the projector interior and lamp replacement.
10
 Caution
When handling the lamp, pay attention to the following points.
•Be sure not to handle the lamp immediately after it has been used. Be sure to switch off the power and wait for approximately 45 minutes for the lamp and the projector to cool down sufficiently. Failure to do so could result in a burn or personal injury due to heat from the lamp or projector.
•When an instruction to replace the lamp has been displayed (LAMP Indicator Displays (See "Timing of replacing the lamp" on page 61 for details)), the possibility of the lamp breaking will increase. Replace the lamp with a new one as soon as possible.
•If the lamp is damaged, gas inside the lamp (containing mercury) and dust may be emitted from the exhaust vents. If this happens, immediately open the windows and doors to provide ventilation to the room. If you inhale any gas emitted from the lamp or it has come into contact with your eyes or mouth, consult a doctor immediately.
•When disposing of a used mercury lamp, dispose of it in the same way as a fluorescent lamp and in accordance with the local regulations where you live.
Precautions for the remote control battery
 Warning
Pay attention to the following points regarding handling of the battery. Failure to do so could result in a fire or injury.
•Do not place the battery in a fire or apply heat to, short circuit or disassemble the battery.
•Do not attempt to recharge the battery.
•Insert the battery in the correct + / - positions.
•If any liquid leaks from the battery and comes into contact with skin, wash off thoroughly with water.
Caution for viewing 3D content
 Caution
Pay attention to the following points when viewing 3D content.
•Photosensitive patients, patients with heart disease, pregnant women, elderly people, and people with serious illness and/or with a history of epilepsy should not view 3D content.
•We advise that you should refrain from viewing 3D content if you are in bad physical condition, need sleep or have been drinking alcohol.
•Stop watching 3D content if you experience the following symptoms. If you experience such symptom, immediately stop viewing 3D content and take a break until the symptom has subsided.
•You see doubly-blurred images or you cannot view the image stereoscopically.
•You feel fatigue or discomfort.
•Take breaks when viewing 3D content for an extended period of time. As this may cause eye fatigue. Viewing 3D content for an extended period of time or viewing them from an oblique angle can cause eye strain.
•Parents should accompany and monitor their children as children cannot properly express discomfort with 3D content viewing. Children who are six year of age or younger should not view 3D content.
•The optimum 3D viewing distance from the screen is about 3 times of the vertical screen size or more and your eyes should be level with the screen.
11

For Safe Use
Pay attention to the following points when carrying or transporting the projector.
•This projector is a precision instrument. Do not knock it over or subject it to impacts. Doing so may cause a malfunction.
•Do not reuse any packaging or shock-absorbent materials that were supplied with the projector at the time of purchase for transporting or shipping the projector. Protection of the projector cannot be guaranteed if used packaging or shock-absorbent materials are reused. Fragments from shockabsorbent material may also enter the interior of the projector which could cause a malfunction.
•Disconnect the cables connected to the projector. Carrying the projector with the cables attached may cause an accident.
•Retract the adjustable feet.
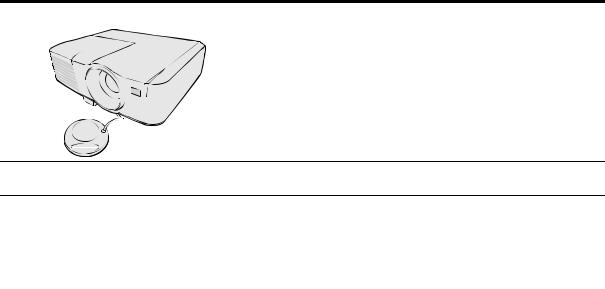
•Attach the lens cap to protect the lens.
Pay attention to the following points when installing or using the projector.
•Be sure to install the projector in a location where the air intake and exhaust vents are separated from the wall by more than 50 cm (1.6'). Failure to do so could cause a malfunction.
•Do not install the projector in a location that is damp, or where there is a lot of dust, oily smoke or tobacco smoke. Doing so could cause contamination of optical components such as the lens and the mirror and may result in deterioration of image quality.
•Do not touch the lens with bare hands. Doing so may result in deterioration of image quality.
•If the projector is suddenly moved from a location where the temperature is low to a location where the temperature is high, or if the temperature in the location where the projector is installed increases suddenly, moisture in the air could cause condensation to form on the projector lens or mirror. This may cause a blurred image. Wait until the condensation has evaporated for the image projected to return to normal.
•Do not install the projector in a location where the temperature is high or low. Doing so may cause a malfunction.
Operating temperature: 0°C (32°F) to 40°C (104°F) Humidity level: 10% to 90%
Storage temperature: -20°C (-4°F) to 60°C (140°F)
•Do not install the projector near high-voltage electrical power lines or an electrical power source.
•Do not use the projector on a soft surface such as carpet or sponge mat, etc. Doing so could cause heat to build up inside the projector and this could result in a malfunction.
•Do not block the air intake or exhaust vents of the cooling fan. Doing so could cause heat to build up inside the projector and may cause a malfunction.
•Do not place any objects on top of the projector that may change shape or color due to heat.
•When using the projector at altitudes greater than 1500 m (4921'), please turn on the High Altitude Mode.
•Please do not brush or rub the surface of the top plate of the projector. The surface may be damaged.
12
Contents of package
|
(US) |
|
|
(EU) |
|
|
(China) |
|
Projector |
Power cord 1.8 m (70.8") |
Computer cable 1.8 m (70.8") |
|
|
(5K.1VC09.501) |
CD & QSG Important Information |
Warranty card |
Remote control |
|
|
(type number: LV-RC08) |
|
|
Battery (type number: CR2025) |
13

Projector exterior view
Front/upper side
1
|
5 |
2 |
|
3 |
8 |
|
6 |
4 |
7 |
|
 9
9
Rear/lower side
10 11 |
12 |
13 |
14 |
15 16 17 |
|||
|
|
|
|
|
|
|
|
|
|
|
|
|
|
|
|
|
|
|
|
|
|
|
|
|
|
|
|
|
|
|
|
|
|
|
|
|
|
|
|
|
|
|
|
|
|
|
|
18 |
|
19 |
21 |
|
|
|
22 |
|
20 |
1.External control panel
(See "Projector" on page 15 for details.)
2.Lamp cover
3.Vent (heated air exhaust)
4.Quick-release button
5.Focus ring
6.Front IR remote sensor
7.Projection lens
8.Vent (air intake)
9.Lens cap
10.SERVICE port
11.LAN (RJ-45) port
12.HDMI input terminal
13.PC input terminal x 2
14.CONTROL port
15.Video input terminal
16.S-Video input terminal
17.Audio input terminal Audio output terminal
18.AC power cord inlet
19.Kensington lock
20.Quick-release foot
21.Security bar
22.Rear adjuster foot
14

Controls and functions
Projector
1 |
|
|
7 |
2 |
8 |
3 |
9 |
4 |
10 |
|
11 |
||
5 |
||
12 |
||
6 |
||
10 |
||
|
1.Focus ring
Adjusts the focus of the projected image. See "Fine-tuning the image clarity" on page 33 for details.
2.POWER indicator light
Lights up or flashes when the projector is under operation. See "Indicators" on page 65 for details.
3.II POWER (ON/STANDBY)
Toggles the projector between standby mode and on. See "Starting up the projector" on page 28 and "Shutting down the projector" on page 42 for details.
4. Left/BLANK
Used to hide the screen picture. See "Hiding the image" on page 41 for details.
5.OK/IMAGE
Enacts the selected On-Screen Display (OSD) menu item.
Selects an available picture setup mode. See "Selecting a image mode" on page 37 for details.
6.MENU
Turns on the On-Screen Display (OSD) menu. Goes back to previous OSD menu, exits and saves menu settings. See "Using the menus" on page 29 for details.
7.TEMPerature indicator light
Lights up red if the projector's temperature becomes too high. See "Indicators" on page 65 for details.
8.LAMP indicator light
Indicates the status of the lamp. Lights up or flashes when the lamp has developed a problem. See "Indicators" on page 65 for details.
9.AUTO PC
Automatically determines the best picture timings for the displayed image. See "Auto-adjusting the image" on page 33 for details.
10.Keystone/Arrow keys (  /
/ Up,
Up,  /
/ Down)
Down)
Manually corrects distorted images resulting from an angled projection. See "Correcting keystone" on page 34 for details.
11. Right/
Activates panel key lock. See "Locking control keys" on page 41 for details.
When the On-Screen Display (OSD) menu is activated, the #4, #10, and #11 keys are used as directional arrows to select the desired menu items and to make adjustments. See "Using the menus" on page 29 for details.
12.INPUT
Displays the source selection bar. See "Switching input signal" on page 32 for details.
15
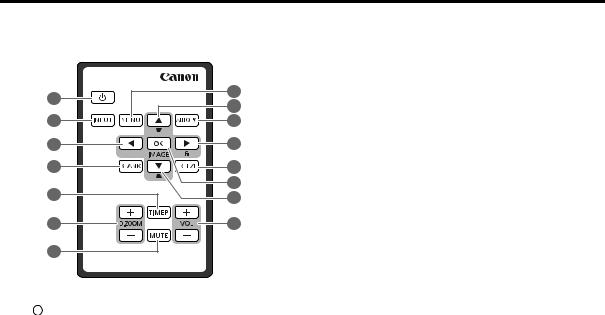
Remote control: LV-RC08
1 |
8 |
|
9 |
||
2 |
||
10 |
||
3 |
11 |
|
4 |
12 |
|
5 |
13 |
|
9 |
||
6 |
14 |
|
7 |
|
1. II POWER (ON/STANDBY)
Toggles the projector between standby mode and on. See "Starting up the projector" on page 28 and "Shutting down the projector" on page 42 for details.
2.INPUT
Displays the source selection bar. See "Switching input signal" on page 32 for details.
3. Left
Left
Selects the desired menu items and makes adjustments. See "Using the menus" on page 29 for details.
4.BLANK
Used to hide the screen picture. See "Hiding the image" on page 41 for details.
5.TIMER
Activates or adjusts some basic settings of an onscreen timer. See "Using the TIMER key" on page 40 for details.
6.D.ZOOM (+, -)
Magnifies or reduces the projected picture size. See "Magnifying and searching for details" on page 35 for details.
7.MUTE
Temporarily mutes the audio. See "Adjusting the sound" on page 42 for details.
8.MENU
Turns on the On-Screen Display (OSD) menu. Goes back to previous OSD menu, exits and saves menu settings. See "Using the menus" on page 29 for details.
9.Keystone/Arrow keys (  /
/ Up,
Up,  /
/ Down)
Down)
Manually corrects distorted images resulting from an angled projection. See "Correcting keystone" on page 34 for details.
10.AUTO PC
Automatically determines the best picture timings for the displayed image. See "Auto-adjusting the image" on page 33 for details.
11. Right/
Activates panel key lock. See "Locking control keys" on page 41 for details.
When the On-Screen Display (OSD) menu is activated, the #3, #9 and #11 keys are used as directional arrows to select the desired menu items and to make adjustments. See "Using the menus" on page 29 for details.
12.FREEZE
Freezes the projected image. See "Freezing the image" on page 41 for details.
13.OK/IMAGE
Enacts the selected On-Screen Display (OSD) menu item.
Selects an available picture setup mode. See "Selecting a image mode" on page 37 for details.
14.VOLUME keys (+, -)
Adjusts the sound level. See "Adjusting the sound" on page 42 for details.
16
Using the remote control for the first time
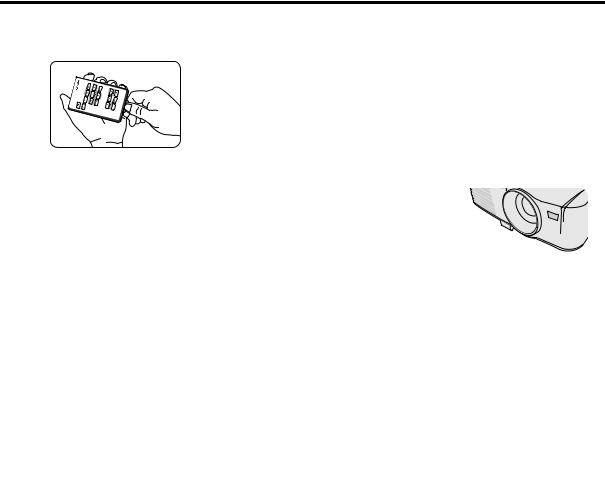
Pull the tab before using the remote control.
Remote control effective range
Infra-Red (IR) remote control sensor is located on the front of the projector. The distance between the remote control and the sensor should not exceed 8 meters (~ 26 feet).
Make sure that there are no obstacles between the remote control and the IR sensor on the projector that might obstruct the infra-red beam.
• You may not be able to perform operations if there are any obstacles between the remote control and the projector.
•You may not be able to operate the remote control if direct sunlight or strong light is shining onto the remote IR receiver.
Replacing the remote control battery
1.Pull out the battery holder.
Please follow the illustrated instructions. Push and hold the locking arm while pulling out the battery holder.
2.Insert the new battery in the holder. Note the positive polarity should face outward.
3.Push the holder into the remote control.
• Risk of explosion if battery is replaced by an incorrect type.
•Dispose of used batteries according to the instructions.
•Use of a battery of wrong type may cause explosion. Use Lithium coin battery, type CR2025 only.
•Dispose of used batteries according to your local regulations. Discard used battery promptly. Batteries may explode if mistreated. Do not recharge, disassemble, or dispose of in fire.
•Be careful in handling the battery according to the instructions.
•Load the battery with its positive (+) and negative (-) sides correctly oriented as indicated on the remote control.
•Keep batteries out of reach of children and pets.
•The remote control battery and battery holders can be a choking hazard if swallowed accidentally by small children. Make sure these are placed out of the reach of children. If they are swallowed accidentally, contact a physician immediately.
•Remove the battery if the remote control is not used for a long time.
•Keep battery in original package until ready to use.
•Never put battery in mouth for any reason as it can easily be accidentally swallowed. If battery is accidentally swallowed, contact your physician or your poison control center.
•Dispose of the used battery with cellophane tape wrapping both ends of it.
•If any liquid leaks from the battery and comes into contact with skin, wash it off thoroughly with water.
17

Third party software
This product includes third party software modules.
•uIP (micro IP) version 0.9
Please see the below licence text concerning the licence condition. Copyright © 2001-2003, Adam Dunkels.
All rights reserved.
Redistribution and use in source and binary forms, with or without modification, are permitted provided that the following conditions are met:
1.Redistributions of source code must retain the above copyright notice, this list of conditions and the following disclaimer.
2.Redistributions in binary form must reproduce the above copyright notice, this list of conditions and the following disclaimer in the documentation and/or other materials provided with the distribution.
3.The name of the author may not be used to endorse or promote products derived from this software without specific prior written permission.
THIS SOFTWARE IS PROVIDED BY THE AUTHOR ''AS IS'' AND ANY EXPRESS OR IMPLIED WARRANTIES, INCLUDING, BUT NOT LIMITED TO, THE IMPLIED WARRANTIES OF MERCHANTABILITY AND FITNESS FOR A PARTICULAR PURPOSE ARE DISCLAIMED. IN NO EVENT SHALL THE AUTHOR BE LIABLE FOR ANY DIRECT, INDIRECT, INCIDENTAL, SPECIAL, EXEMPLARY, OR CONSEQUENTIAL DAMAGES (INCLUDING, BUT NOT LIMITED TO, PROCUREMENT OF SUBSTITUTE GOODS OR SERVICES; LOSS OF USE, DATA, OR PROFITS; OR BUSINESS INTERRUPTION) HOWEVER CAUSED AND ON ANY THEORY OF LIABILITY, WHETHER IN CONTRACT, STRICT LIABILITY, OR TORT (INCLUDING NEGLIGENCE OR OTHERWISE) ARISING IN ANY WAY OUT OF THE USE OF THIS SOFTWARE, EVEN IF ADVISED OF THE POSSIBILITY OF SUCH DAMAGE.
Third party software support
Canon Inc., Canon's affiliated companies, as well as sales companies do not offer any support services for these programs. We are unable to respond to questions or inquiries from you or any other parties regarding these programs.
18
Positioning your projector
Choosing a location
Your room layout or personal preference will dictate which installation location you select. Take into consideration the size and position of your screen, the location of a suitable power outlet, as well as the location and distance between the projector and the rest of your equipment.
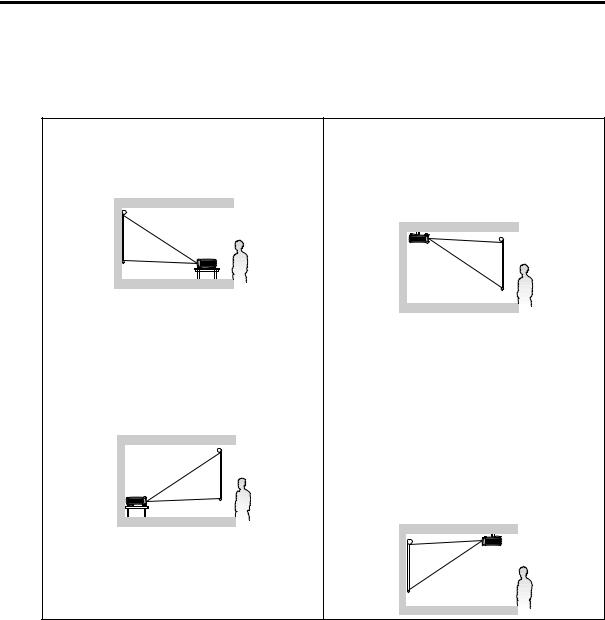
Your projector is designed to be installed in one of the possible installation locations:
1.Front Table
Select this location with the projector placed near the floor in front of the screen. This is the most common way to position the projector for quick setup and portability.
2.Rear Table
Select this location with the projector placed near the floor behind the screen.
Note that a special rear projection screen is required.
Set Rear Table in the SYSTEM SETUP: Basic >
Projector Position menu after you turn the projector on.
3.Rear Ceiling
Select this location with the projector suspended upside-down from the ceiling behind the screen.
Note that a special rear projection screen and qualified projector ceiling mount kit are required for this installation location.
Set Rear Ceiling in the SYSTEM SETUP: Basic
> Projector Position menu after you turn the projector on.
4.Front Ceiling
Select this location with the projector suspended upside-down from the ceiling in front of the screen.
Purchase a qualified projector ceiling mount kit from your dealer to mount your projector on the ceiling.
Set Front Ceiling in the SYSTEM SETUP: Basic
> Projector Position menu after you turn the projector on.
For ceiling mounting, you need the ceiling mount kit to be available for this projector. Ask a specialist for installation. For details, consult your dealer.
•The warranty on this projector does not cover any damage caused by use of any non-recommended ceiling mount kit or installation of the ceiling mount kit in an improper location.
•When the projector is mounted on the ceiling, images may appear darker than those projected in the case of tabletop mounting. This isn’t a product malfunction.
19
Obtaining a preferred projected image size
The distance from the projector lens to the screen, and the video format each factors in the projected image size.
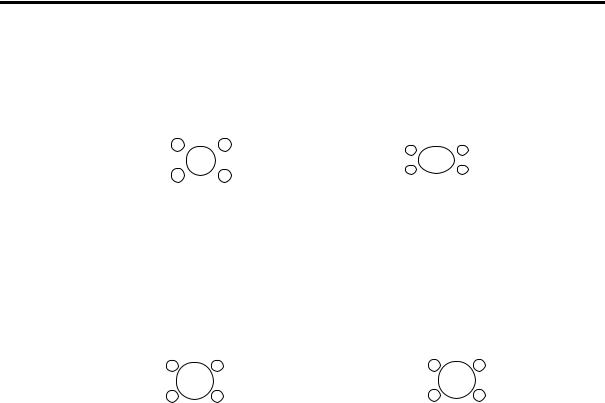
4:3 is the native aspect ratio of LV-X300ST. To be able to project a complete 16:9 (widescreen) aspect ratio image, the projector can resize and scale a widescreen image to the projector's native aspect width. This will result in a proportionally smaller height equivalent to 75% of the projector's native aspect height.
|
|
|
|
|
|
|
|
|
|
|
|
|
|
|
|
|
|
4:3 aspect image in a 4:3 aspect display |
16:9 aspect image scaled to a 4:3 aspect |
||||
|
area |
|
display area |
||
Thus, a 16:9 aspect image will not utilize 25% of the height of a 4:3 aspect image displayed by this projector. This will be seen as darkened (unlit) bars along the top and bottom (vertical 12.5% height respectively) of the 4:3 projection display area whenever displaying a scaled 16:9 aspect image in the vertical center of the 4:3 projection display area.
16:10 is the native aspect ratio of LV-WX300ST. To be able to project a complete 16:9 (widescreen) aspect ratio image, the projector can resize and scale a widescreen image to the projector's native aspect width. This will result in a proportionally smaller height equivalent to 90% of the projector's native aspect height.
|
|
|
|
|
|
|
|
|
|
|
|
|
|
|
|
4:3 aspect image in a 16:10 aspect display area |
16:9 aspect image scaled to a 16:10 aspect |
||||||
|
|
|
|
|
|
display area |
|
Thus, a 16:9 aspect image will not utilize 10% of the height of a 16:10 aspect image displayed by this projector. This will be seen as darkened (unlit) bars along the top and bottom (vertical 5% height respectively) of the 16:10 projection display area whenever displaying a scaled 16:9 aspect image in the vertical center of the 16:10 projection display area.
The projector should always be placed horizontally level (like flat on a table), and positioned directly perpendicular (90° right-angle square) to the horizontal center of the screen. This prevents image distortion caused by angled projections (or projecting onto angled surfaces).
The modern digital projector does not project directly forward (like older style reel-to-reel film projectors did). Instead, digital projectors are designed to project at a slightly upward angle above the horizontal plane of the projector. This is so that they can be readily placed on a table and will project forward and upwards onto a screen positioned so that the bottom edge of the screen is above the level of the table (and everyone in the room can see the screen).
You can see from the diagram on page 22, that this type of projection causes the bottom edge of the projected image to be vertically offset from the horizontal plane of the projector.
If the projector is positioned further away from the screen, the projected image size increases, and the vertical offset also increases proportionately.
When determining the position of the screen and projector, you will need to account for both the projected image size and the vertical offset dimension, which are directly proportional to the projection distance.
When fine streaks are seen on projected images
This is due to interference with the screen surface and is not a mal-function. Replace the screen or displace the focus a little.
20
How to determine the position of the projector for a given screen size
1.Select your image size.
2.Refer to the table and find the closest match to your image size in the left columns labeled "Image size". Using this value, look across this row to the right to find the corresponding average distance from screen value in the column labeled "Distance from the screen: L". This is the projection distance.
3.On that same row, look across to the right column and make note of the "Hd" value. This will determine the final vertical offset placement of the projector in relation to the edge of the image.
4.The recommended position for the projector is aligned perpendicular to the horizontal center of the screen, at the distance from the screen determined in step 2 above, and offset by the value determined in step 3 above.
<Example>
LV-X300ST: If you are using a 4:3 aspect ratio, 100-inch screen, distance from the screen is 1.23 m and with a vertical offset of 22.9 cm.
If you place the projector in a different position (to that recommended), you will have to tilt it down or up to center the image on the screen. In these situations, some image distortion will occur. Use the Keystone function to correct the distortion. See "Correcting keystone" on page 34 for details.
How to determine the recommended screen size for a given distance
This method can be used for situations where you have purchased this projector and would like to know what screen size will fit in your room.
The maximum screen size is limited by the physical space available in your room.
1.Measure the distance between the projector and where you want to position the screen. This is the projection distance.
2.Refer to the table and find the closest match to your measurement in the distance from the Image size column. If the min and max values are available on the table, check that your measured distance is between the min and max distances listed on either side of the average distance value.
3.Using this value, look across that row to the left to find the corresponding "Image size". That is the projected image size of the projector at that projection distance.
4.On that same row, look across to the right column and make note of the "Hd" value. This will determine the final placement of the screen in relation to the horizontal plane of the projector.
<Example>
LV-X300ST: If your measured projection distance was 1 m and your screen aspect ratio is 4:3, the closest match in the "Distance from the screen: L" column is 0.99 m. Looking across this row shows that a 80inch screen is required.
21

Layout of the projector
Image size varies depending on the distance between the screen and the projector.
Front projection
|
W |
A |
B |
H |
|
Hd |
A=B |
|
L
L: Between the screen and the front edge of the projector
H: Height of the projected image
LV-X300ST (4:3)
|
|
|
Image size |
|
|
Distance from the |
|
Hd |
|||
Diagonal Size |
|
Width: W |
Height: H |
screen: L |
|
||||||
|
|
|
|
||||||||
inch |
m |
|
inch |
cm |
inch |
cm |
inch |
m |
inch |
|
cm |
60 |
1.5 |
|
48 |
122 |
36 |
91 |
29 |
0.74 |
5.4 |
|
13.7 |
70 |
1.8 |
|
56 |
142 |
42 |
107 |
34 |
0.86 |
6.3 |
|
16.0 |
80 |
2.0 |
|
64 |
163 |
48 |
122 |
39 |
0.99 |
7.2 |
|
18.3 |
90 |
2.3 |
|
72 |
183 |
54 |
137 |
44 |
1.11 |
8.1 |
|
20.6 |
100 |
2.5 |
|
80 |
203 |
60 |
152 |
49 |
1.23 |
9.0 |
|
22.9 |
120 |
3.0 |
|
96 |
244 |
72 |
183 |
58 |
1.48 |
10.8 |
|
27.4 |
LV-WX300ST (16:10) |
|
|
|
|
|
|
|
|
|
||
|
|
|
|
|
|
|
|
|
|
||
|
|
|
Image size |
|
|
Distance from the |
|
Hd |
|||
Diagonal Size |
|
Width: W |
Height: H |
screen: L |
|
||||||
|
|
|
|
||||||||
inch |
m |
|
inch |
cm |
inch |
cm |
inch |
m |
inch |
|
cm |
60 |
1.5 |
|
51 |
129 |
32 |
81 |
25 |
0.63 |
1.6 |
|
4.0 |
70 |
1.8 |
|
59 |
151 |
37 |
94 |
29 |
0.74 |
1.9 |
|
4.7 |
80 |
2.0 |
|
68 |
172 |
42 |
108 |
33 |
0.84 |
2.1 |
|
5.4 |
90 |
2.3 |
|
76 |
194 |
48 |
121 |
37 |
0.95 |
2.4 |
|
6.1 |
100 |
2.5 |
|
85 |
215 |
53 |
135 |
41 |
1.05 |
2.6 |
|
6.7 |
120 |
3.0 |
|
102 |
258 |
64 |
162 |
50 |
1.26 |
3.2 |
|
8.1 |
The above figures are approximate and may be slightly different from the actual measurements. Canon recommends that if you intend to permanently install the projector, you should physically test the projection size and distance using the actual projector in suit before you permanently install it, so as to make allowance for this projector's optical characteristics. This will help you determine the exact mounting position so that it best suits your installation location.
22

Connection
When connecting a signal source to the projector, be sure to:
1.Turn all equipment off before making any connections.
2.Use the correct signal cables for each source.
3.Ensure the cables are firmly inserted.
 • See the user’s manual of each device for details about its connections.
•Contact your dealer for details about its connections.
•In the connections shown below, some cables may not be included with the projector. They are commercially available from electronics stores.
Connecting a computer or monitor
Connecting a computer
The projector provides a PC input terminal that allows you to connect it to both IBM® compatibles and Macintosh® computers. A Mac adapter is needed if you are connecting legacy version Macintosh computers.
To connect the projector to a notebook or desktop computer:
1.Take the supplied Computer cable and connect one end to the D-Sub output terminal of the computer.
2.Connect the other end of the Computer cable to the COMPUTER-1 or COMPUTER-2 signal input terminal of the projector.
3.If you wish to make use of the projector speaker in your presentations, take a suitable audio cable and connect one end of the cable to the audio output terminal of the computer, and the other end to the AUDIO IN terminal of the projector.
4.If you wish, you can use another suitable audio cable and connect one end of the cable to the AUDIO OUT terminal of the projector, and the other end to your external speakers (not supplied).
Once connected, the audio can be controlled by the projector On-Screen Display (OSD) menus. See "Adjusting the sound" on page 42 for details.
The final connection path should be like that shown in the following diagram:
|
Audio cable (option) |
|
|
Computer cable (supplied) |
|
|
Speakers |
|
Notebook or desktop computer |
Audio cable |
|
(option) |
||
|
Many notebooks do not turn on their external video ports when connected to a projector. Usually a key combo like FN + F3 or CRT/LCD key turns the external display on/off. Locate a function key labeled CRT/LCD or a function key with a monitor symbol on the notebook. Press FN and the labeled function key simultaneously. Refer to your notebook's documentation to find your notebook's key combination.
•When you use a longer Computer cable instead of the provided cable, the image may not be projected correctly.
•Some computers require additional connectors or analog RGB output adapters to be connected with this projector.
23

Connecting Video source devices
You can connect your projector to various Video source devices that provide any one of the following output sockets:
•HDMI
•Component Video
•S-Video
•Video (composite)
You need only connect the projector to a Video source device using just one of the above connecting methods, however each provides a different level of video quality. The method you choose will most likely depend upon the availability of matching terminals on both the projector and the Video source device as described below:
HDMI (High-Definition Multimedia Interface) supports uncompressed video data transmission between compatible devices like DTV tuners, DVD players and displays over a single cable. It provides pure digital viewing experience. See "Connecting an HDMI device" on page 24 for how to connect the projector to an HDMI device.
Digital TV tuner and DVD players output Component Video natively, so if available on your devices, this should be your connection method of choice in preference to (composite) Video. See "Connecting a Component Video source device" on page 25 for how to connect the projector to a component video device.
If you have both composite Video and S-Video output terminals on your Video source device, you should elect to use the S-Video option. See "Connecting an S-Video source device" on page 25 for how to connect the projector to an S-Video device.
If you have only composite Video output terminals on your Video source device, connect to Composite Video input. See "Connecting a composite Video source device" on page 26 for how to connect the projector to a composite Video device.
Connecting an HDMI device
You should use an HDMI cable when making connection between the projector and HDMI devices.
To connect the projector to an HDMI device:
1.Take an HDMI cable and connect one end to the HDMI output terminal of the video device.
2.Connect the other end of the cable to the HDMI input terminal on the projector.
HDMI device
 HDMI cable (option)
When you connect this projector and an HDMI device (such as a DVD player) via the HDMI terminal, black color may appear dark and deep, depending on the type of the connected device.
•This depends on the black level setting of the connected device. There are two kinds of methods to digitally transfer image data, in which different black level settings are employed respectively. Therefore, the specifications of the signals output from DVD players differ, depending on the type of the digital data transfer method they use.
•Some DVD players are provided with a function to switch the methods to output digital signals. When your DVD player is provided with such function, set it as follows.
EXPAND or ENHANCED -> NORMAL
• See the User’s Manual of your DVD player for details.
24
Loading...