


 Loading...
'LJLWDO 9LGHR &DPFRUGHU
,QVWUXFWLRQ 0DQXDO
0LQL 'LJLWDO 9LGHR
&DVVHWWH
3OHDVH UHDG DOVR WKH IROORZLQJ LQVWUXFWLRQ PDQXDO
'LJLWDO 9LGHR 6RIWZDUH
'LJLWDO 9LGHR 6RIWZDUH (
9HUVLRQ 9HUVLRQ
,QVWUXFWLRQ 0DQXDO
7KLV LQVWUXFWLRQ PDQXDO H[SODLQV KRZ WR LQVWDOO WKH VRIWZDUH DQG &DQRQ 86% 9LGHR 'ULYHU :LQGRZV ;3 RQO\ FRQQHFW WKH FDPFRUGHU WR D FRPSXWHU DQG GRZQORDG LPDJHV IURP D PHPRU\ FDUG WR D FRPSXWHU
,I \RX DUH XVLQJ :LQGRZV RSHUDWLQJ V\VWHP XVH WKH VXSSOLHG ',*,7$/ 9,'(2 62/87,21 ',6. )RU :LQGRZV ,I \RX DUH XVLQJ 0DFLQWRVK RSHUDWLQJ V\VWHP XVH WKH VXSSOLHG ',*,7$/ 9,'(2 62/87,21 ',6. )RU 0DFLQWRVK
38% ',(
(QJOLVK
(QJOLVK 
,QWURGXFWLRQ
3UHSDUDWLRQ
%DVLF
)XQFWLRQV
$GYDQFHG )XQFWLRQV
(GLWLQJ
3ULQWLQJ
&RQQHFWLQJ WR
D 3&
7URXEOH"
'R¶V 'RQ¶WV
$GGLWLRQDO
,QIRUPDWLRQ
3$/

,SRUWDQW 8VDJH ,QVWUXFWLRQV
:$51,1*
72 5('8&( 7+( 5,6. 2) ),5( 25 (/(&75,& 6+2&. '2 127 5(029( &29(5 25 %$&. 12 86(5 6(59,&($%/( 3$576 ,16,'( 5()(5 6(59,&,1* 72 48$/,),(' 6(59,&( 3(56211(/
:$51,1* 72 5('8&( 7+( 5,6. 2) ),5( 25 (/(&75,& 6+2&. '2 127 (;326( 7+,6 352'8&7 72 5$,1 25 02,6785(
&$87,21 72 5('8&( 7+( 5,6. 2) (/(&75,& 6+2&.$1' 72 5('8&(
$112<,1* ,17(5)(5(1&( 86( 7+( 5(&200(1'('$&&(6625,(6 21/<
&$87,21
',6&211(&7 7+( 0$,16 3/8* )520 7+( 6833/< 62&.(7 :+(1 127 ,1 86(
&$ LGHQWLILFDWLRQ SODWH LV ORFDWHG RQ WKH ERWWRP
Using this Manual
Thank you for purchasing the Canon MVX45i/MVX40i/MVX40. Please read this manual carefully before you use the camcorder and retain it for future reference.
Symbols and References Used in This Manual
 : Precautions related to the camcorder operation.
 : Additional topics that complement the basic operating procedures.
 : Reference page number.
Capital letters are used to refer to buttons on the camcorder or the wireless controller.
[ ] are used to refer to menu items displayed on the screen.
“Screen” refers to the LCD and the viewfinder screen.
Please note that the illustrations mainly refer to the MVX45i.
Operating modes (see below) |
Menu item showing at its default position |
Button and switches to be operated |
E
Introduction
About the Operating Modes
The operating modes are determined by the position of the POWER switch and the TAPE/CARD switch.
|
Operating Mode |
POWER Switch |
TAPE/CARD Switch |
|||||||
|
|
CAMERA |
|
|
|
|
|
|
(TAPE) |
|
|
CAMERA |
|
|
|
|
|
|
|
||
|
|
|
|
|
|
|
|
|||
|
|
|
|
|
|
|
|
|
|
|
|
|
|
|
|
|
|
|
|
|
|
|
|
PLAY (VCR) |
|
|
|
|
|
|
(TAPE) |
|
|
PLAY (VCR) |
|
|
|
|
|
|
|
||
|
|
|
|
|
|
|
|
|||
|
|
|
|
|
|
|
|
|
|
|
|
|
|
|
|
|
|
|
|
|
|
|
|
CAMERA |
|
|
|
|
|
|
(CARD) |
|
|
CARD CAMERA |
|
|
|
|
|
|
|
||
|
|
|
|
|
|
|
|
|||
|
|
|
|
|
|
|
|
|||
|
|
|
|
|
|
|
|
|
|
|
|
|
|
|
|
|
|
|
|
|
|
|
|
|
|
|
|
|
|
|
|
|
|
|
PLAY (VCR) |
|
|
|
|
|
|
(CARD) |
|
|
CARD PLAY |
|
|
|
|
|
|
|
||
|
|
|
|
|
|
|
|
|||
|
|
|
|
|
|
|
|
|||
|
|
|
|
|
|
|
|
|
|
|
|
|
|
|
|
|
|
|
|
|
|
|
|
|
|
|
|
|
|
|
|
|
CAMERA : Function can be used in this mode.
CAMERA : Function cannot be used in this mode.
3
Trademark Acknowledgements
• is a trademark.
•
 is a trademark.
•Windows® is a registered trademark of Microsoft Corporation in the United States and/ or other countries.
•Macintosh and Mac OS are trademarks of Apple Computer, Inc., registered in the United States and other countries.
•HDV is a trademark of Sony Corporation and Victor Company of Japan, Limited (JVC).
•Other names and products not mentioned above may be registered trademarks or trademarks of their respective companies.
4
Table of Contents |
|
Introduction |
|
Using this Manual............................................................................................ |
3 |
Checking Supplied Accessories ...................................................................... |
8 |
Components Guide.......................................................................................... |
9 |
Screen Displays............................................................................................. |
13 |
Preparation |
|
Step 1: Preparing the Power Supply.............................................................. |
16 |
Step 2: Loading a Cassette ........................................................................... |
19 |
Step 3: Inserting a Memory Card................................................................... |
20 |
Step 4: Preparing the Camcorder.................................................................. |
21 |
Step 5: Using the Wireless Controller............................................................ |
23 |
Step 6: Adjusting the LCD Screen................................................................. |
24 |
Step 7: Changing the Display Language ....................................................... |
25 |
Step 8: Setting the Time Zone, Date and Time.............................................. |
26 |
Basic Functions |
|
Recording |
|
Recording Movies on a Tape......................................................................... |
28 |
Recording on a Memory Card ....................................................................... |
31 |
Zooming......................................................................................................... |
34 |
Tips for Better Recording............................................................................... |
36 |
Playback |
|
Playing Back a Tape...................................................................................... |
37 |
Playing Back a Memory Card........................................................................ |
39 |
Adjusting the Volume..................................................................................... |
40 |
Playing Back on a TV Screen........................................................................ |
41 |
Advanced Functions |
|
Recording Programs |
|
Using the Recording Programs ..................................................................... |
44 |
Using the Super Night Mode ................................................... |
46 |
Using the Special Scene Modes ............................................................. |
47 |
Using the Program AE Mode ..................................................................... |
48 |
Using the Shutter-Priority AE Mode ......................................................... |
49 |
Using the Aperture-Priority AE Mode....................................................... |
50 |
Recording |
|
Adjusting Exposure Manually ........................................................................ |
51 |
Adjusting the Focus Manually........................................................................ |
52 |
Using the Mini Video Light ........................................................... |
53 |
Using the Self-Timer...................................................................................... |
54 |
Recording with an External Microphone........................................................ |
55 |
Changing the Settings (1) |
|
Changing the Settings with the FUNC. Button .............................................. |
56 |
List of Menu Items (FUNC.)........................................................................... |
57 |
Setting the White Balance ............................................................................. |
58 |
Selecting an Image Effect.............................................................................. |
60 |
Using Digital Effects....................................................................................... |
61 |
Changing the Settings (2) |
|
Changing the Settings with the MENU Button............................................... |
70 |
E
Introduction
5

List of Menu Items (MENU) ........................................................................... |
71 |
Changing the Recording Mode (SP/LP) ........................................................ |
76 |
Adjusting the Audio Recording Level............................................................. |
77 |
Using the Wind Screen.................................................................................. |
79 |
Widescreen TV Recording (16:9) .................................................................. |
80 |
Changing the My Camera Settings................................................................ |
81 |
Playback |
|
Magnifying the Image .................................................................................... |
83 |
Displaying the Data Code.............................................................................. |
84 |
End Search.................................................................................................... |
85 |
Returning to a Pre-marked Position .............................................................. |
86 |
Date Search................................................................................................... |
87 |
Digital Camera Functions |
|
Selecting the Image Quality/Size................................................................... |
88 |
Simultaneous Recording on Tape and Memory Card.................................... |
90 |
Using the Flash.............................................................................................. |
91 |
Selecting the Metering Method...................................................................... |
93 |
Changing the focusing method...................................................................... |
94 |
Selecting the Drive Mode .............................................................................. |
95 |
Recording Panoramic Images (Stitch Assist Mode) ...................................... |
97 |
Reviewing a Still Image Right after Recording .............................................. |
99 |
Playing Back/Searching Images.................................................................. |
100 |
Protecting Images........................................................................................ |
102 |
Erasing Images............................................................................................ |
103 |
Formatting a Memory Card.......................................................................... |
104 |
Editing |
|
Recording to a VCR or Digital Video Device ............................................... |
105 |
Analog Line-in Recording.......................................... |
106 |
DV Dubbing............................................................... |
108 |
Converting Analog Signals into Digital Signals |
|
(Analog-Digital Converter) ........................................................................ |
111 |
Audio Dubbing............................................................................................. |
113 |
Recording from the Tape on a Memory Card .............................................. |
116 |
Printing |
|
Printing Still Images..................................................................................... |
118 |
Selecting the Print Settings ......................................................................... |
121 |
Trimming Settings........................................................................................ |
126 |
Printing with Print Order Settings ................................................................ |
127 |
Connecting to a PC |
|
Transferring Video Recordings to a Computer ............................................ |
129 |
Transferring Memory Card Images to a Computer...................................... |
131 |
Direct Transfer (Windows OS only) ............................................................. |
132 |
Selecting Images for Transfer (Transfer Order)........................................... |
134 |
Using the NETWORK Mode (DV Messenger Version 2)............................. |
135 |
Trouble? |
|
Troubleshooting........................................................................................... |
136 |
List of Messages.......................................................................................... |
140 |
6

Do’s & Don’ts
Handling Precautions .................................................................................. |
143 |
|
|
Cleaning the Video Heads........................................................................... |
147 |
|
|
|
|||
Maintenance/Others .................................................................................... |
148 |
|
E |
Additional Information |
|
|
|
|
|
|
|
|
|
|
|
System Diagram.......................................................................................... |
149 |
|
|
Optional Accessories................................................................................... |
150 |
|
|
Specifications............................................................................................... |
153 |
|
|
Index............................................................................................................ |
155 |
|
|
|
|
|
|
|
|
|
|
|
|
|
Introduction |
7
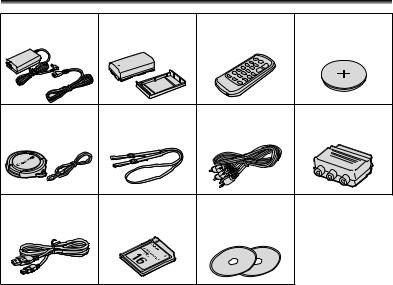
Checking Supplied Accessories
CA-570 Compact |
NB-2LH Battery Pack |
WL-D85 Wireless |
Lithium Button Battery |
||||
Power Adapter |
|
|
Controller |
CR2025 for Wireless |
|||
(incl. power cord) |
|
|
|
|
Controller |
||
|
|
|
|
|
|
|
|
|
|
|
|
|
|
|
|
|
|
|
|
|
|
|
|
|
|
|
|
|
|
|
|
|
|
|
|
|
|
|
|
|
|
|
|
|
|
|
|
|
|
|
|
|
|
|
|
|
|
|
|
|
|
|
|
Lens Cap and Lens |
SS-900 Shoulder Strap STV-250N Stereo |
PC-A10 SCART |
||||
Cap Cord |
|
|
Video Cable |
Adapter* |
||
|
|
|
|
|
|
|
|
|
|
|
|
|
|
|
|
|
|
|
|
|
|
|
|
|
|
|
|
|
|
|
|
|
|
|
|
|
|
|
|
|
|
IFC-300PCU USB |
MMC-16M |
DIGITAL VIDEO |
|||
Cable |
MultiMediaCard |
SOLUTION DISK |
|||
|
|
|
|
For Windows |
|
|
|
|
|
For Macintosh |
|
|
|
|
|
|
|
|
|
|
|
|
|
|
|
|
|
|
|
|
|
|
|
|
|
* Europe only.
8

Components Guide
MVX45i/MVX40i/MVX40
Left side view
Right side view
E
Introduction
Focus ring ( |
52) |
|
|
|
FUNC. button ( |
56) |
|
|
|
SET dial ( |
40, 56, 70) |
|
|
|
Speaker ( |
40) |
|
|
|
Memory card slot ( |
20) |
|
||
FOCUS button ( |
52) / |
|
|
|
DATA CODE button ( |
84) |
|
||
EXP button ( |
51) / |
|
|
|
END SEARCH button ( |
85) |
|
||
Mode dial ( |
44) |
|
|
|
(self-timer) button ( |
54) / |
|
||
REC PAUSE button* ( |
106, 108) |
|||
RESET button ( |
136) |
|
|
|
(flash) button ( |
91) / |
|
||
/ (play/pause) button ( |
37) |
|||
REC SEARCH – button ( |
30) / |
|||
(record review) button ( |
30) / |
|||
(rewind) button ( |
37) / |
|
||
CARD – button ( |
39) |
|
|
|
* MVX45i/MVX40i only.
 REC SEARCH + button (
 30) /
30) /  (fast forward) button (
 38) /
38) /
CARD + button ( 39)
39)
 DRIVE MODE button (
 95) /
95) /  (stop) button (
 37) /
37) /
AUDIO LEVEL button ( 77)
77)
 MENU button (
 70)
70)
 D.EFFECTS button (
 61)
61)
 LCD BACKLIGHT button (
 24)
24)
 Terminal cover
 DC IN terminal (
 16)
16)
 Power switch (
 3, 135)
 MIC terminal (
 55)
55)
 AV terminal (
 41) /
41) /  (phones) terminal (
 40)
40)
 DV terminal (
 105, 108, 129)
 Grip belt (
 21)
21)
9
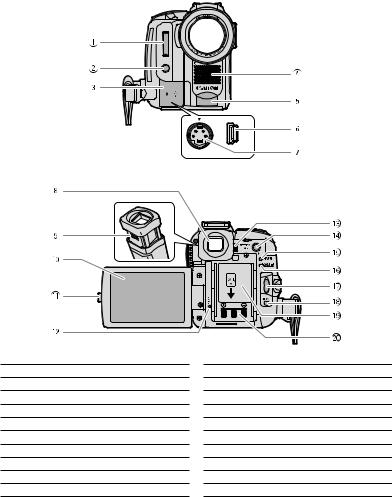
Front view
Back view
 Flash (
 91)
91)
 Mini video light (assist lamp)* (
 53)
53)
 Terminal cover
 Stereo microphone
 Remote sensor (
 23)
23)
 USB terminal (
 118, 131)
 S-video terminal (
 43)
43)
 Viewfinder (
 21)
21)
 Dioptric adjustment lever (
 21)
21)
 LCD screen (
 24)
24)
* MVX45i only.
 OPEN button (
 24)
24)
 Card access indicator (
 31)
31)
 BATTERY RELEASE button (
 16)
16)
 LIGHT button* (
 53)
53)
 CHARGE indicator (
 16)
16)
 POWER indicator
 Start/stop button (
 28, 31)
 UNLOCK button (
 135)
135)
 Serial number
 Battery attachment unit (
 16)
16)
10
Top view
Bottom view
E
Introduction


 (print/share) button (
 119, 132)
 TAPE/CARD switch (
 3)
3)
 PHOTO button (
 31)
31)
 Zoom lever (
 34)
34)
Advanced accessory shoe ( 55)
55)
Accessory shoe ( 55)
55)
 Cassette compartment (
 19)
19)
 OPEN/EJECT
  switch (
 19)
19)
 Cassette compartment cover (
 19)
19)
 Strap mount (
 22)
22)
 Tripod socket (
 36)
36)
11
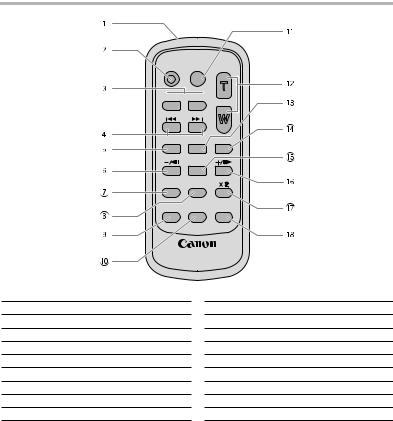
Wireless Controller WL-D85
START/
STOP PHOTO ZOOM

 CARD
CARD 

DATE SEARCH
REW PLAY
PLAY FF
FF
STOP
PAUSE SLOW
SLOW
ZERO SET
AUDIO DUB. MEMORY TV SCREEN
WIRELESS CONTROLLER WL-D85
 Transmitter
 START/STOP button (
 28, 31)
 CARD –/+ buttons (
 39)
39)
 DATE SEARCH
  /
/ buttons (
 87)
87)
 REW
REW  button (
 37)
37)
 –/
–/
 button (
 38)
38)
 PAUSE
PAUSE  button (
 38)
38)
 SLOW
SLOW  button (
 38)
38)
 AUDIO DUB. button (
 113)
113)
 ZERO SET MEMORY button (
 86)
86)
 PHOTO button (
 31)
31)
 Zoom buttons (
 34)
34)
 PLAY
PLAY  button (
 37)
37)
 FF
FF  button (
 38)
38)
 STOP
STOP  button (
 37)
37)
 +/
+/
 button (
 38)
38)
 x 2 button (
 38)
38)
 TV SCREEN button (
 73)
73)
12

Screen Displays
Screen Displays during Recording/Playback
CAMERA Mode
 Recording Program (
 44)
44)
 White balance (
 58)
58)
 Image effect (
 60)
60)
 Digital effects (
 61)
61)
 Condensation warning (
 139)
139)
 Still image quality/size (
 90)
90)
 Remote sensor mode (
 74)
74)
 Mini video light* (
 53)
53)
 Flash (
 91)
91)
* MVX45i only.
 AF/AE locked during still image recording (
 90)
90)
 Accessory connected to the Advanced Accessory Shoe*
 Zoom (
 34)
34)
 Self-timer (
 54)
54)
 Manual focus (
 52)
52)
 Image stabilizer (
 71)
71)
 Recording mode (
 76)
76)
 Tape operation (
 14)
14)
 Time code (
 29)
29)
 Remaining tape (
 29)
29)
 Remaining battery charge (
 29)
29)
 Wind screen (
 79)
79)
 Microphone attenuator (
 78)
78)
 Audio mode (
 73)
73)
 Widescreen mode (
 80) /
80) /
Headphones ( 78)
78)
 Remaining card capacity for still images (
 90)
90)
 Audio level indicator (
 77)
77)
E
Introduction
13

PLAY (VCR) Mode
 12 bit audio (
 115)
115)
 End search (
 85)
85)
 Movie size (
 116)
116)
 Still image quality/size (
 116)
116)
 Data code (
 84)
84)
 Volume level of built-in speaker or headphones (
 40)
40)
Tape operation |
|
|
|
|
|
|
|
|
|
|
|
|
|
|
|
|
|
|
|
|
|
|
|
|
|
|
|
|
|
|
|
|
|
|
|
|
|
|
|
|
|
|
|
|
|
|
|
|
|
|
||
|
|
: Record |
|
|
|
|
|
|
/ |
|
|
|
: Fast forward playback/ |
|
|
|
|
|
/ |
|
|
|
|
: Playback pause ( |
|
|
|
|
38) |
|||||||||||||||||||||||
|
|
: Pause |
|
|
|
rewind playback ( |
|
|
|
38) |
|
|
|
|
|
|
|
|
|
|
/ |
|
|
|
: Date search ( |
|
|
|
|
87) |
|
|
|
|||||||||||||||||||
|
|
|
|
|
|
|
|
|
|
|
|
|
|
|
|
|
||||||||||||||||||||||||||||||||||||
|
|
|
|
|
|
|
|
|
|
|
|
|
|
|
|
|
|
|
|
|
|
|
||||||||||||||||||||||||||||||
|
|
|
|
|
|
|
|
|
|
|
|
|
|
|
||||||||||||||||||||||||||||||||||||||
|
|
: Stop |
x2 |
|
|
|
/ |
|
|
x2: x2 playback |
( |
|
|
|
|
38) |
|
|
|
|
|
|
|
|
|
|
: Zero set memory ( |
|
|
86) |
||||||||||||||||||||||
|
|
|
|
|
|
|
|
|
|
|
|
|
|
|
|
|
|
|
|
|
||||||||||||||||||||||||||||||||
|
|
|
|
|
|
|
|
|
|
|
|
|
|
|
/ |
|
|
|
|
|
|
|||||||||||||||||||||||||||||||
|
|
: Eject |
x1 |
|
|
|
/ |
|
|
x1: x1 playback ( |
|
|
|
|
38) |
|
|
|
/ |
|
|
|
|
|
|
: Audio dubbing ( |
|
|
|
|
113) |
|||||||||||||||||||||
|
|
|
|
|
|
|
|
|
|
|
|
|
|
|
|
|||||||||||||||||||||||||||||||||||||
|
|
|
|
|
|
|
|
|
|
|
|
|
|
|
|
|
|
|
|
|
|
|
||||||||||||||||||||||||||||||
|
|
: Play |
|
|
|
/ |
|
|
|
|
: Slow playback ( |
|
|
|
|
|
38) |
|
|
|
|
|
|
|
|
|
|
|
|
|
|
|
|
|
|
|
|
|
|
|
|
|
|
|||||||||
|
|
|
|
|
|
|
|
|
|
|
|
|
|
|
|
|
|
|
|
|
|
|
|
|
|
|
|
|
|
|
|
|
|
|
|
|
|
|
||||||||||||||
|
|
|
|
|
|
|
|
|
|
|
|
|
|
|
|
|
|
|
|
|
|
|
|
|
|
|
|
|
|
|
|
|
|
|
|
|
|
|
||||||||||||||
|
|
: Fast |
|
|
|
/ |
|
|
|
|
: Frame advance playback/ |
|
|
|
|
|
|
|
|
|
|
|
|
|
|
|
|
|
|
|
|
|
|
|
|
|||||||||||||||||
|
|
|
|
|
|
|
|
|
|
|
|
|
|
|
|
|
|
|
|
|
|
|
|
|
|
|
|
|
|
|
|
|
||||||||||||||||||||
|
|
|
|
|
|
|
|
|
|
|
|
|
|
|
|
|
|
|
|
|
|
|
|
|
|
|
|
|
|
|
|
|
||||||||||||||||||||
|
|
forward |
|
|
|
frame reverse playback |
( |
|
|
|
38) |
|
|
|
|
|
|
|
|
|
|
|
|
|
|
|
|
|
|
|
|
|
|
|
|
|||||||||||||||||
|
|
|
|
|
|
|
|
|
|
|
|
|
|
|
|
|
|
|
|
|
|
|
|
|
|
|
|
|
|
|
|
|||||||||||||||||||||
|
|
|
|
|
|
|
|
|
|
|
|
|
|
|
|
|
|
|
|
|
|
|
|
|
|
|
|
|
|
|
|
|||||||||||||||||||||
|
|
: Rewind |
|
|
|
|
|
|
|
|
|
|
|
|
|
|
|
|
|
|
|
|
|
|
|
|
|
|
|
|
|
|
|
|
|
|
|
|
|
|
|
|
|
|
|
|
|
|
|
|
|
|
|
|
|
|
|
|
|
|
|
|
|
|
|
|
|
|
|
|
|
|
|
|
|
|
|
|
|
|
|
|
|
|
|
|
|
|
|
|
|
|
|
|
|
|
|
|
|
|
|
|
|
|
|
CARD CAMERA Mode
 Metering mode (
 93)
93)
 White balance (
 58)
58)
 Image effect (
 60)
60)
 Drive mode (
 95)
95)
 Digital effects (
 61)
61)
 Movie size (
 88)
88)
 Still image quality/size (
 88)
88)
 Camcorder shake warning (
 71)
71)
 Remaining card capacity for movies
 Remaining card capacity for still images
14
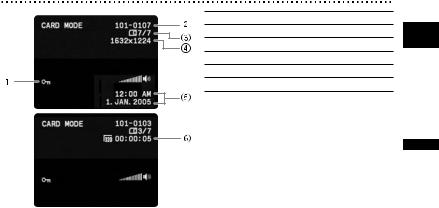
CARD PLAY Mode
 Protect mark (
 102)
102)
 File number (
 72)
72)
 Number of images
 Still image size
 Data code (
 84)
84)
 Movie size/playback time
E
Introduction
15
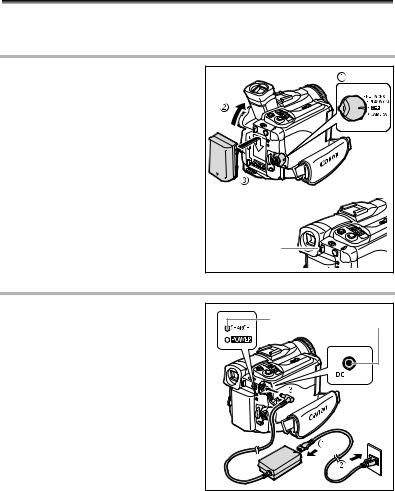
Step 1: Preparing the Power Supply
The camcorder can be powered by a battery pack or connected to a household power source. Charge the battery pack before use.
Attaching the Battery Pack |
|
|
|
1. |
Turn the POWER switch to OFF. |
|
|
2. |
Move the viewfinder upward. |
|
|
3. |
Attach the battery pack to the |
|
|
|
camcorder. |
|
|
|
• Remove the terminal cover of the |
|
|
|
battery pack. |
|
|
|
• Press lightly and slide it in the direction |
|
|
|
of the arrow until it clicks. |
|
|
To remove the battery pack: |
|
|
|
1. |
Move the viewfinder upward. |
|
|
2. |
Press the BATTERY RELEASE |
|
|
|
button and slide the battery pack |
|
|
|
upward. |
BATTERY |
|
|
|
RELEASE button |
|
Charging the Battery Pack |
|
|
|
1. |
Connect the power cord to the |
|
|
|
adapter. |
CHARGE |
DC IN terminal |
|
indicator |
||
|
|
|
|
2. Plug the power cord into a power outlet.
3. Connect the power adapter to the camcorder’s DC IN terminal.
The CHARGE indicator starts flashing. It glows steadily when charging is complete.
To remove the power adapter:
1. Disconnect the power adapter from the camcorder.
2. Unplug the power cord from the power outlet.
3.Disconnect the power cord from the adapter.
16
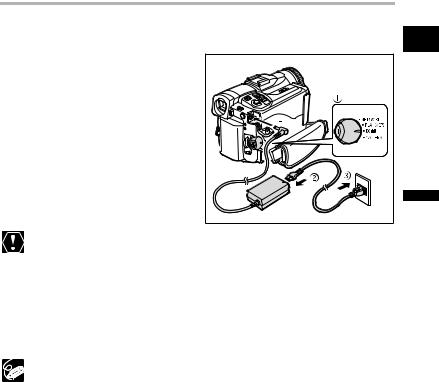
Using a Household Power Source
Connect to a household power source to use the camcorder without worrying about the |
|
battery power. You can keep the battery pack attached; the battery power will not be |
E |
consumed. |
1. Turn the POWER switch to OFF. |
|
2. Connect the power cord to the |
|
power adapter. |
|
3. Plug the power cord into a power |
|
outlet. |
|
4. Connect the power adapter to the |
|
camcorder’s DC IN terminal. |
|
Turn off the camcorder before connecting or disconnecting the power adapter. |
Preparation |
|
|
Do not connect any products that are not expressly recommended to the |
|
camcorder’s DC IN terminal or to the power adapter. |
|
You may hear some noise from the power adapter during use. This is not a |
|
malfunction. |
|
Do not disconnect and reconnect the power cord while charging a battery pack. |
|
Charging may stop. The battery pack may not be charged correctly even if the |
|
CHARGE indicator glows steady. The battery pack may also not be charged |
|
correctly when a power outage occurs during charging. Remove the battery |
|
pack and attach it back to the camcorder. |
|
When the power adapter or battery pack is defective, the CHARGE indicator |
|
flashes rapidly (at about 2 flashes/second) and charging stops. |
|
The CHARGE indicator informs you about the charge status. |
|
0-50%: Flashes once every second |
|
More than 50%: Flashes twice every second |
|
100%: Glows steadily |
|
17
Charging, Recording and Playback Times
Below times are approximate and vary according to the charging, recording or playback conditions.
Battery Pack |
|
NB-2LH |
NB-2L |
BP-2L12 |
BP-2L14 |
|
|
|
|
|
|
|
|
Charging Time |
|
140 min. |
125 min. |
220 min. |
260 min. |
|
Max. Recording Time |
|
|
|
|
||
|
|
|
|
|
|
|
|
Viewfinder |
|
85 min. |
70 min. |
145 min. |
185 min. |
|
|
|
|
|
|
|
|
LCD |
normal |
80 min. |
65 min. |
140 min. |
175 min. |
|
|
bright |
75 min. |
60 min. |
130 min. |
165 min. |
|
|
|
|
|
|
|
Typical Recording Time* |
|
|
|
|
||
|
|
|
|
|
|
|
|
Viewfinder |
|
45 min. |
35 min. |
80 min. |
100 min. |
|
LCD |
normal |
45 min. |
35 min. |
80 min. |
100 min. |
|
|
|
|
|
|
|
|
|
bright |
40 min. |
35 min. |
75 min. |
95 min. |
|
|
|
|
|
|
|
Playback Time |
|
115 min. |
90 min. |
200 min. |
245 min. |
|
*Approximate times for recording with repeated operations such as start/stop, zooming, power on/off.
We recommend charging the battery pack in temperatures between 10 °C and 30 °C (50 °F and 86 °F). Outside the temperature range of 0 °C to 40 °C (32 °F to 104 °F), the CHARGE indicator flashes rapidly and charging stops.
A lithium ion battery pack can be charged at any charge state. Unlike conventional battery packs, you do not need to completely use or discharge it before charging.
To conserve battery power, turn off the camcorder instead of leaving it in record pause mode.
We recommend that you prepare battery packs 2 to 3 times longer than you think you might need.
18
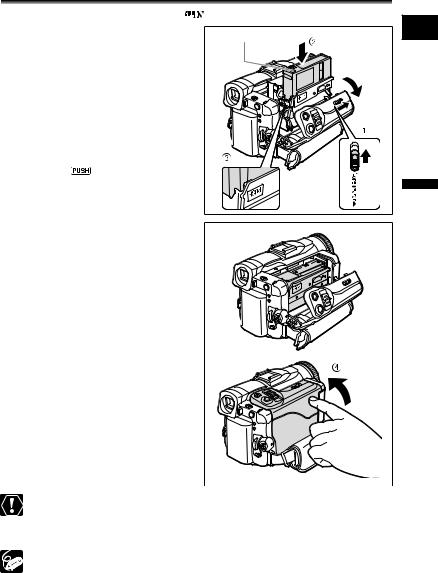
Step 2: Loading a Cassette |
|
|||
Use only videocassettes marked with the |
logo. |
|
||
1. |
Slide the OPEN/EJECT switch and |
Tape protection tab |
E |
|
|
open the cassette compartment |
|
|
|
|
cover. |
|
|
|
|
The cassette compartment opens |
|
|
|
|
automatically. |
|
|
|
2. |
Load the cassette. |
|
|
|
|
• Load the cassette with the window |
|
|
|
|
facing the grip belt. |
|
|
|
|
• Unload the cassette by pulling it straight |
|
|
|
|
out. |
|
|
|
3. |
Press the |
mark on the |
|
|
|
cassette compartment until it |
|
|
|
|
clicks. |
|
|
Preparation |
4. |
to retract automatically and close |
|
||
Wait for the cassette compartment |
|
|
||
|
the cassette compartment cover. |
|
|
|
Do not interfere with the cassette compartment while it is opening or closing automatically, or attempt to close the cover before the cassette compartment has fully retracted.
Be careful not to get your fingers caught in the cassette compartment cover.
If the camcorder is connected to a power source, cassettes can be loaded/ unloaded even if the POWER switch is set to OFF.
19
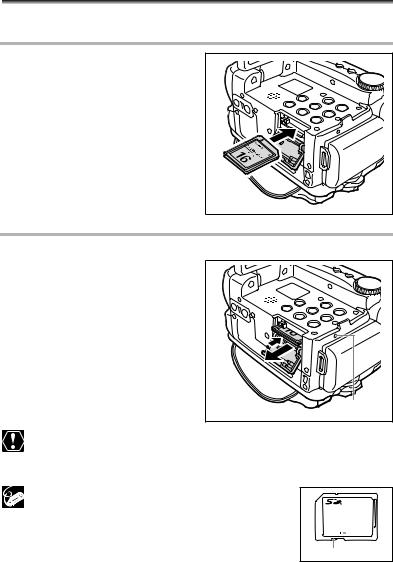
Step 3: Inserting a Memory Card
This camcorder is for use with MultiMediaCards and SD Memory Cards only.
Inserting the Card
1. Set the POWER switch to OFF.
2. Open the cover.
3. Insert the memory card straight all the way into the memory card slot.
4. Close the cover.
Do not close the cover forcefully without having the card correctly inserted.
Removing the Card
Do not forcefully remove the memory card without first pushing it in.
1. Turn off the camcorder.
Make sure that the card access indicator is not flashing before you turn off the camcorder.
2. Open the cover.
3. Push the memory card to release it. Remove the memory card.
4. Close the cover.
 Card access indicator
Turn off the camcorder before inserting or removing the memory card. Otherwise, it may result in data damage.
If you use memory cards other than the supplied one, make sure to format them with the camcorder ( 104).
104).
The SD Memory Card has a protect switch to prevent
accidental erasure.
Proper operation cannot be guaranteed for all memory cards.
Protect switch
20
Step 4: Preparing the Camcorder
Adjusting the Viewfinder (Dioptric Adjustment) |
E |
|
|
1.Turn on the camcorder and keep the LCD panel closed.
2. Pull out the viewfinder.
3. Adjust the dioptric adjustment lever.
4. Push the viewfinder back in.
Attaching the Lens Cap
1.Attach the cord to the lens cap.
2.Pass the grip belt through the loop on the cord.
Press the buttons on the lens cap when attaching/removing it. Hook the lens cap on the grip belt while you are recording, and place it over the lens when you have finished.
Preparation |
Fastening the Grip Belt
Hold the camcorder with your right hand and adjust the belt with your left.
Adjust the grip belt so that you can reach the zoom lever with your index finger, and the start/stop button with your thumb.
21
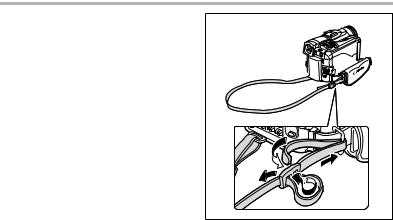
Attaching the Shoulder Strap
Pass the ends through the strap mount and adjust the length of the strap.
22
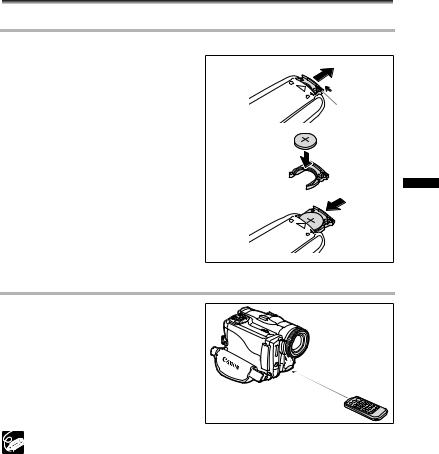
Step 5: Using the Wireless Controller
Inserting the Battery |
E |
|
|
The wireless controller operates with a lithium button battery CR2025.
1. Press the tab in the direction of the arrow and pull out the battery holder.
2. Place the lithium button battery |
|
with the + side facing up. |
Tab |
3. Insert the battery holder.
Preparation
Using the Wireless Controller
Point it at the camcorder’s remote sensor when you press the buttons.
The wireless controller may not work properly when the remote sensor is subjected to strong light sources or direct sunlight.
If the wireless controller does not work, check if the remote sensor is set to
[OFF  ] (
] ( 74).
74).
When the camcorder cannot be operated with the wireless controller, or when it can only be operated in very close range, replace the battery.
23
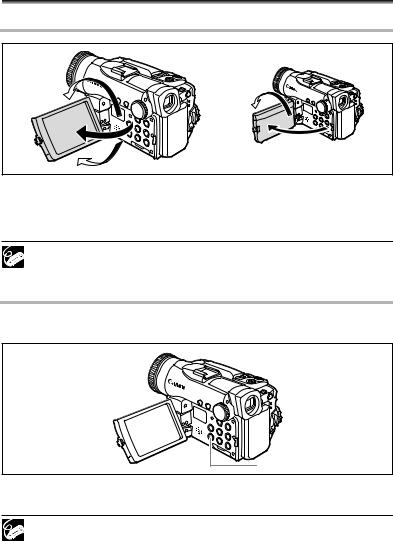
Step 6: Adjusting the LCD Screen
Rotating the LCD Panel
Subject can monitor the LCD screen
Press the OPEN button and open the LCD panel 90 degrees.
•You can rotate the panel downward by 90 degrees.
•You can rotate the panel by 180 degrees toward the lens (allowing the subject to monitor the LCD screen).
You can rotate the LCD panel to allow the subject to monitor the screen while you use the viewfinder. It is also useful if you wish to include yourself when recording with the self-timer.
LCD Backlight
You can switch the brightness of the LCD screen between normal and bright by pressing the LCD BACKLIGHT button. This is useful for outdoor recordings.
LCD BACKLIGHT button
Press the LCD BACKLIGHT button.
The brightness changes with each press of the button.
This setting does not affect the brightness of the recording or the viewfinder screen.
When using a battery pack, the camcorder retains the setting even if you change the position of the POWER switch.
The battery usage time shortens when the LCD screen is set brighter.
24
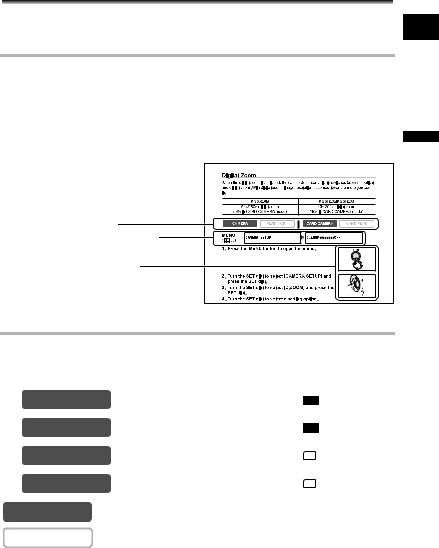
Step 7: Changing the Display
Language
E
The language used in the camcorder displays and menu items can be changed to German, Spanish, French, Italian, Russian, Simplified Chinese, Traditional Chinese, Korean or Japanese.
MENU
DISPLAY SETUP/ 
 LANGUAGE
 •••ENGLISH
( 70)
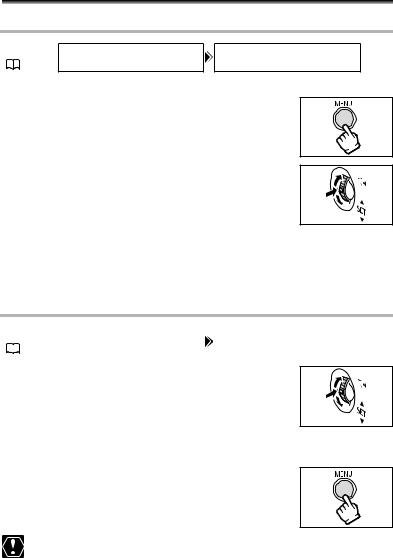
1.Turn the POWER switch to CAMERA or PLAY (VCR).
2.Press the MENU button.
3.Turn the SET dial to select [DISPLAY SETUP/ ] and press the SET dial.
4. Turn the SET dial to select [LANGUAGE ] and press the SET dial.
5. |
Turn the SET dial to select a language and press the SET dial. |
Preparation |
|
6. |
Press the MENU button. |
|
|
|
|
||
|
|
|
|
|
If you have mistakenly changed the language, follow the |
mark next to the |
|
|
menu item to change the setting. |
|
|
The displays “  ” and “
 ” at the bottom of the screen refer to the button names on the camcorder and will not change when you change the language.
25
Step 8: Setting the Time Zone, Date
and Time
Setting the Time Zone/Daylight Saving Time
MENU
SYSTEM T.ZONE/DST•••PARIS
( 70)
1. Turn the POWER switch to CAMERA or PLAY (VCR).
2. Press the MENU button to open the menu.
3. Turn the SET dial to select [SYSTEM] and press the SET dial.
4. Turn the SET dial to select [T.ZONE/DST] and press the SET dial.
The time zone setting appears (see table on the next page). The default setting is Paris.
5.Turn the SET dial to select the setting option that represents your time zone and press the SET dial.
To adjust for daylight saving time, select the time zone with the  next to the area.
Setting the Date and Time
MENU |
SYSTEM |
|
D/TIME SET••• 1.JAN.2005 |
||
|
|||||
( |
|
70) |
|
12:00 AM |
|
|
|
|
|||
|
|
|
|
|
|
6. Turn the SET dial to select [D/TIME SET] and press the SET dial.
The year display starts to flash.
7. Turn the SET dial to select the year, and press the SET dial.
•The next part of the display starts flashing.
•Set the month, day, hours and minutes in the same way.
8. Press the MENU button to close the menu and to start the clock.
When you do not use the camcorder for about 3 months, the built-in rechargeable lithium battery may become discharged, and the date/time setting may be canceled. In such case, recharge the built-in lithium battery ( 145).
145).
26

Time Zones
Once you have set time zone, date and time, you do not need to reset the clock each time |
|
you travel to another time zone. Just set the time zone to the one of your destination, and |
E |
the camcorder automatically adjusts the clock. |
16 |
|
|
|
|
|
|
|
|
|
|
|
|
|
|
|
|
|
|
|
|
|
|
|
1 |
|
4 |
|
|
|
|
|
|
|
|
|
|
|
|
|
|
|
|
|
|
|
|
|
|
|
|
|
|
|
|
|
19 |
20 |
|
|
|
|
|
|
|
|
|
|
|
|
|
|
|
|
|
|
|
2 |
|
|
|
|
|
|
|
|
|
|
|
|
|
|
18 |
|
|
24 |
|
|
|
|
|
|
|
|
|
|
|
|
|
|
|
|
|
|
|
|
|
|
|
|
|
|
|
|
|
|
|
|
17 |
|
|
|
|
|
3 |
|
6 |
|
7 |
|
9 |
|
|
|
|
|
|
|
|
|
|
|
|
|
|
10 |
|
|
||||
15 |
|
|
|
|
|
|
|
|
|
|
|
|
|
|
|||
|
|
|
|
|
|
|
|
|
|
|
|
|
|
|
|
|
|
|
|
|
|
|
|
|
|
|
|
5 |
|
8 |
|
|
|
|
|
|
|
|
21 |
|
|
|
|
|
|
|
|
|
|
|
|
|
|
|
|
|
|
|
|
|
|
|
|
|
|
|
|
|
|
|
|
|
|
|
|
|
23 |
|
|
|
|
|
|
|
|
|
|
|
|
14 |
|
|
|
|
|
|
|
|
|
|
|
|
|
|
|
|
|
|
|
|
|
|
|
|
|
|
|
|
|
|
|
|
|
12 |
|
|
|
|
|
22 |
|
|
|
|
|
|
|
|
|
|
|
|
|
|
|
|
|
|
|
|
|
|
|
|
|
|
|
|
|
11 |
|
|
|
|
|
|
|
|
|
|
|
|
|
|
|
|
|
13 |
Preparation |
1 |
|
LONDON |
20 21 |
22 |
23 24 |
1 |
13 |
3 |
WELLGTN (Wellington) |
10 |
11 12 13 |
||||||
14 15 |
16 17 18 19 |
2 |
4 |
5 |
6 |
7 |
8 |
9 |
|
||||||||
No. |
Time zone |
|
|
|
|
No. |
|
Time zone |
|
|
|
|
|
|
|||
2 |
|
PARIS |
|
|
|
|
14 |
|
SAMOA |
|
|
|
|
|
|
|
|
3 |
|
CAIRO |
|
|
|
|
15 |
|
HONOLU. (Honolulu) |
|
|
|
|||||
4 |
|
MOSCOW |
|
|
|
|
16 |
|
ANCHOR. (Anchorage) |
|
|
|
|||||
5 |
|
DUBAI |
|
|
|
|
17 |
|
L.A. (Los Angeles) |
|
|
|
|
|
|||
6 |
|
KARACHI |
|
|
|
|
18 |
|
DENVER |
|
|
|
|
|
|
|
|
7 |
|
DACCA |
|
|
|
|
19 |
|
CHICAGO |
|
|
|
|
|
|
||
8 |
|
BANGKOK |
|
|
|
|
20 |
|
N.Y. (New York) |
|
|
|
|
|
|||
9 |
|
H. KONG (Hong Kong) |
|
|
21 |
|
CARACAS |
|
|
|
|
|
|
||||
10 |
|
TOKYO |
|
|
|
|
22 |
|
RIO (Rio de Janeiro) |
|
|
|
|
||||
11 |
|
SYDNEY |
|
|
|
|
23 |
|
FERNAN. (Fernando de Noronha) |
|
|||||||
12 |
|
SOLOMON |
|
|
|
|
24 |
|
AZORES |
|
|
|
|
|
|
|
|
27
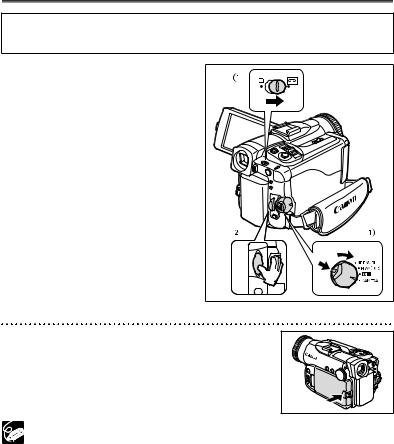
Recording Movies on a Tape
Before You Begin Recording
Make a test recording first to check if the camcorder operates correctly. If necessary, clean the video heads ( 147).
147).
1. Set the camcorder to CAMERA mode.
•Set the POWER switch to CAMERA and the TAPE/CARD switch to  .
.
• The POWER indicator lights up.
2. Press the start/stop button to begin recording.
Press the start/stop button again to pause recording.
When You Have Finished Recording
1. Turn the POWER switch to OFF.
2. Close the LCD panel.
3. Replace the lens cap.
4. Unload the cassette.
5. Disconnect the power source.
Wait until the tape counter stops completely before you start recording.
When you do not remove the cassette, you can record the next scene without producing any noise or blank sections between the recordings even if you turn the camcorder off.
Bright light may make it difficult to use the LCD screen. In such case, use the viewfinder instead.
When recording near loud sounds (such as fireworks, drums or concerts), sound may become distorted or may be recorded not in the actual sound level. This is not a malfunction. The audio recording level can also be adjusted manually ( 77).
77).
The camcorder enters stop mode after 4 minutes 30 seconds when left in record pause mode to protect tape and video heads.
In stop mode, press the start/stop button to start recording and press the
 (self-timer) button to go into record pause mode.
28
When powered by a battery pack, the camcorder shuts off after 5 minutes
when the camcorder is left without any operation to save power ( 74). Approximately 30 seconds before the camcorder shuts off, “
  AUTO
AUTO
POWER OFF” appears in the center of the screen. If the camcorder shuts off, turn the POWER switch to OFF and back on again.
About the LCD and viewfinder screen: The screens are produced with extremely high-precision manufacturing techniques, with more than 99.99% of the pixels operating to specification. Less than 0.01% of the pixels may occasionally misfire or appear as black or green dots. This has no effect on the recorded image and does not constitute a malfunction.
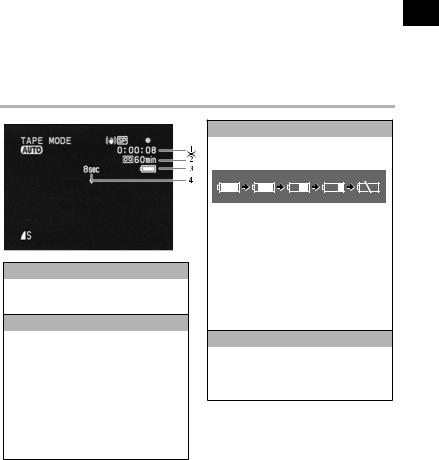
Screen Displays during Recording
 Time Code
Indicates the recording time in hours, minutes and seconds.
 Remaining tape
Indicates the remaining time of the tape in minutes. “ ” moves during recording. “
 END” flashes when the tape reaches the end.
•When the time left is less than 15 seconds, the remaining tape time may not appear.
•Depending on the type of the tape, the indication may not be displayed correctly.
 Remaining battery charge
The battery symbol indicates the charge status of the battery pack.
•“ ” starts flashing in red when the battery pack is empty.
•When you attach an empty battery pack, the power may turn off without displaying “ ”.
”.
•The actual battery charge may not be indicated accurately depending on the condition under which battery pack and camcorder are used.
 Recording reminder
The camcorder counts from 1 to 10 seconds when you start recording. This is helpful to avoid scenes that are too short.
E
|
|
Recording |
Functions Basic |
29
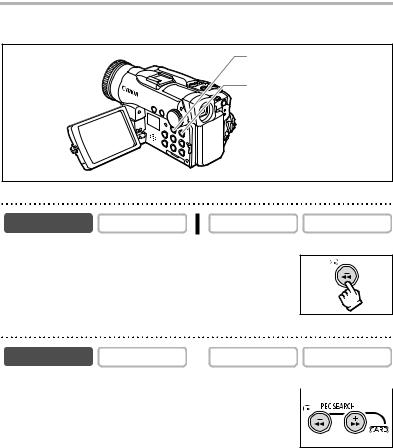
Reviewing and Searching when Recording
You can review the last few seconds of your recording (record review). You can also play back the tape to locate the point where you wish to begin recording (record search).
REC SEARCH – button/  (record review) button
REC SEARCH + button
Record Review
CAMERA |
PLAY (VCR) |
CARD CAMERA |
CARD PLAY |
In record pause mode:
Press and release the  (record review) button.
The camcorder rewinds the tape, plays back the last few seconds, and returns to record pause mode.
Record Search
CAMERA |
PLAY (VCR) |
CARD CAMERA |
CARD PLAY |
In record pause mode: |
|
|
|
|
|
|
|
Press and hold the REC SEARCH + button (forward) or |
|
||
|
|||
– button (reverse). |
|
|
|
• Release the button at the point you wish to begin recording.
• The camcorder returns to record pause mode.
30
Loading...