


 Loading...
Starter Guide
Please read this guide before operating this product.
After you finish reading this guide, store it in a safe place for future reference. 

Contents
What You Can Do with the Machine..................................................................................................................... |
1 |
Find Your Purpose on the Machine....................................................................................................................... |
2 |
Set Up the Machine.................................................................................................................................................. |
3 |
Do You Have Everything?.................................................................................................................................................. |
3 |
Manuals for the machine....................................................................................................................................... |
3 |
Install Toner Cartridge........................................................................................................................................................ |
4 |
Set Up the Paper Cassette and Load Paper................................................................................................................ |
7 |
Connect the Power Cord and Turn On the Machine............................................................................................... |
8 |
Set the Date and Time........................................................................................................................................................ |
9 |
Before FAX Setting (MF6595cx/MF6595/MF6590 Only)................................................................................. |
10 |
Connect Telephone Cables............................................................................................................................................ |
10 |
If Necessary to Use Pulse Dialing...................................................................................................................... |
11 |
Set the Machine for Sending Faxes (MF6595cx/MF6595/MF6590 Only)..................................................... |
12 |
Entering Information............................................................................................................................................ |
12 |
Registering Sender Information................................................................................................................................... |
13 |
Guidelines for Entering Information............................................................................................................... |
13 |
Set the Machine for Receiving Faxes (MF6595cx/MF6595/MF6590 Only).................................................. |
14 |
Select the Receive Mode that Suits Your Needs..................................................................................................... |
14 |
Set the Receive Mode...................................................................................................................................................... |
14 |
About the Receiving Modes............................................................................................................................... |
15 |
Software Settings with Computer...................................................................................................................... |
16 |
Types of Connection Between Computer and the Machine.............................................................................. |
16 |
Network Connection (MF6595cx/MF6595/MF6590 Only)...................................................................... |
16 |
USB Connection...................................................................................................................................................... |
16 |
About User Software CD................................................................................................................................................. |
17 |
MF Drivers & Toolbox............................................................................................................................................ |
17 |
Bundled Programs................................................................................................................................................. |
18 |
Manuals..................................................................................................................................................................... |
18 |
Network Connection (MF6595cx/MF6595/MF6590 Only).................................................................................. |
19 |
Connect the Machine to a Network................................................................................................................ |
19 |
Automatic Setting.................................................................................................................................................. |
19 |
Manual Setting........................................................................................................................................................ |
20 |
Installation Procedure.......................................................................................................................................... |
21 |
Checking the Installation.................................................................................................................................... |
24 |
USB Connection................................................................................................................................................................. |
25 |
Installation Procedure.......................................................................................................................................... |
25 |
Checking the Installation.................................................................................................................................... |
28 |
Appendix................................................................................................................................................................. |
29 |
Uninstallation Procedure................................................................................................................................................ |
29 |
Uninstalling the MF Toolbox (USB Connection Only)............................................................................... |
29 |
Uninstalling the MF Drivers................................................................................................................................ |
29 |
Using Online Help............................................................................................................................................................. |
30 |
What You Can Do with the Machine
You can use the following functions with imageCLASS MF6500 Series.
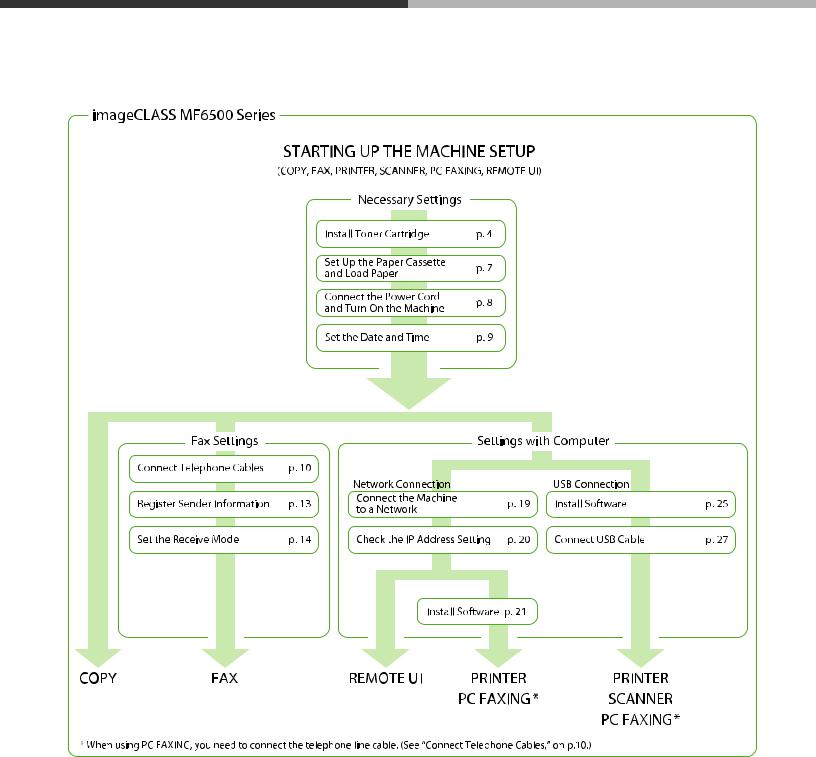
Find Your Purpose on the Machine
For using each function (COPY, FAX, PRINTER, SCANNER, PC FAXING, REMOTE UI), follow the settings in the flowchart below.
For example, when you use copy function only, follow “Necessary Settings”. When you use both copy and fax functions, follow “Necessary Settings” and “Fax Settings”.
Set Up the Machine
Unless otherwise mentioned, illustrations used in this manual are those taken when no optional equipment is attached to the imageCLASS MF6595, and also the menus described in this manual are based on the model MF6595.
Depending on the model of your machine, some settings may not be available and the number on the top of each menu may vary.
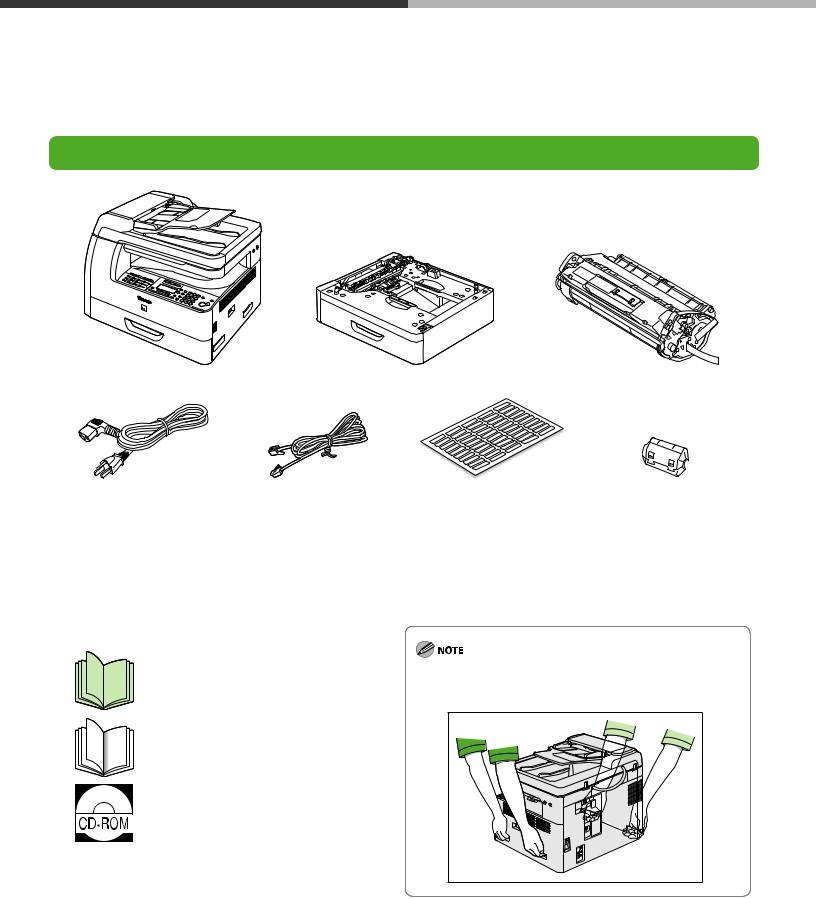
Do You Have Everything?
●Machine |
●Paper Cassette* |
●Toner Cartridge |
●Power Cord |
●Telephone Cable** |
●Destination Labels** |
●Ferrite Core for USB Cable** |
●Limited Warranty Notice |
●Basic Operation Guide |
|
* MF6595cx/MF6595 only (Optional for MF6595) |
●Registration Card |
●User Software CD |
|
**MF6595cx/MF6595/MF6590 only |
●Starter Guide (This Document) |
●Unpacking Instruction Sheet |
|
|
Manuals for the machine
●Starter Guide:
Machine set-up and software installation
(This Document)
●Basic Operation Guide: Basic operation features
●Reference Guide:
Total operation features
(Also includes the basic operation
(User software CD) guide contents.)
●Scanner Driver Guide: Scanner settings
Use the handles (on the left side) and the hand grips (on the right side) to lift the machine. Be sure at least two people lift the machine.
Set Up the Machine
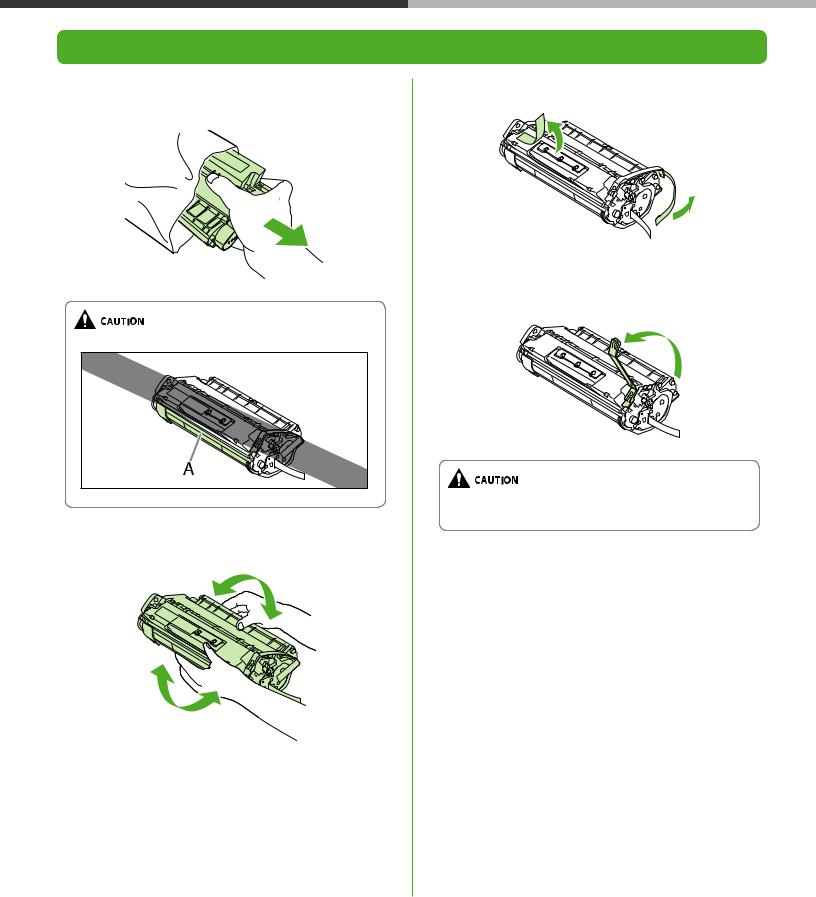
Install Toner Cartridge
1 Remove the toner cartridge from the bag. Keep the bag for future use.
Do not open the drum protective shutter (A).
2 Gently rock the toner cartridge several times to evenly distribute the toner inside.
3 Remove the seals (2 places).
4 Bend back the blue plastic pull tab as in the illustration above.
Do not remove the pull tab as it is used to pull out the toner when the cartridge needs replaced.

5 Place the toner cartridge on a flat surface and pull the seal completely out.
Do not pull the seal out at an angle.
–If toner is adhered on the removed seal, be careful that your hands or clothes do not get dirty from touching the toner.
–If your hands or clothes get dirty from touching the toner, wash them immediately in cold water. Do not use hot water. If you do, the toner may be set permanently.
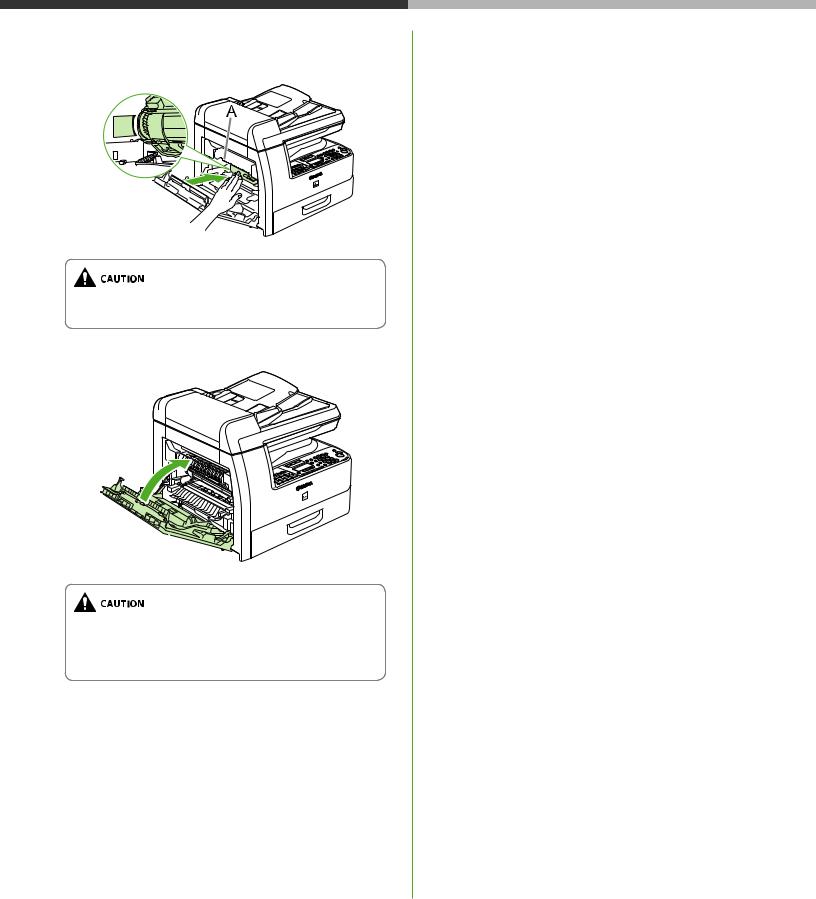
6 Open the left cover.
Set Up the Machine
7 Hold the toner cartridge by its handle. Insert the toner cartridge into the machine with the arrows (A) on the toner cartridge pointing toward the machine.
8 Insert the toner cartridge so that the left edge of the toner cartridge (A) and the protrusions on the right side of the toner cartridge (B, C) fit into the guides inside the machine. The blue plastic pull tab should be pulled up as illustrated in step 4.
Set Up the Machine
9 Push the toner cartridge to make sure it is properly set in the machine.
Do not touch the fixing assembly (A) as it becomes very hot during use.
10 Close the left cover.
–Be careful not to get your fingers caught.
–If you cannot close the left cover, do not force it to close. Open the cover and make sure the toner cartridge is properly set in the machine.

Set Up the Machine
Set Up the Paper Cassette and Load Paper
1 Pull out the paper cassette until it stops. If you use LTR size, go to step 4. If you use other sizes, go to step 2.
2 Incline the rear paper end guide until it is unlocked, then remove it from the paper cassette.
By default, the guide is set to LTR.
3 Attach the guide to the slots of the desired paper size.
4 Even the edges of the paper stack.
5 Load the paper stack print side up.
Make sure the back edge of the paper stack touches the rear paper end guide (A), the paper stack does not exceed the load limit mark (B), and the load is under the small fins (C) on the paper guides.
6 Gently insert the paper cassette as far as it will go.
Be careful not to get your fingers caught.
–You can load the paper into the additional paper cassette (standard for MF6595cx and optional for MF6595). For attaching the additional paper cassette, see the instruction sheet that comes with the machine.
–For loading paper in the multi-purpose tray, see Chapter 2, “Document and Paper,” in the Basic Guide.

Set Up the Machine
Connect the Power Cord and Turn On the Machine
1 Connect the power cord into the rear socket on the back side of the machine and the wall outlet, and press the [I] side of the main power switch (A) to ON.
2 The machine enters the standby mode. MF6595/MF6590/MF6540/MF6520
1 0 0 % |
|
|
L T R |
0 1 |
||
|
|
A |
|
T E X T |
|
|
|
|
|
|
|||
|
|
|
|
|
|
|
MF6595cx or MF6595 with the optional cassette
1 0 0 % |
|
A U T O |
0 1 |
|
|
A |
|
T E X T |
|
|
|
|||
|
|
|
|
|
●The LCD display turned off:
The machine may enter the sleep mode while you are setting up the machine. Press [POWER] to turn the machine back on and continue the setup.
●<CLOSE COVER LEFT COVER> is displayed:
Make sure that the left cover is closed properly. (See “Install Toner Cartridge,” on p. 4.)
●<TONER IS NOT SET INSERT TONER> is displayed:
Make sure that the toner cartridge is installed properly. (See “Install Toner Cartridge,” on p. 4 and “Set Up the Paper Cassette and Load Paper” on p. 7.)
Any data stored in the memory, including received fax documents, will be deleted about 60 minutes after you turn off the main power switch or unplug the power cord.
Set Up the Machine
Set the Date and Time
Before using the machine, you MUST set the current date and time. The current date and time settings are used as standard timer settings for functions that require them.
● Entering Information
‒Numeric keys: Enters numbers.
‒[ ] or [
 ]: Moves the cursor position.
‒[OK]: Confirms the entry.
1 Press [Additional Functions].
2 Press [ ] or [
 ] to select <6. TIMER SETTINGS>, then press [OK].
3 Press [ ] or [
 ] to select <1. DATE&TIME SETTING>, then press [OK].
4 Use the numeric keys to enter the date (month/ day/year) and time (in 24-hour/military time format), then press [OK].
Ex.
D A T E & T I M E |
S E T T I N G |
1 2 / 3 1 / ´ 0 7 |
1 1 : 1 9 |
|
|
If you accidently enter an incorrect number, press [ ] or [
 ] to move the cursor to the number that needs correcting and overwrite it.
5 Press [Stop] to return to the standby mode.
–You can select one of the following three date formats in <2. DATE TYPE SELECT>.
–<MM/DD/YYYY>
–<DD/MM YYYY>
–<YYYY MM/DD>
–By default, <5. DAYLIGHT SV. TIME> in the <6. TIMER SETTINGS> menu is set to <OFF>.
If you want to set <5. DAYLIGHT SV. TIME> in the <6. TIMER SETTINGS> menu to <ON>, see Chapter 1, “Before Using the Machine,” in the Basic Operation Guide.
●The LCD display turned off:
The machine may enter the sleep mode while you are setting up the machine. Press [POWER] to turn the machine back on and continue the setup.
Loading...