


E
English Edition
INSTRUCTIONS


Thank you for purchasing a Canon product.
The EOS-3 is the world’s first high-performance AF single-lens reflex camera with Eye-Control area AF. The camera’s many features can suit diverse picture-taking requirements from fully automatic operations to highly specialized applications. It also retains the simple electronic dial operation found on other top-tier EOS cameras.
Before using the camera, read this Instructions booklet and familiarize yourself with the camera.
● Precautions
•Before using the camera for important events such as a weddings, be sure to take test shots to make sure the camera operates properly.
•EOS cameras have a lens mount fitted with electrical contacts for dedicated operation (autofocusing, exposure control, etc.) with Canon EF lenses. Using a non-EF lens with an EOS camera may not result in proper camera or lens operation.
Also, the warranty does not cover any malfunction or damage occurring with the use of non-Canon lenses.
●Symbols used in this Instructions booklet:
 : Warning for preventing camera malfunction.
: Supplementary notes for basic camera operation.
: Helpful tip for operating your camera and taking pictures.
•Page numbers in parentheses indicate where you can find more information.
•Also read “Handling Precautions” on page 6 to prevent faulty pictures and camera mishaps.
•Retain this Instructions manual for future reference.
3

Contents
|
...........................Handling Precautions |
6 |
Conventions Used in this Instructions |
.............................Attaching the Strap |
|
14 |
|
|||||
|
Nomenclature....................................... |
9 |
|
Booklet ......................................... |
|
13 |
|
|
|
|
|
|
|
1. |
Basic Operation ........................... |
16 |
4. |
Loading Film ................................ |
|
24 |
5. |
Unloading Film ............................. |
|
28 |
|
Before You Start |
2. |
Installing the Battery and |
|
|
Setting the Film Speed ................ |
26 |
|
Midroll Rewind ( |
)................... |
28 |
|
|
|
Checking the Battery Level |
21 |
|
|
|
|
|
|
|
|
|
|
|
|
|
|
|
|
|
|
|
|
|
||
|
3. |
Mounting and Detaching a Lens |
..23 |
|
|
|
|
|
|
|
|
|
|
|
|
|
|
|
|
|
|
|
|||
Quick Start With |
Program AE........................................ |
30 |
Dioptric Adjustment Lenses ............... |
32 |
|
|
|
|
|
|||
Program AE |
Shifting the Program .......................... |
31 |
|
|
|
|
|
|
|
|
|
|
|
|
|
|
|
|
|
|
|
|
|
|
|
|
1. |
AF Mode Selection ...................... |
34 |
|
● Manual Selection ..................... |
38 |
6. |
Focusing an Off-Center Subject |
..49 |
|
||
|
|
AF Modes .................................... |
35 |
|
● Eye-Control Selection .............. |
38 |
|
● AF Sensitivity and the Lens’ |
|
|
||
Autofocus (AF) |
2. |
Area AF Ellipse and |
|
|
About Eye-Control AF.................. |
41 |
|
Maximum Aperture................... |
50 |
|
||
|
Focusing Points ........................... |
37 |
|
Eye-Control Calibration................ |
42 |
7. |
When Autofocus Fails.................. |
51 |
|
|||
|
3. |
Focusing Point Selection ............. |
38 |
4. |
Eye-Control One-Shot AF Mode |
..47 |
8. |
Manual Focusing ......................... |
|
52 |
|
|
|
|
● Automatic Selection ................. |
38 |
5. |
Eye-Control AI-Servo AF Mode ... |
48 |
|
|
|
|
|
|
|
|
|
|
|
|
|
|
|
|
|
|
|
Metering Modes |
1. |
Selecting a Metering Mode .......... |
54 |
|
Partial Metering ( |
).................... |
55 |
|
Focusing Point-Linked |
|
|
|
2. Metering Modes ........................... |
55 |
|
Spot Metering ( |
)....................... |
55 |
|
Spot Metering .............................. |
|
56 |
|
||
|
|
Evaluative Metering ( ) ............. |
55 |
|
Centerweighted Metering ( )..... |
56 |
|
Multi-Spot Metering...................... |
|
57 |
|
|
|
|
|
|
|
|
|
|
|
|
|
||
|
1. |
Shutter Speed-Priority AE (Tv): |
|
4. |
Manual Exposure (M): You Set the |
10. |
buLb Exposures ........................... |
|
84 |
|
||
|
|
You Set the Shutter Speed .......... |
62 |
|
Shutter Speed and Aperture ........ |
73 |
11. |
Switching the |
|
|
|
|
|
2. |
Aperture-Priority AE (Av): |
|
5. |
Setting Exposure Compensation... |
75 |
|
Film Advance Mode ..................... |
|
85 |
|
|
|
|
You Set the Aperture ................... |
65 |
6. |
Autoexposure Bracketing |
|
12. |
Self-timer Operation..................... |
|
87 |
|
|
Shooting Modes |
3. |
Depth-of-field AE (DEP): |
|
|
(AEB) ........................................... |
|
77 |
|
Attaching the Eyepiece Cover ..... |
88 |
|
|
|
You Set the Depth of Field........... |
68 |
|
Canceling AEB............................. |
|
78 |
13. |
Mirror Lockup ............................... |
|
89 |
|
|
|
|
Depth-of-field AE with a Manually- |
7. |
AE Lock ....................................... |
|
79 |
14. |
Depth-of-field Preview ................. |
90 |
|
||
|
|
Selected Focusing Point .............. |
68 |
8. |
Setting the Film Speed Manually... |
81 |
15. |
LCD Panel Illumination ................ |
90 |
|
||
|
|
Depth-of-field AE with Eye-Selected |
9. |
Multiple Exposures ( )............... |
82 |
|
|
|
|
|
||
|
|
Focusing Points ........................... |
70 |
|
|
|
|
|
|
|
|
|
|
|
|
|
|
|
|
|
|
|
|||
Flash Photography |
1. |
Flash Photography with Speedlite |
2. |
Using Other EOS-Dedicated |
|
3. |
Using Non-Canon Flash Units ... |
101 |
|
|||
|
550EX |
92 |
|
Speedlites |
|
100 |
|
|
|
|
|
|
|
|
|
|
|
|
|
|
|
||||
Custom Functions |
1. |
Setting and Canceling Custom |
|
2. |
Custom Function Settings.......... |
106 |
3. |
Index of Custom Functions ........ |
124 |
|
||
|
Functions |
104 |
|
|
|
|
|
|
|
|
|
|
|
|
|
|
|
|
|
|
|
|
|
||
|
1. |
Troubleshooting Guide .............. |
128 |
4. |
Shutter Speed and Aperture |
|
6. |
Major Accessories ..................... |
|
135 |
|
|
Reference Section |
2. |
Exposure Warning List............... |
130 |
|
Readouts ................................... |
|
132 |
Major Specifications ......................... |
|
140 |
|
|
3. Program Line ............................. |
131 |
5. |
Interchanging the |
|
|
Custom Function Symbols ............... |
145 |
|
||||
|
|
|
|
|
Focusing Screen........................ |
|
133 |
|
|
|
|
|
|
|
|
|
|
|
|
|
|
|
|
|
|
4 |
5 |


Handling Precautions
Camera Care and Storage
( 1 ) The camera is a precision instrument. Do not drop it or subject it to physical shock.
( 2 ) This camera is not waterproof and cannot be used underwater. If the camera gets really wet, promptly consult your nearest Canon Service Center. Wipe off any water droplets with a dry cloth. If the camera has been exposed to salty air, wipe with a well-wrung damp cloth.
( 3 ) Do not leave the camera in places prone to excessive heat such as in a car on a sunny day. Excessive heat can cause the camera to malfunction.
( 4 ) The camera contains precision electronic circuitry. Never attempt to disassemble the camera.
( 5 ) Use only a blower brush to blow away dust on the lens, viewfinder eyepiece, focusing screen, film compartment, and mirror. Do not use an organic solvent-containing cleaner to clean the camera body or lens. For stubborn dirt, consult your nearest Canon Service Center.
( 6 ) The shutter curtains are extremely thin. Use only a blower to clean. Be careful not to blow air too forcefully on the shutter curtains. The shutter curtains can be easily deformed or damaged. Also, when loading and unloading film, be careful not to touch the shutter curtains.
( 7 ) Do not touch the electrical contacts with your fingers. Otherwise corrosion may develop on the contacts, resulting in improper camera operation.
( 8 ) If the camera is not to be used for an extended period, remove the battery. Store the camera in a well-ventilated, cool, dry place. During the storage period, release the shutter a few times once in a while.
( 9 ) Avoid storing the camera in a laboratory, cabinet, etc., where corrosive chemicals are present.
(10)If the camera has not been used for an extended period or if the camera is to be used for an important event, check the operation of all the camera controls or take it to your nearest Canon Service Center.
6

Handling Precautions
(11)After detaching the lens from the camera, put on the lens caps or put down the lens with the rear end up to avoid scratching the lens surface and electrical contacts.
(12)Even when the Main switch is set to <  >, a small amount of power is still supplied to the camera’s LCD panel. However, this does not affect the number of film rolls which can be taken with the battery.
LCD Panel
In time, the camera’s LCD (liquid-crystal display) panel indications may become light and difficult to read. If this happens, have it replaced (at cost) by a Canon Service Center.
At low temperatures, the display response of the LCD panel may become slower. And at 60˚C or higher temperatures, the display may blacken. In either case, the display will return to normal at room temperature.
Blinking “ 
 ” on the LCD panel
If the battery power falls to a very low level or a camera misoperation or malfunction occurs, “

 ” will blink on the LCD panel. In such a case, follow the procedure below:
( 1 ) Press the battery check button to check the battery power. If the battery power is low, replace the battery.
( 2 ) If the battery power is normal, remove the battery and reload it.
( 3 ) Release the shutter once.
If the “

 ” then turns off, the camera is back to normal. However, if this procedure is repeated and “

 ” still continues to blink, the camera has a malfunction. Take it to your nearest Canon Service Center.
7

Handling Precautions
About the Battery
The camera operates only after the battery is properly installed (see page 21). Check the battery power in the following cases:
(1)After replacing the battery.
(2)After not using the camera for an extended period.
(3)The shutter does not work.
(4)The camera is being used in a low-temperature environment.
(5)Before using the camera for an important event.
•Before installing the battery, wipe the battery contacts to remove any fingerprints and smudges. This is to prevent faulty connections and corrosion.
•Never disassemble or recharge the battery. Also, never store a battery in high-temperature places or short circuit the battery contacts or toss a battery into a fire.
•Although lithium batteries work well even in low temperatures, battery performance may suffer slightly in freezing temperatures. In such a case, keep a spare battery warm in a pocket, etc., and use and warm the batteries alternately.
Low Battery Power
Even when 

 is not displayed or when it blinks on the LCD panel, a correctly-exposed picture can still be taken as long as the shutter can be released. However, when the battery power runs out, there may not be enough power to advance and rewind the film automatically. “

 ” will then blink on the LCD panel. After the battery is replaced with a new one, film advance will resume automatically or film rewind will continue when the midroll film <
  > is pressed.
8
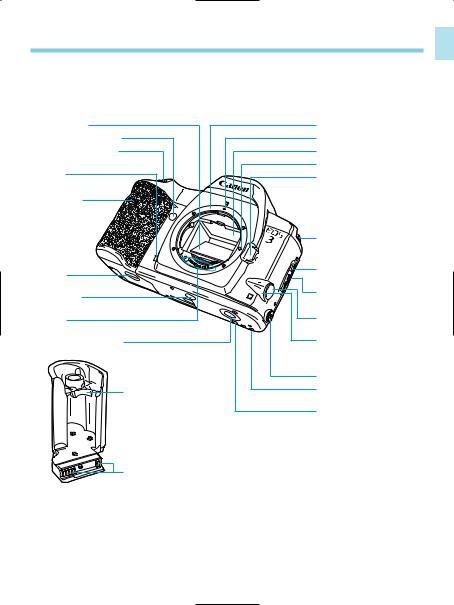
Nomenclature
•Reference page numbers are indicated in parentheses.
•In the text, camera controls are indicated by their respective icons.
Mirror (page 89) |
Lens mount |
Self-timer lamp (page 87) |
Lens mount index (page 23) |
Shutter button (page 16) |
Focusing screen |
Depth-of-field preview button |
Lens lock pin |
(page 90) |
Lens release button |
|
|
|
(page 23) |
Grip (page 21) |
|
|
Strap eyelet (page 14) |
Grip screw |
(page 21) |
Tripod socket |
Electrical contacts |
(page 23) |
Motor drive coupler cover
Battery release lever (page 21)
Camera back lock release
button (page 24)
Camera back lever (page 24)
Remote control socket cover
Quick-lock remote control socket
PC terminal (page 101)
Motor drive coupling pin
Positioning pin hole
Contacts
9
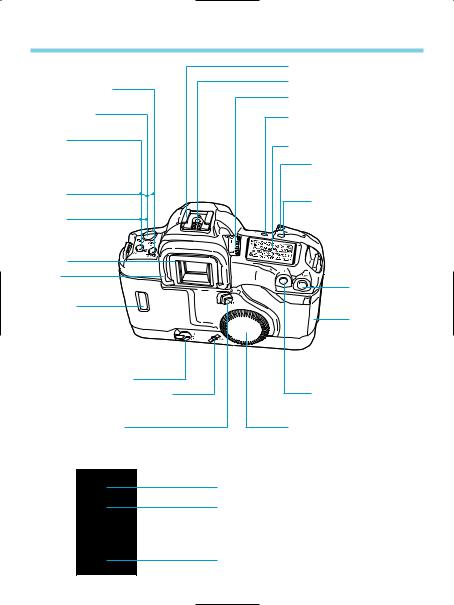
Nomenclature
< > Metering mode button /
< >Exposure compensation button (page 54, 97)
<  > Shooting mode selector (page 30)
< > AF mode button (page 34)
< > Film advance
mode buttons (page 85) 
<  > Film speed button (page 81)
<  > AEB buttons (page 77)
Eyepiece
Eyecup
Film window
<
 > Main switch (page 16)
< > Midroll rewind button (page 28)
< > Quick Control Dial
ON/OFF switch (page 19)
Side Door Buttons
Hot shoe
X-sync contact
< > Eye-Control switch (page 40)
< > LCD panel illumination button (page 90)
LCD panel (page 11)
< > FE lock button / Multispot metering button
(pages 57, 95)
< > Exposure compensation button / Aperture button (pages 73, 76)
 <
<  > Main Dial
(page 17)
<  > Focusing point selector (page 38)
Side door
< > AE lock button (page 79)
< > Quick Control Dial (page 19)
< > Custom Function set button (page 104)
<  > Battery check button (page 22)
 <
<  > Multiple exposure button (page 82)
<  > Clear button (page 20)
10
Nomenclature
LCD Panel
•On the LCD panel, the display boxes are colored to match the color of the camera controls.
Shooting mode |
|
|
|
Shutter speed ( |
|
~ |
) |
||
|
|
|
|||||||
P |
: Program AE |
|
bulb display ( |
|
) |
|
|||
|
: Manual exposure |
|
|
|
|||||
|
|
Depth-of-field AE point ( |
) |
||||||
|
: Shutter speed-priority |
|
|||||||
|
|
Focusing point selection mode |
|||||||
|
: AE |
|
|||||||
|
|
||||||||
|
( |
, |
, |
, |
) |
||||
|
: Depth-of-field AE |
||||||||
|
|
|
|
|
|
|
|||
|
: Aperture-priority AE |
|
ISO film speed ( |
~ |
) |
||||
|
|
||||||||
Aperture ( |
~ |
) |
Custom Function No. ( |
~ |
) |
|
|
|||
Calibration display ( |
, |
) |
|
|
||||||
( |
) |
, |
|
|
|
|
||||
|
|
Battery check ( |
) |
|
|
|
|
|||
AEB amount |
|
|
|
|
|
|||||
|
FE lock display ( |
) |
|
|
|
|
||||
( |
~ |
|
) |
|
|
|
|
|
||
|
|
|
|
ISO icon |
|
|
||||
Focusing point |
|
|
|
|
|
|||||
|
|
|
|
|
|
|
||||
selection mode |
|
|
|
AF mode |
|
|
||||
( |
) |
|
|
|
|
|
One-Shot AF |
|
||
Custom Function |
|
|
|
AI Servo AF |
|
|
||||
|
|
|
|
|
|
|
||||
setting |
|
|
|
|
|
|
|
|
|
|
( / / / ) |
|
|
|
|
|
|
|
|||
Calibration |
|
|
|
|
|
|
|
|
||
channel No. |
|
|
|
AEB icon |
|
|
||||
( |
~ |
|
) |
|
|
|
|
|
||
|
|
|
|
|
|
|
|
|||
Metering mode |
|
|
|
Film advance mode |
|
|||||
|
|
|
Single-frame shooting ( |
) |
||||||
|
Evaluative |
|
|
|
||||||
|
|
|
|
Continuous shooting ( |
) |
|||||
|
Partial |
|
|
|
||||||
|
|
|
|
Low-speed continuous |
|
|||||
|
Spot |
|
|
|
|
|
||||
|
|
|
|
|
shooting ( |
) |
|
|||
|
Centerweighted |
|
|
|
||||||
|
|
|
High-speed continuous |
|
||||||
|
averaging |
|
|
|
|
|||||
|
|
|
|
shooting ( |
) |
|
||||
|
|
|
|
|
|
|
|
|||
|
|
|
|
|
|
|
Self-timer setting |
|
||
Film-loaded indicator |
|
|
(10 sec. |
, 2 sec. |
) |
|||||
Film rewind completed |
Exposure compensation scale |
|
||||||||
indicator |
|
|
|
|
||||||
Flash exposure compensation icon |
Film advance and rewind indicator |
|
||||||||
|
|
|
|
|
Film advance failure warning |
|
|
|||
Remaining frame counter icon |
Film advance completed indicator |
|
||||||||
Frame counter ( ~ |
) |
|
|
|
|
|
|
|
|
|
|
|
Battery check icon |
|
|
|
|
|
|
|
|
|
|
|
|||
|
|
|
|
|
|
|
|
|
|
|
Exposure compensation indicator |
||
Bulb exposure time ( |
~ |
|
) |
|
|
|
|
|
|
|
|
||
|
|
|
|
|
|
|
|
|
Bulb elapsed time (30-sec. units) |
||||
|
|
|
|
|
|
|
|
|
|||||
Multiple exposure setting ( |
~ |
) |
|
|
|
|
|
|
|||||
|
|
|
|
|
|
AEB amount indicator |
|||||||
Remaining multiple exposures ( |
~ ) |
|
|
|
|
|
|||||||
|
|
|
|
|
|||||||||
|
|
|
|
|
Flash exposure compensation amount |
||||||||
|
|
|
|
|
|||||||||
Self-timer indicator ( |
~ |
|
) |
|
|
|
|
|
|
|
|
|
|
|
|
|
|
|
|
|
|
|
|
Custom Function setting |
|||
|
|
|
|
|
|
|
|
|
|
||||
|
|
|
|
|
|
|
|
|
|
|
|
|
|
|
|
|
|
|
|
|
|
|
|
|
Multiple exposure icon |
||
|
|
|
|
|
|
|
|
|
|
|
|||
11

Nomenclature
Viewfinder Information |
|
Area AF ellipse |
Spot metering focusing points |
|
|
|
(Lights at the required point) |
Center spot |
|
metering circle |
Exposure |
|
compensation |
|
scale |
New Lasermatte |
Film Counter |
screen |
|
Eye-Control AF icon |
|
|
|
|
|
|
|
|
|
In-focus indicator |
|
|
|
|
|
|
|
|
|
|
|||
AE lock indicator |
|
|
|
|
|
|
|
|
|
|
|
|
|
|
|
|
|
|
|
|
Lights when focus is achieved, blinks |
||
|
|
|
|
|
|||||||
Flash-ready indicator |
|
|
|
|
|
|
|
|
(8 Hz) when not achieved. |
||
|
|
|
|
|
|||||||
FE lock warning indicator |
|
|
|
|
|
|
|
During manual focus, lights when focus |
|||
|
|
|
|
|
|
|
is achieved and stays off when not |
||||
|
|
|
|
|
|
|
|
|
|
|
|
High-speed sync (FP flash) indicator |
|
|
|
|
|
|
achieved. |
||||
|
|
|
|
||||||||
Exposure compensation |
Exposure compensation icon |
|
||||||||
Flash exposure compensation icon |
|
|||||||||
|
|
|
|
|
||||||
scale |
|
|
|
Aperture display ( |
~ |
) |
|
|||
Standard exposure index |
, |
, |
, |
display |
|
|||||
Exposure level scale |
|
|||||||||
|
|
|
|
|
|
|||||
|
|
: 1 stop |
: 1/3 stop |
Shutter speed display ( |
~ |
) |
||||
Overexposure indicator |
||||||||||
FE lock display( |
) |
|
|
|||||||
Flash overexposure |
|
|
display |
|
|
|
||||
|
|
|
|
|
|
|
||||
indicator |
|
display |
|
|
|
|||||
|
|
|
|
|
|
|
||||
Exposure level indicator |
, |
|
display |
, display |
|
|||||
|
|
|
|
, |
|
, |
, |
|
||
Flash exposure level indicator |
|
|
|
|
|
|
||||
Flash underexposure indicator |
|
|
|
|
|
|
||||
Underexposure indicator |
|
|
|
|
|
|
||||
Frame counter (count up or down) |
|
|
|
|
|
|
||||
( |
~ |
) |
|
|
|
|
|
|
|
|
12

Conventions Used in this Instructions Booklet
CF
•All the operations described in this booklet assume that the <  > switch is already set to <
  >. Before
proceeding with any operation, first turn the <  > switch to <
  > or
> or
<  >.
>.
•For <  > dial operations, make sure the <
  > switch is set to <
  >.
>.
•This symbol is used to indicate that there is a related Custom Function. For details, see “Custom Functions” on page 111
•In the text, the <  > icon indicates the Main Dial, <
  > indicates the Quick Control Dial, <
 > indicates the main switch, and <
  > indicates the Quick Control Dial switch.
•The camera control icons and markings used in the text correspond to the actual icons and markings found on the camera. The correct name of the button or setting indicated by the icon or marking can be found in “Nomenclature” on page 9. Reference page numbers are also stated in parentheses.
•In these Instructions, a Canon EF 50mm f/1.4 USM lens is used for explaining the procedures.
•The procedures are based on the pretense that the Custom Functions are set to the default settings.
13

•The (  6 ) icon indicates that the respective function or setting remains effective for 6 seconds after you take off your finger from the shutter button.
•The (  16 ) icon indicates that the respective function or setting remains effective for 16 seconds after you take off your finger from the shutter button.
Attaching the Strap
Pass the end of the strap through the camera’s strap eyelet and the strap’s clasp on the under side. Pull the strap to make sure it does not slip out of the clasp.
14

Before You Start
This chapter explains a few preliminary steps and basic operations which you should know before you start taking pictures. If you are a new EOS user, read this chapter first.
If you are familiar with the basic operations of EOS cameras and want to start using the camera right away, see “Quick Start with Program AE” on page 29.
15
1. Basic Operation
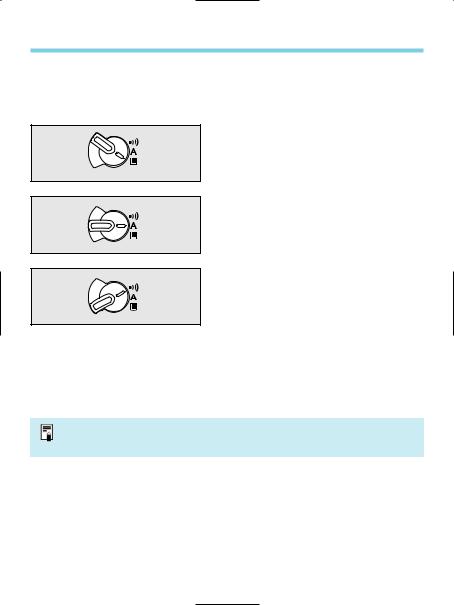
Main Switch
The camera operates only after the <  > switch is turned on. This main switch has three settings:
<  >: Lock position. The camera does not operate. Set to this position when not using the camera.
<  >: To turn on the camera, set to this position. The “A” stands for “Advance.”
<  >: This is the same as <
  > except that it also enables the beeper to sound in the following cases:
• Focus is achieved in One-Shot AF mode.
• Focus is achieved with manual focus.
• During Eye-Control calibration. (Short beeps for successful registration and intermittent beeping for failed registration.)
When the camera is not to be used, set the Command Dial to <  >. This will prevent accidental battery drainage if the shutter button is held down inadvertently.
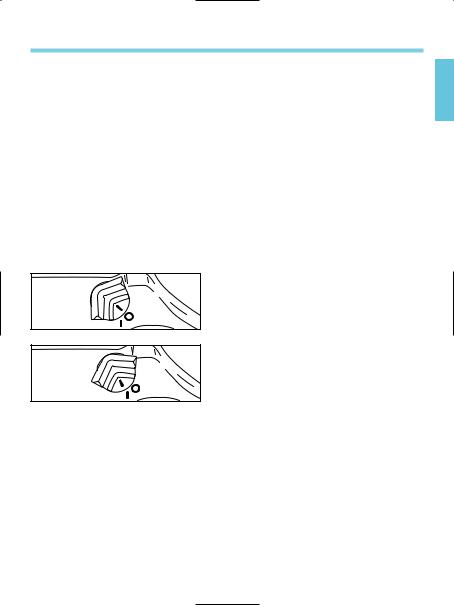
Shutter Button
You can press the shutter button halfway or all the way.
Hold the camera steadily and press the shutter button slowly without any jerking movement. The difference between halfway and complete pressing of the shutter button is explained below. Beginners should practice pressing the shutter button halfway and completely before loading any film.
16

Basic Operation
(1) Halfway pressing
When the shutter button is pressed halfway, autofocusing (AF) is activated to focus the subject. Autoexposure (AE) metering is also turned on to set the correct shutter speed and aperture which is displayed in the viewfinder and on the LCD panel for ( 6 ).
6 ).
(2) Complete pressing
This releases the shutter and takes the picture. After the frame is exposed, the camera advances the film automatically.
Using the Electronic Dials
There are three ways to use the < > dial:
1.Press and hold down a button and turn the < > dial while looking at the LCD panel. When the button is released, you can take a picture.
1Hold down a button... |
2then turn the < |
>. |
17
Basic Operation
2.After pressing a button, turn the <  > dial.
When a button is pressed, its function turns on for 6 or 16 seconds. You then look at the LCD panel and turn the <  > dial during this time. After the function turns off or when the shutter button is pressed halfway again, the camera will be ready to take a picture.
Buttons which turn on for 6 or 16 seconds are indicated in these Instructions with the following icons:
(  6 ): The button’s function remains active for 6 seconds after the button is released.
(  16 ): The button’s function remains active for 16 seconds after the button is released.
1 After a button
is pressed...
2Turn the < >.
>.
3.Just turn the <  > dial.
While looking at the LCD panel, you can set the shutter speed, aperture, or another setting.
18
Basic Operation
There are two ways to use the <  >:
>:
1.While holding down a button, turn the <  > dial.
2.After pressing and releasing a button, turn the <  > dial.
3.Just turn the <  > dial.
Look at the LCD panel to confirm the setting.
To restore the button’s function or to ready the camera for picture taking, turn the <  > dial.
The <  > is used to set the following:
1.Real-time exposure compensation
2.Aperture
3.Flash exposure compensation
4.Selection of a focusing point above or below
The <  > dial functions only when the <
 > switch is set to <
  >.
>.
 : Set to this position to disable the <
  >.
>.
 : Set to this position to enable the <
  >.
>.
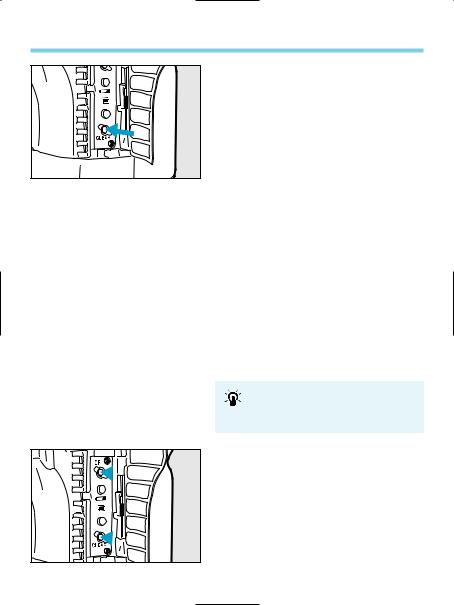
Reverting to the Default Settings
With the EOS-3, you can set the shooting mode, metering mode, and other settings as you wish. You can also use Custom Functions (see page 103) to customize camera controls and functions according to your preferences. These preferences can be reset to the default settings with the following procedure.
19
Basic Operation
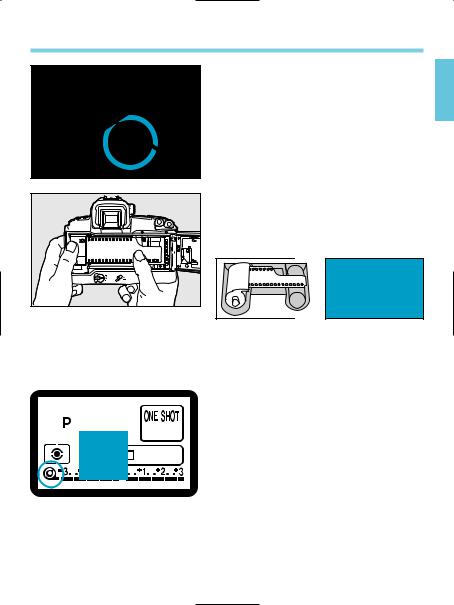
 1
1
 2
2
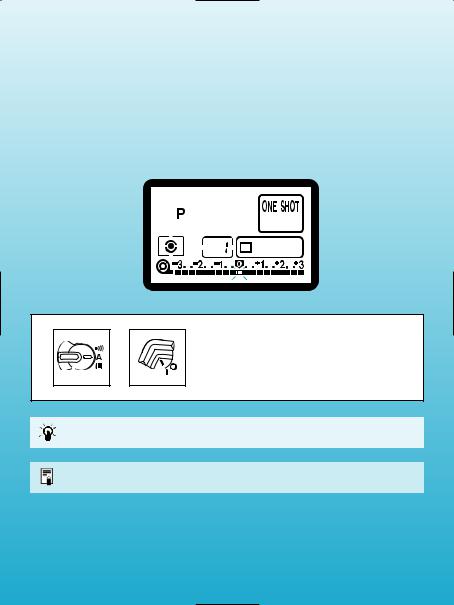
To reset the camera to the default settings:
1 Open the side door and press the <  > button. This resets the camera to the default settings shown in the table below.
Shooting mode |
P |
|
|
AF mode |
One-Shot AF |
|
|
Metering mode |
Evaluative |
|
|
Film advance mode |
Single |
|
|
Focusing point selection |
Automatic |
|
|
Multiple exposures |
Canceled |
|
|
Exposure compensation |
0 |
|
|
Flash exposure |
0 |
compensation |
|
|
|
AE lock |
Canceled |
|
|
FE lock |
Canceled |
|
|
AEB |
Canceled |
|
|
Custom Functions |
Settings retained |
|
|
• When the camera is reset, the shooting mode will be set automatically to Program AE <P> (page 29).
To reset all Custom Functions (except CF-0 described on page 105) to the default settings, follow the step below:
2 Open the side door, press the <  > button, then press the <
  > button.
20
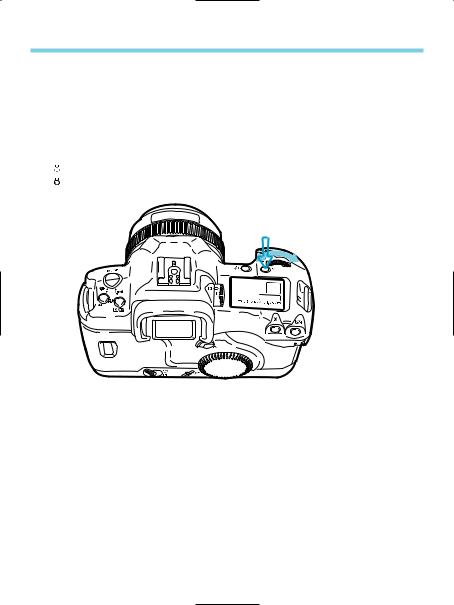
2. Installing the Battery and Checking the Battery Level
The battery is housed in the camera grip. Remove the grip to install one 2CR5 lithium battery.
2
1
Battery release lever
Installing the Battery
1 Loosen the grip screw by turning it counterclockwise as shown in the figure.
2 Slide the grip downward to remove.
3 Insert the battery so that its contacts touch the grip’s contacts at the bottom.
4 After inserting the battery, turn the battery as shown by the arrow in the figure.
•To take out the battery, slide the battery release lever.
5 Reattach the grip to the camera, then turn the grip screw to tighten securely.
Lithium batteries may not be available in certain areas. Carry a spare battery when going on a trip or when you will use many rolls of film.
21
Installing the Battery and Checking the Battery Level
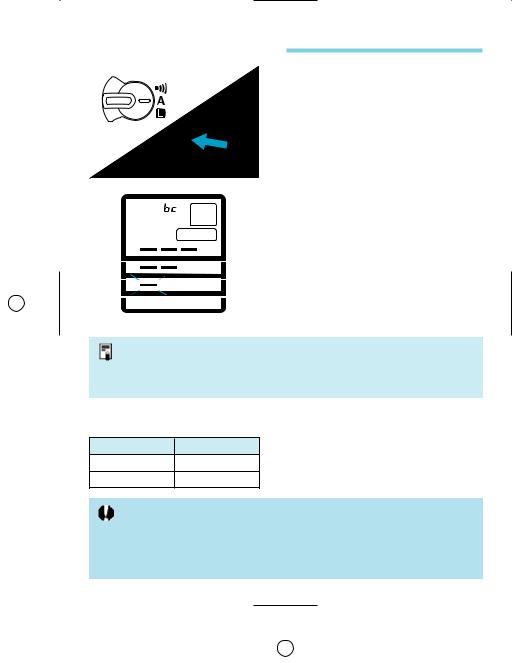
Checking the Battery Level
1 Set the <  > switch to <
  >.
>.
2 |
Open the side cover and press the |
||
< |
> button. |
||
|
The battery level indicator will |
||
3 appear on the LCD panel. The |
|||
|
different indicators indicate the |
||
1 |
following: |
||
1: Battery level OK. |
|||
|
|||
2 |
2: Keep spare battery handy. |
||
3 |
3: (Blinking display) Battery will soon be |
||
|
exhausted. |
||
|
|
||
44: (No display): Replace with new battery.

 (blinking): See page 7.
•If the < 
 > switch is set to <
  > and nothing is displayed on the LCD panel, the battery is probably installed incorrectly. Install the battery correctly and check the battery level.
•Even if the conditions described in 3 and 4 apply, a proper exposure will be obtained as long as the shutter releases to take a picture.
2CR5 Lithium Battery Life (No. of Rolls)
Temperature |
Rolls |
+20 °C |
75 (50) |
–20 °C |
18 (12) |
•The table shows the number of 24-exposure rolls based on Canon’s tests with a new battery and an EF 50mm f/1.4 USM lens. Figures in parentheses are the number of 36-exposure rolls.
•Pressing the shutter button halfway and activating the autofocus will still consume battery power even if no pictures are taken.
•Since field conditions may differ, the actual number of rolls may be less than the figures in the table.
•Pressing the shutter button halfway for prolonged periods or frequent playing with the autofocus without taking any pictures will lower the number of rolls that can be taken.
22
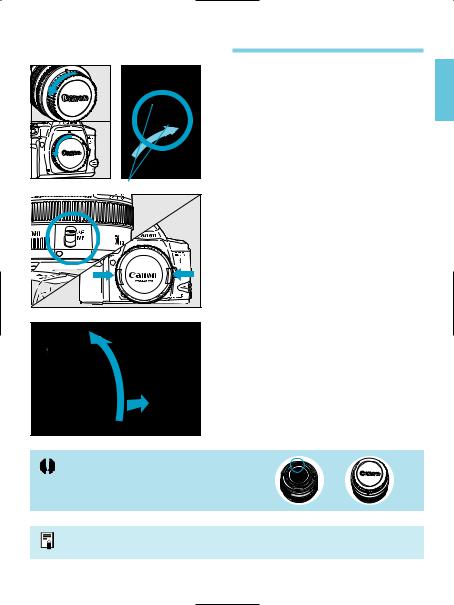
3. Mounting and Detaching a Lens
Mounting a Lens |
Remove the rear lens cap and the |
1 camera body cap by turning them |
as shown by the arrow. |
2 Align the red dots on the lens and |
camera and turn the lens as shown |
by the arrow until it snaps in place. |
Red dots
3 On the lens, set the focus mode switch to AF.
• If the focus mode switch is set to MF) or M on older lenses, autofocus will not operate.
4 Remove the front lens cap.
Detaching the Lens
While pressing the lens release button, turn the lens as shown by the arrow until it stops. Then remove the lens.
To avoid getting the lens surface and electrical contacts scratched, attach the rear lens cap to the detached lens or always put down the lens with the rear end up.
AF stands for autofocus.
23

4. Loading Film
1 Set the <  > switch to <
  >.
>.
1
2 Use your thumb to press the 2 camera back lock release button and slide the camera back lever down as shown by the arrow to
open the camera back.
• If this is difficult to do with one finger, use one finger to press the lock release button and another finger to slide down the lever.
3 Insert the film cartridge at an angle as shown in the figure.
Orange mark |
Right |
4 Hold down the film cartridge and pull the edge of the film leader to the orange mark on the camera.
The shutter curtain is manufactured with very high precision. Never touch the shutter curtain. When loading or unloading film, be careful not to touch the shutter curtain with your fingers or the film.
24
Loading Film
Wrong |
5 After checking that the film leader edge is correctly aligned with the orange mark, close the camera back.
Right |
Wrong |
• If the edge of the film leader goes beyond the orange mark, rewind some of the film back into the cartridge.
6 When you close the camera back, the film will advance to frame 1 automatically. The film-loaded indicator on the LCD panel will appear. “  ” will also be displayed on the frame counter on the LCD panel and below the exposure compensation scale in the viewfinder.
• If the film is not loaded properly, the film advance/rewind indicator will blink and the shutter will not work. Reload the film properly.
25
Loading Film
CF |
Custom Function CF-8 can set the frame counter to count down the remaining |
|
number of exposures. If this function is set, will be displayed on the upper left of |
||
|
||
|
the frame counter on the LCD panel. See page 112. |
|
|
|
When using the camera in high temperatures, do not remove the film packaging until you are ready to load the film.
36 |
400 |
|
EXP |
36 EXP
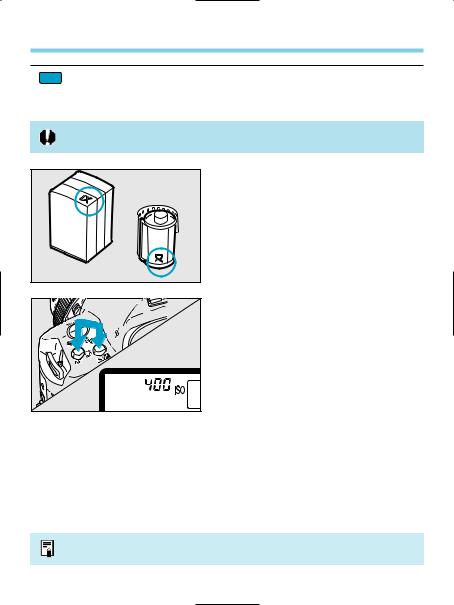
Setting the Film Speed
With DX-coded film, the camera sets the film speed automatically within a range from ISO 25 to 5000.
400
• To check the loaded film’s ISO film speed, press the <  > button and <
  > button simultaneously. The ISO icon and film speed will be displayed on the LCD panel.
•If the film is not DX-coded, the LCD
panel will display the following:
(1) The ISO icon and previous film speed will be blinking. Set the film speed by following “Setting the Film Speed Manually” on page 81.
(2) If Custom Function CF-8 has been set to count down the remaining frames on the frame counter, will be displayed and “ 

 ” will blink on the frame counter. The frame counter counts down each time a picture is taken (the number keeps blinking).
To set a film speed different from the film’s ISO speed, see “Setting the Film Speed Manually” on page 81.
26
Loading Film
CF |
Custom Function CF-3 can prevent the ISO film speed from being set |
|
automatically. See page 108. |
||
|
Since an infrared sensor is used to detect the film’s transport, it will fog (expose) infrared film below the picture area.
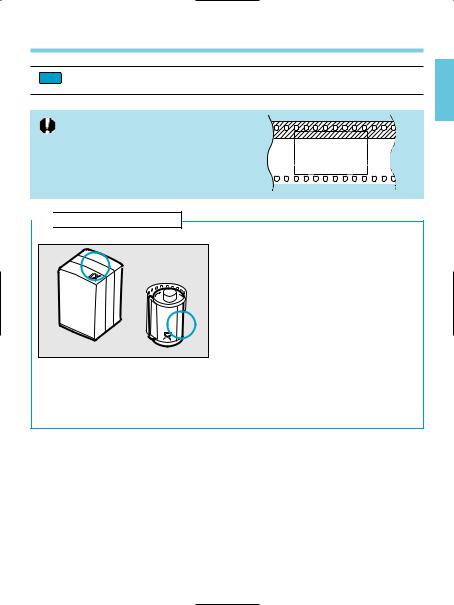
 Basic Terminology 1
36 |
400 |
|
EXP |
EXP |
400 |
36 |
|
● ISO film speed
The ISO film speed indicates the film’s sensitivity to light. The higher the film speed, the more sensitive the film is. The more sensitive the film is, the less light is required to obtain a standard exposure. Therefore, a high-speed film is suited for low-light situations. The ISO film speed is standardized by the International Standardization Organization (ISO). The EOS-3 can display a film speed from 6 to 6400.
27
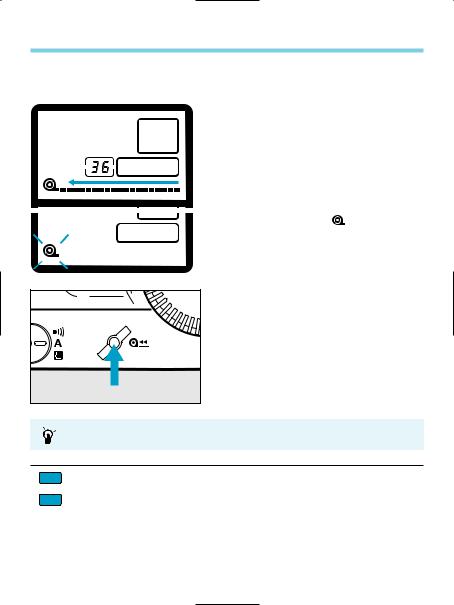
5. Unloading Film
After the film’s last frame is exposed, the camera rewinds the film automatically.
1 When the film starts to rewind, the film advance and rewind indicator (exposure compensation scale) on the LCD panel will “flow” from right to left to indicate that the film is rewinding. The frame counter also counts in reverse.
2 The film rewind ends automatically. Check that the icon on the LCD panel is blinking, then remove the film cartridge.
Midroll Rewind ( )
)
To rewind the film in midroll, press the <  > button. The film will start rewinding immediately.
During film rewind, pressing the <  > button switches between high-speed and low-speed (quiet) rewind.
|
CF |
Custom Function CF-1 can alter the rewind speed and method. See page 106. |
|
|
|
|
|
Normally, the entire film leader is rewound inside the film cartridge. Custom |
|
CF |
|
|
Function CF-2 can leave out the film leader after film rewind. See page 108. |
|
|
|
|
|
|
|
28
Quick Start With Program AE
For quick and easy picture-taking, use the Program AE mode. This mode sets both the shutter speed and aperture automatically to suit the subject’s brightness. Anyone can easily take pictures in this mode. By using the focusing points in the wide area AF ellipse in the viewfinder, it is easy to compose and capture a variety of subjects.
First set the <  > switch to <
  >. If necessary, also set the <
  > switch to <
  >.
>.
The Program AE mode is set automatically as the camera’s initial shooting mode. See page 19.
AE is an abbreviation for Auto Exposure.
29
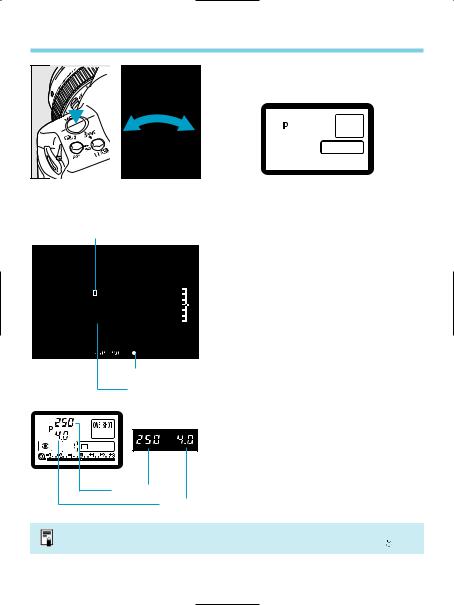
Quick Start With Program AE
Focusing point
In-focus indicator Area AF ellipse
Shutter speed Aperture
1 While pressing the <  > button, turn the <
 > dial to <P>.
2 After <P> appears on the LCD panel, release the <  > button.
3 Look through the viewfinder and cover the area AF ellipse over the subject. Then press the shutter button halfway.
•The focusing point which achieves focus flashes in red briefly.
At the same time, the in-focus indicator in the viewfinder lights in green ●.
•If the in-focus indicator in the viewfinder blinks, the shutter will lock and a picture cannot be taken. See “Manual Focusing” on page 52.
•The shutter speed and aperture will be displayed on the LCD panel and in the viewfinder.
•Do not touch the part of the lens which moves while it autofocuses.
4 Make sure the shutter speed and aperture are not blinking, then press the shutter button completely to take the picture.
The focusing point which achieves focus flashes in red briefly. If the focusing point has been selected manually (see page 38), it lights dimly while it is active for ( 6 ).
6 ).
30
 Loading...