


Personal Embroidery Design Software System
Instruction Manual
Before using this software, first read the Reference Guide for details on installing or upgrading the software. In addition, be sure to read this Instruction Manual before using the software.
We recommend that you keep this document nearby for future reference.

Congratulations on choosing our product!
Thank you very much for purchasing our product. To obtain the best performance from this device and to ensure safe and correct operation, please read this Instruction Manual carefully, and then keep it in a safe place together with your warranty.
Please read before using this product
For designing beautiful embroidery designs
•This system allows you to create a wide variety of embroidery designs and supports a wider range of sewing attribute settings (thread density, sewing pitch, etc.). However, the final result will depend on your particular sewing machine model. We recommend that you make a trial sewing sample with your sewing data before sewing on the final material.
For safe operation
•Do not save any files on the "PE-DESIGN Software Key" for transferring or storage.
•Do not plug the "PE-DESIGN Software Key" into your sewing machine.
For a longer service life
•When storing the "PE-DESIGN Software Key", avoid direct sunlight and high humidity locations. Do not store the "PE-DESIGN Software Key" close to a heater, iron or other hot objects.
•Do not spill water or other liquids on the "PE-DESIGN Software Key".
•Do not drop or hit the "PE-DESIGN Software Key".
For repairs or adjustments
•In the event that a malfunction occurs or adjustment is required, please consult your nearest service center.
Notice
•Since this "PE-DESIGN Software Key" device is required to run the software, its replacement value is the retail price of the software. Please keep in a safe place when not in use.
•Neither this Instruction Manual nor the Reference Guide explains how to use your computer under Windows®. Please refer to the Windows® manuals.
Copyright acknowledgment
Windows® is a registered trademark of Microsoft Corporation. Other product names mentioned in the Instruction Manual and Reference Guide may be trademarks of registered trademarks of their respective companies and are hereby acknowledged.
Caution
The software included with this product is protected by copyright laws. This software can be used or copied only in accordance with the copyright laws.
SAVE THESE INSTRUCTIONS
This product is intended for household use.
For additional product information and updates, visit our website at: http://www.brother.com/ or http://support.brother.com/
1

Table of Contents
Table of Contents ............................ |
2 |
How To Use Manuals....................... |
4 |
Support/Service............................... |
5 |
Technical Support ............................................. |
5 |
Online Registration............................................ |
5 |
Checking for the Latest Version of the |
|
Program ............................................................ |
6 |
PE-DESIGN Software Key ............... |
7 |
Comparison of Types of Data |
|
Created With PE-DESIGN 10........... |
8 |
Starting Up/Exiting Applications.... |
9 |
Starting Up the Application................................ |
9 |
Exiting the Application....................................... |
9 |
About the Startup Wizard ................................ |
10 |
Understanding Windows .............. |
11 |
Layout & Editing Window ................................ |
11 |
Example of Importing Embroidery Data .......... |
13 |
Basic Software Settings................ |
14 |
Specifying the Design Page Settings .............. |
14 |
Using Fabric Selector...................................... |
17 |
Specifying Basic Display Settings ................... |
18 |
Basic Layout & Editing |
|
Operations...................................... |
22 |
Tutorial 1: Drawing shapes to create an |
|
embroidery design........................................... |
23 |
Editing Embroidery Designs............................ |
31 |
Specifying Thread Colors and Sew Types for |
|
Lines and Regions .......................................... |
46 |
Drawing Shapes.............................................. |
60 |
Reshaping Embroidery Patterns ..................... |
66 |
Editing a Stitch Pattern.................................... |
71 |
Checking Embroidery Patterns ....................... |
77 |
Opening/Importing Embroidery Designs ......... |
90 |
Saving and Printing ......................................... |
95 |
Creating Embroidery Patterns |
|
Containing Text ........................... |
100 |
Tutorial 2: Using Templates........................... |
101 |
Template Feature .......................................... |
104 |
Tutorial 3: Entering text ................................. |
105 |
Advanced Operations for Entering Text ........ |
106 |
Tutorial 4: Monograms................................... |
120 |
Advanced Operations for Entering |
|
Monograms.................................................... |
123 |
Tutorial 5: Creating Name Drop..................... |
124 |
Name Drop Feature (Replacing Text) ........... |
127 |
Creating Embroidery Patterns |
|
Using Images ............................... |
130 |
Stitch Wizard: Automatically Converting an |
|
Image to an Embroidery Design .................... |
131 |
Tutorial 6-1: Auto Punch................................ |
132 |
Auto Punch Features..................................... |
134 |
Tutorial 6-2: Cross Stitch ............................... |
135 |
Cross Stitch Features .................................... |
137 |
Tutorial 6-3: Photo Stitch 1............................ |
139 |
Photo Stitch 1 Features................................. |
142 |
Tutorial 6-4: Photo Stitch 2............................ |
144 |
Photo Stitch 2 Features................................. |
146 |
Advanced Stitch Wizard Operations.............. |
147 |
Importing Image Data .................................... |
150 |
Changing the Image Settings ........................ |
152 |
Tutorial 7: Print and Stitch ............................. |
154 |
Operations for Specific |
|
Applications................................. |
160 |
Tutorial 8-1: Creating Appliqués .................... |
161 |
Tutorial 8-2: Creating Embroidered |
|
Patches.......................................................... |
166 |
Tutorial 8-3: Creating a Cutwork Pattern |
|
Filled with Net Stitching ................................. |
169 |
On Using the Cutwork Functions................... |
173 |
Tutorial 9-1: Creating Split Embroidery |
|
Designs.......................................................... |
177 |
Tutorial 9-2: Creating Design for |
|
Multi-Position Hoops...................................... |
183 |
Tutorial 9-3: Embroidering With the Jumbo |
|
Frame ............................................................ |
188 |
Specifying/Saving Custom Sewing |
|
Attributes ....................................................... |
192 |
Using Manual Punch Tool ............................. |
197 |
2

Table of Contents
Transferring Data ........................ |
200 |
Transferring Embroidery Designs to |
|
Machines ....................................................... |
201 |
Using the Link Function to Embroider From |
|
the Computer................................................. |
204 |
Design Center.............................. |
210 |
Basic Design Center Operations ................... |
211 |
Design Center Window.................................. |
221 |
Original Image Stage..................................... |
222 |
Line Image Stage .......................................... |
224 |
Figure Handle Stage...................................... |
226 |
Sew Setting Stage ......................................... |
231 |
Design Database ......................... |
240 |
Design Database Window ............................. |
241 |
Starting Up Design Database ........................ |
242 |
Organizing Embroidery Designs.................... |
243 |
Opening Embroidery Designs........................ |
245 |
Transferring Embroidery Designs to |
|
Machines ....................................................... |
246 |
Searching for an Embroidery Design............. |
251 |
Converting Embroidery Design Files to |
|
Different Formats........................................... |
252 |
Checking Embroidery Designs ...................... |
253 |
Outputting a Catalog of Embroidery |
|
Designs.......................................................... |
255 |
Programmable Stitch Creator .... |
258 |
Basic Programmable Stitch Creator |
|
Operations ..................................................... |
259 |
Creating Fill/Stamp Stitch Pattern ................. |
260 |
Editing a Pattern in Fill/Stamp Mode ............. |
264 |
Creating Motif Stitch Pattern.......................... |
266 |
Editing a Pattern in Motif Mode ..................... |
269 |
Programmable Stitch Creator Window .......... |
270 |
Opening a Template ...................................... |
271 |
Preview Window ............................................ |
272 |
Saving Patterns ............................................. |
272 |
Changing the Settings ................................... |
273 |
Font Creator ................................ |
274 |
Basic Font Creator Operations ...................... |
275 |
Font Creator Window..................................... |
282 |
Opening a File ............................................... |
284 |
Selecting a Character and Preparing the |
|
Template........................................................ |
285 |
Creating a Font Character Pattern ................ |
287 |
Editing the Points of a Font Character |
|
Pattern .......................................................... |
288 |
Checking the Created Font Patterns ............ |
289 |
Saving Font Character Patterns ................... |
291 |
Changing the Settings .................................. |
292 |
Supplement ................................. |
294 |
For Basic Operations .................................... |
295 |
On Settings ................................................... |
297 |
Changing Various Settings ........................... |
298 |
For Making an Effective Use of This |
|
Application .................................................... |
303 |
Menus/Tools and Reference ...... |
306 |
Layout & Editing............................................ |
307 |
Design Center............................................... |
312 |
Design Database .......................................... |
315 |
Programmable Stitch Creator ....................... |
317 |
Font Creator.................................................. |
318 |
Sewing Attributes.......................................... |
320 |
Font List ........................................................ |
340 |
Troubleshooting ............................................ |
344 |
New Features of PE-DESIGN 10.................. |
346 |
Index............................................. |
348 |
3

How To Use Manuals
The following manuals are included with this software.
Reference Guide
Read this guide before using the software. This guide contains instructions and precautions necessary to begin using the software. The second half is filled with tutorials that use key features to create embroidery patterns as well as project examples.
Instruction Manual
This manual contains instruction on how to use the PE-DESIGN software.
First, read "PE-DESIGN Software Key", "Starting Up/Exiting Application", "Comparison of Types of Data Created With PE-DESIGN 10", "Example of Importing Embroidery Data" and "Understanding Windows" to gain a general understanding of the basic software applications.
Next, read "Basic Layout & Editing Operations". This chapter provides procedures for creating embroidery patterns as examples for performing basic Layout & Editing operations and transferring patterns to the embroidery machine. Follow the procedures to create actual embroidery patterns.
The chapters dedicated to each application provide descriptions of the useful functions and the various settings. Each descriptive title allows you to easily find the information that you need. In the chapters containing tutorials, follow the procedures to practice the various operations. Afterward, read the detailed descriptions.
Additional information is provided in the following chapters. Read the appropriate chapter when necessary.
Support/Service: Provides warranty information for this product in addition to the procedure for updating the software.
Supplement: Provides function introductions, details on the settings available in the [Options] dialog box and troubleshooting procedures in addition to tips and precautions to maximize the use of this software.
Menus/Tools and Reference: Provides lists of sew types, sewing attributes and fonts in addition to the various commands.
The procedures in this manual are written for use in Windows® 8.1. If this software is used on an operating system other than Windows® 8.1, the procedures and appearance of the windows may differ slightly.
■ Opening the Instruction Manual (PDF format)
This manual is provided in a PDF format on the included "PE-DESIGN Software Key". The Instruction Manual is also installed during software installation.
Click the down arrow in the bottom-left corner of the [Start] screen to show the [All Apps] view, and then Click
[Instruction Manual] under the title [PE-DESIGN 10] in the screen. (For Windows® 7 or Windows Vista® users: Click [All Programs], then [PE-DESIGN 10], then [Instruction Manual].)
Otherwise, with any application other than Design Database, click  , then [Instruction Manual]. With Design Database, click [Help], then [Instruction Manual].
b
•Adobe® Reader® is required for viewing and printing the PDF version of the Instruction Manual.
•If Adobe® Reader® is not on your computer, it must be installed. It can be downloaded from the Adobe Systems Incorporated Web site (http://www.adobe.com/).
4

Support/Service
Technical Support
Contact Technical Support if you have a problem. Please check the company web site (http://www.brother.com/) to find the Technical Support in your area. To view the FAQ and information for software updates, visit the Brother Solutions Center at (http://support.brother.com/).
a
•Have the information ready before contacting Technical Support.
Make sure your computer's operating system is current with all updates.
Have the make and model of your computer and Windows® Operating System. (Refer to the Reference Guide for system requirements.)
Information on error messages that appear. This information will help expedite your questions more quickly.
Make sure PE-DESIGN 10 is current with any updates.
Online Registration
If you wish to be contacted about upgrades and provided with important information such as future product developments and improvements, you can register your product online by following a simple registration procedure.
Click  in Layout & Editing, then [Online Registration] to start up the installed Web browser and open the
online registration page on our Web site.
The online registration page on the Web site appears when the following address is entered in the address bar of the Web browser.
http://www.brother.com/registration/
b
Online registration may not be available in some areas.
5
Support/Service
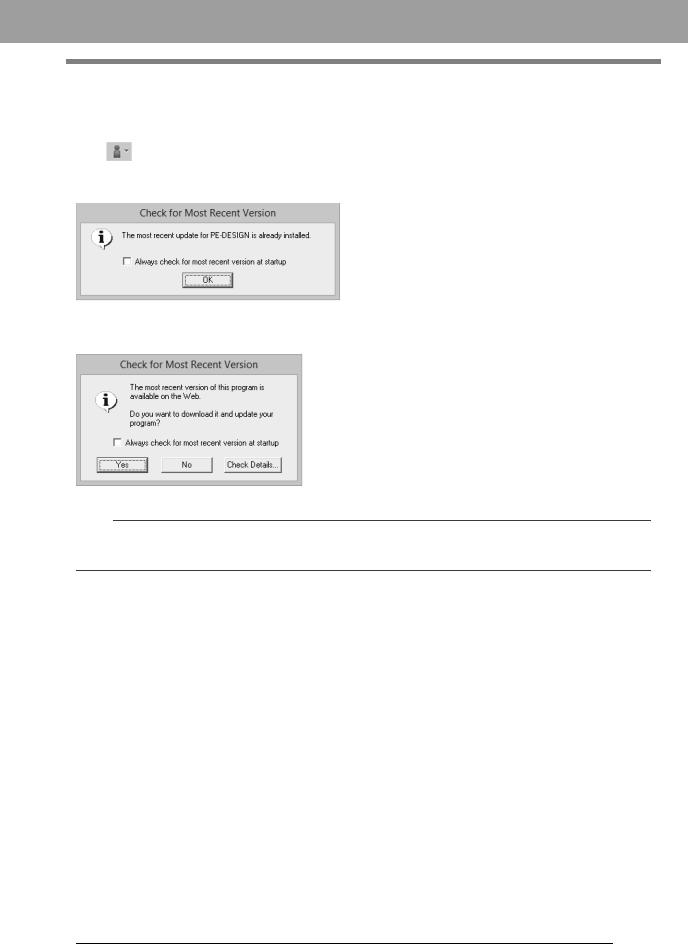
Checking for the Latest Version of the Program
Click |
in Layout & Editing, then [Check for Updates]. |
The software is checked to determine whether or not it is the latest version.
If the message shown below appears, the latest version of the software is being used.
If the message shown below appears, the latest version of the software is not being used. Click [Yes], and then download the latest version of the software from the Web site.
b
If the [Always check for most recent version at startup] check box is selected, the software is checked at startup to determine whether or not it is the latest version.
6
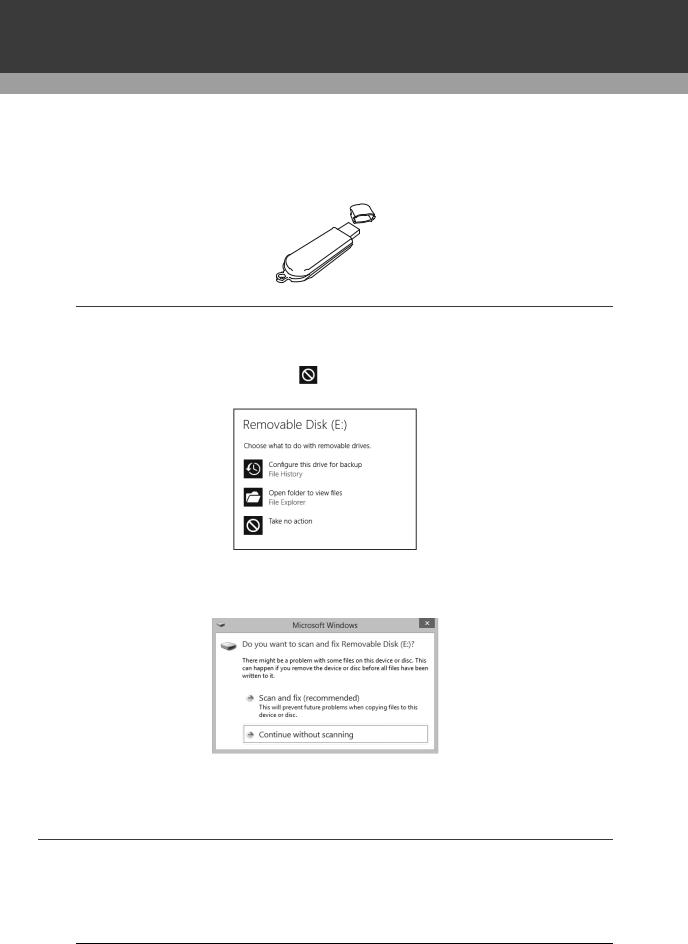
PE-DESIGN Software Key
In order to use PE-DESIGN 10, the included "PE-DESIGN Software Key" must be plugged into a USB port of the computer.
The "PE-DESIGN Software Key" prevents unauthorized use of this software. The software cannot be started if the "PE-DESIGN Software Key" is not plugged in.
a
•The "PE-DESIGN Software Key" cannot be used as USB media. Do not save embroidery files on the "PEDESIGN Software Key" for transferring or storage.
•When the "PE-DESIGN Software Key" is plugged into a USB port of the computer, the [AutoPlay] dialog
box appears. Do not use this dialog box. Click |
to close the dialog box, and then start up PE-DESIGN |
10. |
|
•When the message "Do you want to scan and fix Removable Disk (E:)?" appears, select [Continue without scanning] and then start up PE-DESIGN 10. The drive name for the Removable Disk differs depending on computers.
•To unplug the "PE-DESIGN Software Key" from the computer, click [Start] - [Computer], right-click the "PE-DESIGN Software Key", and then click [Eject].
•Do not format the "PE-DESIGN Software Key".
•We recommend that you back up this software in order to prepare for unexpected problems.
7
Comparison of Types of Data Created
With PE-DESIGN 10
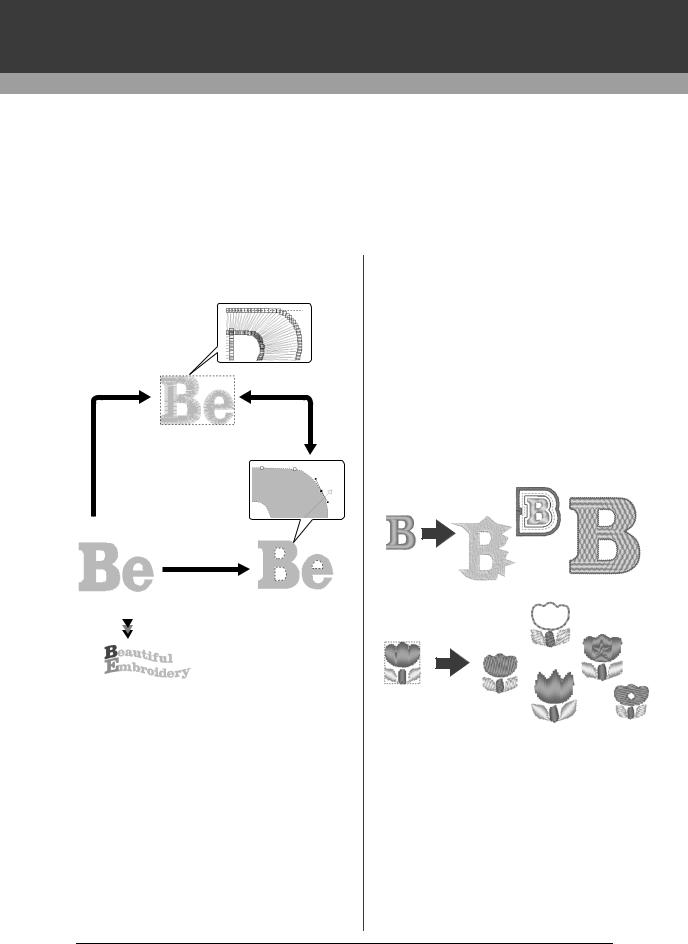
Three types of data are used in PE-DESIGN 10.
Stitch pattern: Built-in embroidery data (created through a conversion in PE-DESIGN 10) Text pattern: Data created with the [Text] tools
Shape pattern (Outline pattern): Data created with the [Shapes] tools. A uniform/multiple sewing direction(s) are applied to the entire region.
Each data can be converted to another type as shown below. The arrows indicate the directions in which data can be converted. The methods of editing the data differ depending on the data type.
Change the shape by editing needle drop points.
Stitch pattern
Change the shape by editing paths.
Text pattern |
Shape pattern |
Edit the text or change the font.
Stitch pattern
You can edit (reshaping by moving/deleting points or splitting/connecting lines at points) points (needle drop points) and split stitches; however, you cannot specify region and line sew types or sewing attributes.
Text pattern
You can edit text by entering/deleting characters, specify text attributes (such as the font or the transformation shape) and specify sewing attributes.
Shape pattern
You can specify region and line sew types as well as sewing attributes, edit paths (by moving/deleting points, reshaping through handle movements or by splitting/connecting lines at points), change the sewing direction, input/edit stamps, apply embossing/engraving effects, remove/merge overlapping regions, set hole sewing, split outlines and create offset lines and floral patterns.
For example, when a stitch pattern is converted to shapes, the sew types and sewing attributes can be changed, and the shapes can easily be edited and resized. When text pattern is converted to shapes, the sewing direction and character shapes can be edited and offset lines can be created.
Functions that are not available with one data type may be performed if the data is converted to a different type. Convert data to the type that allows you to perform the operations necessary for creating the desired embroidery data.
8

Starting Up/Exiting Applications
Starting Up the Application
Click the down arrow in the bottom-left corner of the [Start] screen to show the [All Apps] view, and then Click
[PE-DESIGN 10 (Layout & Editing)] under the title [PE-DESIGN 10] in the screen. When the application starts up, the Startup Wizard appears.
cc "About the Startup Wizard" on page 10
b
For Windows® 7 or Windows Vista® users: Click |
, then [All Programs], then [PE-DESIGN 10], and then |
click [PE-DESIGN 10 (Layout & Editing)]. |
|
|
|
Exiting the Application
Click  , then [Exit].
9
Starting Up/Exiting Applications
About the Startup Wizard
When [Layout & Editing] starts up, the following wizard appears.
b a |
c g |
|
|
j |
|||||||||||
|
|
|
|
|
|
|
|
|
|
|
|
|
|
|
|
|
|
|
|
|
|
|
|
|
|
|
|
|
|
|
|
|
|
|
|
|
|
|
|
|
|
|
|
|
|
|
|
|
|
|
|
|
|
|
|
|
|
|
|
|
|
|
|
|
|
|
|
|
|
|
|
|
|
|
|
|
|
|
|
|
|
|
|
|
|
|
|
|
|
|
|
|
|
|
|
|
|
|
|
|
|
|
|
|
|
|
|
|
|
|
|
|
|
|
|
|
|
|
|
|
|
|
|
|
|
|
|
|
|
|
|
|
|
|
|
|
|
|
|
|
|
|
|
|
|
|
|
|
|
|
|
|
|
|
|
|
|
|
|
d e f l k i h
aUse Template Designs
Click this button to start the [Template Wizard].
cc"Tutorial 2: Using Templates" on page 101
bCreate Embroidery Patterns Using Images
Click this button to start the wizard for creating an embroidery pattern from an image.
cc"Stitch Wizard: Automatically Converting an Image to an Embroidery Design" on page 131 and "Importing Image Data" on page 150
cSet Hoop Size and Fabric
Click this button to specify the size of the Design Page (embroidery hoop size). The fabric to be embroidered can be selected, and the sewing attributes appropriate for that fabric can be specified.
cc"Specifying the Design Page Settings" on page 14 and "Recalling a group of settings from the list" on page 192
d  , e
, e  , f
, f 
Click these buttons to import the pattern shown on the button from the [Import] pane.
gMost Recently Used Files
Select a thumbnail of the most recently used file from the list, and then click [Open] to recall the file.
hOpen Embroidery Design
Click this button to open embroidery data (.pes).
cc"Opening a Layout & Editing file" on page 90
iStart Design Database to Manage Embroidery Files
Click this button to start up Design Database.
cc "Design Database" on page 240
j 
Click this button to open the Instruction Manual (in PDF format).
kAlways show Wizard at Startup
Select this check box to start up the wizard each time Layout & Editing is started up.
lClose this Wizard
Click this button to close the Startup Wizard without performing an operation.
b
To open the wizard while you are using the
[Layout & Editing], click |
at the top of the |
window (in the [Quick Access Toolbar]), or click
and then select [Wizard] from the command menu.
10
Understanding Windows
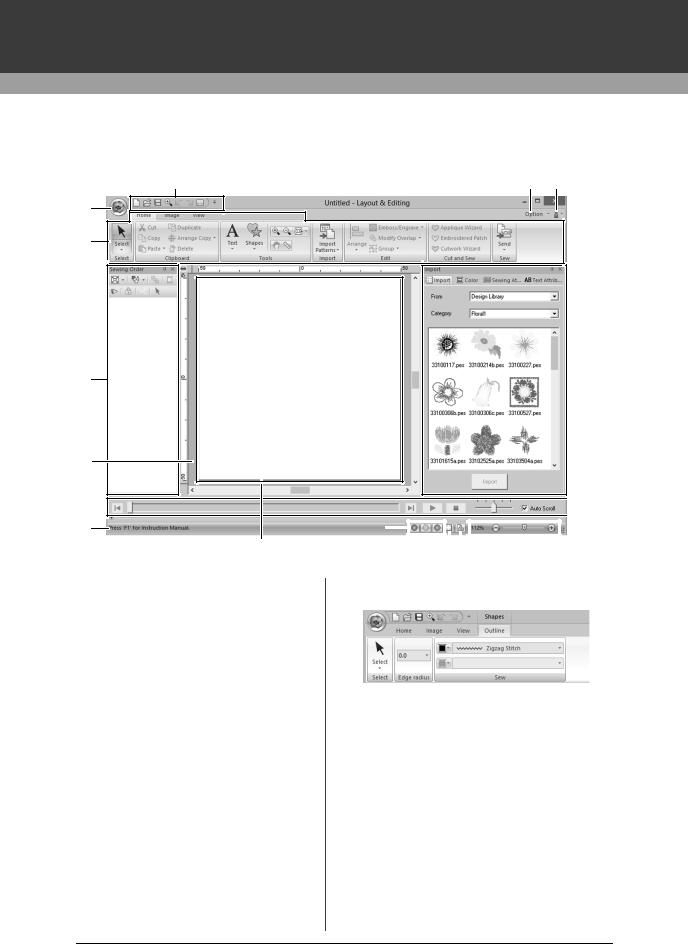
Layout & Editing Window
3 |
4 |
5 |
||
|
|
|
|
|
1 |
2 |
6
10
11
9
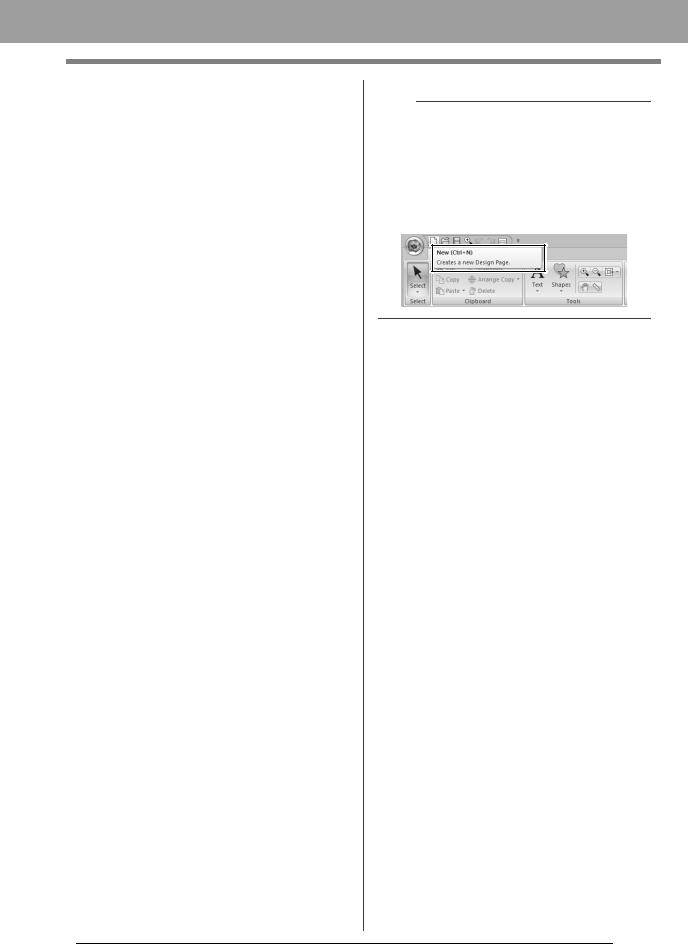
1Application button
Click to display a menu containing commands for file operations, such as [New], [Save],
[Print] and [Design Settings].
2Ribbon
Click a tab at the top to display the corresponding commands.
Refer to the name below each group when selecting the desired command. Clicking a
command with the  mark displays a menu containing a choice of commands.
Some other tabs may appear depending on the tool or embroidery pattern that is selected. These tabs contain various commands for performing operations with the selected tool or embroidery pattern.
 7
7
 8
8
|
|
|
|
|
|
|
|
|
|
|
|
12 |
13 |
|
|
|
|
|
14 |
|
15 |
||
|
|
||||||||||
|
|
|
|
|
|
||||||
Example: When the Shapes (Rectangle) tool is selected
3Quick Access Toolbar
This contains the most frequently used commands. Since this toolbar is always displayed, regardless of the Ribbon tab that is selected, adding your most often used commands makes them easily accessible.
cc"Customizing Quick Access Toolbar" on page 300
4Option button
Click this button to start up other applications and specify application settings, such as user thread charts.
11
Understanding Windows
5Help button 
Click this button to display the Instruction Manual and view information about the software.
6Sewing Order pane
This pane shows the sewing order. Click the buttons at the top of the pane to change the sewing order or thread color.
7Import/Color/Sewing Attributes/Text Attributes panes
This pane combines tabs for importing embroidery patterns as well as for specifying thread colors, sewing attributes and text attributes. Click a tab to display the available parameters.
8Stitch Simulator pane
The Stitch Simulator shows how the pattern will be sewn by the machine and how the stitching will appear.
9Design Page
The actual part of the work area that can be saved and sewn.
10Work area
11Status Bar
This displays the size of the embroidery data, the number of stitches or a description of the selected command.
12View mode buttons
Click a button to change the View mode.
13Show grid button
Click to switch between displaying and hiding the grid.
14Design Property button
Click to display a dialog box containing sewing information for the embroidery data.
15Zoom slider
This displays the current magnification ratio. Click to specify a value for the magnification ratio.
Drag the slider to change the magnification ratio.
b
•Panes 6, 7 and 8 can be displayed or hidden from the [Show/Hide] group in the [View] tab. In addition, these panes can be displayed as separate dialog boxes (Floating) or attached to the main window (Docking).
•Position the pointer over a command to display a ScreenTip, which provides a description of the command and indicates its shortcut key.
12
Understanding Windows
Example of Importing Embroidery Data
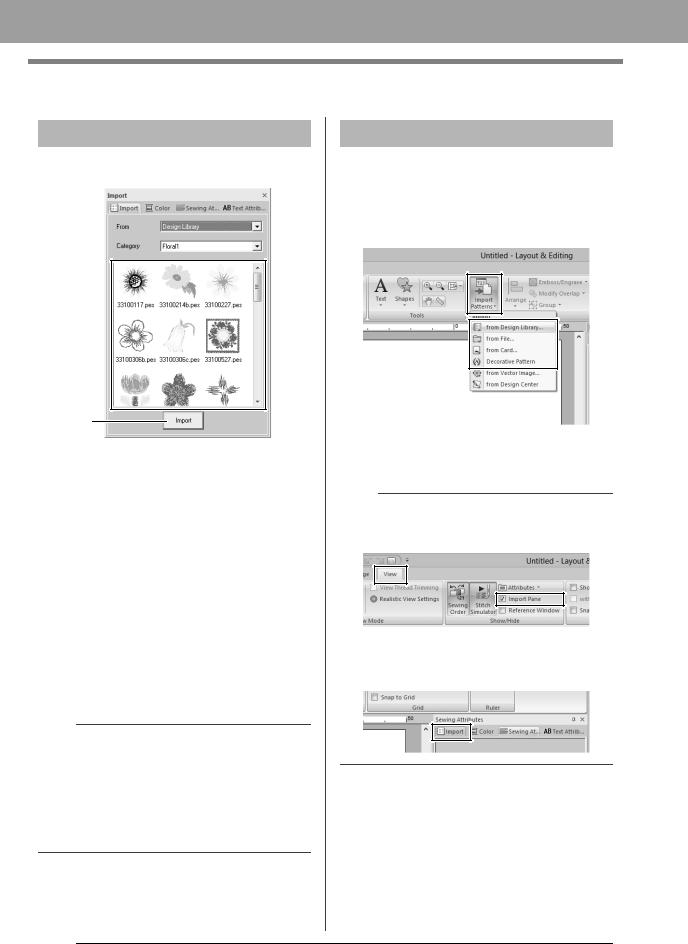
Using the Import pane
Embroidery data can be imported by using the
[Import] pane.
a
b
c
d
aFrom
Select a pattern location.
bCategory
Select a pattern category.
The categories in the pattern location selected in the [From] selector are listed.
cThe patterns in the category selected in the [Category] selector appear in the list. Pointing to a pattern and holding down the left mouse button displays a dotted box in the Design Page. This allows you to check the size of the pattern.
dImport
Click this button to import the selected pattern.
b
•The pattern can also be imported by doubleclicking it in the list or by dragging it to the Design Page.
•Multiple files cannot be selected to be imported at the same time.
cc"From a folder" on page 91 and "From an original card" on page 92
Using Import commands
1Click the [Home] tab.
2Click [Import Patterns] in the [Import] group, and then click [from Design Library], [from File], [from Card] or [Decorative Pattern] from the [Import] menu.
The [Import] pane appears on the right side of the screen.
b
The [Import] pane can also be displayed by selecting the [Import Pane] check box in the
[View] tab.
When the [Color] pane, [Sewing Attributes] pane or [Text Attributes] pane is displayed, click the [Import] tab to display the [Import] pane.
13
Basic Software Settings
Specifying the Design Page Settings
The color and size of the Design Page can be changed. You can select a Design Page size according to the size of hoop that you will be using with your embroidery machine. You can also specify a custom size for the Design Page for embroidery patterns that will be split and embroidered in multiple sections.
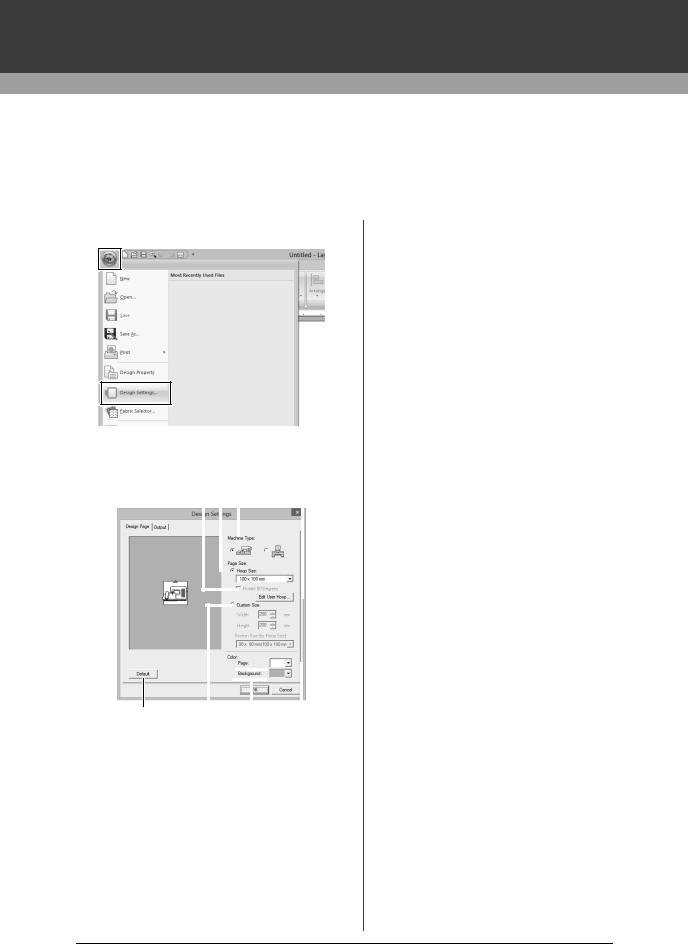
1 Click  , then [Design Settings].
2Specify the settings for the Design Page, and then click [OK].
c b a |
h |
||||||||||
|
|
|
|
|
|
|
|
|
|
|
|
|
|
|
|
|
|
|
|
|
|
|
|
|
|
|
|
|
|
|
|
|
|
|
|
|
|
|
|
|
|
|
|
|
|
|
|
|
|
|
|
|
|
|
|
|
|
|
|
|
|
|
|
|
|
|
|
|
|
|
|
|
|
|
|
|
|
|
|
|
|
|
|
|
|
|
|
|
|
|
|
|
|
|
|
|
|
|
|
|
|
|
|
|
|
|
|
g d f e
aMachine Type
Select your machine type. The settings available in the [Page Size] selector differ depending on the selected machine type.
bHoop Size
Select the desired hoop size from the selector.
cRotate 90 Degrees
Select this check box to arrange the pattern in a Design Page rotated 90°.
dCustom Size
Specify a custom size for split embroidery patterns.
Select this option, and then type or select the desired width and height for the Design Page.
cc"Tutorial 9-1: Creating Split Embroidery Designs" on page 177
ePage
Select the desired color for the Design Page.
fBackground
Select the desired color for the work area.
gDefault
To return to the default settings, click this button.
hEdit User Hoop
Click this button to display the [User Hoop Settings] dialog box, where a user hoop size can be added. The added user hoop size appears at the bottom of the list.
cc "Specifying a user hoop size" on page 15
14
Basic Software Settings
a
•The Design Page sizes 130 × 300 mm, 100 × 172 mm indicated by the "*", are used to embroider multi-position designs using a special embroidery hoop attached to the embroidery machine at three installation positions.
cc"Tutorial 9-2: Creating Design for MultiPosition Hoops" on page 183
•Do not select a hoop size larger than the embroidery hoop that can be used with your machine.
•When Cap Frame, Cylinder Frame or Round Frame has been selected, the Design Page cannot be rotated 90°.
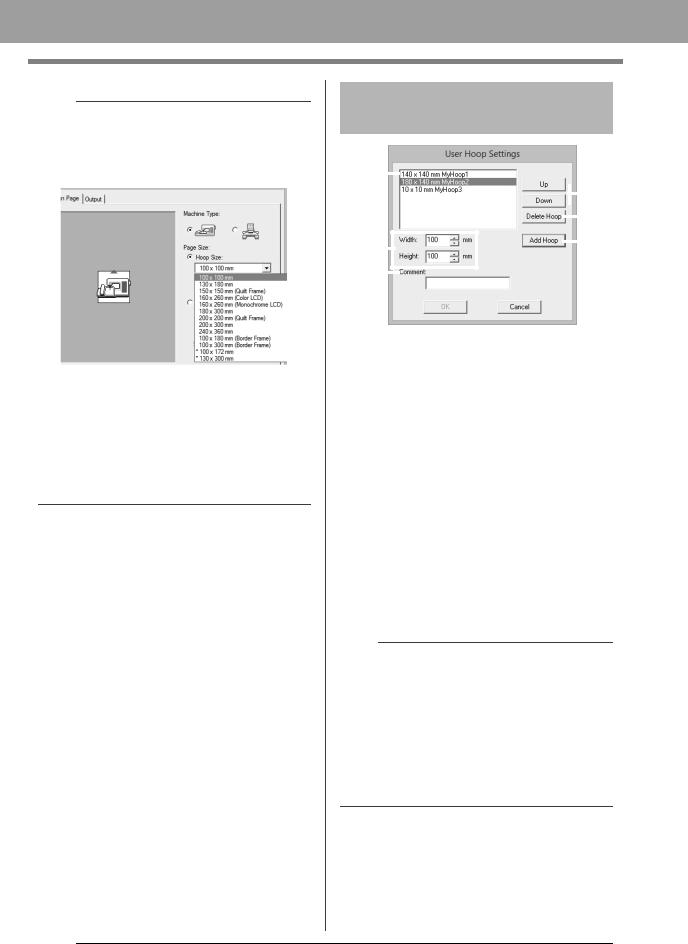
Specifying a user hoop size
d |
|
|
|
|
e |
||
|
|
|
|||||
|
|
|
|
|
|
|
|
|
|
|
|
|
|
|
|
|
|
|
|
|
|
|
|
|
|
|
|
|
|
|
f |
|
|
|
|
|
|
|
|
|
|
|
|
|
|
|
|
a |
|
|
|
|
|
|
c |
|
|
|
|
|
|
||
|
|
|
|
|
|
||
|
|
|
|
|
|
|
|
b |
|
|
|
|
|
|
|
|
|
|
|
|
|
|
|
|
|
|
|
|
|
|
|
aWidth, Height
Type in the size of the hoop to be added.
bComment
If text was entered in this box, that text appears beside the size.
cAdd Hoop
Click this button to add the hoop size.
dUser Hoop List
The added hoop size appears in the list. Select a hoop size in this list to change the display order or to delete it.
eUp, Down
Click these buttons to move the selected hoop size up or down in the display order.
fDelete Hoop
Click this button to delete the selected hoop size.
a
•A User Hoop cannot rotate 90°.
•A User Hoop cannot be added to the Section Size (for Hoop Size) selector under Custom Size.
•Do not create a Custom Hoop larger than the embroidery hoop that can be used with your machine.
•Embroidery data created in a user hoop size cannot be saved in a format for a previous version.
15
Basic Software Settings
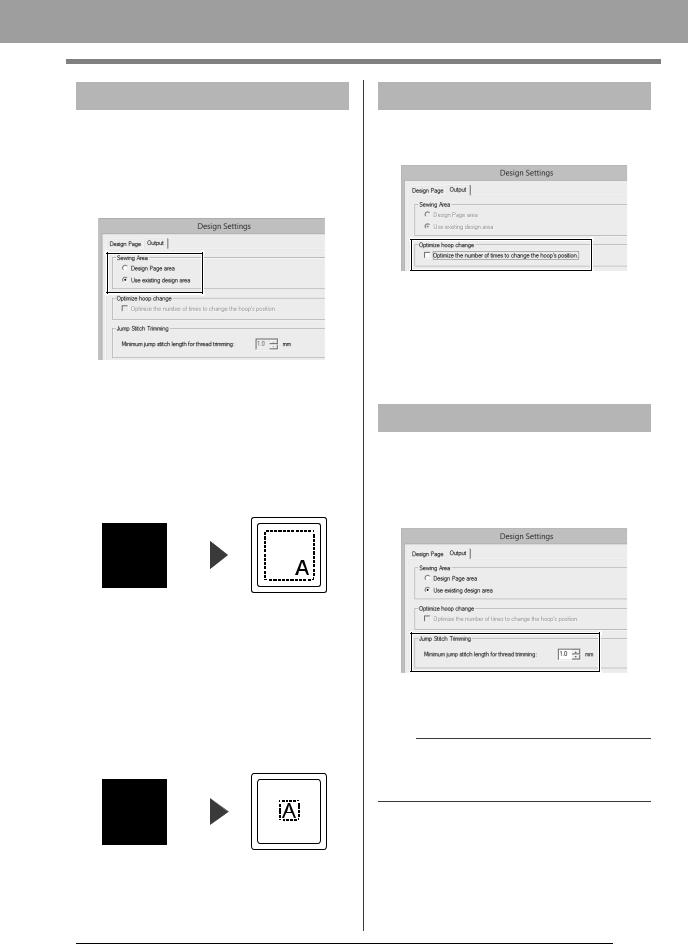
Specifying the sewing area
The pattern drawn in the Design Page is sewn differently depending on the sewing area setting.
1Click [Output] tab.
2Select the desired sewing area ([Design Page area] or [Use existing design area]).
Design Page area
The patterns will be sewn so that the needle position when you start sewing is aligned with the center of your Design Page. The dimension of the pattern matches the size of the Design Page, therefore reducing the ability to move a pattern around the layout screen of your embroidering machine.
|
|
|
Design Page (on |
|
Sewing area = |
your screen) |
|
Design Page area |
Use existing design area
The patterns will be sewn so that the needle position when you start sewing is aligned with the center of the actual patterns. The actual pattern size is maintained, therefore allowing greater mobility when using the layout functions of your embroidering machine.
|
|
|
Design Page (on |
|
Sewing area = Use |
your screen) |
|
existing design area |
Optimize hoop change
This setting can be selected if a multi-position hoop (100 × 172 mm or 130 × 300 mm) has been selected as the Design Page size.
Select the check box to optimize the sewing order/ order of hoop position changes so that the number of times that the hoop position is changed is reduced to the minimum.
This reduces the risk of misalignment in the embroidery pattern or uneven stitching from changing the hoop position too often.
Jump Stitch Trimming
These settings are applied only when embroidering with our multi-needle embroidery machines. Before
these settings can be specified, select  under
under
[Machine Type] in the [Design Settings] dialog box.
Specify the minimum jump stitch length for thread trimming.
a
These settings are not applied with any other embroidery machine. For details, refer to the Operation Manual provided with your machine.
cc"Jump Stitch Trimming" on page 87, "Specifying trimming settings in Layout & Editing" on page 297 and "Adding jump stitch trimming to new patterns" on page 302
16
Basic Software Settings
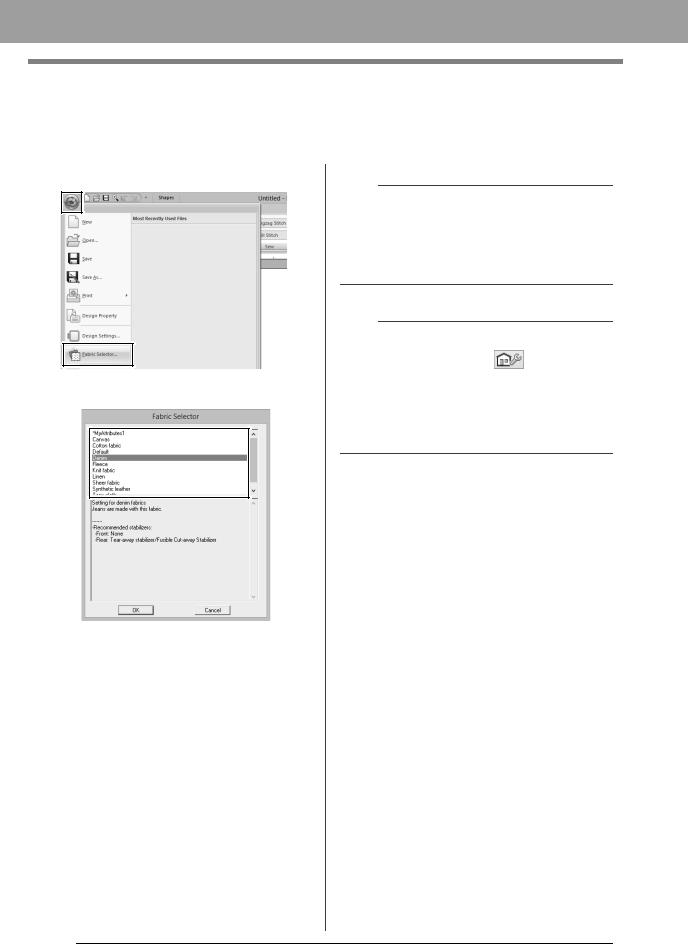
Using Fabric Selector
A group of sewing attribute settings appropriate for the major types of fabric can be recalled from the [Fabric Selector] dialog box. Select the fabric to be embroidered to view a description of the fabric and advice on embroidering.
1 Click  , then [Fabric Selector].
2 Select the group of settings to be recalled.
a 
aSelect the type of fabric to be embroidered to specify the recommended settings for that fabric.
When a fabric type is selected, a description appears.
3Click [OK].
When shapes and text are entered, the sewing attributes will be set to those recommended for the selected fabric.
cc "Specifying sewing attributes" on page 54
a
•The sewing attributes of imported shapes and text are not changed.
•Perform a trial sewing before embroidering your project.
cc "For Basic Operations" on page 295
b
Original settings can be saved to be later used in
the [Fabric Selector]. Click |
in the [Sewing |
Attributes] tab, click [Save As], and then click [OK] without changing the name for the settings. The group of settings that you have saved will appear with “*” beside its name.
cc "Saving the settings in a list" on page 192
17
Basic Software Settings
Specifying Basic Display Settings
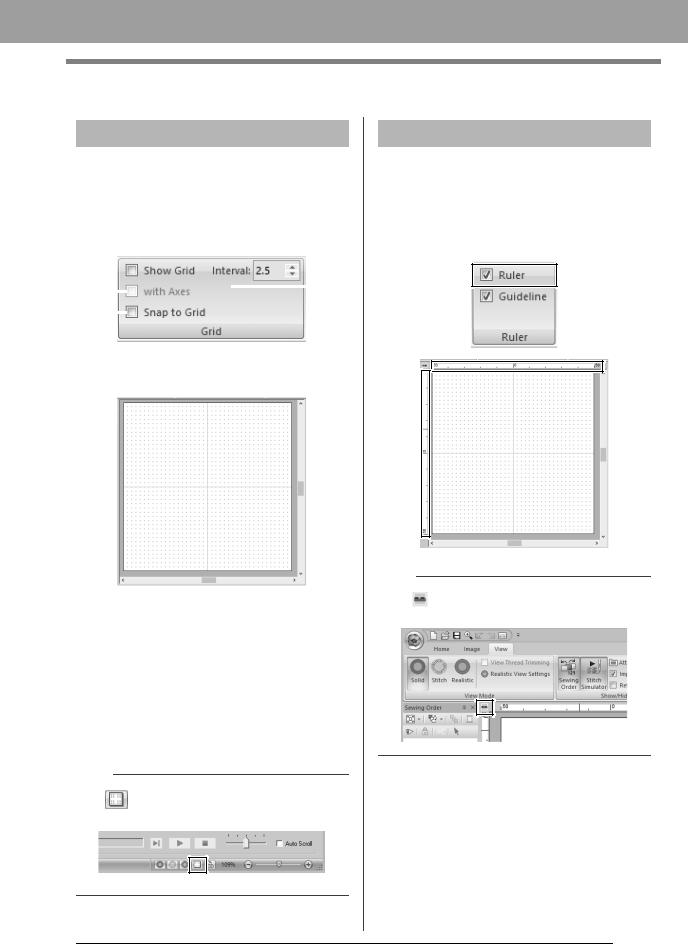
Changing the grid settings
A grid of dotted lines or solid lines can be displayed or hidden, and the spacing for the grid can be adjusted.
1Click [View] tab.
2Specify the grid settings.
a
b |
|
|
|
c |
|
|
|
||
|
|
|||
|
|
|
|
|
d |
|
|
|
|
|
|
|
|
aShow Grid
Select this check box to display the grid.
bwith Axes
Select this check box to display the grid as solid lines.
cInterval
Specify the grid spacing.
dSnap to Grid
Select this check box to align patterns with the grid. The snap feature works whether or not the grid is displayed.
b
The |
button can also be used to switch the |
grid between being displayed or hidden.
Changing the ruler settings
The ruler can be displayed or hidden.
1Click the [View] tab.
2To display the ruler, select the [Ruler] check box in the [Ruler] group.
To hide the ruler, clear the [Ruler] check box.
b
Click to switch the measurement units between millimeters and inches.
18
Basic Software Settings
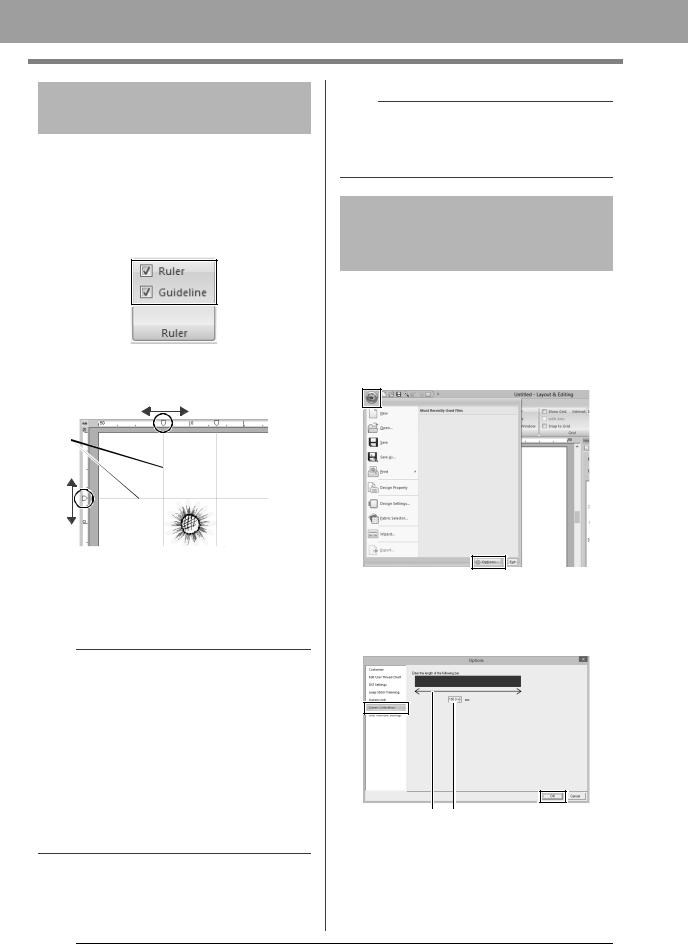
Changing the guideline settings
Guidelines can also be used when the ruler is displayed.
1Click the [View] tab.
2Select the [Ruler] check box, and then select the [Guideline] check box in the [Ruler] group.
3Click a ruler in the Design Page.
 appears, and a guideline is drawn.
1
1 Guideline
•To move a guideline, drag  .
.
•To delete a guideline, click  .
.
b
•A guideline is added each time the ruler is clicked. In addition, up to 100 guidelines each can be added to the horizontal and vertical rulers.
•While a guideline is being dragged, its position is shown in the status bar.
•When the [Ruler] check box or the [Guideline] check box is cleared, the guidelines are hidden.
•If both the [Show Grid] and [Snap to Grid] check boxes are selected, the guidelines will be added/moved along the lines of the grid.
cc "Changing the grid settings" on page 18
b
When a pattern is saved, the guidelines are saved with it. However, the guidelines are deleted if the pattern is saved in a format for a version earlier than version 10.
Adjusting on-screen measurements (Screen Calibration)
Measurements can be adjusted so that objects will be displayed at the same size as the actual embroidery at a zoom ratio of 100%. Once this adjustment is made, it will not need to be done again later.
1 Click  , then [Options].
2 Click [Screen Calibration]. Hold a ruler against the screen to measure the length of a. Next, enter the value at b, and then click
[OK].
a b
Be sure to enter the length in millimeters. A value in inches is invalid.
19
Basic Software Settings
System unit
1 Click  , then [Options].
2Click [System Unit], and then select the desired measurement units ([mm] or [inch]).
20

Basic Software Settings
21

Basic Layout & Editing Operations
This section describes the basic operations performed in Layout & Editing, such as drawing shapes, editing the embroidery design, specifying sewing attributes, saving the file and printing it.
Tutorial 1: Drawing shapes to create an embroidery design
Tutorial 1: Drawing shapes to create an embroidery design
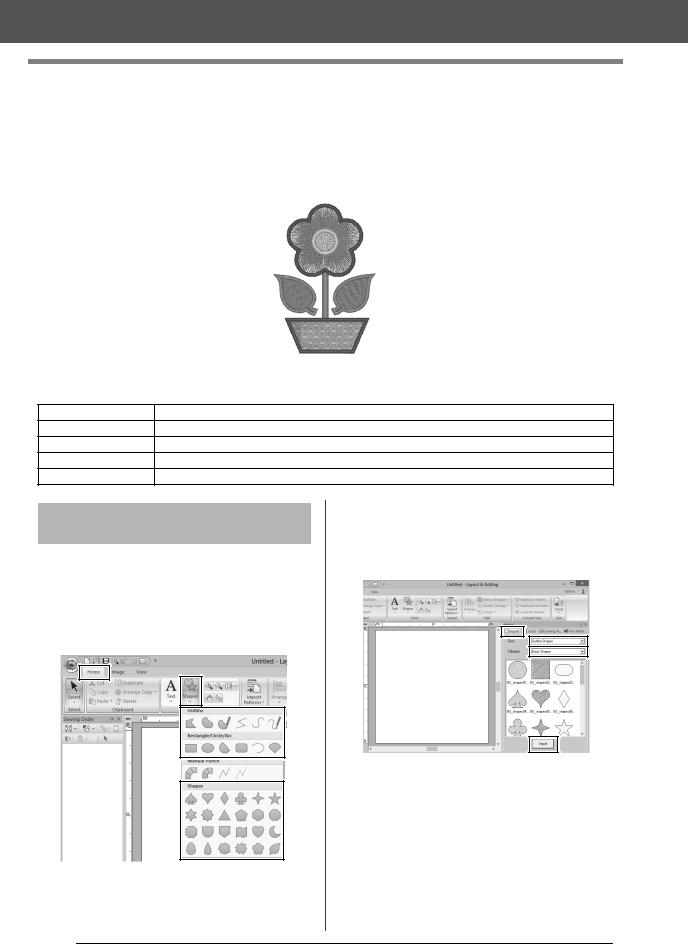
This section will describe how to combine various shapes to create an embroidery design.
We will use an Outline tool to draw the stem. Then, we will create the leaves, flower and flower pot by importing shape patterns.
The sample file for this tutorial is located at Documents (My documents)\PE-DESIGN 10\Tutorial\Tutorial_1.
Step 1 |
Drawing, importing and moving shapes |
Step 2 |
Duplicating, flipping and moving shapes |
Step 3 |
Specifying hole sewing |
Step 4 |
Applying a pattern to stitching |
Step 5 |
Editing points and modifying shapes |
Step 1 Drawing, importing and moving shapes
Shapes can be created either by drawing them with the Shapes tools or by importing sample shape patterns.
1To draw a shape, select a Shapes tool, and then drag the pointer in the Design Page to draw the shape.
1
2To import a shape, select [Outline Shapes] from the [From] selector of the [Import] pane, then [Basic Shapes] from the [Category] selector. Select the shape, and then click
[Import].
Specify the sew types for the shape on the [Shapes] tab, and the thread colors on the
[Shapes] tab or the [Color] pane.
1 Shapes tools
23

Tutorial 1: Drawing shapes to create an embroidery design
1 2
34
5 6
1 Line color button
2 Line sew type selector
3 Region color button
4 Region sew type selector
5 Selected thread color and color name
6 Thread color palette
1Draw the stem.
(A) Click the [Home] tab.
(B) Click [Shapes] in the [Tools] group, and then click  .
.
(C)Click the [Color] tab to display the color palette.
(D)Click [LIME GREEN].
If the desired color is not displayed, move the scroll bar until it appears.
b
To view the thread colors in a list so that the desired color can more easily be found, click [To list mode].
cc "Setting the sew type" on page 49
|
|
|
Basic |
|
(E) Click the [Line sew type] selector, and |
||||
Operations Editing & Layout |
||||
then select [Zigzag Stitch]. |
||||
|
|
|
||
|
|
|
||
|
|
|
||
(F)Click the start point 1, and then doubleclick the end point 2.
1
2
b
The color, sewing attributes and size can also be changed after the shape is drawn.
24
Tutorial 1: Drawing shapes to create an embroidery design
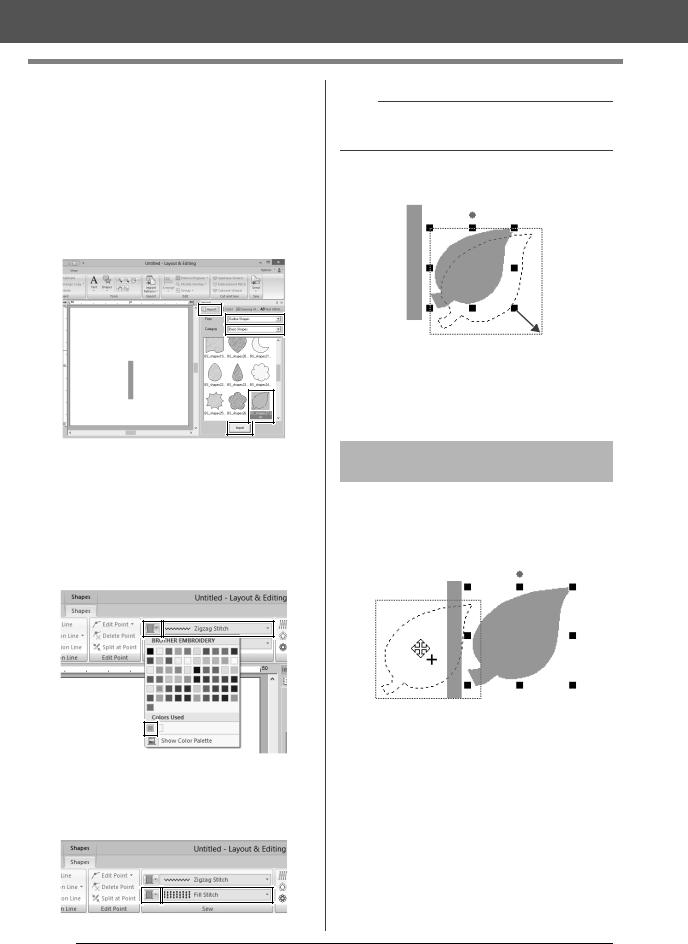
2Create the leaf on the right.
This time, we will import a shape pattern. We will also specify the color and sew type for the region.
(A)Click the [Import] tab.
(B)Select [Outline Shapes] from the [From] selector and [Basic Shapes] from the
[Category] selector.
(C)Select [BS_shapes27.pes], and then click [Import].
(D)Click the [Shapes] tab.
(E)Click  for line sewing, and then click
 under [Colors Used] to select [LIME GREEN].
(F)Click the [Line sew type] selector, and then select [Zigzag Stitch].
(G)As with the line color, click  for region
sewing, and then click  under [Colors Used] to select [LIME GREEN].
b
The thread colors being used are listed under
[Colors Used].
(H)Drag the handle to adjust the leaf to the desired size.
(I)Place the pointer over the leaf so that the
shape of the pointer changes to  , and then drag the leaf to the desired position.
Step 2 Duplicating, flipping and moving shapes
Now, we will duplicate the leaf on the right side, flip it horizontally, and then move it to the left side of the stem.
1 To duplicate the leaf on the right.
(A)Select the leaf.
(B)While holding down the <Ctrl> key, drag the leaf to move it.
(C)Release the mouse button.
25

Tutorial 1: Drawing shapes to create an embroidery design
2 To flip the duplicated leaf horizontally.
(A)Right-click on the duplicated leaf.A drop down menu will appear.
(B)Click [Flip], then [Horizontal].
3Drag the duplicated leaf to the left side of the stem.
b
To move an object horizontally, hold down the <Shift> key while dragging the object.
4 Align the leaves on the left and right sides.
(A)While holding down the <Ctrl> key, click the leaf on the right side, then the leaf on the left side to select the two leaves.
Then, right-click the selected leaves.
(B)Right-click the leaves, and then click
[Align], then [Top].
b
•Multiple embroidery patterns can be selected in any of the following ways.
Click the first pattern, and then, while holding down the <Ctrl> key, click the next pattern.
Drag the pointer to draw a selection frame around the patterns to be selected.
•Flipped copies can also be created by clicking
[Arrange Copy] in the [Clipboard] group of the [Home] tab, then clicking [Vertical Mirror Copy].
cc"Using the Mirror Copy tool" on page 35.
Step 3 Specifying hole sewing
Now, we will create the flower and a circle at the |
|
||||||
center. Then, we will apply a setting so that the |
Basic |
||||||
overlapping areas are not sewn twice. |
|||||||
1 Create the flower petals. |
|||||||
(A) |
click [Import]. |
&Layout |
|||||
Click the [Import] tab. |
|
||||||
(B) |
Select [BS_shapes26.pes], and then |
|
|||||
|
|
|
|
|
|
|
Operations Editing |
|
|
|
|
|
|
|
|
|
|
|
|
|
|
|
|
|
|
|
|
|
|
|
|
|
|
|
|
|
|
|
|
|
|
|
|
|
|
|
|
(C) Click the [Shapes] tab.
26
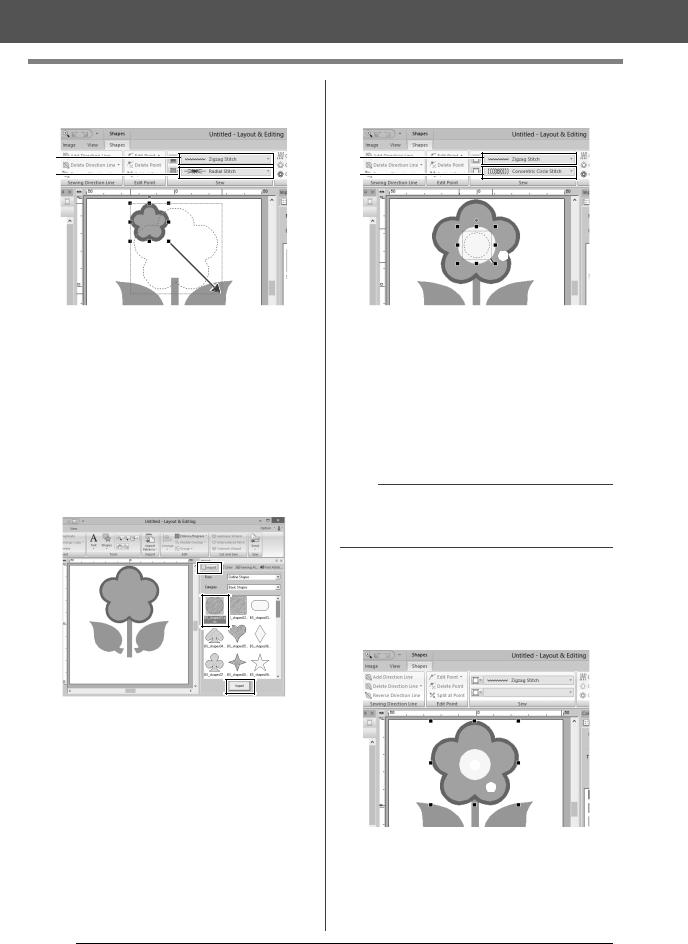
Tutorial 1: Drawing shapes to create an embroidery design
(D)Select [RED] in the color palette as the line color and [Zigzag Stitch] as the sew type a.
a b
c
(E) Select [Radial Stitch] as the sew type
b.
(F)Drag the handle (c) to adjust the flower petals to the desired size.
(G)Drag the flower petals to adjust their position.
2Create the circle at the center.
(A)Click the [Import] tab.
(B)Select [BS_shapes01.pes], and then click [Import].
(C) Click the [Shapes] tab.
(D)Select [YELLOW] in the color palette as the line color and [Zigzag Stitch] as the sew type a.
a b
 c
c
(E)Select [YELLOW] in the color palette as the region color and [Concentric Circle Stitch] as the sew type b.
(F)Drag the circle to the center of the flower petals.
(G)While holding down the <Shift> key, drag the handle (c) to adjust the circle to the desired size.
a
If the <Shift> key is held down while a handle is dragged, the pattern is enlarged or reduced from the center of the pattern.
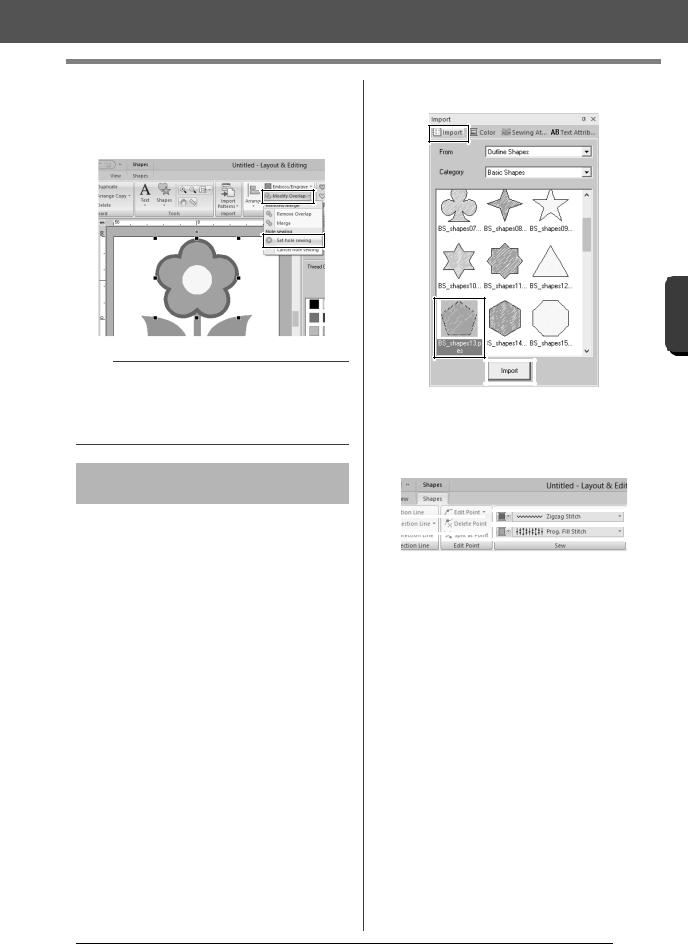
3Select the patterns where hole sewing is to be applied.
(A)While holding down the <Ctrl> key, click the yellow circle aand the flower petals
b.
a
b
27
Tutorial 1: Drawing shapes to create an embroidery design
4Specify hole sewing.
(A)Click the [Home] tab.
(B)Click [Modify Overlap] in the [Edit] group, and then click [Set hole sewing].
a
Hole sewing cannot be applied if one of the patterns is not completely enclosed within the other pattern.
cc "Hole sewing" on page 39.
Step 4 Applying a pattern to stitching
Detailed line and region attribute settings can be specified from the [Sewing Attributes] pane. Now, we will specify settings for region sewing for the flowerpot.
1Specify the color and sew type for the line and region of the flowerpot.
(A)Click the [Import] tab.
(B)Select [BS_shapes13.pes], and then click [Import].
|
|
|
|
|
|
|
Basic |
|
|
|
|
|
|
|
|
|
(C) |
Click the [Shapes] tab. |
Layout |
||||
|
(D) |
Select [CLAY BROWN] in the color |
|||||
|
|
||||||
|
|
palette as the line color and [Zigzag |
& |
||||
|
|
Stitch] as the sew type a. |
|||||
|
|
Editing |
|||||
a |
|
|
|
|
|
|
|
|
|
|
|
|
|
Operations |
|
b |
|
|
|
|
|
|
|
|
|
|
|
|
|
||
|
|
|
|
|
|
|
|
|
(E) |
Select [DEEP GOLD] in the color palette |
|
||||
|
|
as the region color and [Prog. Fill Stitch] |
|
||||
|
|
as the sew type b. |
|
||||
28
Tutorial 1: Drawing shapes to create an embroidery design
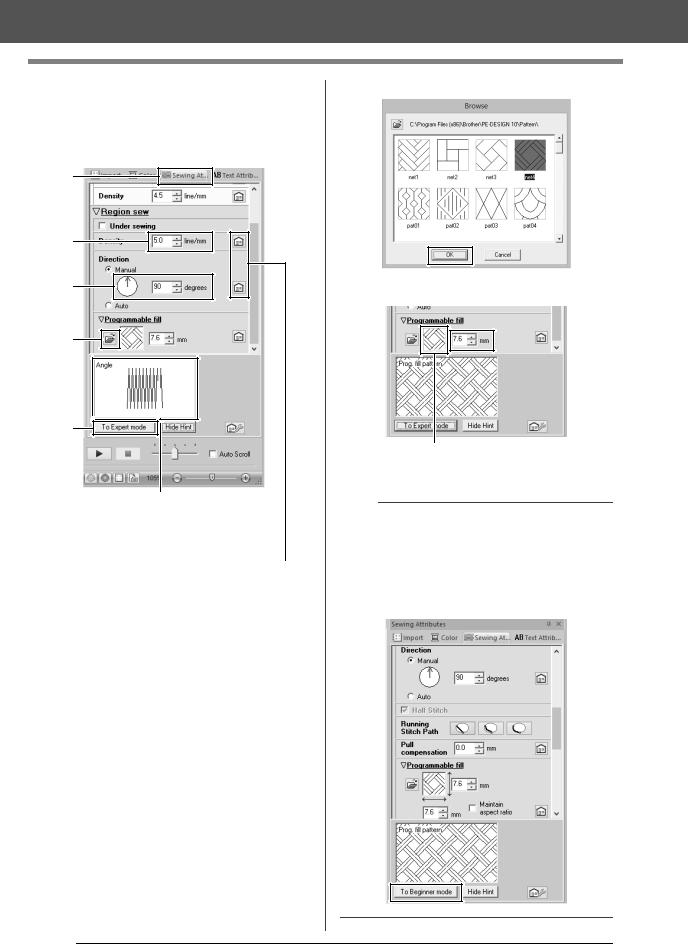
2Specify the sewing attributes.
(A)Click the [Sewing Attributes] tab.
If the [Sewing Attributes] pane is not displayed, click the [View] tab, then
[Attributes], then [Sewing Attributes].
(A)
(C)
(D)
(E)
(B)
The effects of the specified settings can be previewed. This preview can be displayed/hidden by clicking the Show Hint/Hide Hint button.
Click this button to return the attribute to its default setting.
(B)There are two display modes for the
[Sewing Attributes] pane. For this example, we will specify settings in Beginner mode.
(C)In the [Density] box, type "5.0".
(D)In the [Direction] section, drag the red arrow to 90°. Otherwise, type "90".
(E)Click  in the [Programmable fill] section.
(F) Select [net4], and then click [OK].
(G) Type "7.6" to specify the pattern size.
1
1 The selected pattern is displayed.
b
•If the dialog box is displayed in Expert mode, click [To Beginner mode] to display the dialog box in Beginner mode.
•More detailed settings can be specified in Expert mode.
cc "Specifying sewing attributes" on page 54
29
 Loading...