


 Loading...
PD-3000
INSTRUCTION MANUAL
Please read this manual before using the machine.
Please keep this manual within easy reach for quick reference.
PROGRAMMER

Thank you very much for buying a BROTHER sewing machine. Before using your new machine, please read the safety instructions below and the explanations given in the instruction manual.
With industrial sewing machines, it is normal to carry out work while positioned directly in front of moving parts such as the needle and thread take-up, and consequently there is always a danger of injury that can be caused by these parts. Follow the instructions from training personnel and instructors regarding safe and correct operation before operating the machine so that you will know how to use it correctly.
SAFETY INSTRUCTIONS
1. Safety indications and their meanings
This instruction manual and the indications and symbols that are used on the machine itself are provided in order to ensure safe operation of this machine and to prevent accidents and injury to yourself or other people.
Indications
WARNING |
The instructions which follow this term indicate situations where failure to follow the |
instructions can result in severe injury or death. |
|
|
|
CAUTION |
The instructions which follow this term indicate situations where failure to follow the |
instructions could cause injury when using the machine or physical damage to |
|
|
equipment and surroundings. |
Symbols |
|
 · · · · ·
 · · · · ·
 · · · · ·
This symbol (  ) indicates something that you should be careful of. The picture inside the triangle indicates the nature of the caution that must be taken.
(For example, the symbol at left means “beware of injury”.)
This symbol (  ) indicates something that you must not do.
This symbol (  ) indicates something that you must do. The picture inside the circle indicates the nature of the thing that must be done.
(For example, the symbol at left means “you must make the ground connection”.)
i |
PD-3000 |
2. Notes on safety
 WARNING
Basic precautions
|
Do not disassemble or modify the programmer, |
|
If the programmer is subjected to a strong force |
||||||
|
otherwise it may cause fire or electric shocks or |
|
such as by being dropped or stepped on, it may |
||||||
|
problems with correct operation. |
|
become damaged. |
|
|
|
|
||
|
|
|
|
|
|
||||
|
|
|
|
|
|||||
|
Ask the place of purchase or a qualified technician to |
|
If you continue to use the programmer while it is |
||||||
|
carry out any internal inspections, adjustments or |
|
damaged, it may result in fire or electric shocks. |
If |
|||||
|
repairs that may be required. |
|
the programmer becomes damaged, immediately |
||||||
|
(Any problems with correct operation that occur as a |
|
disconnect |
it |
from |
the sewing |
machine |
(or |
|
|
|
disconnect the AC adapter from the wall outlet) and |
|||||||
|
result of the customer attempting to disassemble or |
|
|||||||
|
|
contact the |
place |
of purchase |
or |
a qualified |
|||
|
modify the programmer will not be covered by the |
|
|||||||
|
|
technician. |
|
|
|
|
|
|
|
|
warranty.) |
|
|
|
|
|
|
|
|
|
|
|
|
|
|
|
|
|
|
|
The bag that the programmer came in should be |
|
Do not insert objects such as screwdrivers into the |
||||||
|
|
AC adapter jack or the CF card slot, otherwise it |
|||||||
|
kept out of the reach of children or disposed of |
|
|||||||
|
safely. Young children may risk suffocation if they |
|
may case fire or electric shocks or problems with |
||||||
|
|
correct operation. |
|
|
|
|
|||
|
place it over their head while playing with it. |
|
|
|
|
|
|||
|
|
|
|
|
|
||||
|
|
|
|
|
|
|
|
|
|
|
Do not handle the programmer or connector for the |
|
Disconnect |
the |
AC |
adapter from |
the |
wall outlet |
|
sewing machine or the AC adapter with wet hands, |
|
before disconnecting the AC adapter plug from the |
|
programmer, otherwise it may cause electric shocks |
|
otherwise it may cause electric shocks. |
|
|
|
or problems with correct operation. |
|
|
|
Installation
|
|
Do not use any AC adapter other than the one from |
|
Do not damage or process the connection cable for |
|
|
Brother, otherwise it may cause fire or electric |
|
the sewing machine or the AC adapter cable, or |
|
|
shocks or problems with correct operation. |
|
place heavy objects such as furniture on top of them |
|
|
|||
|
|
|
|
or bend or pull them with excessive force, otherwise |
|
|
|
|
it may cause fire or electric shocks or problems with |
|
|
When using the AC adapter, do not use any voltage |
|
correct operation. |
|
|
other than the specified voltage, otherwise it may |
|
|
|
|
cause fire or electric shocks or problems with correct |
|
|
|
|
|
|
|
|
|
operation. |
|
|
During use
|
If a foreign object gets inside the programmer, |
|
Do not use the programmer if a problem is noticed |
|
immediately disconnect it from the sewing machine |
|
such as smoke or a bad odor coming from the |
|
(or disconnect the AC adapter from the wall outlet) |
|
programmer, otherwise it may cause fire or electric |
|
|
||
|
and contact the place of purchase or a qualified |
|
shocks or problems with correct operation. |
|
technician. If you continue to use the programmer |
|
Immediately disconnect the programmer from the |
|
while there is a foreign object inside it, may result in |
|
sewing machine (or disconnect the AC adapter from |
|
fire or electric shocks or problems with correct |
|
the wall outlet) and contact the place of purchase or |
|
operation. |
|
a qualified technician. |
|
Do not allow water or oil to get onto the programmer, |
|
(The programmer must never be repaired by the |
|
otherwise it may cause fire or electric shocks or |
|
customer, as it can be extremely dangerous to do |
|
problems with correct operation. |
|
so.) |
|
|||
|
If any liquids get onto the programmer, immediately |
|
|
|
disconnect it from the sewing machine (or |
|
|
|
disconnect the AC adapter from the wall outlet) and |
|
|
|
contact the place of purchase or a qualified |
|
|
|
technician. |
|
|
PD-3000 |
ii |
 CAUTION
Environmental requirements
Use the programmer and the sewing machine in |
The ambient temperature should be within the |
|
an area which is free from sources of strong |
range of 5°C to 35°C during use and storage. |
|
electrical noise such as electrical line noise or |
Temperatures which are lower or higher than this |
|
static electric noise. |
may cause problems with correct operation of the |
|
Sources of strong electrical noise may cause |
programmer and the sewing machine. |
|
problems with correct operation of the programmer |
The relative humidity should be within the range of |
|
and the sewing machine. |
||
45% to 85% during use and storage, and no dew |
||
Any fluctuations in the power supply voltage |
||
formation should occur in any devices. |
||
should be within ±10% of the rated voltage for the |
Excessively dry or humid environments and dew |
|
machine. |
formation may cause problems with correct |
|
Voltage fluctuations which are greater than this |
operation of the programmer and the sewing |
|
may cause problems with correct operation of the |
machine. |
|
programmer and the sewing machine. |
In the event of an electrical storm, turn off the power |
|
The power supply capacity should be greater than |
||
and disconnect the power cord from the wall outlet. |
||
the requirements for the equipment’s power |
Lightning may cause problems with correct |
|
consumption. |
operation of the programmer and the sewing |
|
Insufficient power supply capacity may cause |
machine. |
|
problems with correct operation of the programmer |
|
|
and the sewing machine. |
|
Installation
Do not place the programmer on unstable |
Turn off the power switch before connecting and |
|||||
surfaces such as unsteady tables or high |
disconnecting the connector for the sewing |
|||||
shelves, otherwise it may tip over or fall down |
machine, otherwise it may damage the programmer |
|||||
and cause injury. |
|
|
|
and the control box. |
||
|
|
|
|
|||
Do not place |
heavy objects |
on top of the |
Be sure to disconnect the connector for the sewing |
|||
programmer, |
otherwise |
it |
may |
become |
||
machine when using the AC adapter, otherwise it |
||||||
unbalanced and tip over |
or |
fall |
down and |
|||
may cause problems with correct operation of the |
||||||
cause injury. |
|
|
|
|
||
|
|
|
|
programmer. |
||
During use
The programmer and the sewing machine |
When finished with creating programs, |
|||||
should only be used by operators who have |
disconnect the connector for the sewing |
|||||
received proper training. |
machine and store the programmer in a safe |
|||||
Be sure to wear protective goggles when using |
place. |
|
|
|
|
|
If the sewing machine is operated while the |
||||||
the sewing machine. |
||||||
programmer is still sitting |
on the |
work |
table, |
|||
If goggles are not worn, there is the danger |
||||||
the programmer may |
fall |
down |
and |
cause |
||
that if a needle breaks, parts of the broken |
||||||
injury, or damage to |
the |
programmer may |
||||
needle may enter your eyes and injury may |
||||||
result. |
|
|
|
|
||
result. |
|
|
|
|
||
|
|
|
|
|
||
If a problem occurs with the operation of the programmer or the sewing machine , contact the place of purchase or a qualified technician.
iii |
PD-3000 |

CONTENTS
Chapter 1 Read Me.............................................................. |
1 |
Confirming the contents of the box ................................................... |
2 |
Contents and usage ............................................................................ |
3 |
Chapter 2 Setting Up Your Programmer ........................... |
5 |
Part names and functions ................................................................... |
6 |
Features.............................................................................................. |
7 |
Stitch length................................................................................................. |
7 |
Stitch count .................................................................................................. |
7 |
Basic operation .................................................................................. |
7 |
Connecting the programmer to the sewing machine ................................... |
8 |
Turning the power on................................................................................... |
8 |
Turning the power off.................................................................................. |
9 |
When using the programmer alone............................................................ |
10 |
Precautions on disassembly, assembly, and part replacement................... |
10 |
Making initial settings ...................................................................... |
11 |
Making environment settings .......................................................... |
12 |
Functional overview of PD-3000..................................................... |
13 |
Notes on pattern sheet...................................................................... |
13 |
About pattern sheet.................................................................................... |
13 |
Handling media................................................................................ |
14 |
Handling CF cards..................................................................................... |
14 |
Handling floppy disks................................................................................ |
16 |
Applicable types of media ......................................................................... |
17 |
Setting a medium....................................................................................... |
18 |
Protecting data in floppy disks .................................................................. |
20 |
Chapter 3 Programming with Icons................................. |
21 |
Programming with icons.................................................................. |
22 |
Keys to be used.......................................................................................... |
22 |
Making environment settings .................................................................... |
23 |
Programming screen.................................................................................. |
24 |
Description of icons................................................................................... |
24 |
Procedure for programming with icons........................................... |
29 |
Programming example..................................................................... |
32 |
Programming for each stitch ..................................................................... |
32 |
Programming a detailed pattern for each stitch (magnified input)............ |
33 |
Pattern with lines ....................................................................................... |
33 |
Pattern with curves .................................................................................... |
34 |
Double stitch.............................................................................................. |
35 |
Continuous sewing with the work clamp in position after thread |
|
trimming (feed).......................................................................................... |
36 |
Basting....................................................................................................... |
37 |
Symmetrical pattern................................................................................... |
38 |
Programming different patterns by splitting each in sequence (split)....... |
39 |
Zigzag stitch .............................................................................................. |
40 |
Multiple stitch............................................................................................ |
41 |
Programming tracing according to a pattern ............................................. |
43 |
Procedure for modifying program ................................................... |
44 |
Example of modified program......................................................... |
46 |
Resizing a pattern ...................................................................................... |
46 |
Modifying a part of pattern........................................................................ |
47 |
Deleting the first stitch to change the sewing start point to the position |
|
of the second stitch .................................................................................... |
49 |
Moving the sewing start point ................................................................... |
50 |
Adding a new sewing start point before the first stitch............................. |
51 |
Adding an escape point before the sewing start point............................... |
52 |
Moving the escape point............................................................................ |
54 |
Deleting the escape point........................................................................... |
55 |
Moving the pattern in parallel |
|
(when the first stitch is the sewing start point).......................................... |
56 |
Moving the pattern in parallel (when the first stitch is the escape point).. |
56 |
Deleting a part of data during programming ............................................. |
58 |
Moving a part of a continuous program in paralle .................................... |
59 |
Moving a part of a continuous program in parallel partially..................... |
60 |
Not trimming thread at the last stitch ........................................................ |
61 |
Programming ..................................................................... |
62 |
Creating a line............................................................................ |
62 |
|
PD-3000 |
Creating a curve ........................................................................ |
62 |
Creating a circle............................................. |
63 |
Creating an arc .......................................................................... |
64 |
Creating a semicircle................................................................. |
64 |
Creating a zigzag stitch ............................................................. |
65 |
Creating a zigzag circle.................................... |
65 |
Creating double stitch.................................... |
67 |
Creating a multiple stitch .......................................................... |
68 |
Creating needle drop data.......................................................... |
68 |
Creating feed data...................................................................... |
68 |
Creating basting data................................................................. |
69 |
Creating trace data..................................................................... |
69 |
Checking the program setting and setting attribute................... |
69 |
Editing the current program ...................................................... |
70 |
Deleting a part of current data................................................... |
72 |
Creating a stop stitch ................................................................. |
73 |
Creating code...................................................................... |
74 |
Making out thread trimming ..................................................... |
74 |
Setting out option output........................................................... |
74 |
Low-speed sewing..................................................................... |
74 |
Creating split data...................................................................... |
75 |
Basting....................................................................................... |
75 |
Changing the height of the presser foot .................................... |
76 |
Changing the thread tension...................................................... |
76 |

|
Inputting the trigger ................................................................... |
76 |
|
Ending programming................................................................. |
77 |
|
Checking the program setting and setting |
|
attributes ......................................................................................... |
|
78 |
Checking each stitch.................................................................................. |
79 |
|
Checking a series of stitches automatically............................................... |
79 |
|
Skipping..................................................................................................... |
|
79 |
Editing program ................................................................ |
81 |
|
If |
is selected ............................................................................... |
81 |
If |
is selected................................................... |
82 |
If |
is selected .............................................................................. |
82 |
If |
is selected .............................................................................. |
83 |
If |
is selected ............................................................................... |
84 |
If |
is selected ............................................................................... |
84 |
If |
is selected .............................................................................. |
85 |
If |
is selected .............................................................................. |
85 |
If |
is selected ............................................................................... |
85 |
If |
is selected ............................................................................... |
85 |
Deleting program being created/edited ............................. |
86 |
|
Chapter 4 Programming with Commands ....................... |
87 |
|
Programming with commands ........................................................ |
88 |
|
Keys to be used.......................................................................................... |
88 |
|
Programming screen.................................................................................. |
89 |
|
Description of Commands .............................................................. |
90 |
|
Procedure for programming with commands.................................. |
94 |
|
Programming example.................................................................... |
95 |
|
Programming for each stitch ..................................................................... |
95 |
|
Programming a detailed pattern for each stitch (magnified input)............ |
96 |
|
Pattern with lines ....................................................................................... |
96 |
|
Pattern with curves .................................................................................... |
97 |
|
Double stitch.............................................................................................. |
98 |
|
Continuous sewing with the work clamp in position after thread |
|
|
trimming (feed).......................................................................................... |
99 |
|
Basting..................................................................................................... |
|
100 |
Symmetrical pattern................................................................................. |
101 |
|
Programming multiple patterns by splitting each in sequence (split) ..... |
102 |
|
Zigzag stitch ............................................................................................ |
103 |
|
Multiple stitch.......................................................................................... |
104 |
|
Programming by tracing a pattern (trace)................................................ |
106 |
|
Procedure for modifying program ................................................ |
107 |
|
Example of modified program...................................................... |
108 |
|
Resizing a pattern .................................................................................... |
109 |
|
Modifying a part of pattern...................................................................... |
110 |
|
Deleting the first stitch to change the second stitch to the sewing start |
|
|
point......................................................................................................... |
|
111 |
Moving the sewing start point ................................................................. |
112 |
|
Adding a new sewing start point before the first stitch........................... |
113 |
|
Adding an escape point before the sewing start point............................. |
114 |
|
Moving the escape point.......................................................................... |
115 |
|
Deleting the escape point ......................................................................... |
116 |
Moving the pattern in parallel |
|
(when the first stitch is the sewing start point) ........................................ |
116 |
Moving the pattern in parallel |
|
(when the first stitch is the escape point)................................................. |
117 |
Deleting a part of data during programming............................................ |
118 |
Moving a part of continuous program in parallel .................................... |
119 |
Not trimming thread at the last stitch....................................................... |
119 |
Programming................................................................................. |
120 |
Creating a line ......................................................................................... |
120 |
Creating a curve ...................................................................................... |
121 |
Creating a circle ...................................................................................... |
121 |
Creating an arc ........................................................................................ |
123 |
Creating a semicircle............................................................................... |
124 |
Creating a zigzag stitch ........................................................................... |
125 |
Creating a multiple stitch ........................................................................ |
126 |
Creating double stitch ............................................................................. |
128 |
Creating a parallel stitch ......................................................................... |
129 |
Creating an offset .................................................................................... |
130 |
Creating feed data ................................................................................... |
130 |
Creating split data ................................................................................... |
131 |
Creating magnified data.......................................................................... |
131 |
Low-speed sewing................................................................................... |
132 |
Setting the option output ......................................................................... |
132 |
Setting the height of presser foot ............................................................ |
132 |
Ending programming .............................................................................. |
133 |
Editing program............................................................................. |
134 |
Moving a pattern symmetrically to the Y-axis ........................................ |
134 |
Moving a pattern symmetrically to the X-axis........................................ |
135 |
Moving a pattern symmetrically to a point ............................................. |
135 |
Rotating a pattern clockwise (counterclockwise) ................................... |
136 |
Copying a rotated pattern rotated clockwise (counterclockwise) ........... |
137 |
Resizing a pattern.................................................................................... |
138 |
Copying a pattern resized........................................................................ |
139 |
Repeated copying.................................................................................... |
140 |
Copying a pattern symmetrically to a point............................................ |
140 |
Copying a pattern symmetrically to the X-axis ...................................... |
140 |
Copying a pattern symmetrically to the Y-axis ....................................... |
141 |
Turnover.................................................................................................. |
141 |
Moving in parallel................................................................................... |
141 |
Deleting data being created/edited ................................................ |
142 |
Deleting a part of data............................................................................. |
142 |
Deleting program data............................................................................. |
142 |
Checking the program setting and setting attribute ....................... |
143 |
Chapter 5 Extended Option Output ............................... |
145 |
Function of the extended option output......................................... |
146 |
Opening the extended option output setting screen ................................ |
146 |
Items which can be set in the extended option output ............................ |
147 |
Setting details of the extended option output .................. |
147 |
Setting enabling conditions ............................................. |
148 |
Reading the extended option output data......................... |
148 |
Saving the extended option output data........................... |
149 |
Deleting the extended option output data ........................ |
149 |
Table of condition number............................................................. |
150 |
Mode for operating the sewing machine................................................. |
150 |
Standard input ......................................................................................... |
150 |
Standard output ....................................................................................... |
150 |
External input of the extended option..................................................... |
151 |
Extended option output ........................................................................... |
151 |
Table of extended option input................................................................ |
152 |
Table of extended option output.............................................................. |
153 |
Examples of the extended option output................................................. |
154 |
Use of extended option output (Basics)......................................... |
157 |
Use of extended option output (Application) ................................ |
164 |
Use of extended option output (Reference material)..................... |
170 |
PD-3000

Chapter 6 Reading/Saving/Deleting Program and |
|
Formatting Media.......................................... |
173 |
Procedures for reading/saving/deleting program and |
|
formatting media............................................................................ |
174 |
Reading program............................................................................ |
175 |
Reading program ..................................................................... |
175 |
Reading additional program .................................................... |
176 |
Reading program in a different format .................................... |
177 |
Saving program.............................................................................. |
178 |
Saving program........................................................................ |
178 |
Chapter 7 Checking/Copying/Moving/ |
|
Changing Program ........................................ |
183 |
Checking program .......................................................................... |
184 |
Displaying program information............................................................. |
184 |
Selecting a program display method....................................................... |
184 |
Displaying detailed information of a file ................................................ |
187 |
Copying/moving/deleting program/renaming a file................................ |
188 |
Chapter 8 Displaying Sewing Machine Program .......... |
191 |
Displaying sewing machine program............................................. |
192 |
Displaying sewing machine program...................................................... |
192 |
Chapter 9 Displaying a Clock ......................................... |
193 |
Displaying a clock .......................................................................... |
194 |
Displaying a clock................................................................................... |
194 |
Selecting a clock display method............................................................ |
194 |
Setting a clock......................................................................................... |
195 |
Deleting program ........................................................................... |
179 |
Deleting program saved on a medium..................................... |
179 |
Formatting media........................................................................... |
181 |
Formatting media..................................................................... |
181 |
PD-3000
Additional Information....................................................... |
197 |
Upgrade .......................................................................................... |
198 |
Troubleshooting.............................................................................. |
198 |
Memory switch setting display function ........................................ |
199 |
Error log display function............................................................... |
200 |
Spare parts ...................................................................................... |
201 |
PD-3000
Chapter 1
Read Me
PD-3000

CHAPTER 1 READ ME
Confirming the contents of the box
Open the box and make sure all the following items are in it.
1. Programmer main unit |
2. Basic operation manual |
3. Document CD |
|
|
(Manual CD-ROM) |
2 |
PD-3000 |
CHAPTER 1 READ ME
Contents and usage
This document is organized as follows.
Chapter 1 Read Me
Describes general precautions.
Chapter 2 Setting Up Your Programmer
Describes how to set up your programmer and its basic operations.
Chapter 3 Programming with Icons (PROGRAM)
Describes how to create programs with icons. It is recommended for persons
•who are familiar with icon entry,
•who use this sewing machine for the first time, and
•who sometimes create programs.
Chapter 4 Programming with Commands (PROGRAM)
Describes how to create programs with commands consisting of numerics and characters. It is recommended for persons
•who is specially responsible for program creation, and
•who have created programs for BAS-300 series.
Chapter 5 Extended Option Output (PROGRAM)
Describes how to set the extended option output.
Chapter 6 Reading/Saving/Deleting Program and Formatting Media (PROGRAM)
Describes how to read, save, and delete program data, and format media.
Chapter 7 Checking/Copying/Moving/Changing Program (FILE)
Describes how to check, copy, move, and change program data.
Chapter 8 Displaying Sewing Machine Program (PANEL)
Describes how to display program of the sewing machine.
Chapter 9 Displaying a Clock (CLOCK)
Describes how to display and set a clock.
Additional Information
PD-3000 |
3 |
CHAPTER 1 READ ME
4 |
PD-3000 |
Chapter 2
Setting Up Your Programmer
PD-3000
CHAPTER 2 SETTING UP YOUR PROGRAMMER
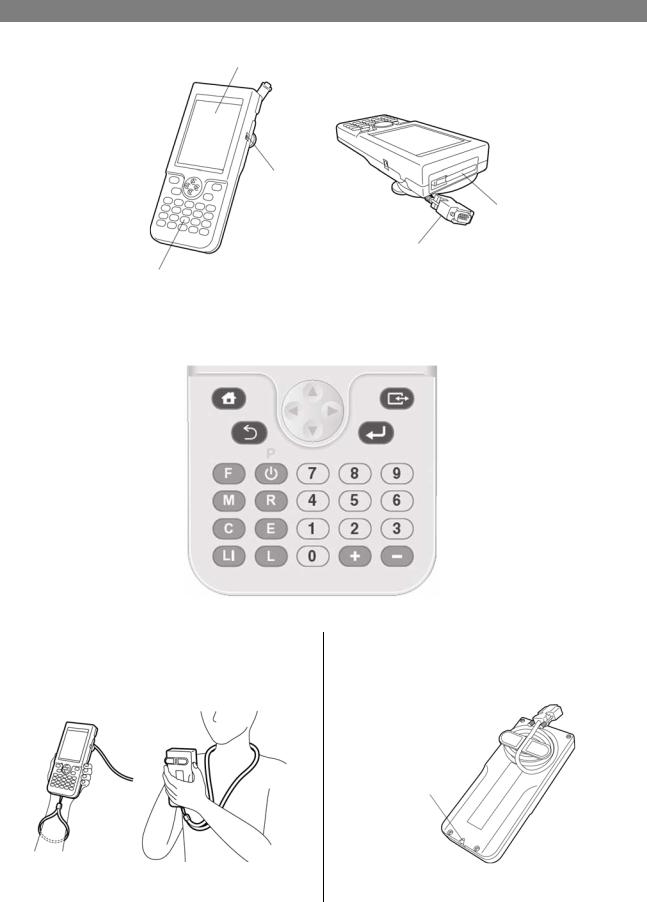
Part names and functions
Display panel
Displays a program image and messages being programmed.
AC adapter jack
CF card slot
Connector
Operation panel
Press these keys for operation.
Operation panel key
|
|
|
|
|
JOG key |
|||||
HOME key |
|
|
|
|
|
|
|
|
DISP key |
|
|
|
|
|
|
|
|
|
|||
|
|
|||||||||
BACK key |
|
|
|
|
|
|
|
|
|
ENTER key |
|
|
|
|
|
|
|
|
|
||
P key |
|
|
|
|
|
|
|
|
|
|
|
|
|
|
|
|
|
|
|
|
|
|
|
|
|
|
|
|
|
|
|
|
Example of the use of a strap
A strap is not provided as a standard accessory.
After use
Wind the cable as shown in the figure.
Hole for a strap
After using the programmer, keep it in a safe place.
6 |
PD-3000 |
CHAPTER 2 SETTING UP YOUR PROGRAMMER
Features
Stitch length
Can be set in the range 0.3 to 12.7 mm
Stitch count
The maximum stitch count per data is 20,000. (The sewing machine can hold 512 patterns and the CF card can hold 900 patterns. The holdable number of patterns created using a large number of stitches per data may be less.)
Basic operation
 WARNING
Do not handle the programmer or connector for the sewing machine or the AC adapter with wet hands, otherwise it may cause electric shocks.
Do not insert objects such as screwdrivers into the AC adapter jack or the CF card slot, otherwise it may case fire or electric shocks or problems with correct operation.
Do not use any AC adapter other than the one from Brother, otherwise it may cause fire or electric shocks or problems with correct operation.
When using the AC adapter, do not use any voltage other than the specified voltage, otherwise it may cause fire or electric shocks or problems with correct operation.
If a foreign object gets inside the programmer, immediately disconnect it from the sewing machine (or disconnect the AC adapter from the wall outlet) and contact the place of purchase or a qualified technician. If you continue to use the programmer while there is a foreign object inside it, may result in fire or electric shocks or problems with correct operation.
Disconnect the AC adapter from the wall outlet before disconnecting the AC adapter plug from the programmer, otherwise it may cause electric shocks or problems with correct operation.
Do not damage or process the connection cable for the sewing machine or the AC adapter cable, or place heavy objects such as furniture on top of them or bend or pull them with excessive force, otherwise it may cause fire or electric shocks or problems with correct operation.
Do not use the programmer if a problem is noticed such as smoke or a bad odor coming from the programmer, otherwise it may cause fire or electric shocks or problems with correct operation.
Immediately disconnect the programmer from the
sewing machine (or disconnect the AC adapter from the wall outlet) and contact the place of purchase or a qualified technician.
(The programmer must never be repaired by the customer, as it can be extremely dangerous to do so.)
 CAUTION
Do not place the programmer on unstable surfaces |
Turn off the power switch before connecting and |
|
such as unsteady tables or high shelves, otherwise |
disconnecting the connector for the sewing |
|
it may tip over or fall down and cause injury. |
machine, otherwise it may damage the programmer |
|
Do not place heavy objects on top of the |
and the control box. |
|
Be sure to disconnect the connector for the sewing |
||
programmer, otherwise it may become unbalanced |
||
and tip over or fall down and cause injury. |
machine when using the AC adapter, otherwise it |
|
The programmer and the sewing machine should |
may cause problems with correct operation of the |
|
programmer. |
||
only be used by operators who have received |
||
When finished with creating programs, disconnect |
||
proper training. |
||
|
the connector for the sewing machine and store the |
|
|
programmer in a safe place. |
|
|
If the sewing machine is operated while the |
|
|
programmer is still sitting on the work table, the |
|
|
programmer may fall down and cause injury, or |
|
|
damage to the programmer may result. |
PD-3000 |
7 |
CHAPTER 2 SETTING UP YOUR PROGRAMMER
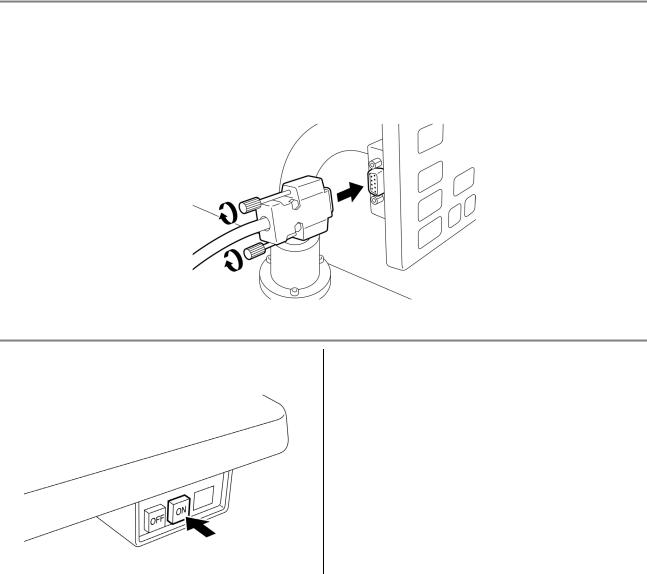
Connecting the programmer to the sewing machine
This section describes how to connect the programmer to the sewing machine.
Check that the sewing machine is off before connecting the cable.
1.Connect the cable to the connector on the left side of the operation panel. Fasten the screws securely.
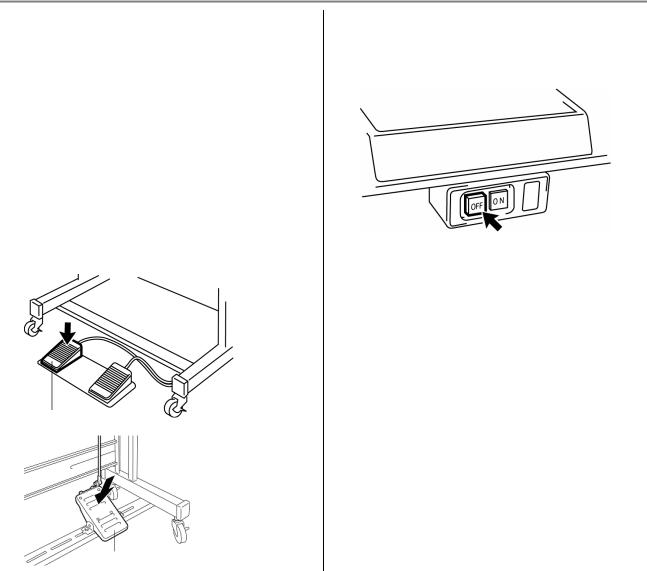
Turning the power on
1. Switch on the sewing machine. |
2. Set a pattern sheet. |
For preventing the pattern sheet from moving, secure it by using adhesive tape.
3. Press  of the programmer.
8 |
PD-3000 |
CHAPTER 2 SETTING UP YOUR PROGRAMMER
Turning the power off
1.Write the program of the programmer to a medium.
See "Saving program" (page 178).
If there is no need to save the program, delete it.
See "Deleting program saved on a medium" (page 179).
2.Press  of the programmer.
The panel is turned off.
3.Press the foot switch pedal to raise the work clamp.
4.Remove the pattern sheet.
5.Switch off the sewing machine.
Foot switch pedal
Foot switch pedal
PD-3000 |
9 |
CHAPTER 2 SETTING UP YOUR PROGRAMMER
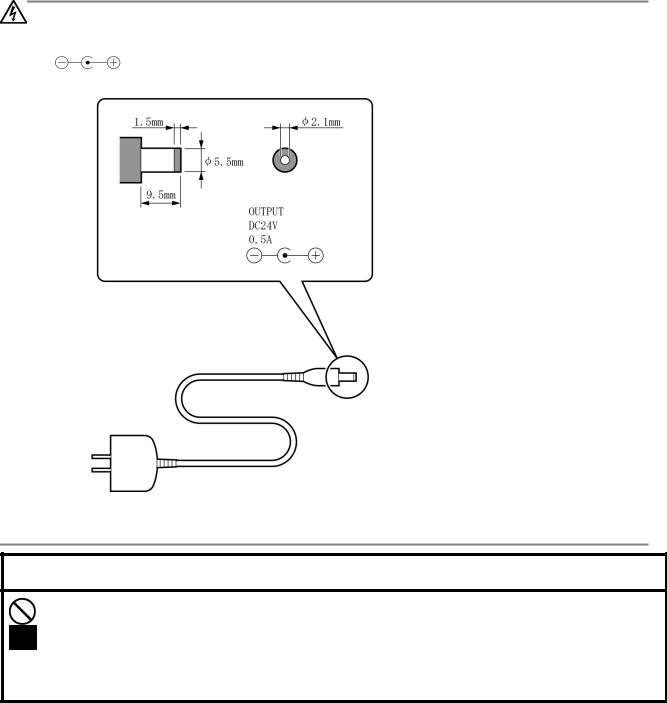
When using the programmer alone
Purchase an AC adaptor conforming to the specifications below.
OUTPUT: 24 VDC, 0.5A
Polarity:
Precautions on disassembly, assembly, and part replacement
 WARNING
Do not disassemble or modify the programmer, otherwise it may cause fire or electric shocks or problems with correct operation.
Ask the place of purchase or a qualified technician to carry out any internal inspections, adjustments or repairs that may be required.
(Any problems with correct operation that occur as a result of the customer attempting to disassemble or modify the programmer will not be covered by the warranty.)
•For preventing the internal wiring from being damaged, considerable care must be taken when assembling and disassembling the case.
•For preventing the internal wiring from getting caught in the case or other parts, care must be taken when assembling the case.
•Be sure to use a torque of 0.5 N/m when tightening screws.
Using excessive torque may damage the case.
10 |
PD-3000 |

CHAPTER 2 SETTING UP YOUR PROGRAMMER
Making initial settings
If the following menu is displayed at power-up, make an entry at every item by using  and the numeric keys.
When the setting has been completed, press  .
.
Adjusts the contrast of the screen.
Selects a language.
Selects a date format.
Inputs the year.
Inputs the month.
Inputs the date.
Inputs the hour.
Inputs the minute.
PD-3000 |
11 |

CHAPTER 2 SETTING UP YOUR PROGRAMMER
Making environment settings
To change the environment settings during the setting process, |
|
|
|
|
||
1. Select |
on the launcher screen. Press |
|
2. Select |
by using |
. Press |
. |
|
||||||
|
|
|
|
|
||
. |
|
|
|
|
|
|
|
|
|
|
|
|
|
Adjusts the contrast of the screen.
Selects a language.
Switches between ON and OFF of the buzzer sound.
Switches between ON and OFF of the key click sound.
Switches between ON and OFF of the warning display.
Selects a date format.
Inputs the year.
Inputs the month.
Inputs the date.
Inputs the hour.
Inputs the minute.
12 |
PD-3000 |
CHAPTER 2 SETTING UP YOUR PROGRAMMER
Functional overview of PD-3000
Creates and |
Displays the date |
edits program. |
and time. |
Displays the data list and detailed data in each medium.
Displays the data image of the sewing machine.
Makes settings of the programmer such as a display language and clock.
Notes on pattern sheet
About pattern sheet
•Write a pattern on thin plotting paper or use copies of pattern sheet.
•Design pattern sheet in full scale. Adjust the size to magnification (2, 5, or 10) when using the magnified input.
PD-3000 |
13 |

CHAPTER 2 SETTING UP YOUR PROGRAMMER
Handling media
 WARNING
Do not insert objects such as screwdrivers into the CF card and the floppy disk slot, otherwise it may case fire or electric shocks or problems with correct operation.
Handling CF cards
Precautions on handling CF cards (commercial items)
•Use CF cards of 32, 64, 128, or 256 MB.
•Do not disassemble or modify CF cards.
•Do not bend CF cards with excessive force, drop or damage them, or put any heavy item on them.
•Do not subject CF cards to any kind of liquid such as water, oil, solvent, and drink.
•Use and store CF cards in an environment where no strong statistic electricity and electric noise are generated.
•Do not use or store CF cards in a place subject to vibrations, impacts, direct sunlight, lint and dust, high-temperature and humidity, big difference in temperature, or strong magnetism generated by a loudspeaker or the like.
•Do not subject a CF card to vibrations or impacts or take it out from the sewing machine during reading or writing data.
•The data in CF cards may be lost or damaged by wrong operation or an accident. We recommend you to produce backups of important data.
•Be sure to turn off the sewing machine before loading and ejecting a CF card.
•Commercially available CF cards are preformatted. Do not format them again.
•Recommended CF cards are commercially available ones from SanDisk and Hagiwawa Sys-Com. Though products from other manufacturers are also available, in some cases, you cannot read and write data on them due to the difference in their formats.
Also, read the instruction manual attached to the CF card you purchased.
*This programmer is compatible with CF cards of FAT16 format, but not compatible with ones of FAT 32 format.
*CF is a trademark of SanDisk Corporation.
*Company names and product names in this document are trademarks of their respective companies. Any mark such TM is not given in the main body of the document.
Configuration of the CF card folder
\BROTHER\ISM¥ISMSYS \ISM02MN.MOT |
: Control program |
\BROTHER¥ISM¥ISMDB00\ISMMSW.SEW |
: Memory switch data |
*1 \ISMUPG.SEW |
: User program data |
\ISMHST.SEW |
: Error log data |
\ISMS0100.SEW |
: Sewing data P No.=100 |
\ISMS0101.SEW |
: Sewing data P No.=101 |
\ISMS0102.SEW |
: Sewing data P No.=102 |
*1 If you change the numeric values of the memory switch No. 752, the underlined number is changed. By this procedure, you can change the name of the folder \BROTHER\ISM\ISMDB00 which holds data per sewing. To manage sewing data of different sewing machines in one CF card, change the folder name.
14 |
PD-3000 |

CHAPTER 2 SETTING UP YOUR PROGRAMMER
Handling floppy disks
Do not directly touch the magnetic surface by opening the shutter needlessly.
Do not bring disks near magnetic matters such as a magnetic screwdriver or the back side of the programmer.
Do not store floppy disks in a place subject to high or low ambient temperature.
Do not use floppy disks under high humidity.
Do not use or store floppy disks in a dusty place. |
Do not store floppy disks subject to direct sunlight. |
Do not bend floppy disks. Do not put things on them.
Do not subject floppy disks to solvent or drink.
Do not eject a floppy disk from the slot during the access lamp is lit.
PD-3000 |
15 |

CHAPTER 2 SETTING UP YOUR PROGRAMMER
Applicable types of media
Data type (*1) |
Stitch count which can be |
Data resolution |
Medium |
Format |
Write |
|
stored |
||||||
|
|
|
|
|
||
|
20000 stitches/pattern |
|
|
|
|
|
|
900 patterns |
|
|
|
|
|
|
Holdable sum total of |
|
|
|
|
|
BAS-300G data |
patterns depends on the |
0.05 mm/pulse |
CF card |
FAT16 |
Available |
|
capacity of the CF card. |
(*4) |
|||||
|
|
|
|
|||
|
Approx. 7.9 million |
|
|
|
|
|
|
stitches for a CF card of 32 |
|
|
|
|
|
|
MB. |
|
|
|
|
|
BAS-300E Data |
20000 stitches/pattern |
|
|
|
|
|
100 patterns |
0.05 mm/pulse |
2HD |
1.44M for |
|
||
(BAS-300F, KE-436B, |
Available |
|||||
Up to 360,000 stitches in |
(*4) |
floppy disk |
DOS/V |
|||
436C) |
|
|||||
total |
|
|
|
|
||
|
|
|
|
|
||
TFD embroidery data |
|
|
|
|
Not |
|
(*2) |
20,000 stitches/pattern |
0.1 mm/pulse |
CF card |
FAT16 |
||
available |
||||||
(DST, DSB, DSZ) |
|
|
|
|
||
|
|
|
|
|
||
|
4000 stitches/pattern |
|
|
|
|
|
Former BAS-300A data |
10 patterns |
0.1 mm/pulse |
|
|
Available |
|
Up to 40,000 stitches in |
2DD |
|
||||
|
|
Formatted |
|
|||
|
total |
|
|
|||
|
|
floppy disk |
|
|||
|
2000 stitches/pattern |
|
automatically. |
|
||
|
|
(*3) |
Not |
|||
|
10 patterns |
|
|
|||
Former BAS-300 data |
0.2 mm/pulse |
|
|
|||
Up to 20,000 stitches in |
|
|
available |
|||
|
|
|
|
|||
|
total |
|
|
|
|
(*1) Five types of data above can be read. Data written on 2HD and 2DD disks are automatically converted to BAS-300E and former BAS-300A data respectively.
(*2) TFD embroidery data is converted to BAS-300G data by the programmer and becomes available for sewing.
(*3) Restrictions when using a 2DD
To keep compatibility with the former BAS-300A data, functions added to E series are subject to restrictions as shown below. (*4) KE-436B and 436C are restricted to data resolution of 0.1 mm/pulse at the sewing machine side.
Restricted |
A series (2DD) |
E and F series |
KE-436B, |
G series (CF |
Corresponding |
|
functions |
(2HD) |
436C(2HD) |
card) |
commands |
||
|
||||||
Resolution |
0.1mm/pulse |
0.05mm/pulse |
0.1 mm/pulse |
0.05 mm/pulse |
|
|
Low-speed |
2 options: 400 |
4 options: 400, 600, 800, 1200 rpm |
|
|
||
sewing |
and 1200 rpm |
|
|
|||
|
|
|
|
|||
Split function |
No |
Yes |
|
|
|
|
during sewing |
|
|
|
|||
|
|
|
|
|
||
Stoppage of split |
|
|
|
|
|
|
with the needle at |
No |
Yes |
|
|
|
|
the lower end |
|
|
|
|
|
|
Extended option |
No |
Yes |
No |
Yes |
|
|
output |
|
|||||
|
|
|
|
|
||
16 |
PD-3000 |
CHAPTER 2 SETTING UP YOUR PROGRAMMER
Setting a medium
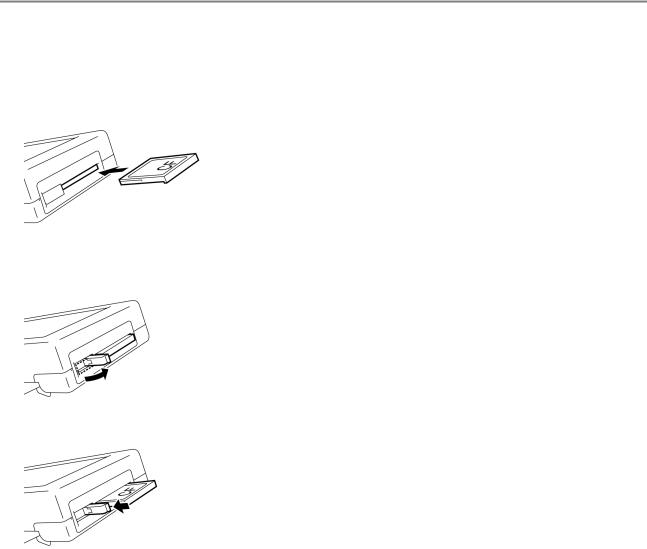
CF card (to the programmer)
When loading a CF card onto the programmer,
1.Turn off the programmer.
2.Load a CF card into the CF slot in correct orientation.
When ejecting the CF card from the programmer,
1.Raise the eject lever.
2.Press the eject lever to eject the CF card.
Caution
zDo not eject the CF card during writing or reading program. This may lead to program corruption.
PD-3000 |
17 |

CHAPTER 2 SETTING UP YOUR PROGRAMMER
CF card (to the sewing machine)
When loading a CF card onto the sewing machine,
1.Turn off the sewing machine.
2.Load a CF card into the CF slot in correct orientation.
Caution
zBe sure to load a CF card into the CF slot in correct orientation.
zThe lid of the CF slot must be closed except when loading or ejecting a CF card. Dust intrusion may cause malfunctions.
zWhen no enabled data is found, the CF lamp does not light.
When ejecting the CF card from the sewing machine,
1.Press the eject lever to eject the CF card.
Caution
zDo not eject the CF card during writing or reading data. This may lead to data corruption.
Floppy disk (FD)
When setting a floppy disk, insert it straight into the slot with the label side upward.
When removing the floppy disk, press the eject switch.
Do not press the eject switch during the access lamp is lit. This may lead to data corruption.
Eject switch
Access lamp
18 |
PD-3000 |

CHAPTER 2 SETTING UP YOUR PROGRAMMER
Protecting data in floppy disks
Floppy disks are provided with a write-protect to prevent data from deleting accidentally.
Write-protected disks are for read-only. You are recommended to write-protect floppy disks holding important data. To enable the write-protect, slide the write-protect notch to the side where a square hole shows up.
Slide the notch in this direction to prevent data loss or overwriting.
Slide the notch in this direction to write data.
PD-3000 |
19 |
CHAPTER 2 SETTING UP YOUR PROGRAMMER
20 |
PD-3000 |
Chapter 3 Programming with Icons
PD-3000

CHAPTER 3 PROGRAMMING WITH ICONS
Programming with icons
While being operated by the programmer, a number of icons are displayed on the screen which illustrate its operations and functions.
This chapter describes the procedure for programming with icons.
*Other than programming with the icons, programming with commands is also possible. Holding  down allows the user to switch between the mode for programming with icons and the mode for programming with commands.
Refer to Chapter 4 "Programming with Commands" (page 88).
Keys to be used
This section describes keys to be used for programming with icons.
The screen returns to the launcher screen.
Press this key to return to the previous step or to cancel a setting.
Switches the display size of an image. Hold this key down to switch to the command mode.
Press these keys to select an icon or to move the work clamp.
Press this key to confirm settings.
Turns on (off) the programmer. See "Turning power OFF" (page 8.)
Use these keys to input numerical values.
Use these keys to advance steps.
22 |
PD-3000 |
Loading...