


 Loading...
Quick Setup Guide
FAX-1860C
Before you can use the machine, you must set up the hardware.
Please read this Quick Setup Guide for the correct setup procedure.
Setting Up the Machine
Setup is Complete!
Keep this Quick Setup Guide and the User’s Guide in a convenient place for quick and easy reference at all times.
1 Symbols used in this guide
Warning |
Caution |
Improper Setup |
|
|
|
Warnings tell you what to do to prevent |
Cautions specify procedures you must |
Improper Setup icons alert you to |
possible personal injury. |
follow or avoid to prevent possible |
devices and operations that are not |
|
damage to the machine or other objects. |
compatible with the machine. |
|
|
|
Note |
User’s Guide |
|
|
|
|
|
|
|
Notes tell you how you should respond |
Indicates reference to the User’s Guide |
|
to a situation that may arise or give tips |
we have supplied. |
|
about how the current operation works |
|
|
with other features. |
|
|
|
|
|
Getting Started
1
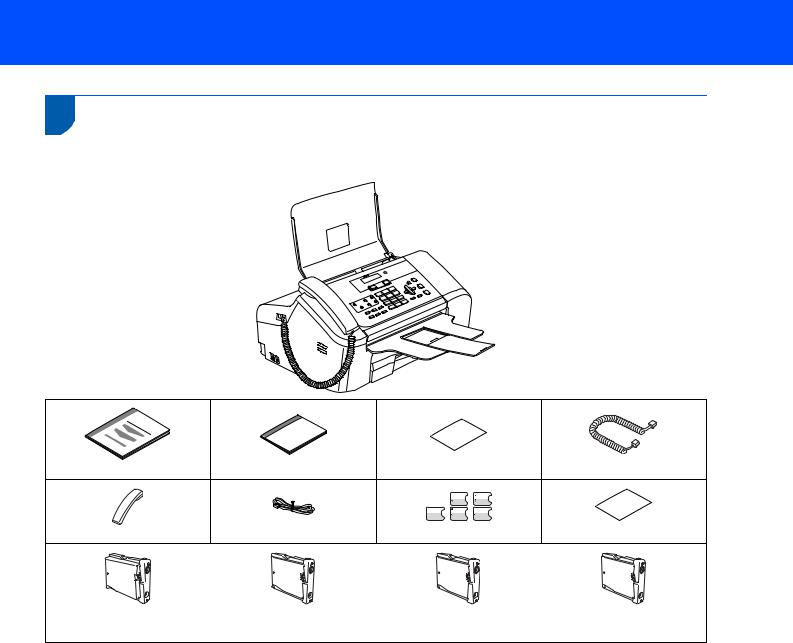
1 Carton components
Carton components may vary from one country to another.
Save all packing materials and the carton in case for any reason you must ship your machine.
Quick Setup Guide |
User’s Guide |
Accesory Order Form |
Handset Curled Cord |
|
|
|
|
Telephone Handset |
Telephone Line Cord |
One Touch Labels |
Test Sheet |
|
Black (LC51BK) |
Yellow (LC51Y) |
Cyan (LC51C) |
Magenta (LC51M) |
Ink Cartridges
1
Getting Started
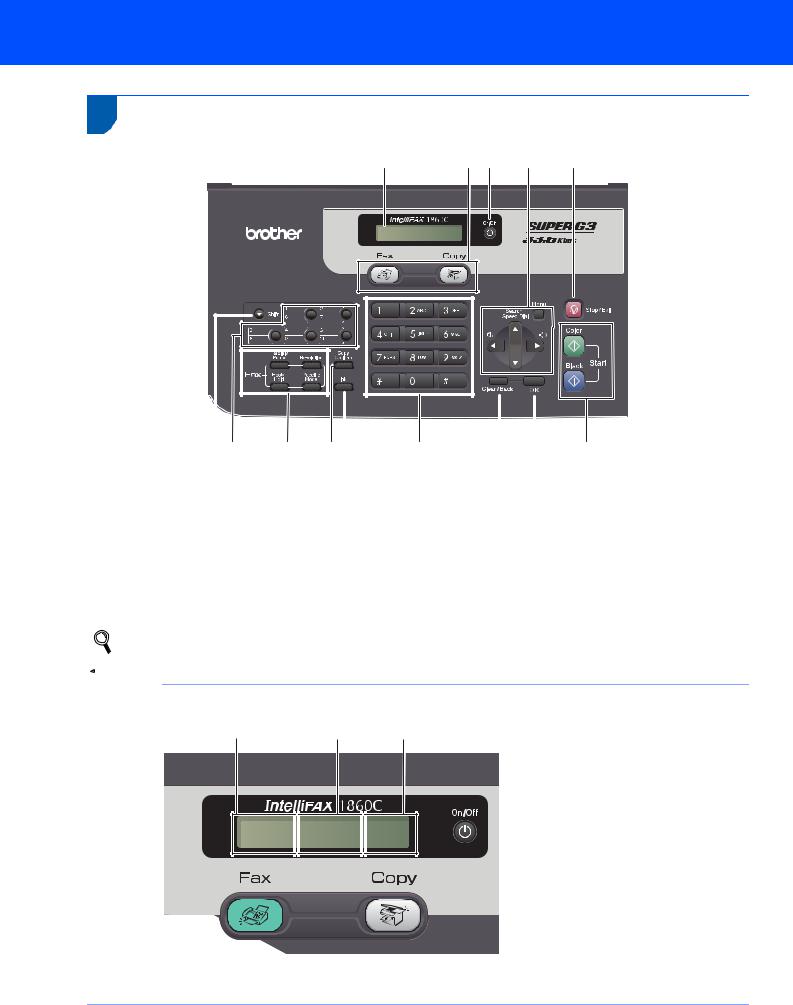
2 Control panel
14 |
13 |
12 |
11 |
10 |
01/01 13:00 Fax
|
|
|
|
|
|
|
|
|
|
|
|
|
|
|
|
|
|
|
|
|
|
|
|
|
2 |
|
|
|
|
|
|
|
|
|
|
|
|
|
|
|
|
|
|
|
|
|
|
|
|
|
|
|
|
|
|
|
|
|
|
|
|
|
|
|
|
|
|
|
|
|
|
|
|
|
|
|
|
|
|
|
|
|
|
|
|
|
|
|
|
|
|
|
|
|
|
|
|
|
|
|
|
|
|
|
|
|
|
|
|
|
|
|
|
|
|
|
|
|
|
|
|
|
|
|
|
|
|
|
|
|
|
|
|
|
|
|
|
|
|
|
|
|
|
|
|
|
|
|
|
|
|
|
|
|
1 |
|
3 |
4 |
5 |
6 |
|
7 |
|
|
|
|
8 |
9 |
|||||||
1 |
Shift |
|
|
|
|
|
|
|
|
8 |
OK key |
|
|
|
|||||||
2 |
One Touch keys |
|
|
|
|
|
|
|
|
9 |
Start keys |
|
|
|
|||||||
3 |
Fax and telephone keys |
|
|
|
|
|
|
10 |
Stop/Exit key |
|
|
|
|||||||||
4 |
Copy Options key |
|
|
|
|
|
|
|
|
11 |
Menu keys |
|
|
|
|||||||
5 |
Ink key |
|
|
|
|
|
|
|
|
12 |
On/Off key |
|
|
|
|||||||
6 |
Dial Pad |
|
|
|
|
|
|
|
|
13 |
Mode keys |
|
|
|
|||||||
7 |
Clear/Back key |
|
|
|
|
|
|
|
|
14 |
LCD (Liquid Crystal Display) |
||||||||||
For the details of the control panel, see Control panel overview in Chapter 1 of the User’s Guide.
 Note
Note
1 |
2 |
3 |
01/01
 13:00
13:00 
 Fax
Fax
1 |
Date |
2 |
Time |
3 |
Receive mode |
When the machine is idle (not being used) it will return to the default display shown above. The default display shows the date, time, and the current receive mode.
2

Setting Up the Machine
1
1Removing the protective parts
1 Remove the protective tape.
2 Remove the foam bag containing the ink cartridges from on top of the paper tray.
2Opening the document support and document tray
1Open the document support (  ) and the document tray (
  ) and then pull out the extension (
  ).
).
1
2
3
3 Loading paper
You can load up to 100 sheets of 20 lb
(80 g/m2) paper.
For details, see Acceptable paper and other media in Chapter 2 of the User’s Guide.
1 Pull the paper tray completely out of the machine. If the paper support flap (1) is open, close it. Open the output paper tray cover (2).
1
2
2 If you are using Letter, A4 or Legal size paper, press and hold universal guide release button (1) as you slide out the front of the paper tray to match the paper size you are using.
1
3 Press and slide the paper side guides (1) and paper length guide (2) to fit the paper size.
1
2
4 Fan the stack of paper well to avoid paper jams and misfeeds.
5 Gently put the paper into the paper tray print side down and top edge first.
Check that the paper is flat in the tray.
3
Loading...