


 Loading...
Quick Setup Guide
PA-TDU-001
Touch Panel Display
Before using this printer, be sure to read this Quick Setup Guide. |
|
We suggest that you keep this manual in a handy place for future |
|
reference. |
|
Please visit us at http://support.brother.com/ where you can get product |
ENG |
support and answers to frequently asked questions (FAQs). |
Safety Precautions
WARNING |
Indicates a potentially hazardous situation which, if not avoided, |
could result in death or serious injuries. |
Keep out of the reach of children, particularly infants. Otherwise, injuries may result.
IMPORTANT |
Indicates a potentially hazardous situation which, if not avoided, |
may result in damage to property or loss of product functionality. |
Place the printer on a stable surface, such as a level desk, before installing or removing the touch panel display.
Press touch panel keys with the tip of your finger. Using a fingernail, mechanical pencil, screwdriver or any other sharp or hard object on the touch panel may damage it.
Do not press touch panel keys with more force than necessary. Otherwise, damage may result.
Be careful not to scrape or scratch the surface of the touch panel or display with a hard object.
When moving the printer, do not carry it by the touch panel or the display.
When installing the touch panel display onto the printer, do not allow the cord to be squashed. Otherwise, damage or malfunctions may result.
Before opening the RD Roll compartment top cover, close the LCD.
Do not drop the printer or subject it to strong shocks.
Wipe any dust or dirt from the printer with a soft, dry cloth. Wiping it with a moistened cloth may damage it.
Symbols Used in This Document
The following symbols are used throughout this document.
This symbol indicates information or directions that should be followed.
Ignoring them may result in damage or failed operations.
NOTE
This symbol indicates notes that provide information or directions that can help you better understand and use the product more efficiently.
English
1 |

Regulation
Federal Communications Commission (FCC) Declaration of
Conformity (For USA Only)
Responsible Party: |
Brother Mobile Solutions, Inc. |
|
100 Technology Drive Suite 250A |
|
Broomfield, CO 80021 U.S.A. |
|
Tel: (303) 460-1600 |
Product Name: |
Touch Panel Display |
Model Number: |
PA-TDU-001 |
This device complies with Part 15 of the FCC Rules. Operation is subject to the following two conditions: (1) this device may not cause harmful interference, and (2) this device must accept any interference received, including interference that may cause undesired operation.
This equipment has been tested and found to comply with the limits for a Class B digital device, pursuant to Part 15 of the FCC Rules. These limits are designed to provide reasonable protection against harmful interference in a residential installation. This equipment generates, uses, and can radiate radio frequency energy and, if not installed and used in accordance with the instructions, may cause harmful interference to radio communications. However, there is no guarantee that interference will not occur in a particular installation. If this equipment does cause harmful interference to radio or television reception, which can be determined by turning the equipment off and on, the user is encouraged to try to correct the interference by one or more of the following measures:
Reorient or relocate the receiving antenna.
Increase the separation between the equipment and receiver.
Connect the equipment into an outlet on a circuit different from that to which the receiver is connected.
Consult the dealer or an experienced radio/TV technician for help.
This transmitter must not be co-located or operated in conjunction with any other antenna or transmitter.
Important
The enclosed interface cable should be used in order to ensure compliance with the limits for a Class B digital device.
A shielded interface cable should be used in order to ensure compliance with the limits for a Class B digital device.
Changes or modifications not expressly approved by Brother Mobile Solutions, Inc. could void the user’s authority to operate the equipment.
 2
2

Declaration of Conformity (Europe only)
We, Brother Industries, Ltd.
15-1, Naeshiro-cho, Mizuho-ku, Nagoya 467-8561 Japan
declare that this product is in conformity with the essential requirements of all relevant directives and regulations applied within the European Community.
The Declaration of Conformity (DoC) can be downloaded from our website. Visit http://support.brother.com/ and:
-> select “Europe”
-> select your country -> select your model
-> select “Manuals” and your language, then click “Search” -> select Declaration of Conformity
-> click “Download”.
Your Declaration will be downloaded as a PDF file.
English
Printing With the Touch Panel Display
Follow the procedure below to print by using the touch panel display. Carefully read all information on the indicated pages.
1. Preparation
Install the touch panel display onto the printer. Connect the printer to the computer, and then use the included CD-ROM to install the printer driver and software. Specify the desired settings for the touch panel display, and then load labels into the printer to complete its preparation.
|
Related Topics |
Page Reference |
|
|
|
|
General Description |
page 5 |
|
|
|
|
Attaching the Touch Panel Display |
page 5 |
|
• Installing the Time/Date Battery |
page 7 |
|
|
|
|
Installing the Printer Driver and Software |
User's Guide |
|
|
|
|
LCD |
page 8 |
|
• Screen |
page 8 |
|
|
|
|
Touch Panel |
page 9 |
|
• Information About Replacing the Touch Panel |
page 10 |
|
|
|
|
Touch Panel Display Settings |
page 12 |
|
• Specifying Settings From the Touch Panel Display |
page 12 |
|
|
|
|
Inserting the RD Roll |
User's Guide |
|
|
|
3 |
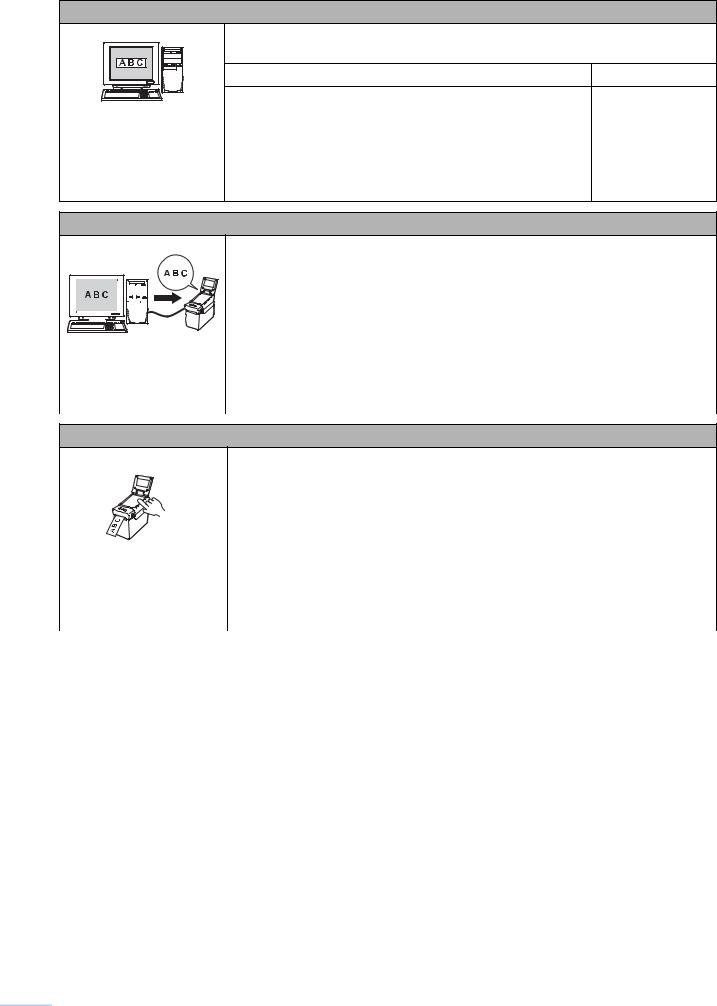
2. Create a label layout.
From the computer, use P-touch Editor 5.0, which is included on the CD-ROM, to create a label layout.
|
Related Topics |
Page Reference |
Creating a Label Layout |
page 15 |
|
• |
Creating a Template |
page 15 |
• |
Linking a Database to a Template |
page 17 |
• |
Printing a Different Date/Time Than the Printer's |
page 24 |
|
Internal Clock |
|
3. Transfer the label layout to the printer.
Use P-touch Transfer Manager to transfer the created label layout from the computer to the printer.
|
|
|
|
|
|
|
|
|
|
|
|
|
|
|
|
|
|
|
|
|
|
|
|
|
|
|
|
|
|
|
|
|
|
|
|
Related Topics |
Page Reference |
|
|
|
|
|
|
|
|
|
|
|
|
|
|
|
|
|
||
|
|
|
|
|
|
|
|
|
|
|
|
|
|
|
|
|
Transferring the Label Layout to the Printer |
page 18 |
|
|
|
|
|
|
|
|
|
|
|
|
|
|
|
|
|
||
|
|
|
|
|
|
|
|
|
|
|
|
|
|
|
|
|
• Selecting the Touch Panel |
page 19 |
|
|
|
|
|
|
|
|
|
|
|
|
|
|
|
|
|
||
|
|
|
|
|
|
|
|
|
|
|
|
|
|
|
|
|
||
|
|
|
|
|
|
|
|
|
|
|
|
|
|
|
|
|
• Selecting the Data Assigned to Keys on the One- |
page 19 |
|
|
|
|
|
|
|
|
|
|
|
|
|
|
|
|
|
Touch Panel |
|
|
|
|
|
|
|
|
|
|
|
|
|
|
|
|
|
|
• Creating a One-Touch Panel |
page 20 |
|
|
|
|
|
|
|
|
|
|
|
|
|
|
|
|
|
|
|
4. Print the label.
Use the touch panel of the touch panel display to print the label.
|
|
Related Topics |
Page Reference |
|
|
|
|
|
Printing the Label |
page 21 |
|
|
• |
Printing Using the Basic Control Panel |
page 21 |
|
• |
Printing Using the One-Touch Panel |
page 23 |
|
|
|
|
|
Label Layouts on the Printer (Checking, Deleting and |
page 25 |
|
|
Log) |
|
|
|
|
|
|
|
Frequently Asked Questions |
page 25 |
|
|
|
|
|
 4
4
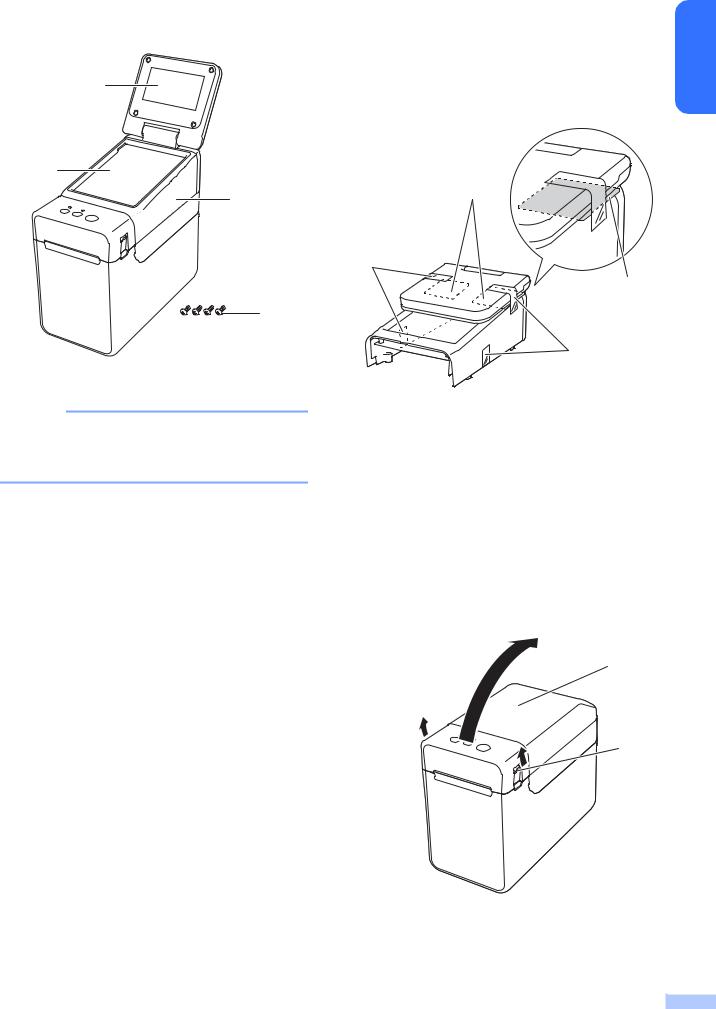
General Description
1
2
3
4
1 LCD
NOTE
A protective clear plastic sticker is placed over the LCD during manufacturing and shipping. This sticker should be removed prior to use.
2Touch panel
3TDU Panel cover
4Bind Screw M2.6 6mm
Attaching the Touch |
|
|
Panel Display |
English |
|
a Remove the tapes (1) and protective |
||
|
||
materials (2) before use. |
|
2
1
2
1
b Press and hold the  (Power) button to turn the printer off, and then disconnect the printer from the AC power outlet. If the rechargeable Li-ion battery (optional) is being used, remove the rechargeable battery.
c Press the cover release lever (1) on either side and lift up to open the RD Roll compartment top cover.
2
1
1Cover release lever
2Top cover
5 |

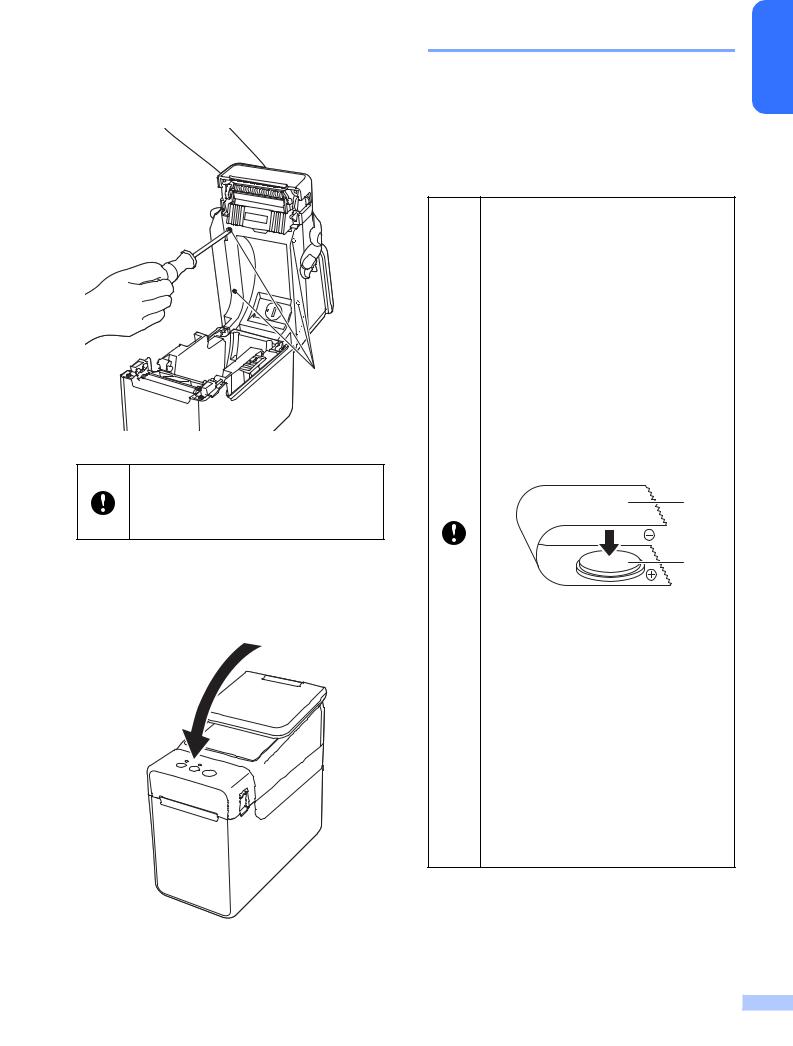
d While holding the RD Roll compartment top cover securely, use a screwdriver to remove the four screws (1).
f Plug the connector on the touch panel display into the connector on the printer. Insert the four tabs on the touch panel display into place on the printer.
1
Be careful not to allow the top cover to fall when the four screws are removed.
e Close the RD Roll compartment top cover, and then remove the top cover
(1).
 1
1
Be careful that the connector cords are not trapped by the cover. In addition, if the cords are caught between the screw holes, the cords may be damaged when the screws are tightened.
 6
6
g While holding the touch panel display securely, open the RD Roll compartment top cover. Secure the touch panel display with the four screws
(1) included as accessories to attach the touch panel display to the printer.
1
Be sure to use the screws included with the touch panel display. The screws previously installed in the printer are a different shape.
h Close the RD Roll compartment top cover by pressing down on the centre, until it clicks into place.
Installing the Time/Date
Battery
A time/date battery is provided as an accessory to be used for backing up the touch panel display time. The battery will maintain the settings for the internal clock. The battery will be consumed even if the printer is not used for a long period of time.
Only use recommended batteries in the printer. Other batteries may cause damage to the printer.
Dispose of the battery at an appropriate collection point, not in the general waste stream. In addition, be sure to observe all applicable federal, state, and local regulations.
When storing or discarding the battery, wrap it (for example with cellophane tape), to prevent it from short-circuiting.
(Battery insulation example)
1
2
1Cellophane tape
2Time/Date Battery
We recommend replacing the battery every two years.
If the clock is reset while power is supplied to the printer, replace this battery. When replacing the lithium battery, purchase a CR2032 battery (recommended manufacturers:
Hitachi Maxell, Ltd., FDK Corporation, Panasonic Corporation, Sony Corporation, Toshiba Corporation and VARTA Microbattery Inc.).
English
7 |
a Press and hold the  (Power) button to
turn the printer off, and then disconnect the printer from the AC power outlet. If the rechargeable Li-ion battery (optional) is installed, remove the rechargeable battery.
b Press the cover release lever on either side and lift up to open the RD Roll compartment top cover.
c Using a coin or similar object, slowly turn the time/date battery cover in the direction of the arrow on the battery cover until it stops, and then remove the time/date battery cover.
If the time/date battery cover is forcibly turned past the stop position, it may be damaged.
d Install the battery.
Be sure to insert the new battery with the + and – sides facing the correct direction.
NOTE
When removing the battery, press part A, shown below, to release the battery so that it can easily be removed.
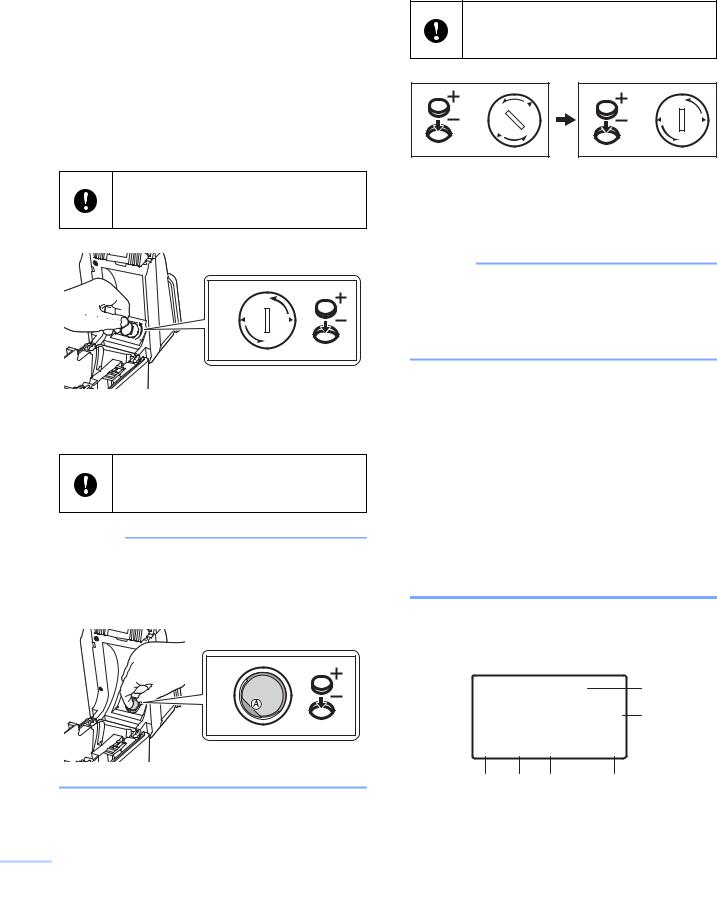
e Return the time/date battery cover to its original position, and then use a coin or similar object to slowly turn the time/date battery cover in the opposite direction of the arrow on the battery cover until it stops in order to install the time/date battery cover.
If the time/date battery cover is forcibly turned past the stop position, it may be damaged.
f Close the RD Roll compartment top cover. Press down until it snaps into place.
NOTE
The time and date can be configured from the  ] (admin key) on the touch panel. For details, see the User’s Guide included on the CD-ROM.
LCD
Lift up the LCD, and then adjust it to an angle so that the screens are visible. If the screen is dark and hard to read, the backlight can be turned on. For details, see Specifying Settings From the Touch Panel Display
on page 12.
Screen
When the printer is turned on, the main screen appears.
1
2
3 |
4 |
5 |
6 |
 8
8
Loading...