


Printed in USA
LBE501001
PJ-722/PJ-723/PJ-762/PJ-763/PJ-763MFi/PJ-773
User’s Guide
English
Thank you for purchasing the Brother PocketJet PJ-722/PJ-723/PJ-762/ PJ-763/PJ-763MFi/PJ-773 thermal mobile printer.
We recommend that you keep this document nearby for future reference. To download the latest manuals, please visit the Brother Solutions Center (support.brother.com) where you can also download the latest drivers and applications for your printer, read FAQs and troubleshooting tips and learn about special printing solutions.
Available Manuals
You can download the latest manuals from the Brother Solutions Center at support.brother.com.
Product Safety Guide 1, 2 |
This guide provides safety information; read it |
|
before you use the printer. |
User's Guide 1, 2 |
This guide provides basic information about |
|
using the printer along with detailed |
|
troubleshooting tips. |
Online User’s Guide 2 |
This guide includes the contents of the User’s |
|
Guide, and additional information about the |
|
printer settings and operations, network |
|
connection and settings, troubleshooting tips, |
|
and maintenance instructions. |
AirPrint Guide 2 |
This guide provides information for using |
|
AirPrint to print from a Mac or iOS device. |
Google Cloud Print |
This guide provides details on how to use |
Guide 2 |
Google Cloud Print™ services for printing |
|
over the Internet. |
Mobile Print/Scan Guide |
This guide provides useful information about |
for Brother iPrint&Scan 2 |
printing from your mobile device when the |
|
printer and the device are connected using |
|
Bluetooth or Wi-Fi®. |
P-touch Template |
This manual provides information on P-touch |
Manual 2 |
Template. |
Raster Command |
This manual provides information about |
Reference 2 |
printer control commands for controlling the |
|
printer directly. |
1Printed manual in the box
2PDF manual on the Brother Solutions Center website
General Description
|
|
10 |
|
11 |
9 |
|
|
|
1 |
|
8 |
2 |
|
|
|
45 67 |
|
3 |
|
|
|
|
14 |
|
|
12 |
|
15 |
|
|
|
13 |
1(Power) button
2 (Feed) button
3 (Bluetooth) button (PJ-762/PJ-763/PJ-763MFi only)
 (Wi-Fi) button (PJ-773 only)
4POWER indicator
5DATA indicator
6STATUS indicator
7 (Bluetooth) indicator (PJ-762/PJ-763/PJ-763MFi only)
 (Wi-Fi) indicator (PJ-773 only)
8Release cover
9Paper outlet slot
10Tear bar
11Paper input slot
12USB port
13DC connector
14Battery latches
15Battery cavity mounting block
LED Indicators
PJ-722/PJ-723
PJ-762/PJ-763/PJ-763MFi
PJ-773
The indicators light and flash to indicate the printer’s status. Each indicator may light or flash in green, red, orange or blue.
Button Functions
|
(Power) button function |
Operation |
|
||
Turn the printer on |
Press and hold the button for about one second |
|
|
|
until the POWER indicator turns on. |
Turn the printer off |
Press and hold the button for about one second |
|
|
|
or press it quickly two times depending on the |
|
|
printer setting (see the Online User’s Guide for |
|
|
more information). |
(Feed) button function |
Operation |
|
Feed paper |
Load the paper and press the button to feed the |
|
|
paper. |
|
Print the printer settings |
To print the printer settings without connecting |
|
|
the printer to a computer or mobile device: |
|
|
1 |
Turn the printer on and make sure no paper |
|
|
is loaded. |
|
2 |
Press and hold the button until the DATA |
|
|
indicator lights in red. |
|
3 |
Load paper. |
 (Bluetooth) button function (PJ-762/PJ-763/PJ-763MFi Operation only)
Enable/disable the |
Press and hold the button for one second to |
|
Bluetooth function |
enable or disable the Bluetooth function of the |
|
|
printer. |
|
|
|
|
(Wi-Fi) button |
Operation |
|
function (PJ-773 only) |
||
|
||
Enable/disable the Wi-Fi |
Press and hold the button for one second to |
|
function |
enable or disable the Wi-Fi function of the |
|
|
printer. |
|
Use WPS to configure |
Press and hold the button for about five |
|
Wi-Fi settings easily |
seconds to configure the Wi-Fi settings using |
|
|
WPS. |
Use the Rechargeable Li-ion Battery (Optional)
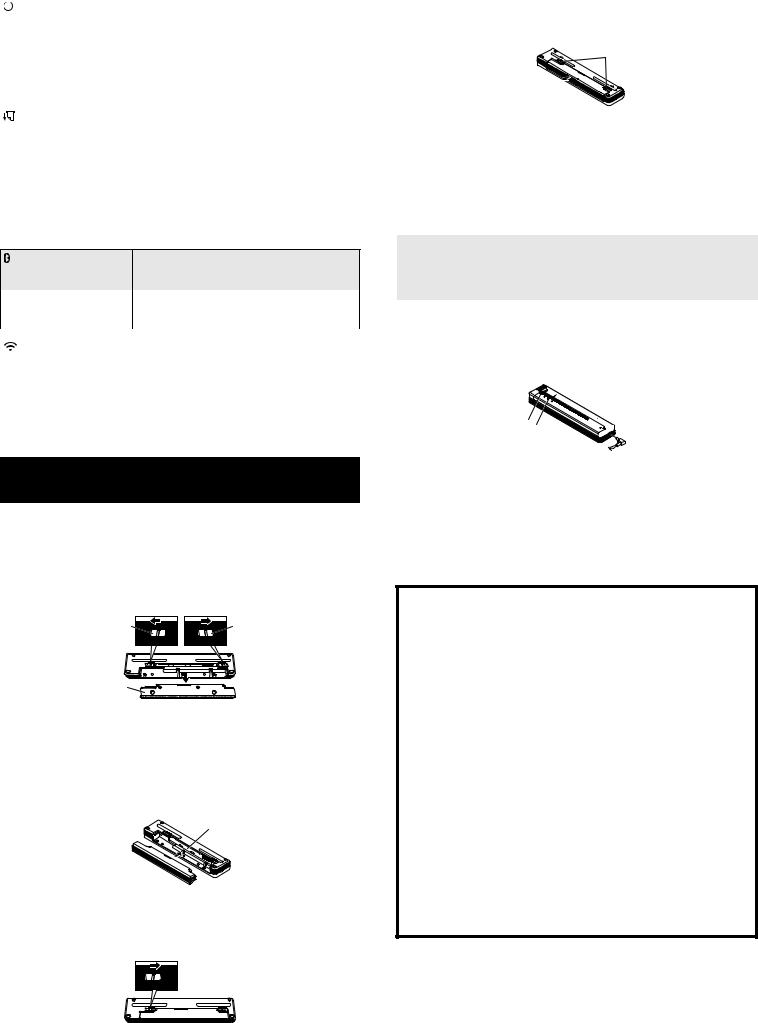
Installing the Rechargeable Li-ion Battery
1. |
Move battery latch 1 to the unlock position. |
|
2. |
While holding battery latch 2 in the unlock position, remove the battery |
|
|
cavity mounting block. |
|
|
1 |
2 |
3
1Battery latch 1
2Battery latch 2
3Battery cavity mounting block
3.Release battery latch 2.
Battery latch 2 moves back to the lock position.
4.Insert the battery into the battery cavity until it locks into place.
4
5
4Battery cavity
5Rechargeable Li-ion battery
5.Move battery latch 1 to the lock position.
Removing the Rechargeable Li-ion Battery
1. Move the battery latches to the unlock position, and then remove the battery.
1
1Battery latches
2.Insert the battery cavity mounting block into the battery cavity until it locks into place.
3.Move battery latch 1 to the lock position.
Charging the Rechargeable Li-ion Battery
NOTE
•Charge the battery immediately after purchase using the following procedure.
•Up to three hours are needed to fully charge the rechargeable Li-ion battery. When fully charged, the battery will print about 600 pages.
1. Turn the printer off and install the battery.
2. Use the AC adapter and AC power cord to connect the printer to an AC power outlet, or use the car adapter to connect the printer to a DC power
outlet.
1 2 


1POWER indicator
2STATUS indicator
3.When the battery is fully charged, the STATUS indicator turns off. Disconnect the AC adapter or car adapter from the DC connector.
Stopping Rechargeable Li-ion Battery Charging
To stop the battery charging, disconnect the AC adapter or car adapter from the DC connector.
Notes on Using the Rechargeable Li-ion Battery
Fully charge the battery before use. Do not use it before it is fully charged.
High density (dark) printing discharges the battery faster than low density printing.
Adjust the print density setting in the printer driver’s dialog box or Printer Setting Tool (see the Online User’s Guide).
The battery charging must take place in 32°F - 104°F (0°C - 40°C) environments, otherwise the battery will not be charged, and the STATUS indicator will remain lit.
If you use the printer when both the battery is installed and the AC adapter or car adapter is connected, the STATUS indicator may turn off and charging may stop even if the battery has not been fully charged.
Rechargeable Li-ion Battery Characteristics
To ensure the highest performance and longest life from your the battery:
Do not use or store the battery in a location exposed to extreme high or low temperatures as it may discharge more quickly. This may happen when using a rechargeable Li-ion battery with a high charge (charged 90% or more) in a location exposed to high temperatures.
Remove the battery when storing the printer for long periods of time.
Store batteries with less than a 50% charge in a cool dry place out of direct sunlight.
Recharge the battery every six months if it is stored for long periods of time.
Connect the Printer to External Power
Connecting to an AC Power Outlet (Optional)
Connect the printer to a nearby AC power outlet to power the printer or charge the rechargeable Li-ion battery using AC power.
1. Connect the AC adapter to the printer.
2. Connect the AC power cord to the AC adapter.
3. Connect the AC power cord to a nearby AC power outlet (100 - 240 VAC, 50 - 60 Hz).
1
2
1AC adapter
2AC power cord
NOTE
The AC adapter and AC power cord are optional accessories. When purchasing, choose an adapter and power cord appropriate for the region
where the printer will be used.
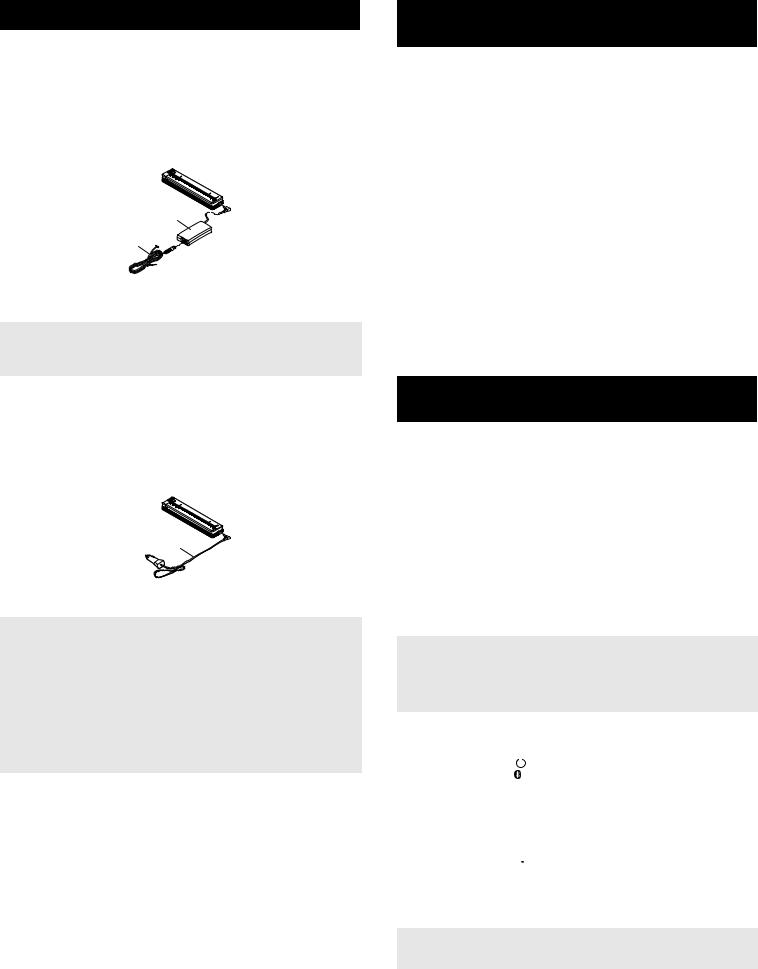
Connecting to a DC Power Outlet (Optional)
Connect the printer to your vehicle’s 12 V DC power outlet(cigarette lighter or
similar) to power the printer or charge the rechargeable Li-ion battery using the vehicle’s DC power.
1. Connect the car adapter to the vehicle’s 12 V DC power outlet. 2. Connect the car adapter to the printer.
1
1 Car adapter
NOTE
•The car adapter is an optional accessory.
•The voltage supplied by a vehicle may fluctuate, and printing speed may vary.
•The maximum valtage is 12 V DC.
•The car adapter plug is not compatible with other outlets that are not the 12 V cigarette type.
•When the car adapter is connected to charge the rechargeable Li-ion battery, the amount of voltage required to fully charge the battery may not be supplied by the DC power outlet. If 9 hours have passed since charging started, the STATUS indicator turns off and charging stops even if the rechargeable Li-ion battery has not been fully charged.
Install Software to Your Computer or Mobile Device
Several printing methods are available depending on your printer model and the computer or mobile device you use to print from.
Refer to the Online User’s Guide for more information and install other applications to your computer or mobile device as needed.
Installing the Printer Driver and Applications (When Using a Windows® PC or Mac)
To print from your Windows® PC or Mac, install the printer driver, P-touch Editor and other applications to your computer.
1. Visit our website (www.brother.com/inst/) and download the installer for the software and documents.
2. Double-click the downloaded .exe file and follow the on-screen instructions to proceed with the installation. Select the software you want in the installer's software selection window.
Updating the Printer Drivers and Applications
You can download the latest versions from the Brother Solutions Center website (support.brother.com). We recommend you visit the website to make sure you have the latest version of the drivers and applications.
A software development kit (SDK) is available. Visit the Brother Developer Center (www.brother.com/product/dev/index.htm).
Connect the Printer to a Computer or Mobile Device
The printer can be connected to your computer or mobile device using a USB cable or via a Bluetooth connection (PJ-762/PJ-763/PJ-763MFi only) or
Wi-Fi connection (PJ-773 only). For more information, see the Online User’s Guide.
Connecting Using USB
1. Make sure the printer is turned off before connecting the USB cable.
2. Connect the printer end of the USB cable to the USB port on the side of the printer.
3. Connect the other end of the USB cable to the USB port on the computer.
Connecting Using Bluetooth (PJ-762/PJ-763/PJ-763MFi only)
NOTE
•Follow the recommendations of the manufacturer of your Bluetooth-equipped devices (computers and mobile devices) or Bluetooth adapter and install any necessary hardware and software.
•The Bluetooth connection settings are saved even after the printer is turned off.
Use this procedure to pair the printer with the computer or mobile device using the Bluetooth management software.
1. Press and hold the |
|
(Power) button to turn the printer on, and then |
|
||
|
||
press and hold the |
|
(Bluetooth) button. |
2. Use your Bluetooth device management software to discover the printer.
Connecting Using Wi-Fi® (PJ-773 only)
1. Press and hold the  (Wi-Fi) button for one second.
The  (Wi-Fi) indicator on your printer starts flashing in blue once every three seconds.
2. Use your computer or mobile device to select the SSID of your printer ("DIRECT-*****_PJ-773"). If required, enter the password ("773*****").
NOTE
For more information about connecting using Wi-Fi, see the Online User's Guide.
 Loading...