


 Loading...
User’s Guide
PDS-5000
PDS-6000
Version 0
ENG

Using the documentation
Thank you for buying a Brother machine! Reading the documentation will help you make the most of your machine.
Symbols and conventions used in the documentation
The following symbols and conventions are used throughout the documentation.
CAUTION
CAUTION indicates a potentially hazardous situation which, if not avoided, may result in minor or moderate injuries.
IMPORTANT |
IMPORTANT indicates a potentially hazardous situation which, if not avoided, may |
|
result in damage to property or loss of product functionality. |
NOTE |
Notes tell you how you should respond to a situation that may arise or give tips |
|
about how the operation works with other features. |
Bold |
Bold style identifies keys on the machine or computer screen. |
Italics |
Italicized style emphasizes an important point or refers you to a related topic. |
NOTE
•For PDS-5000 users: This guide uses PDS-6000 screen images, unless otherwise indicated.
•If you are using a tablet running Windows®, you can make your selections either by tapping the screen or by clicking with your mouse.
i |

Table of Contents |
|
|
1 |
Scanning Software |
1 |
|
Choose your scanning software ............................................................................................................... |
1 |
2 |
General Information |
2 |
|
Scanner overview ..................................................................................................................................... |
2 |
|
Control panel ............................................................................................................................................ |
3 |
|
Control panel overview ....................................................................................................................... |
3 |
|
LED indications ................................................................................................................................... |
4 |
|
Scanner status messages .................................................................................................................. |
4 |
3 |
Document Information |
5 |
|
Acceptable documents ............................................................................................................................. |
5 |
|
Unacceptable documents ......................................................................................................................... |
6 |
|
Documents recommended for use with the Carrier Sheet ........................................................................ |
7 |
4 |
Scan Preparation |
8 |
|
Set up your scanner .................................................................................................................................. |
8 |
|
Load documents ....................................................................................................................................... |
9 |
|
Loading documents ............................................................................................................................ |
9 |
|
Loading multiple differently-sized documents ................................................................................... |
11 |
|
Load documents using the Carrier Sheet ......................................................................................... |
13 |
|
Loading documents wider than Letter/A4 size .................................................................................. |
15 |
5 |
Scan (Windows®) |
17 |
|
Scan using the control panel .................................................................................................................. |
17 |
|
Assign a scanning application to the Scan button ............................................................................ |
17 |
|
Scan a document .............................................................................................................................. |
21 |
|
Scan using your computer ...................................................................................................................... |
22 |
|
Scan with DS Capture ...................................................................................................................... |
22 |
|
Change scan settings using the TWAIN driver ....................................................................................... |
24 |
|
Functional overview .......................................................................................................................... |
24 |
|
DS Capture home screen ................................................................................................................. |
25 |
|
Scanner Properties dialog box ......................................................................................................... |
27 |
|
Image tab .......................................................................................................................................... |
28 |
|
Compression tab .............................................................................................................................. |
34 |
|
Color Dropout tab ............................................................................................................................. |
35 |
|
Paper tab .......................................................................................................................................... |
37 |
|
Multi-Feed Detection tab .................................................................................................................. |
41 |
|
Preview tab ....................................................................................................................................... |
43 |
|
Rotation tab ...................................................................................................................................... |
47 |
|
Enhancement tab ............................................................................................................................. |
49 |
|
More Settings tab ............................................................................................................................. |
53 |
|
Digital Imprinter tab .......................................................................................................................... |
55 |
|
Information tab .................................................................................................................................. |
59 |
|
Scan using the ISIS driver ...................................................................................................................... |
60 |
ii 

6 |
Scan (Macintosh) |
61 |
|
Scan using the control panel .................................................................................................................. |
61 |
|
Assign a profile to the Scan button ................................................................................................... |
61 |
|
Scan a document .............................................................................................................................. |
61 |
|
Scan using your computer ...................................................................................................................... |
62 |
|
Scan with DS Capture ...................................................................................................................... |
62 |
|
Change scan settings using the TWAIN driver ....................................................................................... |
63 |
|
Functional overview .......................................................................................................................... |
63 |
|
DS Capture screen overview ............................................................................................................ |
64 |
|
Profile tab ......................................................................................................................................... |
65 |
|
Image tab .......................................................................................................................................... |
66 |
|
File tab .............................................................................................................................................. |
72 |
|
Color Dropout tab ............................................................................................................................. |
74 |
|
Paper tab .......................................................................................................................................... |
76 |
|
Rotation tab ...................................................................................................................................... |
79 |
|
Enhancement tab ............................................................................................................................. |
81 |
|
Setting tab ........................................................................................................................................ |
85 |
|
Imprinter tab ..................................................................................................................................... |
86 |
|
Information tab .................................................................................................................................. |
90 |
7 |
Scanner Maintenance |
91 |
|
Clean the outside of your scanner .......................................................................................................... |
91 |
|
Clean the inside of your scanner ............................................................................................................ |
92 |
|
Replace parts .......................................................................................................................................... |
97 |
|
Supply information ............................................................................................................................ |
97 |
|
Check replacement cycle ................................................................................................................. |
99 |
|
Replace the Rollers .......................................................................................................................... |
99 |
|
Reset the usage counters ............................................................................................................... |
103 |
|
Packing and shipping the machine ....................................................................................................... |
104 |
8 |
Troubleshooting |
106 |
|
Error and maintenance messages ........................................................................................................ |
106 |
|
Document jam ................................................................................................................................ |
109 |
|
Multi-feed ........................................................................................................................................ |
111 |
|
Troubleshooting .................................................................................................................................... |
113 |
A |
Appendix A |
117 |
|
Specifications ........................................................................................................................................ |
117 |
|
General ........................................................................................................................................... |
117 |
|
Scanner .......................................................................................................................................... |
119 |
|
Interfaces ........................................................................................................................................ |
120 |
|
Supported languages ..................................................................................................................... |
120 |
|
Computer requirements .................................................................................................................. |
121 |
iii 

B |
Appendix B |
122 |
|
Contact Brother ..................................................................................................................................... |
122 |
|
Register your product ..................................................................................................................... |
122 |
|
Frequently Asked Questions (FAQs) .............................................................................................. |
122 |
|
For customer service ...................................................................................................................... |
123 |
|
For Brother accessories & supplies ................................................................................................ |
123 |
|
Technical support (for PageManager) .................................................................................................. |
124 |
iv 

 1 Scanning Software
Choose your scanning software |
1 |
After installing Brother’s scanner drivers, select a scanning application for saving scanned images to your computer. Brother has supplied several options for you on Brother’s installation DVD; use this table to help determine which of the included scanning applications will work best for you:
Software |
Description |
Where is it? |
For more information |
DS Capture |
Brother’s scanning application: it allows |
Windows®: DVD / |
For Windows®: See Scan using |
(Windows®/Mac) |
you to scan, browse and file your |
Brother Solutions |
your computer on page 22. |
|
scanned documents. DS Capture is |
Center 1 |
For Macintosh: See Scan using |
|
installed automatically when you install |
|
|
|
Mac: Brother |
your computer on page 62 and |
|
|
the scanner driver. |
||
|
Solutions Center 1 |
Scan using the control panel on |
|
|
|
|
page 61). |
|
|
|
|
Button Manager V2 |
Use this application to extend the |
DVD / Brother |
See the Button Manager V2 |
(Windows®) |
DS Capture’s scanning functionality, and |
Solutions Center 1 |
User’s Guide. |
|
to create multiple types of scan button to |
|
To scan using the Scan button |
|
perform one-touch scanning. If scanning |
|
|
|
|
on your machine’s control panel, |
|
|
with your computer, click the button to |
|
|
|
|
customize the Scan button in |
|
|
which the required scan settings have |
|
|
|
|
advance (see Scan using the |
|
|
been assigned with the application. |
|
|
|
|
control panel on page 17). |
|
|
If scanning with your machine, select the |
|
|
|
|
|
|
|
menu to which the required scan settings |
|
|
|
have been assigned on the LCD screen, |
|
|
|
and then press the machine’s Scan |
|
|
|
button. |
|
|
|
The following scan functions are |
|
|
|
supported: |
|
|
|
Scan to File / Scan to File (OCR) / Scan |
|
|
|
to App / E-mail / Printer / Shared Folder / |
|
|
|
FTP / SharePoint |
|
|
|
See the Button Manager Help menu |
|
|
|
for more information about using |
|
|
|
Button Manager V2. |
|
|
OmniPage SE 18 |
OmniPage SE 18 is an OCR scanning |
DVD |
See the software’s user |
(Windows®) |
application from Nuance. |
|
instructions. |
QuickScan Pro |
QuickScan Pro is a trial document |
DVD |
See Scan using the ISIS driver |
(Windows®) |
capture scanning application from EMC. |
|
on page 60. |
PageManager 9 |
PageManager 9 is a scanning application |
Brother Solutions |
See the software’s user |
(Mac) |
from NewSoft. |
Center 1 |
instructions. |
1 Visit http://support.brother.com
NOTE
In addition to the above, you can also use your TWAIN (Windows®/Mac), WIA (Windows®), ISIS (Windows®) and ICA (Mac) compatible applications for scanning.
1 
 2 General Information
Scanner overview
4 |
3 |
2 |
1 |
2 |
|
|
|
|
5
6
7
8

 10
10
9
11
12
13
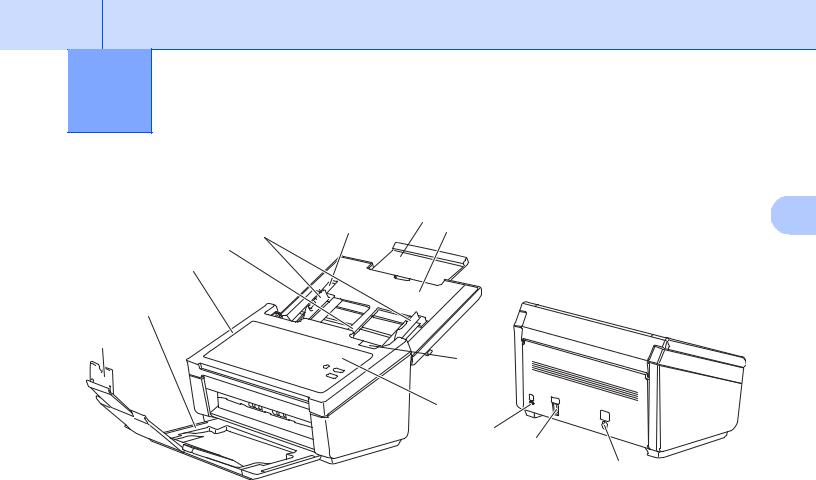
1Top Cover
2Cover Extension
3Document Guide Stopper
4Document Guides
5Automatic Document Feeder (ADF)
6ADF Cover
7Output Tray
8Document Stopper
9Control Panel
10Cover Release Lever
11Kensington Security Slot
12USB Connector
13AC Power Connector
2 

General Information
Control panel
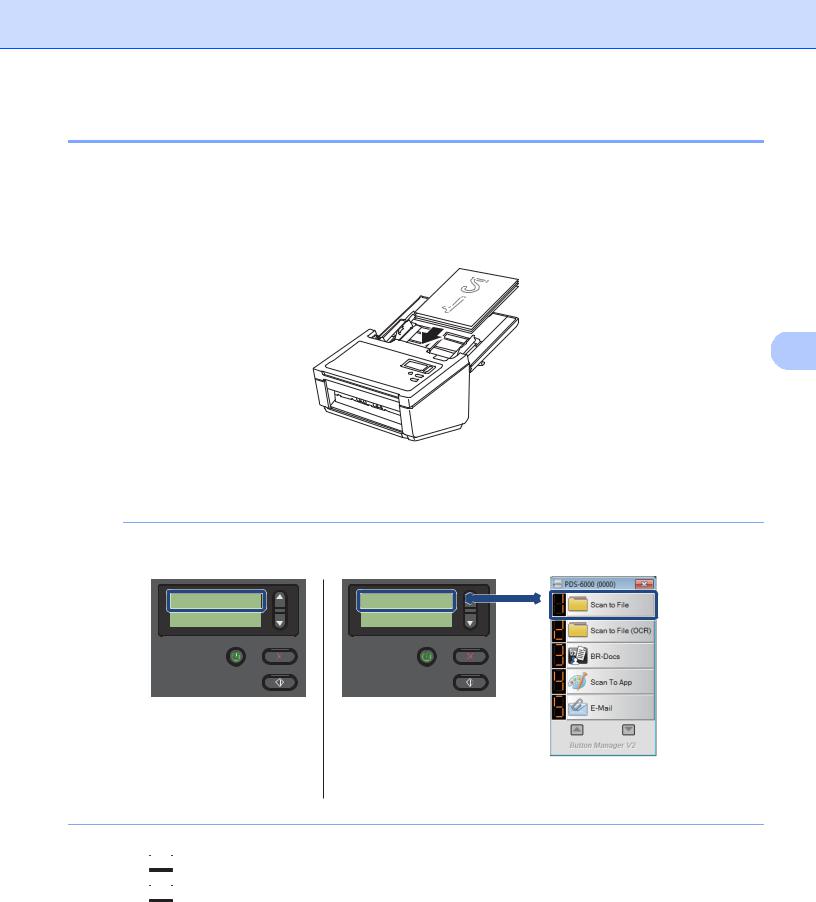
This scanner has one Liquid Crystal Display (LCD), five buttons and one Light Emitting Diode (LED) on the control panel. The LCD is a 16 character two-line display.
2
Control panel overview
1 |
2 |
3 |
4 |
5
1Liquid Crystal Display (LCD)
Displays messages to help you set up and use your scanner.
2Function Selector (a or b)
Press to scroll through the function numbers.
For more information about the function numbers, see Scan using the control panel on page 17, step 4 and 5.
3Power button (LED)
•Press to turn the scanner ON when the scanner is off or in Power Saving Mode.
•Press to enter Power Saving Mode when the scanner is ON.
•Press and hold down to turn the scanner OFF.
For more information about Power Saving Mode, see Energy Saving Control on page 54.
4Cancel button
Press to stop scanning.
5Scan button
Press to start scanning or to launch a scanning application.
3 

General Information
LED indications
The LED indicates the scanner’s status.
LED Indication |
Meaning |
2 |
No light |
The scanner is OFF. |
|
|
|
|
Green |
The scanner is ON. |
|
|
|
|
Blinking green |
The scanner is initializing or in Power Saving Mode. |
|
|
|
|
Blinking red |
There is a problem with the scanner. |
|
|
|
|
Scanner status messages
The following table explains the scanner’s status messages during normal operation:
Scanner Status Message |
Meaning |
Function X |
This shows the current selected function number. |
PageCount XXXXX |
The scanner is ready to scan. |
|
XXXXX is the document scan count. |
Scanning XXXXX |
The machine is scanning. |
|
XXXXX is the current document scan count. |
Canceling |
The scanner is canceling the current scan job. |
NOTE
When Button Manager is running on your computer, Function X changes to a Button Manager function number and name. For more information, see the Button Manager V2 User’s Guide. See your model’s Manuals page on the Brother Solutions Center at http://support.brother.com to download the Button Manager V2 User’s Guide.
Function 1 |
1.Scan to |
File |
PageCount 0 |
PageCount |
0 |
LCD |
LCD |
(When Button Manager V2 |
(When Button Manager V2 |
is not launched) |
is launched) |
Button Manager V2
Button Panel
4 

´
3 Document Information
Acceptable documents
Standard Paper |
Length |
54 to 356 mm |
|
|
|
|
|
|
|
|
Width |
51 to 218 mm |
|
3 |
|
|
|
|
|
|
Weight |
28 to 400 g/m2 |
|
|
|
|
|
||
|
|
To scan thinner documents, use the Carrier Sheet |
|
|
|
|
(see Load documents using the Carrier Sheet on page 13). |
|
|
|
|
|
|
|
|
Maximum Number of Pages |
100 sheets (with 28 to 80 g/m2 paper) |
|
|
|
|
90 sheets (with 105 g/m2 paper) |
|
|
|
|
60 sheets (with 127 g/m2 paper) |
|
|
|
|
50 sheets (with 200 g/m2 paper) |
|
|
|
|
15 sheets (with 400 g/m2 paper) |
|
|
|
|
15 sheets (Business Card) |
|
|
|
|
|
|
|
|
Standard Paper Size |
A4 |
210 × 297 mm |
|
|
|
A5 |
148 × 210 mm |
|
|
|
A6 |
105 × 148 mm |
|
|
|
A7 |
74 × 105 mm |
|
|
|
B5 |
182 × 257 mm |
|
|
|
B6 |
128 × 182 mm |
|
|
|
B7 |
91 × 128 mm |
|
|
|
Legal |
215.9 × 355.6 mm |
|
|
|
Letter |
215.9 × 279.4 mm |
|
|
|
|
|
|
|
|
|
|
|
Long Paper |
Maximum Length |
5,994 mm 1 |
|
|
|
Width |
51 to 218 mm |
|
|
|
|
|
|
|
|
Weight |
28 to 400 g/m2 |
|
|
|
|
To scan thinner documents, use the Carrier Sheet |
|
|
|
|
(see Load documents using the Carrier Sheet on page 13). |
|
|
|
|
|
|
|
|
Maximum Number of Pages |
1 page (1 sheet) |
|
|
|
|
|
|
|
1 If scanning at 200 dpi
5 
Document Information
Plastic Cards |
Length |
70 to 95 mm |
|
|
|
|
|
|
|
|
Width |
51 to 55 mm |
|
|
|
|
|
|
|
|
Standard Size (ISO) |
85.6 × 54.0 × 0.76 mm |
|
|
|
|
|
|
|
|
Material |
Plastic (PET) |
|
|
|
|
|
|
|
|
Type |
Plastic card such as a driver’s license or an insurance card |
|
|
|
|
|
|
|
|
Thickness (ISO) |
Less than 0.76 mm |
3 |
|
|
|
Up to 1.25 mm (with Embossed) |
||
|
|
|
|
|
|
|
|
|
|
|
Maximum Number of Pages |
1 page (1 sheet) |
|
|
|
|
|
|
|
Unacceptable documents
Documents with paper clips or staples
Documents with wet ink
Fabrics, metallic sheets, overhead projector sheets
Glossy or mirrored media
Embossed plastic cards
Documents that exceed recommended thicknesses
6 

Document Information
Documents recommended for use with the Carrier Sheet
NOTE
The Carrier Sheet is an optional item. To purchase a Carrier Sheet, see For Brother accessories & supplies on page 123.
Use the optional Carrier Sheet when you scan the following: |
3 |
|
Plastic cards |
||
|
Documents with a carbon sheet attached
Documents written in pencil
Documents narrower than 50 mm wide
Documents shorter than 54 mm long
Documents of uneven thickness, such as envelopes
Documents with large wrinkles or curls
Bent or damaged documents
Documents that use tracing paper
Documents that use coated paper
Photographs (photographic paper)
Documents printed on perforated paper
Documents printed on unusually-shaped paper (not square or rectangular)
Documents with photos, notes, or stickers affixed to them
Documents that use carbonless paper
Documents that use loose-leaf paper or any paper with holes in it
Photographic negatives
Receipts
For more information about using the Carrier Sheet, see Load documents using the Carrier Sheet on page 13.

 CAUTION
To avoid cutting yourself, do not slide or scrape your hand or fingers along the edges of the Carrier Sheet.
7 
 4 Scan Preparation
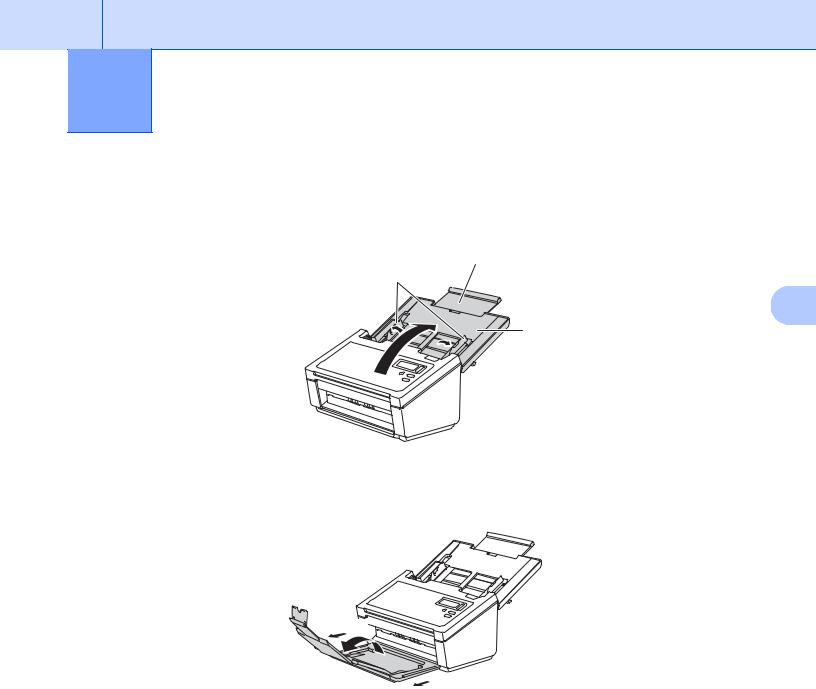
Set up your scanner
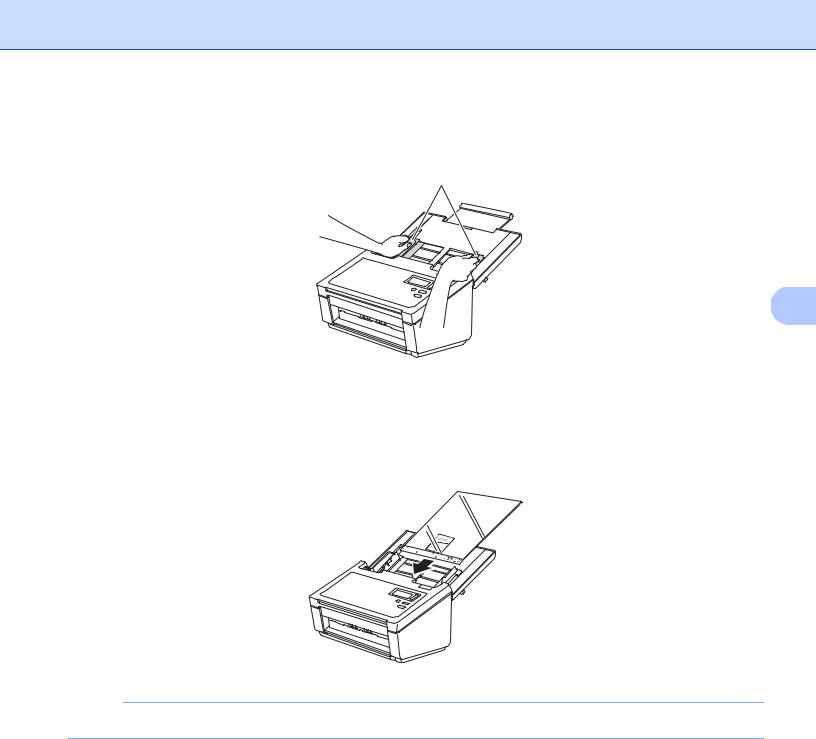
a Open the Top Cover (1), pull the Cover Extension (2) out and then unfold the Document Guides (3).
2
3
4
1
b Pull the Output Tray (1) out of the machine and then unfold the Document Stopper (2).
1 2
1
8 

Scan Preparation
Load documents
IMPORTANT
•The ADF can hold up to 100 pages and feeds each sheet individually. Use 80 g/m2 paper and always fan the pages before placing them in the ADF.
•DO NOT pull on the document while it is feeding.
•DO NOT use paper that is curled, wrinkled, folded, ripped, stapled, paper-clipped, pasted, or taped.
•DO NOT try to scan cardboard or fabric.
4
NOTE
•Make sure documents that have ink or correction fluid on them are completely dry.
•Certain types of plastic cards may be scratched when scanned. To prevent damage to the card, we recommend using the Carrier Sheet.
•If misfeeds frequently occur when you scan thin sheets, reduce the number of documents held in the ADF, and then start scanning again.
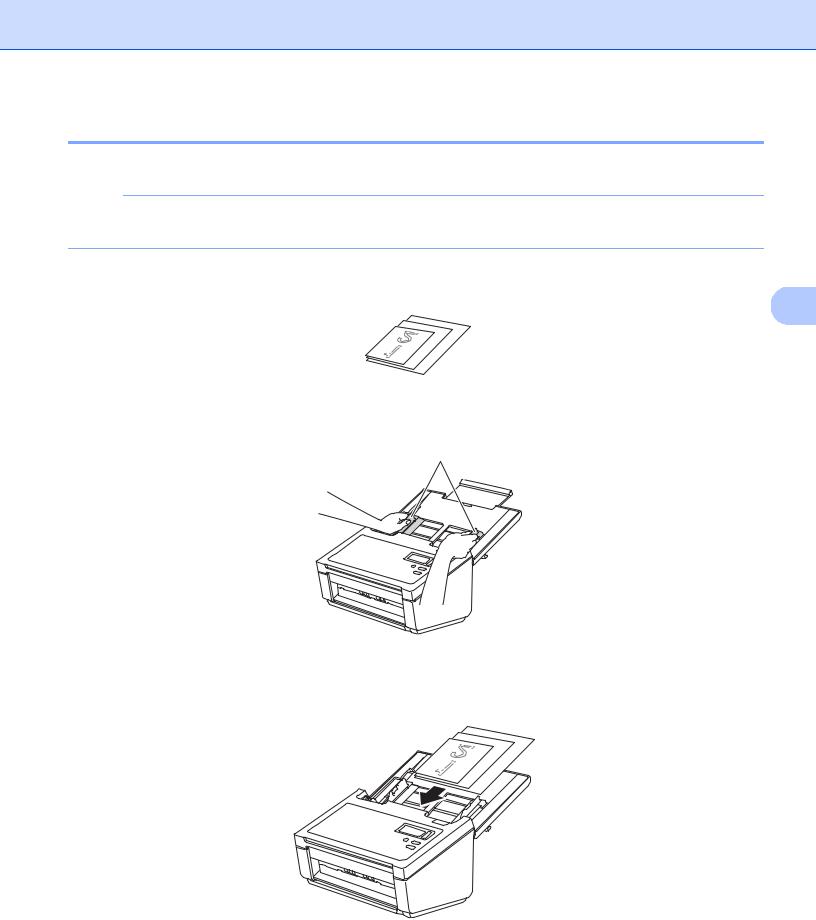
Loading documents
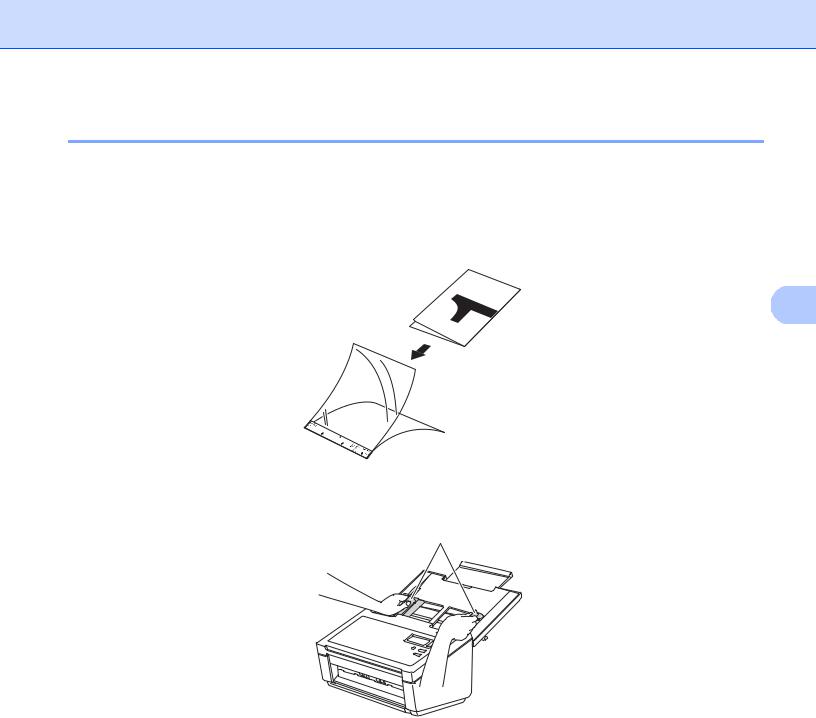
a Fan the pages several times along both the long edge and the short edge.
b Adjust the Document Guides (1) to fit the width of your document.
1
9 

Scan Preparation
NOTE
Slide up the Document Guide Stopper (1) and extend the Document Guide (2) when you set the documents with punch holes such as continuous form paper.
|
1 |
2 |
4 |
c Set your document, face down, top edge first in the ADF between the Guides until you feel it touch the inside of the machine.
For plastic cards: Set your document, face down and short side first in the ADF between the Guides until you feel it touch the inside of the scanner. Load only one plastic card at a time.
For documents longer than Letter/A4 size: Support the document with your hand if the document is longer than the Top Cover. Load only one document at a time.
10 
Scan Preparation
Loading multiple differently-sized documents
To scan multiple pages that are different sizes, follow these steps:
NOTE
Make sure that the narrowest document is wide enough to touch the ADF’s feed rollers, to avoid a document jam.
a Stack the documents on top of each other, making sure that the top edge and the left side of each
document is aligned.
4
b Adjust the Document Guides (1) to fit the width of the largest document.
1
c Set the documents, face down, top edge first in the ADF between the Guides until you feel it touch the inside of the machine.
11 

Scan Preparation
Combinations of multiple different-sized documents
|
Maximum size |
LTR (P) |
A4 (P) |
B5 (P) |
A5 (P) |
B6 (P) |
A6 (P) |
B7 (P) |
A7 (P) |
B8 (P) |
A8 (P) |
|
||
|
|
|
|
Carrier Sheet |
A5 (L) |
B6 (L) |
A6 (L) |
B7 (L) |
A7 (L) |
B8 (L) |
A8 (L) |
|
|
|
|
Width (mm) (*1) |
216 |
210 |
182 |
149 |
129 |
105 |
91 |
74.3 |
64.3 |
52.5 |
|
||
|
LTR (P) |
216 |
|
|
|
|
|
|
|
|
|
|
|
|
|
Carrier Sheet |
|
|
|
|
|
|
|
|
|
|
|
|
|
|
A4 |
(P) |
210 |
|
|
|
|
|
|
|
|
|
|
|
|
A5 |
(L) |
|
|
|
|
|
|
|
|
|
|
|
|
|
B5 |
(P) |
182 |
Available range |
|
|
|
|
|
|
|
|
|
4 |
|
B6 |
(L) |
|
|
|
|
|
|
|
|
|
|
|
|
|
A5 |
(P) |
149 |
|
|
|
|
|
|
|
|
|
|
|
size |
A6 |
(L) |
|
|
|
|
|
|
|
|
|
|
|
|
B6 (P) |
129 |
|
|
|
|
|
|
|
|
|
|
|
||
Minimum |
B7 |
(L) |
|
|
|
|
|
|
|
|
|
|
|
|
|
A6 |
(P) |
105 |
|
|
|
|
|
|
|
|
|
|
|
|
A7 |
(L) |
|
|
|
|
|
|
|
|
|
|
|
|
|
B7 |
(P) |
91 |
|
|
|
|
|
|
|
|
|
|
|
|
B8 |
(L) |
|
|
|
|
|
|
|
|
|
|
|
|
|
A7 |
(P) |
74.3 |
|
|
|
|
|
|
|
|
|
|
|
|
A8 |
(L) |
|
|
|
|
|
|
|
|
|
|
|
|
|
B8 |
(P) |
64.3 |
|
|
|
|
|
|
|
|
|
|
|
|
|
|
|
|
|
|
|
|
|
|
|
|
|
|
|
A8 |
(P) |
52.5 |
|
|
|
|
|
|
|
|
|
|
|
|
|
|
|
|
|
|
|
|
|
|
|
|
|
|
LTR: Letter size (P): Portrait (L): Landscape
12 
Scan Preparation
Load documents using the Carrier Sheet
The Carrier Sheet is an optional item that you can use with your scanner. To purchase a Carrier Sheet, see
For Brother accessories & supplies on page 123.
IMPORTANT
•Do not write on the Carrier Sheet, as the writing may be seen in scanned documents. If the Carrier Sheet becomes dirty, wipe it with a dry cloth.
•Do not leave documents in the Carrier Sheet for extended periods of time, as the printing on the documents may bleed through onto the Carrier Sheet.
• Do not place the Carrier Sheet in direct sunlight or in an area subject to high temperatures and high |
4 |
humidity, as the Carrier Sheet may warp. |
|
•Do not place large or heavy objects on the Carrier Sheet when it is lying flat.
•Do not bend or pull the Carrier Sheet. If it becomes damaged, it may not be acceptable for scanning, and should not be used.
•Do not scan multiple Carrier Sheets in a row.
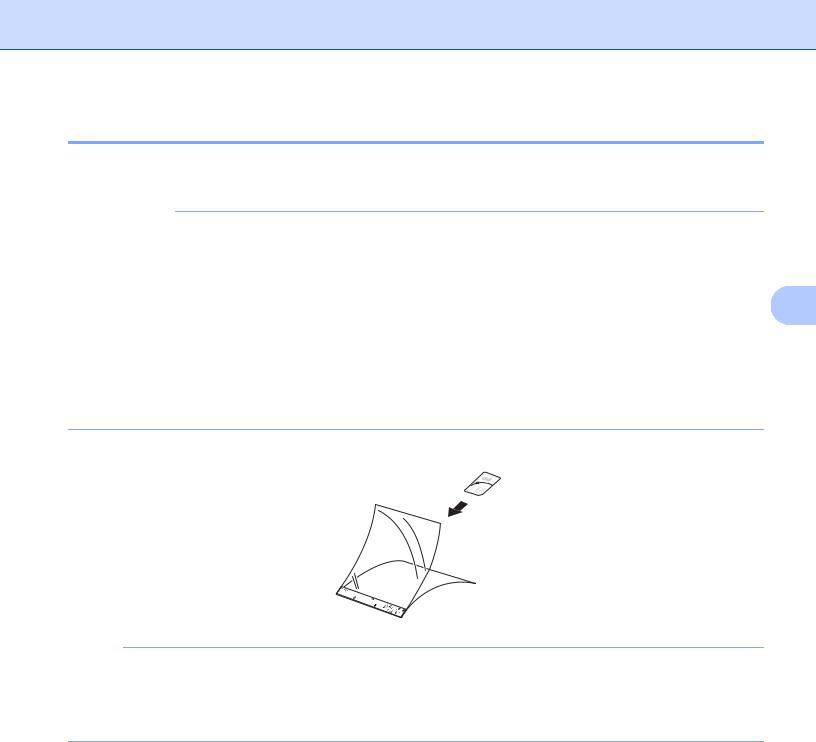
a Insert the document into the Carrier Sheet.
NOTE
•Set the document in the center of the Carrier Sheet and align the top of the document with the top of the Carrier Sheet.
•To avoid document jams, do not put several small documents into the Carrier Sheet at the same time. Insert only one document into the Carrier Sheet at a time.
13 
Scan Preparation
b Adjust the Document Guides (1) to fit the width of the Carrier Sheet.
1
4
c Set the Carrier Sheet in the ADF between the Guides until you feel it touch the inside of the machine.
NOTE
To avoid document jams, do not load the Carrier Sheet upside down.
14 
Scan Preparation
Loading documents wider than Letter/A4 size
You can scan documents that are wider than Letter/A4 size by using the Carrier Sheet.
Before scanning, see Load documents using the Carrier Sheet on page 13 for basic usage instructions and notes about the Carrier Sheet.
a For best results, carefully fold your document in half, making sure all the corners are even, and then insert the document into the Carrier Sheet.
4
b Adjust the Document Guides (1) to fit the width of the Carrier Sheet.
1
15 
Scan Preparation
c Set the Carrier Sheet in the ADF between the Guides until you feel it touch the inside of the machine.
NOTE
To reduce the white space in the center of a scanned page, be sure to position the folded edge of the original document closer to the right edge of the Carrier Sheet.
4
16 

 5 Scan (Windows®)
Scan using the control panel
Customize the 

 Scan button on your Brother machine’s control panel to scan using your preferred scanning software.
Assign a scanning application to the Scan button
a Confirm that the machine is connected to your computer via a USB cable.
b Access the machine from your computer using one of the following: |
5 |
(For Windows® 8/8.1)
Move your mouse to the lower right corner of your desktop. When the menu bar appears, click
Settings > Control Panel. In the Hardware and Sound group, click View devices and printers.
(For Windows® 7)
Click  (Start) > Devices and Printers.
(For Windows Vista®)
Click  (Start) > Control Panel > Scanners and Cameras > Printers.
(For Windows® XP)
Click Start > Control Panel > Scanners and Cameras.
c Right-click the scanner icon, and select Scan properties from the menu. For Windows Vista®, select the machine and click Properties.
17 
Scan (Windows®)
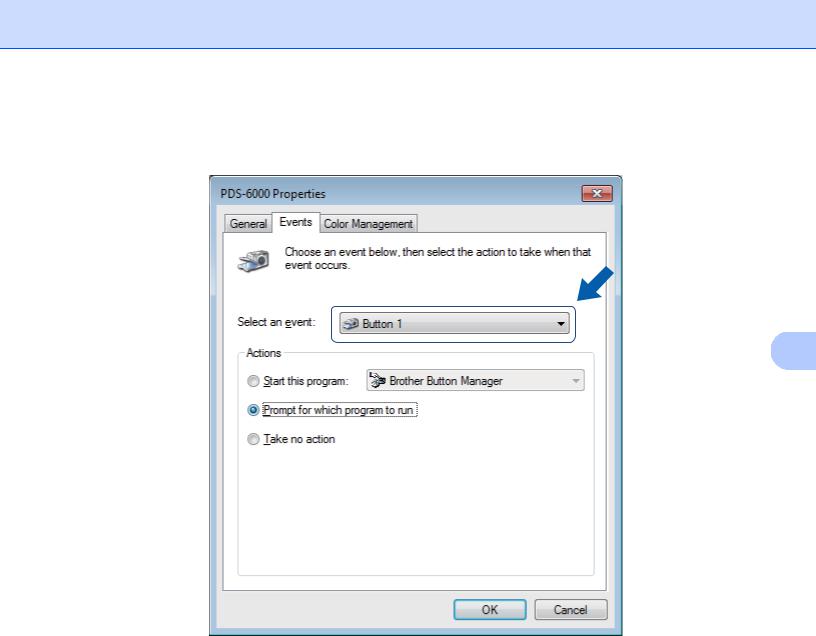
d Click the Events tab, and then select an event number from the Select an event drop-down list. The Button # you select from this list directly corresponds with the function numbers (Function X) displayed on the machine’s LCD.
5
18 
Scan (Windows®)
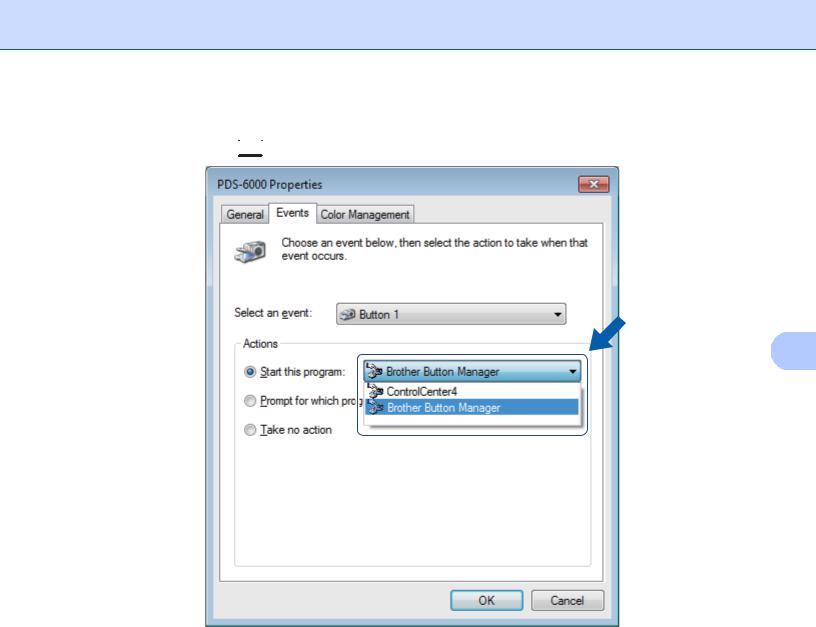
e Select Start this program when you press the 
from Actions, and then select the scanning application you want to launch Scan button on your machine’s control panel.
5
f Click OK.
19 

Scan (Windows®)
g Select the function number you assigned the scanning application on the machine’s LCD, then push the  Scan button on your machine. The assigned application will launch.
NOTE
When you use Button Manager V2 application, you can syncronize the machine’s LCD and application’s function names by assigning Brother Button Manager to all the Button # in the Select an event drop-down list. For more information, see the Button Manager V2 User’s Guide.
Function 1 |
1.Scan to |
File |
PageCount 0 |
PageCount |
0 |
5
LCD |
LCD |
(When Button Manager V2 |
(When Button Manager V2 |
is not launched) |
is launched) |
Button Manager V2
Button Panel
20 
Scan (Windows®)
Scan a document
a
b
Confirm that the machine is connected to your computer via a USB cable.
Set your document in the ADF.
5
c Press a or b to select a Function.
NOTE
When Brother’s Button Manager is running on your computer, the machine’s LCD displays a Button Manager function number and name. For more information, see the Button Manager V2 User’s Guide.
Function 1 |
1.Scan to |
File |
PageCount 0 |
PageCount |
0 |
LCD |
LCD |
(When Button Manager V2 |
(When Button Manager V2 |
is not launched) |
is launched) |
Button Manager V2
Button Panel
d e
Press to launch the scanning application. Press
 again to begin scanning.
21 

Scan (Windows®)
Scan using your computer
To scan using your computer, launch a TWAIN-compatible application on your computer, such as DS Capture or Adobe® PhotoShop®. This guide uses DS Capture as an example.
Scan with DS Capture
a Confirm that the machine is connected to your computer via a USB cable. b Double-click the DS Capture icon  on your desktop.
NOTE
5
If the DS Capture icon |
is not visible on your desktop, click Start > All Programs > |
Brother PDS-XXXX Scanner (where XXXX is your model name) > DS Capture.
c The Select Scanner Model dialog box appears.
Under Scanner Model, select your PDS scanner model, and then click OK.
22 

Scan (Windows®)
d
e
f g
DS Capture launches.
5
Click Setup to change the scan settings, if needed.
For more information on changing settings, see Change scan settings using the TWAIN driver on page 24.
Set your document in the ADF.
Click Scan  . Your scanner starts scanning.
A thumbnail of the scanned image appears in the DS Capture screen and the scanned image will be saved in the directory you specified in the Path field. For more information, see DS Capture home screen on page 25.
Check the scan result to confirm that all settings are correct.
23 

Scan (Windows®)
Change scan settings using the TWAIN driver
The TWAIN driver provides various settings and useful functions that you can use when scanning, as listed in the overview table below.
In this guide, we use the DS Capture application in our examples. Instructions for other scanning software will be similar.
Functional overview
Category |
Function |
Reference |
|
Basic settings |
Specify the image type (color) and scan |
Image tab on page 28 |
5 |
|
|
|
|
|
Automatically identify the document color and scan |
Image tab on page 28 |
|
|
|
||
|
|
|
|
|
Specify the document size and scan |
Paper tab on page 37 |
|
|
|
|
|
|
Automatically identify the document size and scan |
Paper tab on page 37 |
|
|
|
|
|
|
Specify the resolution and scan |
Image tab on page 28 |
|
|
|
|
|
Image processing |
Remove the specified color and scan |
Color Dropout tab on page 35 |
|
|
|
|
|
|
Rotate the document |
Rotation tab on page 47 |
|
|
|
|
|
|
Detect and remove the blank page |
Enhancement tab on page 49 |
|
|
|
|
|
|
Remove punch holes of scanned documents |
Enhancement tab on page 49 |
|
|
|
|
|
|
Automatically compensate the document tilt |
Paper tab on page 37 |
|
|
|
|
|
|
Remove the document base color |
Enhancement tab on page 49 |
|
|
|
|
|
|
Clean up paper edge of border with white or black result |
Enhancement tab on page 49 |
|
|
|
|
|
|
Remove small defects due to dust, or scratches, on a |
Enhancement tab on page 49 |
|
|
scanned image |
|
|
|
|
|
|
Efficient scanning |
See preview and check scan settings |
Preview tab on page 43 |
|
|
|
|
|
|
Save your scanner properties |
Image tab on page 28 |
|
|
|
|
|
|
Acquire multiple color type scan results with a single |
Image tab on page 28 |
|
|
scan |
|
|
|
|
|
|
|
Specify the computer memory used when scanning |
More Settings tab on page 53 |
|
|
|
|
|
|
Perform consecutive document scanning |
Paper tab on page 37 |
|
|
|
|
|
Advanced functions |
Scan a barcode to read information |
Enhancement tab on page 49 |
|
|
|
|
|
|
Add a character string to the scan result |
Digital Imprinter tab on page 55 |
|
|
|
|
|
|
Divide a 1 page document into 2 pages |
Rotation tab on page 47 |
|
|
|
|
|
|
Scan a document larger than Letter/A4 size |
Image tab on page 28 |
|
|
|
|
|
Machine settings |
Specify multi-feed detection settings |
Multi-Feed Detection tab on |
|
|
|
page 41 |
|
|
Check and reset the scan count |
Information tab on page 59 |
|
|
|
|
|
|
Change the Power Saving Mode and Power Off time |
More Settings tab on page 53 |
|
|
settings |
|
|
|
|
|
|
System information |
Check the scanner and computer system information |
Information tab on page 59 |
|
|
|
|
|
24 

Scan (Windows®)
DS Capture home screen
(1) |
(2) |
(3) |
(4) |
(5) |
(6)(7) |
5
No. |
Name |
Description |
Default |
(1) |
Fast scan mode / |
Switch the scan mode if needed. |
Fast scan mode |
|
Fast display mode |
Fast scan mode |
|
|
(select from the File |
|
|
|
Fast scan mode gives priority to scanning speed. |
|
|
|
menu) |
|
|
|
|
Thumbnails are displayed after scanning is |
|
|
|
complete. |
|
|
|
Fast display mode |
|
|
|
In Fast display mode, thumbnails are displayed in |
|
|
|
real-time. |
|
|
|
NOTE |
|
|
|
|
|
|
|
|
|
When you select Fast display mode, scanning |
|
|
|
|
speed may be slower, depending on your computer. |
|
|
|
|
|
|
|
|
Debug |
Set the debug value between 0 and 9. |
0 |
|
|
(select from the File |
NOTE |
|
|
|
menu) |
|
|
|
|
|
|
||
|
|
Debug is a developer’s function. Users should not |
|
|
|
|
need to change this setting. |
|
|
|
|
|
|
|
(2) |
Setup |
Change scanner properties. For more information, see |
- |
|
|
|
Scanner Properties dialog box on page 27. |
|
|
(3) |
Scan |
Click this button to scan. |
- |
|
25 
Loading...