


 Loading...
SC/PT-2040W
|
|
|
|
|
|
|
|
|
|
|
|
|
|
|
|
|
|
|
|
|
|
|
|
|
|
|
Safety Precautions |
||
|
|
|
|
|
|
|
|
|
|
|
|
|
|
|
|
|
|
|
|
|
|
|
|
|
|
|
WARNING |
6 |
|
|
|
|
|
|
|
|
|
|
|
|
|
|
|
|
|
|
|
|
|
|
|
|
|
|
|
|
; |
||
|
|
|
|
|
|
|
|
|
|
|
|
|
|
|
|
|
|
|
|
|
|
|
|
|
|
|
|
7 |
|
|
|
|
|
|
|
|
|
|
|
|
|
|
|
|
|
|
|
|
|
|
|
|
|
|
|
|
|
||
|
|
|
|
|
|
|
|
|
|
|
|
|
|
|
|
|
|
|
|
|
|
|
|
|
|
|
! ! ! " |
||
|
|
|
|
|
|
|
|
|
|
|
|
|
|
|
|
|
|
|
|
|
|
|
|
|
|
|
" # |
|
|
|
|
|
|
|
|
|
|
|
|
|
|
|
|
|
|
|
|
|
|
|
|
|
|
|
|
|
- ! |
||
|
|
|
|
|
|
|
|
|
|
|
|
|
|
|
|
|
|
|
|
|
|
|
|
|
|
|
6 ! |
||
|
|
|
|
|
|
|
|
|
|
|
|
|
|
|
|
|
|
|
|
|
|
|
|
|
|
|
6 7 |
||
|
|
! |
|
||||||||||||||||||||||||||
|
- ( ( ( |
||||||||||||||||||||||||||||
|
|
|
|
|
|
|
|
|
|
|
|
|
|
|
|
|
|
|
|
|
|
|
|
|
|
|
&(0*28#9(*%)5(0*28#9( *%)' ! |
||
|
|
|
|||||||||||||||||||||||||||
- 0 ! |
|||||||||||||||||||||||||||||
|
|
|
|
|
|
|
|
|
|
|
|
|
|
|
|
|
|
|
|
|
|
|
|
|
|
|
- 0 ! 5 ( ( |
||
|
|
|
|
|
|
|
|
|
|
|
|
|
|
|
|
|
|
|
|
|
|
|
|
|
|
|
|
|
|
! A J *2%8% > *2%8% |
- 0 |
||||||||||||||||||||||||||||
! 9 |
- 0 7 |
||||||||||||||||||||||||||||
; |
0 ( |
||||||||||||||||||||||||||||
( ( |
|||||||||||||||||||||||||||||
6 |
|||||||||||||||||||||||||||||
- : ! 0 |
|||||||||||||||||||||||||||||
|
|||||||||||||||||||||||||||||
|
|
||||||||||||||||||||||||||||
|
- 0 ! 5 ( ( 5 5 |
||||||||||||||||||||||||||||
( ! |
|
||||||||||||||||||||||||||||
|
|
|
|
|
|
|
|
|
|
|
|
|
|
|
|
|
|
|
|
|
|
|
|
|
|
|
|
|
|
|
|
|
|
|
|
|
|
|
|
|
|
|
|
|
|
|
|
|
|
|
|
|
|
|
|
|
- ! |
||
|
|
|
|
|
|
|
|
|
|
|
|
|
|
|
|
|
|
|
|
|
|
|
|
|
|
|
6 ! |
||
|
|
|
|
|
|
|
|
|
|
|
|
|
|
|
|
|
|
|
|
|
|
|
|
|
|
|
|
||
|
|
|
|
|
|
|
|
|
|
|
|
|
|
|
0%)K 8%%) |
! |
|||||||||||||
|
|
|
|
|
|
|
|
|
|
|
|
|
|
|
- 0 ! 5 ( ( 5 |
||||||||||||||
|
|
|
|
|
|
|
|
|
|
|
|
|
|
|
|
|
|
|
|
|
|
|
|
|
|
|
|
|
|
|
|
|
|
|
|
|
|
|
|
|
|
|
|
|
|
|
|
|
|
|
|
|
|
|
|
|
|
||
|
|
|
|
|
|
|
|
|
|
|
|
|
|
|
|
|
|
|
|
|
|
|
|
|
|
|
- 0 7 |
||
|
|
|
|
|
|
|
|
|
|
|
|
|
|
|
|
|
|
|
|
|
|
|
|
|
|
|
- 0 7 ; |
||
|
|
|
|
|
|
|
|
|
|
|
|
|
|
|
|
|
|
|
|
|
|
|
|
|
|
|
|
|
|
|
|
|
|
|
|
|
|
|
|
|
|
|
|
|
|
|
|
|
|
|
|
|
|
|
|
|
|
||
|
|
|
|
|
|
|
|
|
|
|
|
|
|
|
|
|
|
|
|
|
|
|
|
|
|
|
- 0 |
||
General Precautions |
- 0 ( ( |
||||||||||||||||||||||||||||
! |
|||||||||||||||||||||||||||||
|
|||||||||||||||||||||||||||||
-0
- 0 !
7 A
! - 0 !
-0 !
0 6
! CAUTION ;
-> A C ! 0
 ! 7
! 7
-! =
-> , $#
-0 7 ( ( - 0
-0 ! 5 5 ( ( - 0
- 6 ! !
&
! ' - < ( (
!
-0 - 0 0
-0 =
-0 = 0
!
-( - 0 ! 5 ( (
! - 0 0
-! M - 0 !
-0
-( !
!

1 GETTING STARTED
Installing Power Supply
Battery Compartment |
Cover |
When using AC Adapter (AD-24ESA-01/ AD-24ESAW-01):
1.Insert the Power Adapter cord into the AC Adapter Jack on the side of the machine.
2.Insert the Power Adapter into a standard AC electrical outlet.
When using batteries:
1.Make sure the power is off.
2.With the LCD facing down, remove the Battery Compartment Cover by pressing the grooved tab and pushing in the direction of the arrow, as illustrated.
3.This label maker requires six (6) AA alkaline batteries, not included.
Make sure that the positive (+) and negative (-) ends of the batteries match the marks inside the battery compartment.
Note:
Always replace all six batteries at the same time using brand new ones.
4. Attach the Battery Compartment Cover by inserting the three hooks at the bottom into the slotsonthemachine,then press down firmly until it clicks into place.
When running a memory backup, we recommend using both the Power Adapter AND batteries, in the event that one or the other power method fails.
Installing a Tape Cassette
1. Open the Cassette Coverbyliftingbothsides at the same time.
|
2.InserttheTapeCassette |
|
|
following the drawing |
|
|
marked inside the case. |
|
|
Gently press the Tape |
|
|
Cassette into the label |
|
Tape |
maker until it clicks into |
|
place. |
||
Exit Slot |
||
• Use only tape widths of |
||
|
0.13" (3.5 mm), 0.23" |
|
|
(6 mm), 0.35" (9 mm), |
|
|
0.47" (12 mm) or 0.70" |
|
|
(18 mm). |
|
|
• If your TZe tape is |
|
|
packaged with protective |
|
|
plastic, be sure to remove |
|
|
the plastic before inserting |
|
|
the Tape Cassette. |
|
|
• Use Brother TZe tapes |
|
|
with this machine. |
3. Close the Cassette 
 Cover and gently press


 until it clicks into place.
Release
Lever
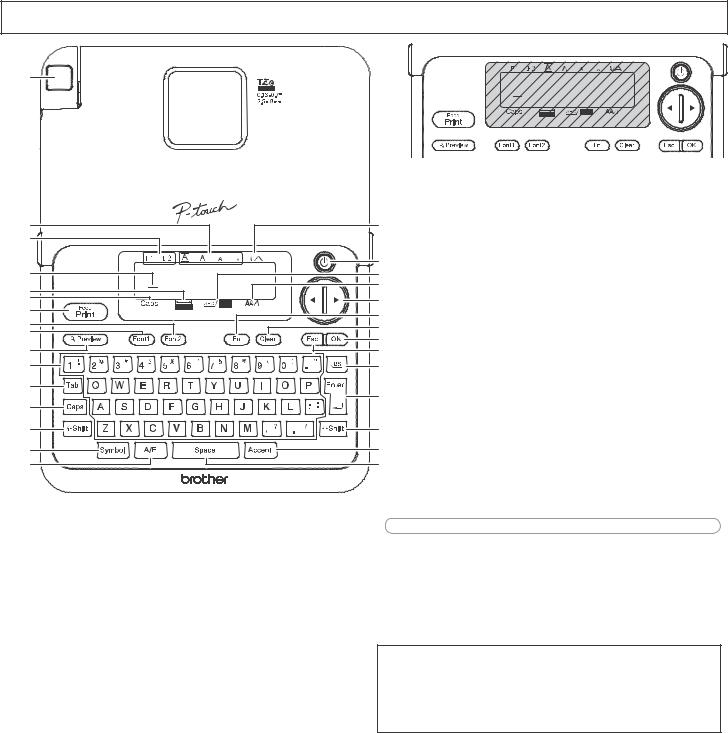
LCD and Keyboard
1
29
28
27
26
25
24
23
22
21
20
19
18
13
17
16
2
3
4
5
6
7
8
9
10
11
12
13
14
15
XRemoving the protective film
To protect your machine from scratching during shipping, a protective film was placed on the LCD.
Make sure to remove the protective film before using the machine.
1. |
Tape Cutter Lever |
15. Space key |
2. |
Width |
16. Auto Format (A/F) key |
3. |
Power key |
17. Symbol key |
4. |
Underline / Frame |
18. Caps key |
5. |
Style |
19. Tab key |
6. |
Cursor key |
20. Character key |
7. |
Function (Fn) key |
21. Preview key |
8. |
Clear key |
22. Font1 key |
9. |
OK key |
23. Font2 key |
10. Escape key |
24. Feed/Print key |
|
11. Backspace key |
25. Caps |
|
12. Enter key |
26. Label Length |
|
13. Shift key |
27. Cursor |
|
14. Accent key |
28. Font |
|
|
|
29. Size |
 NOTE
NOTE
•The LCD displays one row of 15 characters; however, there is a maximum of 80 characters (including spaces, tabs, symbols, and a return) for a label.
•When selecting the settings, press  to return to the default item.
•Pressing the Preview key (21) displays a preview of the label, and may differ from the actual label when printed.
•Label length shown on the LCD may differ slightly from the actual length when printed.
Supplies and Accessories
For a complete list of tapes compatible with your machine, see your model’s page at support.brother.com.
Tape
Cassettes: Brother TZe tapes with  mark. 0.13" (3.5 mm), 0.23" (6 mm), 0.35" (9 mm), 0.47" (12 mm), 0.70" (18 mm)
See the included Supplies and Accessories Guide.
AC Adapter: AD-24ESA-01/
AD-24ESAW-01
Print Head
Cleaning
Cassette: TZe-CL4
Specifications
Dimensions: |
Approx. 6.5" x 8.6" x 2.7" |
(W x D x H) |
(Approx. 164 mm x 218 mm x 58 mm) |
Weight: |
Approx. 1.3 lb. (Approx. 570 g) |
|
(without batteries and Tape Cassette) |
Power Supply: • AC Adapter (AD-24ESA-01/
AD-24ESAW-01)
•Batteries (not included)
Six AA alkaline batteries (LR6)
Tape Cassette: Brother TZe tape (width) 0.13" (3.5 mm), 0.23" (6 mm), 0.35" (9 mm), 0.47" (12 mm), 0.70" (18 mm)
For FAQs and to download manuals, visit: support.brother.com.
Initial Settings
1Turn your machine on.
Supply power by using the AC Adapter (included) or six AA batteries (not included), and then press  .
.
2Set the language.
The default setting is [English].


 [Language]

 (Select a language)
  .
.
3Set the unit of measurement.
The default setting is [inch].


 [Unit]

 [inch / mm]
  .
.
 NOTE
NOTE
•The machine automatically turns off if no keys are pressed within five minutes.
•To cancel any operation, press  .
.
Loading...