


 Loading...
Brother Printer Management Tool Quick Start Guide
|
Version 03 |
© 2020 Brother Industries, Ltd. All rights reserved. |
ENG |
|
Contents |
|
|
1. Introduction .................................................................................................. |
1 |
|
2. Getting Started ............................................................................................. |
1 |
|
3. Printer Configuration .................................................................................... |
2 |
|
4. File Manager .............................................................................................. |
26 |
|
5. Command Tool ........................................................................................... |
28 |
|
6. RTC (Real Time Clock) Setup .................................................................... |
29 |
|
7. Printer Function.......................................................................................... |
30 |
|
8. Bitmap Font Manager................................................................................. |
32 |
|
9. Users Configuration.................................................................................... |
33 |
|
10. |
Alert Configuration .................................................................................. |
34 |
11. |
Group Configuration ............................................................................... |
35 |
12. |
Setup Configuration ................................................................................ |
36 |
13. |
Manual Name Configuration ................................................................... |
37 |
14. |
Firmware Update .................................................................................... |
38 |
1. Introduction
The Brother Printer Management Tool allows you to:
-Check a printer’s status and settings
-Change printer settings
-Send additional commands to a printer
-Download graphics and fonts
-Create a printer bitmap font
-Download and update firmware
2.Getting Started
The BPM does not support the Bluetooth connection. We recommend connecting your printer to the computer using either the USB or Wi-Fi connection.
1.Double-click the  (Brother Printer Management Tool.exe) icon to run the tool.
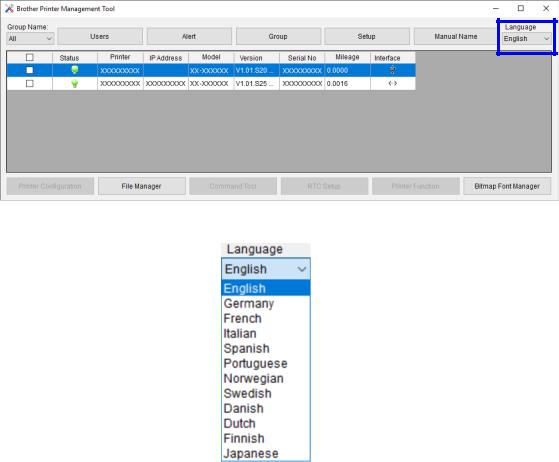
2.The Settings Page lists both USB-connected printers and network-connected printers (belonging to the same subnet as your computer).
Select your language from the Language drop-down list, if necessary.
1
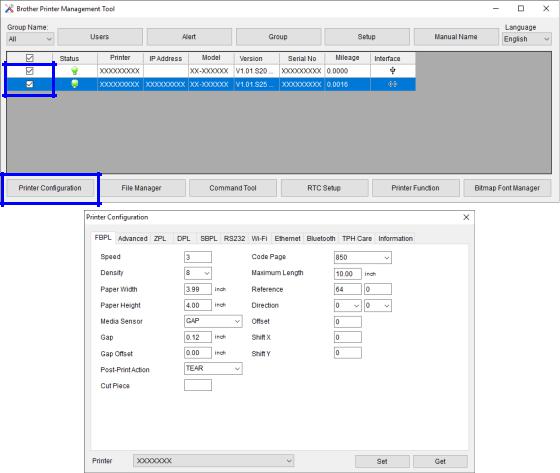
3. Printer Configuration
The Printer Configuration page is used to modify (Set) and view (Get) printer settings. This page includes the following tabs:
- FBPL |
- Wi-Fi |
- Advanced |
- Ethernet |
- ZPL |
- Bluetooth |
- DPL |
- TPH Care |
- SBPL |
- Information |
- RS 232 |
|
These correspond to the printer settings most commonly used in the FBPL/EPL2/ZPL/DPL/SBPL printer languages.
1.Select the printer you want to modify.
2.Click the Printer Configuration button to modify the printer settings.
3.Select the printer setting tab you want.
2

4.Modify the printer settings by selecting or entering new values, and then click the Set button to apply the new settings.
Note
-Any modified values will be highlighted in yellow.
-If you select more than one printer, only the values shared by the selected printers will be shown.
5.After the printer settings have been modified, click the Get button to view the new printer settings.
Note
Use the Printer drop-down list to view individual printer groups and their settings.
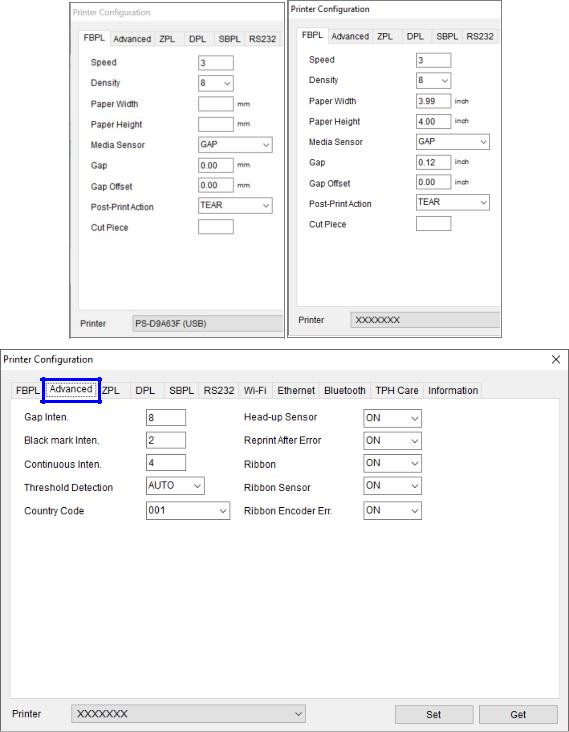
FBPL & Advanced
FBPL printer language settings
3
Function |
Description |
|
|
Speed |
Set the print speed. For more information about the available print speed settings, |
|
see the SPEED command in FBPL Command Reference. |
|
|
Density |
Set the print density from 0 to 15. |
|
|
Paper Width |
Set the media width. |
|
|
Paper Height |
Set the media height. |
|
|
Media Sensor |
Set the media sensor type. |
|
|
Gap |
Set the gap distance between two labels. |
|
|
Gap Offset |
Set the offset distance of the gap. |
|
|
Post-Print Action |
Set the post-print action. |
|
|
Cut Piece |
Set the number of printing labels between each automated cut. |
|
|
Code Page |
Set the international character set code page. For more information, see the |
|
CODEPAGE command in FBPL Command Reference. |
|
|
Maximum Length |
Set the maximum length for the sensor detection. If the label length is less than the |
|
default length (10" or 254mm, for example a wristband), set a value larger than the |
|
label length so that the sensor can detect the label correctly.. |
|
|
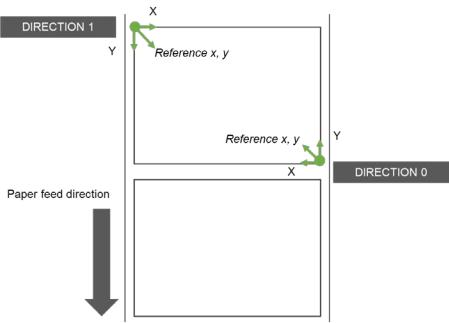
Reference |
Set the origin of the printer coordinate system vertically and horizontally: Left: X |
|
(Horizontal) coordinate, Right: Y (Vertical) coordinate. Settings range from 0 dots to |
|
999 dots. The reference point varies depending on the print direction. |
|
|
4

Function |
Description |
|
|
Direction |
Specify the print direction. For more information, see the DIRECTION command in |
|
FBPL Command Reference. |
Offset |
Fine-tune the media stop location. Settings range from -999 dots to 999 dots. |
|
|
|
|
Shift X |
Fine-tune the print position. Settings range from -999 dots to 999 dots. |
|
|
||
Shift Y |
||
|
Note
To change the unit of measurement to millimeters or inches, go to Control Panel > Clock and Region >
Region > Formats > Additional settings... > Measurement System. Select U.S. for “inch” and Metric for “mm”.
5
Function |
Description |
|
|
Gap Inten. |
Adjust the sensor detection sensitivity. Use this setting when auto calibration does |
|
not work because the thickness of the backing paper and that of the label with |
|
backing paper are not of within the sensor's detection range, or there are |
|
pre-printed marks or patterns on the label. |
|
|
Black mark Inten. |
Adjust the sensor detection sensitivity if the printer cannot detect the black mark |
|
correctly. |
|
|
Continuous Inten. |
Adjust the sensor detection sensitivity if the paper is either too thin or too thick. |
|
|
|
6 |

Function |
Description |
|
|
Threshold Detection |
Set the sensor sensitivity to AUTO or FIXED. |
|
AUTO: Fine-tune the paper positioning threshold automatically when feeding paper. |
|
FIXED: Fix the paper positioning threshold. |
Country Code |
Set the country code. |
|
|
Head-up Sensor |
Enable or disable the print head-up sensor. |
|
|
Reprint After Error |
Enable or disable the print restart after an error. |
|
|
Ribbon |
Enable or disable both the ribbon end sensor and the ribbon encoder sensor. |
|
|
Ribbon Sensor |
Enable or disable the ribbon end sensor. |
|
|
Ribbon Encoder Err. |
Enable or disable the ribbon encoder sensor. |
|
|
Note
For more information, see the FBPL Command Reference Manual at your model’s Manuals page at support.brother.com.
7
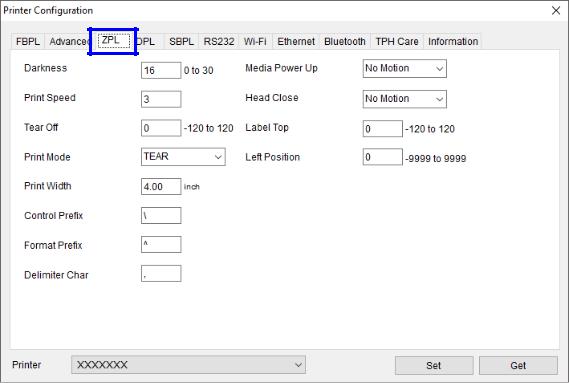
ZPL
ZPL printer language settings
Function |
Description |
|
|
|
|
Darkness |
Set the print darkness. |
|
|
|
|
Print Speed |
Set the print speed. |
|
|
|
|
Tear Off |
Adjust the tear off position. |
|
|
|
|
Print Mode |
Set the post-print action. |
|
|
|
|
Print Width |
Set the print width. |
|
|
|
|
Control Prefix |
Set the control character. |
|
|
|
|
Format Prefix |
Set the format character. |
|
|
|
|
Delimiter Char |
Set the delimiter character. |
|
|
|
|
|
Set the action of the media when turning on the printer or closing the print head. |
|
Media Power Up / |
Feed: Advance one label. |
|
Calibration: Calibrate the sensor levels, determine the length, and feed a label. |
||
Head Close |
||
Length: Determine the length and feed a label. |
||
|
||
|
No Motion: The printer will not adjust the media. |
|
|
|
|
Label Top |
Adjust the print position on the label vertically. |
|
|
|
|
Left Position |
Adjust the print position on the label horizontally. |
|
|
|
8
Note
The items in the ZPL tab work only with the ZPL printer language.
DPL
DPL printer language settings
Function |
Description |
|
|
|
|
Heat |
Increase or decrease the heat applied by the print head to the media to darken or |
|
lighten the print contrast. |
||
|
||
|
|
|
Print Speed |
Set the print speed. |
|
|
|
|
Label Width |
Set the maximum limit for the printable width. |
|
|
|
|
Present Sensor |
Enable or disable the present sensor. |
|
|
|
|
Cutter Equipped |
Enable or disable the optional Cutter. |
|
|
|
|
Control Codes |
Change the prefix of the commands interpreted by the printer. |
|
|
|
|
Column Offset |
Shift both the horizontal print start position and the label width end point to the |
|
right. |
||
|
||
|
|
|
Row Offset |
Shift the vertical print start position. |
|
|
||
|
|
Note
The items included in the DPL tab only work with the DPL printer language.
9

SBPL
SBPL printer language settings
Function |
Description |
|
|
|
|
Print Speed |
Set the print speed. |
|
|
|
|
Print Darkness |
Set the print darkness. |
|
|
|
|
Sensor Type |
Set the sensor type: Black Mark, Gap, or Continuous. |
|
|
|
|
Label Gap |
Set the gap between labels. |
|
|
|
|
Horizontal LabelSize |
Set the horizontal label size. |
|
|
|
|
Vertical LabelSize |
Set the vertical label size. |
|
|
|
|
Horizontal Correction Pitch Value |
Adjust the print start position horizontally. |
|
|
|
|
Vertical Correction Pitch Value |
Adjust the print start position vertically. |
|
|
|
|
Label Pitch Offset |
|
|
|
|
|
Tear Off Offset |
Set the offset of the label stop position for each operation. |
|
|
||
Cutter Offset |
||
|
||
|
|
|
Dispenser Offset |
|
|
|
|
Note
The items in the SBPL tab only work with the SBPL printer language.
10
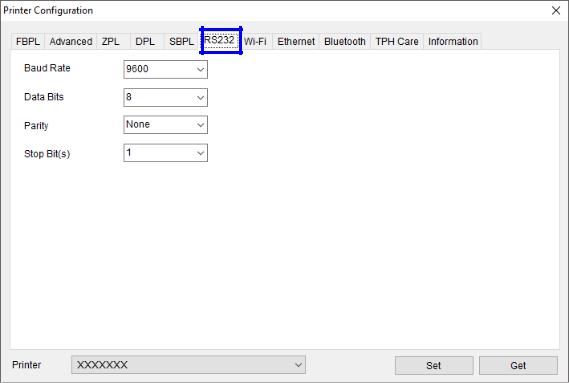
RS232
Printer RS232 interface settings
11
Loading...