


 Loading...
ELECTRONIC LABELING SYSTEM

 E110 User’s Guide
English

ELECTRONIC LABELING SYSTEM

 E110 User’s Guide
English
Thank you for purchasing a Brother P-touch labeling system!
Use your new Brother P-touch labeling system to create a wide variety of custom, self-adhesive labels.
This P-touch labeling system uses Brother TZe or HGe tapes. TZe and HGe tape cassettes are available in many color and sizes. For a complete list of tapes compatible with your P-touch labeling system, visit us at: www.brother.com.
Please read this guide, and the included Product Safety Guide, before using this P-touch labeling system. After reading this guide, keep it in a safe place.
Printed in China
D00PN3001
1 GETTING STARTED
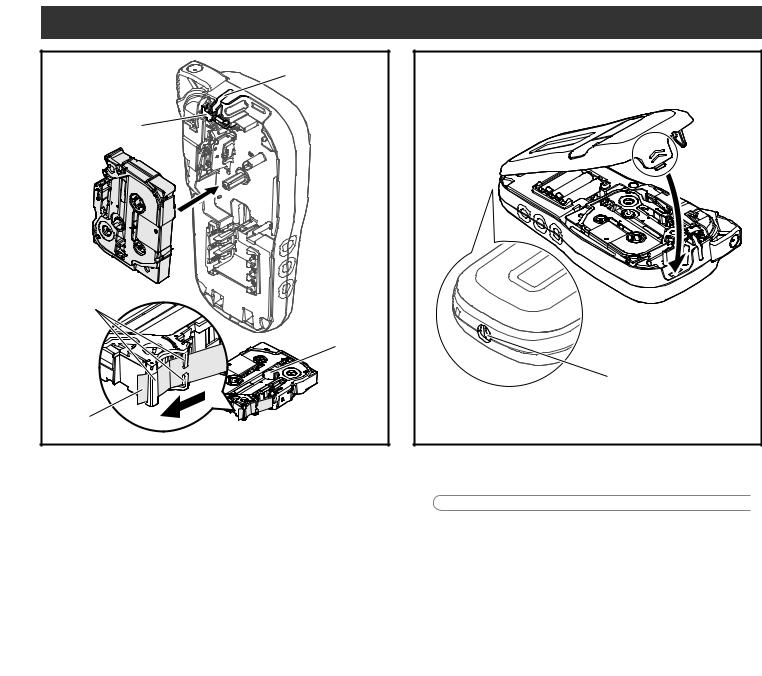
Installing Power Supply and Tape Cassette
1
Print Head
Cassette Cover |
Tape Cutter Lever |
With the LCD facing down, open the Cassette Cover by pressing the grooved tab and pushing in the direction of the arrow, as illustrated.
2 |
When replacing batteries or tape cassettes, make sure the power is turned off.
This P-touch labeling system requires six (6) AAA alkaline batteries or six (6) fully-charged Ni-MH batteries, not included.
3 |
Tape Exit Slot |
|
|
Cutter Edge |
|
Tape Guides |
|
|
Toothed Wheel |
End of Tape |
|
Insert the Tape Cassette following the drawing marked inside the case. Gently press the Cassette into the P-touch labeling system until it clicks into place.
•Make sure your Tape Cassette is marked  or
or 
 .
.
•Use only Brother TZe or HGe tapes with this machine.
4 |
AC Adapter Jack |
Close the Cassette Cover and gently press until it clicks into place.
 NOTE
NOTE
If you prefer to use the optional AC Adapter (AD24) instead of using batteries:
1.Insert the Power Adapter cord into the AC Adapter Jack on the side of the P-touch labeling system.
2.Insert the Power Adapter into a grounded AC electrical outlet.
LCD
|
|
|
|
|
|
|
|
|
|
|
|
|
|
|
5 |
|
|
||||
|
|
|
|
|
|
|
|
|
|
|
|
|
|
|
|||||||
|
|
1 |
|
|
|
|
|
|
|
|
|
|
|
|
6 |
|
|
||||
|
|
|
|
|
|
|
|
|
|
|
|
|
|
||||||||
|
|
2 |
|
|
|
|
|
|
|
|
|
|
|
|
|
|
|
7 |
|
|
|
|
|
|
|
|
|
|
|
|
|
|
|
|
|
|
|
|
|
|
|
||
|
|
|
|
|
|
|
|
|
|
|
|
|
|
|
|
|
|
|
|
||
|
|
|
|
|
|
|
|
|
|
|
|
|
|
|
|
||||||
|
|
|
|
|
|
|
|
|
|
|
|
|
|
|
|
|
|||||
|
|
|
|
|
|
|
|
|
|
|
|
|
|
|
|
|
|
|
|
|
|
|
|
|
|
|
|
|
|
|
|
|
|
|
|
|
|
|
|
|
|
|
|
|
|
3 |
|
|
|
|
|
|
|
|
|
|
|
|
|
|
|
|
|
|
|
|
|
|
|
|
|
|
|
|
|
|
|
|
|
|
|
|
|
|
|
|
|
|
|
|
|
|
|
|
|
|
|
|
|
|
|
|
|
|
|
|
|
|
|
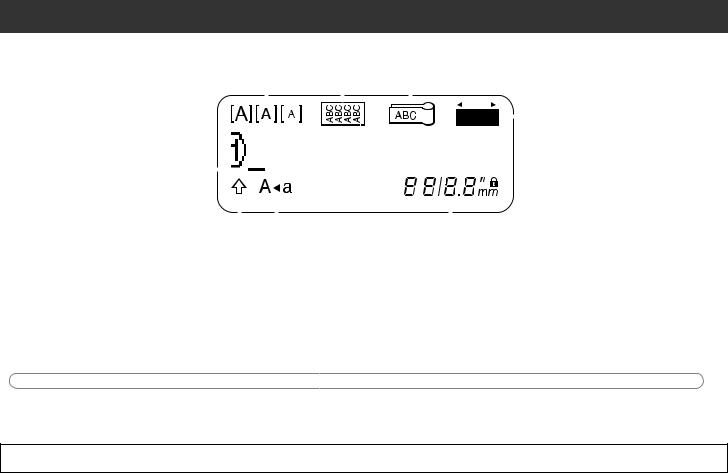
1. |
Size |
4 |
|
|
|
|
|
|
|
|
|
|
|
|
8 |
|
|
||||
|
|
|
|
|
|
|
|
|
|
|
|
||||||||||
5. |
Cable Wrap |
|
|
|
|
8. Label Length |
|||||||||||||||
2. |
Cursor |
6. |
Cable Flag |
|
|
|
|
If a specific label length has |
|||||||||||||
3. |
Shift |
|
|
|
|
|
|
|
|||||||||||||
7. |
Faceplate |
|
|
|
|
been selected, |
|
also appears. |
|||||||||||||
4. |
Caps |
|
|
|
|
|
|
|
|
|
|
|
|
|
|
|
|
|
|
|
|
 NOTE
NOTE
•The LCD displays one row of 15 characters; however, the text you enter can be up to 80 characters in length.
•Label length displayed on LCD may differ slightly from the actual label length when printed.

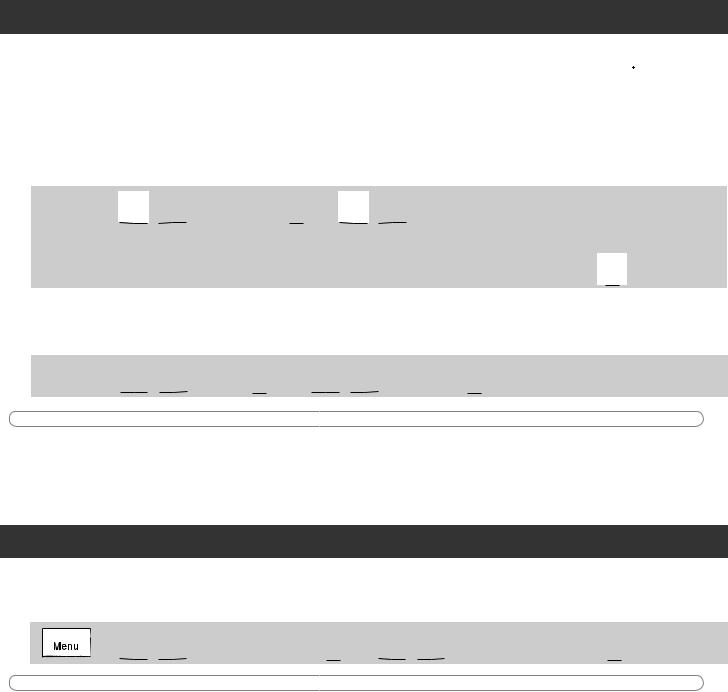
Keyboard
1
2
3
4
5
6
7
8
9
10
11
12
13
14
15
16
17
18
19
20
21
22
23
1. |
Menu key |
9. Shift key |
17. Cable Flag key |
2. |
Power key |
10. Caps key |
18. Faceplate key |
3. Cursor key : Left (Use with Shift |
11. Accent key |
19. Serialize key |
|
|
key to go to top of the text.) |
12. Tape Cutter lever |
20. Backspace key |
4. |
Escape key |
13. Clear key |
21. Enter key |
5. |
OK key |
14. Print key |
22. Symbols key |
6. |
Cable Wrap key |
15. Preview key |
23. Space key |
7. |
Text key |
16. Cursor key : Right (Use with |
|
8. |
Character keys |
Shift key to go to end of the text.) |
|
 NOTE
NOTE
•When selecting settings or lengths, press the Space key to return to the default value.
•Pressing the Preview key displays a generated image of the label, and may differ from the actual label when printed.
Initial Settings
1Turn on your P-touch labeling system.
Supply power using six AAA batteries or the optional AC Adapter (AD24), and then press  to turn on the power.
2
3
Set the language.
The default setting is [English].


 /
/ [Language]

 /
/ [English/Español/Français/Hrvatski/
Italiano/Magyar/Melayu/Nederlands/Norsk/Polski/Português/Portug. (BR)/Românã/
Slovenski/Slovenský/Suomi/Svenska/Türkçe/ýeština/Dansk/Deutsch]  .
.
Set the unit of measurement.
The default setting is [inch].


 /
/ [Unit]

 /
/ [inch/mm]
  .
.
 NOTE
NOTE
•The P-touch labeling system automatically turns off if it is inactive for five minutes.
•To cancel any operation, press  .
.
•To return to the default setting, press the Space key.
Contrast
Use this function to set LCD brightness. There are five levels from [-2] (darkest) to [+2] (brightest). The default setting is [0].

 /
/ [LCD contrast]

 /
/ [-2 / -1 / 0 / +1 / +2]
 NOTE
NOTE
• To return to the default setting, press the Space key.
Loading...