Brother PT-7600 User Manual
PT-7500/7600
USER´S GUIDEI
GUÍAÍA DE USUARIOIO
•Read this User’s Guide before you start using your P-touch labeler.
•Keep this User’s Guide in a handy place for future reference.
•Lea este manual de instrucciones antes de emplear la etiquetadora P-touch.
•Guarde esta guía de usuario para futuras referencias.
If you encounter any problems with your product, visit our Web site:
http://solutions.brother.com/
Si tiene algún problema con su producto, visite nuestro sitio web:
http://solutions.brother.com/

PT-7600
Federal Communications Commission (FCC) Declaration of Conformity (For USA Only)
Responsible Party : Brother International Corporation
100 Somerset Corporate Boulevard
Bridgewater, NJ 08807-0911 USA
TEL : (908) 704-1700
declares that the product
Product Name : Brother P-touch Electronic Labeling System
Model Number : |
PT-7600 |
This device complies with Part 15 of the FCC Rules. Operation is subject to the following two conditions: (1) this device may not cause harmful interference, and (2) this device must accept any interference received, including interference that may cause undesired operation.
This equipment has been tested and found to comply with the limits for a Class B digital device, pursuant to Part 15 of the FCC Rules. These limits are designed to provide reasonable protection against harmful interference in a residential installation. This equipment generates, uses and can radiate radio frequency energy and, if not installed and used in accordance with the instructions, may cause harmful interference to radio communications. However, there is no guarantee that interference will not occur in a particular installation. If this equipment does cause harmful interference to radio or television reception, which can be determined by turning the equipment off and on, the user is encouraged to try to correct the interference by one or more of the following measures:
•Reorient or relocate the receiving antenna.
•Increase the separation between the equipment and receiver.
•Connect the equipment into an outlet on a circuit different from that to which the receiver is connected.
•Consult the dealer or an experienced radio/TV technician for help.
Important
•The enclosed interface cable should be used in order to ensure compliance with the limits for a Class B digital device.
•Changes or modifications not expressly approved by Brother Industries, Ltd. could void the user’s authority to operate the equipment.

PT-7500
FCC NOTICE
This device complies with Part 15 of the FCC Rules. Operation is subject to the following two conditions: (1) this device may not cause harmful interference, and (2) this device must accept any interference received, including interference that may cause undesired operation.
This equipment has been tested and found to comply with the limits for a Class B digital device, pursuant to Part 15 of the FCC Rules. These limits are designed to provide reasonable protection against harmful interference in a residential installation. This equipment generates, uses and can radiate radio frequency energy and, if not installed and used in accordance with the instructions, may cause harmful interference to radio communications. However, there is no guarantee that interference will not occur in a particular installation. If this equipment does cause harmful interference to radio or television reception, which can be determined by turning the equipment off and on, the user is encouraged to try to correct the interference by one or more of the following measures:
•Reorient or relocate the receiving antenna.
•Increase the separation between the equipment and receiver.
•Connect the equipment to an outlet on a circuit different from that to which the receiver is connected.
•Consult the dealer or an experienced radio/TV technician for help.
Important
•Changes or modifications not expressly approved by Brother Industries, Ltd. could void the user’s authority to operate the equipment.
Compilation and Publication Notice
Under the supervision of Brother Industries Ltd., this manual has been compiled and published, covering the latest product’s descriptions and specifications.
The contents of this manual and the specifications of this product are subject to change without notice.
Brother reserves the right to make changes without notice in the specifications and materials contained herein and shall not be responsible for any damages (including consequential) caused by reliance on the materials presented, including but not limited to typographical and other errors relating to the publication.
Trademarks
The Brother logo is a registered trademark of Brother Industries, Ltd. Brother is a registered trademark of Brother Industries, Ltd.
©2010 Brother Industries Ltd.
●Microsoft, Windows and Windows Vista are registered trademarks of Microsoft Corporation in the United States and other countries.
●The names of other software or products used in this document are trademarks or registered trademarks of the respective companies that developed them.
Brother® Two-Year Limited Warranty and Replacement Service (USA Only)
Who is covered:
•This limited warranty (“warranty”) is given only to the original end-use/retail purchaser (referred to in this warranty as “Original Purchaser”) of the accompanying product, consumables and accessories (collectively referred to in this warranty as “this Product”).
•If you purchased a product from someone other than an authorized Brother reseller in the United States or if the product was used (including but not limited to floor models or refurbished product), prior to your purchase you are not the Original Purchaser and the product that you purchased is not covered by this warranty.
What is covered:
•This Product includes a Machine and Consumable and Accessory Items. Consumable and Accessory Items include but are not limited to label and tape rolls/cassettes, cutters, adaptor, carrying cases, batteries and print servers. Except as otherwise provided herein, Brother warrants that the Machine and the accompanying Consumable and Accessory Items will be free from defects in materials and workmanship, when used under normal conditions.
•This warranty applies only to products purchased and used in the United States. For products purchased in, but used outside, the United States, this warranty covers only warranty service within the United States (and does not include shipping outside the United States).
What is the length of the Warranty Periods:
•Machines: two years from the original purchase date.
•Accompanying Consumable and Accessory Items: 90 days from the original purchase date or the rated life of consumable, whichever comes first.
What is NOT covered:
This warranty does not cover:
(1)Physical damage to this Product;
(2)Damage caused by improper installation, improper or abnormal use, misuse, neglect or accident (including but not limited to transporting this Product without the proper preparation and/or packaging);
(3)Damage caused by another device or software used with this Product (including but not limited to damage resulting from use of non Brother®-brand parts and Consumable and Accessory Items);
(4)Consumable and Accessory Items that expired in accordance with a rated life; and,
(5)Problems arising from other than defects in materials or workmanship.
This limited warranty is VOID if this Product has been altered or modified in any way (including but not limited to attempted warranty repair without authorization from Brother and/or alteration/ removal of the serial number).
What to do if you think your Product is eligible for warranty service:
Report your issue to our Customer Service Hotline at 1-877-BROTHER (1-877-276-8437) or to a Brother Authorized Service Center within the applicable warranty period. Supply Brother or the Brother Authorized Service Center with a copy of your dated bill of sale showing that this Product was purchased within the U.S. For the name of local Brother Authorized Service Center(s), call 1- 877-BROTHER (1-877-276-8437) or visit www.brother-usa.com.
What Brother will ask you to do:
After contacting Brother or a Brother Authorized Service Center, you may be required to deliver (by hand if you prefer) or send the Product properly packaged, freight prepaid, to the Authorized Service Center together with a photocopy of your bill of sale. You are responsible for the cost of shipping, packing product, and insurance (if you desire). You are also responsible for loss or damage to this Product in shipping.
What Brother will do:
If the problem reported concerning your Machine and/or accompanying Consumable and Accessory Items is covered by this warranty and if you first reported the problem to Brother or an Authorized Service Center within the applicable warranty period, Brother or its Authorized Service Center will repair or replace the Machine and/or accompanying Consumable and Accessory Items at no charge to you for parts or labor. The decision as to whether to repair or replace the Machine and/or accompanying Consumable and Accessory Items is made by Brother in its sole discretion. Brother reserves the right to supply a refurbished or remanufactured replacement Machine and/or accompanying Consumable and Accessory Items and use refurbished parts provided such replacement products conform to the manufacturer’s specifications for new product/parts. The repaired or replacement Machine and/or accompanying Consumable and Accessory Items will be returned to you freight prepaid or made available for you to pick up at a conveniently located Authorized Service Center.
If the Machine and/or accompanying Consumable and Accessory Items are not covered by this warranty (either stage), you will be charged for shipping the Machine and/or accompanying Consumable and Accessory Items back to you and charged for any service and/or replacement parts/ products at Brother’s then current published rates.
The foregoing are your sole (i.e., only) and exclusive remedies under this warranty.
What happens when Brother elects to replace your Machine:
When a replacement Machine is authorized by Brother, and you have delivered the Machine to an Authorized Service Center, the Authorized Service Center will provide you with a replacement Machine after receiving one from Brother. If you are dealing directly with Brother, Brother will send to you a replacement Machine with the understanding that you will, after receipt of the replacement Machine, supply the required proof of purchase information, together with the Machine that Brother agreed to replace. You are then expected to pack the Machine that Brother agreed to replace in the package from the replacement Machine and return it to Brother using the pre-paid freight bill supplied by Brother in accordance with the instructions provided by Brother. Since you will be in possession of two machines, Brother will require that you provide a valid major credit card number. Brother will issue a hold against the credit card account number that you provide until Brother receives your original Product and determines that your original Product is entitled to warranty coverage. Your credit card will be charged up to the cost of a new Product only if: (i) you do not return your original Product to Brother within five (5) business days; (ii) the problems with your original Product are not covered by the limited warranty; (iii) the proper packaging instructions are not followed and has caused damage to the product; or (iv) the warranty period on your original Product has expired or has not been sufficiently validated with a copy of the proof of purchase (bill of sale). The replacement Machine you receive (even if refurbished or remanufactured) will be covered by the balance of the limited warranty period remaining on the original Product, plus an additional thirty (30) days. You will keep the replacement Machine that is sent to you and your original Machine shall become the property of Brother. Retain your original Accessory Items and a copy of the return freight bill, signed by the courier.
Limitations:
Brother is not responsible for damage to or loss of any equipment, media, programs or data related to the use of this Product. Except for that repair or replacement as described above, Brother shall not be liable for any direct, indirect, incidental or consequential damages or specific relief. Because some states do not allow the exclusion or limitation of consequential or incidental damages, the above limitation may not apply to you.
THIS WARRANTY IS GIVEN IN LIEU OF ALL OTHER WARRANTIES, WRITTEN OR ORAL, WHETHER EXPRESSED BY AFFIRMATION, PROMISE, DESCRIPTION, DRAWING, MODEL OR SAMPLE. ANY AND ALL WARRANTIES OTHER THAN THIS ONE, WHETHER EXPRESS OR
IMPLIED, INCLUDING IMPLIED WARRANTIES OF MERCHANTABILITY AND FITNESS FOR A PARTICULAR PURPOSE, ARE HEREBY DISCLAIMED.
•This Limited Warranty is the only warranty that Brother is giving for this Product. It is the final expression and the exclusive and only statement of Brother’s obligations to you. It replaces all other agreements and understandings that you may have with Brother or its representatives.
•This warranty gives you certain rights and you may also have other rights that may vary from state to state.
•This Limited Warranty (and Brother’s obligation to you) may not be changed in any way unless you and Brother sign the same piece of paper in which we (1) refer to this Product and your bill of sale date, (2) describe the change to this warranty and (3) agree to make that change.
Important: We recommend that you keep all original packing materials, in the event that you ship this Product.

Important Information
Should you have questions, or need information about your Brother Product, we have a variety of support options for you to choose from:
Customer Service
1-877-BROTHER (877-276-8437)
Customer Service 1-901-379-1210 (fax)
World Wide Web
www.brother-usa.com
Supplies/Accessories
www.brothermall.com or 1-877-552-MALL (6255)
BROTHER INTERNATIONAL CORPORATION 100 SOMERSET CORPORATE BLVD. BRIDGEWATER, NEW JERSEY 08807-0911
Please record your model and serial number and your date and location of Purchase below for your records. Keep this information with your proof of purchase (bill of sale) in case your Product requires service.
Model # __________________________________________________
Serial #___________________________________________________
Date of purchase:____________________________________________
Store where purchased:_______________________________________
Location of store: ___________________________________________
Important: We recommend that you keep all original packing materials, in the event you ship this product.
Save Time - Register On-Line!
Don’t stand in line at the post office or worry about lost mail. Visit us on-line at www.registermybrother.com
Your product will immediately be registered in our database and you can be on your way! Also, while you're there, look for contests and other exciting information!
Before Using Your P-touch Labeler
Thank you for purchasing the PT-7500/7600.
Your new P-touch labeler is an easy to operate, feature packed labeling system that makes creating professional, high quality labels a breeze. In addition to easy label creation via pre-formatted label layouts, the P-touch labeler editing software features advanced label formatting, block formats, bar codes and auto-numbering functions.
Safety precautions
To prevent injury and damage, important notes are explained using various symbols. The symbols and their meanings are as follows:
 WARNING Tells you what to do to avoid the risk of injury.
Tells you about procedures you must follow to prevent damage to the P-touch CAUTION labeler.
The symbols used in this manual are as follows:
|
Action NOT allowed. |
|
DO NOT disassemble the product. |
|
|
|
|
|
DO NOT splash the product with or |
|
DO NOT touch a given portion of the |
|
immerse the product in water. |
|
product. |
|
|
|
|
|
Mandatory action |
|
Unplugging |
|
|
|
|
|
Safety alert |
|
Alerts to the possibility of electrical |
|
|
shock |
|
|
|
|
|
|
|
|
|
i

 WARNING
Rechargeable battery pack (for PT-7600 only)
Follow these guidelines to avoid fire, heat, damage, and electric shock.
Do not use this P-touch labeler with any rechargeable battery pack other than that specified.
To recharge the rechargeable battery pack, insert the rechargeable battery pack into the P-touch labeler, and then use AD-18 designed specifically for this P-touch labeler.
Do not insert or use the rechargeable battery pack in any equipment other than the P- touch labeler. Do not directly connect it to a power supply, car cigarette lighter or electrical outlet.
Do not expose the rechargeable battery pack or the P-touch labeler with the rechargeable battery pack installed to pressure, heat, electric charge or microwaves.
Do not place the rechargeable battery pack or the P-touch labeler with the rechargeable battery pack installed near a fire or in a location exposed to heat or high temperatures (for example, near a flame or stove, in the sun, or in a location where the temperature is 140 °F or more, such as in a hot car).
Do not allow the rechargeable battery pack to get wet.
Do not short-circuit the terminals of the rechargeable battery pack or the P-touch labeler with the rechargeable battery pack installed, such as with a metal object.
Do not pierce the external casing of the rechargeable battery pack in any way. Take care to prevent damage to the rechargeable battery pack, or the P-touch labeler with the rechargeable battery pack installed.
Do not disassemble or alter the rechargeable battery pack or the P-touch labeler with the rechargeable battery pack installed.
Do not use a damaged or deformed rechargeable battery pack.
Do not use in a corrosive environment (for example, exposed to salty air or salt water, or acidic, alkaline or corrosive gas).
Do not insert or remove the rechargeable battery pack when the AC adapter is connected.
AC adapter
Follow these guidelines to avoid fire, damage, electric shock, or failure.
Use only the AC adapter (AD-18) designed exclusively for your P-touch labeler. Failure to observe this may result in an accident or damage. Brother shall not assume any responsibility for any accident or damage resulting from not using the specified AC adapter.
Unplug the power cord immediately and stop using the machine during an electrical storm. There may be a remote risk of electric shock from lightning.
Do not touch the AC adapter or power plug with wet hands.
Do not use the AC adapter in places of high humidity such as bathrooms.
 Do not use a damaged power cord.
 Do not overload the power outlet.
Do not place heavy objects on, damage or modify the power cord or plug. Do not forcibly bend or pull the power cord.
Do not drop, hit or otherwise damage the AC adapter.
Make sure that the plug is fully inserted in the power outlet. Do not use an outlet that is loose.
ii
 WARNING
Batteries (Alkaline/Rechargeable)
Follow these guidelines to avoid leakage, or damage to the batteries.
Do not use metallic articles, such as tweezers or a metallic pen, when exchanging the batteries.
Do not charge the batteries in high temperature locations.
Do not throw into fire, heat up, or disassemble the battery.
If battery fluid comes into contact with skin or clothes, wash the affected areas thoroughly with clean water. Battery fluid is harmful to skin.
 If the batteries leak, make sure the fluid does not come into contact with your eyes, as this may result in loss of eyesight. If contact does occur, flush eyes with clean water and seek medical attention urgently.
If the batteries begin to emit an odor, overheat, discolor, deform, or any other change occurs during use, charging, or storage, remove the batteries immediately and discontinue use.
P-touch labeler
Follow these guidelines to avoid fire, damage, electric shock, and choking.

 Do not allow the P-touch labeler to get wet in any way.
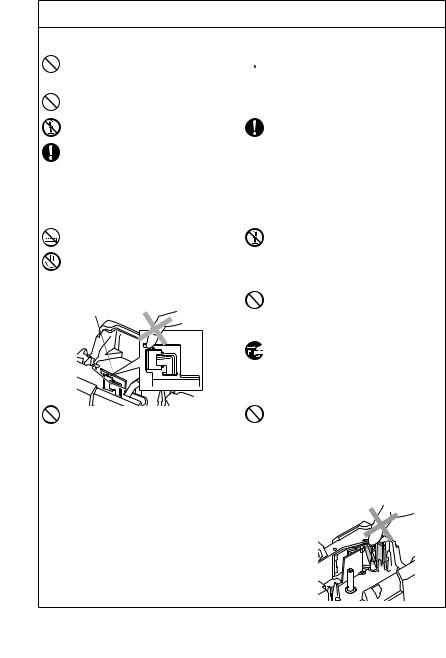
Do not touch any metal parts near the print head. The print head becomes very hot during use and remains very hot immediately after use. Do not touch it directly with your hands.
Print head
Do not use the P-touch labeler with a foreign object in it. If water, metallic substance or any foreign object enters the P-touch labeler, disconnect the AC adapter and remove battery, and contact the retail outlet where the P-touch labeler was purchased or your local authorized service center.
 Do not touch the blade of the cutter unit.
Do not disassemble the P-touch labeler. For inspection, adjustment, and repair of the P- touch labeler, contact the retail outlet where the P-touch labeler was purchased or your local authorized service center.
Plastic bags are used in the packaging of your machine. To avoid danger of suffocation, keep these bags away from babies and children.
Disconnect the AC adapter and remove battery immediately and stop using when you notice abnormal odour, heat, discoloration, deformation or anything unusual while using or storing it.
To prevent damage, do not drop or hit the machine.
iii
 CAUTION
Tape Cutter
Follow these guidelines to avoid personal injury and damage of the P-touch labeler.
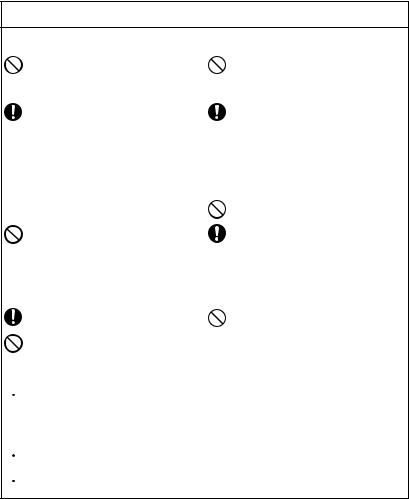
Do not open the tape compartment cover when operating the cutter unit.
Do not apply excessive pressure to the cutter unit.
AC adapter
If you do not intend using the P-touch labeler for an extended period of time, please disconnect the AC adapter from the power outlet and the P-touch labeler to avoid battery leakage or loss of charge.
Always hold the plug when disconnecting the power cord from the power outlet.
Batteries
Follow these guidelines to avoid liquid leakage, heat or rupture of the batteries.
 Do not use old and new batteries together.
Do not mix alkaline batteries with other type batteries.
 Do not let the batteries get wet.
Check that the batteries are correctly inserted.
If you do not intend using the P-touch labeler for an extended period of time, please remove the battery to avoid battery leakage or loss of charge.
P-touch labeler
Follow these guidelines to avoid personal injury and damage of the P-touch labeler.
Place the P-touch labeler on a flat, stable surface such as a desk.
Do not leave the P-touch labeler within reach of children with the back cover open.
Tape
Do not place any heavy objects on top of the P-touch labeler. Do not press on the LCD screen.
 Depending on the location, material, and environmental conditions, the label may unpeel or become irremovable, the color of the label may change or be transferred to other objects. Before applying the label, check the environmental condition and the material.
Memory
 Any data stored in memory will be lost due to failure or repair of the P-touch labeler, or when the batteries expires and the power is disconnected.
 When power is disconnected for more than two minutes, all text and format settings will be cleared. Any text files stored in the memory will also be cleared.
iv

General Precautions
●Do not use the P-touch labeler in any way or for any purpose not described in this guide. Doing so may result in accidents or damage to the machine.
●Do not put any foreign objects into the tape exit slot, AC adapter connector, or USB port (for PT-7600 only), etc.
●Do not touch the print head with your fingers. Use a soft wipe (e.g. a cotton swab) when cleaning the print head or the optional print head cleaning cassette (TZ-CL4) when cleaning the print head.
●Do not clean the machine with alcohol or other organic solvents. Only use a soft, dry cloth.
●Do not place the P-touch labeler/battery in direct sunlight or rain, near heaters or other hot appliances, in any location exposed to extremely high or low temperatures (e.g. on the dashboard or in the back of your car), high humidity, or dusty locations. Standard operating temperature range: (50 °F to 95 °F).
●Do not leave any rubber or vinyl on the machine for an extended period of time, otherwise the machine may be stained.
●Depending on the environmental conditions and the applied settings, some characters or symbols may be difficult to read.
●Use only Brother TZ tapes with this machine. Do not use tapes that do not have the
 mark.
mark.
●Do not pull or apply pressure to the tape in the cassette. Otherwise the tape cassette or P-touch labeler may be damaged.
●Make sure that the release lever is up when closing the back cover. The back cover cannot be closed if the release lever is pressed down.
●Do not try to print labels using an empty tape cassette or without a tape cassette set in the P-touch labeler. Doing so will damage the print head.
●Do not attempt to cut tape while printing or feeding since this will damage the tape.
●It is recommended that you use the USB cable supplied with the P-touch labeler. Should another USB cable need to be used, ensure it is of high quality construction (for PT-7600 only).
●Be careful not to scratch the CD-ROM. Do not place the CD-ROM in any location exposed to high or low temperatures. Do not place heavy objects on the CD-ROM or bend it (for PT-7600 only).
●The software on the CD-ROM is intended for use with the P-touch labeler and may be installed on more than one PC (for PT-7600 only).
●We strongly recommend that you read this User's Guide carefully before using your P-touch labeler, and then keep it nearby for future reference.
v

Contents |
|
Before Using Your P-touch Labeler ................................................ |
i |
Safety precautions .......................................................................................... |
i |
General Precautions ...................................................................... |
v |
Contents ....................................................................................... |
vi |
1. Getting Started .............................................................. |
1 |
Unpacking Your P-touch Labeler ................................................... |
1 |
General Description ...................................................................... |
3 |
Top view & bottom view ............................................................................... |
3 |
Keyboard & LCD screen .............................................................................. |
4 |
Back light ...................................................................................................... |
5 |
Power Supply ................................................................................. |
5 |
AC Adapter ................................................................................................... |
5 |
Batteries ........................................................................................................ |
6 |
Rechargeable battery pack (for PT-7600 only) ............................................ |
7 |
Tape Cassettes ............................................................................... |
9 |
Installing a tape cassette ............................................................................... |
9 |
Turning the P-touch Labeler On/Off ............................................ |
12 |
Changing the Language ................................................................ |
12 |
2. Label Type Modes ........................................................ |
13 |
Selecting a Label Type Mode ....................................................... |
13 |
Normal and Vertical Modes ......................................................... |
13 |
Rotate and Rotate & Repeat Modes ............................................. |
14 |
Flag Mode .................................................................................... |
15 |
Port and Panel1 Modes ................................................................ |
16 |
Panel2 Mode ................................................................................ |
17 |
3. Basic Functions ............................................................ |
19 |
Performing Basic Operations ....................................................... |
19 |
Choosing functions, parameters, settings and groups ................................ |
19 |
Choosing the default setting ....................................................................... |
19 |
Confirming a choice .................................................................................... |
19 |
Cancelling a choice .................................................................................... |
19 |
vi

Inputting Label Data .................................................................... |
20 |
Entering and editing text ............................................................................. |
20 |
Entering an accented character .................................................................. |
22 |
Entering a bar code .................................................................................... |
23 |
Entering a symbol ....................................................................................... |
25 |
Formatting the Label .................................................................... |
28 |
Specifying a label length ............................................................................. |
28 |
Specifying a margin size ............................................................................. |
28 |
Framing the text .......................................................................................... |
29 |
Specifying the character size ...................................................................... |
30 |
Specifying the character width ................................................................... |
31 |
Specifying the character style ..................................................................... |
32 |
Using the pre-formatted Auto Format templates ........................................ |
33 |
Printing Labels ............................................................................. |
34 |
Previewing the label layout ........................................................................ |
34 |
Feeding tape ............................................................................................... |
35 |
Printing a label ........................................................................................... |
35 |
Using special printing functions ................................................................. |
35 |
Storing and Recalling Files ........................................................... |
39 |
Storing label text ......................................................................................... |
39 |
Recalling text that has been stored ............................................................. |
40 |
Deleting text that has been stored ............................................................... |
40 |
4. Machine Adjustments .................................................. |
42 |
Selecting how tape is fed and cut ................................................................ |
42 |
Adjusting the display contrast ..................................................................... |
43 |
Using the Auto Reduction function ............................................................. |
43 |
Calibrating the label length ........................................................................ |
43 |
Specifying if the PERSONAL symbol category is continually updated ..... |
44 |
Changing the units of measure ................................................................... |
44 |
Displaying version information .................................................................. |
44 |
Cleaning ...................................................................................... |
45 |
Cleaning the print head, rollers and tape cutter ........................................ |
45 |
5. Using P-touch Labeler With a Computer (for PT-7600 only) ...47
System requirements ................................................................................... |
48 |
Installing the P-touch Editor 5.0 and Printer driver .................................. |
48 |
Uninstalling the P-touch Editor 5.0 ............................................................ |
52 |
Uninstalling / Replacing the printer driver ................................................ |
53 |
vii

Using P-touch Editor 5.0 .............................................................. |
54 |
Starting P-touch Editor ............................................................................... |
56 |
Layout window ............................................................................................ |
57 |
Starting P-touch Editor Help ...................................................................... |
59 |
Transferring Data To/From a Computer ...................................... |
61 |
Entering Transfer mode .............................................................................. |
61 |
How to use P-touch Transfer Manager & P-touch Library ........... |
62 |
Starting up P-touch Transfer Manager ...................................................... |
62 |
Transferring label templates from the PC .................................................. |
64 |
Adding a user-defined character image to the text ..................................... |
66 |
Using template data .................................................................................... |
66 |
Using downloaded database data ............................................................... |
68 |
Backing up label templates ......................................................................... |
70 |
Starting up the P-touch Library .................................................................. |
72 |
Searching labels .......................................................................................... |
72 |
6. Appendix ..................................................................... |
74 |
Resetting the P-touch Labeler ...................................................... |
74 |
Troubleshooting ........................................................................... |
74 |
Error Message List ........................................................................ |
76 |
Machine Specifications ................................................................ |
81 |
Main Unit .................................................................................................... |
81 |
Operating Environment: Windows® (for PT-7600 only) ........................... |
83 |
Index ........................................................................................... |
84 |
Contact Information (For USA Only) ........................................... |
87 |
viii
1 Getting Started
Unpacking Your P-touch Labeler
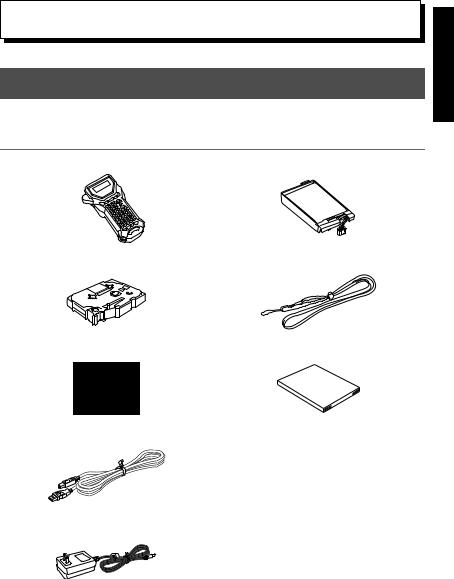
Check that the package contains the following before using your P-touch labeler.
Rechargeable battery pack (BA-7000)
Strap belt
User's Guide
Getting Started
1
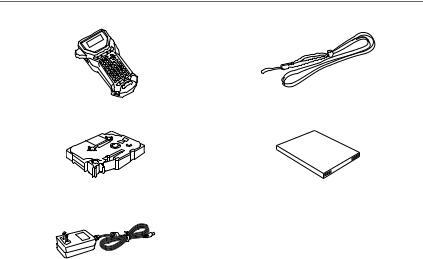
PT-7500
P-touch labeler |
Strap belt |
TZ tape cassette |
User's Guide |
AC adapter (AD-18)
(The design of the adapter may differ by country.)
2
General Description
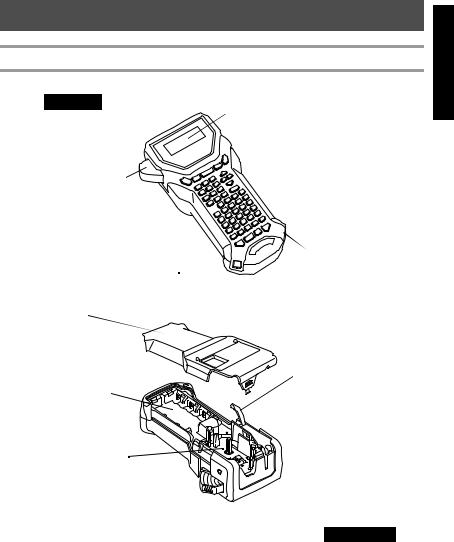
Top view & bottom view
Top view
 Display
Tape cutter button 
Keyboard 

AC adapter connector
USB port  (for PT-7600 only)
Back cover
Release lever
Battery compartment
Print head
Tape cassette compartment
 Tape exit slot
Bottom view
Getting Started
3
Keyboard & LCD screen |
|
|
|
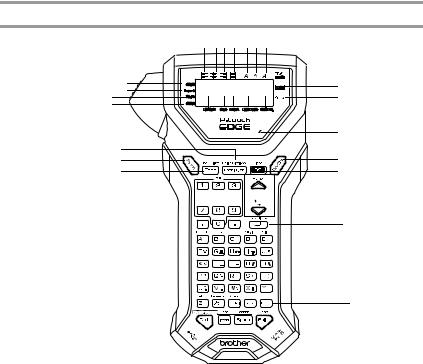
PT-7600 is shown here. |
1 234 567 |
|
|
|
|
||
E |
|
8 |
|
G F |
D CB A 0 |
||
9 |
|||
H |
|
|
I
R
Q |
J |
P |
K |
O 


 L
L
M
1 Left text alignment (page 33)
2 Center text alignment (page 33)
3 Right text alignment (page 33)
4 Justified text alignment (page 33)
5 Bold text style (page 32)
6 Outline text style (page 32)
7 Italic text style (page 32)
8 Frame (page 29)
9 Low battery indicator (page 7)
0 Block number (page 21)
A Label Type setting (page 13) B Width setting (page 31)
C Size setting (pages 30 & 31) D Length setting (page 28)
E Caps mode (page 20)
N
F Insert mode (page 21) G Shift mode (page 20) H Code mode (page 20)
I Charging indicator light (page 8) (PT-7600)
J Power key (page 12) K Backspace key
(pages 19 & 22)
L Arrow keys (page 19)
M Return key (pages 19 & 21) N Global format key (page 30)
OPF keys (page 33) (PT-7600) Auto Format keys (page 33)
(PT-7500)
P Feed key (page 35) Q Print key (page 35) R Label Type (page 13)
4
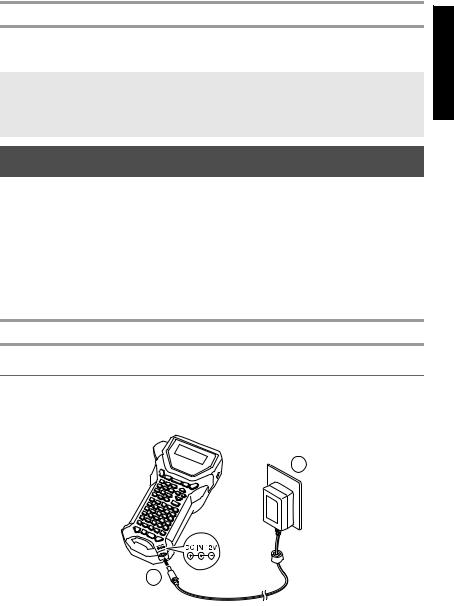
Back light
Press g and f to turn on or turn off the back light. The back light can be used when you wish to see the display more clearly. The default setting is ON.
Power can be saved when the back light is turned off.
When the back light is turned off, the back light will flash on for about a second when first powering on the machine as a reminder you can use this feature if the display is too hard to see.
Power Supply
The P-touch labeler can be supplied with power in two or three ways.
|
AC adapter (page 5) |
Batteries (page 6) |
Rechargeable battery pack (page 7) |
|
|
|
|
PT-7500 |
● |
● |
- |
|
|
|
|
PT-7600 |
● |
● |
● |
|
|
|
|
*The rechargeable battery pack is a consumable product. Therefore, there is no guarantee available for the deterioration of the products.
Use the power supply best suited to your needs. For details on each power supply, refer to the following.
AC Adapter
Connecting the AC adapter
When printing a large number of labels or labels that contain a large amount of text, it may be useful to connect the P-touch labeler to a standard electrical outlet using the AC adapter.
Getting Started
2
1
5

Notes on the AC adapter
Only use the AC adapter designed exclusively for this machine.
Disconnect the AC adapter if you do not intend to use this P-touch labeler for an extended period of time. When the power is disconnected and without battery power, all text shown in the display and stored in the memory will be lost.
Batteries
Installing the batteries
This machine has been designed to allow you to change the batteries quickly and easily. With batteries installed, this compact and portable machine can be used anywhere.
1 |
2 |
Notes on batteries
This P-touch labeler requires six AA-size (LR6) batteries. Rechargeable AA-size (Ni-MH) batteries can be used instead of the six alkaline batteries.
The AA-size (Ni-MH) batteries cannot be recharged by leaving them in the P-touch labeler with the AC adapter connected. Instead, recharge these rechargeable batteries by using a battery charger designed specifically for the type or rechargeable batteries used. For more details on the rechargeable batteries, refer to the instructions provided with them.
Do not use any of the following, otherwise battery leakage or damage may occur.
•Manganese batteries
•A combination of new and used batteries
•A combination of batteries of different types (alkaline and Ni-MH), different manufacturers or different models
•A combination of recharged and uncharged batteries
6
Make sure that the batteries are inserted so that their poles point in the correct direction. |
|
||
|
With batteries installed, the P-touch labeler determines the remaining battery charge |
Started |
|
|
during printing and feeding. If a low battery charge is detected, the low battery indicator |
||
|
|
||
|
()) comes on. When this occurs, be sure to replace the batteries. The low battery |
|
|
|
indicator may not come on in some operating conditions. |
Getting |
|
|
Before replacing the batteries, make sure that the P-touch labeler is turned off. In |
||
|
|||
|
addition, when replacing the batteries, insert the new ones within two minutes of |
|
|
|
removing the old ones, otherwise the text shown in the display and any text stored in the |
|
|
|
memory will be lost. |
|
|
If you do not intend to use this P-touch labeler for an extended period of time, remove the batteries. When the power is disconnected, all text shown in the display and stored in the memory will be lost.
Rechargeable battery pack (for PT-7600 only)
The machine has a rechargeable battery pack that allows you to use it anywhere when charged, and an AC adapter that allows you to use it while connected to an electrical outlet when the rechargeable battery pack’s charge becomes low.
To increase the life of the rechargeable battery pack, it is required to charge every six months.
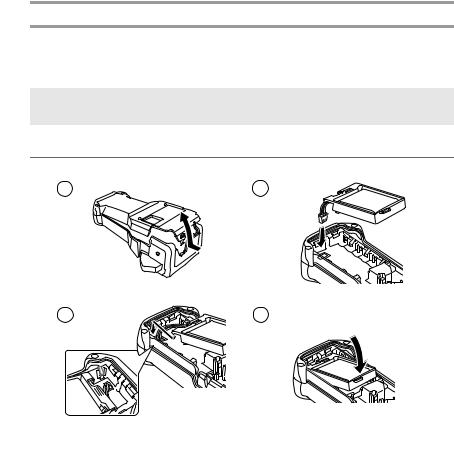
Installing the rechargeable battery pack
1 |
2 |
3 |
|
7
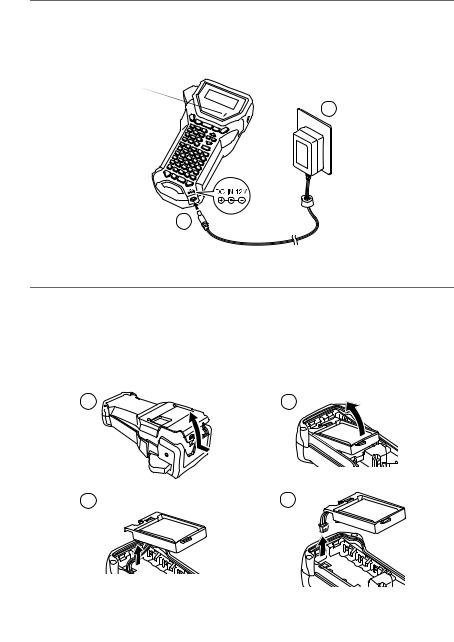
Charging the rechargeable battery pack
Insert the plug on the AC adapter cord into the connector on the machine and insert the AC adapter plug into a standard electrical outlet. While the rechargeable
battery pack is charging, the charging indicator light lights up. Charging time is approx. 3 hours. The charging indicator light turns off when charging is completed.
Charging indicator light
2
1
Replacing the rechargeable battery pack
Replace the rechargeable battery pack when the P-touch labeler can only be used for a short time even after recharging. A fully charged battery pack will continually print one full tape cassette at 77 °F. While the replacement period varies depending on the conditions of use, the rechargeable battery pack will generally need to be replaced after approximately one year. Be sure to replace it with the specified rechargeable battery pack (BA-7000).
1 |
2 |
8

Notes on the rechargeable battery pack |
|
|
|
|
|||
Be sure to use the suggested AC adapter (AD-18) |
Started |
||
Connect the AC adapter directly to the P-touch labeler to use it immediately after |
|||
|
|||
purchase or when the rechargeable battery pack’s charge becomes low. |
|
||
Disconnect the AC adapter from the P-touch labeler when installing or removing the |
Getting |
||
Be sure to charge the rechargeable battery pack before using the P-touch labeler. |
|||
rechargeable battery pack. |
|
||
The rechargeable battery pack may not be charged sufficiently when the power supply is |
|
||
less than the rated voltage. |
|
||
|
|||
Be sure to charge the new rechargeable battery pack for 3 hours after replacement. |
|
||
Be sure to dispose of the expired rechargeable battery pack as directed by local |
|
||
regulations for the disposal of nickel metal hydride batteries. |
|
||
Tape Cassettes
Installing a tape cassette
This machine has been designed to allow you to change the tape cassettes quickly and easily. TZ tape cassettes are available for this machine in a wide variety of types, colors and sizes, enabling you to make distinctive color-coded and stylized labels.
1 |
2 |
9
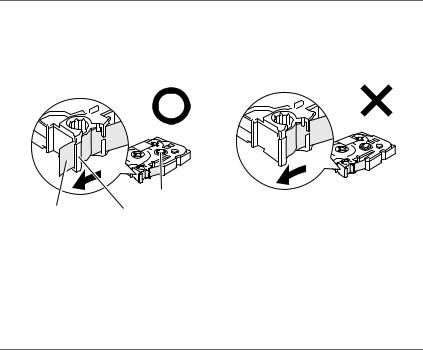
Notes on tape cassettes
Before installing the tape cassette, make sure that the end of the tape feeds under the tape guides.
If the tape cassette to be installed has an ink ribbon and the ink ribbon is loose, use your finger to wind the toothed wheel in the direction of the arrow on the cassette until there is no slack in the ribbon.
Toothed wheel
End of the tape |
Tape guide |
When inserting the tape cassette, make sure that the inner ribbon does not catch on the corner of the metal guide.
After installing a tape cassette and installing the back cover, press f once to remove any slack in the tape, and then press the tape cutter button to cut off the excess tape.
Always cut off the tape before removing it from the machine. If the tape is pulled on before being cut off, the tape cassette may be damaged.
Extra Strength Adhesive Tape
For textured, rough, or slipping surface, we recommend using Extra Strength Adhesive Tape.
Although the instruction sheet included with the Extra Strength Adhesive Tape cassette recommends cutting the tape with scissors, the tape cutter that this P-touch labeler is equipped with is able to cut Extra Strength Adhesive Tape.
10
Flexible ID Tape |
|
|
|
|
|
|
|
||
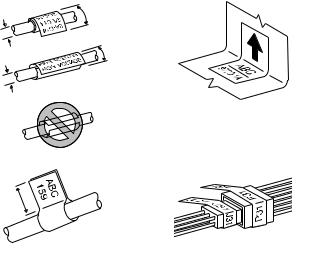
For applications that require more flexible labels, such as around sharp bends and |
Started |
|||
cylindrical objects, we recommend using Flexible ID Tape. |
||||
|
||||
Labels made with Flexible ID Tape are not designed for use as electrical insulation. |
|
|||
When wrapping labels around cylindrical objects, the diameter of the object should be at |
Getting |
|||
Type mode should be used. In addition, the overlapping ends of the label or the label flag |
||||
least 1/8" (3 mm), otherwise the label should be wrapped as a flag and the FLAG Label |
|
|||
should be at least 3/16" (5 mm). |
|
|||
The label may peel off cylindrical objects if the object is bent after the label is affixed. |
|
|||
|
||||
Diameter > 1/8" |
Overlap > 3/16" |
|
||
(5 mm) |
|
|||
(3 mm) |
|
|
|
|
Overlap > 3/16"
(5 mm)
Diameter > 1/8"
(3 mm)
Flag > 3/16"
(5 mm)
11

Turning the P-touch Labeler On/Off
Press o to turn on or turn off the P-touch labeler.
If the P-touch labeler is powered by the AC adapter or batteries, the previous session’s text is displayed when the P-touch labeler is turned on again. This feature allows you to stop work on a label, turn off the machine, and return to it later without having to reenter the text.
Regardless of whether the P-touch labeler is being operated from battery or the AC adapter, the machine will automatically turn off if no key is pressed or no operation is performed for 5 minutes.
Changing the Language
The language of the menus, settings and messages can be changed by selecting
ENGLISH, FRANÇAIS, ESPAÑOL, PORTUGUÊS, DEUTSCH, NEDERLANDS, ITALIANO, DANSK, SVENSKA, NORSK, or SUOMI. (The default setting is ENGLISH.)
1Press g, then Z.
2Press l or r until LANGUAGE is displayed.
3Press u or d until the desired setting is displayed, and then press n.
12

2 Label Type Modes
Selecting a Label Type Mode
Pressing a allows you to select one of the two regular modes for designing and printing your own custom labels, or any of the six special modes available for printing labels pre-formatted for identifying patch panels, cables, connectors and other components.
1Press a.
2Press u or d (or continue pressing a) until the desired mode is displayed. (For details on each Label Type mode, refer to the sections below.)
3Press n to apply the selected Label Type mode.
•If NORMAL or VERTICAL was selected, continue entering the label text as described in chapter 3, Basic Functions.
•If ROTATE, ROT-REP, PORT, PANEL1, PANEL2 or FLAG was selected, continue with the following steps.
4Press l or r until the desired parameter is displayed.
5Press u or d until the desired setting is displayed (or use the number keys to type in the desired setting).
6Press n to apply the selected settings.
7Type the text for each label in a separate text block.
8Print the labels.
•To print a single copy of each label, press p.
•To print multiple copies or several copies while increasing certain characters, or to print using any other special printing function, press g, then a and choose
your options. (For details, refer to Using special printing functions on page 35.)
Normal and Vertical Modes
Labels printed using the Normal and Vertical Label Type modes can be formatted and printed to fit any need.
NORMAL
ABCDE
VERTICAL
A B C D E
Label Type Modes
13
After selecting the Label Type mode NORMAL or VERTICAL, the label text can be entered, formatted, printed and cut as usual. With the Normal Label Type mode, the entered text is printed horizontally along the label. With the Vertical Label Type mode, the entered text is printed vertically along the label.
Rotate and Rotate & Repeat Modes
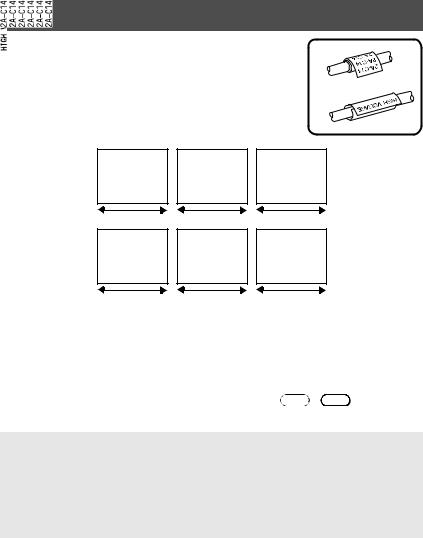
Labels printed using these Label Type modes can be wrapped around cables and wires to mark them. With both of these modes, the text is rotated 90° counterclockwise and each text block printed on a separate label as shown below. With the Rotate & Repeat mode, the text is printed repeatedly along the length of the label so that it can easily be read from any angle.
Rotate
Block length |
Block length |
Block length |
Rotate
&
Repeat
Block length |
Block length |
Block length |
After selecting the ROTATE or ROTREP Label Type mode, specify the length of each label and a frame style if desired.
● BLK LEN. (block length): 0.80" to 8.00" (20.0 to 200.0 mm) Default: 1.20" (30.0 mm)
● FRAME: |
OFF, |
1 |
, |
2 |
, 3 , 4 |
|
Default: OFF |
||||
A single block of text can contain a maximum of 7 text lines, and with the ROT-REP Label Type mode, only the text lines that fit within the label are printed.
For labels to be attached to cables and wires, we recommend using Flexible ID Tape. When wrapping Flexible ID Tape around cylindrical objects, the diameter of the object should be at least 1/8" (3 mm), otherwise the FLAG Label Type mode should be used. In addition, the overlapping ends of the label or the flag length should be at least 3/16" (5 mm).
14
Flag Mode
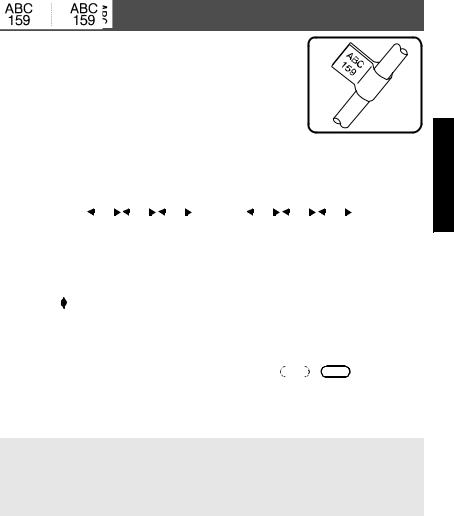
Labels printed using this Label Type mode can be wrapped around cable or wire with the ends stuck together to form a flag. With the FLAG Label Type mode, each block of text is printed at both ends of separate labels. The length of the unprinted part of this label is equal to the circumference of the cable or wire. In addition, the text can be printed horizontally or rotated 90°.
ROTATE |
|
|
|
|
|
|
|
|
ROTATE |
|
|
|
|
|
|
|
|
set to |
|
|
|
|
|
|
|
|
set to |
|
|
|
|
|
|
|
|
OFF |
|
|
|
|
|
|
|
|
ON |
|
|
|
|
|
|
|
|
|
|
|
|
|
|
|
|
|
|
|
|
|
|
|
|
|
|
|
|
|
|
|
|
|
|
|
|
|
|
|
|
|
|
|
|
|
Flag |
Flag |
Flag |
|
Flag |
Flag |
Flag |
||||||||||
|
length |
diameter |
length |
|
length |
diameter |
length |
||||||||||
After selecting the FLAG Label Type mode, specify the length and diameter of the flag, a frame style if desired, and whether or not to rotate the text.
● FLAG (flag diameter): |
0.00" to 4.00" |
(0.0 to 100.0 mm) |
||||
|
Default: 0.25" (7.0 mm) |
|||||
● FLAG LEN (flag length): |
0.40" to 8.00" |
(10.0 to 200.0 mm) |
||||
|
Default: 1.20" (30.0 mm) |
|||||
● FRAME: |
OFF, |
|
, |
|
|
, 3 , 4 |
1 |
2 |
|||||
|
Default: OFF |
|
|
|
||
● ROTATE: |
OFF, ON |
|
|
|
|
|
|
Default: OFF |
|
|
|
||
A single block of text can contain a maximum of 7 text lines.
For labels to be attached to cables and wires, we recommend using Flexible ID Tape. To wrap Flexible ID Tape around cylindrical objects, use the FLAG Label Type mode when the diameter of the object is less than 1/8"(3 mm). In addition, the flag length should be at least 3/16" (5 mm).
Label Type Modes
15
 Loading...