


 Loading...
Software Developer's Manual
P-touch Template Command Reference
QL-720NW
Version 1.0
The Brother logo is a registered trademark of Brother Industries, Ltd. Brother is a registered trademark of Brother Industries, Ltd.
© 2012 Brother Industries, Ltd. All rights reserved.
BarStar Pro Encode Library (DataMatrix, MaxiCode, PDF417, RSS) Copyright (c) 2007 AINIX Corporation. All rights reserved.
QR Code is a registered trademark of DENSO WAVE INCORPORATED in Japan and other countries. QR Code Generating Program Copyright © 2008 DENSO WAVE INCORPORATED
Each owner whose software title is mentioned in this document has a Software License Agreement specific to its proprietary programs.
Any trade names and product names of companies appearing on Brother products, related documents and any other materials are all trademarks or registered trademarks of those respective companies.

IMPORTANT - PLEASE READ CAREFULLY
Note
This documentation (“Documentation”) gives you information that will assist you in controlling your Printer QL-XXX (where “XXX” is the model name).
You may use the Documentation only if you first agree to the following conditions. If you do not agree to the following conditions, you may not use the Documentation.
Condition of Use
You may use and reproduce the Documentation to the extent necessary for your own use of your Printer Model (“Purpose”). Unless expressly permitted in the Documentation, you may not;
(i)copy or reproduce the Documentation for any purpose other than the Purpose,
(ii)modify, translate or adapt the Documentation, and/or redistribute it to any third party,
(iii)rent or lease the Documentation to any third party, or,
(iv)remove or alter any copyright notices or proprietary rights legends included within the Documentation.
No Warranty
a.Any updates, upgrades or alteration of the Documentation or Printer Model will be performed at the sole discretion of Brother. Brother may not respond to any request or inquiry about the Documentation.
b.THIS DOCUMENTATION IS PROVIDED TO YOU "AS IS" WITHOUT WARRANTY OF ANY KIND, WHETHER EXPRESS OR IMPLIED, INCLUDING, BUT NOT LIMITED TO, THE IMPLIED WARRANTY OF FITNESS FOR A PARTICULAR PURPOSE. BROTHER DOES NOT REPRESENT OR WARRANT THAT THIS DOCUMENTATION IS FREE FROM ERRORS OR DEFECTS.
c.IN NO EVENT SHALL BROTHER BE LIABLE FOR ANY DIRECT, INDIRECT, PUNITIVE, INCIDENTAL, SPECIAL OR CONSEQUENTIAL DAMAGES OR ANY DAMAGES WHATSOEVER, ARISING OUT OF THE USE, INABILITY TO USE, OR THE RESULTS OF USE OF THE DOCUMENTATION OR ANY SOFTWARE PROGRAM OR APPLICATION YOU DEVELOPED IN ACCORDANCE WITH THE DOCUMENTATION.

P-touch Template Command Reference
Contents
Introduction ··············································································································1
What is P-touch Template? ·····················································································2
1.Using P-touch Template ······················································································3
2.P-touch Template Settings Tool User’s Guide ··················································4
3.Examples for Using Commands·········································································9
3.1 Example for using P-touch Template......................................................................... |
9 |
4. P-touch Template Limitations ···········································································13
4.1 |
Relating to text objects ............................................................................................ |
13 |
|
4.1.1 Font, size, etc. .............................................................................................. |
13 |
|
4.1.2 Character alignment ..................................................................................... |
14 |
|
4.1.3 Text Layout settings...................................................................................... |
15 |
4.2 |
Relating to barcodes ............................................................................................... |
16 |
|
4.2.1 Barcodes ...................................................................................................... |
16 |
|
4.2.2 1D barcodes ................................................................................................. |
17 |
|
4.2.3 2D barcodes ................................................................................................. |
18 |
4.3 |
Relating to images................................................................................................... |
19 |
4.4 |
Relating to Numbering............................................................................................. |
19 |
4.5 |
Relating to Database ............................................................................................... |
19 |
4.6 |
Others...................................................................................................................... |
20 |
|
4.6.1 Transferring templates.................................................................................. |
20 |
|
4.6.2 About objects in a template .......................................................................... |
20 |
5. Precautions·········································································································21
5.1 |
Relationship between the P-touch Editor settings and the printer image ................ |
21 |
5.2 |
Making a template in order to save time before starting to print .............................. |
22 |
6. Control Code Lists ·····························································································23
6.1 |
Setting and retrieving commands for P-touch Template mode ................................ |
23 |
6.2 |
Setting and retrieving commands for raster mode................................................... |
24 |
7. Control Command Details ·················································································26
^PT |
Select print start trigger...................................................................... |
26 |
^FF |
Start printing ...................................................................................... |
27 |
^PS |
Specify print start command text string.............................................. |
28 |
^PC |
Specify print start received character count ....................................... |
29 |
^SS |
Specify delimiter ................................................................................ |
30 |
^TS |
Select template.................................................................................. |
31 |
^CO |
Select printer settings (cut options) ................................................... |
32 |
^LS |
Specify line spacing with line feed ..................................................... |
33 |
^CC |
Change the prefix character .............................................................. |
34 |
^RC |
Specify line feed command text string ............................................... |
35 |
^CN |
Specify number of copies .................................................................. |
36 |
^NN |
Specify number of Numbering copies ................................................ |
37 |
^ID |
Initialize template data ....................................................................... |
37 |
^QS |
Select print options ............................................................................ |
38 |
^QV |
Specify QR Code version .................................................................. |
39 |
^FC |
FNC1 replacement setting ................................................................. |
40 |
- i -
P-touch Template Command Reference
^II |
Initialize.............................................................................................. |
41 |
^OP |
Perform printer operation (feed) ........................................................ |
42 |
^SR |
Status request.................................................................................... |
43 |
^VR |
Retrieve version information .............................................................. |
45 |
^CR |
Line feed in object ............................................................................. |
45 |
^OS |
Select object (object number) ............................................................ |
46 |
^ON |
Select object (object name) ............................................................... |
47 |
^DI |
Directly insert object .......................................................................... |
48 |
ESC i a |
Select command mode...................................................................... |
49 |
ESC iXT2 |
Select print start trigger...................................................................... |
50 |
ESC iXP2 |
Specify print start command text string.............................................. |
51 |
ESC iXr2 |
Specify print start received character count ....................................... |
52 |
ESC iXD2 |
Specify delimiter ................................................................................ |
53 |
ESC iXa2 |
Specify non-printed text strings.......................................................... |
54 |
ESC iXi2 |
Select command mode...................................................................... |
55 |
ESC iXn2 |
Select template.................................................................................. |
56 |
ESC iXf2 |
Change the prefix character .............................................................. |
57 |
ESC iXc2 |
Select printer settings (cut options) ................................................... |
58 |
ESC iXy2 |
Specify printer settings (cut options–specifying number of labels)..... |
59 |
ESC iXm2 |
Select character code set .................................................................. |
60 |
ESC iXj2 |
Select international character set ...................................................... |
61 |
ESC iXR2 |
Specify line feed command text string ............................................... |
62 |
ESC iXC2 |
Specify number of copies .................................................................. |
63 |
ESC iXN2 |
Specify number of Numbering copies ................................................ |
64 |
ESC iXF2 |
FNC1 replacement setting ................................................................. |
65 |
ESC iXq2 |
Select print options ............................................................................ |
66 |
ESC iXT1 |
Retrieve print start trigger setting....................................................... |
67 |
ESC iXP1 |
Retrieve print start command setting text string................................. |
68 |
ESC iXr1 |
Retrieve print start received character count ..................................... |
69 |
ESC iXD1 |
Retrieve delimiter............................................................................... |
70 |
ESC iXa1 |
Retrieve non-printed text strings........................................................ |
71 |
ESC iXi1 |
Retrieve command mode setting ....................................................... |
72 |
ESC iXn1 |
Retrieve number of selected template ............................................... |
73 |
ESC iXc1 |
Retrieve printer settings (cut options) ................................................ |
74 |
ESC iXy1 |
Retrieve printer settings (cut options–specifying number of labels)... |
75 |
ESC iXm1 |
Retrieve character code set setting ................................................... |
76 |
ESC iXj1 |
Retrieve international character set setting........................................ |
77 |
ESC iXf1 |
Retrieve prefix character.................................................................... |
78 |
ESC iXR1 |
Retrieve line feed command setting text string .................................. |
79 |
ESC iXC1 |
Retrieve number of copies setting ..................................................... |
80 |
ESC iXN1 |
Retrieve number of Numbering copies setting................................... |
81 |
ESC iXF1 |
Retrieve FNC1 replacement setting................................................... |
82 |
ESC iXq1 |
Retrieve print options......................................................................... |
83 |
Appendix A: Specifications···················································································84
Appendix B: Character Code Tables····································································85
Character code tables ................................................................................................... |
85 |
International character set table .................................................................................... |
88 |
Appendix C: Troubleshooting···············································································89
If printing does not begin (main most frequent cause)................................................... |
89 |
If a template linked to a database is not printed ............................................................ |
89 |
Appendix D: Introducing the Brother Developer Center····································90
- ii -
P-touch Template Command Reference
Introduction
This material provides the necessary information for directly controlling the templates transferred to QL-720NW.
This information is provided assuming that the user has full understanding of the operating system being used and basic mastery of RS-232C in a developer's environment.
We accept no responsibility for any problems caused by programs that you develop using the information provided in this material, affecting software, data or hardware, including the QL-720NW, and any problems resulting directly or indirectly from them. Use this material only if you accept these terms.
This material shall not be reproduced, in part or in full, without prior approval. In addition, this material shall not be used as evidence in a lawsuit or dispute in a way that is unfavorable towards our company.
Read the model names that appear in the screens in this manual as the name of your printer.
- 1 -
Introduction

P-touch Template Command Reference
What is P-touch Template?
P-touch Template helps the user develop a printing system that connects directly from the host and has following functions:
transfers the template data from P-touch Editor to the printer (2)
transfers the ASCII text and binary data from a host to the template in the printer (3) (“Host” includes medias such as barcode readers, scales or medical devices.)
prints the transferred data (3)
(See the figure shown below.)
2. Design the template with P-touch Editor, then transfer it to printer.
1. Set up the printer from the PC according to the configuration of the host.
3. Transfer the data (text) from the host, and then print the template.
P-touch Template commands consist of a prefix character and a two-character text string.
When the prefix character is sent, the printer begins the analysis of the P-touch Template command, and performs the specified process if the following two-character text string corresponds to a command.
Note
*P-touch Template is not compatible with some hosts.
*These hosts should have a serial cable (RS-232C) to transfer the data.
- 2 -
What is P-touch Template?

1. Using P-touch Template
(1)Specify the printer settings.
Using the P-touch Template Settings tool, specify the initial printer settings according to the host system environment or the host that the printer is connected to.
(Please refer to “2. P-touch Template Settings Tool User’s Guide” on page 4.)
The printer driver must first be installed via a USB connection.
(2)Design the template.
Using P-touch Editor, design the template to be transferred to the printer.
(Please refer to “4. P-touch Template Limitations” on page 13.)
(3)Transfer the templates.
Using P-touch Transfer Manager, transfer the templates to the printer.
(Please refer to the QL series Software User’s Guide.)
(4)Program using P-touch Template commands.
If any special commands are required to control the printer, change the host’s program in accordance with the P-touch Template commands.
(Please refer to “6. Control Code Lists” on page 23.)
(5)Connect the printer with the host and print slips etc.
Using a serial cable, connect the printer to the host device. Transfer the data such as ASCII text from the host to templates in the printer, and print the label etc.
- 3 -
P-touch Template Command Reference
1. Using P-touch Template
P-touch Template Command Reference
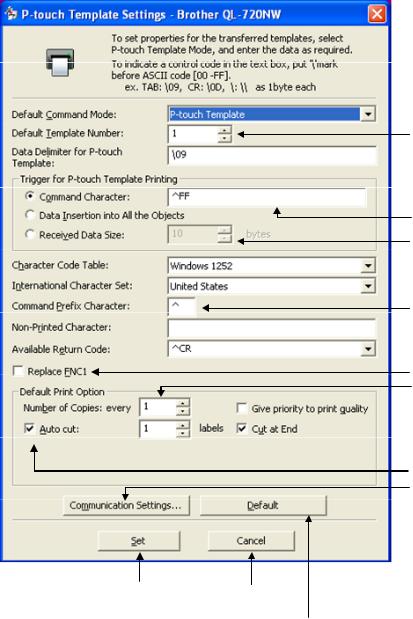
2. P-touch Template Settings Tool User’s Guide
 (1) Command mode setting
(2) Template number setting
 (3) Delimiter setting
 (4) Print start trigger setting
(5) Print start command text string setting
(6) Print start data amount setting
 (7) Character code set setting
 (8) International character set setting
(9) Prefix character setting
 (10) Non-printed character setting
 (11) Line feed character setting (12) FNC1 replacement setting (13) Number of copies setting
 (14) Print quality setting
 (15) Cut at End setting
 (16) Cut number setting (17) Auto cut setting
(18) Communication settings
Applies settings for (1) |
Closes the tool. |
through (18) to the printer. |
|
Returns (1) through (18) to their default settings.
- 4 -
2. P-touch Template Settings Tool User’s Guide
P-touch Template Command Reference
(1)Command mode setting
-P-touch Template mode
To use P-touch Template, select the P-touch Template mode.
-ESC/P mode
-Raster mode
(2)Template number setting
Specify the template number selected as the default when the printer is turned on.
However, if any template has been set to not be transferred to the printer, the number of that template cannot be specified.
(3) Delimiter setting
A delimiter is the symbol used to indicate when to move to the next object in the data that is being sent. Between 1 and 20 characters can be specified.
(4) Print start trigger setting
Select one of the following three options for the print start trigger. - Command Character
(Printing starts when the command character specified in (5) is received.) - Data Insertion into All the Objects
(Printing starts when the delimiter for the last object is received.) - Received Data Size
(Printing starts when the number of characters specified in (6) is received. However, delimiters are not counted in the number of characters.)
(5)Print start command text string setting
Specify 1 to 20 characters.
(6)Print start data amount setting
The amount of data that must be received before printing can begin can be set between 1 and 999.
(7) Character code set setting
Select one of the following three character code sets. For character code tables, refer to “Appendix B: Character Code Tables”.
-Windows1252
-Windows1250
-Brother standard
- 5 -
2. P-touch Template Settings Tool User’s Guide
P-touch Template Command Reference
(8) International character set setting
Select one of the following countries for the character set.
-USA
-France
-Germany
-Britain
-Denmark I
-Sweden
-Italy
-Spain I
-Japan
-Norway
-Denmark II
-Spain II
-Latin America
-South Korea
-Legal
The following 12 codes are switched depending on the country selected from those listed above. 23h 24h 40h 5Bh 5Ch 5Dh 5Eh 60h 7Bh 7Ch 7Dh 7Eh
For the characters that are switched, refer to the “International character set table” in “Appendix B: Character Code Tables”.
(9) Prefix character setting
Change the prefix character code. Specify as a one-character character code.
The prefix character is the code for the first character that identifies commands that can be used in P-touch Template mode.
(10) Non-printed character setting
The characters specified here are not printed when data is received. Specify 1 to 20 characters.
(11) Line feed character setting
The line feed code is used when feeding data to indicate that the following data should be moved to the next line in a text object. One of the following four line feed codes can be selected, or 1 to 20 characters can be specified as the line feed code.
1.^CR
2.\0D\0A
3.\0A
4.\0D
- 6 -
2. P-touch Template Settings Tool User’s Guide
P-touch Template Command Reference
(12) FNC1 replacement setting
This setting selects whether or not GS codes, which are included in barcode protocols such as GS1-128 (UCC/EAN-128), are replaced with FNC1 codes.
If the check box is selected, a received GS code is replaced with the FNC1 code. If the check box is cleared, a received GS code is outputted as is.
(13) Number of copies setting
Specify the number of copies. A number between 1 and 99 can be specified.
(14) Print quality setting
Select the print quality setting. If the check box is selected, priority is given to the print quality. If the check box is cleared, priority is given to the print speed.
(15) Cut at End setting
If this setting is selected, the cut operation will be performed when printing is finished.
(16) Cut number setting
A number between 1 and 99 can be specified.
(17) Auto cut setting
If auto cutting is selected, the cut operation will be performed after the number of labels specified in (16).
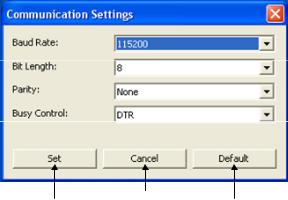
(18) Communication settings
Settings can be specified for the following parameters for serial communication.
Baud rate |
115200 bps, 57600 bps, 38400 bps, 31250 bps, 28800 bps, 19200 bps, |
|
14400 bps, 9600 bps, 4800 bps, 2400 bps, 1200 bps, 600 bps, 300 bps |
||
|
||
|
|
|
Bit length (bits) |
8 bits, 7 bits |
|
|
|
|
Parity |
None, Odd, Even |
|
|
|
|
Busy control |
DTR, XON/XOFF |
|
|
|
Applies the four settings |
|
Closes the Communication |
|
Returns the four parameters |
|
|
|||
to the printer. |
|
Settings dialog box. |
|
to their default settings. |
- 7 -
2. P-touch Template Settings Tool User’s Guide

P-touch Template Command Reference
Others · ini file
After the [Set] button (in the main dialog box or the Communications Settings dialog box) is clicked, the settings are saved when the dialog box is closed.
C:\Documents and Settings\(user_account_name)\Application Data\Brother
\Printer Settings\Pts3734.ini
· Typing text into text boxes (3), (5), (9) and (10)
Characters that can be entered as text can be typed in, and control codes can be entered as ASCII codes (00 to FF) with \ in front of them.
Example
Tab control code
Line feed control code
\
- 8 -
2. P-touch Template Settings Tool User’s Guide
P-touch Template Command Reference
3. Examples for Using Commands
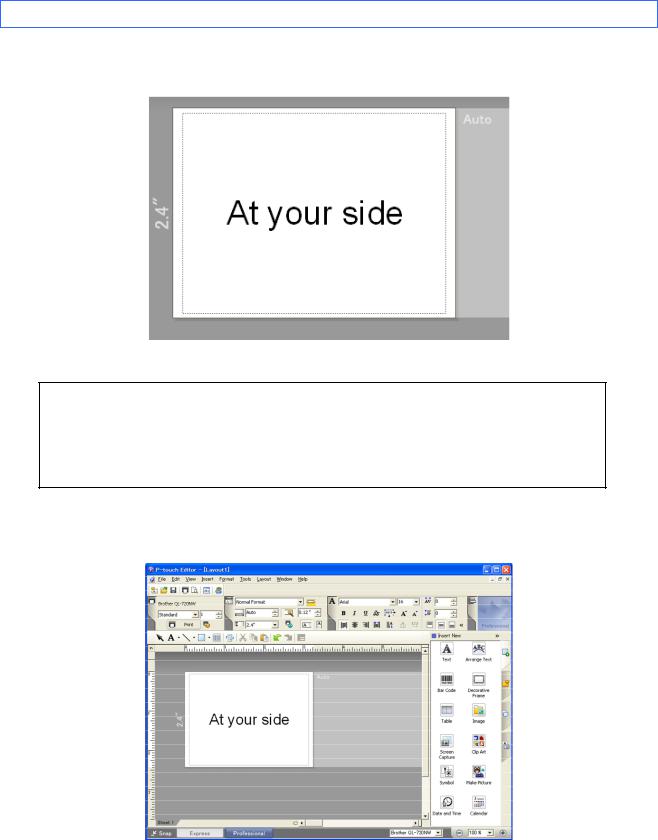
3.1 Example for using P-touch Template
Here is the label that will be made.
2.4 inches width continuous label is to be used.
Steps
1.Make a template with P-touch Editor.
2.Transfer the template to Transfer Manager.
3.Transfer the template from Transfer Manager to the printer.
4.Use P-touch Template commands for printing.
Step 1: Make a template with P-touch Editor.
Start the P-touch Editor and make a label.
- 9 -
3. Examples for Using Commands

P-touch Template Command Reference
Step 2: Transfer the template to Transfer Manager.
The template sent in step 2 is stored in Transfer Manager, as shown below.
Assigned number
Stored template
Step 3: Transfer the template from Transfer Manager to the printer.
Click [Transfer] button.
- 10 -
3. Examples for Using Commands
P-touch Template Command Reference
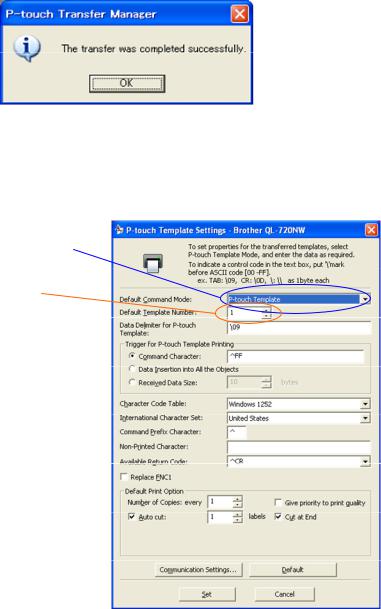
Note
Make sure that the printer is turned on and hooked up to the PC with a USB cable before using Transfer Manager. Also, make sure that the printer communication setting is always bidirectional communication when Transfer Manager is used.
When the template is transferred to the printer, the following message appears.
Step 4: Use P-touch Template commands for printing.
When using P-touch Template commands, at least these four commands are required. However, two out of the four can be set by using the P-touch Template Settings tool.
(1)Select the P-touch Template mode.
(2)Choose the assigned number.
After setting (1) and (2) with the P-touch Template Settings tool, the other two commands must be sent to the printer.
- 11 -
3. Examples for Using Commands
P-touch Template Command Reference
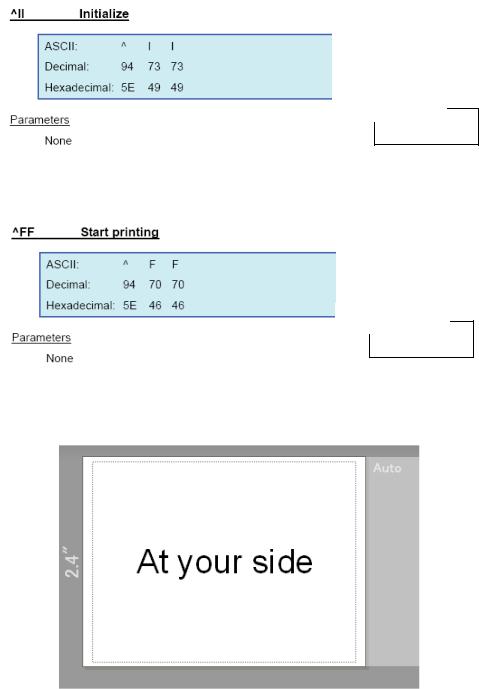
(3) Initialize P-touch Template
Entered command
^II
(4) Print Start
Entered command
^FF
When the printer receives the command above, the label below is printed.
- 12 -
3. Examples for Using Commands

P-touch Template Command Reference
4. P-touch Template Limitations
4.1 Relating to text objects
4.1.1 Font, size, etc.
Please also refer to “5.1 Relationship between the P-touch Editor settings and the printer image” on page 21.
Fonts specified in P-touch Editor are converted to Helsinki, Letter Gothic or Brussels, depending on the font shape, when the data is sent to the printer.
The font is converted according to the following rules: fixed pitch: Letter Gothic; serif: Brussels; san serif: Helsinki.
With symbol fonts, symbols are converted to text objects if text input mode has been entered, and the font is converted to one of the three described above. If the text input mode has been exited, simbols are converted to image objects and the selected font is not converted.
Character sizes specified in P-touch Editor are converted to the closest built-in character size when the data is sent to the printer.
Character sizes specified in P-touch Editor are all made the same size within an object.
If “At Printing” is selected, a time stamp specified in P-touch Editor is not printed. If “At Printing” is not selected, the time stamp is printed with the date and time that the data was created in P-touch Editor.
Depending on the language of the computer used for transferring, either the Western European or the Eastern European character set is used for characters within text objects.
“At Printing” setting
To cancel the “At Printing” setting for a date/time in P-touch Editor, display the properties for the “Date and Time Properties” object, and then clear the “At Printing” check box.
- 13 -
4. P-touch Template Limitations

P-touch Template Command Reference
4.1.2 Character alignment
Horizontal alignment settings (“Justify” or “Equal Length”) specified in P-touch Editor are changed to the left alignment setting.
The setting for line feed with a line feed specified with the P-touch Editor can be set between 0 and 255 dots.
A negative line spacing setting cannot be used in P-touch Editor. In addition, since there is an upper limit (about 21 mm) for the line width with the printer, a line spacing setting larger than this limit specified in P-touch Editor will not be applied on the printer.
Specifying the line spacing setting in P-touch Editor
- 14 -
4. P-touch Template Limitations
P-touch Template Command Reference
4.1.3 Text Layout settings
Character styles specified in P-touch Editor all become the same style within an object.
If the “Long Text” setting is selected under “Text Layout” in P-touch Editor, the vertical alignment setting is normally set for top alignment.
If continuous length tape is used, the print length is increased to fit the text depending on the setting. (Refer to “5.1 Relationship between the P-touch Editor settings and the printer image” on page 21 for details.)
If the “Fixed Frame Size (Wrap)” setting is selected under “Text Layout” in P-touch Editor, the object size does not change, and the text size is reduced.
“Fixed Frame Size (Wrap)” is a setting that was added for inserting long text. Since it is possible that the text size may become extremely small if the wrapping feature is no longer applied, we recommend that “Fixed Frame Size” be selected when die-cut labels or a fixed length is specified in P-touch Editor, or that “Automatic Length” be selected when an automatic media length is specified.
Shrink to Fit |
The text object size is fixed, and the text size is changed depending on the text |
|
length. |
||
|
||
|
|
|
Clip Text |
The text object size is fixed, and the text size is fixed. If the text is too long, the text |
|
is not printed. |
||
|
||
|
|
|
Long Text |
The text object width is fixed, and the text size is fixed. If the text is too long, the text |
|
object height is increased. |
||
|
||
|
|
|
Automatic |
The text object height is fixed, and the text size is fixed. If the text is too long, the |
|
Length |
text object width is increased. |
|
|
|
|
Free Size |
The text size is fixed. If the text is too long, the text object width is increased. If a |
|
new line is started, the text height is increased. |
||
|
||
|
|
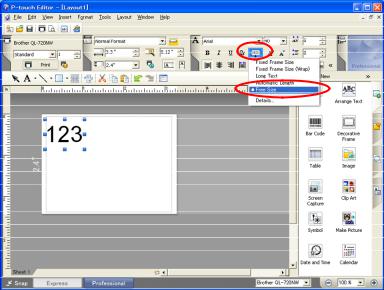
Specifying a Text Layout setting
Click the button circled in red to display a drop-down list, and then select the desired option.
- 15 -
4. P-touch Template Limitations
P-touch Template Command Reference
4.2 Relating to barcodes
4.2.1 Barcodes
When trying to transfer a template containing a barcode that is not compatible with the printer, an error will occur while transferring and the template cannot be transferred to the printer.
The following barcodes are compatible with the QL-XXX.
1D barcodes |
CODE39, ITF(I-2/5), UPC-A, UPC-E, EAN-13, EAN-8, CODABAR, CODE128, |
|
GS1-128(UCC/EAN-128) , RSS |
||
|
||
|
|
|
2D barcodes |
PDF417, QR Code, Data Matrix, MaxiCode |
|
|
|
If data containing characters incompatible with the protocol are fed into the barcode object, that barcode object is not printed.
The barcode size may differ from that in the print result with P-touch Editor.
Since CODE128 and GS1-128(UCC/EAN-128) can easily be printed slightly larger, we recommend leaving larger margins when creating templates in P-touch Editor.
If data fed into a barcode in a template created with P-touch Editor causes an extremely long barcode, the barcode may not be fully printed. If continuous length tape is used, the print length is increased to fit the barcode length.
Do not insert line feed immediately before or immediately after the barcode data. Otherwise, it will be considered as part of the barcode data. In that case, the barcode will be created containing the line feed code, or the barcode will not be printed since data incompatible with the barcode protocol is entered.
A delimiter or print start text string should be entered immediately after the barcode data.
- 16 -
4. P-touch Template Limitations
P-touch Template Command Reference
4.2.2 1D barcodes
The ratio setting for 1D barcodes specified in P-touch Editor is invalid. Normally, this is fixed at 3:1.
A barcode wider than 22.5 cm will not be printed.
A 1D barcode taller than 99 mm is converted to 99 mm.
The number of characters that can be entered for each protocol is shown below.
|
1 to 50 characters (not including “*” on both sides) |
|
CODE39 |
When feeding data, the asterisks (*) at the beginning and end of the data are |
|
|
skipped. |
|
|
|
|
ITF |
1 to 64 characters |
|
I-2/5 |
The bearer bar setting specified in P-touch Editor is invalid. |
|
|
|
|
EAN-8 |
7 characters |
|
|
|
|
EAN-13 |
12 characters |
|
|
|
|
UPC-A |
11 characters |
|
|
|
|
UPC-E |
6 characters |
|
|
|
|
|
3 to 64 characters (with “A”, “B”, “C” or “D” at the beginning and end) |
|
CODABAR |
Insertion of lowercase letters “a”, “b”, “c” or “d” at the beginning or end will be |
|
accepted with the directly insert object command, but the text that will be printed |
||
|
||
|
are the uppercase letters “A”, “B”, “C” or “D”. |
|
|
|
|
CODE128 |
1 to 64 characters |
|
|
|
|
GS1-128 |
1 to 64 characters |
|
(UCC/EAN-128) |
||
|
||
|
|
|
RSS-14 |
3 to 15 characters (begins with “01”) |
|
|
|
|
RSS Limited |
3 to 15 characters (begins with “01”; third digit is “0” or “1”) |
|
|
|
|
RSS Expanded |
1 to 64 numbers or 1 to 40 letters* |
|
|
|
* ISO646 characters can be printed.
<<numbers, letters, spaces, !, ”, %, &, ’, (, ), *, +, ,, -, ., /, :, ;, <, =, >, ? and _>>
When trying to transfer data exceeding the ranges described above, an error will occur while transferring. If the data that is fed does not meet the minimum limit, the barcode is not printed. If the data exceeds the maximum limit, only the data to the maximum limit is applied. However, if the data exceeds 64 characters, the barcode is not printed.
If a template is created in P-touch Editor with an extremely low barcode bar height, the bars may not be printed.
- 17 -
4. P-touch Template Limitations
P-touch Template Command Reference
4.2.3 2D barcodes
|
The version setting for a QR Code specified in P-touch Editor is invalid. The |
|
|
version setting must be turned off. |
|
QR Code |
The Structured Append settings specified in P-touch Editor are invalid. |
|
If the value specified with the QR Code version command is outside of the |
||
|
||
|
allowable range, it is changed to AUTO. (MODEL1:0 to 14, MODEL2:0 to 40, |
|
|
MicroQR:0 to 4) |
|
|
|
|
|
Since the error correction levels for PDF417 specified in P-touch Editor are |
|
|
inconsistent with those on the printer, the size of the barcode may change when |
|
PDF417 |
it is printed with P-touch Template. |
|
The width for PDF417 specified in P-touch Editor may change from the medium |
||
|
||
|
size to the small size. |
|
|
The Structured Append settings specified in P-touch Editor are invalid. |
|
|
|
|
Data Matrix |
The Structured Append settings specified in P-touch Editor are invalid. |
|
Macro settings specified in P-touch Editor are invalid |
||
|
||
|
|
|
|
The Structured Append settings specified in P-touch Editor are invalid. |
|
|
The barcode is partitioned when too much data is entered. |
|
Maxi Code |
When specifying the country code and service class with P-touch Editor, the |
|
number is entered at the beginning if the maximum number of characters is not |
||
|
reached. However, with the printer, the number is entered at the end. |
|
|
Example: “2” is specified. |
|
|
P-touch Editor: “200”; Printer: “002” |
|
|
|
- 18 -
4. P-touch Template Limitations
P-touch Template Command Reference
4.3 Relating to images
If a template containing overlapping images is transferred with P-touch Editor, all image data will be overlapping. (P-touch Editor displays the image created last on top.)
4.4 Relating to Numbering
A single template can contain a maximum of 9 valid Numbering objects. Numbering will not be performed for Numbering objects that exceed the maximum of 9.
A single object contains a single Numbering field.
A Numbering field can contain a maximum of 15 digits. If the field contains more than 15 digits, Numbering will only be performed with the last 15 digits.
Only Numbering fields will be saved in Numbering objects when printing is finished.
If the number of characters that was fed in is less than the number of characters in the Numbering object, it may not be printed correctly.
Note
Numbering objects refer to text objects or barcode objects that have the Numbering function applied.
4.5 Relating to Database
When a database is transferred, it is named using the file name + sheet name (when created in Excel).
The file name can contain up to 15 bytes of characters (15 one-byte characters or 7 two-byte characters).
A maximum of 99 databases can be transferred. However, the transfer cannot be completed if the amount of data being transferred exceeds 6,144 KB.
If there is a line feed in a cell containing text to be replaced, only the string of characters before the line feed will be replaced.
The text to be replaced can contain up to 256 characters.
A database can contain a maximum of 65,000 rows.
If a database containing more than 65,000 rows is transferred, all data after the 65,000th row will be deleted.
A database can contain a maximum of 100 columns. If a database containing more than 100 columns is transferred, all data after the 100th column will be deleted.
If there is no database linked to the template being printed, or if the corresponding string of characters to be replaced cannot be found, an error occurs.
If columns linked to the template being printed are not in the database, the objects related to those columns remain as they were when the template was transferred.
Depending on the language of the computer used for transferring, either the Western European or the Eastern European character set is used for characters within databases.
-19 -
4.P-touch Template Limitations
P-touch Template Command Reference
4.6 Others
4.6.1 Transferring templates
A maximum of 99 templates can be transferred. The transfer cannot be completed if the amount of data being transferred exceeds 6,144 KB.
A single template can contain a maximum of 50 objects. If trying 51 or more objects, an error will occur and the transfer cannot be completed.
When print data is fed, the command mode should be the P-touch Template mode.
When a template is transferred to the printer, all values specified with dynamic commands are initialized.
This is not compatible with split labels.
After printing from P-touch Editor, the command mode changes to raster mode. In order to print a template, select the P-touch Template mode in the P-touch Template Settings tool or, if the previous mode in the P-touch Template Settings tool was the P-touch Template mode, turn the printer off, then on again to enter P-touch Template mode.
4.6.2 About objects in a template
A single template can contain a total of 1000 lines. If it exceeds this limit, an error will occur during printing.
The line feed codes (0D0A, 0D and 0A) in print data are read, then discarded. However, when specified as special data, such as delimiters, print start text strings or line feed commands, they are applied.
The order of the objects is determined only by the last four-digit number of the object name. Objects with no numbers in their names will be at the end of the order. If objects have the same number, the order is
determined in the following order: text, 1D barcodes, then 2D barcodes. If the objects are of the same type, the object created first is first in the order. We recommend that the numbers indicating the order be added at the end of the object name.
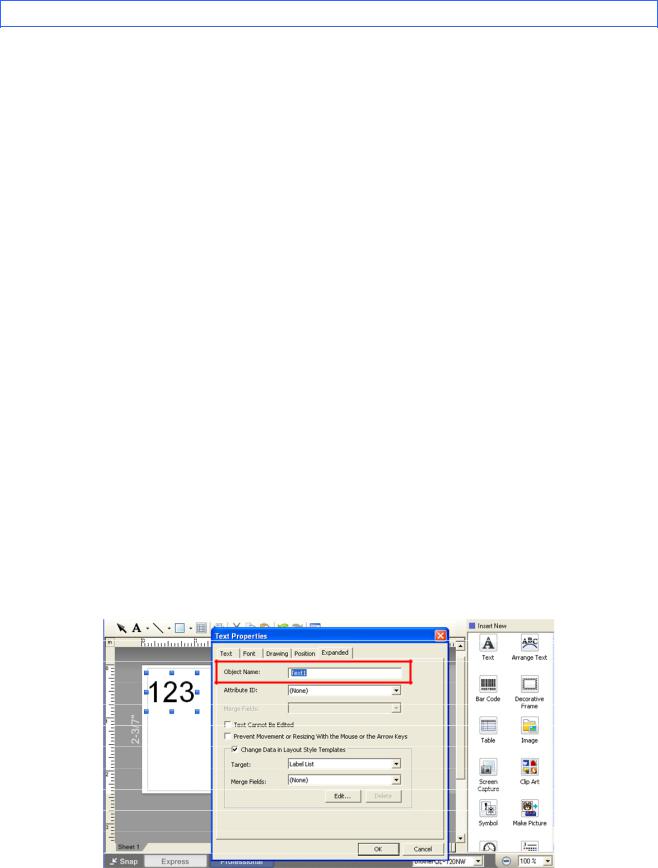
(To specify the name of an object in P-touch Editor, display the properties of the text or barcode object, and then specify the name in the “Object Name” box on the Expanded tab.)
Specifying the object name
- 20 -
4. P-touch Template Limitations

P-touch Template Command Reference
5. Precautions
5.1 Relationship between the P-touch Editor settings and the printer image
P-touch Editor setting |
|
|
Printer image |
|
|
||||||
|
Text options |
|
|
|
|
|
|
|
Printed |
||
|
|
Width |
|
Height |
|
||||||
(Text Layout settings) |
|
|
|||||||||
|
|
|
|
|
|
|
|
|
|
|
image |
Text |
|
Details- |
|
Wrap |
Frame Size |
|
Text Size |
Frame Size |
|
Text Size |
|
|
|
|
|
|
|||||||
Layout |
|
Options |
|
Text |
|
|
|
||||
|
|
|
|
|
|
|
|
|
|||
|
|
|
|
|
|
|
|
|
|
|
|
|
|
|
|
|
Fixed |
|
|
Fixed |
|
|
1 |
|
|
|
|
|
If the text is too |
|
|
If the text is too |
|
|
|
|
|
Clip Text |
|
|
Fixed |
|
Fixed |
(See |
|||
|
|
|
long, the overflow |
|
long, the overflow |
|
|||||
|
|
|
|
|
|
|
|
|
below.) |
||
|
|
|
|
|
text is not printed. |
|
|
text is not printed. |
|
|
|
|
|
|
|
|
|
|
|
|
|
||
Fixed |
|
|
|
|
|
|
|
|
|
|
|
|
Shrink to Fit |
|
|
|
|
|
|
|
|
||
Frame Size |
|
|
Fixed |
|
|
Fixed |
|
|
|
||
|
|
|
|
|
|
Auto |
|
Auto |
|
||
|
|
Clip Text |
|
Selected |
|
||||||
|
|
|
If the text is too |
|
If the text is too |
|
|
||||
|
|
|
|
The text is |
|
The text is |
|
||||
|
|
|
|
|
long, even with |
|
long, even with |
|
2 |
||
|
|
|
|
|
|
|
|||||
|
|
Shrink to |
|
|
|
automatically |
|
automatically |
|||
|
|
|
Selected |
the minimum text |
|
the minimum text |
|
(See |
|||
|
|
Fit |
|
|
maximized to |
|
maximized to |
||||
|
|
|
|
size, the overflow |
|
size, the overflow |
|
below.) |
|||
|
|
|
|
|
|
fit the frame |
|
fit the frame |
|||
Fixed |
|
|
|
|
text is printed |
|
text is printed |
|
|
||
|
|
|
|
|
size. * |
|
size. |
|
|||
|
- |
|
outside the frame. |
|
outside the frame. |
|
|
||||
Frame Size |
|
|
|
|
|
|
|
||||
(Wrap) |
|
|
|
|
|
|
|
|
|
|
|
|
|
|
|
|
|
|
|
|
|
|
|
|
|
|
|
|
Fixed |
|
|
|
|
|
|
|
|
- |
|
The overflow text |
|
|
Even the overflow |
|
|
3 |
|
Long Text |
|
|
is automatically |
|
Fixed |
text is printed |
|
Fixed * |
(See |
||
|
|
|
|
|
sent to the new |
|
|
outside the frame. |
|
|
below.) |
|
|
|
|
|
line. |
|
|
|
|
|
|
|
|
|
|
|
|
|
|
|
|
|
|
|
|
|
|
|
|
|
|
Fixed |
|
Auto |
|
|
|
|
|
|
|
|
|
If the text is too |
|
|
|
|
|
|
|
|
|
|
|
|
The text is |
|
|
|
|
|
|
|
Even the overflow |
|
|
long, even with |
|
4 |
|
Automatic |
|
- |
|
|
|
|
automatically |
||||
|
|
text is printed |
|
Fixed * |
the minimum text |
|
(See |
||||
Length |
|
|
|
|
maximized to |
||||||
|
|
|
|
outside the frame. |
|
|
size, the overflow |
|
below.) |
||
|
|
|
|
|
|
|
|
fit the frame |
|||
|
|
|
|
|
|
|
|
text is printed |
|
|
|
|
|
|
|
|
|
|
|
|
size. |
|
|
|
|
|
|
|
|
|
|
outside the frame. |
|
|
|
|
|
|
|
|
|
|
|
|
|
|
|
|
|
|
|
|
|
|
|
|
|
|
|
|
|
- |
|
Even the overflow |
|
|
Even the overflow |
|
|
5 |
|
Free Size |
|
|
text is printed |
|
Fixed * |
text is printed |
|
Fixed |
(See |
||
|
|
|
|
|
outside the frame. |
|
|
outside the frame. |
|
|
below.) |
|
|
|
|
|
|
|
|
|
|
|
|
(* If continuous length tape is used, the print length is increased to fit the text.)
Printed image |
|
|
|
|
1 |
2 |
3 |
4 |
5 |
- 21 -
5. Precautions

P-touch Template Command Reference
5.2 Making a template in order to save time before starting to print
Perform the following operation to convert permanent objects into images.
- In the Text Properties dialog box, select the Expanded tab, and then select the “Text Cannot Be Edited” check box.
- If the Expanded tab of the Text Properties dialog box is not displayed, click [Options] on the Tools menu, and then select the “Display Expanded Tabs of Object Properties” check box on the General tab.
Specify the text options (Text Layout settings) so that the text size is fixed.
- 22 -
5. Precautions

P-touch Template Command Reference
6. Control Code Lists
6.1 Setting and retrieving commands for P-touch Template mode
ASCII Code |
Binary Code |
Static/Dynamic |
Description |
|
^PT |
5E |
50 54 |
Dynamic |
Select print start trigger |
|
|
|
|
|
^FF |
5E |
46 46 |
|
Start printing |
|
|
|
|
|
^PS |
5E |
50 53 |
Dynamic |
Specify print start command text string |
|
|
|
|
|
^PC |
5E |
50 43 |
Dynamic |
Specify print start received character count |
|
|
|
|
|
^SS |
5E |
53 53 |
Dynamic |
Specify delimiter |
|
|
|
|
|
^TS |
5E |
54 53 |
Dynamic |
Select template |
|
|
|
|
|
^CO |
5E |
43 4F |
Dynamic |
Select printer settings (cut options) |
|
|
|
|
|
^LS |
5E |
4C 53 |
Dynamic |
Specify line spacing with line feed |
|
|
|
|
|
^CC |
5E |
43 43 |
Dynamic |
Change prefix character |
|
|
|
|
|
^RC |
5E |
52 43 |
Dynamic |
Specify line feed command text string |
|
|
|
|
|
^CN |
5E |
43 4E |
Dynamic |
Specify number of copies |
|
|
|
|
|
^NN |
5E |
4E 4E |
Dynamic |
Specify number of Numbering copies |
|
|
|
|
|
^ID |
5E |
49 44 |
|
Initialize template data |
|
|
|
|
|
^QS |
5E |
51 53 |
Dynamic |
Select print options |
|
|
|
|
|
^QV |
5E |
51 56 |
Dynamic |
Specify QR Code version |
|
|
|
|
|
^FC |
5E |
46 43 |
Dynamic |
FNC1 replacement setting |
|
|
|
|
|
^II |
5E |
49 49 |
|
Initialize |
|
|
|
|
|
^OP |
5E |
4F 50 |
|
Perform printer operation (feed) |
|
|
|
|
|
^SR |
5E |
53 52 |
|
Status request |
|
|
|
|
|
^VR |
5E |
56 52 |
|
Retrieve version information |
|
|
|
|
|
^CR |
5E |
43 52 |
|
Line feed in object |
|
|
|
|
|
^OS |
5E |
4F 53 |
|
Select object (object number) |
|
|
|
|
|
^ON |
5E |
4F 4E |
|
Select object (object name) |
|
|
|
|
|
^DI |
5E |
44 49 |
|
Directly insert object |
|
|
|
|
|
ESC ia |
1B |
69 61 |
Dynamic |
Select command mode |
|
|
|
|
|
Note
*The commands listed above must be used in P-touch Template mode.
*These commands (except ESC ia) cannot be used in raster mode or ESC/P mode.
*With dynamic commands, settings specified with a command are temporarily saved and applied until the printer is turned off.
-23 -
6.Control Code Lists

P-touch Template Command Reference
6.2 Setting and retrieving commands for raster mode
|
ASCII Code |
|
Binary Code |
|
Static/Dynamic |
|
Description |
|
|
ESC iXT2 |
|
1B |
69 58 54 32 |
|
Static |
|
Select print start trigger |
|
|
|
|
|
|
|
|
|
|
ESC iXP2 |
|
1B |
69 58 50 32 |
|
Static |
Specify print start command text string |
|
|
|
|
|
|
|
|
|
|
|
ESC iXr2 |
|
1B |
69 58 72 32 |
|
Static |
Specify print start received character count |
|
|
|
|
|
|
|
|
|
|
|
ESC iXD2 |
|
1B |
69 58 44 32 |
|
Static |
Specify delimiter |
|
|
|
|
|
|
|
|
|
|
|
ESC iXa2 |
|
1B |
69 58 61 32 |
|
Static |
|
Specify non-printed text strings |
|
|
|
|
|
|
|
|
|
|
ESC iXi2 |
|
1B |
69 58 69 32 |
|
Static |
Select command mode |
|
|
|
|
|
|
|
|
||
|
ESC iXn2 |
|
1B |
69 58 6E 32 |
Static |
Select template |
||
|
|
|
|
|
|
|
|
|
|
ESC iXf2 |
|
1B |
69 58 66 32 |
|
Static |
|
Change prefix character |
|
|
|
|
|
|
|
|
|
|
ESC iXc2 |
|
1B |
69 58 63 32 |
|
Static |
Select printer settings (cut options) |
|
|
|
|
|
|
|
|
|
|
|
ESC iXy2 |
|
1B |
69 58 79 32 |
|
Static |
|
Specify printer settings (cut options–specifying |
|
|
|
|
number of labels) |
||||
|
|
|
|
|
|
|
|
|
|
|
|
|
|
|
|
||
|
ESC iXm2 |
|
1B |
69 58 6D 32 |
Static |
Select character code set |
||
|
|
|
|
|
|
|
|
|
|
ESC iXj2 |
|
1B |
69 58 6A 32 |
Static |
|
Select international character set |
|
|
|
|
|
|
|
|
|
|
|
ESC iXR2 |
|
1B |
69 58 52 32 |
|
Static |
Specify line feed command text string |
|
|
|
|
|
|
|
|
|
|
|
ESC iXC2 |
|
1B |
69 58 43 32 |
|
Static |
Specify number of copies |
|
|
|
|
|
|
|
|
|
|
|
ESC iXN2 |
|
1B |
69 58 4E 32 |
Static |
|
Specify number of Numbering copies |
|
|
|
|
|
|
|
|
|
|
|
ESC iXF2 |
|
1B |
69 58 46 32 |
|
Static |
FNC1 replacement setting |
|
|
|
|
|
|
|
|
|
|
|
ESC iXq2 |
|
1B |
69 58 71 32 |
|
Static |
Select print options |
|
|
|
|
|
|
|
|
|
|
|
ESC iXT1 |
|
1B |
69 58 54 31 |
|
|
|
Retrieve print start trigger setting |
|
|
|
|
|
|
|
|
|
|
ESC iXP1 |
|
1B |
69 58 50 31 |
|
|
|
Retrieve print start command setting text string |
|
|
|
|
|
|
|
|
|
|
ESC iXr1 |
|
1B |
69 58 72 31 |
|
|
Retrieve print start received character count |
|
|
|
|
|
|
|
|
|
|
|
ESC iXD1 |
|
1B |
69 58 44 31 |
|
|
Retrieve delimiter |
|
|
|
|
|
|
|
|
|
|
|
ESC iXa1 |
|
1B |
69 58 61 31 |
|
|
|
Retrieve non-printed text strings |
|
|
|
|
|
|
|
|
|
|
ESC iXi1 |
|
1B |
69 58 69 31 |
|
|
Retrieve command mode setting |
|
|
|
|
|
|
|
|
||
|
ESC iXn1 |
|
1B |
69 58 6E 31 |
|
Retrieve number of selected template |
||
|
|
|
|
|
|
|
|
|
|
ESC iXc1 |
|
1B |
69 58 63 31 |
|
Static |
Retrieve printer settings (cut options) |
|
|
|
|
|
|
|
|
|
|
|
ESC iXy1 |
|
1B |
69 58 79 31 |
|
Static |
|
Retrieve printer settings (cut options–specifying |
|
|
|
|
number of labels) |
||||
|
|
|
|
|
|
|
|
|
|
|
|
|
|
|
|
|
|
|
ESC iXm1 |
|
1B |
69 58 6D 31 |
|
|
Retrieve character code set setting |
|
|
|
|
|
|
|
|
||
|
ESC iXj1 |
|
1B |
69 58 6A 31 |
|
Retrieve international character set setting |
||
|
|
|
|
|
|
|
|
|
|
ESC iXf1 |
|
1B |
69 58 66 31 |
|
|
|
Retrieve prefix character |
|
|
|
|
|
|
|
|
|
|
ESC iXR1 |
|
1B |
69 58 52 31 |
|
|
Retrieve line feed command setting text string |
|
|
|
|
|
|
|
|
|
|
- 24 -
6. Control Code Lists
Loading...