


99625942_ML_A.qxd 23/06/03 10:50 Page 1
GB |
Guide to using - Glass hood |
FR Le guide d'utilisation - Hotte Verre |
|
DE |
Bedienungsanleitung - Dunstabzugshaube |
|
aus Glas |
DK Betjeningsvejledning - Glasemhætte |
|
NL Gebruiksaanwijzing - Glazen Afzuigkap |
|
SE |
Användarmanual - Köksfläkt i glas |
NO Bruksveiledning - Kjøkkenvifte |
|
IT |
Libretto istruzioni - Cappa Di Vetro |
PT |
O manual de utilização - Extractor de fumos |
|
de vidro |
GR |
|
99625942_ML_A.qxd 23/06/03 10:50 Page 2
Introduction
Dear Customer,
Thank you for choosing the BRANDT hood.
Our design staff have produced a new generation of kitchen equipment, to make everyday cooking a pleasure.
The modern, attractive design of your new Brandt hood will blend smoothly into your kitchen installation, providing an optimum combination of easy use and performance.
The Brandt range also includes a huge choice of fitted cooking hobs, ovens, dish-washers and refrigerators, that will match your new Brandt hood.
Of course, we make every effort to ensure that our products meet all your requirements, and our Customer Relations department is at your disposal, to answer all your questions and to listen to all your suggestions (see back cover of manual).
Brandt has always been a leader in the development of new products, thus enhancing the quality of everyday life by providing increasingly efficient products, that are easy to use, respect the environment, and are attractive and reliable.
The BRANDT name.
Brandt UK Ltd
INTEC FOUR
Wade road
Basingstoke Hampshire - RG 24 8NE
After Sales : 0115 976 6937
Fax (0) 1256 34 6877
 Safety instructions
-You should never "flambé" dishes under the hood or operate gas rings under the hood without cooking utensils being placed on them (the flames sucked up into the hood can damage the appliance).
-When frying food under the appliance, a careful watch must be kept on this at all times.
-Repairs must only be carried out by an approved specialist.
-You should regularly clean the filter cartridge.
-The hood should never be used over a combustible fuel burning stove (wood, coal, etc).
These hoods have been designed for non-commercial use in private homes.
With a view to constantly improving our products, we reserve the right to modify their technical, functional or aesthetic characteristics, making any changes to their features considered necessary or desirable in view of technical progress.
These hoods are designed exclusively for cooking foodstuffs and drinks. These products do not contain any asbestos based components.
99625942_ML_A.qxd 23/06/03 10:50 Page 3
Throughout this manual, |
|
indicates safety recommendations, |
||||
|
||||||
|
|
|
indicates advice to help you make the |
|||
|
|
|
best use of your oven |
|||
|
|
|
|
|||
The controls on your hood |
Fig.1 |
|
||||
|
|
|
|
|
|
|
|
|
|
|
|
|
GB |
|
|
|
Electronic model |
|
|
|
|
|
|
|
|
|
|
|
|
|
|
|
|
|
1 2 3
Lighting
Switching off the hood
Switching on the hood
1Low power
2Medium power
3Max. power
In the case of a kitchen heated by a device connected to a chimney (for example a stove) the "recycling" version of the hood should be installed. Do not
use the hood without metal filters.
Suitable ventilation should be ensured for the room when the suction hood is used at the same time as appliances using gas or another combustible fuel.
99625942_ML_A.qxd 23/06/03 10:50 Page 4
Installing your hood ?
If you possess an outlet to the exterior: fig. 4
Your hood can be connected to this using a flue (minimum Ø 125 mm, enamelled, made from aluminium, flexible or made from a non-flammable material). If your flue is below 125 mm in diameter, you must obligatorily use the "recycling" mode.
If you do not possess an outlet to the exterior: fig. 5
All of our appliances can be used in recycling mode.
In this case, you should add an active carbon filter which will keep in odours.
Assembling your hood
The hood must be installed in conformity with the applicable regulations  concerning the ventilation of premises. In France, these regulations are detailed in DTU 61.1 from the CSTB. In particular, the evacuated air must not be channelled into a duct used to evacuate fumes from appliances using gas or
other combustible fuels. Disused ducts may only be used after approval from a competent specialist.
The minimum distance between the cooking surface and the lowest part of the hood must be 70 cm. If the instructions for the hob installed under the hood specify a distance of more than 70 cm, this requirement must be respected.
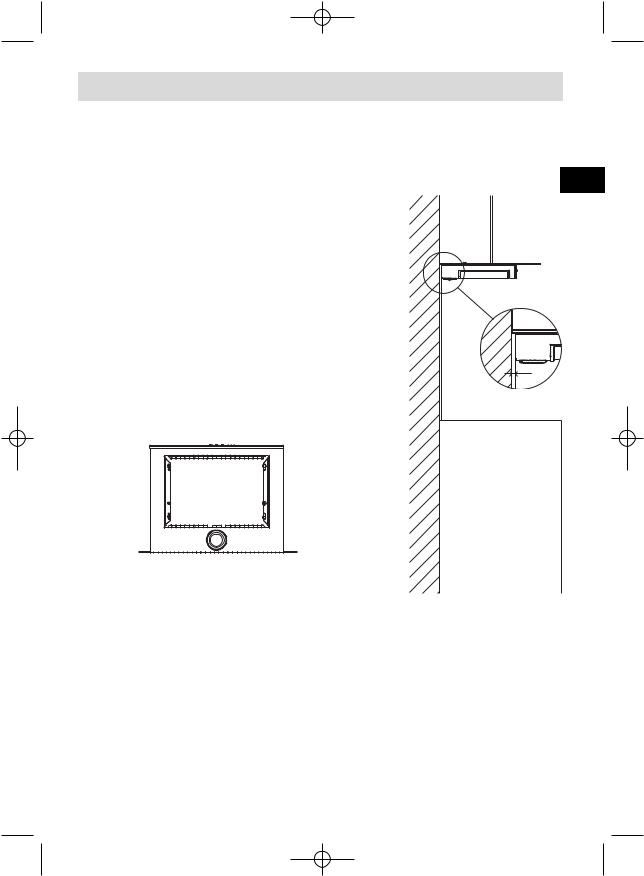
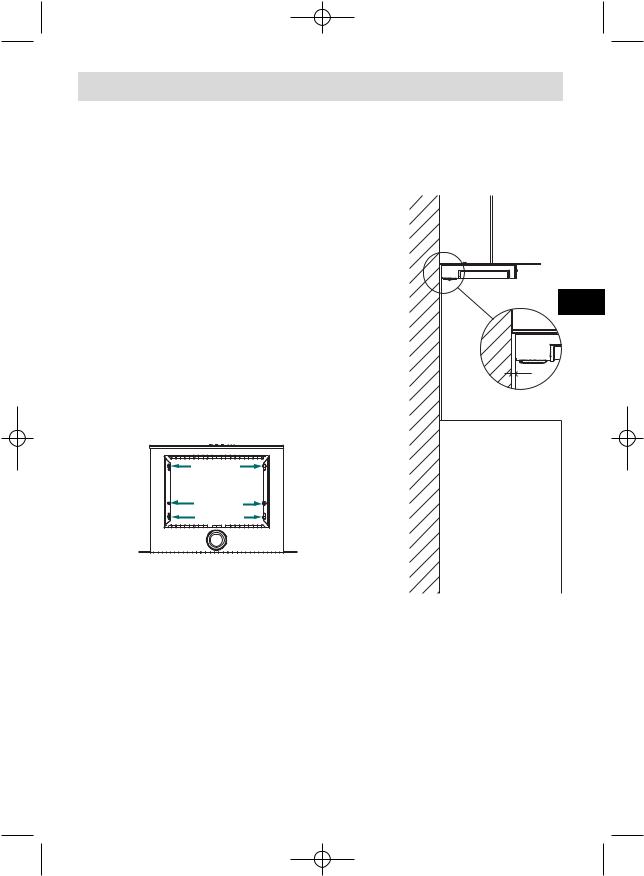
-Place the assembly template against the wall: fig. 2
-Draw a vertical line on the wall in order to perfectly line up your hood with your cooking appliance.
-Draw a mark on the vertical line at 70 cm (minimum) from your cooktop.
Note : in the case of a hollow wall, you should use suitable screws and wall plugs.
-Dismantle the filter cartridges (fig. 3).
-Attach the hood via its rectangular slots. The size of the slots enable you to position
the hood, moving it slightly to the left or right as needed (fig. 3).


 Adjust the height and level by manoeuvring the bracket adjustment screws

 ("A") and then attach the hood securely to the wall by tightening the screws ("B") (Fig. 3).
Connecting up your hood
This appliance is delivered with a H 05 VVF power cable with three
conductors of 0.75 mm2 (neutral, live and earth). This must be connected to the 220-240 V single phase mains network via a CEI 60083 standard plug which must remain accessible following installation, or an all pole cut-off device with a minimum contact opening distance of 3 mm. We will not be liable in the event of an accident arising following incorrect or non-existent earthing. The fuse for your installation must be 10 or 16A. If the power cable is damaged, call the after sales service department in order to
avoid danger.
99625942_ML_A.qxd 23/06/03 10:50 Page 5
“LE PLUS” for an attractive installation
BRANDT cares about the appearance of your kitchen. You can now adjust the hood to the tiles or credence. There is an adjustment margin of 10 mm in relation to the wall“ AN EXCLUSIVE BRANDT FEATURE “.
Before mounting your hood on the wall:
-Remove the metal filter.
-Remove the two screws (item 1).
-Slightly unscrew the four screws, but do not remove them (item 2).
-Pull the lower section outwards.
-Assemble and mount the extractor duct as described.
-Adjust the lower section to be in contact with the tiles or credence.
-Tighten the four screws (item 2).
-Install the metal filter.
 item 2
 item 1
 item 2
GB
10 mm
Detail of offset
Dé ail décalage
Wall/decorative feature décor / mur
99625942_ML_A.qxd 23/06/03 10:50 Page 6
Assembling the chimney
Hood to be used with external evacuation: fig. 4 and 8
-Remove the two attachment clips provided for the transportation of the chimneys.
-Remove the two attachment screws from the plastic deflector (in recycle mode only).
-Attach the metal chimney bracket to the wall, also placing this against the ceiling (fig. 6). Take care in aligning the 2 triangular slots on the metal bracket with the vertical line on the wall.
-In the case of a flue with a diameter of 125 mm, use the adapter supplied (fig. 8).
If your exterior duct is below 125 mm, you must obligatorily connect your hood in recycling mode
-Prepare your telescopic chimney taking care to block off the vents (fig. 8). Fit the chimneys into one another as far as they will go.
-Fit the upper part to the metal bracket.
-Adjust the length of the telescopic chimney by bringing down the lower part and fitting it to the top of the hood.
To ensure optimal use of your device, we advise that you connect a flue with a 

 diameter of 150 mm (not supplied). Limit the number of angles and bends as


 far as possible, and keep the length of the flue to a minimum. In the event
  that the hood will be functioning using exterior evacuation, you should ensure
a sufficient inlet of fresh air to avoid a pressure deficiency in the room.
Hood to be used in "recycling" mode: fig. 5 and 9
-It is possible to remove the back flow valves.
-Fit the plastic smoke deflector to the wall also placing this against the ceiling.
Take care to centre the deflector vis-à-vis the vertical line drawn on the wall
(fig. 7).
-Prepare your chimney taking care to place the vents toward the top to ensure that they are visible (fig. 9).
-Fit the upper part to the plastic deflector.
-Adjust the length of the telescopic chimney by bringing down the lower part and fitting it into the top of the hood.
Changing the lamp ?
Before carrying out any work, the power supply to the hood must be turned off, either by unplugging it or by using the circuit breaker switch,
1.Remove the viewing port (fig. 11).
2.Change the halogen lamp G4-20W-12V.
3.Replace the lamp assembly by carrying out the above operations in reverse order.
99625942_ML_A.qxd 23/06/03 10:50 Page 7
Cleaning your hood ?
The power supply to the hood must be turned off either by removing the plug or by using the circuit breaker switch before you remove the metal filters. After cleaning, the metal filters must be refitted in conformity with the instructions.
|
FILTER CARTRIDGE |
ACTIVATED CARBON FILTER |
|
|||
|
Remove the protective film before using the |
For |
hoods |
installed |
in |
|
|
filter cartridge for the first time. |
"recycling" mode. |
|
|||
|
|
|
|
|
||
MAINTENANCE |
VITAL EVERY MONTH |
|
VITAL EVERY YEAR |
GB |
||
To avoid all risks of fire. |
|
|
||||
|
|
|||||
|
This filter traps fatty vapours and dust. This |
This filter traps odours and must be |
||||
WHY? |
component plays an important part in |
changed at least once a year |
||||
|
ensuring the effectiveness of your hood. |
depending on your level of use. |
|
|||
|
Use a commercial household cleaning product then |
You should order these filters from |
||||
|
rinse abundantly and dry. This cleaning can be |
|||||
|
your dealer (quoting the reference |
|||||
HOW ? |
carried out in your dishwasher in the vertical position |
|||||
shown on the ID plate located |
||||||
(ensure that the cartridge never comes into |
||||||
|
contact with dirty crockery or silver |
inside the hood) and note the date |
||||
|
tableware). |
the filter was changed. |
|
|||
Never use metal scouring pads, abrasive products or excessively stiff brushes.
To clean the body and the lighting port, you should use only commercial household cleaning products diluted in water and then rinse using clean water, drying with a soft cloth.
Dismantling the filter cartridge (fig. 10)
Fitting the carbon filter (fig. 12)
1.Remove the cartridge.
2.Place the new carbon filter on the cartridge inside the hood.
3.Fit the two retention rods.
Who should I contact ?
Blemishes on the hood caused by abnormal use or cleaning with abrasive products which do not cause the appliance to cease functioning or which do not cause it to become unsuitable for use will not be dealt with by the manufacturer. Any repairs must be carried out by a qualified technician.
Only the distributors of our brand:
•Are fully familiar with your appliance and its operation,
•Fully apply our adjustment, maintenance and repair methods,
•Use only original parts.
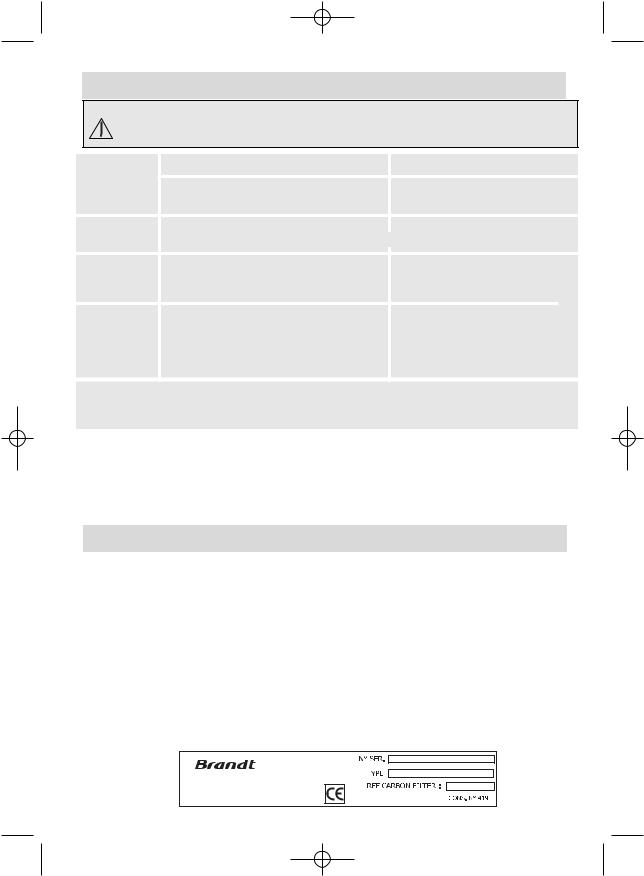
To submit a complaint or to order spare parts from your distributor, please be sure to give him the complete reference for your appliance (type of appliance and serial number).
You can find this information on the identification plate fitted inside the appliance.
The descriptions and characteristics featuring in this booklet are provided for information purposes only, and are not binding upon us. Indeed, as part of our ongoing commitment to improving the quality of our products, we reserve the right to make any modifications or improvements necessary, without notice.
BRANDT APPLIANCES SAS 7 rue Henri Becquerel
92500 RUEIL MALMAISON
MADE IN FRANCE
220 - 240V ~ 50 Hz
99625942_ML_A.qxd 23/06/03 10:50 Page 8
Edito
Chère Cliente, Cher Client,
Vous venez d'acquérir une hotte BRANDT et nous vous en remercions. Nos équipes de recherche ont conçu pour vous une nouvelle génération d'appareils pour cuisiner chaque jour avec plaisir.
Avec des lignes pures et une esthétique moderne, votre nouvelle hotte Brandt s'intègre harmonieusement dans votre cuisine et allie parfaitement facilité d'utilisation et performances.
Vous trouverez également dans la gamme des produits Brandt, un vaste choix de tables de cuisson, de fours, de lave-vaisselle et de réfrigérateurs intégrables, que vous pourrez coordonner à votre nouvelle hotte Brandt. Bien entendu, dans un souci permanent de satisfaire au mieux vos exigences vis à vis de nos produits, notre service consommateurs est à votre disposition et à votre écoute pour répondre à toutes vos questions ou suggestions (coordonnées à la fin de ce livret).
A la pointe de l'innovation, Brandt contribue ainsi à l'amélioration de la qualité de la vie quotidienne en vous apportant des produits toujours plus performants, simples d'utilisation, respectueux de l'environnement, esthétiques et fiables.
La Marque BRANDT.
BRANDT
7, rue Henri Becquerel
92854 RUEIL MALMAISON CEDEX
Tel : 33 (0) 1 47 16 65 65
S.A.S au capital de 10.000.000 Euros RCS Nanterre B 440 303 196 N° SIREN : 440 303 196 - APE 297 A
 Consignes de sécurité
-Il est interdit de flamber des mets ou de faire fonctionner des foyers gaz sans les recouvrir de plats de cuisson au-dessous de la hotte (les flammes aspirées risqueraient de détériorer l’appareil).
-Les fritures effectuées sous l’appareil doivent faire l’objet d’une surveillance constante.
-Les réparations doivent être exclusivement effectuées par un spécialiste agréé.
-Nettoyez régulièrement le filtre cassette.
-Le fonctionnement au-dessus d’un foyer à combustible (bois, charbon, etc...) n’est pas autorisé.
Ces hottes ont été conçues pour être utilisées par des particuliers dans un lieu d’habitation. Dans le souci d’une amélioration constante de nos produits, nous nous réservons le droit d’apporter à leurs caractéristiques techniques, fonctionnelles ou esthétiques toutes modifications de leurs caractéristiques liées à l’évolution technique.
Ces hottes sont destinées exclusivement à la cuisson des boissons et denrées alimentaires. Ces produits ne contiennent aucun composant à base d’amiante.
99625942_ML_A.qxd 23/06/03 10:50 Page 9
Tout au long de la notice, |
vous signale les consignes de sécurité, |
vous signale les conseils et les astuces
Comment se présente votre hotte ? Fig.1
Modèle électronique
FR
1 2 3
Eclairage
Arrêt hotte
Démarrage hotte
1Petite vitesse
2Moyenne vitesse
3Grande vitesse
Dans le cas d’une cuisine chauffée avec un appareil raccordé à une cheminée (ex : poêle), il faut installer la hotte en version recyclage. Ne pas utilisez la hotte
sans les filtres métalliques.
Une ventilation convenable de la pièce doit être prévue lorsqu’une hotte de cuisine est utilisée simultanément avec des appareils utilisants du gaz ou un autre combustible.
99625942_ML_A.qxd 23/06/03 10:50 Page 10
Comment installer votre hotte ?
Vous possédez une sortie vers l’extérieur : fig. 4
Votre hotte peut être raccordée sur celle-ci par l’intermédaire d’une gaine d’évacuation (minimum Ø 125 mm, émaillée, en alu, flexible ou en matière ininflammable). Si votre gaine est inférieure à 125 mm de diamètre, passez obligatoirement en mode recyclage.
Vous ne possédez pas de sortie vers l’extérieur : fig. 5
Tous nos appareils ont la possibilité de fonctionner en mode recyclage.
Dans ce cas, ajoutez un filtre à charbon actif qui retiendra les odeurs.
Montage de votre hotte
L’installation doit être conforme aux règlements en vigueur pour la ventila-  tion des locaux. En France, ces règlements sont indiqués dans le DTU 61.1 du CSTB. En particulier, l’air évacué ne doit pas être envoyé dans un conduit utilisé pour évacuer les fumées d’appareils utilisant du gaz ou autre combustible.
L’utilisation de conduits désaffectés ne peut se faire qu’après accord d’un spécialiste compétent.
La distance minimale entre le plan de cuisson et la partie la plus basse de la hotte doit être de 70 cm. Si les instructions de la table de cuisson installée sous la hotte spécifient une distance plus grande que 70 cm, celle-ci doit être prise en compte.
-Placez contre le mur le gabarit de montage : fig. 2
-Tracez un trait vertical sur le mur afin de positionner parfaitement l’axe de votre hotte avec votre appareil de cuisson.
-Tracez un repère sur le trait vertical à 70 cm minimum de votre plan de cuisson.
Remarque : dans le cas d’un mur creux, utilisez des vis et des chevilles adaptées.
- Démontez les filtres cassette (fig. 3).
- Accrochez la hotte par ses découpes rectangulaires. La taille de ces découpes vous permet un réglage vers la gauche ou vers la droite (fig. 3).


 Régler la hauteur et le niveau en manoeuvrant les vis de réglage «A» des

 supports puis bloquer la hotte contre le mur en serrant les vis «B» (Fig. 3).
Raccordement de votre hotte
Cet appareil est livré avec un câble d’alimentation H 05 VVF à 3 conducteurs
de 0,75 mm2 (neutre, phase et terre). Il doit être branché sur réseau 220-240 V monophasé par l’intermédiaire d’une prise de courant normalisée CEI 60083 qui doit rester accessible après installation, ou d’un dispositif de coupure
omnipolaire ayant une distance d’ouverture des contacts d’au moins 3 mm.
Notre responsabilité ne saurait être engagée en cas d’accident consécutif à une mise à la terre inexistante ou incorrecte. Le fusible de votre installation doit être de 10 ou 16 A. Si le câble d’alimentation est endommagé, faites appel au service après-vente afin d’éviter un danger.

99625942_ML_A.qxd 23/06/03 10:50 Page 11
L’esthétique “LE PLUS”
BRANDT a pensé à l’esthétique. Vous pouvez dorénavant ajuster la hotte à la faïence ou à la crédence. Un réglage de 10 mm par rapport au mur est possible
“ UNE EXCLUSIVITE BRANDT “.
Avant l’installation de votre hotte sur le mur:
-Retirez le filtre métallique .
-Retirer les 2 vis (Repère 1).
-Desserrez légèrement les 4 vis sans les ôter (Repère 2)
-Tirez le caisson inférieur vers l’avant.
-Effectuez le montage de la hotte suivant instruction.
-Ajustez le caisson inférieur pour prendre appui sur la faïence ou crédence.
-Resserrez les 4 vis (Repère 2).
-Remettez le filtre métallique.
FR
10 mm
Détail décalage décor / mur

99625942_ML_A.qxd 23/06/03 10:50 Page 12
Montage de la cheminée
Fonctionnement en évacuation extérieure: fig. 4 et 8
-Enlevez les 2 clips de fixation prévus pour le transport des cheminées.
-Enlevez les 2 vis de fixation du déflecteur plastique (en mode recyclage uniquement).
-Fixez contre le mur, en appui sur le plafond, le support de cheminée métallique (fig. 6). Prendre soin d’aligner les 2 encoches triangulaires du support métallique avec le trait vertical sur le mur.
-Dans le cas d’une gaine diamètre 125 mm, utilisez l’adaptateur fourni (fig. 8).
Si votre gaine extérieure est inférieure à 125 mm, il est obligatoire de raccorder votre hotte en mode recyclage.
-Préparez votre cheminée télescopique en prenant soin de dissimuler les ouïes (fig. 8). Emboîter les cheminées l’une dans l’autre au maximum.
-Fixez la partie supérieure sur le support métallique.
-Ajustez la longueur de la cheminée télescopique en descendant la partie inférieure et l’emboîter dans le sommet de la hotte.
Pour une utilisation optimale de votre appareil, nous vous conseillons le rac- 

 cordement à une gaine diamètre 150 mm (non livrée). Limiter au maximum le


 nombre de coude et la longueur de la gaine. Dans le cas où la hotte fonctionne
  en évacuation extérieure, il convient d’assurer une arrivée d’air frais suffisan-
te pour éviter de mettre la pièce en dépression.
Fonctionnement en recyclage: fig. 5 et 9
-Il est possible de retirer les clapets anti-retours.
-Fixez contre le mur, en appui sur le plafond, le déflecteur plastique des fumées.
Prendre soin de centrer le déflecteur par rapport au trait vertical tracé sur le mur
(fig. 7).
-Préparez votre cheminée en prenant soin de placer les ouïes vers le haut de manière qu’elles soient visibles (fig. 9).
-Fixez la partie supérieure sur le déflecteur plastique.
-Ajustez la longueur de la cheminée télescopique en descendant la partie inférieure et l’emboîter dans le sommet de la hotte.
Comment changer la lampe ?
Avant toute intervention, la hotte doit être mise hors tension, soit en retirant la prise, soit en actionnant le disjoncteur,
1.Retirez le hublot (fig. 11).
2.Changez la lampe halogène G4-20W-12V.
3.Replacez l’ensemble en effectuant les opérations en sens inverse.

99625942_ML_A.qxd 23/06/03 10:51 Page 13
Comment nettoyer votre hotte ?
La hotte doit être mise hors tension, soit en retirant la prise, soit en actionnant le disjoncteur, avant que les filtres métalliques soient enlevés. Après le nettoyage, les filtres métalliques doivent être de nouveau fixés conformément aux instructions.
|
FILTRE CASSETTE |
FILTRE CHARBON ACTIF |
|
|
Avant la première utilisation du filtre cassette, |
Pour les hottes installées en |
|
|
retirez le film de protection. |
recyclage |
|
ENTRETIEN |
IMPERATIF TOUS LES MOIS |
IMPERATIF TOUS LES ANS |
|
Pour éviter tout risque d’incendie. |
|||
|
|
Ce filtre retient les odeurs et doit |
|
|
Ce filtre retient les vapeurs grasses et les |
FR |
|
POURQUOI ? |
poussières. Il est l’élément assurant une part |
être changé au moins tous les |
|
|
|||
|
importante de l’efficacité de votre hotte. |
ans en fonction de votre utilisation. |
|
|
Avec un nettoyant ménager du commerce, puis rin- |
Commandez ces filtres chez votre |
|
|
cez abondamment et séchez. Ce nettoyage peut |
revendeur (sous la référence indi- |
|
COMMENT ? être effectué dans votre lave-vaisselle en position |
quée sur la plaque signalétique |
||
|
verticale (ne pas mettre en contact avec de la |
située à l’intérieur de la hotte) et |
|
|
vaisselle sale ou des couverts en argent). |
notez la date de changement. |
|
N’utilisez jamais de tampons métalliques, de produits abrasifs ou de brosses trop dures.
Pour nettoyer la carrosserie et le hublot d’éclairage, utilisez exclusivement des nettoyants ménagers du commerce dilués dans de l’eau, puis rincez à l’eau claire et essuyez avec un chiffon doux.
Démontage du filtre cassette (fig. 10)
Montage du filtre charbon (fig. 12)
1.Retirez la cassette.
2.Placez le filtre charbon neuf sur la cassette coté intérieur de la hotte.
3.Placez les 2 tringles de maintien.
Qui contacter ?
Les défauts d’aspect provoqués par une utilisation anormale ou le nettoyage avec des produits abrasifs qui n’entraîne pas un non fonctionnement ou une inaptitude à l’usage ne sont pas pris en compte par le fabriquant. Tout dépannage doit être effectué par un technicien qualifié.
Seuls les distributeurs de notre marque :
•Connaissent parfaitement votre appareil et son fonctionnement,
•Appliquent intégralement nos méthodes de réglage, d’entretien et de réparation,
•Utilisent exclusivement les pièces d’origine.
En cas de réclamation ou pour commander des pièces de rechange à votre distributeur, précisez-lui la référence complète de votre appareil (type de l’appareil et numéro de série)
Ces renseignements figurent sur la plaque signalétique fixée à l’intérieur de l’appareil.
Les descriptions et les caractéristiques apportées dans ce livret sont données seulement à titre d’information et non d’engagement. En effet, soucieux de la qualité de nos produits, nous nous réservons le droit d’effectuer, sans préavis, toutes modifications ou améliorations nécessaires.
BRANDT APPLIANCES SAS 7 rue Henri Becquerel
92500 RUEIL MALMAISON
MADE IN FRANCE
220 - 240V ~ 50 Hz

99625942_ML_A.qxd 23/06/03 10:51 Page 14
Leitartikel
Liebe Kundin, lieber Kunde,
Sie haben soeben eine Dunstabzugshaube von BRANDT erworben und wir bedanken uns dafür. Unsere Forschungsteams haben für Sie eine neue Gerätegeneration entwickelt, damit Ihnen das Kochen täglich Freude bereitet.
Mit klaren Linien und einer modernen Ästhetik, integriert sich Ihre neue Dunstabzugshaube von Brandt harmonisch in Ihre Küche und verbindet auf perfekte Weise einfache Benutzung und Leistung.
Die Produktreihe von Brandt enthält auch eine breite Auswahl an Kochplatten, Backöfen, Geschirrspülern und Einbaukühlschränken, die zu Ihrer neuen
Dunstabzugshaube von Brandt gut passen.
Darum bemüht, Ihre Ansprüche, was unsere Produkte betrifft, ständig bestmöglich zufrieden zu stellen, steht unser Verbraucherservice (Adresse am Ende dieser Broschüre) gerne zu Ihrer Verfügung und ist bereit, Ihren Vorschlägen zuzuhören und all ihre Fragen zu beantworten.
An der Spitze der Innovation, trägt Brandt zur Verbesserung des täglichen Lebens bei, indem das Unternehmen immer leistungsstärkere Produkte auf den Markt bringt, die einfach zu benutzen sind, die Umwelt respektieren und darüber hinaus ästhetisch und zuverlässig sind.
Die Marke BRANDT.
 Sicherheitshinweise
-Es ist verboten, unter der Dunstabzugshaube Gerichte zu flambieren oder Gaskochstellen ohne Kochgeschirr zu betreiben (die angesaugten Flammen können das Gerät beschädigen).
-Frittiervorgänge unter der Dunstabzugshaube müssen unter Aufsicht erfolgen.
-Reparaturen dürfen nur von einem zugelassenen Fachmann durchgeführt werden.
-Die Filterkassette (Metallfettfilter) muss regelmäßig gereinigt werden.
-Der Betrieb über einer Brennstoff-Feuerstelle (Holz, Kohle, usw.) ist verboten.
Diese Dunstabzugshauben wurden für den Gebrauch im Privathaushalt entwickelt.
Darum bemüht, unsere Produkte ständig zu verbessern, behalten wir uns das Recht vor, ihre technischen, funktionellen oder ästhetischen Eigenschaften, die mit der Entwicklung der Technik in Verbindung stehen, jederzeit zu verändern.
Diese Dunstabzugshauben sind ausschließlich für Kochvorgänge von Getränken und Nahrungsmitteln bestimmt. Die Produkte enthalten keine Asbest-Bestandteile.
99625942_ML_A.qxd 23/06/03 10:51 Page 15
In der Gebrauchsanleitung |
die Sicherheitshinweise, |
kennzeichnet, |
Kennzeichnet Hinweise und kleine Kniffe |
|
Präsentierung Ihrer Dunstabzugshaube Abb. 1
Elektronisches Modell
DE
1 2 3
Beleuchtung
Abzugshaube ausschalten
Abzugshaube einschalten
1Geringe Leistung
2Mittlere Leistung
3Hohe Leistung
Bei einer Küche, die durch ein mit einem Kamin verbundenes Gerät geheizt wird (Beispiel: Zimmerofen, Herd, usw.), muss eine Dunstabzugshaube mit Umluftbetrieb verwendet werden.Die Dunstabzugshaube darf nicht ohne die
Metallfilter betrieben werden.
Es sollte eine geeignete Belüftung des Raums vorgesehen werden, wenn eine Küchenabzugshaube zur gleichen Zeit eingesetzt wird wie Geräte, die mit Gas oder einem anderen Brennstoff funktionieren.

99625942_ML_A.qxd 23/06/03 10:51 Page 16
Installation Ihrer Dunstabzugshaube
Sie verfügen über einen Abzug nach draußen: Abb. 4
Ihre Dunstabzugshaube kann über einem Abzug (Ø mindestens 125 mm, emailliert, aus Alu., einem Schlauch oder einem nicht entzündlichen Material) installiert werden. Wenn der Ø Ihrer Rohrleitung unter 125 mm liegt, müssen Sie automatisch auf den Recyclingmodus
übergehen.
Sie verfügen nicht über einen Abzug nach draußen: Abb. 5
All unsere Geräte können nach dem Umluftprinzip betrieben werden.
In diesem Fall müssen Sie einen Aktivkohlefilter einbauen, der die Gerüche zurückhält.
Montage Ihrer Dunstabzugshaube
Die Installation muss die geltenden Bestimmungen für die Belüftung von  Räumen einhalten. Die Abluft darf insbesondere nicht in Rohre abgeleitet werden, die dem Rauchabzug von Geräten dienen, die mit Gas oder anderen Brennstoffen betrieben werden. Die Verwendung eines stillgelegten Abzugsrohrs
kann nur mit der Erlaubnis eines Fachmanns erfolgen.
Der Mindestabstand zwischen Kochfläche und niedrigstem Teil der Abzugshaube muss 70 cm betragen. Wenn in den Anweisungen betreffend das unter der Abzugshaube installierte Gaskochfeld einen größeren Abstand als 70 cm empfohlen wird, ist dieser Abstand einzuhalten.
-Halten Sie die Montageschablone an die Wand: Abb. 2
-Ziehen Sie einen senkrechten Strich an der Wand, um die Dunstabzugshaube genau in der Mitte Ihres Kochgeräts anzubringen.
-Zeichnen Sie in einem Abstand von mindestens 70 cm von der Kochebene eine Markierung auf dem senkrechten Strich.
Anmerkung: Bei einer Hohlwand müssen Sie geeignete Schrauben und Dübel verwenden.
-Demontieren Sie die Filterkassetten (Abb. 3).
-Die Dunstabzugshaube an den rechteckigen Einkerbungen aufhängen. Die Größe dieser Einkerbungen ermöglicht Ihnen eine Einstellung nach links oder rechts (Abb. 3).


 Stellen Sie die Höhe und das Niveau mit Hilfe der Einstellschrauben «A» der


 Halterungen ein und blockieren Sie anschließend die Dunstabzugshaube durch Festziehen der Schrauben «B» (Abb. 3) an der Wand.
Anschluss Ihrer Dunstabzugshaube
Dieses Gerät wird mit einem Anschlusskabel H05VVF mit 3 Leitern 0,75 mm² (Null-, Phasenund Erdleiter) geliefert. Es muss über eine genormte Steckdose CEI 60083 an ein Einphasenstromnetz mit 220-240 V
angeschlossen werden, die nach dem Einbau zugänglich bleiben muss, oder über einen Unterbrecher für alle Leitungen mit einer Öffnungsweite von mindestens 3 mm. Bei einem Unfall aufgrund einer nicht vorhandenen oder fehlerhaften Erdung können wir nicht zur Haftung gezogen werden. Die Sicherung Ihrer Installation muss 10 oder 16 A stark sein. Wenn das Anschlusskabel beschädigt ist, müssen Sie den Kundendienst in Anspruch nehmen, um Gefahren zu vermeiden.
99625942_ML_A.qxd 23/06/03 10:51 Page 17
Die Ästhetik “DER PLUSPUNKT”
BRANDT hat an die Ästhetik gedacht. Sie können ab sofort die Abzugshaube der Keramik oder Kredenz anpassen. Eine Einstellung von 10 mm im Verhältnis zur Wand ist möglich “ EINE BRANDT-EXKLUSIVITÄT“.
Bevor Sie Ihre Dunstabzugshaube an die Wand montieren:
-Den Metallfilter entfernen.
-Die 2 Schrauben entfernen (Markierung 1).
-Die 4 Schrauben etwas lösen, ohne sie zu entfernen (Markierung 2).
-Den unteren Kasten nach vorne ziehen.
-Dann die Montage der Dunstabzugshaube, den Anweisungen auf entsprechend durchführen.
-Den unteren Kasten so anpassen, dass er auf der Keramik oder Kredenz aufliegt.
-Die 4 Schrauben wieder anziehen (Markierung 2).
-Den Metallfilter wieder einsetzen.
Markierung 2
Markierung 1
Markierung 2
DE
10 mm
AbweichungsdetailDéta l décalage
Dekor / Wand décor / mur

99625942_ML_A.qxd 23/06/03 10:51 Page 18
Montage des Kamins
Abluftbetrieb: Abb. 4 und 8
-Entfernen Sie die 2 für den Transport der Kaminteile vorgesehenen Befestigungsschrauben.
-Entfernen Sie die 2 Befestigungsschrauben des Kunststoffablenkers (Ausschließlich im Recyclingmodus).
-Befestigen Sie die Metallhalterung des Kamins (Abb. 6) direkt unter der Decke an der Wand. Richten Sie dabei die beiden dreieckigen Einkerbungen der Halterung an dem senkrechten Strich an der Wand aus.
-Verwenden Sie bei einem Abzugsrohr Durchmesser 125 mm den mitgelieferten Adapter (Abb. 8).
Wenn das externe Rohr einen Durchmesser unter 125 mm aufweist, müssen Sie Ihre Dunstabzugshaube im Recyclingmodus anschließen.
-Bereiten Sie den ausziehbaren Kamin vor und verbergen Sie dabei die Luftaustrittsöffnungen (Abb. 8). Schieben Sie die Kaminteile so weit wie möglich ineinander.
-Den oberen Teil an der Metallhalterung befestigen.
-Passen Sie die Länge des ausziehbaren Kamins an, indem Sie den äußeren Teil nach unten schieben und in das Oberteil der Dunstabzugshaube einfügen.
Für eine optimale Wirkung Ihrer Dunstabzugshaube empfehlen wir Ihnen den Anschluss an ein Abzugsrohr mit einem Durchmesser von 150 mm (nicht 

 mitgeliefert). Verwenden Sie möglichst wenig Winkelstücke und ein möglichst


 kurzes Rohr. Beim Abluftbetrieb der Dunstabzugshaube müssen Sie für eine
  ausreichende Frischluftzufuhr sorgen, damit im Raum kein Unterdruck entsteht.
Umluftbetrieb: Abb. 5 und 9
-Sie können die Rücklaufklappen entfernen.
-Befestigen Sie den Kunststoffablenker direkt unter der Decke an der Wand.
Zentrieren Sie dabei den Ablenker an dem senkrechten Strich an der Wand
(Abb. 7).
-Bereiten Sie den Kamin vor und richten Sie dabei die Luftaustrittsöffnungen so nach oben, dass sie sichtbar sind (Abb. 9).
-Den oberen Teil am Kunststoffblech befestigen.
-Passen Sie die Länge des ausziehbaren Kamins an, indem Sie den äußeren Teil nach unten schieben und in das Oberteil der Dunstabzugshaube einfügen.
Auswechseln der Lampe
Vor jedem Eingriff muss die Dunstabzugshaube vom Netz getrennt werden, entweder durch Ziehen des Netzsteckers oder durch Betätigen des Sicherungsautomaten.
1.Die Abdeckung entfernen (Abb. 11).
2.Ersetzen Sie die Halogenlampe G4-20W-12V.
3.Bringen Sie die Lampen wieder an, indem Sie die Schritte in umgekehrter Reihenfolge wiederholen.
99625942_ML_A.qxd 23/06/03 10:51 Page 19
Reinigung Ihrer Dunstabzugshaube
Wenn Sie die Metallfilter entfernen, darf die Dunstabzugshaube nicht unter Strom stehen, Sie müssen zuvor entweder den Stecker ziehen oder den Überlastschalter betätigen. Nach ihrer Reinigung müssen die Metallfilter den Anweisungen entsprechend erneut eingesetzt werden.
|
FILTERKASSETTE (METALLFETTFILTER) |
AKTIVKOHLEFILTER |
|
|
|||||
|
Den |
Schutzfilm |
vom |
filterkassette |
für die Dunstabzugshauben mit |
||||
|
(metallfettfilter) entfernen, bevor Sie ihn das |
||||||||
|
Umluftbetrieb |
|
|
||||||
|
erste Mal benutzen. |
|
|
|
|
|
|||
|
|
|
|
|
|
|
|
||
PFLEGE |
UNBEDINGT EINMAL PRO MONAT |
UNBEDINGT EINMAL PRO JAHR |
|||||||
|
|
|
Um Brandrisiken zu vermeiden. |
|
|
||||
|
Dieser Filter hält Fettdämpfe und |
Dieser Filter hält die Gerüche zurück |
|||||||
WARUM? |
Staubpartikel zurück. Dieses Element hat |
und muss je nach Nutzungsgrad |
|||||||
einen |
sehr großen |
Einfluss auf |
die |
wenigstens |
einmal jährlich |
||||
|
Wirksamkeit der Dunstabzugshaube. |
|
gewechselt werden. |
|
DE |
||||
|
Reinigen Sie ihn mit einem handelsüblichen |
Bestellen Sie die Filter bei Ihrem |
|||||||
|
|
||||||||
|
Reinigungsmittel, spülen Sie gründlich nach und |
Fachhändler |
(anhand |
der |
|||||
WIE? |
trocknen Sie ihn ab. Die Reinigung kann auch in der |
Bestellnummer auf dem Geräteschild |
|||||||
Geschirrspülmaschine in |
senkrechter |
Position |
im Inneren der Dunstabzugshaube) |
||||||
|
durchgeführt werden (nicht mit schmutzigem |
und halten Sie das Datum des |
|||||||
|
Geschirr oder Silberbesteck in Kontakt bringen!). |
Wechsels schriftlich fest. |
|
|
|||||
Verwenden Sie niemals Metallschwämme, Scheuermittel oder sehr harte Bürsten.
Verwenden Sie zur Reinigung von Gehäuse und Leuchtblende ausschließlich ein handelsübliches, in Wasser gelöstes Reinigungsmittel. Spülen Sie mit klarem Wasser nach und trocknen Sie mit einem weichen Lappen ab.
Demontage des Kassettenfilters (Abb. 10)
Montage des Kohlefilters (Abb. 12)
1.Die Kassette entfernen.
2.Plazieren Sie einen neuen Aktivkohlefilter auf der Kassette Richtung Innenseite der Dunstabzugshaube.
3.Bringen Sie die 2 Haltebügel an.
Kontaktaufnahme
Auf eine anormale Benutzung oder die Reinigung mit scheuernden Produkten zurückzuführende Schönheitsfehler, die keine Funktionsstörungen oder eine Benutzungsunfähigkeit zur Folge haben, werden vom Hersteller nicht berücksichtigt. Jede Panne muss von einem qualifizierten Techniker behoben werden.
Nur die Händler unserer Marke:
•Kennen Ihr Gerät und seine Funktionsweise genau,
•Wenden vollständig unsere Einstellungs-, Wartungsund Reparationsmethoden an.
•Benutzen ausschließlich Originalteile.
Im Falle einer Reklamation oder zur Bestellung von Ersatzteilen bei Ihrem Händler, geben Sie bitte die vollständige Referenz Ihres Gerätes an (Gerätetyp und Seriennummer).
Diese Auskünfte stehen auf dem im Innern Ihres Gerätes befestigten Typenschild. Die in diesem Heft aufgeführten Eigenschaften dienen lediglich der Information und stellen kein Engagement dar. In der Tat sind wir ständig um die Qualität unserer Produkte bemüht und behalten uns somit das Recht vor, alle erforderlichen Veränderungen oder Verbesserungen, ohne vorherige Benachrichtigung, durchzuführen.
BRANDT APPLIANCES SAS 7 rue Henri Becquerel
92500 RUEIL MALMAISON
MADE IN FRANCE
220 - 240V ~ 50 Hz
99625942_ML_A.qxd 23/06/03 10:51 Page 20
Indledning
Kære kunde,
Tak fordi De har valgt en emhætte fra BRANDT. Vores udviklingsafdeling har udarbejdet en ny generation af apparater, så madlavning bliver en daglig glæde.
Designet af den nye emhætte fra Brandt er moderne med rene linjer, så emhætten bliver en harmonisk del af Deres køkken. Emhætten er effektiv og let at betjene.
Brandt tilbyder desuden et stort udvalg af kogeplader, ovne, opvaskemaskiner og køleskabe i indbygningsmodeller, som passer til Deres nye emhætte fra Brandt.
Serviceafdelingen er altid villig til at besvare spørgsmål og modtager gerne forslag (se adressen bagest i vejledningen), da vi hele tiden prøver at opfylde kundernes behov og krav til vores produkter.
Brandt er med sin nyteknologi med til at sikre en større livskvalitet i hverdagen og tilbyder produkter, der bliver stadig mere effektive, lettere at betjene, mere miljøvenlige, flottere og mere driftssikre.
Mærket BRANDT.
Brandt Norden A/S
Lollandsgade 4, 6400 Sønderborg
Kundeservice telefon: 7342 1840
Fax. servicebestilling: 7342 1841
Fax. reservedelsbestilling: 7342 1851
E.mail servicebestilling: kundeservice@elcobrandt.com
 Sikkerhedsforholdsregler
-Det er forbudt at flambere retter eller at tænde for gaskogeplader uden foregående tildækning af blussene med en pande eller gryde under emhætten (de opsugede flammer ville kunne beskadige apparatet).
-Stegning under apparatet bør overvåges uafbrudt.
-Reparationer bør udelukkende foretages af en godkendt specialist.
-Rengør filterkassen regelmæssigt.
-Igangsætning over en brændselsdreven kogeplade (træ, kul osv.) er ikke tilladt.
Emhætterne er skabt til brug for privatpersoner på deres bopæl.
Da vi lægger vægt på konstant at forbedre vores produkter, forbeholder vi os retten til i takt med den tekniske udvikling at foretage alle nødvendige ændringer på disses tekniske, funktionelle og æstetiske egenskaber.
Emhætterne skal udelukkende bruges ved kogning/stegning af drikke og fødevarer. Produkterne indeholder ingen aspestholdige dele.
 Loading...