

Page 1

Apple Remote Desktop
Administrator’s Guide
Version 3.1
Page 2

K
Apple Computer, Inc.
© 2006 Apple Computer, Inc. All rights reserved.
The owner or authorized user of a valid copy of Apple
Remote Desktop software may reproduce this
publication for the purpose of learning to use such
software. No part of this publication may be reproduced
or transmitted for commercial purposes, such as selling
copies of this publication or for providing paid for
support services.
The Apple logo is a trademark of Apple Computer, Inc.,
registered in the U.S. and other countries. Use of the
“keyboard” Apple logo (Option-Shift-K) for commercial
purposes without the prior written consent of Apple
may constitute trademark infringement and unfair
competition in violation of federal and state laws.
Apple, the Apple logo, AirPort, AppleScript, AppleTalk,
AppleWorks, FireWire, iBook, iMac, iSight, Keychain, Mac,
Macintosh, Mac OS, PowerBook, QuickTime, and Xserve
are trademarks of Apple Computer, Inc., registered in the
U.S. and other countries.
Apple Remote Desktop, Bonjour, eMac, Finder, iCal, and
Safari are trademarks of Apple Computer, Inc.
Adobe and Acrobat are trademarks of Adobe Systems
Incorporated.
Java and all Java-based trademarks and logos are
trademarks or registered trademarks of Sun
Microsystems, Inc. in the U.S. and other countries.
UNIX is a registered trademark in the United States and
other countries, licensed exclusively through
X/Open Company, Ltd.
019-0835/11-13-06
Page 3

Contents
3
Preface 9 About This Book
10
Using This Guide
10
Remote Desktop Help
10
11
Notation Conventions
Where to Find More Information About Apple Remote Desktop
Chapter 1 13 Using Apple Remote Desktop
13
Administering Computers
15
18
21
23
23
25
27
Deploying Software
Taking Inventory
Housekeeping
Supporting Users
Providing Help Desk Support
Interacting with Students
Finding More Information
Chapter 2 28 Getting to Know Remote Desktop
28
Remote Desktop Human Interface Guide
29
31
32
33
34
35
36
36
36
37
Remote Desktop Main Window
Task Dialogs
Control and Observe Window
Multiple-Client Observe Window
Report Window
Changing Report Layout
Configuring Remote Desktop
Customizing the Remote Desktop Toolbar
Setting Preferences for the Remote Desktop Administrator Application
Interface Tips and Shortcuts
Chapter 3 39 Installing Apple Remote Desktop
39
System Requirements for Apple Remote Desktop
40
40
41
Network Requirements
Installing the Remote Desktop Administrator Software
Setting Up an Apple Remote Desktop Client Computer for the First Time
3
Page 4

41
Upgrading the Remote Desktop Administrator Software
42
Upgrading the Client Software
42
43
43
44
46
46
46
47
48
Method #1—Remote Upgrade Installation
Method #2—Manual Installation
Upgrading Apple Remote Desktop Clients Using SSH
Creating a Custom Client Installer
Considerations for Managed Clients
Removing or Disabling Apple Remote Desktop
Uninstalling the Administrator Software
Disabling the Client Software
Uninstalling the Client Software from Client Computers
Chapter 4 49 Organizing Client Computers Into Computer Lists
49
Finding and Adding Clients to Apple Remote Desktop Computer Lists
50
51
51
52
53
53
54
54
55
55
55
56
56
57
57
Finding Clients by Using Bonjour
Finding Clients by Searching the Local Network
Finding Clients by Searching a Network Range
Finding Clients by Network Address
Finding Clients by File Import
Making a New Scanner
Making and Managing Lists
About Apple Remote Desktop Computer Lists
Creating an Apple Remote Desktop Computer List
Deleting Apple Remote Desktop Lists
Creating a Smart Computer List
Editing a Smart Computer List
Creating a List of Computers of from Existing Computer Lists
Importing and Exporting Computer Lists
Transferring Computer Lists from Apple Remote Desktop 3 to a New Administrator
Computer
58
Transferring Remote Desktop 2 Computer Lists to a New Remote Desktop 3
Administrator Computer
58
Transferring Old v1.2 Computer Lists to a New Administrator Computer
Chapter 5 60 Understanding and Controlling Access Privileges
60
Apple Remote Desktop Administrator Access
62
Setting Apple Remote Desktop Administrator Access Authorization and Privileges
Using Local Accounts
63
Apple Remote Desktop Administrator Access Using Directory Services
63
66
66
67
4
Creating Administrator Access Groups
Enabling Directory Services Group Authorization
Apple Remote Desktop Guest Access
Apple Remote Desktop Nonadministrator Access
Contents
Page 5

68
Virtual Network Computing Access
69
Command-Line SSH Access
69
Managing Client Administration Settings and Privileges
70
70
Getting an Administration Settings Report
Changing Client Administrator Privileges
Chapter 6 72 Setting Up the Network and Maintaining Security
72
Setting Up the Network
73
Using Apple Remote Desktop with Computers in an AirPort Wireless Network
74
Getting the Best Performance
74
Maintaining Security
76
76
77
Remote Desktop Authentication and Data Transport Encryption
Encrypting Observe and Control Network Data
Encrypting Network Data During Copy Items and Install Packages Tasks
Chapter 7 78 Interacting with Users
79
Controlling
79
80
81
81
81
82
82
82
83
83
84
85
86
86
88
89
89
89
91
91
92
92
93
93
93
94
Controlling Apple Remote Desktop Clients
Control Window Options
Switching the Control Window Between Full Size And Fit-To-Window
Switching Between Control and Observe Modes
Sharing Control with a User
Hiding a User’s Screen While Controlling
Capturing the Control Window to a File
Switching Control Session Between Full Screen and In a Window
Sharing Clipboards for Copy and Paste
Controlling VNC Servers
Setting up a Non–Mac OS X VNC Server
VNC Control Options
Configuring an Apple Remote Desktop Client to be Controlled by a VNC Viewer
Observing
Changing Observe Settings While Observing
Changing Screen Titles While Observing
Viewing a User’s Account Picture While Observing
Viewing a Computer’s System Status While at the Observe Window
Shortcuts in the Multiple Screen Observe Window
Observing a Single Computer
Observing Multiple Computers
Observing a Computer in Dashboard
Sending Messages
Sending One-Way Messages
Interactive Chat
Viewing Attention Requests
Contents
5
Page 6

94
Sharing Screens
94
95
95
95
96
96
Sharing a Screen with Client Computers
Monitoring a Screen Sharing Tasks
Interacting with Your Apple Remote Desktop Administrator
Requesting Administrator Attention
Canceling an Attention Request
Changing Your Observed Client Icon
Chapter 8 97 Administering Client Computers
97
Keeping Track of Task Progress and History
98
99
99
99
10 0
Enabling a Task Notification Script
Getting Active Task Status
Using the Task Feedback Display
Stopping a Currently Running Task
Getting Completed Task History
10 0 Saving a Task for Later Use
101 Creating and Using Task Templates
10 2 Editing a Saved Task
10 2 Installing Software Using Apple Remote Desktop
10 2 Installing by Package and Metapackage
10 4 Installing Software on Offline Computers
10 5 Installing by Using the Copy Items Command
10 6 Using Installers from Other Companies
10 6 Upgrading Software
10 8 Copying Files
10 8 Copy Options
11 0 Copying from Administrator to Clients
11 0 Copying Using Drag and Drop
111 Restoring Items from a Master Copy
113 Creating Reports
113 Collecting Report Data
11 4 Using a Task Server for Report Data Collection
11 5 Report Database Recommendations and Bandwidth Usage
11 6 Auditing Client Usage Information
11 8 Finding Files, Folders, and Applications
12 0 Comparing Software
121 Auditing Hardware
12 6 Testing Network Responsiveness
12 7
Exporting Report Information
12 8 Using Report Windows to Work with Computers
12 9 Maintaining Systems
12 9 Deleting Items
13 0 Emptying the Trash
6
Contents
Page 7

13 0 Setting the Startup Disk
131 Renaming Computers
131 Synchronizing Computer Time
13 2 Setting Computer Audio Volume
13 3 Repairing File Permissions
13 3 Adding Items to the Dock
13 4 Changing Energy Saver Preferences
13 5 Changing Sharing Preferences for Remote Login
13 5 Setting Printer Preferences
13 7 Managing Computers
13 7 Opening Files and Folders
13 8 Opening Applications
13 9 Quitting Applications Without Logging Out the User
13 9 Putting a Computer to Sleep
14 0 Waking Up a Computer
14 0 Locking a Computer Screen
141 Displaying a Custom Picture on a Locked Screen
141 Unlocking a Computer Screen
14 2 Disabling a Computer Screen
14 2 Logging In a User at the Login Window
14 3 Logging Out the Current User
14 4 Restarting a Computer
14 4 Shutting Down a Computer
14 5 Starting Up a Computer
14 6 UNIX Shell Commands
14 6 Send UNIX Command Templates
14 8 Executing a Single UNIX Command
14 8 Executing Scripts Using Send UNIX Command
15 0 Built-in Command-Line Tools
Chapter 9 156 Automating Tasks
15 6 Working with the Task Server
157 Preliminary Planning for Using the Task Server
157 Setting Up the Task Server
15 8 Setting Up an Admin Console to Query the Task Server
15 9 Setting Up Clients to Interface with the Task Server
15 9 Using Automatic Data Reporting
160 Setting the Client’s Data Reporting Policy
161 Creating a Template Data Reporting Policy
161 Working with Scheduled Tasks
161 Setting Scheduled Tasks
162 Editing Scheduled Tasks
162 Deleting Scheduled Tasks
Contents 7
Page 8

162 Using Scripting and Automation Tools with Remote Desktop
163 Using AppleScript with Remote Desktop
166 Using Automator with Remote Desktop
Appendix A 167 Icon and Port Reference
167 Client Status Icons
167 Apple Remote Desktop Status Icons
168 List Menu Icons
168 Task Status Icons
169 System Status Icons (Basic)
169 System Status Icons (Detailed)
17 0 TCP and UDP Port Reference
Appendix B 171 Report Field Definitions Reference
171 System Overview Report
174 Storage Report
17 5 USB Devices Report
17 5 FireWire Devices Report
17 5 Memory Report
17 6 Expansion Cards Report
17 6 Network Interfaces Report
17 8 Network Test Report
17 8 Administration Settings Report
17 9 Application Usage Report
17 9 User History Report
Appendix C 180 AppleScript Remote Desktop Suite
18 0 Classes and Commands for the Remote Desktop Application.
Appendix D 187 PostgreSQL Schema Sample
Index 18 9
8 Contents
Page 9

About This Book
What Is Apple Remote Desktop?
Apple Remote Desktop is easy-to-use, powerful, open standards-based, desktop
management software for all your networked Macs. IT professionals can remotely
control and configure systems, install software, offer interactive online help to end
users, and assemble detailed software and hardware reports for an entire Mac network.
You can use Apple Remote Desktop to:
 Manage client computers and maintain, update, and distribute software
 Collect more than 200 system-information attributes for any Mac on your network
 Store the results in an SQL database and view the information using any of several
hardware or software reports
 Control and manage multiple computer systems simultaneously, making shutdown,
restart, and sending UNIX commands fast and easy
 Provide help and remote assistance to users when they encounter problems
 Interact with users by sending text messages, observing and controlling users’
screens, and sharing their screens with other client users
Preface
You can use Apple Remote Desktop to manage your client systems. IT administrators
use Remote Desktop in education and business to simplify and empower the
management of their organizations computer assets. For system administrators, Apple
Remote Desktop can be used to administer large numbers of servers, like a virtual
Keyboard-Video-Mouse (KVM) sharing unit. In computer administration environments,
it’s the ideal solution for managing remote systems, reducing administration costs, and
increasing productivity.
Apple Remote Desktop can also be used by educators to facilitate instruction in
computer labs or one-on-one learning initiatives. Used in a classroom, Apple Remote
Desktop enhances the learning experience and allows teachers to monitor and control
students’ computers.
9
Page 10

Using This Guide
The Apple Remote Desktop Administrator’s Guide contains chapters to help you use
Remote Desktop. It contains overviews and explanations about Apple Remote
Desktop’s features and commands. It also explains how to install and configure Apple
Remote Desktop on clients, how to administer client computers, and how to use
Remote Desktop to interact with computer users.
This guide is provided on the Apple Remote Desktop installation disc and on the Apple
Remote Desktop support website as a fully searchable, bookmarked PDF file. You can
use Apple’s Preview application or Adobe (Acrobat) Reader to browse the contents of
this guide as well as search for specific terms, features, or tasks.
Remote Desktop Help
Remote Desktop Help is available using Help Viewer. To open Remote Desktop Help,
choose Help > Remote Desktop Help. The help files contain the same information
found in this guide, and are useful when trying to accomplish a task when this guide is
unavailable.
Additionally, the Remote Desktop Help contains new information, corrections, and latebreaking information about Apple Remote Desktop. The most up-to-date information is
available through Remote Desktop Help before it’s available on the web as an updated
PDF file.
Notation Conventions
This guide and Remote Desktop Help contain step-by-step procedures to help you use
Remote Desktop’s commands effectively. In many tasks shown in this manual and in
Remote Desktop Help, you need to choose menu commands, which look like this:
Choose Edit > Clear.
The first term after Choose is the name of a menu in the Remote Desktop menu bar.
The next term (or terms) are the items you choose from that menu.
10 Preface About This Book
Page 11

Terminal Command Conventions
Notation Indicates
monospaced font A command or other Terminal text
$
[text_in_brackets] An optional parameter
(one|other) Alternative parameters (type one or the other)
underlined A parameter you must replace with a value
[...] A parameter that may be repeated
<anglebrackets>
A shell prompt
A displayed value that depends on your configuration or settings
Commands or command parameters that you might type, along with other text that
normally appears in a Terminal window, are shown in this font. For example:
You can use the doit command to get things done.
When a command is shown on a line by itself as you might type it in a Terminal
window, it follows a dollar sign that represents the shell prompt. For example:
$ doit
To use this command, type “doit” without the dollar sign at the command prompt in a
Terminal window, then press the Return key.
Where to Find More Information About Apple Remote Desktop
For additional information related to Apple Remote Desktop, try these resources.
You’ll find more information in the Apple Remote Desktop Read Me file and on the
Apple Remote Desktop website:
www.apple.com/remotedesktop/
You can find the most recent edition of the Apple Remote Desktop Administrator’s Guide at:
 the Apple Server Division Documentation page
www.apple.com/server/documentation/
 the Remote Desktop section of Apple.com, and
www.apple.com/remotedesktop/
 the Help Menu in the Remote Desktop application
Preface About This Book 11
Page 12

The Apple Remote Desktop Support website provides a database of technical articles
about product issues, use, and implementation:
www.apple.com/support/remotedesktop/
To provide feedback about Apple Remote Desktop, visit the feedback page:
www.apple.com/feedback/remotedesktop.html
For details about how to join the Apple Remote Desktop Mailing list, visit:
lists.apple.com/mailman/listinfo/remote-desktop/
To share information and learn from others in online discussions, visit the Apple
Remote Desktop Discussions Forum:
discussions.info.apple.com/appleremotedesktop/
For more information about PostgreSQL go to:
www.postgresql.org
For more information about using Apple products for IT professionals go to:
apple.com/itpro/
12 Preface About This Book
Page 13

1 Using Apple Remote Desktop
1
Apple Remote Desktop helps you keep Macintosh computers
and the software running on them up to date and trouble
free. And it lets you interact directly with Macintosh users to
provide instructional and troubleshooting support.
This chapter describes the main aspects of Apple Remote Desktop’s administration
and user interaction capabilities and tells you where to find complete instructions for
using them.
Administering Computers
Apple Remote Desktop lets you perform a wide range of client hardware and software
administrative activities remotely, from an administrator computer (a computer on
which administrator software resides):
 Keep users’ software up to date by using Apple Remote Desktop to deploy software
and related files to client computers.
 Create reports that inventory the characteristics of client computer software and
hardware.
 Use Apple Remote Desktop’s remote administration capabilities to perform
housekeeping tasks for client computers.
13
Page 14
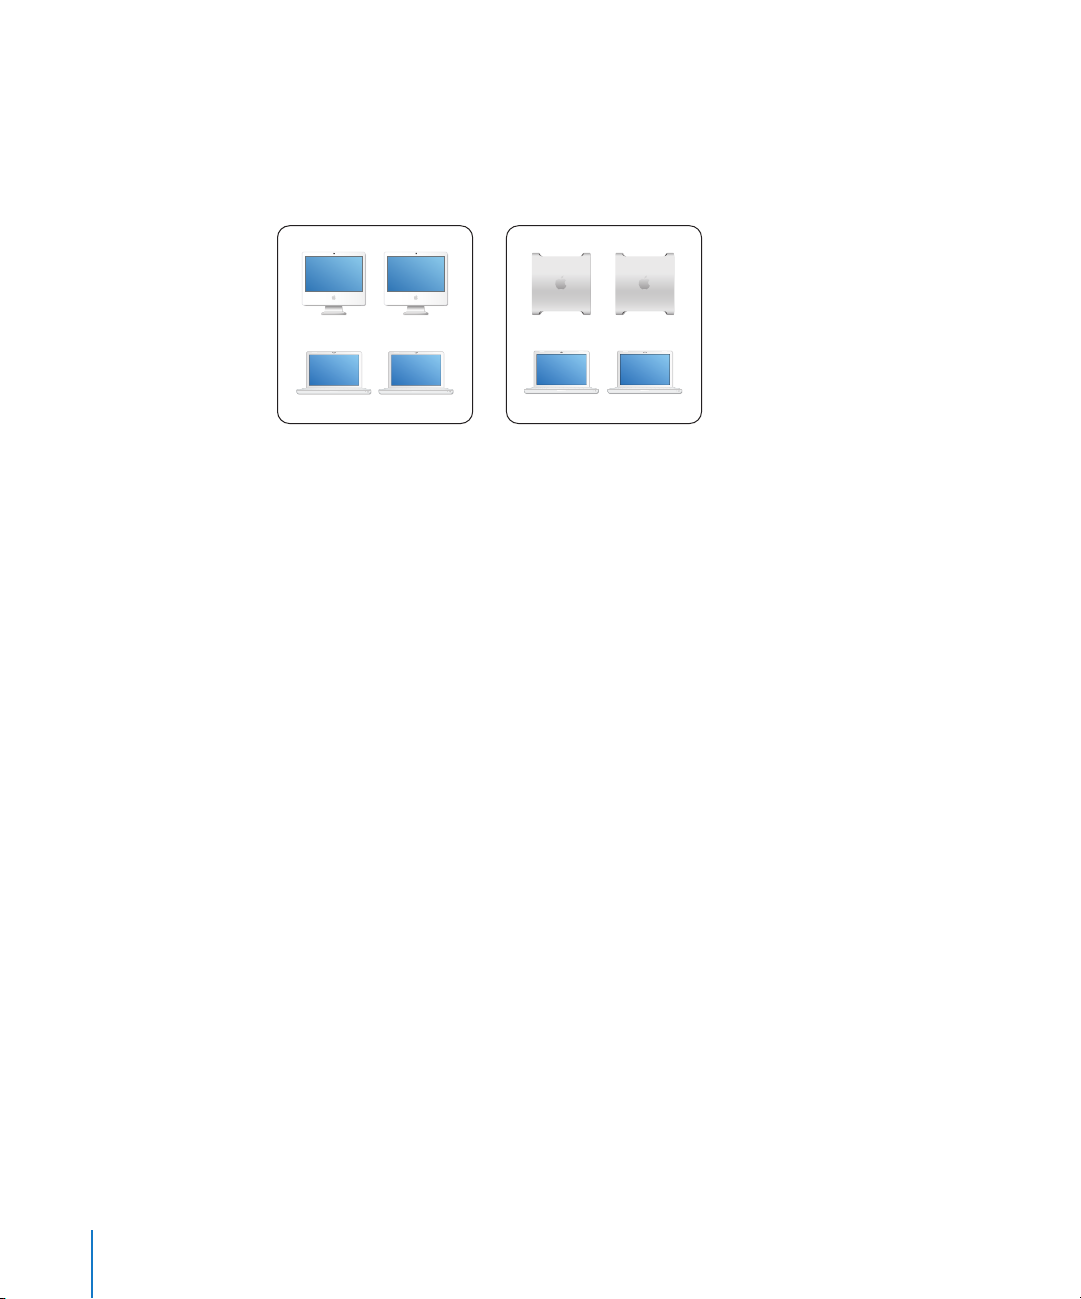
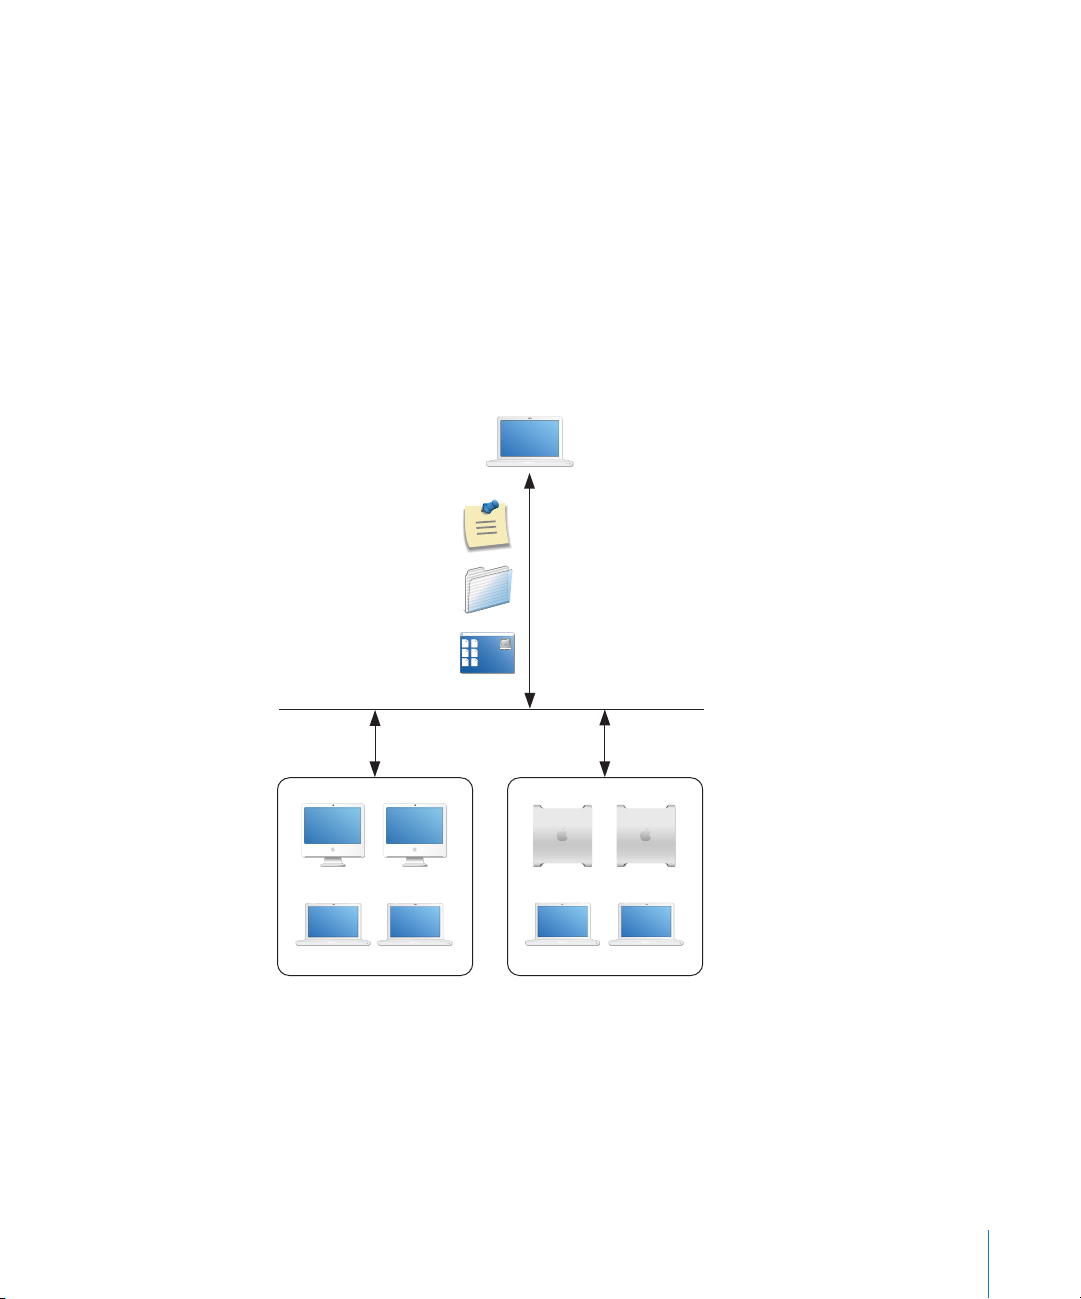
You can administer client computers individually, but most Apple Remote Desktop
features can be used to manage multiple computers at the same time. For example, you
may want to install or update the same applications on all the computers in a particular
department. Or you may want to share your computer screen to demonstrate a task to
a group of users, such as students in a training room.
Marketing department Engineering department
To manage multiple computers with a single action, you define Apple Remote Desktop
computer lists. A computer list is a group of computers that you want to administer
similarly. Computer lists let you group and organize computers for administration.
Setting up computer lists is easy; you simply scan the network or import the identity of
computers from files.
A particular computer can belong to more than one list, giving you a lot of flexibility
for multicomputer management. A computer can be categorized by its type (laptop,
desktop), its physical location (building 3, 4th floor), its use (marketing, engineering,
computing), and so forth.
Once you’ve set up computer lists, you can perform most of the computer
administration activities described next for groups of client computers.
14 Chapter 1 Using Apple Remote Desktop
Page 15
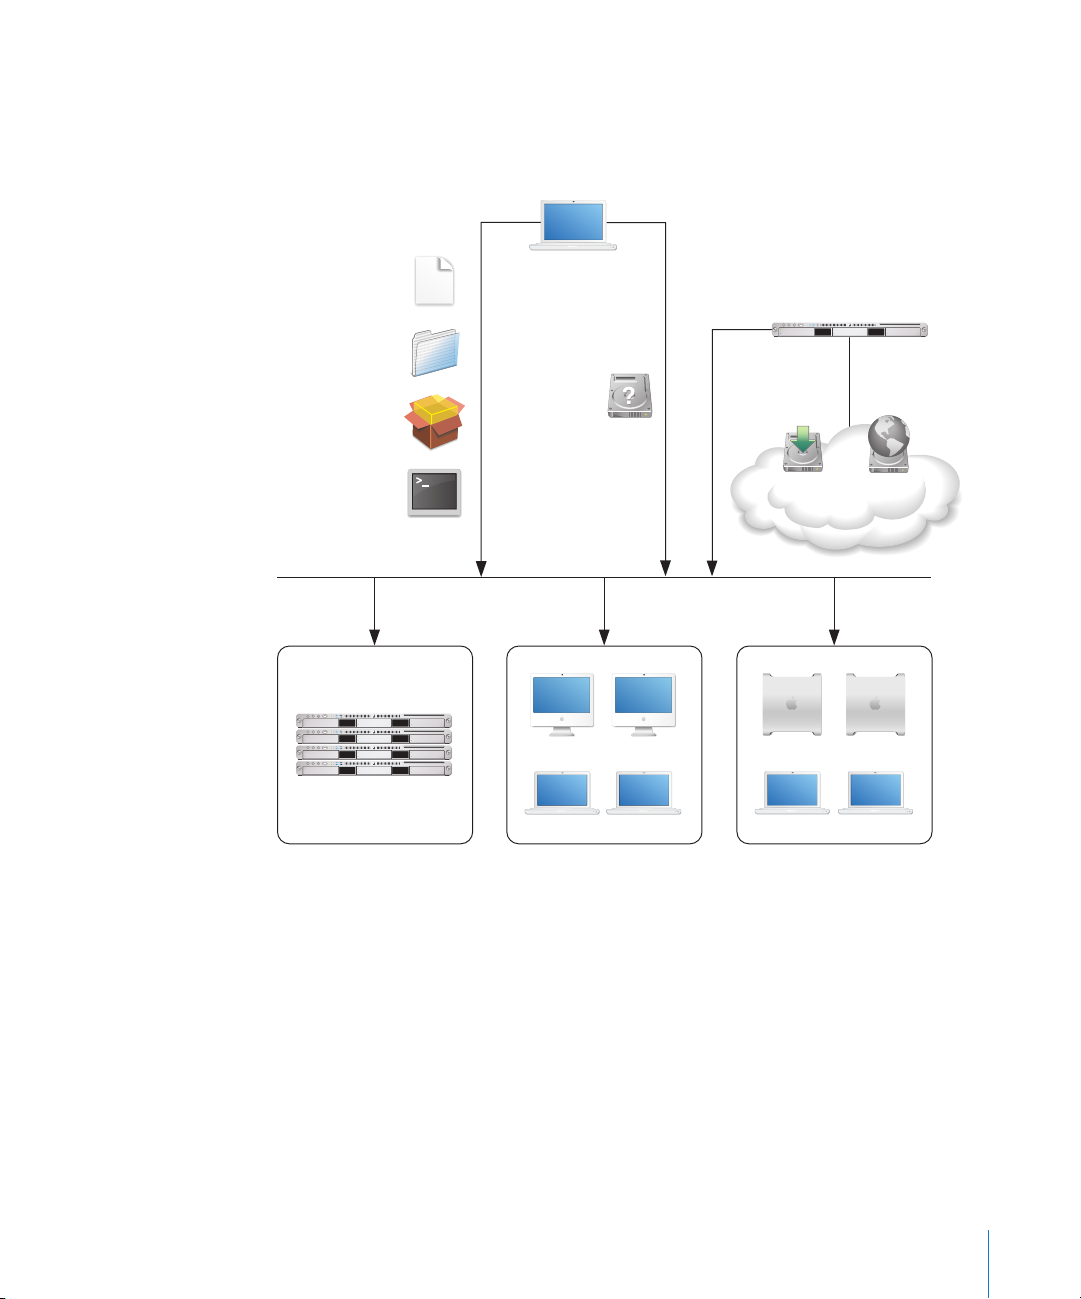
Deploying Software
Apple Remote Desktop lets you distribute software and related files to client computers
from your Apple Remote Desktop administrator computer or from a computer running
Mac OS X Server.
configuration files
Deploy
Deploy
drag-and-drop
application folders
Deploy
install packages
(.pkg or .mpkg)
Deploy UNIX
shell scripts
Administrator
computer
Set startup
partition
Mac OS X Server
Network
install images
NetBoot
images
Xserve cluster node Marketing department Engineering department
Distributing Installer Packages
You can distribute and automatically install packages in .pkg and .mpkg formats.
Apple Remote Desktop lets you install software and software updates on one or more
client computers without user interaction or interruption, or even if no user is logged
in. After installation, Apple Remote Desktop erases the installer files. If the computers
need to be restarted, as they do following an operating system update, you can restart
them from Apple Remote Desktop.
Chapter 1 Using Apple Remote Desktop 15
Page 16

For example, you can use Apple Software Update to download an iCal update or an
operating system update to a test computer. If the update works as expected and
introduces no compatibility issues, copy the installer package to the administrator
computer to distribute to computers that need upgrading. Note that this approach
conserves Internet bandwidth, because only one copy of the package needs to be
downloaded.
You can also use Apple Remote Desktop to deploy new versions of computational
software to Xserve computers in a cluster node.
You can use the PackageMaker tool (included on the Apple Remote Desktop
installation CD and with Apple’s developer tools) to create your own installer packages,
such as when you want to:
 Distribute school project materials or business forms and templates
 Automate the installation of multiple installer packages
 Deploy custom applications
Before performing remote installations, you can send an Apple Remote Desktop text
message to notify users, perhaps letting them know that you’ll be using Apple Remote
Desktop to lock their screens at a particular time before you start the installation.
Using Network Install Images
You can also distribute and install software, including the Mac OS X operating system,
by using Network Install images.
On Mac OS X Server, use the Network Image Utility to create a Network Install image.
You can create the image by cloning a system that’s already installed and set up, or by
using an installation disc or an image downloaded using Apple Software Update. If you
choose to auto-install, you won’t have to interact with each computer. On the Apple
Remote Desktop administrator computer, set the startup disk of remote client systems
to point to the Network Install image, and then remotely reboot the clients to initiate
installation.
Before initiating installations that require computers to be restarted afterwards, send
an Apple Remote Desktop text message to client users to notify them of a pending
installation. For example, tell users you’ll log them off at 5:00 p.m. to install an
operating system update.
Using NetBoot Images
Another kind of system image you can create using Mac OS X Server is a NetBoot
image. Like a Network Install image, a client computer uses NetBoot images to start up.
Unlike a Network Install image, the boot software is not installed on the client system.
Instead, it resides on a remote server. It is recommended you use a NetBoot image that
has Apple Remote Desktop installed and configured. Otherwise, administering the
computer using Apple Remote Desktop after starting up from NetBoot is impossible.
16 Chapter 1 Using Apple Remote Desktop
Page 17

Client computers that boot from a NetBoot image get a fresh system environment
every time they start up. For this reason, using NetBoot images is useful when a
particular computer is shared by several users who require different work environments
or refreshed work environments, or when you want to start a new experiment or use a
different computing environment in a cluster node.
You can use Apple Remote Desktop to set the startup disks of client systems to point to
the NetBoot image, and then restart the systems remotely using Apple Remote
Desktop. Users can also choose a NetBoot image for startup by using the Startup Disk
pane of System Preferences. With just a few clicks you can reconfigure all the
computers in a lab or cluster without having to manually restart and configure each
computer individually.
Distributing Preference Files
Managed computers often require a standard set of preferences for each instance of an
application. Use Apple Remote Desktop to distribute preference files when you need to
replace or update application preferences. For example, you can copy a standardized
preference file to the currently logged in user’s Library/Preferences folder.
Using UNIX Shell Scripts
You can use Apple Remote Desktop to distribute and run UNIX shell scripts on client
computers.
For example, a script can mount an AFP server volume, from which it downloads a disk
image to client computers. The script might also download an installer package and
then perform a command-line installation.
On an Xserve in a cluster node, you could also run a script that mounts an Xserve RAID
disk designed for high throughput and then downloads large data sets for processing.
You can also use Apple Remote Desktop to distribute AppleScript files that automate
PDF workflows, or job instructions for computational clusters.
Distributing Drag-and-Drop Applications
You can distribute and install self-contained (drag-and-drop) applications by copying
them to one or more client computers. Use this approach, for example, to distribute
application updates.
Verifying Installations
To check whether an installation has been completed successfully, use Apple Remote
Desktop’s remote control capabilities.
For example, you can start an application remotely, or search for particular files. You can
also use the File Search report to verify that all files for an application are installed
correctly.
Chapter 1 Using Apple Remote Desktop 17
Page 18
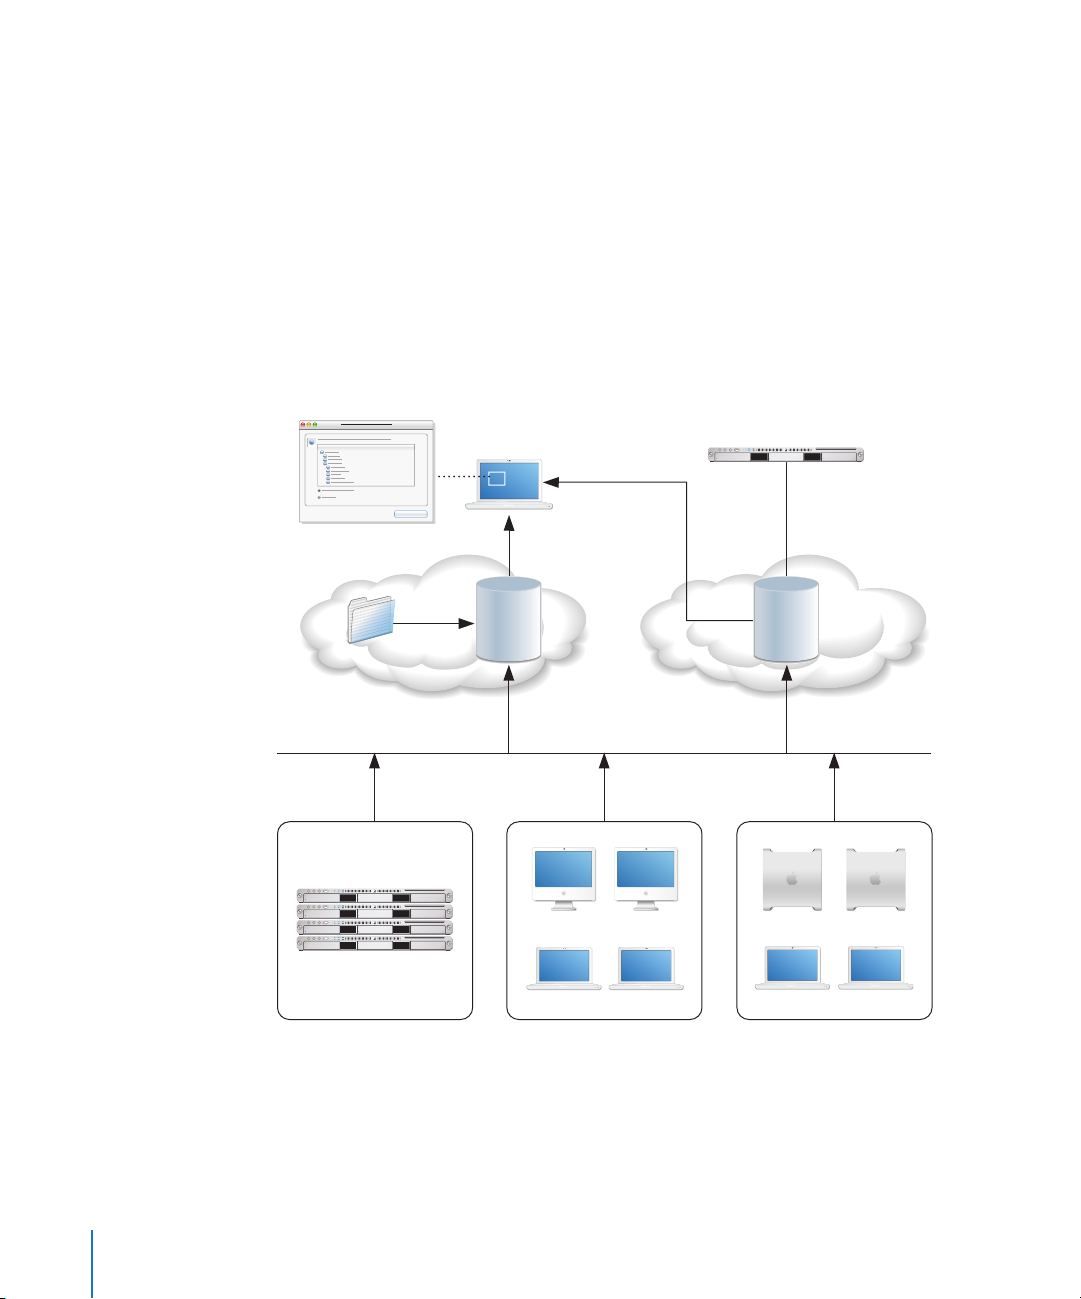
Taking Inventory
Apple Remote Desktop lets you capture data describing the attributes of client
computers, then generate reports based on the data.
You specify how often you want to capture data, the data you want to capture, and the
computers you want to profile. You can collect data just before generating a report if
you need up-to-the-minute information. Or you can schedule data to be collected by
Apple Remote Desktop at regular intervals and stored in its built-in SQL (Structured
Query Language) database for use on an as-needed basis.
You can also specify where you want the database to reside—on the local
administrator computer, or on a server where the Apple Remote Desktop administrator
software is installed and always running, so data can be captured on an ongoing basis.
SQL tools
Administrator
computer
ARD SQL
database
Mac OS X Server
ARD SQL
database
Xserve cluster node Marketing department Engineering department
Using the collected data, Apple Remote Desktop generates reports tailored to your
specifications.
18 Chapter 1 Using Apple Remote Desktop
Page 19

File Search Report
Use the File Search report to search client systems for specific files and folders and to
audit installed applications.
This report can help you find out how many copies of a particular application are in use
so you don’t violate license agreements.
Spotlight File Search
Use the Spotlight Search report to search Tiger client systems for specific files and
folders. The information in the report is updated as files matching your search change
on the client systems.
Software Version Report
Use the Software Version report to make sure that all users have the latest application
versions appropriate for their systems.
Software Difference Report
Use the Software Difference report to detect application versions that are out of date,
nonstandard, or unacceptable. You can also learn whether a user has installed an
application that shouldn’t be installed.
System Overview Report
The System Overview report makes visible a wide variety of client computer
characteristics. Using this report, you can review information about a client’s AirPort
setup, computer and display characteristics, devices, network settings, system
preferences, printer lists, and key software attributes.
There are numerous uses for this report, such as identifying problems or verifying
system configurations before installing new software, or determining how many
devices of a particular type (such as scanners) are in a particular lab.
Hardware Reports
Several reports provide details about particular hardware used by client computers—
storage, FireWire devices, USB devices, network interfaces, memory, and expansion
cards.
Use these reports to determine, for example, which computers need more memory,
which computer has the fastest processor speed, and how much free space is left on a
particular disk.
Chapter 1 Using Apple Remote Desktop 19
Page 20

Administration Settings Report
Use the Administration Settings report to determine which Apple Remote Desktop
administrator privileges are enabled or disabled for you in the Sharing pane of System
Preferences on individual client computers.
User History Report
Use the User History report to show you who has logged in to a client, how they
logged in, and for how long.
Application Usage Report
Use the Application Usage report to find out which applications have been running on
your client computers and who ran those applications.
Network Test Report
A Network Test report helps you measure and troubleshoot the communication
between your administrator computer and your client computers. The Network
Interfaces report might also help troubleshooting network hardware issues.
Use this report to help identify reasons for network communication problems that
could affect Apple Remote Desktop. For example, if you’re unable to copy items to
particular client computers from the administrator computer, you may find you have a
bad connection to the computers. Using this information can help you isolate the
problem to a particular cable or hub.
Generating Your Own Reports
Because the Apple Remote Desktop database is in standard SQL format, you can also
use your favorite SQL scripts to query, sort, and analyze the collected data. In addition,
you can export data from the database into a file so you can import it for viewing in a
different program, such as a spreadsheet application.
20 Chapter 1 Using Apple Remote Desktop
Page 21
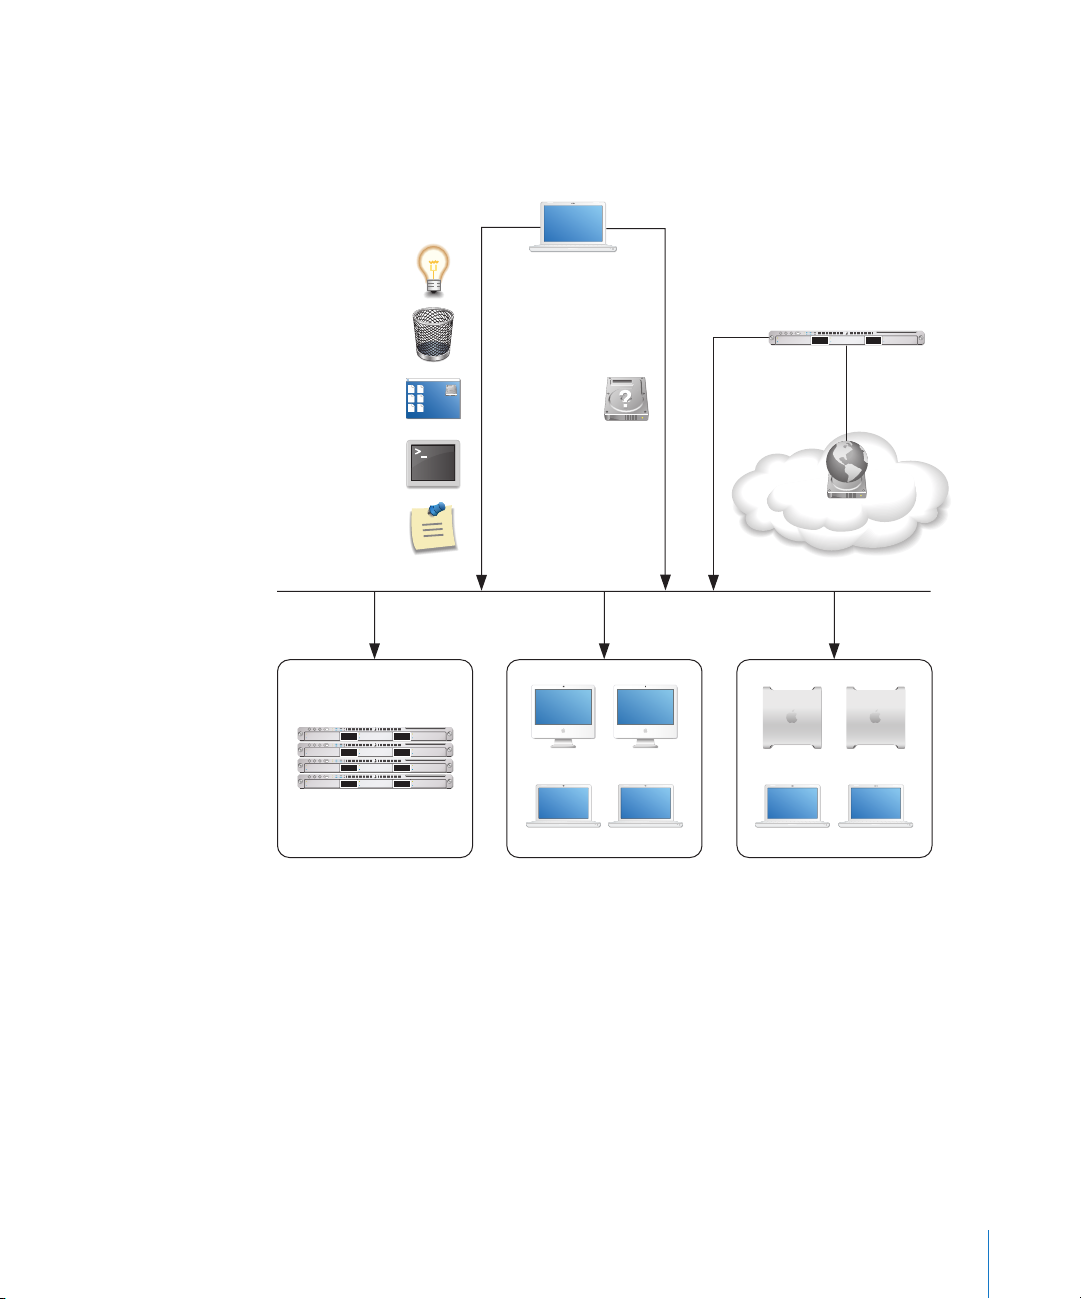
Housekeeping
Apple Remote Desktop provides several ways to remotely control client computers for
housekeeping activities, which you can conduct using one or more Apple Remote
Desktop windows.
Restart/
shutdown/sleep
Empty
Trash
Remote screen
control
Execute UNIX
shell script
Send text
notification
Administrator
computer
Mac OS X Server
Set startup
partition
NetBoot
images
Xserve cluster node Marketing department Engineering department
Chapter 1 Using Apple Remote Desktop 21
Page 22

Managing Power State
Use Apple Remote Desktop to control the power state of client computers.
For example, you may need to have all computers turned off during maintenance of a
power generation unit or during a holiday shutdown. You can send an Apple Remote
Desktop text message reminding users to shut down their computers at a particular
time. Any computers still running when you need to start maintenance can be
detected and shut down remotely with Apple Remote Desktop.
Locking Computer Screens
You can lock the screens of client computers for specified durations when you don’t
want the computers to be used. For example, you may need to perform network
maintenance and want to make sure computers don’t use the network for a few hours.
You can display custom pictures or text messages on locked computer screens to let
users know when the computers are available again.
Reclaiming Disk Space
Periodically empty the Trash on client computers to conserve disk space.
Automating Periodic Maintenance
Use AppleScript and UNIX shell scripts to automate periodic maintenance, such as
checking permissions or deleting log files.
Controlling Screens
Use Apple Remote Desktop’s remote screen control to perform activities on the
desktop of Xserve computers, or use graphical applications on them. Apple Remote
Desktop replaces the need for KVM (keyboard-video-mouse) switches for accessing
Xserve computers without a monitor attached.
You can also remotely control a user’s computer to help determine reasons for slow
performance or other problems.
Changing Startup Disks
Change the startup disk of a client computer to perform diagnostic or troubleshooting
activities.
For example, start up a computer using a server-based NetBoot image that’s been
set up for troubleshooting. When you’re finished, reset the startup disk to the original
boot volume.
Managing Shared Computers
On computers that are shared among users, check for files that need to be deleted,
close applications, log users off, or perform other activities needed to prepare
computers for the next users.
22 Chapter 1 Using Apple Remote Desktop
Page 23
Supporting Users
Apple Remote Desktop lets you interact with users from your administrator computer
in these ways:
 Provide help: respond to users who need help by using Apple Remote Desktop to
receive user requests and to remotely diagnose and fix problems.
 Interact: conduct instructional interactions with students in a school or corporate
training environment—from controlling or observing student screens to sharing your
screen with all your students in order to perform a demonstration.
Providing Help Desk Support
When a user is having trouble, Apple Remote Desktop provides several ways to interact
with the user and his or her computer to diagnose and fix the problem.
Administrator
computer
Use
text chat
Copy
items
Control, observe, and
share screens
Marketing department Engineering department
Chapter 1 Using Apple Remote Desktop 23
Page 24

Requesting Help
A user can discreetly notify you of a problem by sending a request for help using an
Apple Remote Desktop text message.
Users initiate requests using the commands in the menu that appears when they click
the Apple Remote Desktop icon in the menu bar. A notification on the administrator
computer alerts you to the message, and you can use several techniques to obtain
more information and troubleshoot the problem.
Chatting with the User
Conduct two-way Apple Remote Desktop text communication with the user to obtain
more information.
Screen Monitoring
Use Apple Remote Desktop to observe the user’s screen if you need more details to
understand the problem.
Screen Controlling
Use Apple Remote Desktop to control the user’s screen in order to diagnose and fix the
problem. You may have unlimited control, or a user can grant you temporary guest
access so you can control the computer only during troubleshooting.
There are two levels of control available. You can take complete control of the user’s
computer, or you can share control of the keyboard and mouse with the user.
Screen Sharing
If the problem is caused by incorrect actions by the user, share your screen with the
user as you demonstrate the correct way to perform the action.
Using Reports
Use hardware and software reports as diagnostic tools to determine whether the client
computer setup is part of the problem. For example, if a user can’t save his or her work,
the storage report can help you determine whether it’s a disk space issue.
Deploying New Software or Files
If software or configuration settings are part of the problem, use Apple Remote
Desktop to copy new configuration files, installer packages, or other items to client
computers.
24 Chapter 1 Using Apple Remote Desktop
Page 25
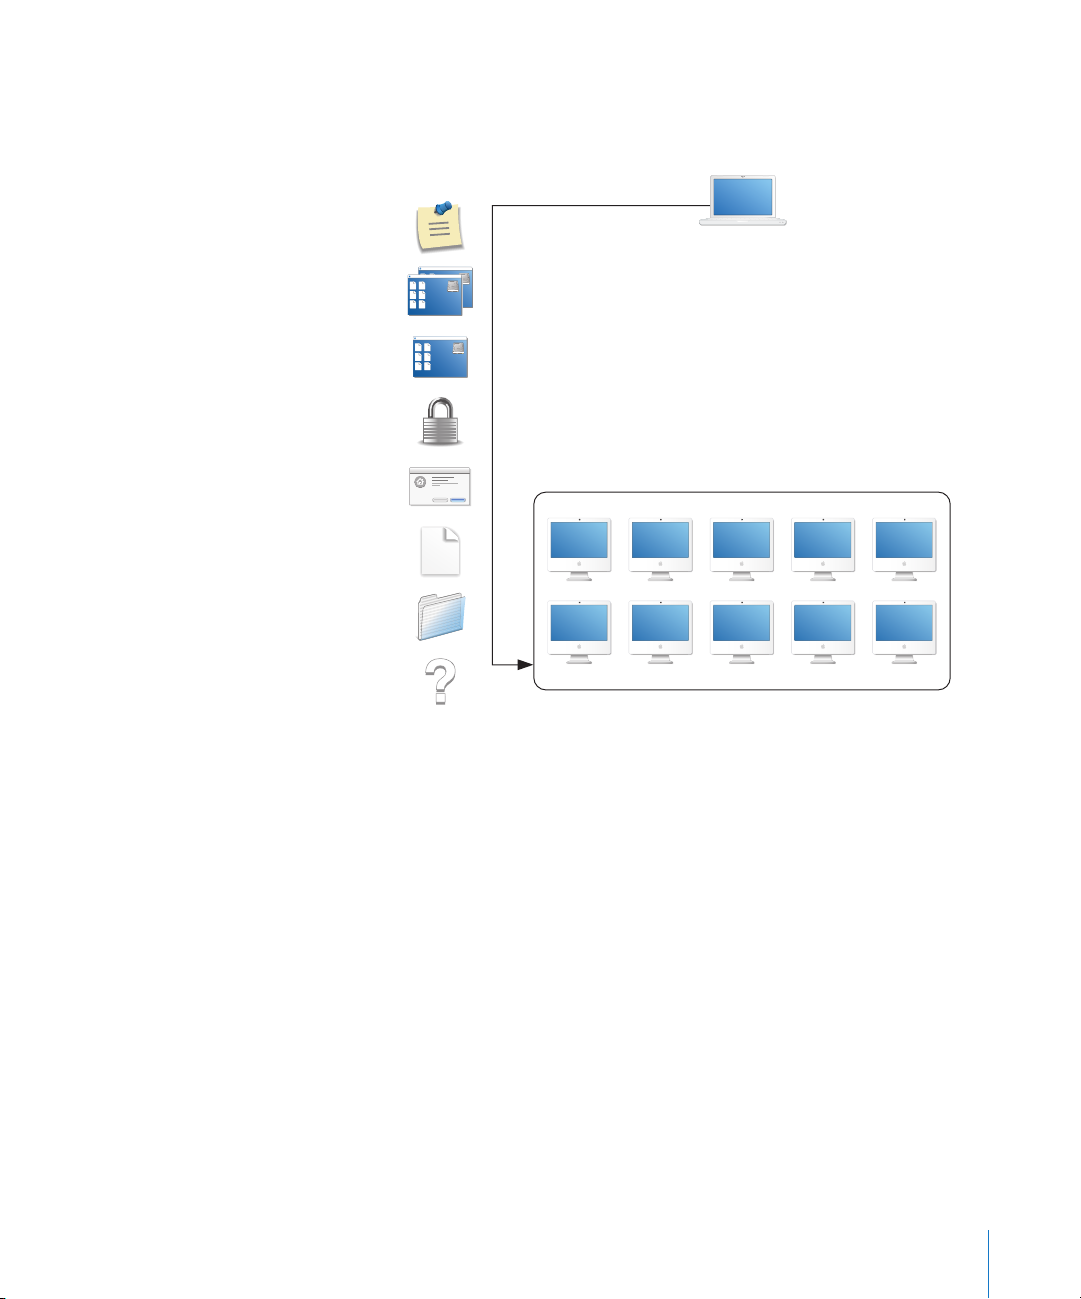
Interacting with Students
Apple Remote Desktop helps instructors teach more efficiently by letting them interact
with student computers individually or as a group.
Broadcast
text messages
Observe and
share one or
multiple screens
Control
screen
Lock
screens
Log out
students
Distribute
items electronically
Administrator
computer
Open applications
help desk support
or files
One-to-one
Classroom
Using Text Messages
Send Apple Remote Desktop text messages to communicate with students.
For example, notify them that a classroom activity will start soon or that they have
ten minutes to finish an examination.
Monitoring Student Computers
View student computer screens on your computer, so you can monitor student
activities or assess how well they’re able to perform a particular task. You can also
monitor the applications running on any student’s computer.
Sharing Screens
Display your screen or a student’s screen on other student computers for training and
demonstration purposes.
Chapter 1 Using Apple Remote Desktop 25
Page 26

Controlling Screens
Show students how to perform tasks by controlling their screens from your computer,
opening applications and using files as required.
Locking Screens
Lock student screens to prevent students from using their computer when you want
them to focus on other activities.
Terminating Computer Use
Remotely log students out or shut down their computers at the end of a class or
school day.
Distributing and Collecting Files
Distribute handouts electronically, at a time that won’t disrupt class activities or when
they’re needed for the next class activity, and collect homework files.
Automating Website Access
Open a webpage on all student computers. Drag a URL from Safari to your desktop,
then copy it to student computers and open it in Safari. You can also copy files and
open them in the appropriate applications on student computers.
Providing One-to-One Assistance
Provide help when a student needs it, conducting private and discreet computer-tocomputer interactions.
26 Chapter 1 Using Apple Remote Desktop
Page 27

Finding More Information
You’ll find detailed instructions for performing the tasks highlighted in this chapter—
and more—throughout this manual.
To learn more about See information for Starting on page
Remote Dekstop interface Window and icon functions page 28
Computer lists Creating computer lists page 49
Apple Remote Desktop
administration
Controlling screens Controlling page 79
Observing screens Observing page 86
Deploying software Installing software
Distributing files Copying files page 108
Taking inventory Data collection options
Client use reporting User login accounting
Housekeeping tasks Deleting items
Automating tasks Configuring data gathering
Administrator privileges
Administrator computers
Upgrading software
Auditing software
Auditing hardware
Network responsiveness
Customizing reports
Exporting report data
Application usage
Emptying the Trash
Setting startup volumes
Renaming computers
Sleeping and waking
Locking screens
Logging users out
Restart and shutdown
Scheduling tasks
Using UNIX shell scripts
page 60
page 102
page 113
page 116
page 129
page 156
Additional information is available at several Apple websites:
 For information about NetBoot and Network Install, download the system imaging
administration guide at:
www.apple.com/server/documentation/
 You can find the Software Delivery Guide on the Apple Developer Connection
website at:
developer.apple.com/referencelibrary/
Chapter 1 Using Apple Remote Desktop 27
Page 28

2 Getting to Know Remote Desktop
2
Remote Desktop is the administrator application for Apple
Remote Desktop. Its attractive interface is powerful, yet
simple to use. Remote Desktop’s interface is customizable,
allowing you to get the information you want quickly, the
way you want it.
This chapter contains screenshots and short descriptions of Remote Desktop’s interface,
as well as detailed instructions for customizing the appearance and preferences of the
application. You will learn about:
 “Remote Desktop Human Interface Guide” on page 28
 “Configuring Remote Desktop” on page 36
 “Interface Tips and Shortcuts” on page 37
28
Remote Desktop Human Interface Guide
The following sections give basic information about the human interface of Remote
Desktop, Apple Remote Desktop’s administrator application.
 “Remote Desktop Main Window” on page 29
 “Task Dialogs” on page 31
 “Control and Observe Window” on page 32
 “Multiple-Client Observe Window” on page 33
 “Report Window” on page 34
 “Changing Report Layout” on page 35
Page 29

Remote Desktop Main Window
The main window of Remote Desktop has a customizable toolbar, groups of lists, tasks,
and scanners on the left, and the main window area to the right. “List Menu Icons” on
page 168 contains icons seen in the list menu of the main window.
K L
A
B
C
D
E
F
G
H
I
J
A All Computers list: The All Computers list is a list of all client computers that you plan to
administer. It includes all the clients you have authenticated to, as well as the client computers
that you plan to authenticate to. Computers need to be in the All Computers list before you can
command or administer them. If you have a 10-client license, the All Computers list can contain
only 10 computers.
B Apple Remote Desktop computer lists: A list of computers you create to group computers in
ways that are convenient for you. Any list is a subset of the client computers in the All
Computers list. If you add a computer directly to a computer list, it is added automatically to the
All Computers list as well.
C Smart computer lists: A smart computer list is a list of computers which is a subset of the client
computers in the All Computers list that meet a predetermined criteria. Smart Computer lists
update themselves based on your criteria compared to the contents of the All Computers list.
D Group folders: Groups are tools to help you organize all your possible lists, tasks, and scanners.
Groups look like folders, and can be collapsed to hide the group contents.
E Saved tasks: Saved tasks are listed in the left portion of the main window. They have the icon of
the type of task and have a user-changeable name.
F Scanner: Scanners find clients to add to the All Computers list. You can make new scanners and
customize them for your needs. See “Making a New Scanner” on page 53.
Chapter 2 Getting to Know Remote Desktop 29
Page 30

G Task server list: This lists tasks delegated to the Task Server, rather than run those run directly
from the application. When all the target computers have come online and participated in the
task, the task is labeled as complete.
H Active tasks list: This list shows all tasks that are currently running or scheduled and
uncompleted.
I History list: The History list shows a list of most recently run tasks, as defined in the Remote
Desktop preferences. You can inspect each task by double-clicking it. Once a task is completed
(whether successfully or not) it is moved to the History list.
J Task status icon: These icons represent the current state of a task. See “Task Status Icons” on
page 168.
K Client status icon: Icon representing the current state of a client computer. See “Client Status
Icons” on page 167.
L Customizable toolbar: The toolbar can be fully customized with icons of your most-used Apple
Remote Desktop features.
30 Chapter 2 Getting to Know Remote Desktop
Page 31

Task Dialogs
When you click a task, a dialog appears to let you set task parameters or confirm
the task.
A
C
D
E
B
F
G
A Task type header: This header area shows you the kind of task represented.
B Saved task name: When you save a task, you name it for your own use.
C Task configuration area: This area is different for every task. It’s where you set operating
parameters for the task to be performed.
D Participating computers: This area shows you the computers that will be affected by the task.
You can add or remove computers in this area without changing computer list membership.
E Schedule task button: When you click this button in a task dialog, you can set a time to
perform the task as well as repeat the task. See “Working with Scheduled Tasks” on page 161 for
more information.
F Save task button: When you click this button in a task dialog, you can name and save the task
as configured. Saved tasks appear in the left side of Remote Desktop’s main window.
G Task templates: This control allows you to save current task configuration settings, or apply
previously saved settings to the current task. These templates are stored on a per-task basis.
For example, the Send UNIX Commands template pop-up has an extensive list of built-in
templates, while other tasks may have none.
Chapter 2 Getting to Know Remote Desktop 31
Page 32

Control and Observe Window
This window is the same for both controlling and observing a single client. The only
difference is the state of the Observe or Control toggle button. When it’s selected,
you have control over the remote client.
B C
D
A
E
F G
H
I
A Observe or control toggle: When this button is selected, you have control over the remote
client.
B Share mouse control: When this button is selected, you share mouse control with the user.
C Fit screen in window: When this button is selected, the remote client is scaled to the Control
window size.
D Lock computer screen for control: When this button is selected, the remote client screen
shows a lock, and your view allows you to view the client desktop normally.
E Capture screen to file: When this button is clicked, the remote client screen is saved to a local
file at the selected image quality.
F Fit screen to full display: When this button is selected, your display doesn’t show your
computer desktop, only that of the remote computer, at full possible resolution.
G Get clipboard from client: When this button is clicked, the contents of the remote client
Clipboard are transferred to the local Clipboard.
32 Chapter 2 Getting to Know Remote Desktop
J
Page 33

H Send clipboard to the client: When clicked, the remote client Clipboard receives the contents
of the local Clipboard.
I Image Quality: Adjusts the screen color depth from black and white to millions of colors.
J Desktop of Controlled Computer: Resize this window from the lower right corner.
Multiple-Client Observe Window
When you observe many clients at the same time, they all appear in the same window.
If you have more computers than will fit in the window, they are divided across several
pages.
C
H
B
A
I
E
G
I
A Page Delay: Adjusts the number of seconds before automatically advancing to the next page of
screens.
B Computers Per Page: Adjusts the number of client screens visible on each page.
C Image Quality: Adjusts the screen color depth from black and white to millions of colors.
D Display Computer Information: Shows the computer information area, which contains desktop
titles, account pictures, and status icons.
E Computer title selector: Changes the titles displayed underneath the client screens (you can
choose the computer name, IP address, or hostname).
F Account picture: Shows the login icon of the currently logged in user.
D
F
Chapter 2 Getting to Know Remote Desktop 33
Page 34

G Computer status: Shows basic computer status beneath each client screen.
H Cycle through pages: Manually advances to the next page of screens.
I View Options: Reveals the view option controls.
J Observed computers: Contains the scaled desktops of the observed client computers.
Report Window
Reports serve as valuable shortcuts when you’re copying files and organizing computer
lists.
B
C
A
C
A Report category: Most reports have subcategories to help you find the information you want.
In the report window, you switch between the subcategories using these tabs.
B Save report to file: Saves the report to a plain text file.
C Print: Formats and prints the report window.
D Open selected: Opens the item selected in the report. The item opens on the client computer.
34 Chapter 2 Getting to Know Remote Desktop
F
D E
B
Page 35

E Delete selected: Deletes the item selected in the report from the remote computer.
F Copy to this computer: Copies selected items to the administrator computer.
Changing Report Layout
You can customize report layouts for your own purposes. By default, reports include a
column for each information type you selected before running the report, in the order
presented in the report dialog. The columns in the report are initially sorted by
computer name.
You can resize or rearrange the columns of a report, as well as sort the rows by column.
Additionally, in the File Search report, you can choose what information is displayed
about a found item. By default, the item name, kind, parent path, actual size, and
modification date are displayed.
To change what information is displayed:
1 In the File Search report window, select or deselect each report column as desired.
Report column If checked, will show
Name The item name
Parent path The path to the folder that the item is in
Full path The full file path
Extension The file extension indicating the file type (.app, .zip, .jpg)
Date modified The last date and time the file was changed and saved
Date created The date and time the file was created
Actual size Actual file size, in kilobytes or megabytes
Size on disk Amount of disk space used by the file, in kilobytes
Kind File, folder, or application (including platform: Universal,
PowerPC, Intel, or Classic)
Invisible A checkmark indicating whether it is visible in the Finder
Version number If an application, the version reported
Version string If an application, the version reported
Owner The item owner’s short name
Group The item’s group name
Permissions The item’s UNIX permissions (for example, -rw-r--r--)
Locked A checkmark indicating whether it is a locked file
2 After making your selections, click Generate Report as usual.
When the report window appears, you can rearrange the columns or sort by a different
column.
Chapter 2 Getting to Know Remote Desktop 35
Page 36

Configuring Remote Desktop
You can configure the Remote Desktop administrator application to meet your work
needs. Remote Desktop has an interface that is both flexible and functional.
Customizing the Remote Desktop Toolbar
The Remote Desktop application has a fully customizable toolbar, which provides a
quick way to perform tasks. To perform a task, just click the appropriate icon in the
toolbar. To show or hide the toolbar, click the toolbar button in the upper-right corner
of the application window. You can add, remove, or rearrange the task icons in the
toolbar to suit your needs.
To customize the application toolbar:
1 Choose Window > Customize Toolbar.
2 Drag your favorite toolbar items or the default set of items to the toolbar. To remove an
item, drag it from the toolbar. To rearrange items, drag them into the order you prefer.
3 Choose whether to display toolbar items as text, icons, or both. Selecting “Use Small
Size” shrinks the items in the toolbar.
Setting Preferences for the Remote Desktop Administrator Application
In Remote Desktop preferences, you can select options that affect how the
administrator application interacts with client computers.
To open the Preferences window:
 Choose Remote Desktop > Preferences.
In the General pane, you can set:
 What double-clicking a client computer does (Get Info, Control, Observe, Text Chat)
 Whether to show the client idle time
 What warnings may appear when quitting the application
 A new serial number
 A new Remote Desktop application password
In the Control & Observe pane, you can set:
 Whether a remote screen is shown in a window or a full screen
 Whether control of the mouse and keyboard is shared with the client computer
when the client is controlled
 Whether a remote screen is shown at its actual size in a window or if it shrinks to fit
the window
36 Chapter 2 Getting to Know Remote Desktop
Page 37

In the Task Server pane, you can set:
 Whether Remote desktop is using another computer as a Task Server, or whether this
copy of Remote Desktop is being used as a Task Server
 Whether other Apple Remote Desktop administrators can access your local Task
Server
 Whether clients collect user and application tracking data
 A saved template for scheduling client reporting policies
In the Labels pane, you can set:
 Label colors and text for labeling computers
In the Tasks pane, you can set:
 Whether to automatically change focus to the active task
 Whether to execute a notification script on task completion
 Limits on History list contents and time until removed
In the Security pane, you can set:
 Whether to accept messages from client users
 Whether to allow control of the computer while Remote Desktop is active
 The default encryption preference for control and observe sessions
 The default encryption preference for Copy Items and Install Packages tasks
 Which features of Remote Desktop are available to nonadministrator users
See “Apple Remote Desktop Nonadministrator Access” on page 67.
Interface Tips and Shortcuts
There are a number of features of the Remote Desktop interface which make it
particularly flexible and powerful. The following lists a few built-in shortcuts to features
which can make using Remote Desktop more productive.
Computers can be selected from any window
Any computer in any window—report windows, task windows, computer lists, observe
windows—can be a target for some task. For example, if you are observing 10
computer screens and need to send a text message to one, select the screen with a
single click and then choose Interact > Send Text Message. Likewise, if you get a
software report on 50 computers and notice that one of the computers is missing
some vital piece of software, you can drop that software onto the selected computer
within the report window.
Treating all windows as possible computer selection lists for tasks may save you lots of
time switching between the Remote Desktop window and other windows as you
accomplish your work.
Chapter 2 Getting to Know Remote Desktop 37
Page 38

Drag and drop works on configuration dialogs
Configuration dialogs accept dragged items. Computer lists in the dialogs accept
dragged computers. The Copy Items dialog accepts dragged files to copy, without
having to browse the file system for them. Save yourself time and effort by dragging
available items to dialogs rather than browsing for them.
Making lists from reports or other lists
You may need to make a list based on the outcome of some report, but you don’t
know which computers will need to be included. After getting a report and sorting on
the desired column, you can select the computers and make a new list from the
selection. If you double-click the list icon, you open another window containing the
computers in the list. This is useful for comparing lists, or for using the new window as
a source from which to drag computers to other lists.
Saved Tasks and Task Templates save you time
You may spend a lot of time coming up with the perfect software search to find exactly
what you need. You shouldn’t recreate that search every time you need it. Save your
tasks, and duplicate them. With a little editing, you can have a number of similar saved
tasks for specific uses. Alternatively, you can use task templates to save settings across
task dialogs, applying the same settings through various tasks.
38 Chapter 2 Getting to Know Remote Desktop
Page 39

3 Installing Apple Remote Desktop
3
To use Apple Remote Desktop, install the administration
software on the administrator computer first, and then install
and enable the client software on the computers you want to
manage. You’ll need your install disc, the serial number, and
either the printed Welcome instructions, or these instructions.
This chapter describes how to install Apple Remote Desktop for system administration
and user interaction and gives complete setup instructions. You can learn about:
 “System Requirements for Apple Remote Desktop” on page 39
 “Installing the Remote Desktop Administrator Software” on page 40
 “Setting Up an Apple Remote Desktop Client Computer for the First Time” on page 41
 “Upgrading the Remote Desktop Administrator Software” on page 41
 “Upgrading the Client Software” on page 42
 “Creating a Custom Client Installer” on page 44
 “Considerations for Managed Clients” on page 46
 “Removing or Disabling Apple Remote Desktop” on page 46
System Requirements for Apple Remote Desktop
Administrator and client computers:
 Mac OS X or Mac OS X Server version 10.3.9 or later (Mac OS X version 10.4 or later is
required for some features).
 Mac OS Extended (HFS+) formatted hard disk.
 For observing and controlling other platforms: a system running Virtual Network
Computer (VNC)-compatible server software.
NetBoot and Network Install (optional)
 Mac OS X Server version 10.3 or 10.4 with NetBoot and Network Install services
enabled
39
Page 40

Network Requirements
 Ethernet (recommended), AirPort, FireWire, or other network connection
See “Setting Up the Network” on page 72 for more information.
Installing the Remote Desktop Administrator Software
To set up Apple Remote Desktop on administrator computers, you install the software
on the computer you plan to use to administer remote computers. Then, you open the
application setup assistant, and add to the main list of computers.
To install Apple Remote Desktop on an administrator computer:
1 Insert the Apple Remote Desktop installation disc.
2 Double-click the Remote Desktop installer package and follow the onscreen
instructions.
The Remote Desktop application will be installed in the Applications folder.
3 Launch Remote Desktop (in the Applications folder).
The Remote Desktop Setup Assistant appears.
4 Enter the serial number.
The serial number can be found on the Apple Remote Desktop Welcome document
that came with your software.
Optionally, enter a registration name and organization.
5 Click Continue.
6 Enter a Remote Desktop application password and verify it.
The Remote Desktop application password is used to encrypt names and passwords of
client computers for Apple Remote Desktop. You can store this password in your
keychain for convenience, or you can require that the password be entered each time
you open Remote Desktop.
7 If you have another unlimited-licensed copy of Apple Remote Desktop acting as a Task
Server (a dedicated computer running Remote Desktop for report data collection and
delegated install tasks), enter the server address and click Continue.
8 Set the default data collection scope and time for newly administered computers.
These settings will be stored as the default upload schedule, which can be applied to
computers when you add them for administration. For more detailed information, see
“Setting the Client’s Data Reporting Policy” on page 160.
9 Click Done.
The main application window appears.
40 Chapter 3 Installing Apple Remote Desktop
Page 41

10 Configure some client computers for administration, find them in a scanner, and add
them to a computer list. See:
 “Setting Up an Apple Remote Desktop Client Computer for the First Time” on page 41
 “Finding and Adding Clients to Apple Remote Desktop Computer Lists” on page 49
Setting Up an Apple Remote Desktop Client Computer for the First Time
The following section contains information on setting up Apple Remote Desktop 3 on
client computers. Since Apple Remote Desktop v1.2 was included with Mac OS X v10.3
computers and Apple Remote Desktop v2.2 was installed with Mac OS X v10.4
computers, all Apple Remote Desktop 3 client installations are upgrade installations,
even if you are setting up clients for the first time.
See “Upgrading the Client Software” on page 42 for more information.
If the Apple Remote Desktop client software was removed from the computer, you can
install a fresh copy of the most recent client software by installing Apple Remote
Desktop manually.
See “Method #2—Manual Installation” on page 43 for more information.
If you’re setting up Mac OS X Server for the first time using Server Setup Assistant, you
can enable Apple Remote Desktop as one of the initial services. This allows you to
administer a server immediately after server software installation by providing Remote
Desktop with the user name and password of the default system administrator.
Upgrading the Remote Desktop Administrator Software
Upgrading Remote Desktop is just like installing it for the first time. The only difference
is that the final button in the installer reads “Upgrade” rather than “Install.” The installer
upgrades existing software to its latest version, imports previously created lists, and
restarts the underlying processes after completion.
See “Installing the Remote Desktop Administrator Software” on page 40, for detailed
instructions.
If you are upgrading from version 1.2 and changing administrator computers, you’ll
need to transfer your existing computer lists. See “Transferring Old v1.2 Computer Lists
to a New Administrator Computer” on page 58. Be sure to transfer your lists from Apple
Remote Desktop v1.2 to the new computer before upgrading to Apple Remote
Desktop 3. If you upgrade from version 1.2 to version 3.1 on the same administrator
computer, this list migration is done for you.
Chapter 3 Installing Apple Remote Desktop 41
Page 42

Upgrading the Client Software
This section contains information on installing Apple Remote Desktop 3 on client
computers. Since Apple Remote Desktop client software was automatically included on
the clients running Mac OS X v10.3 and v10.4, all Apple Remote Desktop 3 installations
are upgrade installations, even if you are setting up clients for the first time.
You can only upgrade Apple Remote Desktop v1.x and v2.x computers if they meet the
minimum system requirements (see “System Requirements for Apple Remote Desktop”
on page 39). Please note that there is no supported “downgrade” to any previous
version, and if you upgrade the client computers to version 3.1, you will not be able to
administer them with earlier versions of Remote Desktop.
There are two methods to upgrade the client computer’s software.
Method #1—Remote Upgrade Installation
This method works best with existing clients already configured using a previous
version of Apple Remote Desktop. If used with existing administered clients, use
Remote Desktop to identify those clients running a previous version. You may then
upgrade them to the latest version. The main benefit of this upgrade method is the
ease of installation and the retention of previous client settings, if any.
This method only works for Apple Remote Desktop 1.2 clients and later. Earlier versions
of Apple Remote Desktop like 1.0 must be upgraded to version 1.2 using Mac OS X’s
Software Update, or they must be updated manually. See “Method #2—Manual
Installation” on page 43 for more information.
To upgrade existing client software remotely using Apple Remote Desktop:
1 Enable the existing version of Apple Remote Desktop on the client computers.
2 Configure the clients for administration.
See “Setting Apple Remote Desktop Administrator Access Authorization and Privileges
Using Local Accounts” on page 62.
3 If the client computers are not in an existing Remote Desktop computer list, find the
client computers using an Apple Remote Desktop scanner.
See “Finding and Adding Clients to Apple Remote Desktop Computer Lists” on page 49
for more information.
4 Select the client computers to be upgraded.
5 Choose Manage > Upgrade Client Software.
6 Click Upgrade.
42 Chapter 3 Installing Apple Remote Desktop
Page 43

Method #2—Manual Installation
This method works best if you have never enabled Apple Remote Desktop on your
clients and have an existing software distribution infrastructure. This method also
allows for the greatest power and configuration flexibility. Also, if you don’t want Apple
Remote Desktop to upgrade your clients using the Upgrade Client Software feature,
you can perform a manual upgrade.
The custom installer not only installs the needed software but also prepares and
configures the client computer for administration and can be configured to add or edit
user names and passwords for Apple Remote Desktop authentication.
To manually upgrade the client software:
1 Use Remote Desktop to create a client software installer package.
For detailed instructions, see “Creating a Custom Client Installer” on page 44.
2 Copy and install the package on the client computers. You need the name and
password of a user with administrator privileges on the computer to install the
package.
There are several ways to do this. For example, you can:
 Distribute the package by removable media, such as a CD.
 Copy the installer to the clients over the network using file sharing.
 Copy the installer to the clients using command-line tools like scp (if ssh is enabled),
and use Apple’s command-line installation tool, “installer,” to install the package
remotely. This process is described in detail in “Upgrading Apple Remote Desktop
Clients Using SSH” on page 43.
 Add the custom installer package to a Network Install image, using System Image
Utility to automatically include the software and your custom settings when clients
install the operating system using Mac OS X Server 10.4’s NetBoot and Network
Install features.
WARNING: Custom install packages that create user names contain sensitive
password data. Take care to store such custom installers securely.
Upgrading Apple Remote Desktop Clients Using SSH
You may not be able to or want to use Remote Desktop to upgrade existing clients to
Apple Remote Desktop 3. If the clients have SSH enabled (called Remote Login in
System Preferences), and are available on the network, you can still upgrade the client
computers.
You still need to use Remote Desktop to create a custom installer package. You also
need the user name and password of a user with system administrator privileges on
the client computer.
Chapter 3 Installing Apple Remote Desktop 43
Page 44

To upgrade existing client software using SSH:
1 Create the custom client installer package.
For detailed instructions, see “Creating a Custom Client Installer” on page 44.
2 Open the Terminal application (located in /Applications/Utilities/).
3 Copy the installer package to the client computer by typing:
$ scp -r <path to installer package> <user>@<host>:<path to package
destination>
For other options, see the scp man page.
4 Log in to the client computer by typing:
$ ssh <user>@<host>
For other options, see the ssh man page.
5 On the client computer, install the package by typing:
$ sudo installer -pkg <path to package> -target /
For other options, see installer man page.
Creating a Custom Client Installer
To install the Apple Remote Desktop client software on computers, you use the
administrator application, Remote Desktop, to create a custom client installer. The
custom client installer not only installs the Apple Remote Desktop system software, but
can create user names and passwords on the client computer with their Apple Remote
Desktop privileges already assigned. You’ll use an assistant to create a custom client
installer package. Any values set in the custom installer will apply to all the computers
that receive the installation.
While creating a custom installer, you will have a chance to create new Apple Remote
Desktop administrator user names with passwords, and automatically set Apple
Remote Desktop access privileges and preferences.
WARNING: Custom installer packages that create user names contain sensitive
password data. Take care to store and transmit such custom installers securely.
To create the client installer:
1 Open Remote Desktop.
2 Choose File > Create Client Installer.
The Custom Installer Setup Assistant appears.
3 Choose to create a custom installer and click Continue.
If you choose not to create a custom installer, you can create a basic installer that sets
no preferences on the client computer.
44 Chapter 3 Installing Apple Remote Desktop
Page 45

4 Click Continue to begin creating a custom installer.
5 Choose whether to start Remote Desktop sharing at system startup.
This changes the setting found in the Sharing pane of System Preferences.
6 Choose whether to hide or show the Apple Remote Desktop menu bar icon.
7 Click Continue.
8 Choose whether to create a new user for Apple Remote Desktop login. Click Continue.
A new user account can be created to grant Apple Remote Desktop administrator
privileges. Creating a new user account does not overwrite existing user accounts or
change existing user passwords.
If you choose not to create a new user account, skip to step 10 after clicking Continue.
9 Add a new user by clicking Add and filling in the appropriate information.
Click OK after adding each user, and click Continue when you’re ready to go on.
10 Choose whether to assign Apple Remote Desktop administrator access privileges to
Directory Services groups.
If you choose to do so, select “Enable directory-based administration.”
See “Apple Remote Desktop Administrator Access Using Directory Services” on page 63
for more information on using this method to grant Apple Remote Desktop
administrator access.
11 Choose whether to assign Apple Remote Desktop administrator access privileges to
specific users. Click Continue.
If you choose not to assign administrator access privileges, skip to step 14.
12 Click Add to designate a user to receive Apple Remote Desktop access privileges.
13 Provide the user’s short name and set the privileges as desired.
See “Apple Remote Desktop Administrator Access” on page 60 for more information.
Click OK after each user, and click Continue when you’re ready to go on.
14 Choose whether to allow temporary guest control by requesting permission on the
client computers.
See “Considerations for Managed Clients” on page 46 for more information.
15 Choose whether to allow non–Apple VNC viewers to control the client computers, and
click Continue.
See “Virtual Network Computing Access” on page 68 for more information.
16 If desired, select and enter information in any or all of the four System Data fields.
This information appears in Apple Remote Desktop System Overview reports. For
example, you can enter an inventory number for the computer, a serial number, or a
user’s name and telephone number.
Chapter 3 Installing Apple Remote Desktop 45
Page 46

17 Click Continue.
18 Select a location for the installer.
19 Click Continue to create the installer.
An installer metapackage (.mpkg file) is created in the designated location.
20 Click Done.
Considerations for Managed Clients
If you plan on restricting what applications can open on a managed client, you’ll need
to make sure that Apple Remote Desktop’s processes are allowed to run. A managed
client is a client computer whose environment is governed by Mac OS X Server’s
Workgroup Manager. The following options need to be enabled in Workgroup
Manager’s client and group application preference settings:
 “Allow approved applications to launch non-approved applications”
 “Allow UNIX tools to run”
Removing or Disabling Apple Remote Desktop
Apple Remote Desktop’s client components are bundled as part of Mac OS X and
Mac OS X Server. You may choose to remove or disable parts of it to fit your own
personal computing needs. The following section describes how to uninstall or disable
key Apple Remote Desktop components.
Uninstalling the Administrator Software
To remove the administrator software completely, you must remove the application,
the encrypted list of computer user names and passwords, and the client information
database.
To remove the administrator software:
1 Drag the Remote Desktop application to the Trash.
2 Empty the Trash.
3 Delete the Apple Remote Desktop database from /var/db/RemoteManagement/ using
the following commands in the Terminal application:
$ sudo rm -rf /var/db/RemoteManagement
4 Delete the Remote Desktop preferences files using the following commands in the
Terminal application.
$ sudo rm /Library/Preferences/com.apple.RemoteDesktop.plist
$ sudo rm /Library/Preferences/com.apple.RemoteManagement.plist
$ rm ~/Library/Preferences/com.apple.RemoteDesktop.plist
46 Chapter 3 Installing Apple Remote Desktop
Page 47

5 Delete the Remote Desktop documentation using the following commands in the
Terminal application.
sudo rm -r /Library/Documentation/Applications/RemoteDesktop
6 Delete the Apple Remote Desktop support files from /Library/Application Support/
using the following commands in the Terminal application:
$ rm -rf ~/Library/Application\ Support/Remote\ Desktop/
$ sudo rm -rf /Library/Application\ Support/Apple\ Remote\ Desktop/
7 Delete the Apple Remote Desktop installation receipts from /Library/Receipts/ using
the following commands in the Terminal application:
$ rm -r /Library/Receipts/RemoteDesktopAdmin*
$ rm -r /Library/Receipts/RemoteDesktopRMDB*
8 Delete the Apple Remote Desktop Dashboard widget (after closing every instance of
the widget) using the following commands in the Terminal application:
$ sudo rm -r /Library/Widgets/Remote\ Desktop.wdgt/
Disabling the Client Software
You may want to temporarily disable Apple Remote Desktop on a client without
removing the software.
WARNING: Because Apple Remote Desktop is part of the default Mac OS X 10.3 and
10.4 installation, do not remove the Apple Remote Desktop client components.
To disable the client software on a client computer:
1 On the client computer, open System Preferences and click Sharing.
If necessary, enter the user name and password of a user with administrator privileges
on that computer.
2 Deselect Apple Remote Desktop in the Sharing pane.
3 Quit System Preferences.
Apple Remote Desktop is now disabled and the underlying software is deactivated.
Alternately, you can disable only the administrator privileges by doing the following:
a Click Access Privileges.
b Deselect each user account that you enabled for Apple Remote Desktop
administration.
c Click OK.
d Quit System Preferences.
Chapter 3 Installing Apple Remote Desktop 47
Page 48

Uninstalling the Client Software from Client Computers
To remove Apple Remote Desktop client software from Mac OS X clients, you need to
remove a number of software components from each client system.
WARNING: It is not recommended that you uninstall the client software. Disabling the
client software is sufficient to stop Apple Remote Desktop system activity. See
“Disabling the Client Software” on page 47 for instructions.
To uninstall client software:
1 Open Terminal (located in /Applications/Utilities).
2 Delete the client pieces from /System/Library/ using the following commands in the
Terminal application:
$ sudo rm -rf /System/Library/CoreServices/Menu\ Extras/RemoteDesktop.menu
$ sudo rm -rf /System/Library/CoreServices/RemoteManagement/
$ sudo rm -rf /System/Library/PreferencePanes/ARDPref.prefPane
$ sudo rm -rf /System/Library/StartupItems/RemoteDesktopAgent/
3 Delete the client preferences from /Library/Preferences/ using the following command
in the Terminal application:
$ sudo rm /Library/Preferences/com.apple.ARDAgent.plist
$ sudo rm /Library/Preferences/com.apple.RemoteManagement.plist
4 Delete the client installation receipts from /Library/Receipts/ using the following
command in the Terminal application:
$ sudo rm -r /Library/Receipts/RemoteDesktopClient*
$ sudo rm -rf /var/db/RemoteManagement/
48 Chapter 3 Installing Apple Remote Desktop
Page 49

4 Organizing Client Computers Into
Computer Lists
4
Apple Remote Desktop uses lists of client computers to
logically organize the client computers under your control.
Connecting to client computers on the network and adding
them to your list is necessary to administer them.
This chapter describes finding clients and organizing them into lists for Apple Remote
Desktop administration and user interaction. You can learn about:
 “Finding and Adding Clients to Apple Remote Desktop Computer Lists” on page 49
 “Making and Managing Lists” on page 54
 “Importing and Exporting Computer Lists” on page 57
Finding and Adding Clients to Apple Remote Desktop Computer Lists
Before you can audit, control, or maintain any client, you need to add it to an Apple
Remote Desktop computer list. To use Bonjour to discover computers on your local
subnet, your local network’s routers and firewalls must allow multicast DNS (mDNS)
packets on port 5353. To find computers that aren’t on the local subnet, your local
network’s routers and firewalls must be properly configured to pass network pings, and
TCP/UDP packets on ports 3283 and 5900.
Remote Desktop has five methods for discovering potential clients:
 Discovering clients on the local subnet (using Bonjour instead of network pings)
 Searching the local networks (found through using all available network interfaces)
 Searching a range of IP addresses
 Using a specific IP address or domain name
 Importing a list of IP addresses
49
Page 50

Once you have found a potential client, you see the following default information:
Search column Description
(none) Displays a small icon indicating whether the computer is already in the
All Computers List.
(none) Displays a small icon showing what kind of access the client is capable of.
See “Client Status Icons” on page 167.
Name The name given to the computer in the Sharing pane of System
Preferences.
IP Address The computer’s IP address, if any.
DNS Name The computer’s DNS name, found by reverse lookup, if any.
ARD Version Apple Remote Desktop client software version.
Network Interface Which interface the client responded through.
If you want to change the default display list for the scanner, you can select Edit >
View Options and choose any of the other available options (which include Computer
Info Fields, Ethernet ID, Label, or others).
To add a computer to a computer list, you first authenticate to the computer.
Authenticated computers are found in the All Computers list in the Remote Desktop
window. You can add a computer to the All Computers list without authenticating, but
you will be unable to administer the client until you provide a valid user name and
password.
Finding Clients by Using Bonjour
You can use Bonjour to display a list of only the computers on your local subnet with
Remote Desktop enabled. All other client discovery methods display computers
regardless of whether they have Remote Desktop enabled.
To add clients found through Bonjour:
1 Select a scanner at the left of the Remote Desktop window.
2 Choose Bonjour.
3 Select the desired computers.
4 Drag the selected computers to the All Computers list.
5 Authenticate by providing a user name and password for an Apple Remote Desktop
administrator.
The computer is now in your All Computers list.
50 Chapter 4 Organizing Client Computers Into Computer Lists
Page 51

Finding Clients by Searching the Local Network
When you choose a local network scanner, Remote Desktop sends a subnet broadcast
to computers on the same subnets as the administrator computer. All possible clients
on the local subnets appear in a list on the right side of the Remote Desktop window.
To search for clients on the local network:
1 Select a scanner at the left of the Remote Desktop window.
2 Choose Local Network.
All responding clients are listed in the Remote Desktop window.
3 Select the desired computers.
4 Drag the selected computers to the All Computers list.
5 Authenticate by providing a user name and password for an Apple Remote Desktop
administrator.
The computer is now in your All Computers list.
Finding Clients by Searching a Network Range
To locate computers by network range, you provide a beginning and ending IP address
to scan, and Apple Remote Desktop queries each IP address in that range in sequence,
asking if the computer is a client computer. This method works best when searching for
clients outside the local subnet, but on the local area network.
Alternatively, you can use a text file that contains IP address ranges (in this format
“192.168.0.1-192.168.3.20”), and use text file import to find clients. See “Finding Clients by
File Import” on page 53.
To search a range of network addresses:
1 Select a scanner at the left of the Remote Desktop window.
2 Select Network Range.
3 Enter the beginning and ending IP address.
4 Click the Refresh button.
All responding clients are listed in the Remote Desktop window.
5 Select the desired computers.
6 Drag the selected computers to the All Computers list.
7 Authenticate by providing a user name and password for an Apple Remote Desktop
administrator.
The computer is now in your All Computers list.
Chapter 4 Organizing Client Computers Into Computer Lists 51
Page 52

Finding Clients by Network Address
If you know the exact IP address or fully qualified domain name of a computer, you can
use that IP address or domain name to add the computer to your All Computers list.
To add a specific address immediately to the All Computers list:
1 Choose File > Add By Address.
2 Enter the IP address or fully qualified domain name.
3 Enter the user name and password.
4 Choose whether to verify the name and password before adding it to the All
Computers list.
5 Click Add.
Alternatively you use the scanner to try an address or domain name and check
availability before attempting to add it to the All Computers list.
To search for a specific address:
1 Select a scanner at the left of the Remote Desktop window.
2 Select Network Address.
3 Enter the IP address or fully qualified domain name in the Address field.
4 Click the Refresh button.
If the client responds successfully, it is listed in the Remote Desktop window.
5 Select the desired computers.
6 Drag the selected computers to the All Computers list.
7 Authenticate by providing a user name and password for an Apple Remote Desktop
administrator.
The computer is now in your All Computers list.
52 Chapter 4 Organizing Client Computers Into Computer Lists
Page 53

Finding Clients by File Import
You can import a list of computers into Apple Remote Desktop by importing a file
listing the computers’ IP addresses. The list can be in any file format (text, spreadsheet,
word processor) and must contain either IP addresses or fully qualified domain names
(such as foo.example.com).
File import also allows you to add ranges of IP addresses by expressing the range in the
following format: xxx.xxx.xxx.xxx-yyy.yyy.yyy.yyy. For example, a text file with the line
“192.168.0.2-192.168.2.200” would add all IP addresses in that address range.
To import a list of computers from a file:
1 Select a scanner at the left of the Remote Desktop window.
2 Select File Import.
3 Browse for the file by clicking the Open File button, or drag a file into the window.
Alternatively, you can enter the file’s pathname in the File field.
All responding clients are listed in the Remote Desktop window.
4 Select the desired computers.
5 Drag the selected computers to the All Computers list.
6 Authenticate by providing a user name and password for an Apple Remote Desktop
administrator.
The computer is now in your All Computers list.
Making a New Scanner
You may want several scanners in order to search for specific address ranges or to do
other types of searches. You can make and save your own scanner so you can quickly
do the search at any time.
You can rename scanners to make them easy to identify.
To make a custom search list:
1 Choose File > New Scanner.
2 Rename the newly created scanner.
3 Select the scanner icon.
4 Choose a search type from the pop-up menu to the right.
Chapter 4 Organizing Client Computers Into Computer Lists 53
Page 54

5 Customize the search by entering the specific parameters for the search (such as an IP
address range, or file location).
You can find out how to customize the search in the following sections:
 “Finding Clients by Using Bonjour” on page 50
 “Finding Clients by Searching the Local Network” on page 51
 “Finding Clients by Searching a Network Range” on page 51
 “Finding Clients by Network Address” on page 52
 “Finding Clients by File Import” on page 53
6 Click the Refresh button.
All responding clients are listed in the Remote Desktop window.
Select your scanner icon and click the Refresh button whenever you want to run the
search.
Making and Managing Lists
You use lists to organize and perform management tasks on client computers. You can
make groups of lists, and rearrange the lists by dragging them up and down the left
side of the main window. Apple Remote Desktop has several different kinds of lists. The
following section describes the kinds of lists, and explains how to create lists and use
them for client management.
About Apple Remote Desktop Computer Lists
Apple Remote Desktop displays computers in lists in the main section of the Remote
Desktop window. The default computer list is called the All Computers list. This is a full
list of all possible clients that you have located and authenticated to. You can create
other lists to group the computers on your network in any way you wish.
Computer lists have the following capabilities:
 You can create as many lists as you want.
 The All Computers list can have up to the number of computers your license allows.
 Computers can appear in more than one list.
 Lists can be made in any grouping you can imagine: geographic, functional,
hardware configuration, even color.
 Click a list name and keep the mouse over the list name, you can edit the list name.
 If you double-click the list icon, you open another window containing the computers
in the list.
54 Chapter 4 Organizing Client Computers Into Computer Lists
Page 55

Creating an Apple Remote Desktop Computer List
You can make more specific, targeted lists of computers from your All Computers list.
The easiest way to make a new list is to use computers already in the All Computers list.
You can also create blank lists and add computers to them later.
To create an Apple Remote Desktop computer list:
1 Select the All Computers list icon in the main Remote Desktop window.
2 Select the computers you want to add to the new list.
3 Choose File > New List From Selection.
4 Name the computer list.
Alternatively, you can choose File > New List to create a blank list and drag computers
from the All Computers list, or from the scanner search results, to the blank list.
Deleting Apple Remote Desktop Lists
You can delete Apple Remote Desktop computer lists and scanner lists that you
created. You cannot delete the All Computers list, Task Server list, or History list.
To delete a list:
m Select the list and press the Delete key.
Creating a Smart Computer List
You can create a computer list which automatically populates based on custom criteria.
Once you create a smart list, any computer added to the All Computers list (or other
specified list) which matches the criteria will automatically be added to the smart list.
You can match any or all of the following criteria:
 Name
 IP Address
 DNS Name
 Label
 Apple Remote Desktop version
 Startup Volume
 Installed RAM
 CPU Information
 Machine Model
 Mac OS version
 Computer is in List
In order to use a smart list which populates from any list except the All Computers list,
you need to add the “Computer is in List” criterion and specify the source list.
Chapter 4 Organizing Client Computers Into Computer Lists 55
Page 56

To create a smart computer list:
1 Choose File > New Smart List.
2 Name the smart computer list.
3 Choose “any” or “all” criteria to match.
4 Select the attribute to select by, using the pop-up windows and text entry field.
5 Add any other criteria with the Add (+) button.
6 Click OK.
The new smart list appears in Remote Desktop’s main window.
Editing a Smart Computer List
You may want to edit the smart lists you have created. The editing window is the same
as the one used to create the smart list. The options available are the same as those
listed in “Creating a Smart Computer List” on page 55.
To edit a smart computer list:
1 Select the smart list in Remote Desktop’s main window.
2 Choose File > Edit Smart List.
3 Change the smart computer list as desired.
Creating a List of Computers of from Existing Computer Lists
You may want a list which combines the results of several different lists and smart lists.
You can create aggregate lists by using the “Computer is in List” option. The list created
will have the computers from the source lists, but not indicate which source list they
came from.
To create an list of computer lists:
1 Create the lists which will serve as the sources of the smart list.
See “Creating an Apple Remote Desktop Computer List” on page 55 or “Creating a
Smart Computer List” on page 55 for more information.
2 Create the Smart List which will draw its computers from the previously created lists.
“Creating a Smart Computer List” on page 55 for more information.
3 In the Smart List creation dialog, choose to match all of the stated conditions.
4 For the first condition, select “Computer is in List.”
5 Select a source list from the pop-up menu.
6 Add another condition by clicking the Add (+) button.
7 Repeat steps 4-6, adding Computer Lists for all of the source lists.
8 Add other conditions and criteria as desired.
56 Chapter 4 Organizing Client Computers Into Computer Lists
Page 57

9 Create the final Smart List by clicking OK.
The new Smart List appears in Remote Desktop’s main window.
Importing and Exporting Computer Lists
When setting up Apple Remote Desktop 3, you may not necessarily use the same
computer you used for the previous version of Apple Remote Desktop. Rather than
create new lists of client computers, you can transfer existing lists between computers,
with benefits and limitations depending on the transfer circumstance. The following
sections will help you import or export your computer lists.
 “Transferring Computer Lists from Apple Remote Desktop 3 to a New Administrator
Computer” on page 57
 “Transferring Remote Desktop 2 Computer Lists to a New Remote Desktop 3
Administrator Computer” on page 58
 “Transferring Old v1.2 Computer Lists to a New Administrator Computer” on page 58
Transferring Computer Lists from Apple Remote Desktop 3 to a New Administrator Computer
You may want to move your existing computer lists to the new administrator computer
running Apple Remote Desktop 3. Lists transferred in this way retain their client
computers as well as the original name of the list. You can only use these instructions
to move computer lists between administrator computers which run Apple Remote
Desktop 3. When you import or export a computer list, the user name and password
used for Apple Remote Desktop authentication are not exported. Once you’ve
imported the computer list, you will still need to authenticate to the computers.
To transfer the computer lists:
1 In the main Remote Desktop window, select the list you want to move.
2 Choose File > Export List.
3 Select a name and a file location for the exported list.
The default file name is the list name. Changing the file name, however, does not
change the list name.
4 Click Save.
A .plist file is created in the desired location.
The XML-formatted .plist file is a plain text file that can be inspected with Apple’s
Property List Editor or a text editor.
5 Copy the exported file to the desired administrator computer.
6 On the new administrator computer, launch Remote Desktop.
7 Choose File > Import List.
Chapter 4 Organizing Client Computers Into Computer Lists 57
Page 58

8 Select the exported list, and click Open.
The list now appears in Remote Desktop’s main window.
Transferring Remote Desktop 2 Computer Lists to a New Remote Desktop 3 Administrator Computer
If you are installing Apple Remote Desktop 3 on a computer different from the version
2.x administrator computer, you may want to move your existing computer lists to the
new administrator computer running Apple Remote Desktop 3. When you import or
export a computer list, the user name and password used for Apple Remote Desktop
authentication are not exported. Once you’ve imported the computer list, you will still
need to authenticate to the computers.
To transfer the computer lists:
1 In the main Remote Desktop window, select the list you want to move.
2 Make sure Remote Desktop lists the computer’s name and IP address.
3 Choose File > Export Window.
4 Select a name and a file location for the exported list, and click Save.
The default file name is the window’s title.
5 Copy the exported file to the desired administrator computer.
6 On the new administrator computer, launch Remote Desktop.
7 Using the Scanner, add the clients by File Import.
See “Finding Clients by File Import” on page 53, for detailed instructions.
The list now appears in Remote Desktop’s main window.
8 Select the computers in the list.
9 Choose File > New List From Selection.
The new list now appears in Remote Desktop’s main window.
Transferring Old v1.2 Computer Lists to a New Administrator Computer
If you are installing Apple Remote Desktop 3 on a computer other than an older
administrator computer using Apple Remote Desktop 1.2, you need to move your
existing computer lists to the new administrator computer before installing version 3.1.
These instructions only apply when moving Apple Remote Desktop 1.2 computer lists
to a new computer.
Throughout these instructions, the computer with the original lists is the “source
computer.” The computer that will have Apple Remote Desktop 3 installed is the “target
computer.”
58 Chapter 4 Organizing Client Computers Into Computer Lists
Page 59

To transfer the computer lists:
1 Open Keychain Access (located in /Applications/Utilities) on the source computer.
2 Choose File > New Keychain.
3 Name the new keychain, and click Create.
4 Enter a password for the new keychain.
This is a temporary password that you will use to retrieve the information in the
keychain. Do not use your login password or other sensitive password.
5 If necessary, click Show Keychains to show the administrator keychain.
6 Select the source computer’s main keychain.
If the keychain is locked, unlock it and authenticate.
7 Select only the Apple Remote Desktop entries in the keychain.
8 Drag the Apple Remote Desktop entries to the newly created keychain.
9 Provide the source computer keychain password for each entry.
10 Quit Keychain Access on the source computer.
11 Copy the newly created keychain from the source computer (~/Library/Keychains/
<keychain name>) to the same location on the target computer.
You can copy the keychain over the network, or use a removable storage drive.
12 On the target computer, open Keychain Access in the Finder.
13 Choose File > Add Keychain.
14 Select the keychain that was copied from the source computer, and click Open.
15 If necessary, click Show Keychains to show the keychains.
16 Unlock the newly imported keychain, using the password designated for that keychain.
17 Select the Apple Remote Desktop entries.
18 Drag the Apple Remote Desktop entries to the main keychain on the target computer.
Provide the temporary keychain password for each entry.
19 Quit Keychain Access on the source computer.
When you open Apple Remote Desktop on the new computer, you will notice that the
computer lists from the old computer are available.
Chapter 4 Organizing Client Computers Into Computer Lists 59
Page 60

5 Understanding and Controlling
Access Privileges
5
There are several different ways to access and authenticate to
Apple Remote Desktop clients. Some depend on Apple
Remote Desktop settings, and others depend on other client
settings, or third-party administration tools.
This chapter explains the various access types, their configuration, and their uses.
You can learn about:
 “Apple Remote Desktop Administrator Access” on page 60
 “Apple Remote Desktop Administrator Access Using Directory Services” on page 63
 “Apple Remote Desktop Guest Access” on page 66
 “Apple Remote Desktop Nonadministrator Access” on page 67
 “Virtual Network Computing Access” on page 68
 “Command-Line SSH Access” on page 69
 “Managing Client Administration Settings and Privileges” on page 69
60
Apple Remote Desktop Administrator Access
Access privileges allow an Apple Remote Desktop administrator to add computers to a
list and then interact with them. If no access privileges are allowed on a client
computer, that computer cannot be used with Apple Remote Desktop. Access
privileges are defined in the Apple Remote Desktop section of the Sharing pane of the
client computers’ System Preferences.
The recommended access privileges for a client computer depend on how it’s used.
 If the computer is used in a public area, such as a computer lab, you may want to
allow administrators full access privileges.
 If the computer is used by one person, you may not want to give administrators full
access privileges. Also, you may want a user who administers his or her own
computer to take responsibility for creating passwords and setting the access
privileges for the computer
Page 61

The following table shows the settings in the Apple Remote Desktop settings in the
Sharing Preference pane and the features of Remote Desktop that they correspond to.
For example, if you want a certain administrator to be rename computer file sharing
names, you will need to grant that user that privilege by selecting “Change Settings”.
checkbox in the Apple Remote Desktop settings in the Sharing Preference pane on the
client computer.
Select To allow administrators to
<a user name> Select any other privileges. (If you select only this box, the
administrator can see the client computer in the Computer Status
window and include it in Network Test reports.)
Generate reports Create hardware and software reports using the Report menu; use
Set Reporting Policy and Spotlight Search.
Open and quit applications Use these Manage menu commands: Open Application, Open
Items, Send UNIX Command and Log Out Current User.
Change settings Use these Manage menu commands: Rename Computer, Send
UNIX Command and Set Startup Disk.
Delete and replace items Use these Manage menu commands: Copy Items, Install Packages,
Send UNIX Command and Empty Trash. Also delete items from
report windows.
This item must be enabled in order to use the Upgrade Client
Software feature.
Send text messages Use these Interact menu commands: Send Message and Chat.
Restart and shut down Use these Manage menu commands: Sleep, Wake Up, Restart,
Send UNIX Command, and Shut Down.
This item must be enabled in order to use the Upgrade Client
Software feature.
Copy items Use these Manage menu and Server menu commands: Copy
Items, Send UNIX Command and Install Packages.
This item must be enabled in order to use the Upgrade Client
Software and Change Client Settings features.
Control Use these Interact menu commands: Control, Share Screen, Lock
and Unlock Screen.
This item must be enabled in order to use the Upgrade Client
Software and Change Client Settings features.
Chapter 5 Understanding and Controlling Access Privileges 61
Page 62

Setting Apple Remote Desktop Administrator Access Authorization and Privileges Using Local Accounts
To prepare a client for administration, you activate the existing version of Apple
Remote Desktop on the client computer and set Apple Remote Desktop administrator
access privileges by using the Sharing pane of the computer’s System Preferences. You
set access privileges separately for each user account on the computer. Follow the
steps in this section to set access privileges on each client computer.
Note: You can skip this step if you create a custom installer that automatically enables
your desired client settings.
To make changes on a client computer, you must have the name and password of a
user with administrator privileges on the computer.
To set administrator privileges on a computer:
1 On the client computer, open System Preferences and click Sharing.
If the preference pane is locked, click the lock and then enter the user name and
password of a user with administrator privileges on that computer.
2 Select Apple Remote Desktop in the Sharing service pane.
3 Click Access Privileges.
4 Select each user that you want enabled for Apple Remote Desktop administration
authentication.
5 Select a listed user whose access privileges you want to set, and then make the
changes you want to the access privileges. Your changes take effect immediately.
Hint: Holding down the Option key while clicking the user’s checkbox will
automatically select all the following checkboxes for access.
See “Apple Remote Desktop Administrator Access” on page 60 for more information.
6 Repeat for additional users whose access privileges you want to set.
7 If desired, enter information in any or all of the four Computer Information fields.
This information appears in Apple Remote Desktop System Overview reports and
optionally in the computer list views. For example, you can enter an inventory number
for the computer, a serial number, or a user’s name and telephone number.
8 Click OK.
9 To activate the Apple Remote Desktop client, make sure to select the Apple Remote
Desktop checkbox, or select Apple Remote Desktop and click Start.
62 Chapter 5 Understanding and Controlling Access Privileges
Page 63

Apple Remote Desktop Administrator Access Using Directory Services
You can also grant Apple Remote Desktop administrator access without enabling any
local users at all by enabling group-based authorization if the client computers are
bound to a directory service. When you use specially named groups from your
Directory Services master domain, you don’t have to add users and passwords to the
client computers for Apple Remote Desktop access and privileges.
When Directory Services authorization is enabled on a client, the user name and
password you supply when you authenticate to the computer are checked in the
directory. If the name belongs to one of the Apple Remote Desktop access groups, you
are granted the access privileges assigned to the group.
Creating Administrator Access Groups
In order to use Directory Services authorization to determine access privileges, you
need to create groups and assign them privileges. There are two ways of doing this:
Method #1
You can create groups and assign them privileges through the mcx_setting attribute
on any of the following records: any computer record, any computer list record, or the
guest computer record.
To create an administrator access group:
1 Create groups as usual.
If you are using Mac OS X Server, you use Workgroup Manager to make them.
2 After you have created groups, you edit either the computer record of the computer to
be administered, its computer list record, or the guest computer record.
3 Use a text editor, or the Apple Developer tool named Property List Editor to build the
mcx_setting attribute XML. The XML contains some administrator privilege key
designations (ard_admin, ard_reports, etc.), and the groups that you want to possess
those privileges. The following privilege keys have these corresponding Remote
Desktop management privileges:
Chapter 5 Understanding and Controlling Access Privileges 63
Page 64

Management Privilege ard_admin ard_reports ard_manage ard_interact
Generate reports X X X
Open and quit applications X X
Change settings X X
Copy items X X
Delete and replace items X X
Send messages X X X
Restart and shut down X X
Control X X
Observe X X
Show being observed X X
In the XML, you name a privilege key and make the value the name of the group or
groups you want to possess the privilege.
Use the sample XML below to make your management/key designation XML.
4 When you have created the snippet of XML, you enter this whole snippet into a
computer record or computer list record.
If you are using Workgroup Manager, you enable the preference to “Show All Records
Tab and Inspector” and use the Inspector to copy the entire snippet of XML the value
which corresponds to the “MCXSettings” attribute name.
64 Chapter 5 Understanding and Controlling Access Privileges
Page 65

The following is the sample XML format you need to use to assign management
privileges via MCX keys. It assigns the above “ard_interact” privileges to the groups
named “some_group” and “staff.” It also assigns the “ard_manage” privileges to the
group named “staff,” the “ard_admin” privileges to the group “my_admin_group,” and
leaves no group with the “ard_reports” privilege set. Here’s the XML:
<?xml version="1.0" encoding="UTF-8"?> <!DOCTYPE plist PUBLIC "-//Apple
Computer//DTD PLIST 1.0//EN" "http://www.apple.com/DTDs/PropertyList-
1.0.dtd"> <plist version="1.0"> <dict>
<key>mcx_application_data</key>
<dict>
<key>com.apple.remotedesktop</key>
<dict>
<key>Forced</key>
<array>
<dict>
<key>mcx_preference_settings</key>
<dict>
<key>ard_interact</key>
<array>
<string>some_group</string>
<string>staff</string>
</array>
<key>ard_manage</key>
<array>
<string>staff</string>
</array>
<key>ard_admin</key>
<array>
<string>my_admin_group</string>
</array>
<key>ard_reports</key>
<array>
</array>
</dict>
</dict>
</array>
</dict>
</dict>
</dict> </plist>
This example attribute defines four privileges, although any of them may be left out.
For more information on using Workgroup Manager, and Open Directory, see their
documentation at:
www.apple.com/server/documentation
Chapter 5 Understanding and Controlling Access Privileges 65
Page 66

Method #2
You can create groups with special names that correspond to the privilege keys
above: ard_admin, ard_reports, ard_manage, and ard_interact. The corresponding
privileges are automatically assigned to these specially named groups. If you have
already created these groups for use with Apple Remote Desktop 2, they will continue
to work as expected with Apple Remote Desktop 3.
Enabling Directory Services Group Authorization
In order to enable group-based authorization for Apple Remote Desktop access, you
create the appropriate groups in your Directory Services master directory domain.
To complete this task, you need to be the Directory Services administrator and have
access to your organization’s users and groups server.
To enable Apple Remote Desktop authorization by group:
1 Use one of the methods in the section “Creating Administrator Access Groups” to
create groups with Apple Remote Desktop access privileges assigned to them.
2 Add users to the groups.
3 Make sure the client computers to be administered are bound to your directory system.
4 Set the clients to use directory authorization by using the Change Client Settings
feature or make a custom installer.
5 Choose to enable directory-based administration on the clients using Directory Access
found in /Applications/Utilities/.
Apple Remote Desktop Guest Access
You can configure an Apple Remote Desktop client to give temporary, one-time access
to an Apple Remote Desktop administrator who does not have a user name or
password for the client computer. Each time the Apple Remote Desktop administrator
would like to control the client computer, he or she must request permission from the
remote client’s user.
WARNING: Granting access to control a screen is the most powerful feature in Apple
Remote Desktop, and can be equivalent to unrestricted access.
66 Chapter 5 Understanding and Controlling Access Privileges
Page 67

To allow guest access:
1 On the client computer, open System Preferences and click Sharing.
If prompted, enter the user name and password of a user with administrator privileges
on that computer.
2 Select Apple Remote Desktop in the Sharing pane.
3 Click Access Privileges.
4 Select “Guests may request permission to control screen.”
5 Click OK.
Apple Remote Desktop Nonadministrator Access
Remote Desktop can operate in what is referred to as “user mode.” User mode is
activated when a nonadministrator user opens Remote Desktop to administer Apple
Remote Desktop client computers. The administrator of the computer with Remote
Desktop installed can choose which features and tasks are available to
nonadministrator users.
Limiting Features in the Administrator Application
User mode is a great way to delegate administrative tasks, or give users only the
features of Remote Desktop that they really use. For example, you might not allow
nonadministrators to copy or delete files, but you may want them to be able to
observe client screens and send messages to client users.
You can choose to allow nonadministrators to:
 Observe, control, and share screens
 Lock and unlock screens
 Send text messages and chat
 Sleep and wake client computers
 Log out users
 Restart and shut down computers
 Open or quit files and applications
 Rename computers
 Generate reports and software searches
 Copy items, delete items, and empty the Trash
 Create Apple Remote Desktop custom client installers
 Upgrade clients and change client settings
 Install packages
 Set the client computer’s startup volume
 Set the client’s data reporting policy
 Send UNIX commands
Chapter 5 Understanding and Controlling Access Privileges 67
Page 68

Each of these features can be enabled or disabled independently of each other, or you
can enable all of Remote Desktop’s features for nonadministrator users.
To enable User Mode:
1 Make sure you are logged in as an administrator user.
2 Open Remote Desktop.
3 Choose Remote Desktop > Preferences.
4 Click the Security button.
5 Enable or disable features, as desired.
6 Close the Preference’s window.
Virtual Network Computing Access
You can use Apple Remote Desktop to access a Virtual Network Computing (VNC)
server and view and interact with the server’s screen. VNC access is determined by the
VNC server software. To access a VNC server, it is only necessary to know the IP address
or fully qualified domain name and the password designated in the VNC server
software.
This password does not necessarily correspond to any other password on the system,
and is determined by the VNC configuration.
VNC access is similar to Apple Remote Desktop’s Control command. It allows you to use
your keyboard and mouse to control a VNC server across a network. It doesn’t give any
other Apple Remote Desktop administrator privileges except those of the currently
logged-in user.
Non-Apple VNC viewers can control Apple Remote Desktop clients if the client allows it.
Allowing a non-Apple VNC viewer access to an Apple Remote Desktop client is less
secure than using Apple Remote Desktop to control the client. The VNC protocol
implemented in third-party VNC viewers may not encrypt keystrokes sent over the
network, so sensitive information can be intercepted.
WARNING: Granting VNC access to control a screen is the most powerful feature in
Apple Remote Desktop, and can be equivalent to unrestricted access.
68 Chapter 5 Understanding and Controlling Access Privileges
Page 69

To allow VNC access:
1 On the client computer, open System Preferences and click Sharing.
If prompted, enter the user name and password of a user with administrator privileges
on that computer.
2 Select Apple Remote Desktop in the Sharing pane.
3 Click Access Privileges.
4 Select “VNC viewers may control screen with password.”
5 Enter a VNC password.
WARNING: Do not use the same password as any local user or Apple Remote Desktop
login.
Command-Line SSH Access
Command-line SSH access is not granted or managed using Remote Desktop. This type
of access is managed in the Sharing pane of System Preferences (called “Remote
Login”) and is separate from Apple Remote Desktop access types. When you log in to a
client remotely using SSH, you have the user privileges assigned to the user name and
password. These may or may not include computer administrator privileges.
You can use SSH to access a client using a user account created for Apple Remote
Desktop, but you are limited to performing whatever tasks were allowed to that user
when the account was created. Conversely, only the users specified in the Apple
Remote Desktop access privileges can access a computer using Apple Remote Desktop.
Apple Remote Desktop privileges are completely separate and distinct from local
computer administrator UNIX privileges.
Managing Client Administration Settings and Privileges
Regular audits of administration settings can help maintain a secure Remote Desktop
administration environment. Using the various administrator options given with Apple
Remote Desktop administrator privileges, you can create specialized logins for certain
tasks, limiting potentially disruptive power of certain sub-administrators. The following
section gives detailed instructions for checking the administrator privilege settings of
client computers, and changing those settings.
Chapter 5 Understanding and Controlling Access Privileges 69
Page 70

Getting an Administration Settings Report
You can query active Apple Remote Desktop clients for a report on what commands
they are accepting from your administrator authentication.
The report is a list of the Apple Remote Desktop administrator access types each with
an “On” or “Off” to indicate whether that access type is available to you.
To get an administration settings report:
1 Select a computer list in the Remote Desktop window.
2 Select one or more computers in the selected computer list.
3 Choose Report > Administration Settings.
4 Click Get Report.
Changing Client Administrator Privileges
Once the client computers are able to be administered, you can change the
administrator access privileges for multiple computers simultaneously, using the
Change Client Settings command. If you are using Directory Services to designate
administrator privileges, you don’t need to change the settings on the clients.
To make changes on a client, you must have the name and password of a user with
administrator privileges on the computer. Additionally, you must already have the
Control privilege.
Note: You do not have to make a selection on every page of the assistant. You can click
Continue to move to the next set of settings.
To change administrator privileges on each computer:
1 Select a computer list.
2 Select one or more computers in the selected computer list.
3 Choose Manage > Change Client Settings.
The client assistant appears. Click Continue.
4 Choose whether to start Remote Desktop sharing at system startup.
This changes the setting found in the Sharing pane of System Preferences.
5 Choose whether to hide or show the Apple Remote Desktop menu bar icon.
6 Click Continue.
7 Choose whether to create a new user for Apple Remote Desktop login. Click Continue.
New users can be used to grant Apple Remote Desktop administrator privileges.
Creating a new user does not overwrite existing users or change existing user
passwords.
If you choose not to create a new user, skip to step 9 after clicking Continue.
70 Chapter 5 Understanding and Controlling Access Privileges
Page 71

8 Add a new user by clicking Add and filling in the appropriate information.
Click OK after adding each user, and click Continue when you’re ready to go on.
9 Choose whether to assign Apple Remote Desktop administrator access privileges to
Directory Services groups.
If you choose to do so, select “Enable directory-based administration.”
See “Apple Remote Desktop Administrator Access Using Directory Services” on page 63
for more information on using this method to grant Apple Remote Desktop
administrator access.
10 Choose whether to assign Apple Remote Desktop administrator access privileges to
specific users. Click Continue.
If you choose not to assign administrator access privileges, skip to step 13.
11 Click Add to designate a user to receive Apple Remote Desktop access privileges.
12 Provide the user’s short name and assign the privileges as desired.
See “Apple Remote Desktop Administrator Access” on page 60 for more information.
Click OK after each user, and click Continue when you’re ready to go on.
13 Choose whether to allow temporary guest control by requesting permission on the
client computers.
14 Choose whether to allow non-Apple VNC viewers to control the client computers, and
click Continue.
See “Virtual Network Computing Access” on page 68 for more information.
15 If desired, select and enter information in any or all of the four System Data fields.
This information appears in Apple Remote Desktop System Overview reports. For
example, you can enter an inventory number for the computer, a serial number, or a
user’s name and telephone number.
16 Click Continue to review the clients’ settings.
17 Choose whether to execute the change using the application or a dedicated task
server.
For more detailed information about setting up and using a task server, see “Working
with the Task Server” on page 156.
18 Click Change to change the clients’ settings
The client configuration assistant contacts all of the selected computers and changes
their administration settings.
Chapter 5 Understanding and Controlling Access Privileges 71
Page 72

6 Setting Up the Network and
Maintaining Security
6
This chapter describes the main aspects of setting up your
network for use with Apple Remote Desktop system
administration, as well as best-practice tips for your network.
Additionally, it contains information about Apple Remote
Desktop security features, and detailed instructions for
enabling them. You can learn about:
 “Setting Up the Network” on page 72
 “Using Apple Remote Desktop with Computers in an AirPort Wireless Network” on
page 73
 “Getting the Best Performance” on page 74
 “Maintaining Security” on page 74
72
Setting Up the Network
Your network configuration determines Apple Remote Desktop’s performance and
usability. AirPort and AirPort Extreme networks offer slower performance than almost
any Ethernet network. Therefore, file copying, client monitoring, and reporting are
slower over AirPort and AirPort Extreme connections. Network routers and firewalls also
shape, direct, or block network traffic; these things can have an effect on Apple Remote
Desktop’s reliability and efficiency. Here are a few guidelines to keep in mind when
setting up Apple Remote Desktop on your network:
 The more AirPort clients connected to a base station, the lower the bandwidth for
each computer. AirPort Base Stations are not considered “switched networks.”
 Local Hostname (name using Apple’s Bonjour technology, that looks like: name.local)
browsing does not extend beyond the local subnet. Local Hostnames do not resolve
across routers like domain names do.
 Networks with switches have fewer collisions and packet errors than networks with
hubs. This means greater reliability and speed. Consider using switches instead of
hubs.
Page 73

 Organize computers you’re administering using Apple Remote Desktop into small
groups, and close the Remote Desktop administrator application when not in use.
This helps reduce the number of status queries, thus reducing network traffic.
 If a client has a slow network type, consider running it in a list separate from the
faster clients. A single slow client can slow down network operations.
 If network traffic passes through firewalls, make sure you have a large Maximum
Transmission Unit (MTU) setting (1200 or greater). Too small an MTU setting can result
in black screens when sharing or sending screens.
 If you are using a wide-area network (WAN), or metropolitan area network (MAN),
make sure that the defrag bit is turned off in your router so packets don’t get
chunked up. This can result in black screens when sharing or sending screens.
 Network Address Translation (NAT) networks (such as those that use the Mac OS X
Internet Sharing feature) can pose configuration and access difficulties.
If you want to use Remote Desktop from behind a NAT router to access computers
beyond the NAT router, you need to set TCP and UDP port forwarding for ports 3283
and 5900 to your administrator computer. Similarly, if you wish to access a single client
computer that is behind a NAT router, you need to set the router to forward TCP and
UDP ports 3283 and 5900 to the client computer you wish to access.
Using Apple Remote Desktop with Computers in an AirPort Wireless Network
Using Apple Remote Desktop to observe or control client computers connected using
AirPort wireless technology can sometimes result in impaired performance or cause
communication errors to appear in the Computer Status window.
To get the best performance from Apple Remote Desktop with computers in an AirPort
wireless network:
 Make sure that all AirPort Base Stations and all Apple Remote Desktop client
computers have the latest versions of Apple Remote Desktop software, AirPort
software, and Mac OS X software installed.
 Limit the number of clients that connect to an AirPort Base Station. AirPort clients on
a base station receive all network communication packets sent to any one client on
that base station. Although clients ignore packets that aren’t addressed to them, CPU
resources are used to identify and discard the packet.
 Scale the Control and Observe window. Apple Remote Desktop has server-side
scaling that will allow for less traffic across the network as you scale the window to
smaller sizes.
 Try not to use tasks that multicast traffic such as Share Screen and File Copy. File
Copy tries to initiate a series of individual copies if there is a significant number of
multicast networking errors.
Chapter 6 Setting Up the Network and Maintaining Security 73
Page 74

 Wireless networks also are not suited for multicast traffic. However Apple Remote
Desktop’s multi-observe feature is different because it doesn’t use multicast traffic.
 Display shared screens in black and white rather than in color.
 Configure your AirPort Base Station with a station density of High and increase the
multicast rate to 11 Mbps using AirPort Admin Utility. Using the base station density
and multicast rate settings limits the range of each AirPort Base Station’s network,
requiring client computers to be fewer than 50 meters from a base station.
Getting the Best Performance
To get the best performance when using the Share Screen, Observe, and Control
commands:
 Use the fastest network possible. This means favoring Ethernet over AirPort,
1000Base-T over 100Base-T, and 100Base-T over 10Base-T.
 If you’re using AirPort, adjust the multicast speed higher.
 Don’t mix network speeds if possible.
 Reduce the use of animation on remote computers. For example, you can simplify
Dock preference settings by turning off animation, automatic hiding and showing,
and magnification effects.
 View the client’s screen in a smaller window when using the “fit to window” option.
 View the client’s screen with fewer colors.
 Use a solid color for the desktop of the screen you’re sharing.
 Share screens only on local networks. If you share a screen with a computer
connected across a router, screen updates happen more slowly.
 Set the Control and Observe image quality to the lowest acceptable for the given
circumstance.
Maintaining Security
Remote Desktop can be a powerful tool for teaching, demonstrating, and performing
maintenance tasks. For convenience, the administrator name and password used to
access Remote Desktop can be stored in a keychain or can be required to be typed
each time you open the application. However, the administrator name and password
for each client computer are stored in the administrator’s preferences and are strongly
encrypted.
74 Chapter 6 Setting Up the Network and Maintaining Security
Page 75

Administrator Application Security
 Make use of user mode to limit what nonadministrator users can do with Remote
Desktop.
See “Apple Remote Desktop Nonadministrator Access” on page 67.
 If you leave the Remote Desktop password in your keychain, be sure to lock your
keychain when you are not at your administrator computer.
 Consider limiting user accounts to prevent the use of Remote Desktop.
Either in a Managed Client for Mac OS X (MCX) environment, or using the Accounts
pane in System Preferences, you can make sure only the users you designate can use
Remote Desktop.
 Check to see if the administrator computer is currently being observed or controlled
before launching Remote Desktop (and stop it if it is).
Remote Desktop prevents users from controlling a client with a copy of Remote
Desktop already running on it at connection time, but does not disconnect existing
observe or control sessions to the administrator computer when being launched.
Although this functionality is helpful if you want to interact with a remote LAN which
is behind a NAT gateway, it is possible to exploit this feature to get secretly get
information about the administrator, administrator’s computer, and its associated
client computers.
User Privileges and Permissions Security
 To disable or limit an administrator’s access to an Apple Remote Desktop client, open
System Preferences on the client computer and make changes to settings in the
Remote Desktop pane in the Sharing pane of System Preferences. The changes take
effect after the current Apple Remote Desktop session with the client computer
ends.
 Remember that Apple Remote Desktop keeps working on client computers as long
as the session remains open, even if the password used to administer the computer
is changed.
 Don’t use a user name for an Apple Remote Desktop access name and password.
Make “dummy” accounts specifically for Apple Remote Desktop password access and
limit their GUI and remote login privileges.
Password Access Security
 Never give the Remote Desktop password to anyone.
 Never give the administrator name or password to anyone.
 Use cryptographically sound passwords (no words found in a dictionary; eight
characters or more, including letters, numbers and punctuation with no repeating
patterns).
 Regularly test your password files against dictionary attack to find weak passwords.
Chapter 6 Setting Up the Network and Maintaining Security 75
Page 76

 Quit the Remote Desktop application when you have finished using it. If you have
not stored the Remote Desktop password in your keychain, the application prompts
you to enter the administrator name and password when you open it again.
Physical Access Security
 If you have stored the Remote Desktop password in your keychain, make sure the
keychain is secured and the application isn’t running while you are away from the
Remote Desktop window.
 If you want to leave the Remote Desktop application open but need to be away from
the computer, use a password-protected screen saver and select a hot corner so you
can instantly activate the screen saver.
Remote Desktop Authentication and Data Transport Encryption
Authentication to Apple Remote Desktop clients uses an authentication method based
on a Diffie-Hellman Key agreement protocol that creates a shared 128-bit key. This
shared key is used to encrypt both the name and password using the Advanced
Encryption Standard (AES). The Diffie-Hellman key agreement protocol used in Remote
Desktop 3 is very similar to the one used in personal file sharing, with both of them
using a 512-bit prime for the shared key calculation.
With Remote Desktop 3, keystrokes and mouse events are encrypted when you control
Mac OS X client computers. Additionally, all tasks except Control and Observe screen
data, and files copied via Copy Items and Install Packages are encrypted for transit
(though you may choose to encrypt these as well by changing your application
preferences). This information is encrypted using the Advanced Encryption Standard
(AES) with the 128-bit shared key that was derived during authentication.
Encrypting Observe and Control Network Data
Although Remote Desktop sends authentication information, keystrokes, and
management commands encrypted by default, you may want additional security. You
can choose to encrypt all Observe and Control traffic, at a certain performance cost.
Encryption is done using an SSH tunnel between the participating computers. In order
to use encryption for Observe and Control tasks, the target computers must have SSH
enabled (“Remote Login” in the computer’s Sharing Preference pane). Additionally,
firewalls between the participating computers must be configured to pass traffic on
TCP port 22 (SSH well known port).
If the you are trying to control a VNC server which is not Remote Desktop, it will not
support Remote Desktop keystroke encryption. If you try to control that VNC server,
you will get a warning that the keystrokes aren’t encrypted which you will have to
acknowledge before you can control the VNC server. If you chose to encrypt all
network data, then you will not be able to control the VNC server because Remote
Desktop is not able to open the necessary SSH tunnel to the VNC server.
76 Chapter 6 Setting Up the Network and Maintaining Security
Page 77

To enable Observe and Control transport encryption:
1 Choose Remote Desktop > Preferences.
2 Click the Security button.
3 In the “Controlling computers” section, select “Encrypt all network data.”
Encrypting Network Data During Copy Items and Install Packages Tasks
Remote Desktop can send files for Copy Items and Install Packages via encrypted
transport. This option is not enabled by default, and you must either enable it explicitly
for each copy task, or in a global setting in Remote Desktop’s preferences. Even installer
package files can be intercepted if not encrypted.
To encrypt individual file copying and package installation tasks:
m In the Copy Items task or Install Packages task configuration window, select “Encrypt
network data.”
To set a default encryption preference for file copies:
1 In the Remote Desktop Preferences window, select the Security pane.
2 Check “Encrypt transfers when using Copy Items,” or “Encrypt transfers when using
Install Packages” as desired.
Alternatively, you could encrypt a file archive before copying it. The encrypted archive
could be intercepted, but it would be unreadable.
Chapter 6 Setting Up the Network and Maintaining Security 77
Page 78

7 Interacting with Users
7
Apple Remote Desktop is a powerful tool for interacting with
computer users across a network. You can interact by
controlling or observing remote screens, text messaging with
remote users, or sharing your screen with others.
This chapter describes Remote Desktop’s user interaction capabilities and gives
complete instructions for using them. You can learn about:
 “Controlling” on page 79
 “Observing” on page 86
 “Sending Messages” on page 93
 “Sharing Screens” on page 94
 “Interacting with Your Apple Remote Desktop Administrator” on page 95
78
Page 79

Controlling
Apple Remote Desktop allows you to control remote computers as if you were sitting in
front of them. You can only control the keyboard and mouse of any one computer at a
time. There are two kinds of remote computers that Apple Remote Desktop can
control: Apple Remote Desktop clients and Virtual Network Computing (VNC) servers.
Controlling Apple Remote Desktop Clients
Apple Remote Desktop client computers can be controlled by any administrator
computer that has the Control permission set. See “Apple Remote Desktop
Administrator Access” on page 60 for more information about Apple Remote Desktop
permissions.
While you control an Apple Remote Desktop client computer, some keyboard shortcut
commands are not sent to the remote computer, but they affect the administrator
computer. These include:
 Change Active Application (Command-Tab and Command-Shift-Tab)
 Show or Hide Dock (Command-Option-D)
 Log Out User (Command-Shift-Q)
 Take Screen Shot (Command-Shift-3, -4)
 Force Quit (Command-Option-Escape)
Chapter 7 Interacting with Users 79
Page 80

Also, special keys including the sound volume, screen brightness, and Media Eject keys
do not affect the client computer.
These instructions assume the that observed computer has Apple Remote Desktop
installed and configured properly (see “Setting Up an Apple Remote Desktop Client
Computer for the First Time” on page 41) and that the computer has been added to an
Apple Remote Desktop computer list (see “Finding and Adding Clients to Apple
Remote Desktop Computer Lists” on page 49).
To control an Apple Remote Desktop client:
1 Select a computer list in the Remote Desktop window.
2 Select one computer from the list.
3 Choose Interact > Control.
4 To customize the control window and session, see “Control Window Options” on
page 80.
5 Use your mouse and keyboard to perform actions on the controlled computer.
If your Remote Desktop preferences are set to share keyboard and mouse control, the
remote computer’s keyboard and mouse are active and affect the computer just as the
administrator computer’s keyboard and mouse do.
If your preferences aren’t set to share control, the remote computer’s keyboard and
mouse do not function while the administrator computer is in control.
Control Window Options
When controlling a client, the control window contains several buttons in the window
title bar which you can use to customize your remote control experience. There are
toggle buttons that switch your control session between two different states, and there
are action buttons that perform a single task. In addition to the buttons, there is a
slider for image quality.
The toggle buttons are:
 Control mode or Observe mode
 Share mouse control with user
 Fit screen in window
 Lock computer screen while you control
 Fit screen to full display
The action buttons are:
 Capture screen to a file
 Get the remote clipboard contents
 Send clipboard contents to the remote clipboard
80 Chapter 7 Interacting with Users
Page 81

Switching the Control Window Between Full Size And Fit-To-Window
When controlling a client, you can see the client window at full size, or scaled to fit the
control window. Viewing the client window at full size will show the client screen at its
real pixel resolution. If the controlled computer’s screen is larger than your control
window, the screen show scroll bars at the edge of the window.
To switch in-a-window control between full size and fit-to-window modes:
1 Control a client computer.
2 Click the Fit Screen In Window button in the control window toolbar.
Switching Between Control and Observe Modes
Each control session can be switched to a single-client observe session, in which the
controlled computer no longer takes mouse and keyboard input from the
administrator computer. This allows you to easily give control over to a user at the
client computer keyboard, or place the screen under observation without accidentally
affecting the client computer.
See “Observing a Single Computer” on page 91 for more information on Apple Remote
Desktop observe mode.
To switch between control and observe modes:
1 Control a client computer.
2 Click the Control/Observe toggle button in the control window toolbar.
Sharing Control with a User
You can either take complete mouse and keyboard control or share control with an
Apple Remote Desktop client user. This allows you to have more control over the client
interaction as well as prevents possible client side interference.
This button has no effect while controlling VNC servers. See “Controlling VNC Servers”
on page 83 for more information.
To switch between complete control and shared mouse modes:
1 Control a client computer.
2 Click the “Share mouse and keyboard control” button in the control window toolbar.
Chapter 7 Interacting with Users 81
Page 82

Hiding a User’s Screen While Controlling
Sometimes you may want to control a client computer with a user at the client
computer, but you don’t want the user to see what you’re doing. In such a case, you
can disable the client computer’s screen while preserving your own view of the client
computer. This is a special control mode referred to as “curtain mode.” You can change
what’s “behind the curtain” and reveal it when the mode is toggled back to the
standard control mode.
To switch between standard control and curtain modes:
1 Control a client computer.
2 Click the “Lock computer screen while you control” button in the control window
toolbar.
Capturing the Control Window to a File
You can take a picture of the remote screen, and save it to a file. The file is saved to the
administrator computer, and is the same resolution and color depth as the controlled
screen in the window.
To screen capture a controlled client’s screen:
1 Control a client computer.
2 Click the “Capture screen to a file” button in the control window toolbar.
3 Name the new file.
4 Click Save.
Switching Control Session Between Full Screen and In a Window
You can control a computer either in a window, or using the entire administrator
computer screen. The “Fit screen to full display” toggle button changes between these
two modes.
In full screen mode, the client computer screen is scaled up to completely fill the
administrator screen. In addition to the client screen, there are a number of Apple
Remote Desktop controls still visible overlaying the client screen.
In in-a-window mode, you can switch between fitting the client screen in the window
or showing it actual size, possibly scrolling around the window to see the entire client
screen. See “Switching the Control Window Between Full Size And Fit-To-Window” on
page 81 for more information.
To switch between full screen and in-a-window modes:
1 Control a client computer.
2 Click the “Fit screen to full display” button in the control window toolbar.
82 Chapter 7 Interacting with Users
Page 83

Sharing Clipboards for Copy and Paste
You can transfer data between the Clipboards of the administrator and client computer.
For example, you may want to copy some text from a file on the administrator
computer and paste it into a document open on the client computer. Similarly, you
could copy a link from the client computer’s web browser and paste it into the web
browser on the administrator computer.
The keyboard shortcuts for Copy, Cut, and Paste are always passed through to the
client computer.
To share clipboard content with the client:
1 Control a client computer.
2 Click the “Get the remote clipboard contents” button in the control window toolbar to
get the client’s Clipboard content.
3 Click the “Send clipboard contents to the remote clipboard” button in the control
window toolbar to send content to the client’s Clipboard.
Controlling VNC Servers
Virtual Network Computing (VNC) is remote control software. It allows a user at one
computer (using a “viewer”) to view the desktop and control the keyboard and mouse
of another computer (using a VNC “server”) connected over the network. For the
purposes of these instructions, VNC-enabled computers are referred to as “VNC clients.”
VNC servers and viewers are available for a variety of computing platforms. Remote
Desktop is a VNC viewer and can therefore control any computer on the network
(whether that computer is running Mac OS X, Linux, or Windows) that is:
 Running the VNC server software
 In an Apple Remote Desktop computer list
If the you are trying to control a VNC server which is not Remote Desktop, it will not
support Remote Desktop keystroke encryption. If you try to control that VNC server,
you will get a warning that the keystrokes aren’t encrypted which you will have to
acknowledge before you can control the VNC server. If you chose to encrypt all
network data, then you will not be able to control the VNC server because Remote
Desktop is not able to open the necessary SSH tunnel to the VNC server. For more
information, see “Encrypting Observe and Control Network Data” on page 76.
These instructions assume the observed computer has been added to an Apple
Remote Desktop computer list (see “Finding and Adding Clients to Apple Remote
Desktop Computer Lists” on page 49). When adding a VNC server to an Apple Remote
Desktop computer list, you only need to provide the VNC password, with no user name.
Chapter 7 Interacting with Users 83
Page 84

To control a VNC client computer:
1 Select a computer list in the Remote Desktop window.
2 Select one computer from the list.
3 Choose Interact > Control.
If the controlled computer’s screen is larger than your control window, the screen
scrolls as the pointer approaches the edge of the window.
4 To customize the control window and session, see “Control Window Options” on
page 80.
5 Use your mouse and keyboard to perform actions on the controlled computer.
Regardless of your Apple Remote Desktop preferences, controlled VNC servers share
keyboard and mouse control. The remote computer’s keyboard and mouse are active
and affect the computer just as the administrator computer’s keyboard and mouse do.
Setting up a Non–Mac OS X VNC Server
This section contains very basic, high-level steps for setting up a non–Mac OS X client
to be viewed with Remote Desktop. This section cannot give detailed instructions, since
the client operating system, VNC software, and firewall will be different.
The basic steps are:
1 Install VNC Server software on the client computer (for example, a PC, or a Linux
computer).
2 Assign a VNC password on the client computer.
3 Make sure the client’s firewall has the VNC port open (TCP 5900).
4 Make sure “Encrypt all network data” is not selected in the Security section of the
Remote Desktop Preferences.
5 Add the computer to the Remote Desktop’s All Computers list using the client’s IP
address.
6 Put the client computer’s VNC password in the Remote Desktop authentication box.
There is no user name for a VNC server, just a password.
Apple Remote Desktop Control and the PC’s Ctrl-Alt-Del
If you use Remote Desktop to administer a PC that’s running VNC, you may be
wondering how to send the Ctrl-Alt-Del command (Control-Alternate-Delete) from a
Mac to the PC. Though Mac and PC key mappings differ, you can use an alternate key
combination to send the command.
 For full-size (desktop) keyboards, use Control-Option-Forward Delete.
 For abbreviated keyboards (on portable computers), use Function-Control-Option-
Command-Delete.
84 Chapter 7 Interacting with Users
Page 85

VNC Control Options
After you have added a VNC server to a computer list (or when you are first adding it),
you can set a custom port for VNC communication, and you can designate a display to
control.
To set a custom port on an existing computer list member:
1 Select a computer list in the Remote Desktop window.
2 Select a VNC Server computer in the Remote Desktop window.
3 Choose File > Get Info.
4 Click Edit in the Info window.
5 At the end of the IP Address or fully qualified domain name, add a colon followed by
the desired port.
For example, if you want to connect to a VNC server (vncserver.example.com) that is
listening on TCP port 15900, you would enter:
vncserver.example.com:15900
6 Click Done.
To set a custom VNC port when adding a computer by address:
1 Choose File > Add By Address.
2 Enter the IP address or fully qualified domain name.
3 At the end of the IP Address or fully qualified domain name, add a colon followed by
the desired port.
For example, if you want to connect to a VNC server (vncserver.example.com) that is
listening on TCP port 15900, you would enter:
vncserver.example.com:15900
4 Enter the user name and password.
5 Click Add.
To designate a display to control:
1 Add a custom port number, as described above.
2 Use the display number for the last number in the custom port designation (display
designations start at 0 for the default primary display).
For example, f you want to control the default display on a VNC server
(vncserver.example.com) that is listening on TCP port 5900, you would enter:
vncserver.example.com:5900
If you want to control the second display, you would enter:
vncserver.example.com:5901
Chapter 7 Interacting with Users 85
Page 86

If you want to control the third display, you would enter:
vncserver.example.com:5902
Configuring an Apple Remote Desktop Client to be Controlled by a VNC Viewer
When configured to do so, an Apple Remote Desktop client can be controlled with a
non–Apple VNC viewer.
Allowing a non–Apple VNC viewer access to an Apple Remote Desktop client is less
secure than using Remote Desktop to control the client. The non–Apple VNC software
expects the password to be stored in a cryptographically unsecured form and location.
To configure a client to accept VNC connections:
1 On the client computer, open System Preferences.
2 Click Sharing, select Apple Remote Desktop, then click Access Privileges.
3 Select “VNC viewers may control screen with the password.”
4 Enter a VNC password.
5 Click OK.
WARNING: Do not use the same password as any user or Apple Remote Desktop
administrator. The password may not be secure.
Observing
You may not want to control a computer, but merely monitor what is on its screen.
Observing a remote computer is similar to controlling one, except your mouse
movements and keyboard input are not sent to the remote computer. Apple Remote
Desktop client computers can be observed on any administrator computer that has the
“Observe” permission set. See “Apple Remote Desktop Administrator Access” on
page 60 for more information about Apple Remote Desktop permissions.
86 Chapter 7 Interacting with Users
Page 87

Remote Desktop allows you to observe multiple clients on the same screen, cycling
through the list of observed computers. This allows you to monitor many screens
without having to select each one individually.
Dealing With Many Client Screens
When observing a single client, you can see the client window at full size, or scaled it to
fit the observe window. To switch between the full size and fitting to the window, click
the Fit to Window button, just as you would in a control window.
If you’re observing more clients than you’ve chosen to fit on one screen, you can cycle
through multiple pages by clicking the Previous or Next button.
Cycle Pages: Use these buttons to manually switch to the previous or next page of
screens.
Getting More Information on Observed Clients
There is a computer information area beneath each of the observed desktops. It’s
automatically disabled when the administrator is viewing more computers than the
computer information area is able to show effectively (a threshhold of about 220 pixels
across). This could happen if:
 the initial selection of computers is too great for the window size
Chapter 7 Interacting with Users 87
Page 88

 the observe window is resized, shrinking the information beneath the threshold
 the setting for the number of viewed machines is changed
The computer information area is reenabled when the sizes are returned to more than
the image size threshhold.
Changing Observe Settings While Observing
While you are observing multiple computers, you can adjust the Apple Remote
Desktop observe settings using the controls at the top of the observe window.
These settings will be visible after clicking View Options in the toolbar.
To change your observe settings:
 Page Delay: Adjust the number of seconds before automatically advancing to the
next page of screens.
 Computers per page: Adjust the number of client screens visible on each page.
 Image Quality: Adjust the screen color depth from black and white to millions of
colors.
 Titles: Change the titles of the displayed screens in the computer information area.
 Account Picture: Add the currently logged-in user’s account picture under each
observed desktop.
See “Viewing a User’s Account Picture While Observing” on page 89 for more
information.
 Computer Status: Add a status overview icon underneath the observed desktop.
See “Viewing a Computer’s System Status While at the Observe Window” on page 89
for more information.
88 Chapter 7 Interacting with Users
Page 89

Changing Screen Titles While Observing
While you are observing multiple computers, you can change the title underneath the
desktops shown in the observe window.
The main title can be the:
 Name (the computer sharing name)
 IP Address
 Host Name
To change your observe window titles:
1 Click View Options in the observe window’s toolbar.
2 Select Display Computer Information.
3 From the Title pop-up menu, select the desired title.
4 Click Done.
Viewing a User’s Account Picture While Observing
Remote Desktop can display the user’s account picture and a user-created status
underneath the observed desktop.
The user’s account picture is their system login icon, so it might be either a picture
taken from an iSight camera, or a custom image selected in the Accounts pane of
System Preferences.
To view a user’s account picture:
1 Click View Options in the observe window’s toolbar.
2 Select Display Computer Information.
3 Select Account Picture.
4 Click Done.
Viewing a Computer’s System Status While at the Observe Window
Remote Desktop can display certain system status information underneath the
observed desktop. This information gives you a basic assessment of the following
service statistics:
 CPU Usage
 Disk Usage
 Free Memory
Chapter 7 Interacting with Users 89
Page 90

There are two levels of detail for system statistics. The top level is a single icon (a red,
yellow, or green icon).
Icon Indicates
or
or
One or more service statistic is red. This takes precedence over any
yellow or green indicator.
One or more service statistic is yellow This takes precedence over
any green indicator.
Service is operating within established parameters.
No service informaiton available.
You show the second level of detail by placing the mouse pointer over the high-level
status icon. The icon changes to an “i” and you can click the “i” to get more information.
Clicking the icon exposes per-service status icons:
Service Icon Status
CPU Usage Usage is at 60% or less
Usage is between 60% to 85%
Usage is at 85% or higher
No status information is available
DIsk Usage Usage is at 90% or less
Usage is between 90% and 95%
Usage is at 95% or higher
No status information is available
Free Memory Less than 80% used
Between 80% and 95% used
90 Chapter 7 Interacting with Users
Page 91

Service Icon Status
Over 95% used
No status information available
To show system status in the observe window:
1 Click View Options in the observe window’s toolbar.
2 Select Display Computer Information.
3 Select Computer Status.
4 Click Done.
Shortcuts in the Multiple Screen Observe Window
You can access several Apple Remote Desktop commands using icons in the observe
window. You can customize the observe window with the commands that are most
useful to you. For example, you may want to access the Copy Items command, the Text
Chat command, and the Lock Screen command, using the buttons in the observe
window toolbar. You perform Remote Desktop tasks on any computer by selecting its
screen and choosing a task from the Remote Desktop menus or the observe window
toolbar.
Regardless of your toolbar customizations, you’ll be able to advance through pages
manually, change the titling of the observed screens, change the number of client
screens per page, change the number of seconds before paging, or change the color
depth of the observed screens.
Observing a Single Computer
When you observe a single computer, the observed screen appears in a window on
your administrator computer. If a screen saver is active when you observe the screen,
the screen saver remains in effect. The observe window contains a “Share mouse
control” button to switch to controlling the screen.
To observe a single computer:
1 Select a computer list in the Remote Desktop window.
2 Select a computer in the Remote Desktop window.
3 Choose Interact > Observe.
If the observed computer’s screen is larger than the observe window, the screen will
scroll as the pointer approaches the edge of the window.
4 To customize the single-client observe window and session, see “Control Window
Options” on page 80. The observe window’s options are the same as those of the
control window.
Chapter 7 Interacting with Users 91
Page 92

Observing Multiple Computers
When you observe multiple client computers, each client screen is scaled down, so that
several computers can be viewed at the same time. You can set the number of client
screens that appear at any one time. See “Setting Preferences for the Remote Desktop
Administrator Application” on page 36 for more information.
If a client has a screen saver running when you start observing, the screen saver
remains in effect.
The screens will cycle through the entire list of selected computers, a few at a time,
switching every 30 seconds, altered by the speed setting.
To observe multiple computers:
1 Select a computer list in the Remote Desktop window.
2 Select one or more computers in the selected computer list.
3 Choose Interact > Observe.
The remote computer screens appear in a window.
Observing a Computer in Dashboard
If you are using Mac OS X version 10.4 or later, you can use the Dashboard widget to
observe one client computer. The computer must be in your All Computers list and be
authenticated with permission to Observe. Apple Remote Desktop does not have to be
launched to use the widget.
To observe using Dashboard:
1 Add the computer to your All Computers list.
See “Finding and Adding Clients to Apple Remote Desktop Computer Lists” on page 49
for detailed information.
2 Activate Dashboard, and click the widget’s icon to run it.
3 Click the widget’s “Info” button to flip the widget over.
4 Supply a hostname or IP address, login name, and password or simply select the
computer you want to observe (if it’s listed).
5 Click Done.
92 Chapter 7 Interacting with Users
Page 93

Sending Messages
Apple Remote Desktop allows you to communicate with users of Apple Remote
Desktop client computers using text messaging. You can use text messages to give
instructions or announcements, to collaborate remotely, or troubleshoot with users.
There are two types of text messaging: one-way messages and two-way interactive
chat. Text messages and chat are available only to Apple Remote Desktop client
computers; they are not available to VNC client computers.
Sending One-Way Messages
You can use a one-way text message to send announcements or information to users
client computers. The announcements appear in front of open application windows
and can be dismissed by the user.
To send a one-way text message:
1 Select a computer list in the Remote Desktop window.
2 Select one computer from the list.
3 Choose Interact > Send Message.
4 Enter your message.
5 Click Send.
The text message appears on the screen of all the selected computers.
Interactive Chat
You can start an interactive text chat with the user of an Apple Remote Desktop client
computer. This allows instant feedback from users, so you can collaborate or
troubleshoot.
To begin an interactive chat:
1 Select a computer list in the Remote Desktop window.
2 Select one or more computers in the selected computer list.
3 Choose Interact > Chat.
4 Enter your message, one line at a time.
The message appears real-time on the user’s screen as you type.
Chapter 7 Interacting with Users 93
Page 94

5 Press the Return key to complete and send each line.
Viewing Attention Requests
After a client user sends an attention request, the Apple Remote Desktop administrator
can read the attention request text.
To view attention requests:
1 Choose Window > Messages From Users.
2 Select the message you want to view.
3 Click Display to view the request’s message.
Sharing Screens
Apple Remote Desktop allows you to show your screen (or the screen of a client
computer in your list) to any or all Apple Remote Desktop client computers in the same
computer list. You can, for example, show a presentation to a classroom of computers
from a single computer.
Sharing a Screen with Client Computers
You can share a client computer’s screen, or the administrator’s screen, with any
number of clients. The client screen displays what is on the shared screen, but cannot
control it in any way.
To share a computer’s screen:
1 Select a computer list in the Remote Desktop window.
2 Select one or more computers in the selected computer list.
These computers include the target computers and the source computer.
3 Choose Interact > Share Screen.
4 Select the screen to be shared.
If you want to share the Apple Remote Desktop administrator screen, select “Share your
screen.”
If you want to share a client screen, select “Share a different screen,” and drag a
computer from an Apple Remote Desktop computer list to the dialog.
5 Click Share Screen.
The selected computer shows the shared computer screen.
If the target computer’s screen resolution is lower than the shared computer’s, only the
top left part of the shared screen (up to the lowest screen resolution) is seen on the
target screen.
94 Chapter 7 Interacting with Users
Page 95

Monitoring a Screen Sharing Tasks
You may want to keep track of the screen sharing tasks you have begun. You can get
information on all active screen sharing tasks, and can sort the tasks by time started,
source screen, or target computers.
To view current active screen sharing tasks:
m Choose Window > Active Share Screen Tasks.
Interacting with Your Apple Remote Desktop Administrator
Users of Apple Remote Desktop client computers can initiate contact with a Remote
Desktop administrator. Clients can ask for attention from the administrator, or cancel
that attention request.
Additionally, users of Apple Remote Desktop client computers can set an identifying
icon for a Remote Desktop administrator to view. The Remote Desktop administrator
can choose whether to view the icon or not.
Requesting Administrator Attention
At times, Apple Remote Desktop client computer users need to get the attention of the
Apple Remote Desktop administrator. If an Apple Remote Desktop administrator is
currently monitoring the client computer, the client user can send an attention request.
To request administrator attention:
1 Click the Apple Remote Desktop status icon and choose Message to Administrator.
The attention request window appears.
2 If the network has more than one Apple Remote Desktop administrator available,
choose an administrator from the “Send message to” pop-up menu.
3 Enter the message.
4 Click Send.
The attention request icon appears on the administrator’s screen.
Chapter 7 Interacting with Users 95
Page 96

Canceling an Attention Request
If a user no longer needs the Apple Remote Desktop administrator’s attention, he or
she can cancel the attention request after it has been sent.
To cancel an attention request:
1 Click the Apple Remote Desktop status icon and choose Message to Administrator.
2 Click the Apple Remote Desktop status icon in the menu bar and choose Cancel
Message.
Changing Your Observed Client Icon
By default, the icon that the Remote Desktop administrator sees while observing is the
login icon for the currently logged-in user. If you had an iSight camera active when
setting up your computer, you may have taken a picture of yourself for your user icon.
You can change this icon, and it will change on the administrator’s observation screen.
To change your login icon:
1 Prepare the picture you want to use.
You could use a graphic file, or take a picture using an iSight camera.
2 Open System Preferences.
The System Preferences application launches.
3 Select the Accounts pane.
4 Select your account, and choose the Picture button.
5 Replace your current account picture with the new picture.
6 Close System Preferences.
96 Chapter 7 Interacting with Users
Page 97

8 Administering Client Computers
8
Apple Remote Desktop gives you powerful administrative
control. You can manually or automatically get detailed
information about every computer, install software, and
maintain systems from a single administrator computer.
This chapter describes Remote Desktop’s capabilities and gives complete instructions
for using them. You can learn about:
 “Keeping Track of Task Progress and History” on page 97
 “Installing Software Using Apple Remote Desktop” on page 102
 “Upgrading Software” on page 106
 “Copying Files” on page 108
 “Creating Reports” on page 113
 “Maintaining Systems” on page 129
 “Managing Computers” on page 137
 “UNIX Shell Commands” on page 146
Keeping Track of Task Progress and History
The task history area is on the left side of the Remote Desktop window (see “Remote
Desktop Main Window” on page 29) with all computer lists and scanners. Every time
you execute a task (generating a report, copying a file, restarting a computer), the task
name, affected computers, task result, and time you execute it is stored in the Task
History window (accessible via Window > Task History). The History list, in the main
Remote Desktop window, shows the task name and result. You can collapse the History
list to reduce its size.
You can select a task in the History list to see some information about it, and doubleclick it to view a more detailed description of the task, as well as the computers
involved with it. Tasks in progress appear in the Active Tasks list, where you can stop
and restart them.
97
Page 98

Remote Desktop keeps track of three kinds of task progress: active, Task Server, and
completed. Active tasks are those which are currently being processed by the client
computers, and the client computers have not all reported back to the administrator
console. Some tasks are so short that they only briefly appear in the list of current tasks;
other tasks may take a long time and remain there long enough to return to the task
and view the progress as it happens. The Active Tasks list is located in the left side of
the Remote Desktop window, and has a disclosure triangle to expand or hide the list.
Task Server tasks are those which have been assigned to the task server (either the one
running on the administrator’s computer, or a remote one) which have not yet
completed for all the task participants.
Completed tasks are those which have received a task status for all participating client
computers. The task description and computer list then moves to the History list. The
History list is located in the left side of the Remote Desktop window, and has a
disclosure triangle for expanding or hiding the list.
In addition to the task status and notification features of Remote Desktop, you can set a
task notification shell script to run when any task has completed. This script is for all
tasks, but it can be as complex as your needs require.
Enabling a Task Notification Script
When a task completes, Remote Desktop can run a script that you create. This script is
for all completed tasks, and it must be a shell script. There is a default notification script
provided, which you can customize for your needs. The script must be a shell script, but
you can use various other scripting environments like AppleScripts with the osascript
command.
To enable a task notification script:
1 Make sure you are logged in as an administrator user.
2 Open Remote Desktop.
3 Choose Remote Desktop > Preferences.
4 Click the Tasks button.
5 Select “Enable task notification script.”
6 Choose the location of the script.
The default notification script is located at /Library/Application Support/Apple/Remote
Desktop/Notify.
7 Close the Preferences window.
98 Chapter 8 Administering Client Computers
Page 99

Getting Active Task Status
When you get a task’s current status, you see the progress of the task, the computers
involved, and their feedback to the administrator computer.
To get status on a currently running task:
1 Select the Active Tasks list.
2 Select the desired task in the Remote Desktop window.
The task status and computers involved are shown in the Remote Desktop window.
You can make sure the main window always shows the currently running task in the
main work area by setting a preference. Otherwise, the main window will continue to
show the last selected computer list.
To automatically show task status in the main window:
1 Make sure you are logged in as an administrator user.
2 Open Remote Desktop.
3 Choose Remote Desktop > Preferences.
4 Click the Tasks button.
5 Select “Always change focus to active task.”
6 Close the Preferences window.
Using the Task Feedback Display
You can use the task feedback display to:
 Retry a task on selected computers
 Cancel a task in progress
Tasks in progress appear in the Active Tasks list, where you can stop them, or run them
again.
To use the task feedback window:
1 Select the task in the History list or Active Tasks list.
2 Change the task as desired:
a Click the retry button to perform the task again.
b Click the stop button to cancel the active task.
Stopping a Currently Running Task
If a task is in progress and Remote Desktop is still waiting for feedback from the client
computers, you can stop the task. You use the Active Tasks list to stop the command in
progress.
Chapter 8 Administering Client Computers 99
Page 100

To stop a currently running task:
1 Select the Active Tasks list.
2 Select the desired task in the Remote Desktop window.
The task status and computers involved are shown in the Remote Desktop window.
3 Click the Stop button in the top-right of the main window.
Getting Completed Task History
After a task has received feedback from all the involved client computers, or they have
experienced a communication time-out, the task is moved to the History list. The
History list is located in the left side of the Remote Desktop window, and has a
disclosure triangle to expand or hide the list. This list stays populated as long you’ve set
in the Remote Desktop preferences. The History list can also be viewed in a separate
window with the tasks sorted by date.
To view a completed task history:
m To view the history in the Remote Desktop window, open the History list by using the
disclosure triangle and select the desired task.
m To view the history in a new window, choose Window > Task History.
The final task status and computers involved are shown in a separate window.
Saving a Task for Later Use
You may want to save a task for later, repeated use. If you find yourself repeating
certain tasks, you can save those tasks and the information about which computers go
with them. Observe and Control tasks cannot be saved.
Saved tasks appear in a list on the left side of the Remote Desktop main window.
To save a task for later use:
1 Open the task you want to save.
For example, if you want to save a Copy Items task, select Manage > Copy Items.
2 Configure the task as desired.
3 Before executing the task, click Save.
4 Name the saved task.
The task appears in a list on the left side of the Remote Desktop main window.
100 Chapter 8 Administering Client Computers
 Loading...