


 Loading...
®
http://www.3com.com/
SuperStack® II
Remote Access System 1500
Getting Started Guide 1.5
Part No. 1.024.1910 Rev 1.00
March, 1999
3Com Corporation 5400 Bayfront Plaza Santa Clara, California 95052-8145
Copyright © 1999, 3Com Corporation. All rights reserved. No part of this documentation may be reproduced in any form or by any means or used to make any derivative work (such as translation, transformation, or adaptation) without written permission from 3Com Corporation.
3Com Corporation reserves the right to revise this documentation and to make changes in content from time to time without obligation on the part of 3Com Corporation to provide notification of such revision or change.
3Com Corporation provides this documentation without warranty of any kind, either implied or expressed, including, but not limited to, the implied warranties of merchantability and fitness for a particular purpose. 3Com may make improvements or changes in the product(s) and/or the program(s) described in this documentation at any time.
UNITED STATES GOVERNMENT LEGENDS:
If you are a United States government agency, then this documentation and the software described herein are provided to you subject to the following:
United States Government Legend: All technical data and computer software is commercial in nature and developed solely at private expense. Software is delivered as Commercial Computer Software as defined in DFARS 252.227-7014 (June 1995) or as a commercial item as defined in FAR 2.101(a) and as such is provided with only such rights as are provided in 3Com’s standard commercial license for the Software. Technical data is provided with limited rights only as provided in DFAR 252.227-7015 (Nov 1995) or FAR 52.227-14
(June 1987), whichever is applicable. You agree not to remove or deface any portion of any legend provided on any licensed program or documentation contained in, or delivered to you in conjunction with, this
User Guide.
[Portions of this documentation are reproduced in whole or in part with permission from (as appropriate).]
Unless otherwise indicated, 3Com registered trademarks are registered in the United States and may or may not be registered in other countries.
3Com, the 3Com logo, and SuperStack are registered trademarks of 3Com Corporation.
Intel and Pentium are registered trademarks of Intel Corporation. AIX, Appletalk, AT, CompuServ, FireWire, IBM, NetView, and OS/2 are registered trademarks and Warp is a trademark of International Business Machines Corporation. Microsoft, MS-DOS, Windows, and Windows NT are registered trademarks of Microsoft Corporation. Novell and NetWare are registered trademarks of Novell, Inc.
Other brand and product names may be registered trademarks or trademarks of their respective holders.

CONTENTS
ABOUT THIS GUIDE
Finding Specific Information vii
Conventions viii
Related Documentation viii
Contacting 3Com ix
1INTRODUCING THE SUPERSTACK II REMOTE ACCESS SYSTEM
1500
About the RAS 1500 |
1-2 |
|
||
Overview 1-2 |
|
|
|
|
Applications |
1-3 |
|
|
|
Security Options |
1-5 |
|
||
Configuration Options |
1-5 |
|||
Universal Connect |
1-5 |
|
||
ISDN Configuration |
1-5 |
|||
Front Panel Description |
1-6 |
|||
RAS 1500 LEDs |
1-7 |
|
|
|
Power and Status LEDs |
1-7 |
|||
WAN Port LEDs |
1-7 |
|
||
LAN Port LEDs |
|
1-7 |
|
|
ISDN I/O |
|
|
|
|
Module LEDs |
|
1-8 |
|
|
Analog I/O |
|
|
|
|
Module LEDs |
|
1-8 |
|
|
2 INSTALLING THE RAS 1500 HARDWARE
Before you Begin 2-1 |
|
Required Equipment |
2-1 |
You Should Have Received 2-2 |
|
Optional Components |
2-2 |
iii

Installing the RAS 1500 System |
2-3 |
|
Installing the |
|
|
RAS 1500 System |
|
|
in a Stack |
2-3 |
|
Installing the |
|
|
RAS 1500 System |
|
|
in a Rack |
2-3 |
|
Rack Installation Guidelines |
2-4 |
|
Grounding the RM and the PEM |
2-4 |
|
I/O Module |
2-5 |
|
Powering the RAS 1500 On or Off |
2-5 |
Powering On the RAS 1500 |
2-5 |
Powering Off the RAS 1500 |
2-5 |
Connecting the FireWire 2-6 |
|
3 USING TRAM TO CONFIGURE THE RAS 1500
Overview |
3-1 |
|
|
|
Before You Begin |
3-2 |
|
|
|
Installing TRAM |
3-2 |
|
|
|
Running TRAM |
3-3 |
|
|
|
Basic TRAM Configuration |
3-3 |
|||
Using the Setup Wizard |
3-5 |
|
||
Getting Help in the Setup Wizard 3-5 |
||||
Starting the Setup Wizard |
3-6 |
|||
Managing the |
|
|
|
|
RAS 1500 |
3-7 |
|
|
|
Viewing Online Help 3-9 |
|
|||
Viewing Specific Help Topics |
3-10 |
|||
Additional Configuration |
3-10 |
|||
4 USING THE CLI TO CONFIGURE THE RAS 1500
Overview 4-1 |
|
|
Using Terminal Emulation |
4-1 |
|
Getting CLI Help |
4-1 |
|
Before You Begin |
4-2 |
|
Accessing the CLI Locally |
4-2 |
|
Accessing the CLI Remotely |
4-3 |
|
iv
|
Basic CLI Configuration |
4-4 |
|||
|
Using CLI Quick Setup |
4-4 |
|||
|
Using CLI Commands |
4-4 |
|||
|
Configuring ISDN |
4-6 |
|
||
|
Configuring the PEM with the CLI 4-7 |
||||
|
Additional Information |
|
4-8 |
||
A |
|
||||
CONFIGURATION ASSISTANCE |
|||||
|
Configuration Worksheet |
A-1 |
|||
|
ISDN Users |
A-1 |
|
|
|
|
IPX users |
A-1 |
|
|
|
|
NOS Users |
A-1 |
|
|
|
|
RADIUS Users |
A-2 |
|
||
|
UNIX SYSLOG users |
|
A-2 |
||
|
Users with an ISP |
A-2 |
|||
|
Users connecting to a remote LAN A-2 |
||||
|
Using the I-Team |
A-2 |
|
||
|
Overview |
A-2 |
|
|
|
|
I-Team Services |
A-3 |
|
||
B |
|
||||
TECHNICAL SPECIFICATIONS |
|||||
|
Certification |
B-1 |
|
|
|
|
United States |
B-1 |
|
||
|
Analog V.34 Model: FCC Part 68 Compliance Statement B-2 |
||||
|
Canadian Installations |
B-2 |
|||
|
Other Specifications |
B-3 |
|||
|
Physical Dimensions |
|
B-3 |
||
|
Interfaces |
B-3 |
|
|
|
|
Power Requirements |
B-4 |
|||
C |
|
||||
3COM LIMITED WARRANTY |
|||||
v

D TECHNICAL SUPPORT
Online Technical Services |
D-1 |
|
|
|
World Wide Web Site |
D-1 |
|
|
|
3Com FTP Site |
D-1 |
|
|
|
3Com Bulletin Board Service |
D-2 |
|
||
3ComFacts Automated Fax Service |
D-3 |
|||
Support from Your Network Supplier |
D-3 |
|||
Support from 3Com |
D-3 |
|
|
|
Returning Products for Repair |
D-5 |
|
||
INDEX
vi

ABOUT THIS GUIDE
This guide describes how to install and configure RAS 1500.
If the information in the release notes shipped with your product differs from the information in this guide, follow the instructions in the release notes.
Finding Specific |
This table shows the location of specific RAS 1500 information. |
|
Information |
|
|
|
|
|
|
If you are looking for this information |
Turn to |
|
|
|
|
Latest changes to documentation |
Release Notes |
|
Configuring LAN-to-LAN routing |
TRAM online help; RAS 1500 |
|
|
System Management Guide |
|
Configuring for dial-out |
TRAM online help; RAS 1500 |
|
|
System Management Guide |
|
Configuring to accept dial-in users |
TRAM online help; RAS 1500 |
|
|
System Management Guide |
|
Configuring for IP terminal service |
TRAM online help; RAS 1500 |
|
|
System Management Guide |
|
Configuring with TRAM |
Chapter 3 of this guide |
|
Configuring for frame relay |
RAS 1500 System Management |
|
|
Guide |
|
Configuring for security and accounting |
TRAM online help; RAS 1500 |
|
|
System Management Guide |
|
|
|

viii ABOUT THIS GUIDE
Conventions |
This table lists conventions that are used throughout this guide. |
||
|
Table 1 |
Notice Icons |
|
|
|
|
|
|
Icon |
Notice Type |
Description |
|
|
|
|
|
|
Information note |
Important features or instructions |
|
|
Caution |
Information to alert you to potential damage to a |
|
|
|
program, system, or device |
|
|
Warning |
Information to alert you to potential personal injury |
|
|
|
|
|
|
|
|
Related |
The RAS 1500 documentation set includes the following documents. All |
Documentation |
3Com documentation is available on the 3Com web site: |
|
http://www.3Com.com |
|
■ RAS 1500 Release Notes |
|
These notes provide information about the system software release, |
|
including new features and bug fixes. It also provides information |
|
about any changes to the RAS 1500’s system documentation. Release |
|
notes are enclosed in the RAS 1500 package and are available at |
|
http://support.3com.com/software/smofficesw.htm. |
|
■ RAS 1500 System Management Guide |
|
This guide describes how to configure your RAS 1500 system. It is |
|
located on the RAS 1500 Resource CD-ROM. |
|
■ Transcend Remote Access Manager (TRAM) Online Help |
|
This online help file describes how to use TRAM to configure your RAS |
|
1500. It is accessed from TRAM. |
|
■ RAS 1500 System Reference Guide |
|
Describes how to configure your RAS1500 system using the |
|
Command Line Interface (CLI). |
|
■ RAS 1500 Quick Reference Card |
|
Describes how to configure the more common tasks (e.g. protocols) |
|
on the RAS 1500. |

Contacting 3Com ix
■I/O Module Installation Guide
Describes how to install an I/O module in a Router Module or Port Expansion Module.
Contacting 3Com Use this chart as a reference when you need to contact 3Com.
Contacting 3Com
3Com Corp. - 5400 Bayfront Plaza - P.O. Box 58145 - Santa Clara, CA - 95052-8145
Internet |
http://support.3Com.com |
|
|
For a complete listing of support and contact numbers, refer to Appendix
D, “Technical Support.”
INTRODUCING THE SUPERSTACK II
1 REMOTE ACCESS SYSTEM 1500
This chapter contains information about the SuperStack II® Remote Access System 1500 (RAS 1500) and how it can be used in your network.
This chapter contains the following information:
■About the RAS 1500
■Overview
■Applications
■Security options
■Configuration options
■Front Panel View and Description
1-2 CHAPTER 1: INTRODUCING THE SUPERSTACK II REMOTE ACCESS SYSTEM 1500
About the RAS 1500 The RAS 1500 is a stackable unit that provides terminal server and remote
|
access services, via analog and ISDN BRI connections in a multi-protocol |
|
networking environment. |
|
Consisting of a base router module (RM), port expansion module (PEM), |
|
and user-installable Input/Output (I/O) modules, RAS 1500 integrates |
|
multiprotocol remote access server and WAN router technology with |
|
high-performance 56 kbps (V.90) and/or ISDN modems. |
|
|
Overview |
The RAS 1500 is a powerful data communications platform that can |
|
support a broad variety of remote access applications. |
|
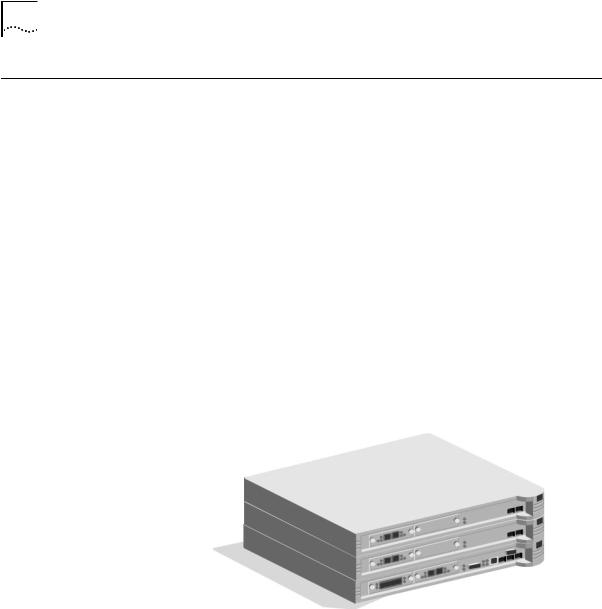
The basic configuration of a RAS 1500 stack consists of one RM and two |
|
PEMs and supports up to 24 channels (up to a total of 12 BRI lines, 24 |
|
analog lines, or any combination up to 24 channels). |
|
In a full RAS 1500 stack, each PEM is connected to the RM using 3Com’s |
|
StackNet, a high speed (up to 200 Mbps), low cost technology. |
Figure 1-1 One RM and two PEMs in a Stack without a StackNet Connection
Overview 1-3
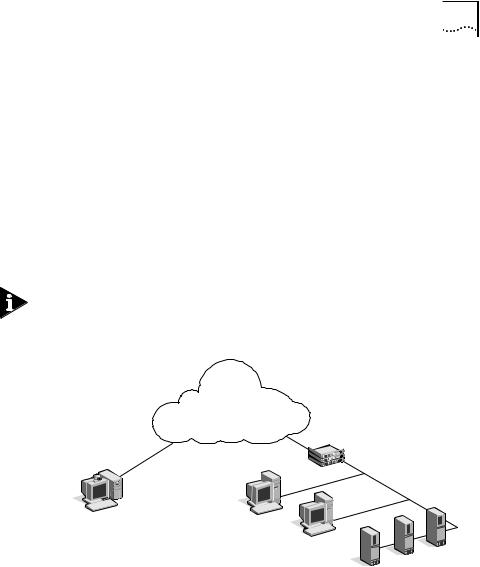
Applications
The RAS 1500 is a multi-protocol, dial-up router and terminal server commonly described as a remote access server. The RAS 1500 performs five basic applications:
■IP Terminal Service
■Network Dial-in Access
■Dial-out Access (NCSI or telnet)
■LAN-to-LAN Routing
■Bridging
For more information about configuring these basic applications, see the SuperStack II Remote Access System 1500 Resource CD-ROM.
PSTN
 RAS 1500
IP network
|
|
|
Network |
|
computers |
Figure 1-2 Application of the RAS 1500 within the IP Network
IP Terminal Service
RAS 1500 provides network access for dumb terminals or computers that emulate dumb terminals. The ASCII data stream to and from these remote terminals is converted into a networking protocol (telnet, Rlogin, or ClearTCP) and a session is established with a host to provide an IP terminal service connection on the RAS 1500’s local network.

1-4 CHAPTER 1: INTRODUCING THE SUPERSTACK II REMOTE ACCESS SYSTEM 1500
The RAS 1500 offers extensive access security, dialback, and easy configuration for terminal service connections.
Network Dial-in Access
RAS 1500 provides dial-in network access for remote users. Remote IP, IPX and Appletalk network users can dial in and connect to the local network as if they were local nodes.
Packets transmitted over the dial-in connection are encapsulated using the following protocols:
■PPP (Point-to-Point Protocol)
■SLIP (Serial Line IP Protocol)
■FCP (3Com’s Fast Connect Protocol)
Dial-out Access
You can access RAS 1500 ports with network computers and workstations to provide users with NCSI and Telnet dial-out services. This allows network users to connect to Bulletin Board Systems (BBSs) or information services such as CompuServe, or access the Internet over a dial-up connection.
IP or IPX LAN users require a NCSI-compatible communications application to access RAS 1500 modems.
LAN-to-LAN Routing and Bridging
RAS 1500 performs dial-up routing over a PPP connection between facilities. Routing occurs when one device dials up another device and logs in as a user.
There are several types of LAN-to-LAN connections:
■Manual
■On demand
■Timed
■Continuous
RAS 1500 supports many routing and protocol configurations. It is capable of establishing additional connections to increase bandwidth automatically when network traffic increases.

Overview 1-5
Security Options
Configuration
Options
Universal Connect
RAS 1500 supports the following security options:
■IP packet filtering in both the inbound and the outbound directions of ports, users, and dial-out locations.
■RADIUS
■NOS-based authentication (Windows NT 4.0, Novell NetWare)
■Dial-back, fixed and roaming
■PAP and CHAP
■Local password authentication
The RAS 1500 supports the following configuration options:
■TRAM
■Command Line Interface (CLI)
TRAM
TRAM allows you to configure your RAS 1500 using a GUI interface, if you are using Windows 95 or Windows NT 4.0.
Command Line Interface
The RAS 1500’s CLI includes an assortment of utilities for troubleshooting connections including:
■The ability to manually dial a location to test connectivity
■The ability to use telnet, Rlogin or ClearTCP to establish a session with another host.
■UNIX-like troubleshooting commands including ping to debug IP connections.
Universal Connect allows ISDN I/O module users to access information at analog speeds up to 56 Kbps and at digital speeds up to 128 Kbps from the same equipment and port.
ISDN Configuration The RAS 1500 supports Basic Rate Interface (BRI) ISDN with either the U-Interface (for North America) or the S/T-Interface (for other countries). Contact your ISDN provider for information about ISDN in your area or call 1-800-877-ISDN (USA only).

1-6 CHAPTER 1: INTRODUCING THE SUPERSTACK II REMOTE ACCESS SYSTEM 1500
Front Panel |
The following figure describes the RAS 1500 front panel. |
||||||||||||
Description |
|
|
|
|
|
|
|
|
|
|
|
|
|
|
|
|
|
|
|
|
|
|
|
|
|
|
FireWire |
Port expansion |
|
|
|
|
|
|
|
|
|
|
|
connector |
|
|
|
|
|
|
|
|
|
|
|
|
|||
modules |
|
|
|
|
|
|
|
|
|
|
|
|
|
|
|
|
|
|
|
|
|
|
|
|
|
|
FireWire |
|
|
|
|
|
|
|
|
|
|
|
|
connector |
|
|
|
|
|
|
|
|
|
|
|
|
|
|
Console |
Router module |
|
|
|
|
|
|
|
|
|
|
|
|
port |
|
|
|
|
|
|
|
|
|
|
|
|
||
|
|
|
|
|
|
|
|
|
|
|
|
|
|
|
|
|
|
|
|
|
|
|
|
|
|
|
|
|
Analog module |
ISDN-BRI module |
WAN port |
|
|
|
|
|
|
||||
|
|
||||||||||||
|
|
|
|
|
|
FireWire |
|||||||
(Four ports) |
(S/T or U) |
|
(IEEE P1394 Connectors) |
||
|
Figure 1-3 RAS 1500 Front Panel
Table 1-1 Front Panel Features
Description |
Function |
Analog module
ISDN -BRI module (S/T or U) WAN port
Connect analog telephone lines.
Connect ISDN-BRI telephone lines.
Connect to the WAN through this port. Automatic cable detection defines interface type.
Console port |
Connect a serial cable to a terminal from this port to access |
|
the unit’s command line interface (CLI). The port defaults to |
|
38.4 Kbps. |
FireWire (IEEE P1394 connectors) |
Connect supplied FireWire from these ports to RAS 1500 |
|
Expansion units. |
|
|

RAS 1500 LEDs 1-7
RAS 1500 LEDs |
The following tables describe Light Emitting Diodes (LEDs) on the RM, |
|||
|
PEM, analog I/O modules, and ISDN I/O modules. |
|||
Power and Status |
|
|
|
|
LEDs |
|
|
|
|
LED |
Color |
Status |
||
|
||||
|
|
|
|
|
|
Power |
Green |
Power is from the main power supply unit. |
|
|
|
|
|
|
|
Power |
Yellow |
Power is from the backup power supply unit. |
|
|
|
|
|
|
|
Power |
Off |
Power cable is not connected. |
|
|
|
|
|
|
|
Status |
Green |
The RAS 1500 is running normally. |
|
|
|
|
|
|
|
Status |
Blinking green |
The RAS 1500 software is running normally. |
|
|
|
|
|
|
|
Status |
Blinking yellow |
Diagnostics are running. |
|
|
|
|
|
|
|
Status |
Red |
Unit has just been powered on, or |
|
|
|
|
diagnostics have failed. |
|
WAN Port LEDs |
|
|
|
|
|
|
|
||
|
|
|
|
|
|
LED |
Color |
Status |
|
|
|
|
|
|
|
Tx |
Green |
The RAS 1500 is sending data. |
|
|
|
|
|
|
|
Tx |
Off |
The RAS 1500 is not sending data. |
|
|
|
|
|
|
|
Rx |
Green |
The RAS 1500 is receiving data. |
|
|
|
|
|
|
|
Rx |
Off |
The RAS 1500 is not receiving data. |
|
LAN Port LEDs |
|
|
|
|
|
|
|
||
|
|
|
|
|
|
LED |
Color |
Status |
|
|
|
|
|
|
|
Tx |
Green |
The RAS 1500 is sending data. |
|
|
|
|
|
|
|
Tx |
Off |
The RAS 1500 is not sending data. |
|
|
|
|
|
|
|
Rx |
Green |
The RAS 1500 is receiving data. |
|
|
|
|
|
|
|
Rx |
Off |
The RAS 1500 is not receiving data. |
|
|
|
|
|
|
|
Lk |
Green |
The RAS 1500 has an active connection. |
|
|
|
|
|
|
|
Lk |
Off |
The RAS 1500 does not have an active |
|
|
|
|
connection. |
|
|
|
|
|
|
|
CO |
Yellow |
Data collisions have occurred. |
|
|
|
|
|
|
|
CO |
Off |
Data collisions have not occurred. |
|
|
|
|
|
|

1-8 CHAPTER 1: INTRODUCING THE SUPERSTACK II REMOTE ACCESS SYSTEM 1500
ISDN I/O |
|
|
||
Module LEDs |
|
|
||
|
|
|
|
|
|
LED |
Color |
Status |
|
|
|
|
|
|
|
1,2,3, or 4 |
Green |
A call is connected. |
|
|
|
|
|
|
|
1,2,3, or 4 |
Yellow |
A call is being negotiated. |
|
|
|
|
|
|
|
1,2,3, or 4 |
Red |
Module failed diagnostics. If all LEDs are red, |
|
|
|
|
the modem-manager software has failed. |
|
|
|
|
|
|
|
1,2,3, or 4 |
Off |
No call is connected. |
|
|
|
|
|
|
|
D |
Flashing green |
Port is being initialized. |
|
|
|
|
|
|
|
D |
Flashing yellow |
Port is being initialized. |
|
|
|
|
|
|
|
D |
Yellow |
The physical ISDN link is active, but the |
|
|
|
|
D-Channel is not fully functional. |
|
|
|
|
|
|
|
D |
Green |
The D-Channel is fully functional. |
|
|
|
|
|
|
|
D |
Red |
The RAS 1500 failed diagnostics. |
|
|
|
|
|
|
|
D |
Off |
ISDN U and ISDN S/T - The physical ISDN link is |
|
|
|
|
not active. |
|
|
|
|
|
|
Analog I/O |
|
|
||
Module LEDs |
|
|
|
|
LED |
Color |
Status |
||
|
||||
|
|
|
|
|
|
1,2,3, or 4 |
Green |
A call is connected. |
|
|
|
|
|
|
|
1,2,3, or 4 |
Yellow |
A call is being negotiated. |
|
|
|
|
|
|
|
1,2,3, or 4 |
Red |
Module failed diagnostics. If all LEDs are red, |
|
|
|
|
the modem-manager software has failed. |
|
|
|
|
|
|
|
1,2,3, or 4 |
Off |
No call is connected. |
|
|
|
|
|
|

INSTALLING THE RAS 1500
2 HARDWARE
This chapter contains the following information:
■Before you Begin
■Installing the RAS 1500 System
■Grounding the RM and the PEM
■Powering the RAS 1500 On or Off
Before you Begin Before you begin installation:
■Confirm you have the required equipment
■Check that your RAS 1500 package is complete (see page 2-2).
The sections below detail each task. Contact your network administrator for further assistance.
Required Equipment A Pentium PC running Windows 95 or Windows NT 4.0 (with the latest service pack from Microsoft) with the following minimum configuration:
■32 MB RAM
■40 MB free Hard Drive storage space
■Mouse
■TCP/IP configured
Loading...