


 Loading...
10-Port 100BASE-FX and
20-Port 10/100BASE-TX Fast Ethernet Layer 2 Switching Modules Quick Start Guide
For the CoreBuilder® 9000 Enterprise Switch
Module Descriptions This guide describes key installation information for two CoreBuilder® 9000 Fast Ethernet (FEN) Switching Modules:
■The 10-port 100BASE-FX Fast Ethernet Layer 2 Switching Module (Model Number 3CB9LF10MC) has ten 100 Mbps Ethernet fiber-optic ports with SC connectors on its front panel and two 1-Gigabit ports on the back for connection to the chassis backplane.
■The 20-port 10/100BASE-TX Fast Ethernet Layer 2 Switching Module (Model Number 3CB9LF20R) has twenty 10/100 Mbps RJ-45 ports on its front panel and two 1-Gigabit ports on the back for connection to the chassis backplane.
Each of these FEN Switching Modules operates as a Layer 2 switch and occupies a single switching module slot in the CoreBuilder 9000 7-slot chassis, 8-slot chassis, or 16-slot chassis.
Key Features The 10/100BASE-TX and 100BASE-FX FEN Switching Modules support the following key features:
■Hot-swapping of modules
■Management using the Administration Console
(a command line interface), the Web Management suite of applications with an Internet browser, or SNMP-based applications

2 10-Port 100BASE-FX and 20-Port 10/100BASE-TX Fast Ethernet Layer 2 Switching Modules Quick Start Guide
For information about the software features that these modules support, see the:
■CoreBuilder 9000 Implementation Guide
■Command Reference Guide
■CoreBuilder 9000 Release Notes for the Fast Ethernet and Gigabit Ethernet Layer 2 Switching Modules
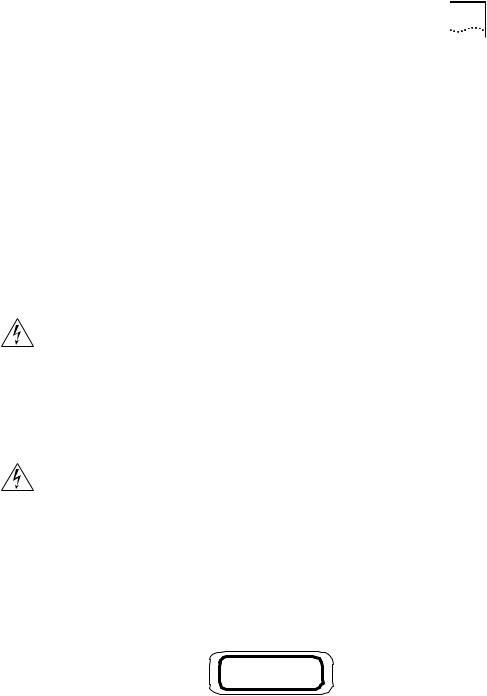
Front Panel On the 10-port 100BASE-FX FEN Switching Module, the front panel ports are numbered 1 through 10, as shown in Figure 1. The two 1-Gigabit ports on the back of the module (not shown in Figure 1) are numbered 11 and 12.
On the 20-port 10/100BASE-TX FEN Switching Module, the front panel ports are numbered 1 through 20, as shown in Figure 1. The two 1-Gigabit ports on the back of the module (not shown in Figure 1) are numbered 21 and 22.
Figure 1 Front Panels for the 10/100BASE-TX and 100BASE-FX FEN Modules
Ejector handle |
Ejector handle |
|||
Module Status LED |
|
|||
|
Port Status LEDs |
|
||
|
|
|
10/100BASE-TX |
|
|
|
|
||
|
|
|
RJ-45 ports |
Model number |
|
|
|
|
|
|
STAT |
14 |
|
MOD |
7 |
||
|
1 |
2 |
3 |
4 |
5 |
6 |
1X |
2X |
3X |
4X |
5X |
6X |
7X |
8X |
9X |
10X |
11X |
12X |
13X |
14X |
15X |
16X |
17X |
18X |
19X |
20X |
3CB9LF20R
|
|
|
|
|
|
|
|
|
|
|
|
|
|
|
|
100BASE-FX |
|
|
|
|
|
|
|
|
|||
|
STAT |
6 |
7 |
8 |
9 |
1 |
0 |
TX |
RX |
TX |
RX |
TX |
RX |
TX |
RX |
TX |
RX |
TX |
RX |
TX |
RX |
TX |
RX |
TX |
RX |
TX |
RX |
MOD |
|
|
|
|
|
|
|
|
|
|
|
|
|
|
|
|
|
|
|
|
|
|
|
|
|
|
|
|
|
|
|
|
|
|
|
|
|
|
|
|
|
|
|
|
|
|
|
|
|
|
|
|
|
|
|
|
|
|
|
1 |
|
2 |
|
|
3 |
|
|
5 |
|
|
|
|
|
|
|
|
1 |
|
|
|
|
|
|
|
|
|
2 |
|
|
|
|
|
|
|
|
|
|
|
|
|
|
|
|
|
|
|
|
|
4 |
|
|
|
|
|
|
|
|
|
|
5 |
|
|
|
|
|
|
|
|
|
6 |
|
|
|
|
|
|
|
|
|
7 |
|
|
|
|
|
|
|
|
|
8 |
|
|
|
|
|
|
|
|
|
|
|
|
|
|
|
|
|
|
|
|
|
10 |
|
|
|
|
|
|||||||||||||
|
|
|
|
|
|
|
|
|
|
|
|
|
|
|
|
|
|
|
|
|
|
|
|
|
|
|
|
|
|
|
|
|
|
|
|
|
|
|
|
|
|
|
|
|
|
|
|
|
|
|
|
|
|
|
|
|
|
|
|
|
|
|
|
|
|
|
|
|
|
|
|
|
|
|
|
|
|
|
|
|
|
|
|
|
|
|
|
|
|
|
|
|
|
|
|
|
|
|
|
|
|
|
|
|
|
|
|
|
|
|
|
|
|
|
|
|
|
|
|
|
|
|
|
|
|
|
|
|
|
|
|
|
|
|
|
|
|
|
|
|
|
|
|
|
|
|
|
|
|
|
|
|
|
|
|
|
|
|
|
|
|
|
|
|
|
|
|
|
|
|
|
|
|
|
|
|
|
|
|
|
|
|
|
|
|
|
|
|
|
|
|
|
|
|
|
|
|
|
|
|
|
|
|
|
|
|
|
|
|
|
|
|
|
|
|
|
|
|
|
|
|
|
|
|
|
|
|
|
|
|
|
|
|
|
|
|
|
|
|
|
|
|
|
|
|
|
|
|
|
|
|
|
|
|
|
|
|
|
|
|
|
|
|
|
|
|
|
|
|
|
|
|
|
|
|
|
|
|
|
|
|
|
|
|
|
|
|
|
|
|
|
|
|
|
|
|
|
|
|
|
|
|
|
|
|
|
|
|
|
|
|
|
|
|
|
|
|
|
|
|
|
|
|
|
|
|
|
|
|
|
|
|
|
|
|
|
|
|
|
|
|
|
|
|
|
|
|
|
|
|
|
|
|
|
|
|
|
|
|
|
|
|
|
|
|
|
|
|
|
|
|
|
|
|
|
|
|
|
|
|
|
|
|
|
|
|
|
|
|
|
|
|
|
|
|
|
|
|
|
|
|
|
|
|
Port Status LEDs |
Fiber-optic ports |
Module Status LED |
(SC connectors) |
|
3CB9LF10MC
In the 7-slot chassis, you install the modules horizontally with the LEDs at the left. In the 8-slot chassis and the16-slot chassis, you install the modules vertically with the LEDs at the top.
10-Port 100BASE-FX and 20-Port 10/100BASE-TX Fast Ethernet Layer 2 Switching Modules Quick Start Guide |
3 |
Audience Description This guide is intended for trained technical personnel only. Do not attempt to install, remove, or replace the 10/100BASE-TX or 100BASE-FX FEN Switching Modules if you have not had the proper training from 3Com. For training information in the United States and Canada, call 1-800-NET-3COM. For the numbers to call in other locations, visit the 3Com Web site:
www.3Com.com/support/
Safety Precautions When you handle components in a CoreBuilder 9000 system, be sure that you follow all safety precautions. To avoid electric shocks, burns, or equipment damage, read and follow these warnings:
WARNING: Allow only trained service personnel to install, remove, or replace any module in the chassis.
WARNING: Hazardous energy exists within the system. Use extreme caution when you install, remove, or replace any module in the chassis. When the system is on:
■Never insert metal objects such as a screwdriver or a finger with jewelry into open module slots.
■Do not touch any connections within the chassis with your hands or fingers.
WARNING: To ensure optical safety when installing a FEN Switching
Module, comply with the following precaution:
Although the data communication LEDs used in this product meet the regulatory requirements for casual exposure to the eye, as with any source of bright light, it is advised that you do not look into the light source.
LED Safety Information: IEC 825 and EN60825, Class 1 LED Device. For connection only to Class 1 LED Devices.
CLASS 1
LED PRODUCT

4 10-Port 100BASE-FX and 20-Port 10/100BASE-TX Fast Ethernet Layer 2 Switching Modules Quick Start Guide
ESD Safety Information
Electrostatic discharge (ESD) can damage components of the module. ESD, which occurs when a module is improperly handled, can cause complete or intermittent failures.
CAUTION: To prevent ESD-related damage:
■ Always wear an ESD wrist strap (not provided) when you handle a module, ensuring that the strap makes good skin contact and is properly grounded.
■ Keep the module in its antistatic bag until you are ready to install it.
Handling Precautions When you handle a module, follow these precautions:
■Always handle the module by the front panel only.
■Do not touch the components, pins, leads, or solder connections.
■Do not twist or otherwise force the module into the chassis when you insert it into the module guides.
■Before you push the module into the chassis, verify that the module ejector handles are open.
■When you slide the module into the 7-slot chassis, match the left and right module guides. In the 8-slot chassis or 16-slot chassis, match the upper and lower module guides.
For details, see “Installation Prerequisites” and “Installing the Module” later in this guide.
10-Port 100BASE-FX and 20-Port 10/100BASE-TX Fast Ethernet Layer 2 Switching Modules Quick Start Guide |
5 |
Unpacking Use the following procedure when you unpack a FEN Switching Module:
Instructions
1Verify that the module is the correct product by matching the 3C number that is listed on the shipping box label to the 3C number that you ordered (Model Number 3CB9LF10MC for the 10-port 100BASE-FX Fast Ethernet Layer 2 Switching Module or Model Number 3CB9LF20R for the 20-port 10/100BASE-TX Fast Ethernet Layer 2 Switching Module).
2Remove the module, in its antistatic bag, from the shipping box.
3Observing the caution instructions, remove the module from its antistatic bag and inspect it for physical damage.
CAUTION: Handle the module only by the front panel. Do not touch any components, pins, leads, or solder connections.
If the module appears to be damaged, replace it in the antistatic bag, put it back in the shipping box, and contact your network supplier.
4Verify that the box also contains:
■CoreBuilder 9000 Release Notes for the Fast Ethernet and Gigabit Ethernet Layer 2 Switching Modules
■10-Port 100BASE-FX and 20-Port 10/100BASE-TX Fast Ethernet Layer 2 Switching Modules Quick Start Guide for the CoreBuilder 9000 Enterprise Switch (this guide)
If the listed contents are not in your shipping box, contact your network supplier.
All shipping boxes are reusable. After you remove the contents, replace the packing materials in the box and store it for future use.

6 10-Port 100BASE-FX and 20-Port 10/100BASE-TX Fast Ethernet Layer 2 Switching Modules Quick Start Guide
Installation
Prerequisites
Module Placement
in the Chassis
Before you install a module, make the following preparations:
■Verify that the chassis is properly installed in a rack, on a table, or on a shelf, according to the instructions in either of these guides:
■7-Slot Chassis Quick Installation Guide for the CoreBuilder 9000 Enterprise Switch
■Chassis Quick Installation Guide for the CoreBuilder 9000 Enterprise Switch 8-slot Chassis and 16-slot Chassis.
■Have a flat-blade torque screwdriver available to secure the module to the chassis after you install it.
■Read the CoreBuilder 9000 Release Notes for the Fast Ethernet and Gigabit Ethernet Layer 2 Switching Modules for important information about installing and upgrading modules in an existing chassis or a new chassis.
CAUTION: All modules in a CoreBuilder 9000 chassis must operate at compatible software levels. You must verify the software release on all new and existing modules in your chassis and upgrade as necessary. See the CoreBuilder 9000 Release Notes for the Fast Ethernet and Gigabit Ethernet Layer 2 Switching Modules for a module software compatibility requirements table, mandatory upgrade procedures, and other important information.
Note the following chassis slot restrictions and recommendations when you choose a chassis slot for the 10-port 100BASE-FX Fast Ethernet Switching Module or the 20-port 10/100BASE-TX Fast Ethernet Switching Module:
■In the 7-slot chassis:
■Do not install the module in slot 7. This slot is reserved for a Gigabit Ethernet (GEN) Switch Fabric Module.
■Install the module in slot 1, 2, 3, 4, 5, or 6.
■In the 8-slot chassis:
■Do not install the module in slot 7 or slot 8. These slots are reserved for GEN Switch Fabric Modules.
■Install the FEN Switching Module in slot 1, 2, 3, 4, 5, or 6.

10-Port 100BASE-FX and 20-Port 10/100BASE-TX Fast Ethernet Layer 2 Switching Modules Quick Start Guide |
7 |
■In the 16-slot chassis:
■Do not install the module in slot 8 or slot 9. These slots are reserved for GEN Switch Fabric Modules.
■Install the module in slot 1, 2, 3, 4, 5, 6, 7, 10, 11, or 12.
■3Com recommends that you do not install the module in slot 13, 14, 15, or 16 because these slots have only one connection to the GEN Switch Fabric Module.
■Table 1, Table 2, and Table 3 list the relationship between the following:
■24-port GEN Switch Fabric Module (SFM) (Model Number 3CB9FG24 or Model Number 3CB9FG24T)
■10-port 100BASE-FX FEN Switching Module
■Switching module slots in the 7-slot chassis, 8-slot chassis, and 16-slot chassis, respectively
Table 4, Table 5, and Table 6 list the relationship between the following:
■24-port GEN Switch Fabric Module (SFM)
■20-port 10/100BASE-TX FEN Switching Module
■Switching module slots in the 7-slot chassis, 8-slot chassis, and 16-slot chassis, respectively
Table 7 and Table 8 list the relationship between the following:
■9-port GEN Switch Fabric Module (SFM) (Model Number 3CB9FG9)
■10-port 100BASE-FX FEN Switching Module
■Switching module slots in the 7-slot chassis and 8-slot chassis, respectively
Table 9 and Table 10 list the relationship between the following:
■9-port GEN Switch Fabric Module (SFM)
■20-port 10/100BASE-TX FEN Switching Module
■Switching module slots in the 7-slot chassis and 8-slot chassis, respectively
Use the table information to help select a slot for your module, as well as administer the system after you have completed the installation.

8 10-Port 100BASE-FX and 20-Port 10/100BASE-TX Fast Ethernet Layer 2 Switching Modules Quick Start Guide
Table 1 Mapping the 24-port GEN SFM and the 10-port FEN Switching Module to the 7-slot Chassis
Chassis |
Number of SFM |
10-port Switching |
SFM Backplane Port |
SFM LED Numbers |
Slot |
Backplane Ports |
Module Backplane |
Numbers Assigned to |
Assigned to Backplane |
Number |
Allocated to Slot |
Port Numbers |
Chassis Slot |
Port Numbers |
|
|
|
|
|
1 |
4; up to 2 can be |
11 |
1 |
1 |
|
accessed by this |
12 |
2 |
2 |
|
module |
|||
|
|
|
|
|
|
|
|
|
|
2 |
4; up to 2 can be |
11 |
5 |
3 |
|
accessed by this |
12 |
6 |
4 |
|
module |
|||
|
|
|
|
|
|
|
|
|
|
3 |
4; up to 2 can be |
11 |
9 |
5 |
|
accessed by this |
12 |
10 |
6 |
|
module |
|||
|
|
|
|
|
|
|
|
|
|
4 |
4; up to 2 can be |
11 |
13 |
7 |
|
accessed by this |
12 |
14 |
8 |
|
module |
|||
|
|
|
|
|
|
|
|
|
|
5 |
4; up to 2 can be |
11 |
17 |
9 |
|
accessed by this |
12 |
18 |
10 |
|
module |
|||
|
|
|
|
|
|
|
|
|
|
6 |
4; up to 2 can be |
11 |
21 |
11 |
|
accessed by this |
12 |
22 |
12 |
|
module |
|||
|
|
|
|
|
|
|
|
|
|
7 |
Reserved for an SFM |
Not applicable |
Not applicable |
Not applicable |
|
|
|
|
|

10-Port 100BASE-FX and 20-Port 10/100BASE-TX Fast Ethernet Layer 2 Switching Modules Quick Start Guide |
9 |
Table 2 Mapping the 24-port GEN SFM and the 10-port FEN Switching Module to the 8-slot Chassis
Chassis |
Number of SFM |
10-port Switching |
SFM Backplane Port |
SFM LED Numbers |
Slot |
Backplane Ports |
Module Backplane |
Numbers Assigned to |
Assigned to Backplane |
Number |
Allocated to Slot |
Port Numbers |
Chassis Slot |
Port Numbers |
|
|
|
|
|
1 |
4; up to 2 can be |
11 |
1 |
1 |
|
accessed by this |
12 |
2 |
2 |
|
module |
|||
|
|
|
|
|
|
|
|
|
|
2 |
4; up to 2 can be |
11 |
5 |
3 |
|
accessed by this |
12 |
6 |
4 |
|
module |
|||
|
|
|
|
|
|
|
|
|
|
3 |
4; up to 2 can be |
11 |
9 |
5 |
|
accessed by this |
12 |
10 |
6 |
|
module |
|||
|
|
|
|
|
|
|
|
|
|
4 |
4; up to 2 can be |
11 |
13 |
7 |
|
accessed by this |
12 |
14 |
8 |
|
module |
|||
|
|
|
|
|
|
|
|
|
|
5 |
4; up to 2 can be |
11 |
17 |
9 |
|
accessed by this |
12 |
18 |
10 |
|
module |
|||
|
|
|
|
|
|
|
|
|
|
6 |
4; up to 2 can be |
11 |
21 |
11 |
|
accessed by this |
12 |
22 |
12 |
|
module |
|||
|
|
|
|
|
|
|
|
|
|
7 |
Reserved for an SFM |
Not applicable |
Not applicable |
Not applicable |
|
|
|
|
|
8 |
Reserved for an SFM |
Not applicable |
Not applicable |
Not applicable |
|
|
|
|
|
Loading...