


3Com Megahertz
10 Mbps LAN PC Card
User Guide
http://www.3com.com/
Part No. 09-1457-000
October 1998
3Com Corporation ■ 5400 Bayfront Plaza ■ Santa Clara, California ■ 95052-8145
© 3Com Corporation, 1998. All rights reserved. No part of this documentation may be reproduced in any form or by any means or used to make any derivative work (such as translation, transformation, or adaptation) without permission from 3Com Corporation.
3Com Corporation reserves the right to revise this documentation and to make changes in content from time to time without obligation on the part of 3Com Corporation to provide notification of such revision or change.
3Com Corporation provides this documentation without warranty of any kind, either implied or expressed, including, but not limited to, the implied warranties of merchantability and fitness for a particular purpose. 3Com may make improvements or changes in the product(s) and/or the program(s) described in this documentation at any time.
UNITED STATES GOVERNMENT LEGENDS:
If you are a United States government agency, then this documentation and the software described herein are provided to you subject to the following restricted rights:
For units of the Department of Defense:
Restricted Rights Legend: Use, duplication or disclosure by the Government is subject to restrictions as set forth in subparagraph (c) (1) (ii) for restricted Rights in Technical Data and Computer Software clause at 48 C.F.R. 52.227-7013. 3Com Corporation, 5400 Bayfront Plaza, Santa Clara, California 95052-8145.
For civilian agencies:
Restricted Rights Legend: Use, reproduction or disclosure is subject to restrictions set forth in subparagraph (a) through (d) of the Commercial Computer Software - Restricted Rights Clause at 48 C.F.R. 52.227-19 and the limitations set forth in 3Com Corporation’s standard commercial agreement for the software. Unpublished rights reserved under the copyright laws of the United States.
The software described in this documentation is furnished under a license agreement included with the product either as a separate document or on the software distribution diskette in a root directory file named LICENSE.TXT. If you are unable to locate a copy, please contact 3Com and a copy will be provided to you.
Unless otherwise indicated, 3Com registered trademarks are registered in the United States and may or may not be registered in other countries.
3Com, DynamicAccess, XJACK, Megahertz, and NetAge are registered trademarks of 3Com Corporation. 3TECH is a trademark of 3Com Corporation. 3ComFacts is a service mark of 3Com Corporation. AutoLink is a trademark of Data National and is licensed by 3Com Corporation.
Microsoft, Windows, and Windows NT are registered trademarks of Microsoft Corporation. Novell and NetWare are registered trademarks of Novell, Inc. IBM is a registered trademark of International Business Machine Corporation. CompuServe is a trademark of CompuServe, Inc. DEC and PATHWORKS are registered trademarks of Digital Equipment Corporation. Banyan and VINES are registered trademarks of Banyan Systems Incorporated. Artisoft and LANtastic are registered trademarks of Artisoft, Inc. Toshiba is a trademark of Toshiba Corporation.
Other brand and product names may be registered trademarks or trademarks of their respective holders.
Guide written by Jean Anderson. Edited by Chris Dresden. Technical illustration by Tim Buckreus. Production by Petra Armenta.

CONTENTS
1 INSTALLING THE LAN PC CARDS
|
Before You Begin 2 |
|
|
|
|
|
|
|
|
Connecting the 3CCE589ET LAN PC Card |
2 |
|
|||||
|
Connecting the 3CCE589EC PC Card |
3 |
|
|
||||
|
Connecting the 3CXE589ET PC Card |
4 |
|
|
||||
|
Connecting the 3CXE589EC PC Card |
5 |
|
|
||||
|
Detaching the PC Card Cable and PC Card COMBO Cable |
6 |
||||||
|
|
|
|
|||||
2 INSTALLING THE NETWORK DRIVER |
|
|
||||||
|
Before You Install the Network Driver |
7 |
|
|
||||
|
Which Driver Installation Instructions Should You Use? |
7 |
||||||
|
Windows 98 and Windows 95 |
8 |
|
|
|
|||
|
Windows 98 |
8 |
|
|
|
|
|
|
|
Windows 95 |
10 |
|
|
|
|
|
|
|
Windows 95 OSR 2 |
10 |
|
|
|
|
|
|
|
Confirming Installation |
11 |
|
|
|
|
||
|
Windows 95 Version 4.00.950A |
12 |
|
|
|
|||
|
Windows NT |
12 |
|
|
|
|
|
|
|
Windows NT 4.0 Installation without Networking |
|
||||||
|
Installed |
13 |
|
|
|
|
|
|
|
Windows NT 4.0 Installation with Networking Installed |
15 |
||||||
|
Windows NT Version 3.51 |
|
16 |
|
|
|
||
|
Microsoft Windows for Workgroups (WFW) |
17 |
|
|||||
|
Before You Begin |
17 |
|
|
|
|
|
|
|
Installing the Network Driver |
18 |
|
|
|
|||
|
AutoLink for Windows 3.x, Windows for Workgroups, and |
|
||||||
|
DOS 19 |
|
|
|
|
|
|
|
|
Installing the Windows CE 2.0 Driver |
20 |
|
|
||||
|
Supported Network Drivers |
21 |
|
|
|
|
||

3 |
TROUBLESHOOTING |
|
|
|
||
|
LEDs 23 |
|
|
|
|
|
|
Accessing the LAN PC Card Help System |
24 |
||||
|
DOS Diagnostics Program |
25 |
|
|
||
|
Resolving Hardware Resource Conflicts |
25 |
||||
|
Windows 98 and Windows 95 25 |
|
||||
|
Windows NT 4.0 |
26 |
|
|
|
|
|
Frequently Asked Questions |
27 |
|
|||
|
Troubleshooting Tips |
29 |
|
|
|
|
4 |
|
|
||||
CHANGING CONFIGURATION |
|
|||||
|
Configuration Settings |
31 |
|
|
|
|
|
Configuration Setting Descriptions |
32 |
||||
|
Changing Configuration 33 |
|
|
|||
|
Windows 98 and Windows 95 |
33 |
|
|||
|
Changing I/O Base Address, Interrupt Request Level (IRQ), or |
|||||
|
Memory Range |
33 |
|
|
|
|
|
Changing Network Driver Optimization, Duplex, NDIS Driver |
|||||
|
Version, or Transceiver Type |
34 |
|
|||
|
Windows NT 4.0 |
34 |
|
|
|
|
|
DOS Configuration Program |
|
34 |
|
||
|
|
|
|
|
|
|
5 DYNAMICACCESS |
|
|
|
|
||
|
Using DynamicAccess Software Version 1.5 with the Edge |
|||||
|
Monitor System |
|
36 |
|
|
|
|
Setting a dRMON Password |
37 |
|
|||
ASPECIFICATIONS
BTECHNICAL SUPPORT
Online Technical Services |
41 |
|
|
|
World Wide Web Site |
41 |
|
|
|
3Com FTP Site |
41 |
|
|
|
3Com Bulletin Board Service |
42 |
|
||
3ComFacts Automated Fax Service |
43 |
|||
Support from Your Network Supplier |
43 |
|||
Support from 3Com |
43 |
|
|
|
Returning Products for Repair |
45 |
|
||

INDEX
3COM CORPORATION LIMITED WARRANTY
FCC CLASS B STATEMENT
FCC DECLARATION OF CONFORMITY
INDUSTRY CANADA CLASS B EMMISSION COMPLIANCE
STATEMENT
AVIS DE CONFORMITÉ À LA RÉGLEMENTATION
D’INDUSTRIE CANADA
3COM END USER SOFTWARE LICENSE AGREEMENT
FIGURES
1 |
3Com Megahertz 10 Mbps LAN PC Cards 1 |
|
2 |
Connecting the 3CCE589ET PC Card |
2 |
3 |
Connecting the 3CCE589EC PC Card |
3 |
4 |
Connecting the 3CXE589ET PC Card |
4 |
5 |
Connecting the 3CXE589EC PC Card |
5 |
6 |
Network Cable and PC Card COMBO Cable LEDs 23 |
|
7 |
XJACK LAN PC Card LED 24 |
|
TABLES
1 |
Network Driver Text File Names |
21 |
|
2 |
LED Description |
24 |
|
3 |
Frequently Asked Questions |
27 |
|
4 |
Option Settings |
31 |
|
5 |
PC Cards Specifications 39 |
|
|
1 |
INSTALLING THE LAN |
PC CARDS |
The 3Com Megahertz 10 Mbps LAN PC Cards (models 3CCE589EC, 3CCE589ET, 3CXE589EC, and 3CXE589ET) connect your notebook to an Ethernet network.
The PC Card models are the same except for the connectors.
Figure 1 3Com Megahertz 10 Mbps LAN PC Cards
These LAN PC Cards automatically operate at 10 Mbps when connected to an Ethernet hub.
This chapter describes how to install a LAN PC Card in your notebook and connect it to the network.
After you install the PC Card, follow the instructions in Chapter 2 to install the driver so you can login to the network.

2 CHAPTER 1: INSTALLING THE LAN PC CARDS
Before You Begin
Make sure that you have an available PC Card slot in your notebook and these items:
■3Com Megahertz 10 Mbps LAN PC Card
■Cable that shipped with your PC Card
■3Com Megahertz 10 Mbps LAN PC Card User Guide
■2 LAN Installation Disks
If any of these items are missing from the LAN PC Card package, contact your PC Card supplier.
Connecting the 3CCE589ET LAN PC Card
1Remove all PC Cards from your notebook and turn it on.
2Connect the PC Card cable to the PC Card .
Figure 2 Connecting the 3CCE589ET PC Card
3Connect the RJ-45 connector to the network port .
4Insert the PC Card into the PC Card slot and slide it all the way in.
CAUTION: Do not force the PC Card into the slot or you may bend the pins inside the slot.
You may see Windows prompts for driver installation.Go to Chapter 2 to install the network driver.
Connecting the 3CCE589EC PC Card |
3 |
Connecting the 3CCE589EC PC Card
1Remove PC Cards from your notebook and turn it on.
2If you are using the RJ-45 connector, connect the PC Card COMBO cable to the 3CCE589EC PC Card.
a Connect one RJ-45 connector on the network cable to the PC Card COMBO cable.
b Insert the other RJ-45 connector into the network port.
cInsert the PC Card into the PC Card slot and slide it all the way in.
You may see prompts for driver installation.
dGo to Chapter 2 to install the network driver that allows you to login to the network.
3If you are using the BNC T-connector, connect the PC Card COMBO cable to the 3CCE589EC PC Card.
aConnect the BNC T-connector to the PC Card COMBO cable .
You must supply your own BNC T-connector.
Figure 3 Connecting the 3CCE589EC PC Card
bConnect the BNC T-connector to the Ethernet cable .
cInsert the PC Card into the PC Card slot and slide it all the way in.
CAUTION: Do not force the PC Card into the slot or you may bend the pins inside the slot.
4 CHAPTER 1: INSTALLING THE LAN PC CARDS
You may see prompts for driver installation. Go to Chapter 2 to install the network driver that allows you to login to the network.
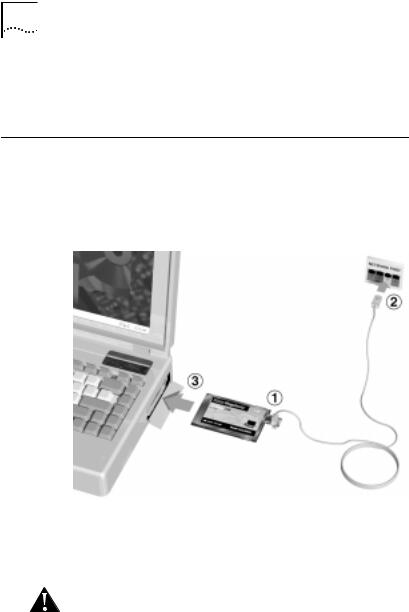
Connecting the 3CXE589ET PC Card
1Remove all PC Cards from your notebook and turn it on.
2Insert one RJ-45 connector on the network cable into the 3CXE589ET PC Card XJACK® connector.
Figure 4 Connecting the 3CXE589ET PC Card
3Insert the other RJ-45 connector into the network port .
4Insert the PC Card into the PC Card slot and slide it all the way in.
CAUTION: Do not force the PC Card into the slot or you may bend the pins inside the slot.
You may see Windows prompts for driver installation.
Go to Chapter 2 to install the network driver that allows you to login to the network.
Connecting the 3CXE589EC PC Card |
5 |
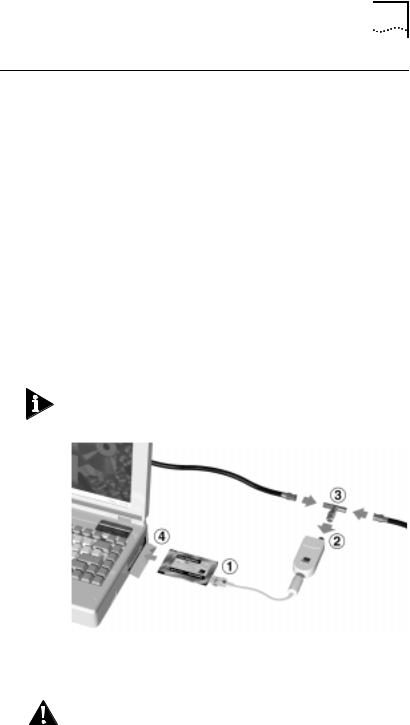
Connecting the 3CXE589EC PC Card
1Remove all PC Cards from your notebook and turn it on.
2If you are using the XJACK RJ-45 connector, connect
one RJ-45 connector on the network cable to the 3CXE589EC PC Card XJACK connector , as shown in Figure 4.
a Insert the other RJ-45 connector into the network port .
bInsert the PC Card into the PC Card slot and slide it all the way in.
You may see Windows prompts for driver installation.
cGo to Chapter 2 to install the network driver that allows you to login to the network.
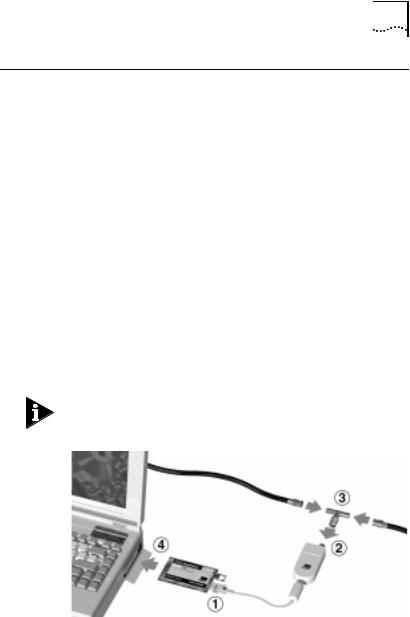
3If you are using the BNC T-connector, connect the PC Card COMBO cable to the 3CXE589EC PC Card.
aConnect the BNC T-connector to the PC Card COMBO cable .
You must supply your own BNC T-connector.
Figure 5 Connecting the 3CXE589EC PC Card
bConnect the BNC T-connector to the Ethernet cable .
cInsert the PC Card into the PC Card slot and slide it all the way in.
You may see Windows prompts for driver installation.
Go to Chapter 2 to install the network driver that allows you to login to the network.

Detaching the PC Card Cable and PC Card COMBO Cable
To detach the PC Card cable and PC Card COMBO cable from the PC Card, squeeze the sides of the connector. The cable detaches from the PC Card easily.

2 |
INSTALLING THE |
NETWORK DRIVER |
This chapter describes how to install the 3Com network driver for Windows 98, Windows 95,Windows NT, Windows for Workgroups, and DOS.
See Table 1 on the last page of this chapter for information about Banyan Vines, Microsoft LAN Manager, IBM LAN Server (DOS and OS/2), Artisoft LANtastic, DEC PATHWORKS, NetWare and OS/2, Windows for Workgroups, DOS, and Windows CE 2.0.
The latest network drivers are available in the Support area on 3Com’s World Wide Web site:
http://www.3Com.com/
Before You Install the Network Driver
Make sure that the PC Card is installed in your notebook and connected to the network before you install any network driver.
Which Driver Installation Instructions Should You Use?
Ask your MIS department which network driver instructions you should use. Instructions are provided in this chapter for each of the following environments:
■Windows 98
■Windows 95 version 4.00.950B (OSR 2)
■Windows 95 version 4.00.950 or 4.00.950A
■Windows NT version 4.0
■Windows NT version 3.51
■Windows for Workgroups
■AutoLink™ for Windows 3.1, Windows for Workgroups, and DOS
Go to the section for your notebook environment to install the driver.

8 CHAPTER 2: INSTALLING THE NETWORK DRIVER
Windows 98 and Windows 95
This section describes how to install the network driver when your notebook is running Windows 98 or Windows 95. You need the Windows 98 or 95 system installation files (either on hard disk, floppy diskettes, or CD) to complete the installation.
3Com includes the NDIS 5, NDIS 4, and the NDIS 3 network drivers on LAN Installation Disk 1. The 3Com software automatically detects which Windows version is installed on your notebook and loads the correct driver.
The NDIS 5 driver works with Windows 98.
The NDIS 4 driver works with Windows 95 OSR 2 (version 4.00.950B) but not with earlier versions of Windows 95. You must use the latest NDIS.VXD (8/24/96 or later) to use the NDIS 4 driver with Windows 95 OSR 2.
The NDIS 3 driver works with Windows 95 and Windows 95 OSR 2.
The following instructions assume that you have not installed any other network adapter in the machine.
If you have been using a network connection on your computer, some of the following instructions may not apply or may produce different results. Refer to your MIS department or system manager for instructions.
Windows 98
“Windows 98” appears on the boot up screen when WIndows 98 is installed on your PC.
1Make sure the LAN PC Card is installed and connected to the network as described in Chapter 1.
2Turn on your notebook and start Windows 98.
Windows 98 automatically detects the LAN PC Card. It opens a New Hardware Found window and starts collecting information for a driver information database.

Windows 98 |
9 |
3When Windows 98 is ready to configure the new hardware, it opens the Add New Hardware Wizard window.
The window states that Windows will search for new drivers for 3Com Megahertz 589E.
4Click Next.
A new window appears asking what you want Windows to do.
5Select Search for the best driver for your device and click Next.
6Select Floppy disk drives, insert LAN Installation Disk 1, and click Next.
After the hardware wizard finds the installation files on the diskette, it displays 3Com Megahertz LAN PC Card (589E) (Ethernet).
7Click Next to copy the required files and build a driver information database.
8If prompted, insert the Windows 98 CD.
The Windows 98 files may be located on the hard drive in the folder C:\WINDOWS\OPTIONS\CABS.
9Click OK to copy the files required.
Please wait while the system checks your current network configuration. The required time depends on your settings for network software components.
A windows appears stating that Windows has finished installing the software that your new hardware device requires.
10Click Finish.
11Remove LAN Installation Disk 1 from the floppy drive and reboot the notebook.
Driver installation is complete.
 Loading...