


56K Voice Faxmodem Internal
User’s Guide
PN 1.024.1644-00

This manual covers installation and operating instructions for the following 3Com U.S. Robotics modem:
56K* Voice Faxmodem Internal
*IMPORTANT! In accordance with the ITU standard for V.90 transmissions, this modem is capable of 56 Kbps downloads. However, the download speeds you experience may be lower due to varying line conditions and other factors. Uploads from users to server equipment travel at speeds up to 31.2 Kbps. An analogue phone line compatible with the ITU V.90 standard or 3Com’s proprietary 56K technology, and an Internet provider or corporate host site with the ITU V.90 standard or 3Com’s proprietary 56K technology are necessary for these high-speed downloads. The ITU V.90 standard was officially determined in February, 1998 and is expected to be ratified in September, 1998. See www.3com.com/56k for details.
The material contained in this document is for information purposes only and is subject to change without notice. 3Com makes no representations or warranties with respect to the contents hereof and specifically disclaims any implied warranties of merchantability or fitness for any particular purpose.
No part of this document may be reproduced, transmitted, transcribed, or stored in a retrieval system in any form or by any means, mechanical, magnetic, electronic, optical, chemical or otherwise, without the written permission of 3Com.
3Com assumes no responsibility for errors or omissions in this manual. Nor does 3Com make any commitment to update the information contained herein.
3Com, the 3Com logo, and U.S. Robotics are registered trademarks of 3Com Corporation or its subsidiaries. Windows is a registered trademark of Microsoft Corp. Any other trademarks, trade names, service marks, or service names owned or registered by any other company and used in this manual are the property of their respective owners.
Copyright ã1998 3Com Corporation or its subsidiaries
All rights reserved.
Table of Contents |
|
WELCOME TO 56K INFORMATION ACCESS...................................... |
1 |
PRODUCT FEATURES ....................................................................... |
2 |
INTERNAL MODEM INSTALLATION WITH WINDOWS 95................... |
5 |
DETERMINING AVAILABLE RESOURCES.................................................... |
5 |
DETERMINING YOUR VERSION OF WINDOWS 95......................................... |
6 |
PLUG AND PLAY INSTALLATION............................................................ |
7 |
HOW TO PREPARE FOR PLUG AND PLAY INSTALLATION ............................. |
7 |
HOW TO INSERT THE MODEM INTO THE COMPUTER ..................................... |
8 |
INSTALLING MODEM DRIVERS WITH WINDOWS 95: |
|
Versions 950 and 950a (Moving Through the “New Hardware |
|
Found” Screens)................................... |
12 |
Version 950b (Using the Update Device Driver Wizard Screens) .... |
16 |
INTERNAL MODEM INSTALLATION WITH WINDOWS 3.X ............... |
20 |
A Word about COM Ports and IRQs ............................................ |
20 |
How to Change the Modem’s Settings .......................................... |
21 |
How to Insert the Modem into the Computer ................................. |
23 |
SOFTWARE INSTALLATION ........................................................... |
29 |
WINDOWS 95.................................................................................. |
29 |
WINDOWS 3.X................................................................................. |
29 |
TYPE OF MODEM.............................................................................. |
30 |
INITIALISATION STRING ...................................................................... |
30 |
FLOW CONTROL.............................................................................. |
30 |
TROUBLESHOOTING ...................................................................... |
31 |
SUPPORT RESOURCES .................................................................. |
39 |
ARE YOU STILL HAVING PROBLEMS?................................................... |
40 |
IF YOU MUST RETURN THE MODEM TO US ............................................. |
40 |
GLOSSARY..................................................................................... |
41 |
Table of Contents |
|
TECHNICAL REFERENCE ................................................................ |
51 |
TYPING COMMANDS.......................................................................... |
51 |
BASIC DATA COMMANDS .................................................................. |
51 |
EXTENDED DATA COMMANDS ............................................................. |
57 |
S-REGISTERS.................................................................................. |
64 |
FAX COMMANDS ............................................................................. |
71 |
THE SERIAL INTERFACE (CABLE INFORMATION) ....................................... |
73 |
REGULATORY (CE COMPLIANCE)................................................... |
74 |
ELECTROMAGNETIC COMPATIBILITY ...................................................... |
74 |
RINGER EQUIVALENCE NUMBER........................................................... |
74 |
LIMITED WARRANTY...................................................................... |
75 |

Welcome to 56K*Information Access
The International Telecommunications Union (ITU) decides the technical protocols that communications devices must use to operate with each other. Modems that comply with ITU standards can “talk” to other standards-compliant modems and fax machines worldwide.
The ITU has determined a worldwide standard for 56K modem technology. With a U.S. Robotics modem, you can get 56K Internet access from any service provider who offers the ITU V.90 standard or 3Com’s proprietary 56K technology. 3Com is working with providers everywhere to quickly upgrade their service to the ITU V.90 standard.
In accordance with the ITU standard for V.90 transmissions, this modem is capable of 56 Kbps downloads. However, the download speeds you experience may be lower due to varying line conditions and other factors. Uploads from users to server equipment travel at speeds up to 31.2 Kbps. An analogue phone line compatible with the ITU V.90 standard or 3Com’s proprietary 56K technology, and an Internet provider or corporate host site with the ITU V.90 standard or 3Com’s proprietary 56K technology are necessary for these high-speed downloads. The ITU V.90 standard was officially determined in February, 1998 and is expected to be ratified in September, 1998. See www.3com.com/56k for details.
56K Voice Faxmodem Internal - User’s Guide |
1 |
Product Features
Modulation Schemes
ITU-T V.90
x2™ technology (Download up to 56kbps, and Upload using V.34) ITU-T V.34+
ITU-T V.34 ITU-T V.32bis ITU-T V.32 ITU-T V.23 ITU-T V.22bis ITU-T V.22 Bell 212A ITU-T V.21 Bell 103
Error Control and Data Compression Schemes
ITU-T V.42
ITU-T V.42bis
MNP 2-5
Fax Modulation Schemes
ITU-T V.17
ITU-T V.29
ITU-T V.27ter
ITU-T V.21
Fax Standards
EIA 578 Class 1 FAX
EIA 592 Class 2.0 FAX
Front Channel Link Rates (Download Speeds)
28000, 29333, 30666, 32000, 33333, 34666, 36000, 37333, 38666, 40000, 41333, 42666, 44000, 45333, 46666, 48000, 49333, 50666, 52000, 53333, 54666, 56000, 57333
2 56K Voice Faxmodem Internal - User’s Guide
Product Features
Back Channel Link Rates (Upload Speeds)
4800, 7200, 9600, 12000, 14400, 16800, 19200, 21600, 24000, 26400, 28800, 31200
V.34+ Link Rates
4800, 7200, 9600, 12000, 14400, 16800, 19200, 21600, 24000, 26400, 28800, 31200, 33600
V.32bis Link Rates
4800, 7200, 9600, 12000, 14400
Additional Link Rates
300, 1200/75 (V.23), 1200, 2400
Fax Link Rates
2400, 4800, 7200, 9600, 12000, 14400
56K Voice Faxmodem Internal - User’s Guide |
3 |
Product Features
Flash ROM Upgradable
56K Voice Faxmodem Internal supports software download through flash memory. You can obtain the latest features by downloading updates quickly and easily.
Speakerphone*
With the addition of an inexpensive set of externally powered speakers, your new voice modem provides all the convenience of a full-duplex speakerphone. Unlike many half-duplex speakerphones, your modem allows you to converse normally without annoying echoes and distortion. Simply plug the speakers and microphone into the jacks on the modem identified with the appropriate icons, and you are ready to go.
Personal Voice Mail*
Personal Voice Mail turns your modem into a full-featured messaging system. Enjoy the convenience of professional voice mail in your home or office for a fraction of the cost. With Personal Voice Mail, you can record custom greetings, receive messages, and set up multiple voice “mailboxes”. You can even access your voice messages remotely. Your modem will automatically detect incoming fax/voice/data calls and route them appropriately.
*A headset, external powered speakers, or sound card (with audio cable) is required to utilise all voice features, including hands-free speakerphone.
4 56K Voice Faxmodem Internal - User’s Guide
Internal Modem Installation
with Windows 95
Before you start your installation, make sure that you have the following items:
Modem
U.S. Robotics Disk
RJ-11 Phone Lead Tail Lead Microphone
Analogue (Standard) Telephone Wall Socket Phillips Head Screwdriver or ¼” Hex Screwdriver
Data/Fax/Voice Communications Software and Manual
Determining Available Resources
Your U.S. Roboticsâ modem is a Plug and Play device. Windowsâ 95 can automatically identify a Plug and Play device and determine if your system has the resources necessary to support the device. However, Plug and Play will not work if you do not have resources available or if devices on your system are not reporting resource usage correctly. Here is how you can verify that your system has the necessary resources before installing the modem.
1.Click the Windows 95 Start button, point to Settings, and then click
Control Panel.
2.Double-click the System icon.
3.When the “System Properties” screen appears, click the Device Manager tab.
4.Double-click Computer and the “Computer Properties” screen appears.
5.Select the option at the top of the screen to show Interrupt Requests
(IRQs).
56K Voice Faxmodem Internal - User’s Guide |
5 |
Internal Modem Installation with Windows 95
You will see the IRQs your system is currently using. If IRQs 3, 4, 5, and 7 are being used, you need to free an IRQ before you begin installation. This process involves moving a device from the IRQ you want to use to a different (and usually higher) IRQ setting. Please read the documentation for (or contact the manufacturer of) the device that is currently using the IRQ you want to use for your modem, to learn more about what you should do to move the other device.
Determining Your Version of Windows 95
Follow these steps to determine your version of Windows 95. This information will be important during installation.
1.Click the My Computer icon on your desktop with the right mouse button.
2.Click Properties.
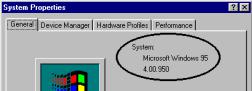
3.In the “System Properties” screen, look at the system information under the General tab (circled in the following screen image). The number following the text “Microsoft Windows 95” will end with “950”, “950a”, or “950b”. This indicates your version of Windows 95.
Windows 95 version
Write down your version of Windows.
Windows 95 version _______
Click OK.
6 56K Voice Faxmodem Internal - User’s Guide
Internal Modem Installation with Windows 95
Plug and Play Installation
This modem’s factory default setting is “Plug and Play” operation. If you are using the Windows 95 environment, the COM port and IRQ will automatically be set to Windows as the environment. Since your new U.S. Robotics modem is a “Plug and Play” device, Windows 95 may be able to detect your modem automatically after you plug it into your computer. The operating system should do all the work of recognising the modem for you.
How to Prepare for Plug and Play Installation
1.Touch an unpainted metal part of your computer (the back is usually unpainted) to discharge static electricity. Static can damage your modem.
2.Take the modem out of its plastic bag.
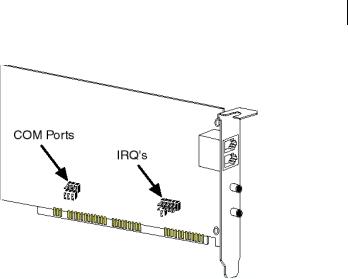
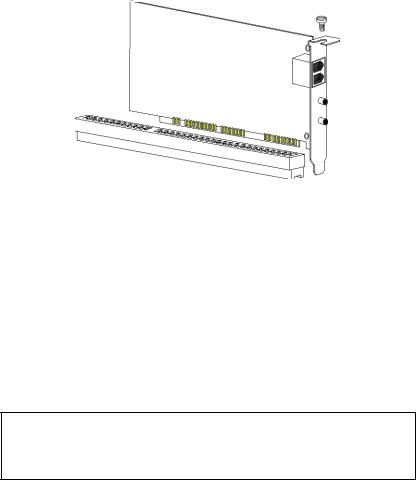
5.3.Find the jumper shunts (small black plastic pieces) on the COM (serial) port and IRQ jumper pins on your modem. They should be in roughly the area indicated in the following illustration.
56K Voice Faxmodem Internal - User’s Guide |
7 |
Internal Modem Installation with Windows 95
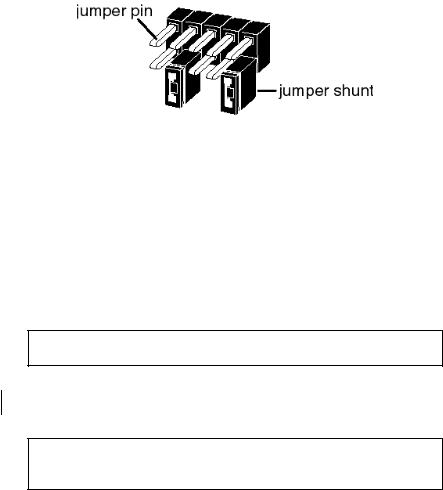
4.When doing a “Plug and Play” installation, the jumper shunts should be placed so that they are hanging from single jumper pins rather than on pairs of pins. Move your jumper shunts so they are hanging as in the diagram.
If you need to move the jumper shunts, grasp them with tweezers or needle-nosed pliers. DO NOT grasp too firmly, however, or you may crush the jumper shunts. If a jumper shunt seems stuck, try gently rocking it back and forth as you lift.
How to Insert the Modem into the Computer
1.Before installing your modem, write down your modem's serial number. The serial number is on the white label under the bar code on the modem and on the outside of the box.
Serial Number_______________________
Before you unplug any cords, label them or make a sketch of how they are connected. This can be helpful when you plug them back in later.
2.Turn off your computer and unplug it from the electrical outlet.
2.3.Unplug any peripheral devices (printer, monitor, keyboard, mouse, etc.) from the computer.
CAUTION: To avoid risk of electric shock, make sure your computer and all peripheral devices are turned off and unplugged from electrical outlets.
8 56K Voice Faxmodem Internal - User’s Guide
Internal Modem Installation with Windows 95
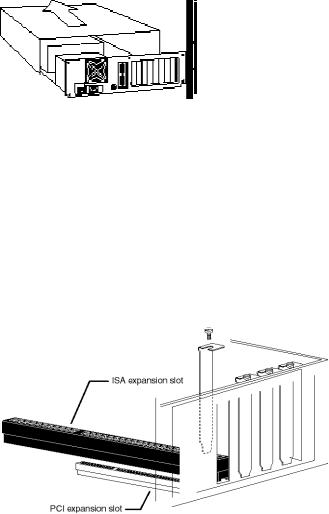
4.Remove the screws from your computer’s cover and then remove the cover, as shown in the following diagrams. Your computer may differ in appearance from these diagrams, but the basic principle for removing the cover should be the same. Refer to your computer manufacturer’s manual if you need further instructions.
5.Find an empty ISA expansion slot that’s at least as long as the gold edge of your modem. (ISA slots are dark plastic grooves lined with metal.) Unscrew and remove the expansion slot cover. It is the long narrow piece of metal that keeps dust from entering through the opening perpendicular to the slot.
56K Voice Faxmodem Internal - User’s Guide |
9 |
Internal Modem Installation with Windows 95
6.Holding the modem by each corner, align the gold edge with the empty expansion slot. Push down gently until the modem snaps into the slot. The diagram shows horizontally aligned expansion slots. Some computers have vertically aligned slots. The instructions apply to both styles.
You need to apply a little pressure to seat the modem properly. Sometimes a gentle back and forth motion helps fit the modem all the way into the slot. If you feel resistance, the modem may not be properly lined up with the slot. Do not force it into the slot. Remove the modem and try again.
7.Once the modem is inserted, fasten it firmly into place using the screw that you removed in step 5.
8.Replace the computer’s cover and fasten it with the screws you removed in step 4.
9.Locate the phone wall socket you plan to use for the modem. If you have a phone plugged into this wall socket, disconnect the telephone cord from the socket.
The phone wall socket you use must be for an ANALOGUE phone line (the type found in most homes). Many office buildings have digital phone lines. Be sure you know which type of line you have. The modem will be damaged if you use a digital phone line.
10.Plug one end of the phone cord included with the modem into the TELCO socket.
11.Plug the other end of the cable into the phone wall socket.
10 56K Voice Faxmodem Internal - User’s Guide
Internal Modem Installation with Windows 95
56K Voice Faxmodem Internal - User’s Guide |
11 |
Internal Modem Installation with Windows 95
You cannot use the modem and a phone at the same time if they share the same telephone line. If you want to use a telephone on the same line as the modem when the modem is not in use, plug your telephone cord into the modem’s PHONEsocket, using the supplied Tail Lead Adaptor.
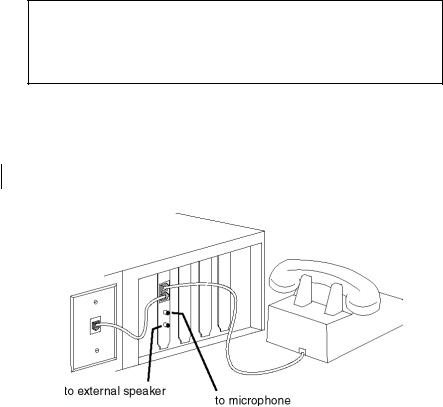
12. An external, powered speaker must be connected for speakerphone and voice mail usage. Plug a set of powered, magnetically-shielded, external speakers or a headset (not included) into the 3.5 mm SPKR socket on the modem.
2. 13. Plug the supplied microphone into the 3.5 mm MIC socket on the modem.
14.Plug the power cords, cables, and peripherals back into the computer and turn on the computer.
15.Start Windows 95.
12 56K Voice Faxmodem Internal - User’s Guide
Internal Modem Installation with Windows 95
Installing Modem Drivers
with Windows 95:
Versions 950 and 950a
Moving Through the “New Hardware Found” Screens
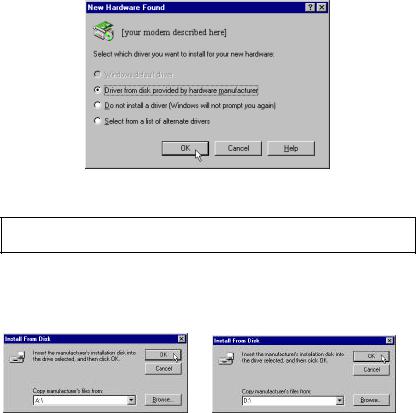
1.When Windows 95 starts, it should detect the modem. If it does, you will see the following screen.
Click Driver from disk provided by hardware manufacturer. Then click OK.
If this screen does not appear, go to “If Plug and Play Does Not Detect Your Modem” on page 37.
2.When you see the Install from Disk screen, insert the disk or the CDROM and type A:\ or D:\
If your disk drive or CD-ROM drive is a different letter, type that letter instead of A or D.
Click OK. Windows will load the modem’s drivers.
56K Voice Faxmodem Internal - User’s Guide |
13 |
Internal Modem Installation with Windows 95
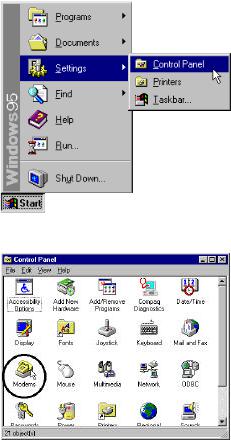
3.Once Windows finishes loading the information from the disk, verify that the modem installation was a success. When your desktop returns, click the Windows Start button and point to Settings. Then click Control Panel.
4. Double-click the Modems icon (circled in the screen image below).
14 56K Voice Faxmodem Internal - User’s Guide
Internal Modem Installation with Windows 95
5.In the “Modems Properties” screen, you should see a description for your modem.
This means the installation was a success. Click OK.
If you do not see your modem listed in the preceding screen, the Plug and Play installation was unsuccessful. Please refer to “If Plug and Play Does Not Detect Your Modem” on page 37.
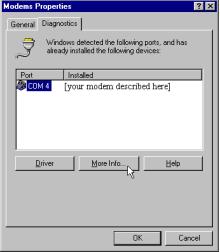
6.Next, click the Diagnostics tab at the top of the “Modems Properties” screen. Write down the COM setting for your modem in the space below. Your screen may show a different setting than that shown in the following screen. You will need to know this setting when you install your communications software.
COM Port___________
56K Voice Faxmodem Internal - User’s Guide |
15 |
Internal Modem Installation with Windows 95
6. Click More Info….
Click OK.
Turn to “Software Installation” on page 29 for information about installing communications software.
16 56K Voice Faxmodem Internal - User’s Guide
Internal Modem Installation with Windows 95
Installing Modem Drivers
with Windows 95:
Version 950b
Using the Update Device Driver Wizard Screens
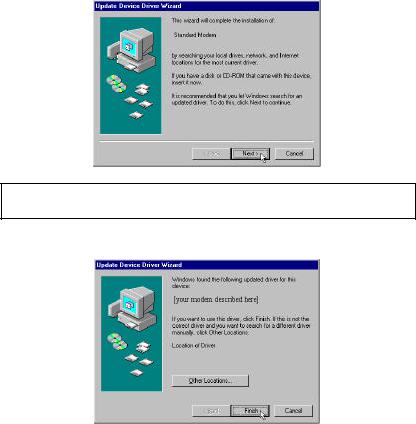
1.Start Windows. Insert the U.S. Robotics disk into your disk drive. Click Next.
If this screen does not appear, go to “If Plug and Play Does Not Detect Your Modem” on page 37.
2. When you see the following screen, click Finish.
56K Voice Faxmodem Internal - User’s Guide |
17 |

Internal Modem Installation with Windows 95
3.Now you should verify that the modem installation was a success. When your desktop returns, click the Windows Start button and point to Settings. Then click Control Panel.
4. Double-click the Modems icon (circled in the screen image below).
18 56K Voice Faxmodem Internal - User’s Guide
Internal Modem Installation with Windows 95
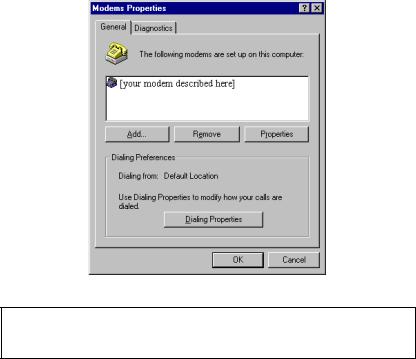
5.In the “Modems Properties” screen, you should see a description of your modem.
This means the installation was a success. Click OK.
If you do not see your modem listed in the preceding screen, the Plug and Play installation was unsuccessful. Please refer to the “If Plug and Play Does Not Detect Your Modem” section on page 37.
6.Next, click the Diagnostics tab at the top of the “Modems Properties” screen. Write down the COM setting for your modem in the space. Your screen may show a different setting than that shown in the following screen. You will need to know this setting when you install your communications software.
COM Port_________
56K Voice Faxmodem Internal - User’s Guide |
19 |
 Loading...