


 Loading...
CD-R/RW Drive |
CRW8424S |
SERIES |
OWNER’S MANUAL |
BEDIENUNGSANLEITUNGI I |
MODE D’EMPLOII |
MANUAL DE INSTRUCCIONESI I |

COMPLIANCE INFORMATION STATEMENT
(DECLARATION OF CONFORMITY PROCEDURE)
Responsible Party: |
Yamaha Systems Technology, Inc. |
Address: |
100 Century Center Court |
|
San Jose, California 95112 |
Telephone: |
(408) 467-2330 |
FAX: |
(408) 437-8791 |
Type of Equipment: |
CD Recordable/Rewritable Drive |
Model Name: |
CRW8424S |
|
CRW8424S-NB |
This device complies with Part 15 of the FCC Rules.
Operation is subject to the following conditions:
1)this device may not cause harmful interference, and
2)this device must accept any interference received including interference that may cause undesired operation.
See user manual instructions if interference to radio reception is suspected.
FCC INFORMATION (U.S.A.)
1. IMPORTANT NOTICE: DO NOT MODIFY THIS UNIT!
This product, when installed as indicated in the instructions contained in this manual, meets FCC requirements. Modifications not expressly approved by Yamaha may void your authority, granted by the FCC, to use the product.
2.IMPORTANT: When connecting this product to accessories and/or another product use only high quality shielded cables. Cable/s supplied with this product MUST be used. Follow all installation instructions. Failure to follow instructions could void your FCC authorization to use this product in the USA.
3.NOTE: This product has been tested and found to comply with the requirements listed in FCC Regulations, Part 15 for Class “B” digital devices. Compliance with these requirements provides a reasonable level of assurance that your use of this product in a residential environment will not result in harmful interference with other electronic devices. This equipment generates/uses radio frequencies and, if not installed and used according to the instructions found in the users manual, may cause interference harmful to the operation of other electronic devices. Compliance with FCC regulations does not guarantee that interference will not occur in all installations. If this product is found to be the source of interference, which can be determined by turning the product “OFF” and “ON,” please try to eliminate the problem by using one of the following measures:
Relocate either this product or the device that is being affected by the interference.
Utilize power outlets that are on different branch (circuit breaker or fuse) circuits or install AC line filter/s (only applies to external drives).
In the case of radio or TV interference, relocate/reorient the antenna. If the antenna lead-in is 300 ohm ribbon lead, change the lead-in to coaxial type cable.
If these corrective measures do not produce satisfactory results, please contact the local retailer authorized to distribute this type of product. If you can not locate the appropriate retailer, please contact Yamaha Systems Technology, Inc. 100 Century Center Court, San Jose, CA95112, U.S.A.
Laser Diode Properties Material: GaAlAs Wavelength: 782-789 nm
Emission Duration: Continuous
Laser Output Power: Less than 44.6 W*
*This output is value measured at a distance 200mm from the objective lens surface on the optical pick-up block.
ANSI Class : Class 1
CLASS 1 LASER PRODUCT
LASER KLASSE 1 PRODUKT
LUOKAN 1 LASERLAITE
PRODUIT LASER DE CLASSE 1
This device is classified as a CLASS 1 LASER product.
The CLASS 1 LASER PRODUCT label must be located on the exterior.
CAUTION : INVISIBLE LASER RADIATION WHEN OPEN. AVOID EXPOSURE TO BEAM.
VORSICHT : UNSICHTBARE LASERSTRAHLUNG WENN ABDECKUNG GEOFFNET. NICHT DEM STRAHL AUSSETZEN.
VARNING : OSYNLIG LASERSTRÅLNING NÄR DENNA DEL ÄR ÖPPNAD OCH SPÄRREN ÄR URKOPPLAD. BETRAKTA EJ STRÅLEN. STRÅLEN ÄR FARLIG.
VARO! : AVATAESSA JA SUOJALUKITUS OHITETTAESSA OLET ALTTINA
NÄKYMÄTTÖMÄLLE LASERSÄTEILYLLE. ÄLÄ KATSO SÄTEESEEN.
ADVARSEL: USYNLIG LASERSTRALNING VED ÅBNING NÅR SIKKERHETSAF-
BRYDERE ER UDE AF FUNKTION. UNDGÅ UDSETTELSE FOR STRÅLNING,
Warning instruction for laser radiation.
Varningsanvisning för laserstrålning.
CAUTION
Use of controls or adjustments or performance of procedures other than those specified herein may result in hazardous radiation exposure.
VAROITUS
LAITTEEN KÄ YTTÄ MINEN MUULLA KUIN TÄ SSÄ KÄ YTTÖ OHJEESA MAINITULLA TAVALLA SAATTAA ALTISTAA KÄ YTTÄ JÄ N TURVALLISUUSLUOKAN 1 YLITTÄ VÄ LLE NÄ KYMÄ TTÖ MÄ LLE
LASERSÄ TEILYLLE.
ADVARSEL
USYNLIG LASERSTRÅ LING VED Å BNING. UNDGÅ UDSAETTELSE FOR STRÅ LING.
VARNING
OM APPARATEN ANVÄ NDS PÅ ANNAT SÄ TT Ä N I DENNABRUKSANVISNING SPECIFICERATS, KAN ANVÄ NDAREN UTSÄ TTAS FÖ R OSYNLIG LASERSTRÅ LNING, SOM Ö VERSKRIDER GRÄ NSEN FÖ R LASERKLASS 1.
CD-R/RW Drive
CRW8424S
SERIES
OWNER’S MANUAL
English
i

SAFETY PRECAUTIONS
PLEASE READ CAREFULLY BEFORE PROCEEDING
These precautions explain how to use the device correctly and safely, thereby preventing injury to yourself or to others. This section has been sub-divided into a WARNING section and a CAUTION section, according to the likelihood and nature of any potential injuries or damage inflicted. They relate to your personal safety, and also help you minimize the risk of damaging the device. Please read these sections carefully before proceeding.
 WARNING
Always follow the basic precautions listed below to avoid the possibility of serious injury or even death from electrical shock, short-circuiting, damages, fire or other hazards. These precautions include, but are not limited to, the following:
● Do not open the device or attempt to disassemble or modify it.
Otherwise, there is an increased risk of electrical shock or fire. The device contains no userserviceable parts. If it appears to be malfunctioning, have it inspected by qualified service personnel.
● Do not look inside the device.
If you expose your eyes to the laser inside the device, you risk losing your vision.
● Do not insert fingers or foreign objects into the device.
Otherwise, there is an increased risk of personal injury, electrical shock, damage to the device or fire. Please take particular care if small children are present.
●Do not expose the device to rain, use it near water or in damp or wet conditions or place containers on it containing liquids which might spill into any openings.
Otherwise, there is an increased risk of electrical shock, fire or personal injury.
●Follow the Owner’s Manual carefully.
Otherwise, there is an increased risk of personal injury, electrical shock, fire or damage to the unit. Follow the correct procedure when setting up the device.
●If unusual smells, sounds or smoke emanate from the device or if liquids enter the device, switch the computer off immediately and unplug it from the power outlet.
Otherwise, there is an increased risk of electrical shock, fire or damage to the device. Return the device immediately to the store at which it was purchased or alternatively, to the nearest Yamaha Service Center (listed at the back of this manual).
●Make sure the computer is electrically grounded
Otherwise, there is an increased risk of electrical shock.
●When opening up the computer, always unplug the computer from the electrical outlet. Do not touch the plug with wet hands.
Otherwise, there is an increased risk of electrical shock.
●When used in a fan-cooled system, the drive should not be exposed to temperatures outside the range 5 ~ 40°C (41 ~ 104°F).
ii

 CAUTION
Always follow the basic precautions listed below to avoid the possibility of physical injury to you or others, or damage to the instrument or other property. These precautions include, but are not limited to, the following:
●Always unplug the computer from the electrical outlet if it will not be used for a prolonged period of time or if there is a risk of lightning.
Otherwise, there is an increased risk of electrical shock, short-circuiting or fire.
●Do not expose the device to excessive heat or vibrations or extreme cold or heat (such as in direct sunlight or near a heater).
Otherwise, the front panel may become disfigured or the internal components may be damaged.
●Do not use the device near other electrical products such as televisions, radios or speakers. Otherwise, this may cause interference which can affect the proper operation of those other products.
●Do not place the device in an unstable position.
Otherwise, it may accidentally fall down and be damaged or cause personal injury.
● Mount the device horizontally.
Otherwise, written data may be destroyed. Set the device up according to the instructions in the Owner’s Manual.
●Always remove the disc from the tray before transporting the device. Otherwise, written data may be destroyed.
●When cleaning the device, never use benzene, paint thinners, detergents or chemical-impregnated wiping cloths. Also, do not place vinyl, plastic or rubber objects on the device.
Otherwise, the device may be damaged or its front panel may become discolored. Use a soft, dry cloth to wipe the device.
●Do not rest your weight on or place heavy objects on the device and do not use excessive force on the buttons, switches or connectors.
Otherwise, there is an increased risk of damage to the device or personal injury.
●Do not listen to audio with headphones at high volume and for prolonged periods of time. Otherwise, there is an increased risk of hearing loss.
●Before using the device, set the volume dial to its lowest setting.
Otherwise, sudden bursts of sound can cause hearing loss.
●Do not place the device near sources of magnetic interference, such as computer displays. Magnetic interference can affect the operation and stability of the device.
●Have the device serviced regularly.
Otherwise, dust can build up inside the device, increasing the risk of fire or damage. For information about servicing charges, contact the store at which the device was purchased or alternatively, the nearest Yamaha Service Center (listed at the back of this manual). The device should be serviced about once a year.
iii

■ About CD-R/RW discs
Please read the following regarding the handling of CD-R/RW discs.
1.Do not expose discs to excessive heat or vibrations or extreme cold or heat (such as in direct sunlight or near a heater).
2.Do not touch disc surfaces.
When handling a disc, hold it by its edges.
3. Remove dust and dirt from disc surfaces.
Use air-based dust removers. The surfaces may be scratched if wiped with a dry cloth.
4.Do not write or stick labels on disc surfaces except where indicated.
5.Do not clean discs with chemicals or detergents.
6.Do not bend or drop discs.
1.The information contained in this manual is subject to change without prior notice.
2.All trademarks contained in this manual belong to their respective owners.
3.Yamaha does not bear any responsibility for any outcome as a result of using this device.
4.Reproduction of this manual, either in part or in full, is expressly forbidden.
■ Precautions for Transportation
Before transporting the device, always place the transportation pad on the disc tray and put the device back in its original box . If the device is transported without adequate packing, the internal components can become damaged and cause the device to malfunction.
■ Distributing Discs
When writing important data or preparing data for distribution to others, make sure that the disc can be read properly before writing duplicates.
■ Copyrights
When writing to CD-R/RW, make sure that you are not infringing any copyrights. It is illegal to copy audio CDs for non-personal use. When backing up software, please make sure that you are not infringing any software copyrights for that product.
■ WARRANTY
YAMAHA AND SUPPLIERS ACCEPT NO LIABILITY FOR THE LOSS OF ANY DATA OR ANY PROBLEMS CAUSED AS A RESULT. AS A PRECAUTION, IT IS RECOMMENDED THAT THE DISCS ARE TESTED AFTER THEY HAVE BEEN WRITTEN TO. FURTHERMORE, UNDER NO CIRCUMSTANCES DOES YAMAHA AND SUPPLIERS GUARANTEE THE
RELIABILITY OF THE DISCS.
iv

 Table of Contents
Setup Flowchart .................................................................. |
1 |
Introduction ........................................................................ |
2 |
Features of the CRW8424S Drive .................................................... |
2 |
System Configuration ............................................................ |
3 |
Computer ........................................................................................ |
3 |
Software ............................................................................................ |
3 |
Discs ................................................................................................ |
4 |
Tools ................................................................................................ |
5 |
Front and Rear of Unit ............................................................ |
6 |
Front Panel ...................................................................................... |
6 |
Rear Panel ........................................................................................ |
7 |
Installation ........................................................................ |
8 |
First Steps ........................................................................................ |
8 |
Installing the CRW8424S Drive .................................................... |
13 |
Fitting the CRW8424S as an Additional Drive ...................... |
14 |
Replacing an Existing CD-ROM Drive with the CRW8424S ...... |
22 |
Operation .......................................................................... |
30 |
Loading a Disc ........................................................................ |
30 |
Ejecting the Disc...................................................................... |
30 |
Manually Ejecting a Disc in an Emergency ............................ |
31 |
Troubleshooting .................................................................. |
32 |
Appendix .......................................................................... |
35 |
Writing Modes ................................................................................ |
35 |
About the firmware ........................................................................ |
37 |
LED Indicator Messages ................................................................ |
38 |
CRW8424S Specifications .............................................................. |
39 |
Index .............................................................................. |
41 |
©1999 Yamaha Corporation. All Rights Reserved.
This document may not, in whole or in part, be copied, photocopied, reproduced, translated, transmitted or reduced to any electronic medium of machine readable form without prior consent in writing from Yamaha. Windows is a registered trademark of Microsoft Corporation.
Unix is a registered trademark of UNIX System Laboratories.
All other trademarks are the property of their respective companies.
v

 Setup Flowchart
This flowchart shows the procedure for setting up the CRW8424S drive. For easy cross-referencing, the relevant pages in this manual are also given.
STEP Do you have a SCSI adapter 1 card?
 YES
YES
STEP Check that the SCSI adapter 2 card is recognized correctly
Go to Control Panel | System | Device Manager tab. Double-click on SCSI controllers to check that the adapter card is recognized correctly by the computer’s OS.
STEP
NO 1-1
STEP
 1-2
1-2
Obtain a SCSI adapter card
Recommended models: Adaptec AHA-2940-series (PCI)
Install the SCSI adapter card
Read this manual and insert the SCSI card into the appropriate PCI slot on the computer.
STEP Set up the CRW8424S drive
3 |
1. |
Set the jumper switches (P.10) |
2. |
Fit the drive into the computer |
|
|
Tower● -type case (P.14) |
As additional or replacement drive
Desktop● -type case (P.22)
As a replacement drive
STEP
4
Check that the CRW8424S drive is recognized correctly
Go to Control Panel | System | Device Manager tab. Double-click on CDROM to check that the drive is recognized correctly by the computer’s OS.
STEP Install the CD writing software
5 |
For details about how to install the |
software, refer to the documentation |
|
that came with it. |
STEP
6
Start using the CRW8424S drive!
Use the drive to create audio CDs, to back up data on your hard disk, or for whatever purpose suits your needs.
1

 Introduction
Features of the CRW8424S Drive
8X Speed Writing to CD-R, 4X Speed Writing to CD-RW and 24X Speed Reading
The CRW8424S drive can write to CD-R at 8X, 6X, 4X or 1X speed and write/overwrite to CD-RW at 4X or 2X speed. It can also read from CD-R, CDRW and CD-ROM discs at up to 24X speed.
Supports a Wide Range of CD Formats
The CRW8424S drive can read from and write to CD-ROM in standard ISO9660 format and to audio CD in CD-DA format. Use the drive for a wide variety of purposes, such as backing up data, writing your own audio CDs and creating multimedia titles (using CD-Extra mode). Just choose the writing/reading format that suits your needs. For more details, refer to page 4.
SCSI-3 (Ultra SCSI) Compatible
The CRW8424S is compatible with the SCSI-3 (Ultra SCSI) protocol for interconnecting computers and peripherals.
Supports all Four CD Writing Modes
These modes are Disc-at-Once (the disc is written in a single pass without pausing, as used for audio CDs and in premastering), Track-at-Once (data can be written incrementally to disc one track at a time), Session-at-Once (each session is written in a single pass without pausing), and Packet Writing (data can be written to disc in small increments just like with a floppy or hard disk). For more details, refer to page 35.
2
 System Configuration
In order to use the CRW8424S drive, your computer system will need to meet the following set of requirements.
Computer
The minimum system requirements for using the CRW8424S drive are as follows:
●Any fully PC/AT-compatible computer.
●A Pentium-class or higher CPU running at 200MHz or faster.
●OS: Windows 95, Windows 98, Windows 98 SE (Second Edition) or Windows NT4.0 with Service Pack 3/4/5.
●A vacant 5.25-inch drive bay for mounting the drive.
●A spare PCI expansion slot for a SCSI card (if one hasn’t been installed yet).
●A SCSI card to connect SCSI devices (including the CRW8424S) to your computer. Make sure it has an internal bus connector. Yamaha recommends any of Adaptec’s AHA-2940-series cards (PCI slot).
Software
The software requirements for using the CRW8424S drive are as follows:
●CD writing software. This software must support the CRW8424S drive for writing to CD-R or CD-RW.
nFor details about how to install and use the software, refer to the documentation that came with it.
●When temporarily storing data on a hard disk prior to writing to CD-R/RW, you will need an extra area of 50 ~ 100MB free hard disk space. When creating an image file of the data on hard disk before writing to CD-R/RW, you will need as much hard disk space as the original data, plus an extra 50 ~ 100MB. However, this extra area is not needed when backing up directly from CD-ROM.
nData is written to disc much more reliably when writing from an image file, eliminating the likelihood of errors occurring. Furthermore, this solution is ideal when making multiple copies of discs since the original data is backed up to hard disk as an image file.
3
System Configuration
Discs
The CRW8424S drive is compatible with discs which meet the following specifications:
●CD-R discs:
Use discs that conform to the Orange Book Part 2 standards. When writing to CD-R at 6X or faster speed, you should use discs that have been designed for high-speed recording.
●CD-RW discs:
Use discs that conform to the Orange Book Part 3 standards. When writing to CD-RW at 4X speed, you should use discs that have been designed for high-speed recording.
●Read-only discs:
You can read from any CD-ROM discs that conform to the Yellow Book standard, and which bear the 
 logo. You can also play back any CDDA (audio) discs that conform to the Red Book standards, and which bear the
  logo.
logo.
nThe Orange Book standard defines how all recordable discs (including CD-R and CD-RW) are written. Part 2 of the Orange Book standard relates to CD-R discs and Part 3, to CD-RW discs. The standard was named after the color of the book’s pages. Similarly, the Red Book standard relates to audio (CD-DA) discs and the Yellow Book standard relates to CD-ROM discs.
About CD-ROM
A CD-ROM disc is a compact disc containing high-density read-only data. It has many applications, including the playback of music and video, the archiving of data, as well as on-line documentation. The following are descriptions of each CD-ROM format:
CD-DA: Up to 74 minutes of stereo audio is written in 16-bit resolution at a sampling rate of 44.1kHz (for a 74 minutes disc).
Data CD: Up to 650 megabytes of computer data is stored in standard ISO9660 format.
Video-CD: These hold movies in which the video and audio data has been compressed using MPEG-1 technology.
4
System Configuration
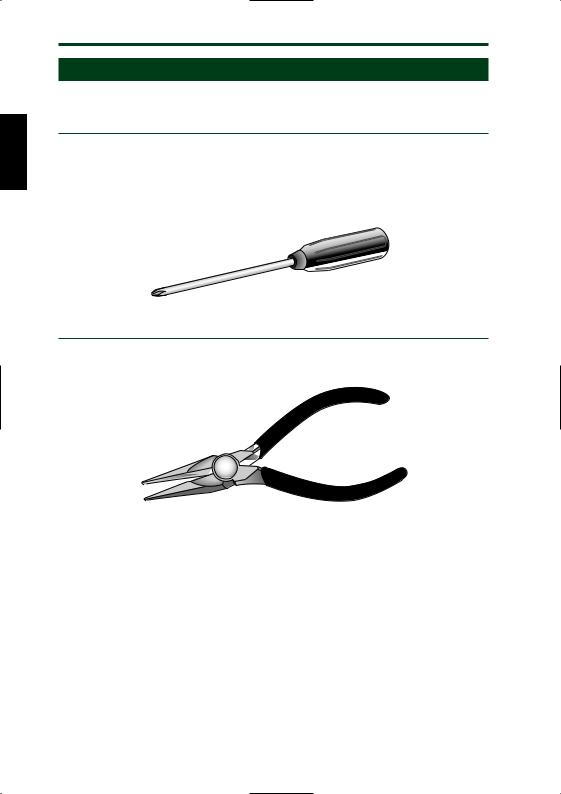
Tools
You will need the following tools at hand when installing the CRW8424S drive.
Phillips Screwdriver
You will need to use this when removing the cover of your computer and when mounting the drive. You may also need to temporarily remove the sound card to gain access to the CD audio connectors. In which case a small screw retaining the sound card’s face plate has to be removed.
n Make sure your screwdriver’s head is the correct size for the screws you need to remove.
Long-Nosed Pliers
You will need these to insert or remove the plastic shunts when setting the jumper switches at the back of the CRW8424S drive.
5
 Front and Rear of Unit
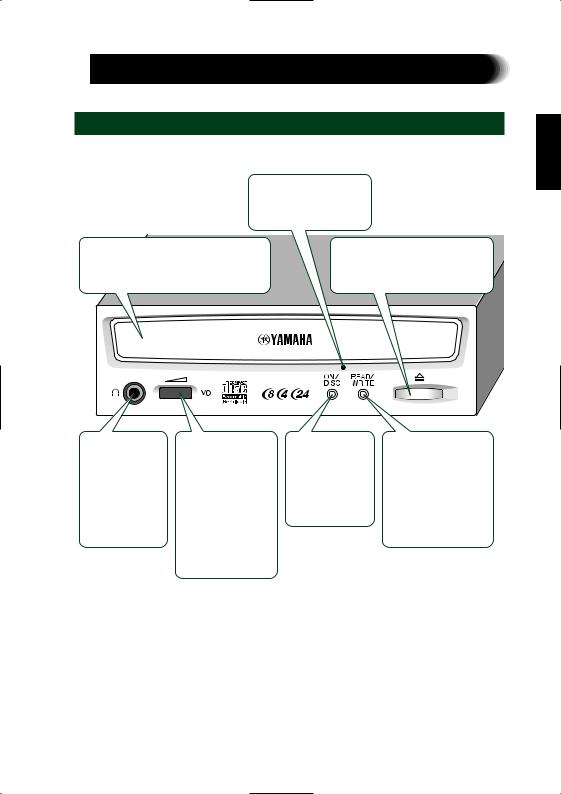
Front Panel
The CRW8424S drive’s front panel features the following:
Manual Eject hole
Only use this if no other method is available for unloading a disc.
Disc tray |
|
button |
|||||||
The tray is used to hold the disc. |
|
this button when you need |
|||||||
It slides out from the drive unit when |
|
a disc. Remove the |
|||||||
a disc needs to be loaded or unloaded |
|
the tray has opened. |
|||||||
|
|
|
|
|
|
|
|
|
|
|
|
|
|
|
|
|
|
|
|
|
|
|
|
|
|
|
|
|
|
|
|
|
|
|
|
|
|
|
|
Headphone |
Headphone |
ON/DISC LED |
READ/WRITE LED |
jack |
volume control |
This LED is |
This LED is green |
You can |
Adjust this control |
orange when |
when data is being |
connect stereo |
to set a suitable |
the drive is |
read off a disc, and |
headphones to |
volume level when |
powered on, |
orange when data is |
this stereo mini |
listening to an |
and green when |
being written. It |
jack and listen |
audio CD using |
the drive |
flashes on and off |
to audio CDs |
the headphone |
contains a disc. |
intermittently when |
loaded in the |
jack. Slide the |
|
the disc is being |
drive. |
knob to the left to |
|
accessed. |
|
decrease the |
|
|
|
volume and to the |
|
|
|
right to increase it. |
|
|
6
Front and Rear of Unit
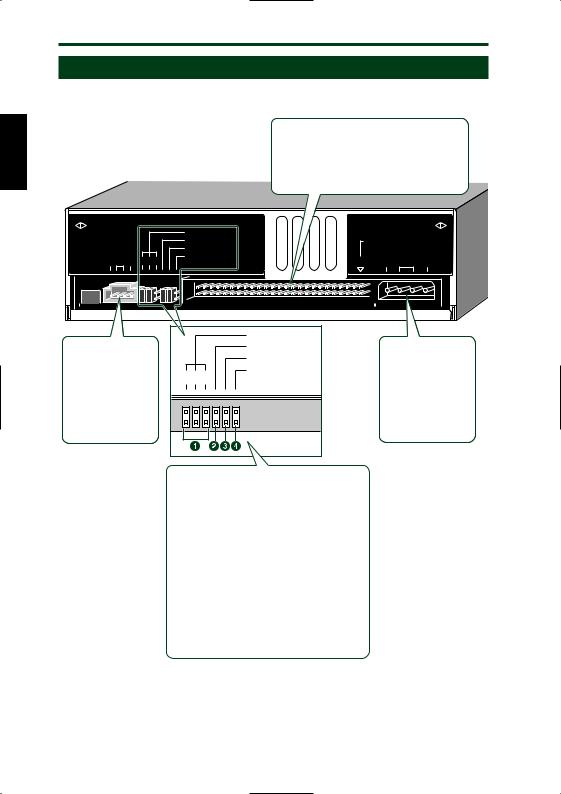
Rear Panel
The CRW8424S drive’s rear panel features the following:
SCSI connector
Insert the connector of the SCSI ribbon cable here. Make sure you align the red line of the ribbon cable with pin 1 of the drive’s connector, marked “SCSI INTERFACE CONNECTOR 1.”
|
|
ID SELECT |
|
SCSI |
|
|
|
INTERFACE |
|
AUDIO OUT |
|
PARITY |
|
CONNECTOR |
|
TERMINATOR |
|
DC INPUT |
|
R G L |
1 2 4 |
BLOCK SIZE |
1 |
+5V G +12V |
|
AUDIO OUT connector
Connect one end of the 4-pin audio cable to this and the other end to your computer’s sound card or built-in audio.
ID SELECT
PARITY
TERMINATOR
BLOCK SIZE
1 2 4
1 ID SELECT jumper switches
Set these switches using black plastic shunts in order to manually assign a SCSI ID number for the drive.
2 PARITY jumper switch
Set this switch using a black plastic shunt in order to enable parity checking.
3 TERMINATOR jumper switch
Set this switch using a black plastic shunt in order to enable the drive’s built-in SCSI termination.
4 BLOCK SIZE jumper switch
Set this switch using a black plastic shunt in order to set the block size to 512 bytes per sector.
DC INPUT connector
Insert the power connector from your computer’s power supply in this socket to feed power to the drive.
7
 Installation
This section gives a step-by-step guide to installing the CRW8424S drive. Make sure you have all the necessary tools.
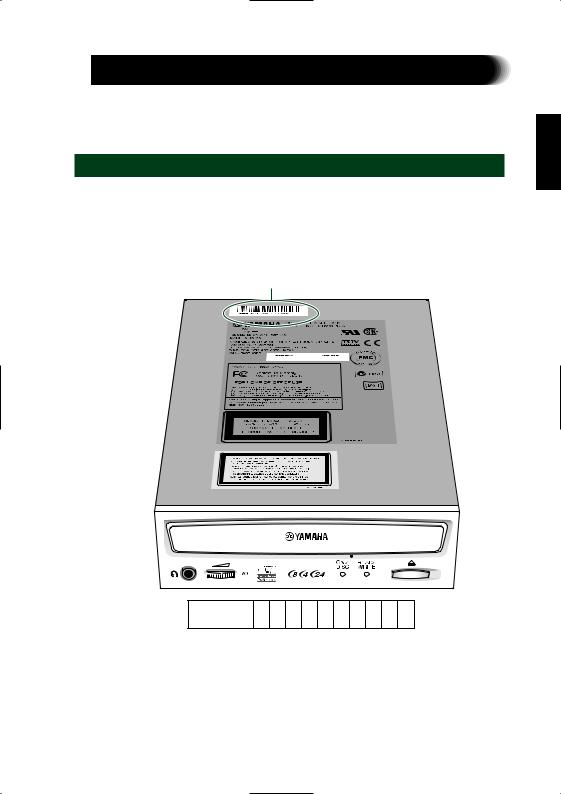
First Steps
Once you have taken the CRW8424S drive out of its packaging, you should immediately note down the serial number shown on the top of the drive together with a barcode. You may need to refer to this number when requesting User Support services. In the box below the following diagram, write down the 10-character serial number (consisting of 3 letters followed by 7 digits).
Drive’s serial number (3 letters + 7 digits)
Serial No.
Before fitting the CRW8424S drive into the computer, you need to set up the drive using the jumper switches located at the rear of the unit. You’ll need to set the following:
●SCSI ID number
●Parity check
●Termination
●Block size
8
Loading...