


Owner’s Manual
EN
SPECIAL MESSAGE SECTION
PRODUCT SAFETY MARKINGS: Yamaha electronic products may have either labels similar to the graphics shown below or molded/stamped facsimiles of these graphics on the enclosure. The explanation of these graphics appears on this page. Please observe all cautions indicated on this page and those indicated in the safety instruction section.
CAUTION |
RISK OF ELECTRIC SHOCK |
DO NOT OPEN |
CAUTION: TO REDUCE THE RISK OF ELECTRIC SHOCK. |
DO NOT REMOVE COVER (OR BACK). |
NO USER-SERVICEABLE PARTS INSIDE. |
REFER SERVICING TO QUALIFIED SERVICE PERSONNEL. |
The exclamation point within the equilateral triangle is intended to alert the user to the presence of important operating and maintenance (servicing) instructions in the literature accompanying the product.
The lightning flash with arrowhead symbol, within the equilateral triangle, is intended to alert the user to the presence of uninsulated “dangerous voltage” within the product’s enclosure that may be of sufficient magnitude to constitute a risk of electrical shock.
IMPORTANT NOTICE: All Yamaha electronic products are tested and approved by an independent safety testing laboratory in order that you may be sure that when it is properly installed and used in its normal and customary manner, all foreseeable risks have been eliminated. DO NOT modify this unit or commission others to do so unless specifically authorized by Yamaha. Product performance and/or safety standards may be diminished. Claims filed under the expressed warranty may be denied if the unit is/has been modified. Implied warranties may also be affected.
SPECIFICATIONS SUBJECT TO CHANGE: The information contained in this manual is believed to be correct at the time of printing. However, Yamaha reserves the right to change or modify any of the specifications without notice or obligation to update existing units.
92-469- 1  (rear)
ENVIRONMENTAL ISSUES: Yamaha strives to produce products that are both user safe and environmentally friendly. We sincerely believe that our products and the production methods used to produce them, meet these goals. In keeping with both the letter and the spirit of the law, we want you to be aware of the following:
Battery Notice: This product MAY contain a small nonrechargeable battery which (if applicable) is soldered in place. The average life span of this type of battery is approximately five years. When replacement becomes necessary, contact a qualified service representative to perform the replacement.
Warning: Do not attempt to recharge, disassemble, or incinerate this type of battery. Keep all batteries away from children. Dispose of used batteries promptly and as regulated by applicable laws. Note: In some areas, the servicer is required by law to return the defective parts. However, you do have the option of having the servicer dispose of these parts for you.
Disposal Notice: Should this product become damaged beyond repair, or for some reason its useful life is considered to be at an end, please observe all local, state, and federal regulations that relate to the disposal of products that contain lead, batteries, plastics, etc.
NOTICE: Service charges incurred due to lack of knowledge relating to how a function or effect works (when the unit is operating as designed) are not covered by the manufacturer’s warranty, and are therefore the owners responsibility. Please study this manual carefully and consult your dealer before requesting service.
NAME PLATE LOCATION: The graphic below indicates the location of the name plate. The model number, serial number, power requirements, etc., are located on this plate. You should record the model number, serial number, and the date of purchase in the spaces provided below and retain this manual as a permanent record of your purchase.
Model
Serial No.
Purchase Date
2 CP88/CP73 Owner’s Manual

FCC INFORMATION (U.S.A.) |
||
1. IMPORTANT NOTICE: DO NOT MODIFY THIS UNIT! |
tions does not guarantee that interference will not occur in all |
|
This product, when installed as indicated in the instructions |
installations. If this product is found to be the source of inter- |
|
contained in this manual, meets FCC requirements. Modifica- |
ference, which can be determined by turning the unit “OFF” |
|
tions not expressly approved by Yamaha may void your |
and “ON”, please try to eliminate the problem by using one of |
|
authority, granted by the FCC, to use the product. |
the following measures: |
|
2. IMPORTANT: When connecting this product to accessories |
Relocate either this product or the device that is being |
|
and/or another product use only high quality shielded cables. |
affected by the interference. |
|
Cable/s supplied with this product MUST be used. Follow all |
Utilize power outlets that are on different branch (circuit |
|
installation instructions. Failure to follow instructions could |
breaker or fuse) circuits or install AC line filter/s. |
|
void your FCC authorization to use this product in the USA. |
In the case of radio or TV interference, relocate/reorient the |
|
3. NOTE: This product has been tested and found to comply |
||
antenna. If the antenna lead-in is 300 ohm ribbon lead, |
||
with the requirements listed in FCC Regulations, Part 15 for |
change the lead-in to co-axial type cable. |
|
Class “B” digital devices. Compliance with these require- |
If these corrective measures do not produce satisfactory |
|
ments provides a reasonable level of assurance that your |
||
results, please contact the local retailer authorized to distrib- |
||
use of this product in a residential environment will not result |
||
ute this type of product. If you can not locate the appropriate |
||
in harmful interference with other electronic devices. This |
||
retailer, please contact Yamaha Corporation of America, |
||
equipment generates/uses radio frequencies and, if not |
||
Electronic Service Division, 6600 Orangethorpe Ave, Buena |
||
installed and used according to the instructions found in the |
||
Park, CA90620 |
||
users manual, may cause interference harmful to the opera- |
||
The above statements apply ONLY to those products distrib- |
||
tion of other electronic devices. Compliance with FCC regula- |
||
uted by Yamaha Corporation of America or its subsidiaries. |
||
|
||
|
|
|
* This applies only to products distributed by YAMAHA CORPORATION OF AMERICA. |
(class B) |
|
COMPLIANCE INFORMATION STATEMENT (DECLARATION OF CONFORMITY PROCEDURE)
Responsible Party: Yamaha Corporation of America
Address: 6600 Orangethorpe Ave., Buena Park, Calif. 90620 Telephone: 714-522-9011
Type of Equipment: STAGE PIANO
Model Name: CP88, CP73
This device complies with Part 15 of the FCC Rules. Operation is subject to the following two conditions: 1)this device may not cause harmful interference, and
2)this device must accept any interference received including interference that may cause undesired operation. See user manual instructions if interference to radio reception is suspected.
* This applies only to products distributed by YAMAHA CORPORATION OF AMERICA. |
(FCC DoC) |
Information for users on collection and disposal of old equipment:
This symbol on the products, packaging, and/or accompanying documents means that used electrical and electronic products should not be mixed with general household waste.
For proper treatment, recovery and recycling of old products, please take them to applicable collection points, in accordance with your national legislation.
By disposing of these products correctly, you will help to save valuable resources and prevent any potential negative effects on human health and the environment which could otherwise arise from inappropriate waste
handling.
For more information about collection and recycling of old products, please contact your local municipality, your waste disposal service or the point of sale where you purchased the items.
For business users in the European Union:
If you wish to discard electrical and electronic equipment, please contact your dealer or supplier for further information.
Information on Disposal in other Countries outside the European Union:
This symbol is only valid in the European Union. If you wish to discard these items, please contact your local authorities or dealer and ask for the correct method of disposal.
(weee_eu_en_02)
CP88/CP73 Owner’s Manual 3

CAUTION
RISK OF ELECTRIC SHOCK
DO NOT OPEN
CAUTION: TO REDUCE THE RISK OF ELECTRIC SHOCK, DO NOT REMOVE COVER (OR BACK). NO USER-SERVICEABLE PARTS INSIDE. REFER SERVICING TO QUALIFIED SERVICE PERSONNEL.
The above warning is located on the rear of the unit.
Explanation of Graphical Symbols
The lightning flash with arrowhead symbol within an equilateral triangle is intended to alert the user to the presence of uninsulated “dangerous voltage” within the product’s enclosure that may be of sufficient magnitude to constitute a risk of electric shock to persons.
The exclamation point within an equilateral triangle is intended to alert the user to the presence of important operating and maintenance (servicing) instructions in the literature accompanying the product.
IMPORTANT SAFETY INSTRUCTIONS
1 Read these instructions.
2 Keep these instructions.
3Heed all warnings.
4Follow all instructions.
5 Do not use this apparatus near water.
6Clean only with dry cloth.
7Do not block any ventilation openings. Install in accordance with the manufacturer’s instructions.
8Do not install near any heat sources such as
radiators, heat registers, stoves, or other apparatus (including amplifiers) that produce heat.
9Do not defeat the safety purpose of the polarized or grounding-type plug. A polarized plug has two blades with one wider than the other. A grounding type plug has two blades and a third grounding prong. The wide blade or the third prong are provided for your safety. If the provided plug does not fit into your outlet, consult an electrician for
replacement of the obsolete outlet.
10Protect the power cord from being walked on or pinched particularly at plugs, convenience receptacles, and the point where they exit from the apparatus.
11Only use attachments/accessories specified by the manufacturer.
12Use only with the cart, stand,
tripod, bracket, or table specified by the manufacturer, or sold with the apparatus. When a cart is used, use caution when moving the cart/ apparatus combination to avoid injury from tip-over.
13Unplug this apparatus during lightning storms or when unused for long periods of time.
14Refer all servicing to qualified service personnel. Servicing is required when the apparatus has been damaged in any way, such as power-supply cord or plug is damaged, liquid has been spilled or objects have fallen into the apparatus, the apparatus has been exposed to rain or moisture, does not operate normally, or has been dropped.
WARNING
TO REDUCE THE RISK OF FIRE OR ELECTRIC SHOCK, DO NOT EXPOSE THIS APPARATUS TO RAIN OR MOISTURE.
(UL60065_03)
4 CP88/CP73 Owner’s Manual

PRECAUTIONS
PLEASE READ CAREFULLY BEFORE PROCEEDING
Please keep this manual in a safe and handy place for future reference.
 WARNING
Always follow the basic precautions listed below to avoid the possibility of serious injury or even death from electrical shock, short-circuiting, damages, fire or other hazards. These precautions include, but are not limited to, the following:
|
|
|
Power supply/Power cord |
If you notice any abnormality |
•Do not place the power cord near heat sources such as heaters or radiators. Also, do not excessively bend or otherwise damage the cord, or place heavy objects on it.
•Only use the voltage specified as correct for the instrument. The required voltage is printed on the name plate of the instrument.
•Use only the supplied power cord/plug.
•Check the electric plug periodically and remove any dirt or dust which may have accumulated on it.
•Be sure to connect to an appropriate outlet with a protective grounding connection. Improper grounding can result in electrical shock.
•When one of the following problems occur, immediately turn off the power switch and disconnect the electric plug from the outlet. Then have the device inspected by Yamaha service personnel.
-The power cord or plug becomes frayed or damaged.
-It emits unusual smells or smoke.
-Some object has been dropped into the instrument.
-There is a sudden loss of sound during use of the instrument.
Do not open
•This instrument contains no user-serviceable parts. Do not open the instrument or attempt to disassemble or modify the internal components in any way. If it should appear to be malfunctioning, discontinue use immediately and have it inspected by qualified Yamaha service personnel.
Water warning
•Do not expose the instrument to rain, use it near water or in damp or wet conditions, or place on it any containers (such as vases, bottles or glasses) containing liquids which might spill into any openings. If any liquid such as water seeps into the instrument, turn off the power immediately and unplug the power cord from the AC outlet. Then have the instrument inspected by qualified Yamaha service personnel.
•Never insert or remove an electric plug with wet hands.
Fire warning
•Do not put burning items, such as candles, on the unit. A burning item may fall over and cause a fire.
DMI-5 1/2
CP88/CP73 Owner’s Manual 5

 CAUTION
Always follow the basic precautions listed below to avoid the possibility of physical injury to you or others, or damage to the instrument or other property. These precautions include, but are not limited to, the following:
|
|
|
Power supply/Power cord |
Connections |
•Do not connect the instrument to an electrical outlet using a multiple-connector. Doing so can result in lower sound quality, or possibly cause overheating in the outlet.
•When removing the electric plug from the instrument or an outlet, always hold the plug itself and not the cord. Pulling by the cord can damage it.
•Remove the electric plug from the outlet when the instrument is not to be used for extended periods of time, or during electrical storms.
Location
•Do not place the instrument in an unstable position where it might accidentally fall over.
•Before moving the instrument, remove all connected cables, to prevent damage to the cables or injury to anyone who might trip over them.
•When setting up the product, make sure that the AC outlet you are using is easily accessible. If some trouble or malfunction occurs, immediately turn off the power switch and disconnect the plug from the outlet. Even when the power switch is turned off, electricity is still flowing to the product at the minimum level. When you are not using the product for a long time, make sure to unplug the power cord from the wall AC outlet.
•Before connecting the instrument to other electronic components, turn off the power for all components. Before turning the power on or off for all components, set all volume levels to minimum.
•Be sure to set the volumes of all components at their minimum levels and gradually raise the volume controls while playing the instrument to set the desired listening level.
Handling caution
•Do not insert a finger or hand in any gaps on the instrument.
•Never insert or drop paper, metallic, or other objects into the gaps on the panel. This could cause physical injury to you or others, damage to the instrument or other property, or operational failure.
•Do not rest your weight on, or place heavy objects on the instrument, and do not use excessive force on the buttons, switches or connectors.
•Do not use the instrument/device or headphones for a long period of time at a high or uncomfortable volume level, since this can cause permanent hearing loss. If you experience any hearing loss or ringing in the ears, consult a physician.
Yamaha cannot be held responsible for damage caused by improper use or modifications to the instrument, or data that is lost or destroyed.
Always turn the power off when the instrument is not in use.
Even when the [  ] (Standby/On) switch is in standby status (display is off), electricity is still flowing to the instrument at the minimum level.
When you are not using the instrument for a long time, make sure you unplug the power cord from the wall AC outlet.
DMI-5 2/2
6 CP88/CP73 Owner’s Manual

NOTICE
To avoid the possibility of malfunction/ damage to the product, damage to data, or damage to other property, follow the notices below.
Handling
•Do not use the instrument in the vicinity of a TV, radio, stereo equipment, mobile phone, or other electric devices. Otherwise, the instrument, TV, or radio may generate noise. When you use the instrument along with an application on your iPad, iPhone or iPod touch, we recommend that you set “Airplane Mode” to “ON” on that device in order to avoid noise caused by communication.
•Do not expose the instrument to excessive dust or vibrations, or extreme cold or heat (such as in direct sunlight, near a heater, or in a car during the day) to prevent the possibility of panel disfiguration, damage to the internal components or unstable operation.
•Do not place vinyl, plastic or rubber objects on the instrument, since this might discolor the panel or keyboard.
Maintenance
•When cleaning the instrument, use a soft and dry/ slightly damp cloth. If the panel (front, side and bottom, excepting the controllers and the keyboard) is dirty, wipe the dirt away using a cloth moistened with a neutral detergent solution and tightly wrung out. Following this, wipe away the detergent solution using a cloth soaked in water and tightly wrung out. Do not use paint thinners, solvents, alcohol, or chemicalimpregnated wiping cloths.
•During extreme changes in temperature or humidity, condensation may occur and water may collect on the surface of the instrument. If water is left, the wooden parts may absorb the water and be damaged. Make sure to wipe any water off immediately with a soft cloth.
Saving data
•Edited Live set sound and settings of MENU/ SETTINGS screens are lost when you turn off the power to the instrument. This also occurs when the power is turned off by the Auto Power Off function (page 21). Save the data to the instrument, or to USB flash drive/an external device such as a computer (page 23). However, the data saved to the instrument may be lost due to some failure, an operation mistake, etc. Save your important data onto USB flash drive/an external device such as a computer (page 23). Before using a USB flash drive, make sure to refer to page 24.
•To protect against data loss through USB flash drive damage, we recommend that you save your important data onto spare USB flash drive or an external device such as a computer as backup data.
Information
About copyrights
•Copying of the commercially available musical data including but not limited to MIDI data and/or audio data is strictly prohibited except for your personal use.
•This product incorporates and bundles contents in which Yamaha owns copyrights or with respect to which Yamaha has license to use others' copyrights. Due to copyright laws and other relevant laws, you are NOT allowed to distribute media in which these contents are saved or recorded and remain virtually the same or very similar to those in the product.
*The contents described above include a computer program, Accompaniment Style data, MIDI data, WAVE data, voice recording data, a score, score data, etc.
*You are allowed to distribute medium in which your performance or music production using these contents is recorded, and the permission of Yamaha Corporation is not required in such cases.
About this manual
•The illustrations and LCD screens as shown in this manual are for instructional purposes only, and may appear somewhat different from those on your instrument.
•iPhone, iPad, Logic Pro are trademarks of Apple Inc., registered in the U.S. and other countries.
•IOS is a trademark or registered trademark of Cisco in the U.S. and other countries and is used under license.
•Cubase is a registered trademark of Steinberg Media Technologies GmbH.
•Ableton Live is a trademarks of Ableton AG.
•Pro Tools® is a registered trademark of Avid Technology, Inc.
•The company names and product names in this manual are the trademarks or registered trademarks of their respective companies.
The model number, serial number, power requirements, etc., may be found on or near the name plate, which is at the rear of the unit. You should note this serial number in the space provided below and retain this manual as a permanent record of your purchase to aid identification in the event of theft.
Model No.
Serial No.
(rear_en_01)
CP88/CP73 Owner’s Manual 7

Welcome
Thank you for purchasing the Yamaha CP88 or CP73.
This instrument is a Stage Piano designed especially for live performance.
Please read this Owner’s Manual carefully before using the instrument in order to take full advantage of its various features. When you have finished reading the manual, keep it in a safe, accessible place, and refer to it when you need to better understand an operation or function.
Accessories
•Owner’s Manual (this book)
•Power cord
•Foot pedal (FC3A)
Main Features
Authentic acousticand electric-piano sounds of unparalleled quality
Building on our decades of experience in the production of stage pianos, we have meticulously adjusted the sound of each individual key and realized perfect balance over the full length of the keyboard, creating full-bodied piano tones ideal for solo performances and authentically rich sounds well suited for playing within an ensemble. Furthermore, by analyzing and replicating the sound-producing mechanisms of classic electric pianos using cutting-edge technologies, we have been able to achieve an extremely smooth response in the CP88 and CP73 keyboards.
Weighted hammer-action keyboards
CP series employ a keyboard with a weighted hammer-action design that is virtually indistinguishable from an acoustic piano. The CP88’s NW-GH (Natural Wood Graded Hammer keyboard with synthetic ebony and ivory keytops) keyboard reproduce a touch of grand piano by giving all keys an authentic resistance that increases from the top register to the lower. And the CP73 features a BHS (Balanced Hammer Standard) keyboard with matte black keytops, perfect for performing as an electric piano as well.
Design embodies high-class appearance and portability
Featuring a stylish, finely crafted aluminum exterior in a light, compact package, the CP88 and CP73 project an exceptionally professional appearance and provide convenient portability onstage.
User interface provides direct, intuitive control required for live performance
The three Voice sections—Piano, E.Piano and Sub—are indicated clearly on the top panel, giving you all the controllers you need onstage, allowing you to directly adjust each parameter as you need while you play. The LED indicator lamps show you the selected Voice, letting you fully concentrate on your performance. Moreover, you can enhance sounds on-the-fly, adding various effects to suit your performance as you play.
Connect with other devices and expand your performance potential
Comprehensive MIDI controls and powerful Master Keyboard features make it easy to connect and use the instrument with software synthesizers and external MIDI devices. Moreover, the instrument has a built-in USB Audio/MIDI interface for convenient recording functions in home and professional studios, as well as onstage performance power.
8 CP88/CP73 Owner’s Manual

Contents |
|
PRECAUTIONS.................................................................. |
5 |
NOTICE ............................................................................... |
7 |
Information.......................................................................... |
7 |
Welcome............................................................................... |
8 |
Accessories ........................................................................... |
8 |
Main Features ...................................................................... |
8 |
Controls and Functions |
10 |
Front Panel........................................................................ |
10 |
Settings of LCD and the indicator lamp ........... |
10 |
Live Set......................................................................... |
12 |
Storing a Live Set Sound ..................................... |
12 |
Swapping Live Set Sounds .................................. |
13 |
Copying a Live Set Sound ................................... |
13 |
Piano section............................................................... |
14 |
Copying a section................................................. |
14 |
Electric Piano section ................................................ |
15 |
Sub section .................................................................. |
16 |
Delay section/Reverb section.................................... |
16 |
Master EQ ................................................................... |
17 |
Rear Panel.......................................................................... |
18 |
Setting Up |
20 |
Power Supply .................................................................... |
20 |
Connecting Speakers or Headphones ........................... |
20 |
Turning On and Off......................................................... |
20 |
Auto Power Off Function................................................ |
21 |
Restoring the Factory Default Settings (Factory Reset) 21 |
|
Basic Structure & Display Content |
21 |
Selecting Voices ................................................................ |
21 |
Exiting from the Current Screen.................................... |
21 |
Display Configuration ..................................................... |
21 |
Editing File Names/Live Set Sound Names .................. |
22 |
Saving / Loading Data |
23 |
Saving the settings to a USB flash drive ........................ |
23 |
Loading the settings from a USB flash drive ................ |
23 |
Using with Other MIDI Devices |
25 |
Controlling a synthesizer or tone generator module from |
|
this instrument ................................................................. |
25 |
Controlling this instrument from an external MIDI |
|
keyboard or synthesizer................................................... |
25 |
Using with a Computer |
26 |
Connecting to a computer .............................................. |
26 |
Connecting an iPhone or iPad ....................................... |
27 |
MENU LIST |
28 |
SETTINGS LIST |
33 |
DATA LIST |
37 |
Live Set Sound List ........................................................... |
37 |
Voice List........................................................................... |
39 |
Control Change Number List......................................... |
40 |
MIDI................................................................................... |
43 |
MIDI Data Format ........................................................... |
44 |
MIDI Data Table .............................................................. |
46 |
MIDI Implementation Chart.......................................... |
50 |
Appendix |
51 |
Display Messages.............................................................. |
51 |
Troubleshooting ............................................................... |
52 |
Specifications .................................................................... |
54 |
Index................................................................................... |
55 |
CP88/CP73 Owner’s Manual 9

Controls and Functions
Front Panel
|
3 |
2 |
5 |
1 |
4 |
|
6


 7
7
|
|
8 |
|
|
|
9 |
|
|
|
) |
|
|
|
|
|
|
|
|
|
Live Set |
Piano section |
||
(page 12) |
(page 14) |
||
1 Pitch bend lever
Use this controller to smoothly raise or lower the pitch of played notes. When you release it, the lever will automatically spring back to the original position, and the pitch will return to normal.
The range can be set for each sections from the [SETTINGS] button → “Controllers” → “Bend Range” (page 36).
2 Modulation lever
Use this lever to apply vibrato to the sound. The vibrato depth can be set for each section from the [SETTINGS] button → “Controllers” → “P.Mod Depth” (page 36).
When the “Rotary” insertion effect of the Sub section is selected, this lever functions as a controller to switch the rotary speed (Fast, Slow).
3 [MASTER VOLUME] knob
Use this knob to adjust the overall volume of the instrument.
4 LCD
Displays the system messages, parameter settings, and a range of other information depending on the function currently being used.
Settings of LCD and the indicator lamp
To make the following settings, press the [MENU] button → “Control Panel” → “Display Lights.”
Section |
For setting “Off” to light the lamps of each |
|
section that is linked with the Voice section |
|
[ON/OFF] switches, or “On” so that they |
|
continuously light. |
|
|
Ins Effect |
For setting “Off” to light each insertion effect |
|
lamps linked with the Insertion effect [ON/ |
|
OFF] buttons, or “On” to continuously light the |
|
lamps. |
|
|
LCD SW |
Set this to “On” to light the Top screen, or “Off” |
|
to turn off. However, regardless of this setting, |
|
the various setting screens such as the MENU |
|
screens and the SETTINGS screens are |
|
always lit. |
|
|
LCD |
For adjusting the contrast of the LCD. |
Contrast |
|
|
|
5 Encoder dial/[ENTER] button
Use this dial to display the Live Set view and to edit the currently selected parameter. In the MENU screens and the SETTINGS screens, move the cursor (highlighted) up or down to select an event for editing.
Also, pressing this dial is equivalent to pressing the [ENTER] button. Use this button to determine the selected parameter or to execute each operation.
6 [EXIT] button
The MENU screens and the SETTINGS screens are organized according to a hierarchical structure. Press this button to exit from the current screen and return to the previous level in the hierarchy.
10 CP88/CP73 Owner’s Manual
Controls and Functions
Illustration shows the CP88.
The keyboard range of the CP88 is A-1 to C7, the keyboard range of CP73 is E1 to E7.
Electric Piano section |
Sub section |
Delay section (page 17) |
Master EQ |
(page 15) |
(page 16) |
Reverb section (page 17) |
(page 17) |
7 [PANEL LOCK] button 9 [TOUCH] button
Use this button to switch the panel lock function on and off. When this is set to “On,” control panel operations are disabled, ensuring that settings cannot be inadvertently changed. Pressing the button alternates between lock and unlock. While the panel lock is engaged,  will appear on the top left corner of the LCD display.
NOTE
Panel lock settings can be made individually for the following areas from the [MENU] button “Control Panel” “Panel Lock Settings.”
A B C D
A.Live Set
B.Piano/E.Piano/Sub
C.Delay/Reverb
D.Master EQ
8 [TUNE] button
Use this button to set the tuning for the entire instrument (414.72 – 466.78 Hz). Press the [TUNE] button, and then use the Encoder dial to change the value.
NOTE
The default value is 440.00 Hz.
Displays the screen to select a curve for determining how the actual velocities will be generated according to the strength with which you play notes on the keyboard. The available settings are as follows. The setting also can be changed from the [MENU] button → “General” → “Keyboard/Pedal” → “Touch Curve” (page 29).
Settings |
Characteristics |
|
|
Normal |
This curve produces velocities in direct proportion |
|
to the strength of your keyboard playing. This is |
|
the most common type of curve. |
|
|
Soft |
This curve makes it easier to produce high |
|
velocities across the entire keyboard. |
|
|
Hard |
This curve makes it more difficult to produce high |
|
velocities across the entire keyboard. |
|
|
Wide |
This curve accentuates your playing strength by |
|
producing lower velocities in response to softer |
|
playing and louder velocities in response to |
|
harder playing. You can use this setting to expand |
|
the dynamic range of your performances. |
|
|
Fixed |
This curve produces the same amount of sound |
|
change, regardless of how hard or soft you play |
|
the keyboard. The fixed velocity can be set from |
|
the [MENU] button “General” “Keyboard/ |
|
Pedal” “Fixed Velocity.” |
|
|
) [MENU] button
Use this button to call up the screens for making overall system settings.
CP88/CP73 Owner’s Manual 11

Controls and Functions
Live Set
@ |
# |
$ |
% |
^ |
! |
! Live Set Sound [1] – [8] button
Use these buttons to call up the stored Live Set Sounds.
Live Set Sound
This is a combination of Voices/effects, consisting of the sounds of all Voice sections – Piano section (page 14), Electric Piano section (page 15), and Sub section
(page 16) and effects of the Delay section (page 17) and the Reverb section (page 17). You can combine sounds and insertion effects, to create and store a custom Live Set Sound.
The Live Set feature supports SSS (Seamless Sound Switching), ensuring that the sound does not cut off even when changed, resulting in smoother transitions between Live Set Sounds and a more natural performance.
NOTE
If you wish to mute the sound continued by the effect of SSS, press again the currently selected Live Set Sound button.
Live Set View
Displays a Live Set Page (Live Set Sound [1] – [8]) in a single screen, for convenient overall view of the available sounds. To open the Live Set View, turn the Encoder dial when at the Top screen. The will appear on the left of the currently selected Live Set Sound. To change the Live Set Sound in Live Set View, turn the Encoder dial to select a Live Set Sound, and press the [ENTER] button to return to the Top screen. To have the Live Set view shown on the Top screen, change the settings of “Live Set View Mode” to “Keep” (page 31).
Live Set View Mode
# [STORE] button
Use this button to store the edited Live Set Sound. Settings of the sections listed below and their parameters can be stored. Stored settings will be retained when this instrument is turned off.
•Piano section
•Electric Piano section
•Sub section
•Delay section
•Reverb section
•SETTINGS (includes Split Point and Transpose)
NOTE
The Master EQ settings cannot be stored in Live Set Sound.
@ PAGE [-]/[+] buttons
Use these buttons to switch the Live Set Pages. The Live Set Sound switches accordingly.
Live Set
Combines the Live Set Sounds [1] – [8] into one page. With the default settings (factory settings), the preset Live Set Sounds are installed in from page 1 to page 10.
Live Set Sound
Piano
Electric Piano |
20 pages |
Sub |
|
Delay |
|
Reverb |
|
SETTINGS |
Live Set |
Storing a Live Set Sound
1.Press the [STORE] button.
Select a Live Set Sound you wish to store the currently edited Live Set Sound setting into.
2.Press the [ENTER] button to execute.
A “Completed.” message will appear on the screen, and then return to the Top screen.
12 CP88/CP73 Owner’s Manual

NOTE
If you wish to store the currently edited settings to another Live Set Sound, use the Encoder dial to select the Live Set Sound which is to be the store destination. Press the keyboard to confirm that the sound has been changed to the edited settings.
NOTICE
•Keep in mind that the settings will be overwritten when you select an existing Live Set Sound (including one of the preset Live Set Sounds). Proceed with caution.
•The settings currently be edited will be lost if you select another Live Set Sound before storing, or turn off the power.
NOTE
•Edits made to a Live Set Sound are normally lost if not stored before selecting a different Live Set Sound; however, by using the “Edit Recall” function, you can recall the last edited condition (page 32).
•You can download the preset Live Set Sounds from Soundmondo. Soundmondo is an iOS application for storing and managing Voice data.
•Please refer to the following Yamaha web page for more details on Soundmondo. http://www.yamaha.com/kbdapps/
Swapping Live Set Sounds
1.Select the Live Set Sound you wish to swap.
2.Call up the Swap screen.
[MENU] button → “Job” → “Live Set Manager” → “Swap.”
3. Select a Live Set Sound.
Use the Encoder dial to select a Live Set Sound to swap, and then press the [ENTER] button. The messages “Executing..” → “Completed.” will appear on the screen, and then return to the Top screen.
Controls and Functions
Copying a Live Set Sound
1.Select the Live Set Sound you wish to copy.
2.Call up the Copy screen.
[MENU] button → “Job” → “Live Set Manager”→ “Copy.”
3.Select the desired Live Set Sound location.
Use the Encoder dial to select the Live Set Sound intended for the store destination, and then press the [ENTER] button. The messages “Executing..” → “Completed.” will appear on the screen, and then return to the Top screen.
$ [SPLIT POINT] button
Use this button to change the Split Point. Turn the Encoder dial or press the key you wish to assign as the Split Point. The setting will be stored in Live Set Sound.
Split
This function allows you to play different Voices with the left and right hands. The point on the keyboard that separates the left hand section and the right hand section of the keyboard is called the “Split Point.”
NOTE
•The default setting is “G2”.
•The lowest note of the right hand section is referred as the Split Point.
•The Split Point can be changed from the [SETTINGS] button “Function” “Split Point” (page 33).
% [TRANSPOSE] button
Use this button to adjust the pitch of the keyboard up or down in semitone steps. The settings can be stored to the Live Set Sound. The settings can be changed from the [SETTINGS] button → “Function” → “Sound Transpose” (page 33).
^ [SETTINGS] button
Use this button to call up the SETTINGS screens. In the SETTINGS screens, you can make detailed settings for the current selected Live Set Sound (page 33), which will then be stored for the Live Set Sound.
CP88/CP73 Owner’s Manual 13
Controls and Functions
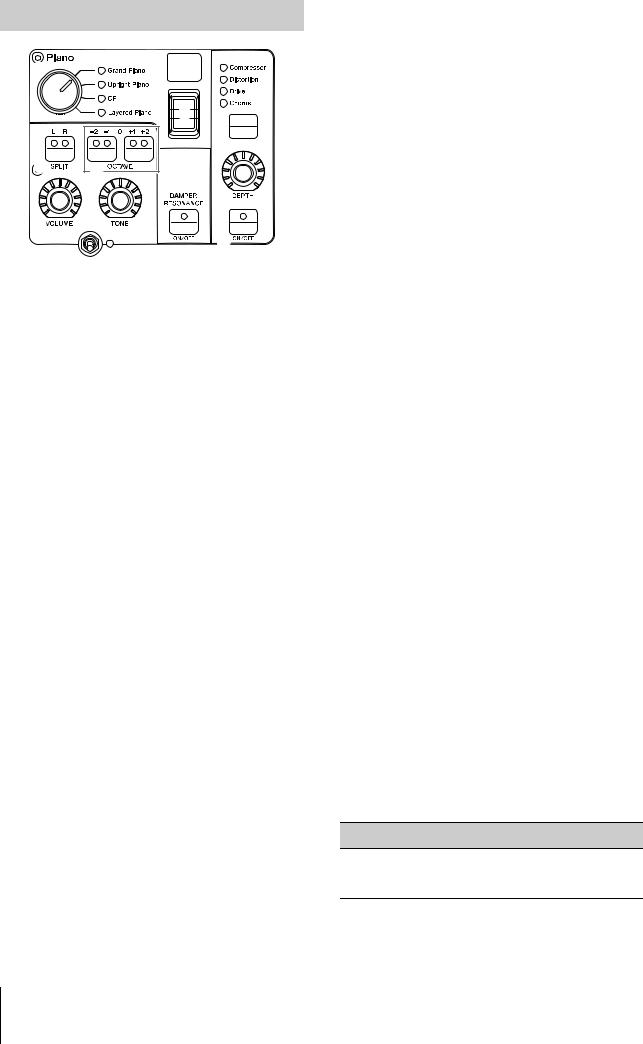
Piano section
* |
A |
|
( |
|
H |
B |
C |
|
F |
|
I |
D |
E |
|
G |
&


&Voice section [ON/OFF] switch
Use these switches to determine whether the corresponding Voice section is enabled (ON) or not (OFF). When these indicator lamps are lit, the corresponding Voice sound is produced when you play the keyboard.
Copying a section
The settings of each Voice section can be copied with the following operation.
1.Select the Voice section you wish to copy.
Select the Live Set Sound which contains the Voice section you wish to copy. Press the [MENU] button → “Job” → “Section Manager” → “Copy,” then select the Voice section you wish to copy.
A “Section copied.” message will appear on the screen, and then return to the Top screen.
2.Select a Voice section you wish to paste.
Select the Live Set Sound which contains the Voice section you wish to paste the copied section. Press the [MENU] button → “Job” → “Section Manager” → “Paste,” then select the Voice section you wish to paste.
A “Section pasted.” message will appear on the screen, and then return to the Top screen.
* Voice category selector
The Voices in each Voice section are divided into four categories. To select a Voice, select a Voice category first.
Voice section |
Voice category |
|
|
Piano |
Grand Piano, Upright Piano, CP, |
|
Layered Piano |
|
|
Electric Piano |
Rd, Wr, Clv, DX |
|
|
Sub |
Pad/Strings, Organ, Chromatic Perc., |
|
Others |
|
|
( Voice select switch
Use this switch to select one of the Voices of the category selected with the Voice category selector. For information about the Voices, refer to page 39.
A Voice number display
Displays the currently selected Voice numbers.
B SPLIT [L R] button
Press these buttons to alternate between the keyboardsplit settings of each Voice section. The area for which the indicator lamp is lit will sound.
NOTE
The Split Point can be changed from the [SPLIT POINT] button (page 13), also from the [SETTINGS] “Function” “Split Point” (page 33).
C OCTAVE [-2 -1]/[+1 +2] buttons
Use these buttons to change the octave range of the keyboard. To restore the normal octave setting, press both buttons simultaneously.
D [VOLUME] knob
Use these knobs to adjust the volume of each Voice section.
E [TONE] knob
Use these knobs to adjust the tone of each Voice section. Setting the knob to the center position produces a flat, evenly balanced sound. Turn the knob to the right (clockwise) to boost the higher and lower ranges. Turn the knob to the left (counter-clockwise) to cut the higher range and the lower range.
F DAMPER RESONANCE [ON/OFF] button
Use this button to switch the damper resonance effect on and off. This simulates the rich sound of open strings produced when the damper pedal of a piano is pressed.
G Insertion effect [ON/OFF] button
Use this button to apply the insertion effects.
NOTE
To more easily confirm the setting value when the display light is turned off, you can turn the light on from the [MENU] button “Control Panel” “Display Lights” “Ins Effect” (page 30).
H Insertion effect switch button
Use this button to switch among the following effects. The indicator lamp of the selected effect is lit.
Effect Description
Compressor Stereo compressor. To increase the compressor effect, turn the [DEPTH] knob to the right (clockwise).
14 CP88/CP73 Owner’s Manual

Effect |
Description |
|
|
Distortion |
Monaural compressor plus distortion. |
|
Settings from the left-most to the center of |
|
the [DEPTH] knob applies compression. |
|
Turning the [DEPTH] knob from the center |
|
to right (clockwise) increases the amount of |
|
distortion. |
|
|
Drive |
Drive effect. Turning the [DEPTH] knob to |
|
the right (clockwise) increases the amount |
|
of distortion, with the maximum value |
|
producing an AM radio-like tone. |
|
|
Chorus |
Stereo chorus. Turning the [DEPTH] knob to |
|
the right (clockwise) increases the amount |
|
of chorus effect. |
|
|
I [DEPTH] knob
Use this knob to adjust the depth of the selected effect.
Electric Piano section
* |
A |
|
|
L |
M |
|
( |
G |
|
K |
|
B |
|
|
C |
|
|
J |
O |
P |
D E |
N |
G |
G |
|
|
& |
|
|
J [DRIVE] knob
Use this knob to adjust the amount of the drive effect. Simulates the distortion produced by a tube amp.
K Insertion effect switch button
Use this button to switch among the following effects. The indicator lamp of the selected effect is lit.
Effect Description
A.Pan Auto pan built into vintage electric pianos. Turn the [DEPTH] knob to adjust the effect depth, and turn the [RATE] knob to adjust the effect speed.
Trem Tremolo built into vintage electric pianos. Turn the [DEPTH] knob to adjust the effect depth, and turn the [RATE] knob to adjust the effect speed.
R.Mod Ring modulator. Turn the [DEPTH] knob to adjust the effect depth, and turn the [RATE] knob to adjust the frequency. Depending on the settings of the [RATE] knob, this effect also can be used as tremolo.
Controls and Functions
Effect Description
T.Wah Wah responds to keyboard dynamics. Turn the [DEPTH] knob to adjust the effect strength, and turn the [RATE] knob to adjust the effect amount.
P.Wah Wah synchronized to an expression pedal connected to the FOOT CONTROLLER [2] jack. Turn the [DEPTH] knob to adjust the amount of distortion, and turn the [RATE] knob to adjust the amount of resonance.
Comp Stereo compressor. Turn the [DEPTH] knob to adjust the effect depth, and turn the [RATE] knob to adjust the sound volume.
L [DEPTH] knob
Use this knob to adjust the depth of the selected effect.
M [RATE] knob
Use this knob to adjust the modulation speed of the selected effect.
N Insertion effect switch button
Use this button to switch among the following effects. The indicator lamp of the selected effect is lit.
Effect Description
Cho 1 Traditional Yamaha multiple chorus. Turn the [DEPTH] knob to adjust the effect depth, and turn the [SPEED] knob to adjust the speed.
Cho 2 Simulates a thick detune chorus produced by the vintage TX816 tone generator. Turn the [DEPTH] knob to adjust the effect depth, and turn the [SPEED] knob to adjust the speed.
Flang Stereo flanger. Turn the [DEPTH] knob to adjust the feedback amount, and turn the [SPEED] knob to adjust the speed.
Pha 1 Phaser applies a smooth and unique sweeping effect. The sweeping effect can be changed by turning the [DEPTH] knob to left/right. Turn the [SPEED] knob to adjust the speed.
Pha 2 Standard phaser. Turn the [DEPTH] knob to adjust the effect strength. Turn the [SPPED] knob to adjust the speed.
Pha 3 Features two different phaser systems. Turn the [DEPTH] knob to switch the depth of “Pha 1” and “Pha 2.” Turn the [SPEED] knob to adjust the speed.
O [DEPTH] knob
Use this knob to adjust the depth of the selected effect.
P [SPEED] knob
Use this knob to adjust the modulation speed of the selected effect.
CP88/CP73 Owner’s Manual 15

Controls and Functions
Sub section
* |
|
A |
|
|
|
|
Q |
|
|
( |
|
|
|
|
R |
B |
C |
|
|
|
|
T |
a |
D |
E |
S |
G |
&


Q [ATTACK] knob
Use this knob to adjust the attack time.
R [RELEASE] knob
Use this knob to adjust the release time.
NOTE
After you change a Live Set Sound, turning the [ATTACK] knob or the [RELEASE] knob does not actually affect the sound until their position reaches the set values of the currently selected Live Set Sound. Until then, the value will be shown in parentheses.
S Insertion effect switch button
Use this button to switch among the following effects. The indicator lamp of the selected effect is lit.
Effect |
Description |
|
|
Cho/Fla |
Chorus/Flanger. Turn the [DEPTH] knob to adjust |
|
the effect depth. Turn the [SPEED] knob to adjust |
|
the speed. Settings from the left-most to the center |
|
of the [DEPTH] knob apply a chorus effect, while |
|
settings from the center to the right (clockwise) |
|
apply a flanger effect (similar to the sound of jet). |
|
|
Rotary |
Rotary speaker. Turn the [DEPTH] knob to adjust |
|
the balance between rotary speaker and horn |
|
speaker. Turn the [SPEED] knob to adjust the |
|
rotation speed. Turning the [DEPTH] knob to the |
|
left applies the horn speaker, and turning to the |
|
right applies the rotary speaker. Turning the |
|
[SPEED] knob from the center to left decreases |
|
the rotation speed, and turning the knob from the |
|
center to right increases the speed. The speed can |
|
be changed by using the Modulation lever. |
|
|
Trem |
Standard tremolo. Turn the [DEPTH] knob to |
|
adjust the effect depth, and turn the [SPEED] knob |
|
to adjust the speed. |
|
|
Dist |
British hard rock type distortion. Turn the [DEPTH] |
|
knob to adjust the amount of distortion, and turn |
|
the [SPEED] knob to adjust the presence. |
|
|
T [DEPTH] knob
Use this knob to adjust the depth of the selected effect.
a [SPEED] knob
Use this knob to adjust the modulation speed of the selected effect.
Effect
The CP88 and CP73 feature insertion effects and delay/ reverb effects that can be configured for each Voice section, as well as a master EQ that affects all the Voice sections in the same way. The illustration below shows the audio signal path.
Piano |
E. Piano |
Sub |
Ins. Effect |
Ins. Effect |
Ins. Effect |
(2 systems) |
(3 systems) |
(1 system) |
|
|
Send |
|
|
level |
|
Delay / Reverb |
|
Master EQ
Delay section/Reverb section
e
 i
i

b
f

 g
g
 j
j

d
c
 h
h

b Effect level display switch button
Use this button to select the desired Voice sections for adjusting the send levels to delay and reverb effects. Turn the [DEPTH] knobs of the Delay section and the Reverb section to adjust the send levels from each Voice section.
16 CP88/CP73 Owner’s Manual

When all the indicator lamps of the Voice sections are lit, the send levels from each Voice section can be adjusted equally. When the send levels of each Voice section are set individually, the indicator lamp of the [DEPTH] knob is unlit. However, when the send levels are readjusted, the indicator lamp of the [DEPTH] knob light, and the send levels are changed from the previously set value.
Delay section
c DELAY [ON/OFF] switch
Use this switch to determine whether to apply (ON) the delay effect or not (OFF). Delay effects create a delayed version of the input signal, and as such, they can be used for many different purposes, such as creating a sense of spaciousness or thickening a sound.
d [Analog/Digital] switch button
Use this button to switch between the analog delay and the digital delay. The indicator lamp of the selected effect is lit.
Effect Description
Analog Typical warm sound of analog delay. Use the [DEPTH] knob to adjust the effect depth, the [FEEDBACK] knob to adjust the number of repeats, and the [TIME] knob to adjust the delay time. The maximum delay time is 800 ms.
Digital Clean digital delay. Use the [DEPTH] knob to adjust the effect depth, the [FEEDBACK] knob to adjust the number of repeats, and the [TIME] knob to adjust the delay time. The maximum delay time is 1,486 ms.
e [DEPTH] knob
Use this knob to adjust the effect depth. Also you can adjust the send level for each Voice section with the Effect level display switch button.
f [FEEDBACK] knob
Use this knob to adjust the feedback level output from the delay that is returned to the input.
NOTE
The sound will be oscillated when the feedback level is set to high levels. To reduce the oscillation, lower the feedback level, or set the DELAY [ON/OFF] switch to OFF. If the Live Set Sound is changed to another while the sound is still oscillating, the controls of the delay section will not be effective in controlling the oscillation. Press the currently selected Live Set Sound button again to stop the oscillation.
g [TIME] knob
Use this knob to set the feedback delay time.
Controls and Functions
Reverb section
h REVERB [ON/OFF] switch
Use this switch to determine whether to apply (ON) the reverb effect or not (OFF). Reverb effects create a rich special ambience of various performance environments, such as a concert hall or a night club.
i [DEPTH] knob
Use this knob to adjust the depth of the reverb effect. Also use the Effect level display switch button to adjust the effect level individually for each Voice section.
j [TIME] knob
Use this knob to set the duration of the reverb effect (max. 30 s).
Master EQ
l

m 
 n
n


o
 k
k


k MASTER EQUALIZER [ON/OFF] button
Use this button to determine whether to apply (ON) the Master EQ or not (OFF). Master EQ adjusts the overall tone of the sound.
NOTE
The Master EQ settings are a global control and cannot be stored to a Live Set Sound.
l [HIGH] knob
Use this knob to adjust the gain (-12 to +12) of the high EQ band (5 kHz).
m [MID] knob
Use this knob to adjust the gain (-12 to +12) of the mid EQ band (100 to 10 kHz).
n [FREQUENCY] knob
Use this knob to adjust the center frequency of the midrange.
o [LOW] knob
Use this knob to adjust the gain (-12 to +12) of the low EQ band (80 Hz).
CP88/CP73 Owner’s Manual 17

Controls and Functions
Rear Panel
1 |
2 |
|
|
|
3 |
4 |
5 |
AC outlet 


USB flash drive |
Computer |
1 [STANDBY/ON] switch
For switching the instrument to standby or turning it on.
2 [AC IN] jack
For connecting the supplied AC power cord.
6 MIDI [IN]/[OUT] terminals
With a standard MIDI cable (available separately), you can connect an external MIDI instrument, and control it from this instrument. Likewise, you can use an external MIDI device (such as a keyboard or sequencer) to control the sounds on this instrument.
3 Music stand attachment holes
Use these two holes to attach a music stand (sold separately).
7 FOOT SWITCH [SUSTAIN] jack
Use this jack to connect an FC3A Foot Switch (provided) for use as a dedicated sustain pedal.
4 USB [TO DEVICE] terminal
Use this terminal to connect a USB flash drive to this instrument, for saving data you have created and loading data you want to restore.
NOTE
Only USB flash drive can be recognized by this instrument. No other USB devices (such as a hard disk drive, CD-ROM drive or USB hub) can be used.
5 USB [TO HOST] terminal
This terminal lets you connect this instrument to a computer, iPhone or iPad via a USB cable, allowing you to transfer MIDI data and audio data between the devices. Unlike MIDI, USB can handle multiple ports via a single cable. For information about how this instrument handles Ports, see page 25.
NOTE
•Audio data sending capability for the instrument is a maximum two channels (one stereo channel) at a sampling rate of
44.1 kHz.
•For details on connecting an iPhone or iPad, refer to page 27.
8 FOOT SWITCH [ASSIGNABLE] jack
Use this jack to connect a separately sold foot switch (FC4A or FC5) in order to perform a range of freely assignable functions such as a soft pedal, sostenuto pedal, and switching Live Set Sounds. With the default settings, “Live Set+” is assigned.
You can assign functions from the [MENU] button → “General” → “Keyboard/Pedal” → “Foot Switch Assign” (page 30). Refer to page 40 for a list of the parameters that can be assigned to this instrument.
18 CP88/CP73 Owner’s Manual
 Loading...