


QUICK START GUIDE
Internal CRW2200EZ & CRW2200SZ Models

Table of Contents
1. INTRODUCTION |
2 |
|
1.1) |
Welcome to the Yamaha 3-in-1 CD-RW drives |
|
1.2) |
About your Yamaha 3-in-1 CD-RW drive |
|
2. REGISTRATION |
6 |
|
3. SCSI MODEL HARDWARE INSTALLATION |
7 |
|
3.1) |
Setup Flowchart for SCSI Models |
|
3.2) |
About SCSI Controllers |
|
3.3) |
SCSI Drive Settings |
|
4. E-IDE MODEL HARDWARE INSTALLATION |
12 |
|
4.1) |
Setup Flowchart for E-IDE Models |
|
4.2) |
About the ATAPI/E-IDE Interface |
|
5. PHYSICAL INSTALLATION OF YOUR NEW CD-RW DRIVE |
15 |
|
5.1) |
Operating System Recognizes the 3-in-1 drive. |
|
6. INCLUDED SOFTWARE |
24 |
|
6.1) |
Nero - Burning ROM 5.5 |
|
6.2) |
InCD |
|
6.3) |
Nero Cover Designer |
|
6.4) |
Nero Wave Editor |
|
6.5) |
Nero Tolkit |
|
6.6) |
NeroMIX |
|
6.7) |
Installation |
|
6.8) |
Program Start |
|
7. MAKING CDS |
29 |
|
7.1) |
Creating a CD |
|
7.2) |
Creating an Audio CD |
|
7.3) |
Creating a Data CD |
|
7.4) |
Creating an Image File |
|
7.5) |
Loading an Image File |
|
7.6) |
Copying a CD |
|
7.7) |
Continuing a Multi-Session CD |
|
7.8) |
Working with InCD |
|
8. OPERATING YOUR NEW 3-IN-1 DRIVE |
37 |
|
8.1) |
Front Panel |
|
8.2) |
Loading a Disc |
|
8.3) |
Ejecting a Disc |
|
8.4) |
Troubleshooting |
|
9. VERIFICATION |
40 |
|
9.1) |
Understanding Your New CD-RW drive |
|
9.2) |
Troubleshooting |
|
10. SPECIFICATIONS |
45 |
|
11. APPENDIX |
47 |
|
11.1) Writing Modes |
|
|
11.2) About the Firmware |
|
|
CRW2200EZ/SZ
Version 1 (5/2001)
1

1. INTRODUCTION
1.1) Welcome to Yamaha 3-in-1 CD-RW drive family
Thank you for purchasing a Yamaha 3-in-1 CD-RW drive.
Bringing a new dimension to your PC’s capabilities and performance, Yamaha’s 3-in-1 CD-RW drives are designed for recording, re-writing, and playing CDs. Used primarily for CD duplication, data storage, back-up, and transferring data, CD-RW drives are quickly becoming mainstream in today’s computers. No other storage medium is so cost effective. No other medium can be read by over 300 million computers worldwide. And no other medium lets you record music and play it back on your home stereo or in your car.
Yamaha makes the CD-ReWritable drives that every other drive is compared to. Yamaha quality, reliability, features, bundled software, and reputation are the reasons.
Before you can start enjoying all the features and benefits of your new Yamaha 3-in-1 CD-RW drive, please read this manual thoroughly. It is also a good idea to keep this manual in a safe place for future reference.
1.1.1) List of the Products Supported by This Manual
This manual provides information relevant to the following Yamaha 3-in-1 CD-RW drives:
Model Name |
Function |
Feature Summary |
CRW2200SZ |
20X Write, 10X Re-Write, 40X Read |
Internal SCSI CD ReWritable drive |
|
|
|
CRW2200EZ |
20X Write, 10X Re-Write, 40X Read |
Internal E-IDE CD ReWritable drive |
|
|
|
1.1.2) System Requirements
Your new Yamaha CD-RW drive is a high performance CD recording device. For optimum performance, Yamaha recommends installing your new CD-RW drive in a high performance PC. While complying to the minimum requirements highlighted below will ensure proper installation and operation of the drive, Yamaha’s recommended requirements are essential for high speed (12x and above) recording speeds.
Recommended Requirements:
IBM PC and compatibles:
•Intel Pentium II or equivalent CPU running at 333 MHz or faster
•32MB memory (64MB or more recommended)
•Fast hard disk drive with 15 ms or faster access speed
•High Performance CD-ROM or DVD-ROM drive for Audio CD duplication and software installation
•An available 5.25" drive bay for mounting the drive
•Available PCI-based SCSI controller card (CRW2200SZ) or available IDE controller port (CRW2200EZ)
•Windows 95/98/ME, Windows 2000, or NT 4.0 (with Service Pack 5 or newer)
Important Note: For SCSI models, Yamaha recommends Iwill 2930c / 2930u+ PCI SCSI controllers or Adaptec’s AHA-29xx, AHA-39xx family of SCSI cards.
2

Macintosh and compatibles:
•Mac OS System 8.0 or newer
•Available SCSI controller port (CRW2200SZ) or available IDE controller port (CRW2200EZ).
1.1.3) Package Contents
If any of the items 1 through 7 (listed below) are missing from the retail package (excludes refurbished products), please contact Yamaha Customer Support (see section 7.4). In addition to the items listed below, this package may contain additional software (see product
1.Internal CD-ReWritable drive
2.Quick Start Guide (this booklet)
3.Yamaha/Ahead Installation CD-ROM
4.3mm mounting screws (total of 4)
5.SCSI Ribbon Cable (CRW2200SZ only)
6.E-IDE Ribbon Cable (CRW2200EZ only)
7.Audio Cable (audio output to soundcard input)
8.1 Blank CD-Recordable (CD-R) media
9.Registration and Warranty Card
10.Adobe Software CD-ROM
11.Late Breaking News (if applicable)
box for details) and optional items such as promotional offers.
1.2) About your new Yamaha 3-in-1 CD-RW Recorder
1.2.1) Major Features of the CRW2200 Series
20X Write Speed: With the industry’s fastest write speed, record a 74-minute CD in less than 4 minutes* (fast enough to meet the tightest deadlines)!
10X ReWrite Speed: Record, erase and record again at incredible 10X** speed, up to 999 times!
40X Read Speed: With a maximum read speed comparable to top CD-ROM drives, this CD-RW recorder eliminates the need for an additional CD-ROM drive.
40X Maximum Audio Ripping: Imagine ripping a 3-minute audio track in just under
5 seconds or rip a 74 minute audio CD in less than 3 minutes! With the fastest rip speed in the industry, up to five times faster than conventional CD-RW or DVD-ROM drives, this recorder blazes when processing music!
Buffer Memory: All Yamaha CRW2200 Series CD-ReWritable drives offer 8MB of generous buffer memory, virtually eliminating buffer underrun and preventing wasted time and media. SafeburnTM Buffer Management System: SafeBurn is the most comprehensive buffer management system in the industry, designed not only to eliminate buffer underruns but also allow you to burn CDs while running multiple applications.
PurephaseTM Laser System: This exclusive Yamaha anti-glare laser technology compensates for unwanted reflections created on the disc surface during recording, reducing jitter rates by over 25% for enhanced reliability and improved performance. Breakthrough Technology: By employing partial CAV (Constant Angular Velocity) technology, this recorder requires no additional time to control the rotation speed of its motor, allowing faster, smoother recording.
Waste-Proof Write StrategyTM: By combining CAV writing support for on-the-fly data backup specific fine tunings to the included recording software and Yamaha’s
exclusive SafeBurn Buffer Management System, this recorder provides a robust, stable recording environment that virtually eliminates buffer underruns and wasted media. RapidLinked™ Packet Writing: Drag and drop files to CD on at a time or all at once.
CD Text Support: Encode music CD album and track titles, arts name and messages directly onto disc.
Flash-ROM: Instantly upgrade your CD-RW recorder via software to optimize performance and extends its life.
3

1.2.2) Main Applications for Yamaha’s 3-in-1 CD-RW Series of Drives:
Music: Record your own original music on CDs or compile your favorite songs and create new Audio CDs.
Images & Graphics: Most scanned or digital photos, digital video and computer generated graphics are notoriously large to record on contemporary, portable media. Now you can record your images on CDs and free your hard drive space for other uses.
Backup and Archive: Save critical information in the least expensive way. For just pennies per megabyte, you can copy files to CD-ReWritable media or archive valuable information for future reference. CDs are recognized as the most reliable, long-lasting medium to store data. Plus, unlike other media used for backup or archiving, the information stored on a CD is instantly accessible.
Distribute and Transfer Data: Send multimedia presentations and catalogs with highresolution images and CD-quality sound to anyone. With Yamaha CD-ReWritable drives, you do not have to worry about media compatibility. Any ordinary CD-ROM drive can read the data you store on a CD-R media using a CD-ReWritable drive.
1.2.3) CD-ReWritable Drives vs. CD-Recordable Drives
All Yamaha CD-RW drives are “multi-function” or “3-in-1” drives. This means that your new drive may be used as a CD-R drive (to write once on CD-R media), a CD-RW drive
(to rewrite on CD-RW media), or as a CD-ROM drive (to play audio or computer CDs).
1.2.4) How CD-RW Drives Write and Re-Write
To write on CD-R media, CD-RW drives write data by burning tiny pits into a green, gold, or blue dye layer. The disc is read by a head which is simply looking for the absence or presence of reflected laser light.
To re-write on CD-RW media, CD-RW drives write data by altering the alignment of crystalline structures in the media. When the disc is read by a laser, these changes in the crystalline structure alter the phase of the effected light. The disc can be “wiped clean”
in an erase process that realigns the crystalline elements.
Your new Yamaha 3-in-1 CD-RW drive automatically recognizes and accommodates whatever CD media is inserted. For better clarification, please study the table below:
Format Function |
CD-R |
|
CD-RW |
|
Compatibility? |
Nearly all CD-ROM drives |
CD-RW drives |
||
Audio CD Players |
MultiRead(MR) enabled CD-ROM |
|||
|
||||
|
All but the earliest DVD drives |
drives and CD-Players (MR dri- |
||
|
ves/players are a recent develop- |
|||
|
|
|
||
|
|
|
ment with a limited installed base) |
|
|
|
|
|
|
Cost of Media? |
Very Low |
|
2X that of CD-R |
|
|
|
|
|
|
Erasable? |
No - Write Once |
|
Yes - May be re-recorded up to |
|
|
|
|
999 times |
|
|
|
|
|
|
Capacity? |
650MB data |
700MB data |
650MB data / 74 Min. Audio |
|
|
74 Min. Audio |
80 Min. Audio |
700 MB data / 80 Min. Audio |
|
|
|
|
||
Storage Life? |
75-200 years |
|
30 years |
|
|
|
|
|
|
Maximum Recording Speed? |
20X |
|
10X |
|
Application? |
Archival Storage |
|
Back-up |
|
|
Storage requiring “audit trail” |
Supplement to hard drive |
||
|
(medical/financial/legal records, etc.) |
Software Authorizing |
||
|
Audio CD |
|
|
|
|
Distribution of Large |
|
||
|
Data Files |
|
|
|
|
Prepare Multimedia |
|
||
|
Presentation |
|
|
|
4

1.2.5) About CD-R and CD-RW Discs
CD-R discs
The CRW2200 drives can write to these discs at 1X, 2X, 4X, 8X, 12X, 16X or 20X speed. These discs can be played back in a CD-ROM drive or a CD player.
16X-20X speed writing is enabled with Partial CAV method. See page 6
When writing at 8X or faster speeds, use “high-speed writing capable” discs.
CD-RW discs
There are two types of CD-RW discs: those that support write/rewrite speeds of 1X, 2X, and 4X, and those that support only 2X. The CRW2200 drives can write/rewrite at 2X or 4X speed on the first type of disc and at 2X on the second type of disc. These discs can be read/ played on a device (e.g., CD-ROM drive) that supports “CD-RW.”
High Speed CD-RW discs
These discs allow writing/rewriting at 4X to 10X speeds. The CRW2200 drives can write/rewrite these discs at 4X, 8X, or 10X speed. These discs can be read/played by a CD-RW drive that bears the High Speed CD-RW logo, or by a device (e.g., CD-ROM drive) that supports “CD-RW.”
10X-speed writing is enabled with Full CAV method.
•In order to write, erase, or read these discs using a CD-R/ RW drive, a drive bearing the High Speed CD-RW logo must be used. When using a CD-ROM drive to read these discs, the drive must be capable of reading CD-RW discs.
•If these discs are used in a CD-R/RW drive not bearing the High Speed CD-RW logo, the discs may not be recognized, resulting in the computer not operating correctly or other malfunctions occurring.
•Refer to the page at the URL below before attempting to read these discs on a Yamaha CD-R/RW drive not bearing the High Speed CD-RW logo.
URL: http://www.yamaha.co.jp/english/product/computer/
5

Important Note: The Orange Book standard defines how all recordable discs (including CD-R and CD-RW) are written. Part 2 of the Orange Book standard relates to CD-R discs, and Part 3 to CD-RW discs. The standard was named after the color of the book’s pages.
1.2.6) About Partial CAV (Constant Angular Velocity) Writing Method
Writing to a CD-R disc is normally done using CLV (Constant Linear Velocity) method. In this method, the disc’s rotation speed is adjusted continuously to keep a steady data transfer rate. The data transfer rate, in the CLV method, is held constant but, because of the smaller size of the inner circles of the disc versus the large outer circles, the disc speed is adjusted depending upon which portion of the disc data is being recorded on (i.e. if recording on the inner edge versus the outer edge, the disc should rotate faster to keep up with the data transfer rate - which is held steady throughout the writing cycle.)
In contrast, the CAV (Constant Angular Velocity) method keeps the disc’s roatation speed constant while adjusting the data transfer rate depending upon which portion of the disc is being recorded. In other words, in the CAV writing method, the outer portion of the disc should receive an increased data transfer rate compared to the inner portion. Applying the CAV method enables a significant increase in the data transfer rates with a minimum load increase to the drive’s mechanism.
Yamaha’s new CRW2200 Lightspeed2 drives use the CAV method in the inner portions of the disc while using CLV method in the outer portions of the disc in order to enable up to 20x of writing speed. This is called a Partial CAV method.The drive will control the disc rotation speed to start writing at 12X speed in the inner portions, gradually accelerting up to 20X speed and maintaining 20X speed in the outer portions.
1.2.7) About 10X-speed writing/rewriting of a High Speed CD-RW Disc
10X-speed writing/rewriting of a High Speed CD-RW disc is enabled with the CLV method, and the 4X-10X Full CAV method. Commonly, writing/rewriting is enabled with the CLV Method.
When writing/rewriting with packet writing, you can also select the Full CAV method.
For more details, refer to the documentation that came with your writing software. (Make sure that your writing software supports the Full CAV method. The supplied writing software is supported.)
When you try to open and use a file recorded on a CD-RW disc with an application, Yamaha recommends you using the Full CAV method.
1.2.8) What is “Buffer Underrun”
CD-R/RW drives are equipped with buffer memory. this memory temporarily stores data while a disc is being recorded. When buffer memory becomes empty (due to unexpected interruptions or the system’s inability to keep up with the writing process), a write error occurs. This error is known as a “buffer underrun error”.
6

Data |
|
|
|
Data is stored in |
If data transfer is |
|
buffer memory... |
interrupted... |
|
|
when no data is left |
|
|
in buffer memory... |
|
|
(Buffer underrun) |
|
and then written |
then buffer memory |
|
to disc |
begins to empty |
|
|
Writing fails |
|
|
(buffer Underrun |
|
|
Error) |
A Buffer Underrun error will permanently ruin the disc.
1.2.9) Yamaha Buffer Underrun Protection
Buffer Underrun Protection is featured in Yamaha’s CRW2200 series CD-R/RW drives. When a buffer underrun is about to occur, a buffer underrun error is prevented by temporarily suspending the writing process. Writing resumes when enough data has accumulated again in buffer memory. Buffer Underrun Protection on the CRW2200 series is extremely accurate, resulting in seamless recording between stop and continuation points.
|
|
If data transfer is |
Once data transfer |
interrupted... |
resumes normally... |
and buffer memory is |
about to empty |
writing is suspended
enough data has accumulated
in buffer memory...
writing continues
Yamaha Buffer Underrun Protection ensures error-free results.
7
2. REGISTRATION
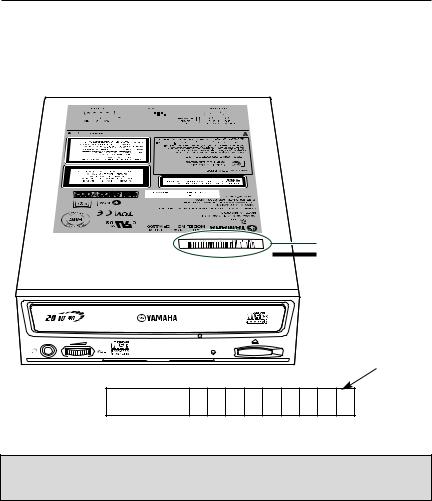
It is very important that you register your new Yamaha CD-RW drive. Registration entitles you to receive technical support and customer service, as well as valuable information regarding upgrades and new product introductions from Yamaha. The unique serial number of your new Yamaha 3-in-1 drive can be found on the unit, as illustrated below.
Serial number
(3 letters and 7 digits
write serial number here
Serial No. 
Important Note: Please write down the serial number of your 3-in-1 CD-RW drive as illustrated in the picture above. Make sure this serial number is included with your registration information posted on the web or sent to us by mail. It is also a good idea to write down the serial number of your 3-in-1 CD-RW drive somewhere else in order to be able to easily refer to it should it become necessary
You can register your Yamaha CD-RW drive by sending in your user Registration Card (included in the package) by mail or online by visiting www.yamaha.com.
8

3. SCSI MODEL HARDWARE INSTALLATION
IBM Compatible or Macintosh Computers
3.1) Setup Flowchart for CRW2200SZ (SCSI)
This flowchart shows the procedure for setting up your new Yamaha 3-in-1 SCSI drive. For easy cross-referencing, the relevant pages in this manual are also given.
STEP |
Do you have a SCSI |
|
|
STEP |
|
1 |
adapter card? |
NO 1.1 |
|||
|
|
|
|
|
STEP |
|
|
|
|
|
|
|
|
|
|
|
1.2 |
|
|
|
|
||
STEP Set up the CD-RW drive
3 |
1. Set the jumper switches |
(Pages 9, 10) |
STEP |
Check that the CD-RW drive |
4 |
is correctly installed |
STEP Install the CD writing software
5 |
For details about how to install the |
software, refer to Chapter 6, starting |
STEP Start using the drive!
6 |
Use the drive to create audio CDs, to |
|
back up data on your hard disk, or for |
|
whatever purpose suits your needs. |
|
Read Chapter 8 pages 27 - 37 or refer |
|
to the online manuals supplied on the |
|
software disc. |
Obtain a SCSI adapter card
Recommended models:
See Section 1.1.2 on pages 2 and 3
Install the SCSI adapter card
Read this manual and insert the SCSI card into the appropriate slot on
the computer.
9
3.2) About SCSI Controllers
The Yamaha CRW2200SZ package does not include a SCSI host adapter card. A host adapter card provides the interface between your PC and various peripheral devices. A wide range of cards are available with various levels of performance, features and price. If you plan to add peripherals such as scanners or external hard drives, you may want a more capable host adapter. If, on the other hand, you plan to use the host adapter only to connect this CD-RW, you may prefer a more economical controller. Yamaha recommends Iwill 2930c / 2930u+ PCI SCSI controllers or Adaptec’s AHA29xx/AHA39xx families of SCSI cards.
You can purchase SCSI controller cards from your local computer peripheral retailer or you may contact Yamaha toll-free at 888-926-2426 to purchase a compatible SCSI controller card.
Once you have selected a SCSI host adapter card, install it in your computer following the directions provided in the card manufacturer’s operating manual.
3.3) CRW2200SZ (SCSI) Drive Settings
Before installing your new CD-RW drive in your computer, you will need to set the following jumpers:
•SCSI ID settings
•Parity setting
•Terminator setting
•Block size setting
You may set these jumpers by inserting a jumper pin in the jumper switch located on the rear panel of your CD-RW drive.
Important Note: Use long-nose pliers to remove or insert jumper connectors. In the diagrams in this manual, solid black fill is used to indicate locations where a jumper is used to short between pins.
10
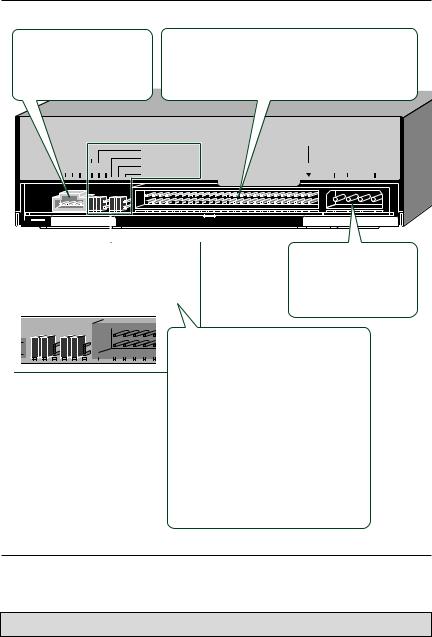
3.3.1) Rear Panel of CRW2200SZ (SCSI)
The CRW2200SZ drive’s rear panel features the following.
AUDIO OUT connector
Connect one end of the 4-pin audio cable to this and the other end to your computer’s sound card or built-in audio.
SCSI INTERFACE connector
Insert the connector of the SCSI ribbon cable here. Make sure you align the red line of the ribbon cable with pin 1 of the drive’s connector, marked “SCSI INTERFACE CONNECTOR 1.”
|
|
|
|
SCSI |
|
|
|
|
|
|
INTERFACE |
|
|
|
|
ID SELECT |
|
CONNECTOR |
|
|
AUDIO OUT |
|
|
DC INPUT |
|||
|
PARITY |
|
||||
R G L |
1 2 4 |
TERMINATOR |
1 |
+5V |
G |
+12V |
|
|
BLOCK SIZE |
|
|
|
|
|
|
|
|
|
|
|
|
|
|
|
|
|
|
|
|
|
|
|
|
|
|
|
|
|
|
ID SELECT.......1 |
|
DC INPUT connector |
||||
|
|
|
|
PARITY.............2 |
|
Insert the power connector |
||||
|
|
|
|
TERMINATOR..3 |
|
from your computer’s |
||||
|
|
|
power supply in this socket |
|||||||
|
1 2 4 |
|
|
BLOCK SIZE....4 |
|
|
|
|||
|
|
|
|
to feed power to the drive. |
||||||
|
|
|
|
|
|
|
|
|
||
|
|
|
|
|
|
1 ID |
SELECT jumper switches |
|||
|
|
|
|
|
|
|||||
|
|
|
|
|
|
Set these switches using black plastic |
||||
|
|
|
|
|
|
|||||
|
|
|
|
|
shunts in order to manually assign a SCSI ID |
|||||
|
|
|
|
|
number |
for the drive. |
|
|||
|
|
|
|
|
|
|||||
|
|
|
|
|
|
|
|
|||
|
|
|
|
|
2 PARITY jumper switch |
|||||
|
|
|
|
|
Set this switch using a black plastic shunt in |
|||||
|
|
|
|
|
order to enable parity checking. |
|||||
|
|
|
|
|
3 TERMINATOR jumper switch |
|||||
|
|
|
|
|
Set this switch using a black plastic shunt in |
|||||
|
|
|
|
|
order to enable the drive’s built-in SCSI |
|||||
|
|
|
|
|
termination. |
|
||||
|
|
|
|
|
4 BLOCK SIZE jumper switch |
|||||
|
|
|
|
|
Set this switch using a black plastic shunt in |
|||||
|
|
|
|
|
order to set the block size to 512 bytes per |
|||||
|
|
|
|
|
sector. |
|
||||
3.3.2) Setting the SCSI ID Number of Your New Yamaha CD-RW Drive
The default factory setting for the SCSI ID Number is 3. For most installations, no adjustment of the SCSI ID number is necessary.
Important Note: Turn off the power before setting the SCSI ID number.
The SCSI ID number is used so that the computer will recognize a connected SCSI device. You can assign 0 through 7 as the SCSI ID number. Usually, “7” is reserved for the SCSI card ID number, and “0” is reserved for the first SCSI device in the chain.
Use a number between 1 and 6 for your new CD-RW drive below for more information on setting the SCSI ID number. The factory set ID number is “3”.
11
Important Note: If you are using other SCSI devices, be sure to use a unique ID number for each device.
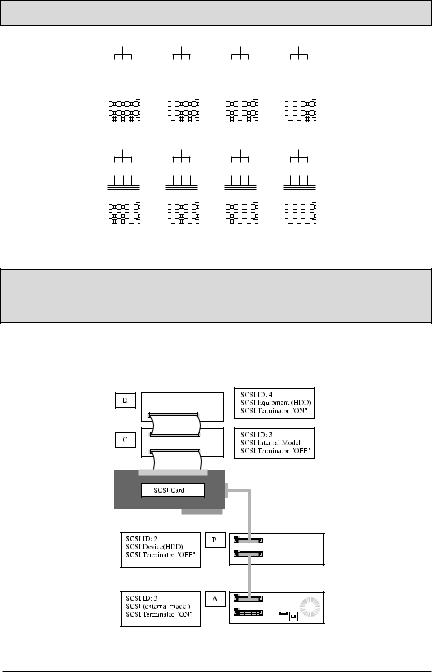
SCSI ID Setting:
|
1 2 4 |
1 2 4 |
|
|
|
|
1 2 4 |
1 2 4 |
|
|
||||||||||||||||||||||||||
|
|
|
|
|
|
|
|
|
|
|
|
|
|
|
|
|
|
|
|
|
|
|
|
|
|
|
|
|
|
|
|
|
|
|
|
|
|
|
|
|
|
|
|
|
|
|
|
|
|
|
|
|
|
|
|
|
|
|
|
|
|
|
|
|
|
|
|
|
|
|
|
|
|
|
|
|
|
|
|
|
|
|
|
|
|
|
|
|
|
|
|
|
|
|
|
|
|
|
|
|
|
|
|
|
|
|
|
|
|
|
|
|
|
|
|
|
|
|
|
|
|
|
|
|
|
|
|
|
|
|
|
|
|
|
|
|
|
|
|
|
|
|
|
|
|
|
|
|
|
|
|
|
|
|
|
|
|
|
|
|
|
|
|
|
|
|
|
|
|
|
|
|
|
|
|
|
|
|
|
|
|
|
|
|
|
|
|
|
|
|
|
|
|
|
|
|
|
|
|
|
|
|
|
|
|
|
|
|
|
|
|
|
|
|
|
|
|
|
|
|
|
|
|
|
|
|
|
|
|
|
|
|
|
|
|
|
|
|
|
|
|
|
|
|
|
|
|
|
|
|
|
|
|
|
|
|
|
|
|
|
|
|
|
|
|
|
|
|
|
|
|
|
|
|
|
|
|
|
|
|
|
|
|
|
|
|
|
|
|
|
|
|
|
|
|
SCSI ID 0 SCSI ID 1 SCSI ID 2 SCSI ID 3
1 2 4 1 2 4 1 2 4 1 2 4
|
|
|
|
|
|
|
|
|
|
|
|
|
|
|
|
|
|
|
|
|
|
|
|
|
|
|
|
|
|
|
|
|
|
|
|
|
|
|
|
|
|
|
|
|
|
|
|
|
|
|
|
|
|
|
|
|
|
|
|
|
|
|
|
|
|
|
|
|
|
|
|
|
|
|
|
|
|
|
|
|
|
|
|
|
|
|
|
|
|
|
|
|
|
|
|
|
|
|
|
|
|
|
|
|
|
|
|
|
|
|
|
|
|
|
|
|
|
|
|
|
|
|
|
|
|
|
|
|
|
|
|
|
|
|
|
|
|
|
|
|
|
|
|
|
|
|
|
|
|
|
|
|
|
|
|
|
|
|
|
|
|
|
|
|
SCSI ID 4 |
SCSI ID 5 |
SCSI ID 6 |
SCSI ID 7 |
|||||||||||||||||||||||||||||
* Use jumper connectors to short the locations shown in black.
Important Note: If you are using Window 95, 98, or ME and the SCSI ID setting on the rear panel is the same as the number assigned to another SCSI device, the Plug and Play component of Windows 95, 98 or ME can automatically assign an unused number to your new CD-RW drive (SCAM protocol level 1- if SCAM is enabled).
Please refer to the SCSI Device Connection Diagram (illustration below) for a practical example of how SCSI devices may be set to function together.
3.3.3) Parity Setting of your new 3-in-1 CD-RW Recorder
•Parity ON (with a jumper): Parity Check will be performed. Normally, use this setting.
•Parity OFF (without a jumper): Parity Check will not be performed.
12
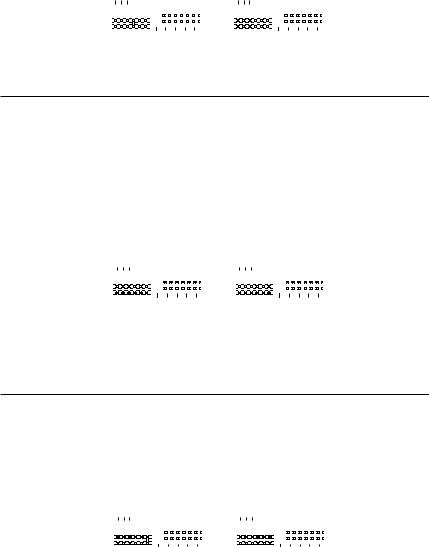
Parity ON (default) |
|
Parity OFF |
|
|
|||||||
|
|
|
|
ID SELECT |
|
|
|
|
|
ID SELECT |
|
|
|
|
|
PARITY |
|
|
|
|
|
PARITY |
|
|
|
|
|
|
|
|
|
|
|
||
|
|
|
|
TERMINATOR |
|
|
|
|
|
TERMINATOR |
|
|
|
|
|
BLOCK SIZE |
|
|
|
|
|
BLOCK SIZE |
|
1 2 4 |
|
1 2 4 |
|
|
|||||||
|
|
|
|
|
|
|
|
|
|
|
|
|
|
|
|
|
|
|
|
|
|
|
|
|
|
|
|
|
|
|
|
|
|
|
|
|
|
|
|
|
|
|
|
|
|
|
|
|
|
|
|
|
|
|
|
|
|
|
|
|
|
|
|
|
|
|
|
|
|
|
|
|
|
|
|
|
|
|
|
|
|
|
|
|
|
|
|
|
|
|
|
|
|
|
|
|
|
|
|
|
|
|
|
|
|
|
|
* Use jumper connectors to short the locations shown in black.
3.3.4) Terminator Setting of your new 3-in-1 CD-RW Recorder
The terminator setting indicates whether or not your new CD-RW drive is the last connected SCSI device.
•Terminator ON (with a jumper): Use this setting if your new CD-RW drive is the last device in the internal SCSI daisy-chain.
•Terminator OFF (without a jumper): Use this setting if devices other than your new CDRW drive are in the internal SCSI daisy-chain and your new drive is not the last device.
Terminator ON (default) |
|
Terminator OFF |
|
||||||||
|
|
|
|
ID SELECT |
|
|
|
|
|
ID SELECT |
|
|
|
|
|
PARITY |
|
|
|
|
|
PARITY |
|
|
|
|
|
|
|
|
|
|
|
||
|
|
|
|
TERMINATOR |
|
|
|
|
|
TERMINATOR |
|
|
|
|
|
BLOCK SIZE |
|
|
|
|
|
BLOCK SIZE |
|
1 2 4 |
1 2 4 |
|
|||||||||
|
|
|
|||||||||
|
|
|
|
|
|
|
|
|
|
|
|
|
|
|
|
|
|
|
|
|
|
|
|
|
|
|
|
|
|
|
|
|
|
|
|
|
|
|
|
|
|
|
|
|
|
|
|
|
|
|
|
|
|
|
|
|
|
|
|
|
|
|
|
|
|
|
|
|
|
|
|
|
|
|
|
|
|
|
|
|
|
|
|
|
|
|
|
|
|
|
|
|
|
|
|
|
|
|
|
|
|
|
|
|
|
|
|
* Use jumper connectors to short the locations shown in black.
For example, in the SCSI device Connection diagram on the previous page, device D will have an ON SCSI terminator while device C will have an OFF SCSI terminator.
3.3.5) Block Size Setting of your new 3-in-1 CD-RW Recorder
•Block size ON (with a jumper): Block Size is set to 512Byte/sector. This function is valid only for workstations, such as those that run UNIX.
•Block size OFF (without a jumper): Normally, use this setting.
Block size ON |
|
|
|
Block size OFF (default) |
|
|||||||||
|
|
|
|
|
|
|
ID SELECT |
|
|
|
|
|
ID SELECT |
|
|
|
|
|
|
|
|
PARITY |
|
|
|
|
|
PARITY |
|
|
|
|
|
|
|
|
|
|
|
|
|
|||
|
|
|
|
|
|
|
TERMINATOR |
|
|
|
|
|
TERMINATOR |
|
|
|
|
|
|
|
|
BLOCK SIZE |
|
|
|
|
|
BLOCK SIZE |
|
1 2 4 |
|
|
|
1 2 4 |
|
|||||||||
|
|
|
|
|
|
|||||||||
|
|
|
|
|
|
|
|
|
|
|
|
|
|
|
|
|
|
|
|
|
|
|
|
|
|
|
|
|
|
|
|
|
|
|
|
|
|
|
|
|
|
|
|
|
|
|
|
|
|
|
|
|
|
|
|
|
|
|
|
|
|
|
|
|
|
|
|
|
|
|
|
|
|
|
|
|
|
|
|
|
|
|
|
|
|
|
|
|
|
|
|
|
|
|
|
|
|
|
|
|
|
|
|
|
|
|
|
|
|
|
|
|
|
|
|
|
|
|
|
|
|
|
|
|
|
|
|
|
|
|
|
|
|
|
|
|
|
|
|
|
|
|
|
|
|
|
|
|
|
* Use jumper connectors to short the locations shown in black.
Verify your SCSI Card: Before installing your new CD-RW drive, you need to verify that your SCSI card is working properly. To verify that your SCSI card is properly installed, in Windows 95/98/ME, click Start, then select Settings and then click on the Control Panel. The Control Panel will open. Double click on System and the System Properties window will be displayed. Select the Device Manager tab and look for SCSI Controllers. Click on the “+” sign next to SCSI Controllers. You should see the name of your SCSI Controller card there.
13

Please note that if there is an exclamation mark on a yellow background, you have a device conflict. Do not install your new CD-RW drive until you have resolved the conflict.
To resolve the device conflict, please follow the instructions below:
•Check the on line Help menu in the software provided with the SCSI Controller card.
•Check the documentation provided with your SCSI Controller.
•Check Windows Help by clicking the Start button and then select Help. Select Index tab and scroll to and select the Index topic "devices, troubleshooting". Then click Display and select Troubleshooting Hardware Conflicts.
•Contact the manufacturer of the SCSI Controller.
Once you have verified that your SCSI controller is correctly installed, proceed with the installation of your new 3-in-1 CD-RW drive.
4. E-IDE (ATAPI) MODEL HARDWARE INSTALLATION |
IBM Compatible or |
|
Macintosh Computers |
4.1) Setup Flowchart for CRW2200EZ (E-IDE) |
|
This flowchart shows the procedure for setting up your new Yamaha 3-in-1 E-IDE drive. For easy cross-referencing, the relevant pages in this manual are also given.
STEP
1
STEP
2
Check that the CD-RW
drive is recognized correctly
Go to Control Panel | System | Device Manager tab. Double-click on CDROM and check that the drive has been recognized correctly by the computer’s OS.
STEP
 3
3
STEP
4
Install the CD writing software
Follow instructions in Chapter 6, starting on page 27 or refer to the
Start using the drive!
Use the drive to create audio CDs, to back up data on your hard disk, or for whatever purpose suits your needs.
Read Chapter 8, pages 27 - 37 or refer to the online manuals supplied on the software disc.
14

4.2) About the E-IDE (ATAPI) Interface
The most common standard for connecting internal hard drives and CD-ROM drives inside a PC is the E-IDE (ATAPI) interface.
E-IDE or Enhanced IDE computers normally have two IDE interface connectors; a primary and a secondary. Each IDE interface connector allows up to two IDE devices to be connected for a total of four IDE devices. Typically, a hard disk is connected to the primary connector while a CD-ROM drive is attached to the secondary connector.
Important Note : Avoid connecting your new CD-RW 3-in-1 drive to the same primary IDE connector as the one connected to your hard drive if possible. Select the secondary connector that may be connected to your CD-ROM drive. But, if you must connect it to the primary connector, make sure there is only one device (your hard drive) selected as MASTER and all other devices are selected as SLAVE.
4.2.1) Rear panel of CRW2200EZ (E-IDE)
The CRW2200EZ drive’s rear panel features the following:
DIGITAL AUDIO OUT connector
If your sound card has a digital audio input, you can connect this connector to that digital input using a digital audio cable (sold separately).
IDE INTERFACE connector
Insert the connector of the IDE cable here. Make sure you align the red line of the ribbon cable with pin 1 of the drive’s connector, marked “IDE INTERFACE CONNECTOR 1.”
ANALOG AUDIO OUT connector
Connect one end of the 4-pin audio cable to this and the other end to your computer’s sound card or built-in audio.
|
|
|
|
|
|
|
|
|
|
|
|
|
|
|
|
|
|
|
|
|
|
|
|
|
|
|
|
|
|
|
|
|
|
|
|
|
|
|
|
|
|
|
|
|
|
|
|
|
|
|
|
|
|
|
|
|
|
|
|
|
|
|
|
|
|
|
|
|
|
|
|
|
CSEL |
DC INPUT |
|
|
|
|
|
|
|
|
|
|
|
|
|
|
|
|
|
|||
IO OUT |
|
|
|
|
|
|
|
SLAVE |
connector |
|||||||||
|
|
|
|
|
|
|
||||||||||||
|
|
G L |
|
|
|
|
|
|
|
MASTER |
Insert the power |
|||||||
|
|
|
|
|
|
|
|
|
|
connector from your |
||||||||
|
|
|
|
|
|
|
|
|
|
|
|
|
|
|
|
|
||
|
|
|
|
|
|
|
|
|
|
|
|
|
|
|
|
|
computer’s power |
|
|
|
|
|
|
|
|
|
|
|
|
|
|
|
|
|
|
||
|
|
|
|
|
|
|
|
|
|
|
|
|
|
|
|
|
supply in this |
|
|
|
|
|
|
|
|
|
|
|
|
|
|
|
|
|
|
||
|
|
|
|
|
|
|
|
|
|
|
|
|
|
|
|
|
socket to feed |
|
|
|
|
|
|
|
|
|
|
|
|
|
|
|
|
|
|
power to the drive. |
|
|
|
|
|
|
|
|
|
|
|
|
|
|
|
|
|
|
|
|
|
|
|
|
|
|
|
|
|
|
|
|
|
|
|
|
|
|
|
1MASTER jumper switch
Plug a plastic shunt into this jumper switch if you are connecting the master CRW2200EZ using an IDE cable.
2SLAVE jumper switch (default setting)
Plug a plastic shunt into this jumper switch if you are connecting the slave CRW2200EZ using an IDE cable.
3CSEL jumper switch
If your computer supports the CSEL function, plug a plastic shunt into this jumper switch to have the computer automatically select master or slave for the CRW2200EZ.
15

4.2.2) Setting the Jumper to Select MASTER, SLAVE or CSEL settings
Your new Yamaha CD-RW 3-in-1 drive setting is configured as SLAVE by default. Most users will connect their new CD-RW drive to the secondary E-IDE controller of their computer (see section 4.2 for more information) in which case there is no need to change the default setting. However, a jumper is provided on the rear panel of your new CD-RW 3-in-1 drive to configure it to work in various situations (see page 15 as well).
MASTER - Change the jumper switch to the MASTER position if:
•You’ll be replacing your system’s existing CD-ROM drive with your new Yamaha CD-RW drive. In this case, you need to disconnect your CD-ROM drive’s secondary IDE controller and power cable and then plug in your new CD-RW drive using the same IDE controller and power cable.
•This drive will be the only IDE drive installed in the computer. Bear in mind that this is somewhat unusual unless your computer is using a SCSI hard disk drive and a SCSI CD-ROM drive.
•The drive will be used in a specialized application with multiple Yamaha CD-RW 3-in-1 or multiple CD-RW drives. In this case, only one drive would be the MASTER. The other drives should be selected as SLAVES.
Note: If adding your new Yamaha CD-RW drive to a system already equipped with a DVD-ROM or high speed CD-ROM drive, you may want to proceed with the following configuration if you encounter problems: Turn off your computer. Remove your DVD-ROM or high speed CD-ROM drive from the secondary IDE connector where it is most likely connected to. Install your Yamaha CD-RW drive (with its default, MASTER jumper setting) on the secondary controller where your DVD-ROM was once installed (replacing it). Reset the jumper switch of your DVD-ROM from MASTER (or CSEL) to SLAVE. Add your DVD-ROM drive to your Primary IDE contoller (the controller connected to your hard disk). Use the included 3-connector ribbon cable to replace your primary IDE connector cable if needed.
16
 Loading...