


 Loading...
CP 100 and CP 200™ 12-Lead
Resting Electrocardiograph
CP 100TM 12Lead Resting Electrocardiograph |
CP 200TM 12Lead Resting Electrocardiograph |
Service Manual

ii |
Welch Allyn CP 100 and CP 200 Electrocardiograph |
Copyright 2005, Welch Allyn, Inc. All rights are reserved. No one is permitted to reproduce or duplicate, in any form, this manual or any part thereof without permission from Welch Allyn.
Caution: Federal US law restricts sale of the device identified in this manual to, or on the order of, a licensed physician.
Welch Allyn assumes no responsibility for any injury, or for any illegal or improper use of the product, that may result from failure to use this product in accordance with the instructions, cautions, warnings, or indications for use published in this manual.
Welch Allyn is a registered trademark of Welch Allyn, Inc., and CP 200, CP100, and CardioPerfect are trademarks of Welch Allyn, Inc.
SD is a trademark of Toshiba.
Software in this product is Copyright 2005, Welch Allyn, Inc., or its vendors. All rights are reserved. The software is protected by United States of America copyright laws and international treaty provisions applicable worldwide. Under such laws, the licensee is entitled to use the copy of the software incorporated within this instrument as intended in the operation of the product in which it is embedded. The software may not be copied, decompiled, reverse-engineered, disassembled or otherwise reduced to human-perceivable form. This is not a sale of the software or any copy of the software; all right, title and ownership of the software remains with Welch Allyn or its vendors.
For information about any Welch Allyn product, please call Welch Allyn Technical Support:
USA |
1 800 535 6663 |
Australia |
+61 |
29 638 3000 |
|
|
+1 315 685 4560 |
|
800 |
074 793 |
|
Canada |
1 800 561 8797 |
China |
+86 |
216 327 9631 |
|
European Call Center |
+353 46 906 7790 |
France |
+33 |
15 569 5849 |
|
Germany |
+49 |
747 792 7186 |
Japan |
+81 |
33 219 0071 |
Latin America |
+315 685 2644 |
Netherlands |
+31 |
15 750 5000 |
|
Singapore |
+65 |
6419 8100 |
South Africa |
+27 11 777 7555 |
|
United Kingdom |
+44 |
207 365 6780 |
Sweden |
+46 |
85 853 6551 |
Part Number (manual only): 704340 Rev D
Welch Allyn
PO Box 220
Skaneateles Falls, NY 13153-0220
www.welchallyn.com
Printed in USA
0297

iii
Contents
1 - Safety Summary. . . . . . . . . . . . . . . . . . . . . . . . . . . . . . . . . . . . . . . . . 1
Introduction. . . . . . . . . . . . . . . . . . . . . . . . . . . . . . . . . . . . . . . . . . . . . . . . . . . . . . 2
Symbols . . . . . . . . . . . . . . . . . . . . . . . . . . . . . . . . . . . . . . . . . . . . . . . . . . . . . . . . 2
Servicing the Electrocardiograph Safely . . . . . . . . . . . . . . . . . . . . . . . . . . . . . . . . 4
General Warnings. . . . . . . . . . . . . . . . . . . . . . . . . . . . . . . . . . . . . . . . . . . . . . 4
Electrostatic Discharge (ESD). . . . . . . . . . . . . . . . . . . . . . . . . . . . . . . . . . . . . 5
General Cautions . . . . . . . . . . . . . . . . . . . . . . . . . . . . . . . . . . . . . . . . . . . . . . 6
2 - Overview. . . . . . . . . . . . . . . . . . . . . . . . . . . . . . . . . . . . . . . . . . . . . . . 7
Purpose and Scope. . . . . . . . . . . . . . . . . . . . . . . . . . . . . . . . . . . . . . . . . . . . . . . . 8
Service Options . . . . . . . . . . . . . . . . . . . . . . . . . . . . . . . . . . . . . . . . . . . . . . . . . . 8
Warranty Service . . . . . . . . . . . . . . . . . . . . . . . . . . . . . . . . . . . . . . . . . . . . . . 8
Non-Warranty Service . . . . . . . . . . . . . . . . . . . . . . . . . . . . . . . . . . . . . . . . . . 8
Technical Support Services . . . . . . . . . . . . . . . . . . . . . . . . . . . . . . . . . . . . . . 9
Returning Products. . . . . . . . . . . . . . . . . . . . . . . . . . . . . . . . . . . . . . . . . . . . . 9
Product Configurations . . . . . . . . . . . . . . . . . . . . . . . . . . . . . . . . . . . . . . . . . . . . 10
Recommended Service Intervals . . . . . . . . . . . . . . . . . . . . . . . . . . . . . . . . . . . . 10
Controls, Indicators, and Connectors . . . . . . . . . . . . . . . . . . . . . . . . . . . . . . . . . 11
“System Settings” Menu Tree . . . . . . . . . . . . . . . . . . . . . . . . . . . . . . . . . . . . . . 16
About the Main Menu. . . . . . . . . . . . . . . . . . . . . . . . . . . . . . . . . . . . . . . . . . . . . 17
Moving Through the Menus . . . . . . . . . . . . . . . . . . . . . . . . . . . . . . . . . . . . . . . . 18
Reviewing the Device Information . . . . . . . . . . . . . . . . . . . . . . . . . . . . . . . . . . . 19
CP 100 and CP 200 Electrocardiograph . . . . . . . . . . . . . . . . . . . . . . . . . . . . . . . 20
Service Menus . . . . . . . . . . . . . . . . . . . . . . . . . . . . . . . . . . . . . . . . . . . . . . . 20
Entering the Service Info Screen . . . . . . . . . . . . . . . . . . . . . . . . . . . . . . . . . 20
Print Log . . . . . . . . . . . . . . . . . . . . . . . . . . . . . . . . . . . . . . . . . . . . . . . . . . . . 21
Battery Life Test . . . . . . . . . . . . . . . . . . . . . . . . . . . . . . . . . . . . . . . . . . . . . . 22
Printer Test . . . . . . . . . . . . . . . . . . . . . . . . . . . . . . . . . . . . . . . . . . . . . . . . . . 22
Export Files . . . . . . . . . . . . . . . . . . . . . . . . . . . . . . . . . . . . . . . . . . . . . . . . . 23
Import Files . . . . . . . . . . . . . . . . . . . . . . . . . . . . . . . . . . . . . . . . . . . . . . . . . 24
Delete Files . . . . . . . . . . . . . . . . . . . . . . . . . . . . . . . . . . . . . . . . . . . . . . . . . 24
Serial Number . . . . . . . . . . . . . . . . . . . . . . . . . . . . . . . . . . . . . . . . . . . . . . . 25
Lead Off Threshold. . . . . . . . . . . . . . . . . . . . . . . . . . . . . . . . . . . . . . . . . . . . 25
Service Tests . . . . . . . . . . . . . . . . . . . . . . . . . . . . . . . . . . . . . . . . . . . . . . . . 25
3 - Functional Verification . . . . . . . . . . . . . . . . . . . . . . . . . . . . . . . . . . . 29
Functional Verification Overview. . . . . . . . . . . . . . . . . . . . . . . . . . . . . . . . . . . . . 30
Full Functional Check . . . . . . . . . . . . . . . . . . . . . . . . . . . . . . . . . . . . . . . . . . . . . 30
Equipment Required . . . . . . . . . . . . . . . . . . . . . . . . . . . . . . . . . . . . . . . . . . . . . . 30
iv |
Contents |
Welch Allyn CP 100 and CP 200 Electrocardiograph |
Operating/Non-Printing Mode Current Test . . . . . . . . . . . . . . . . . . . . . . . . . 30 Battery Accuracy Test. . . . . . . . . . . . . . . . . . . . . . . . . . . . . . . . . . . . . . . . . . 31 Sleep/Standby Mode Current Test . . . . . . . . . . . . . . . . . . . . . . . . . . . . . . . . 31 Charger Detect Test . . . . . . . . . . . . . . . . . . . . . . . . . . . . . . . . . . . . . . . . . . . 31 LED Test. . . . . . . . . . . . . . . . . . . . . . . . . . . . . . . . . . . . . . . . . . . . . . . . . . . . 32 LCD Test. . . . . . . . . . . . . . . . . . . . . . . . . . . . . . . . . . . . . . . . . . . . . . . . . . . . 32 Set Unit Initial Configuration/SD Slot Test . . . . . . . . . . . . . . . . . . . . . . . . . . 32 ECG Communication Test (ECG Input test and lead off) . . . . . . . . . . . . . . . 33 Spirometer Communication Test . . . . . . . . . . . . . . . . . . . . . . . . . . . . . . . . . 33 USB Communications Test . . . . . . . . . . . . . . . . . . . . . . . . . . . . . . . . . . . . . 34 Beeper Test . . . . . . . . . . . . . . . . . . . . . . . . . . . . . . . . . . . . . . . . . . . . . . . . . 34 Keyboard Test. . . . . . . . . . . . . . . . . . . . . . . . . . . . . . . . . . . . . . . . . . . . . . . . 35 Printer Test . . . . . . . . . . . . . . . . . . . . . . . . . . . . . . . . . . . . . . . . . . . . . . . . . . 35 Dielectric Strength Test . . . . . . . . . . . . . . . . . . . . . . . . . . . . . . . . . . . . . . . . 38 Hi-Pot Test Connections . . . . . . . . . . . . . . . . . . . . . . . . . . . . . . . . . . . . . . . . 39 Chassis, Earth and Patient Leakage Current Tests. . . . . . . . . . . . . . . . . . . . 39
Checklist and Test Results Report Form . . . . . . . . . . . . . . . . . . . . . . . . . . . . . . . 40
4 - Troubleshooting . . . . . . . . . . . . . . . . . . . . . . . . . . . . . . . . . . . . . . . . 41
Problem-Solving Suggestions . . . . . . . . . . . . . . . . . . . . . . . . . . . . . . . . . . . . . . . 42
Limited Warranty . . . . . . . . . . . . . . . . . . . . . . . . . . . . . . . . . . . . . . . . . . . . . . . . 45
Service Policy . . . . . . . . . . . . . . . . . . . . . . . . . . . . . . . . . . . . . . . . . . . . . . . . . . . 46
5 - Disassembly and Repair Procedures . . . . . . . . . . . . . . . . . . . . . . . 47
Introduction. . . . . . . . . . . . . . . . . . . . . . . . . . . . . . . . . . . . . . . . . . . . . . . . . . . . . 48 Screws . . . . . . . . . . . . . . . . . . . . . . . . . . . . . . . . . . . . . . . . . . . . . . . . . . . . . . . . 48 Torque Specs . . . . . . . . . . . . . . . . . . . . . . . . . . . . . . . . . . . . . . . . . . . . . . . . . . . 48 Disassembly Procedures . . . . . . . . . . . . . . . . . . . . . . . . . . . . . . . . . . . . . . . . . . 49 Opening the Unit . . . . . . . . . . . . . . . . . . . . . . . . . . . . . . . . . . . . . . . . . . . . . 49 Replacing the Printer Assembly . . . . . . . . . . . . . . . . . . . . . . . . . . . . . . . . . . 50 Replacing the Paper Tray Cover . . . . . . . . . . . . . . . . . . . . . . . . . . . . . . . . . . 52 Replacing the Platen Roller . . . . . . . . . . . . . . . . . . . . . . . . . . . . . . . . . . . . . 54 Replacing the Printhead . . . . . . . . . . . . . . . . . . . . . . . . . . . . . . . . . . . . . . . . 55 Replacing the Stepper Motor and Gear Box. . . . . . . . . . . . . . . . . . . . . . . . . 57 Replacing the Battery or Fuse . . . . . . . . . . . . . . . . . . . . . . . . . . . . . . . . . . . 58 Replacing the Battery (DC) Fuse . . . . . . . . . . . . . . . . . . . . . . . . . . . . . . . . . 60 Replacing the Main Board . . . . . . . . . . . . . . . . . . . . . . . . . . . . . . . . . . . . . . 61 Replacing the Power Supply. . . . . . . . . . . . . . . . . . . . . . . . . . . . . . . . . . . . . 62 Replacing the IEC (AC input) Connector . . . . . . . . . . . . . . . . . . . . . . . . . . . 63 Replacing the LCD Inverter and LCD Assembly (CP 200) . . . . . . . . . . . . . . 64 Replacing the Function Keypad Assembly (CP 200). . . . . . . . . . . . . . . . . . . 65 Replacing the Keyboard Assembly (CP 200) . . . . . . . . . . . . . . . . . . . . . . . . 66 Replacing the LCD Assembly (CP 100) . . . . . . . . . . . . . . . . . . . . . . . . . . . . 67 Replacing the Keyboard Assembly (CP 100). . . . . . . . . . . . . . . . . . . . . . . . . 68
6 - Field Replaceable Parts . . . . . . . . . . . . . . . . . . . . . . . . . . . . . . . . . . 69
Introduction. . . . . . . . . . . . . . . . . . . . . . . . . . . . . . . . . . . . . . . . . . . . . . . . . . . . . 69
Field Replacement Parts. . . . . . . . . . . . . . . . . . . . . . . . . . . . . . . . . . . . . . . . . . . 70
Service Manual |
CP 100 and CP 200 Electrocardiograph |
v |
A - Specifications. . . . . . . . . . . . . . . . . . . . . . . . . . . . . . . . . . . . . . . . . . 77
B - EMC Guidance and Manufacturer’s Declarations . . . . . . . . . . . . . 79
C - Software Updates . . . . . . . . . . . . . . . . . . . . . . . . . . . . . . . . . . . . . . 83
D - Interconnect Diagrams . . . . . . . . . . . . . . . . . . . . . . . . . . . . . . . . . . 85
CP 200 Interconnect Diagram . . . . . . . . . . . . . . . . . . . . . . . . . . . . . . . . . . . . . . 86
CP 100 Interconnect Diagram. . . . . . . . . . . . . . . . . . . . . . . . . . . . . . . . . . . . . . . 87
vi |
Contents |
Welch Allyn CP 100 and CP 200 Electrocardiograph |

1
1 Safety Summary
Introduction . . . . . . . . . . . . . . . . . . . . . . . . . . . . . . . . . . . . . . . . . . . . . . . . . . . . . . . . . . . . 2
Symbols . . . . . . . . . . . . . . . . . . . . . . . . . . . . . . . . . . . . . . . . . . . . . . . . . . . . . . . . . . . . . . . 2
Servicing the Electrocardiograph Safely . . . . . . . . . . . . . . . . . . . . . . . . . . . . . . . . . . . . . . 4
2 |
Safety Summary |
CP 100 and CP 200 Electrocardiograph |
Introduction
The safety summary, and all additional specific warnings and cautions located throughout the documentation, must be read and understood by all users of the CP 100 and CP 200 Electrocardiograph.
Symbols
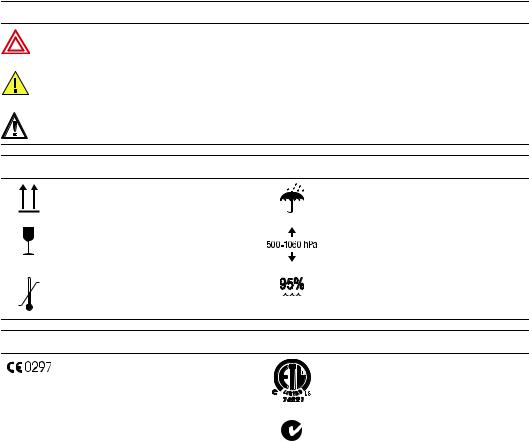
The symbols illustrated on the following pages may appear on the electrocardiograph, the packaging, the shipping container, or in this manual.
Documentation Symbols
WARNING Indicates conditions or practices that could lead to illness, injury, or death.
Caution In the manual, indicates conditions or practices that could damage the equipment or other property.
Caution On the product, means “Consult accompanying documentation.”
|
Shipping, Storing, and Environment Symbols |
This end up |
Keep dry |
Fragile |
Altitude limits |
+49°C Temperature limits |
Relative humidity limit |
-20°C |
|
|
Certification Symbols |
Meets essential requirements of European Medical Device Directive 93/42/EEC
Complies with applicable U.S. and Canadian medical safety standards
|
EC |
REP |
European Regulatory Manager |
Australian registered importer |
|
|
|
Welch Allyn LTD. |
|
|
|
|
Navan Business Park |
N344 |
|
|
|
|
|
|
|
|
Dublin Road |
|
|
|
|
Navan, County Meath, Republic of Ireland |
|
|
|
|
Tel.: 353-46-90-67700 |
|
|
|
|
Fax: 353-46-90-67756 |
|
|
|
|
|
|

Directions for Use |
Safety Summary |
3 |
Operation Symbols
For details on the keys, see “Keyboard Functions” on page 14.
On/standby (off) |
Help |
Navigation arrows |
Backspace |
Enter |
Shift |
Auto ECG |
Menu |
Rhythm ECG |
Stop/Cancel |
SD memory card slot |
Com port A |
|
(for patient cable) |
Alternating current |
Battery charge level |
Dangerous voltage |
Direct current |
Defibrulation-proof type CF applied parts |
Ground equipotential |
(while the electrocardiograph is safety-rated |
|
“CF” for direct cardiac contact it is not |
|
intended to be connected directly to the |
|
patient’s heart; only surface contact with the |
|
patient’s skin is intended). |
|
Do not reuse. |
Sealed lead-acid battery |
Type BF Defibrillator proof |
Recycle |
Do not dispose of this product as unsorted |
AC fuse replacement information |
municipal waste. Prepare this product for
reuse or separate collection as specified by |
T2.0A/250V |
|
|
Directive 2002/96/EC of the European |
|
Parliament and the Council of the European |
|
Union on Waste Electronic and Electrical |
|
Equipment (WEEE). If this product is |
|
contaminated, this directive does not apply. |
|
For more specific disposal information, see |
|
www.welchallyn.com/weee, |
|
or contact Welch Allyn Customer Service at |
|
+44 207 365 6780. |
|
Additional Operation Symbols for CP 200 |
|
Spirometry Key |
OK |
Spirometry port |
Com port B |
|
(for USB cable) |

4 |
Safety Summary |
CP 100 and CP 200 Electrocardiograph |
Servicing the Electrocardiograph Safely
Before using or servicing the electrocardiograph, you must read and understand the following safety-related information.
General Warnings
The following warning statements apply to electrocardiograph use in general. Warning statements that apply specifically to particular procedures, such as connecting the patient cable or performing an ECG test, appear in the corresponding sections of the manual.
Warning statements indicate conditions or practices that could lead to illness, injury, or death.
Warnings Related to the Environment
WARNING To avoid a possible explosion, do not use the electrocardiograph in the presence of flammable anesthetics.
WARNING When transporting the electrocardiograph on a cart, tuck the patient cable away from the wheels so that it does not present a hazard.
WARNING Do not use the CP 100 and CP 200 Electrocardiograph in an MRI suite or hyperbaric chamber.
WARNING Do not autoclave the CP 100 and CP 200 Electrocardiograph or patient cable.
Warnings Related to Accessories and Other Equipment
WARNING For operator and patient safety, peripheral equipment and accessories that can come in direct patient contact must be in compliance with all appropriate safety, EMC, and regulatory requirements. See “EMC Guidance and Manufacturer’s Declarations” on page 79
WARNING All signal input and output (I/O) connectors are intended for connection of only devices complying with IEC 60601-1, or other IEC standards (for example, IEC 60950), as appropriate to the device. Connecting additional devices to the electrocardiograph may increase chassis or patient leakage currents. To maintain operator and patient safety, consider the requirements of IEC 60601-1-1. Measure the leakage currents to confirm that no electric shock hazard exists.
WARNING The electrocardiograph has not been designed for use with highfrequency (HF) surgical equipment and does not protect against hazards to the patient.
Directions for Use |
Safety Summary |
5 |
Warnings Related to Using the Electrocardiograph
WARNING Avoid positioning any leads or cables so that they could easily trip someone.
WARNING Satisfactory maintenance procedures must be implemented, or equipment failure and health hazards may result.
Warnings Related to Repairing the Electrocardiograph
WARNING Only qualified service personnel should attempt to repair the electrocardiograph. In case of a malfunction, call Technical Support and precisely describe the problem. For phone numbers, see page ii.
WARNING While under warranty, the electrocardiograph must be serviced only by a Welch Allyn service technician.
WARNING Electrostatic discharge (ESD) can damage or destroy electronic components. Handle static-sensitive components only at static-safe workstation.
WARNING Consider all electrical and electronic components of the monitor as static-sensitive.
Electrostatic Discharge (ESD)
Electrostatic discharge is a sudden current flowing from a charged object to another object or to ground. Electrostatic charges can accumulate on common items such as foam drinking cups, cellophane tape, synthetic clothing, untreated foam packaging material, and untreated plastic bags and work folders, to name only a few.
Electronic components and assemblies, if not properly protected against ESD, can be permanently damaged or destroyed when near or in contact with electrostatically charged objects. When you handle components or assemblies that are not in protective bags and you are not sure whether they are static-sensitive, assume that they are static-sensitive and handle them accordingly.
•Perform all service procedures in a static-protected environment. Always use techniques and equipment designed to protect personnel and equipment from electrostatic discharge.
•Remove static-sensitive components and assemblies from their static-shielding bags only at static-safe workstations—a properly grounded table and grounded floor mat— and only when you are wearing a grounded wrist strap (with a resistor of at least 1 megohm in series) or other grounding device.

6 |
Safety Summary |
CP 100 and CP 200 Electrocardiograph |
•Use only grounded tools when inserting, adjusting, or removing static-sensitive components and assemblies.
•Remove or insert static-sensitive components and assemblies only with monitor power turned off.
•Insert and seal static-sensitive components and assemblies into their original staticshielding bags before removing them from static-protected areas.
Always test your ground strap, bench mat, conductive work surface, and ground cord before removing components and assemblies from their protective bags and before beginning any disassembly or assembly procedures.
General Cautions
The following caution statements apply to electrocardiograph use in general. Caution statements that apply specifically to particular procedures, such as connecting the patient cable or performing an ECG test, appear in the corresponding sections of the manual.
Caution statements indicate conditions or practices that could damage the equipment or other property.
Caution When removing the electrocardiograph from storage, allow it to thermally stabilize to surrounding environmental conditions before using it.
Caution To prevent possible damage to the keypad, do not use sharp or hard objects to press keys. Only use fingertips.
Caution Do not expose the patient cable to strong ultra-violet radiation.
Caution Do not pull or stretch the patient cable. Doing so could result in mechanical or electrical failures. Form the patient cable into a loose loop before storing.
Caution Avoid positioning the patient cable where it might get pinched or stepped on. If the cable’s impedance is altered, measurements might no longer be accurate, and repair might be necessary.
Caution Using the equipotential terminal for anything but grounding purposes may contribute to damage of the device.
Caution Use only parts and accessories supplied with the device and available through Welch Allyn. The use of accessories other than those specified may result in degraded performance of this device.
Caution Portable and mobile RF communications equipment can affect the performance of the electrocardiograph.
Caution Other medical equipment—including but not limited to defibrillators, ultrasound machines, pacemakers, and other stimulators—may be used simultaneously with the electrocardiograph. However, such devices may disturb the electrocardiograph signal.

7
2 Overview
Purpose and Scope . . . . . . . . . . . . . . . . . . . . . . . . . . . . . . . . . . . . . . . . . . . . . . . . . . . . . . 8
Service Options . . . . . . . . . . . . . . . . . . . . . . . . . . . . . . . . . . . . . . . . . . . . . . . . . . . . . . . . . 8
Product Configurations . . . . . . . . . . . . . . . . . . . . . . . . . . . . . . . . . . . . . . . . . . . . . . . . . . 10
Recommended Service Intervals. . . . . . . . . . . . . . . . . . . . . . . . . . . . . . . . . . . . . . . . . . . 10
Controls, Indicators, and Connectors . . . . . . . . . . . . . . . . . . . . . . . . . . . . . . . . . . . . . . . 11
“System Settings” Menu Tree . . . . . . . . . . . . . . . . . . . . . . . . . . . . . . . . . . . . . . . . . . . . 16
About the Main Menu . . . . . . . . . . . . . . . . . . . . . . . . . . . . . . . . . . . . . . . . . . . . . . . . . . . 17
Moving Through the Menus . . . . . . . . . . . . . . . . . . . . . . . . . . . . . . . . . . . . . . . . . . . . . . 18
Reviewing the Device Information. . . . . . . . . . . . . . . . . . . . . . . . . . . . . . . . . . . . . . . . . . 19
CP 100 and CP 200 Electrocardiograph . . . . . . . . . . . . . . . . . . . . . . . . . . . . . . . . . . . . . . 20

8 |
Overview |
Welch Allyn CP 100 and CP 200 Electrocardiograph |
Purpose and Scope
The service manual is a reference for periodic preventive maintenance and corrective service procedures for the Welch Allyn CP 100 and CP 200 Electrocardiograph.
Corrective service is supported to the level of field-replaceable units. This includes some circuit-board assemblies and some subassemblies, case parts, and other parts. See “Field Replaceable Parts” on page 69 for complete list of user-replaceable service parts.
Note Repair and replacement of the main board is not supported. All service work on the main board must be performed by certified and qualified service personnel at an authorized Welch Allyn service center.
Caution No component-level repair of circuit boards and subassemblies is supported. Use only the repair procedures described in this manual.
WARNING When performing a service procedure, follow the instructions exactly as presented in this manual. Failure to do so could damage the monitor, invalidate the product warranty, and lead to serious personal injury.
This guide provides troubleshooting information, assembly procedures, and instructions for functional testing and performance verification. It is intended for use only by technically qualified service personnel.
Service Options
Warranty Service
All repairs on products under warranty must be performed and/or approved by Welch Allyn. Refer all warranty service to Welch Allyn Factory Service or another authorized Welch Allyn Service Center. Obtain an RMA number for all returns to Welch Allyn Factory Service – see Returning Products (page 9).
Caution Unauthorized repairs will void the product warranty.
Non-Warranty Service
Welch Allyn Factory Service and authorized Service Centers support non-warranty repairs. Contact any Welch Allyn regional service center for pricing and service options.
Welch Allyn offers modular repair parts for sale to support non-warranty service. This service must be performed only by qualified end-user biomedical/clinical engineers using this service manual.
The Welch Allyn Electrocardiograph Service Information supports certain service functions. For information about any Welch Allyn product, please call Welch Allyn Technical Support: (page ii).
Service Manual |
CP 100 and CP 200 Electrocardiograph |
9 |
Technical Support Services
Welch Allyn offers the following technical support services:
Telephone support
Loaner equipment
Service agreements
Replacement service parts
Factory Service
For information on any of these services, contact Welch Allyn at the numbers listed on page ii
Returning Products
To return a product for service, contact Welch Allyn Technical Support and request a Return Material Authorization (RMA) number.
Note Welch Allyn does not accept returned products without an RMA.
•When requesting an RMA, please have the following information available:
•Product name, model number, and serial number
•A complete return shipping address, including a contact name and phone number; include any special shipping instructions
•A purchase-order number or credit-card number if the product is not covered by warranty
•A full description of the problem or service request
To ship the unit, please observe these packing guidelines:
•Remove from the package all hoses, connectors, cables, sensors, power cords, and other ancillary products and equipment, except those items that might be associated with the problem.
•Use the original shipping carton and packing materials, or as close an approximation as possible.
•Include a packing list.
•Write the Welch Allyn RMA number with the Welch Allyn address on the outside of the shipping carton.
United States federal regulations require that any unit received by Factory Service must be free from blood-borne pathogens before processing. All incoming products are cleaned as well as possible, but products that cannot be effectively cleaned cannot be accepted for repair. Please thoroughly clean all organic residues from the product before shipment. This will ensure safe receipt, processing and repair, and will help expedite the return of your device.
10 |
Overview |
Welch Allyn CP 100 and CP 200 Electrocardiograph |
Product Configurations
Model numbers for the configurations are as follows:
Model Number |
|
Description |
|
|
|
CP 1 |
CP 100 Electrocardiograph |
|
|
|
|
CP 1A |
CP 100 Electrocardiograph w/Interpretation |
|
|
|
|
CP 2 |
CP 200 |
Electrocardiograph |
|
|
|
CP 2A |
CP 200 |
Electrocardiograph w/Interpretation |
|
|
|
CP 2S |
CP 200 |
Electrocardiograph w/Spirometry |
|
|
|
CP 2AS |
CP 200 |
Electrocardiograph w/Interpretation & Spirometry |
|
|
|
Recommended Service Intervals
Interval or Condition |
Action Recommended |
Procedure |
|
|
|
|
|
|
Every 6 – 24 months (per |
Complete Functional test |
Functional Verification (page 29) |
hospital protocols) |
|
|
|
|
|
Battery does not hold a charge |
Check battery capacity |
Battery Accuracy Test (page 31) |
|
Replace battery |
Replacing the Battery or Fuse (page 58) |
|
|
|
Unit has been dropped or |
Complete Functional test |
Functional Verification (page 29) |
otherwise damaged |
|
|
|
|
|
Unit malfunctioning |
Complete Functional test |
Functional Verification (page 29) |
|
|
|
Unit does not pass Functional |
Troubleshooting and repair followed by functional test |
Troubleshooting (page 41) |
Verification |
|
Disassembly and Repair Procedures (page |
|
|
47) |
|
|
Functional Verification (page 29) |
|
Return to authorized service center |
Returning Products (page 9) |
|
|
|

Service Manual |
CP 100 and CP 200 Electrocardiograph |
11 |
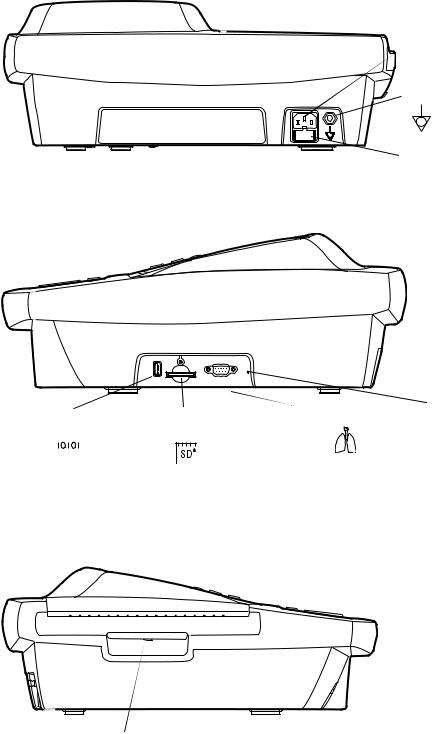
Controls, Indicators, and Connectors
This section describes the controls, indicators, and connectors that are part of the electrocardiograph.
Figure 1. Top of CP 200 Electrocardiograph
Softkeys and functions keys
See Figure 10 on page 15.
Keyboard
See Figure 8 on page 14.
Figure 2. Top of CP 100 Electrocardiograph
Keyboard
See Figure 9 on page 14.
12 |
Overview |
Welch Allyn CP 100 and CP 200 Electrocardiograph |
Figure 3. Back of Electrocardiograph
AC power inlet
Equipotential stud
AC fuses
Figure 4. Right Side of Electrocardiograph
Com port B |
SD memory card |
Spirometry port |
Reset |
Button |
|||
(for USB cable) |
slot |
|
|
(Not functional on CP 100) |
|
(Not functional on CP 100) |
|
|
|
|
Figure 5. Left Side of Electrocardiograph
Paper tray latch

Service Manual |
CP 100 and CP 200 Electrocardiograph |
13 |
Figure 6. Front of CP 200 Electrocardiograph
Com port A (for patient cable)
Figure 7. Front of CP 100 Electrocardiograph
Com port A (for patient cable)

14 |
Overview |
Welch Allyn CP 100 and CP 200 Electrocardiograph |
Keyboard Functions
Figure 8. Keyboard for CP 200 Electrocardiograph
On/Off |
Backspace |
See “ Powering the |
Deletes the character to the |
Electrocardiograph” in the |
left of the cursor. |
Directions of Use manual. |
|
Green LED
Lights up when the electrocardiograph is connected to AC power.
Tab
Moves through the data-entry fields.
Menu
See “About the Main Menu” on page 17.

 Help
Help
See the Directions For
Use manual.
Shift |
Space |
Enter |
Navigation arrows |
Capitalizes letters. |
Enters a space. |
See “Moving Through the Menus” on |
See “Moving Through the |
|
|
page 18. |
Menus” on page 18. |
Figure 9. Keyboard for CP 100 Electrocardiograph
Green LED |
On/Off |
Backspace |
Menu |
Auto ECG |
Lights up when the |
See “ Powering the |
Deletes the character to the |
See “About the Main |
Begins Auto ECGs, |
electrocardiograph is |
Electrocardiograph” in the |
left of the cursor. |
Menu” on page 17. |
normal and stat. |
connected to AC |
Directions of Use manual. |
|
|
|
power. |
|
|
|
|
Tab |
|
|
|
|
Moves through the |
|
|
|
|
data-entry fields. |
|
|
|
Rhythm ECG |
|
|
|
|
Begins a Rhythm ECG. |
|
|
|
|
. |
Help |
|
|
|
|
See the Directions |
|
|
|
|
for Use manual. |
|
|
|
|
Shift |
Space |
Capitalizes letters. |
Enters a space. |
Stop/Cancel
Stops any current activity. See “Moving Through the Menus” on page 18.
Enter |
Navigation arrows |
See “Moving Through the |
See “Moving Through the |
Menus” on page 18. |
Menus” on page 18. |
Service Manual |
CP 100 and CP 200 Electrocardiograph |
15 |
Figure 10. Softkeys and Function Keys for the CP 200 Electrocardiograph
Softkeys
These softkeys display text or images that correspond to the unlabeled buttons below  them. The content changes from screen to
screen.
Softkey buttons
These buttons activate the functions displayed above them. If a softkey is blank, pressing its button has no effect.
Auto ECG |
Spirometry |
Rhythm ECG |
Stop/Cancel |
OK |
Function Keys
Auto ECG
Begins Auto ECGs, normal and stat.
Spirometry
Begins spirometry tests.
See spirometry manual.
Rhythm ECG
Begins Rhythm ECGs.
Stop/Cancel
Stops any current activity.
See “Moving Through the Menus” on page 18.
OK
Accepts data that you have entered, or chooses a highlighted item.
See “Moving Through the Menus” on page 18.
16 |
Overview |
Welch Allyn CP 100 and CP 200 Electrocardiograph |
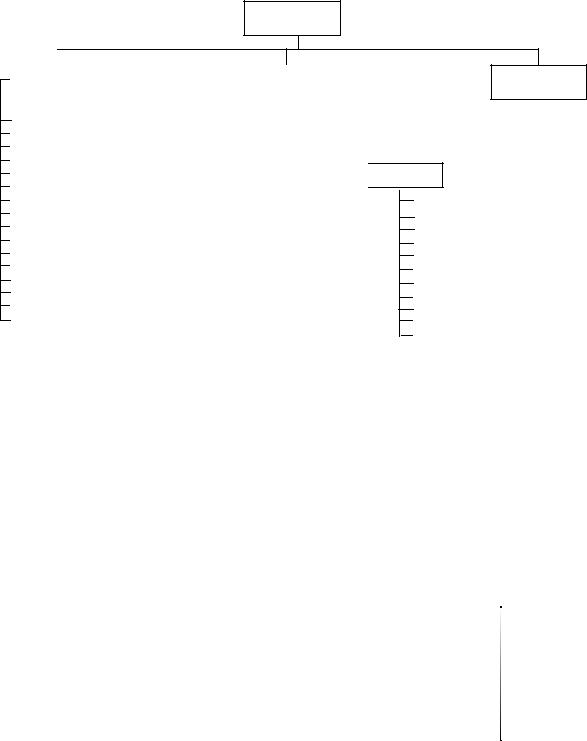
“System Settings” Menu Tree
CP 200 Menu Tree
System Settings
|
|
|
|
|
|
|
|
Device |
|
|
|
Device |
|
||
Configuration |
|
|
|
Info |
|
||
|
|
|
|
|
|
|
|
Set Date/Time |
|
|
|
About |
|
||
|
|
|
|
||||
Language |
|
|
|
Print Settings |
|
||
|
|
|
|
||||
Date Format |
|
|
|
Enable Options |
|
||
|
|
|
|
||||
Time Format |
|
|
|
Upgrade Software |
|
||
|
|
|
|
||||
Weight Unit |
|
|
|
Service Info |
|
|
|
|
|
|
|
|
|||
|
|
|
|
|
|||
Height Unit |
|
|
|
Previous Menu |
|
||
|
|
|
|
||||
Power-Save
Device ID Audio Beeper Flow Unit* Pressure Unit* Temperature*
Increase Display Contrast Decrease Display Contrast Contact Information Previous Menu
* Applicable for spirometry only.
Device
Administration
See “Managing Data” in the
Directions for Use manual.
Service Info
Print Log
Battery Life Test
Printer Test
Export Files
Import Files
Delete Files
Serial Number
Lead Off Thershold
Service Tests
LCD Test
Previous Menus
CP 100 Menu Tree |
|
|
|
|
|
|
|
|
|
|
|
|
|
|
|
|
||||||
System Settings |
|
|
|
|
|
|
|
|
|
|
|
|
|
|
||||||||
|
|
|
|
|
|
|
|
|
|
|
|
|
|
|
|
|
|
|
|
|
||
|
|
|
|
|
|
|
|
|
|
|
|
|
|
|
|
|
|
|
|
|
|
|
|
|
|
|
|
|
|
|
|
|
|
|
|
|
|
|
|
|
|
|
|
|
|
|
|
|
|
|
|
|
|
|
|
|
|
|
|
|
|
|
|
|
|
|
|
|
|
|
|
|
Device |
|
|
|
|
|
Device |
|
|
|
|
|
|
|
|
||||
|
|
|
|
Configuration |
|
|
|
|
|
Info |
|
|
|
|
|
|
|
|
||||
|
|
|
|
|
|
|
|
|
|
|
|
|
|
|
|
|
|
|
|
|
||
|
|
|
|
Set Date/Time |
|
|
|
|
About |
|
|
|
|
|
|
|
|
|||||
|
|
|
|
|
|
|
|
|
|
|
|
|
||||||||||
|
|
|
|
Language |
|
|
|
|
Print Settings |
|
|
|
|
|
|
|
|
|||||
|
|
|
|
|
|
|
|
|
|
|
|
|
|
|
||||||||
|
|
|
|
Date Format |
|
|
|
|
Enable Options |
|
|
|
|
|
|
|
|
|||||
|
|
|
|
|
|
|
|
|
|
|
|
|
|
|
||||||||
|
|
|
|
Time Format |
|
|
|
|
Upgrade Software |
|
|
|
|
|
|
|
|
|||||
|
|
|
|
|
|
|
|
|
|
|
|
|
|
|
||||||||
|
|
|
|
Weight Unit |
|
|
|
|
Service Info |
|
|
Service Info |
|
|||||||||
|
|
|
|
|
|
|
|
|
|
|||||||||||||
|
|
|
|
Height Unit |
|
|
|
|
Previous Menu |
|
|
|
|
|
|
|
|
|||||
|
|
|
|
|
|
|
|
|
|
|
|
|||||||||||
|
|
|
|
Power-Save |
|
|
|
|
|
|
|
|
|
|
|
|
|
|
Print Log |
|||
|
|
|
|
|
|
|
|
|
|
|
|
|
|
|
|
|||||||
|
|
|
|
|
|
|
|
|
|
|
|
|
|
|
|
|
||||||
|
|
|
|
Device ID |
|
|
|
|
|
|
|
|
|
|
|
|
|
|
||||
|
|
|
|
|
|
|
|
|
|
|
|
|
|
|
|
|
|
Battery Life Test |
||||
|
|
|
|
|
|
|
|
|
|
|
|
|
|
|
|
|
||||||
|
|
|
|
Audio Beeper |
|
|
|
|
|
|
|
|
|
|
|
|
|
|
||||
|
|
|
|
|
|
|
|
|
|
|
|
|
|
|
|
|
|
Printer Test |
||||
|
|
|
|
|
|
|
|
|
|
|
|
|
|
|
|
|
||||||
|
|
|
|
Increase Contrast |
|
|
|
|
|
|
|
|
|
|
|
|
|
|
||||
|
|
|
|
|
|
|
|
|
|
|
|
|
|
|
|
|
|
Export Files |
||||
|
|
|
|
Decrease Contrast |
|
|
|
|
|
|
|
|
|
|
|
|
|
|
||||
|
|
|
|
|
|
|
|
|
|
|
|
|
|
|
|
|
|
Import Files |
||||
|
|
|
|
Contact Information |
|
|
|
|
|
|
|
|
|
|
|
|
|
|
||||
|
|
|
|
|
|
|
|
|
|
|
|
|
|
|
|
|
|
Delete Files |
||||
|
|
|
|
|
|
|
|
|
|
|
|
|
|
|
|
|
|
|||||
|
|
|
|
Previous Menu |
|
|
|
|
|
|
|
|
|
|
|
|
|
|
||||
|
|
|
|
|
|
|
|
|
|
|
|
|
|
|
|
|
|
Serial Number |
||||
|
|
|
|
|
|
|
|
|
|
|
|
|
|
|
|
|||||||
|
|
|
|
|
|
|
|
|
|
|
|
|
|
|
|
|
|
|
|
|
||
|
|
|
|
|
|
|
|
|
|
|
|
|
|
|
|
|
|
|
|
|
Lead Off Thershold |
|
|
|
|
|
|
|
|
|
|
|
|
|
|
|
|
|
|
|
|
|
|
||
|
|
|
|
|
|
|
|
|
|
|
|
|
|
|
|
|
|
|
|
|
Service Tests |
|
|
|
|
|
|
|
|
|
|
|
|
|
|
|
|
|
|
|
|
|
|
||
|
|
|
|
|
|
|
|
|
|
|
|
|
|
|
|
|
|
|
|
|
Previous Menus |
|
|
|
|
|
|
|
|
|
|
|
|
|
|
|
|
|
|
|
|
|
|
||
Service Manual |
CP 100 and CP 200 Electrocardiograph |
17 |
About the Main Menu
The main menu appears when you press the Menu key  .
.
Figure 11. Main Menu CP 200


 9:17AM Mar 16 05
Main Menu
1 Test Directory
2 Scheduled Patients
3 ECG Settings
4 Spirometry Settings
5 System Settings
6 Edit Medication List
7 Edit History List
0 Exit
Figure 12. Main Menu CP 100


 9:17AM Mar 16 05
Main Menu
1 ECG Settings
2 System Settings
0 Exit
Submenu |
Purpose |
Procedure |
|
|
|
Test Directory |
View, change, print, or send saved tests. (CP |
|
200 Only) |
Scheduled Patients |
View the scheduled patients list, add |
|
patients to the list, or delete patients from |
|
the list. (CP 200 Only |
ECG Settings |
Review or change ECG settings: Auto |
|
Report format, Rhythm Report format, and |
|
so on. |
Spirometry Settings |
Review or change spirometry settings: |
|
display settings, print settings, and so on. (CP |
|
200 Only |
System Settings |
Review or change system settings: device |
|
configuration, device info, user setup, and |
|
so on. |
Edit Medication List |
Edit the list of medication choices available |
|
to choose during patient data entry. (CP 200 |
|
Only |
Edit History List |
Edit the list of clinical conditions available to |
|
choose during patient data entry. (CP 200 |
|
Only |
See the Directions for Use manual on your specific model.
See the Directions for Use manual on your specific model.
See the Directions for Use manual on your specific model.
See the Directions for Use manual on your specific model.
See the Directions for Use manual on your specific model.
See the Directions for Use manual on your specific model.
See CP 200 Electrocardiograph Directions for Use manual.
18 Overview Welch Allyn CP 100 and CP 200 Electrocardiograph
Moving Through the Menus
Figure 13. CP 200 Standard Menu |
Figure 15. CP 200 Parent Menu With Submenu |
|||||||||
|
|
|
|
9:17AM Mar 16 05 |
Edit Auto Report 1 : Format |
|
|
9:17AM Mar 16 05 |
||
|
|
|
|
|
|
|||||
|
|
|
|
|||||||
|
|
|
|
|
|
|
|
|||
ECG Setup : Edit Auto Report 1 |
|
|
|
|
||||||
|
|
|
|
|
|
|||||
|
|
|
|
|
|
|
|
|
|
|
|
1 Format |
|
|
1 |
Lead Arrangement |
|
|
3x4 |
|
|
|
|
|
2 Rhythm Lead 1 |
|
|
|
||||
|
2 Interp Settings |
|
|
|
|
3x4 +1R |
|
|||
|
|
3 Rhythm Lead 2 |
|
|
|
|||||
|
3 Patient Data |
|
|
|
|
3x4 +3R |
|
|||
|
|
4 Rhythm Lead 3 |
|
|
|
|||||
|
0 Previous Menu |
|
|
|
|
6x2 |
|
|||
|
|
5 |
Extended Measurements |
|
|
|
||||
|
|
|
|
|
|
|
12x1 |
|
||
|
|
|
|
|
6 |
Average Cycles |
|
|
|
|
|
|
|
|
|
|
|
6x2 50 mm/s |
|
||
|
|
|
|
|
0 |
Previous Menu |
|
|
|
|
|
|
|
|
|
|
|
6x2 10 Ext. |
|
||
|
|
|
|
|
|
|
|
|
No Print |
|
|
|
|
|
|
|
|
|
|
|
|
|
|
|
|
|
|
|
|
|
|
|
|
|
|
|
|
|
|
|
|
|
|
|
|
|
|
|
|
|
|
|
|
|
|
|
|
|
|
|
|
|
|
|
|
|
|
|
|
|
|
|
|
|
|
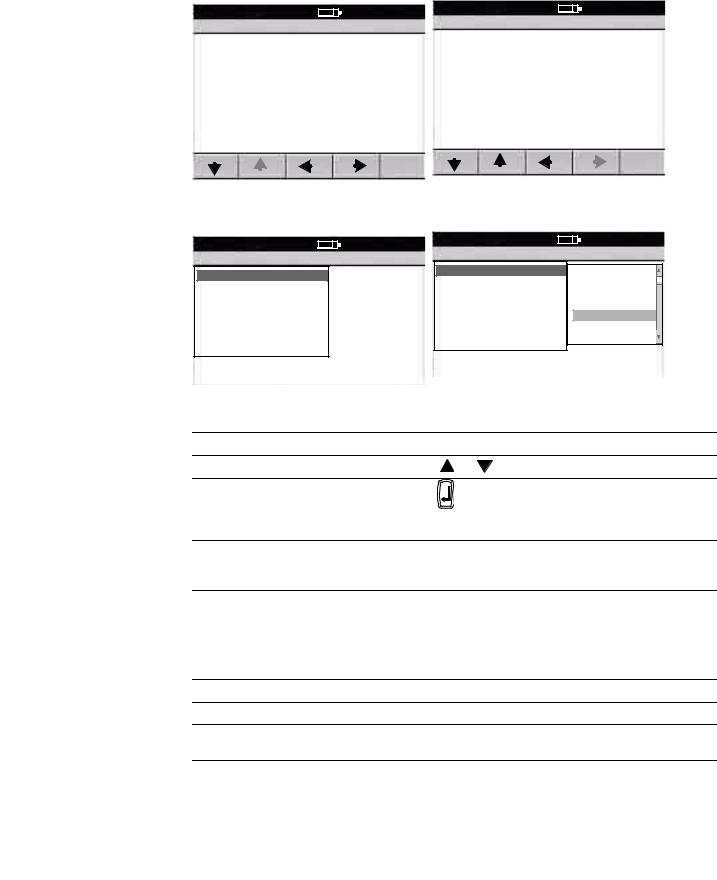
Figure 14. CP 100 Standard Menu |
Figure 16. CP 100 Parent Menu with Submenu |
||||||||||||||||||||||||||||||
|
|
|
|
|
|
|
|
|
|
|
|
|
9:17AM Mar 16 05 |
|
|
|
|
|
|
|
|
|
|
9:17AM Mar 16 05 |
|||||||
|
|
|
|
|
|
|
|
|
|
|
|
|
|
|
|
|
|
|
|
|
|
|
|||||||||
|
|
|
|
|
|
|
|
|
|
|
|
|
|||||||||||||||||||
|
|
|
|
|
|
|
|
|
|
|
|
|
Format |
||||||||||||||||||
Edit Auto Report |
|||||||||||||||||||||||||||||||
|
|
|
|
|
|
|
|
|
|
|
|
|
|
||||||||||||||||||
1Format
2Interp Settings
3Patient Data
0 Previous Menu
1 Lead Arrangement
2 Rhythm Lead 1
3 Rhythm Lead 2
4 Rhythm Lead 3
5 Extended Measurements
6 Average Cycles
0 Previous Menu
3x4 |
+1R |
3x4 |
+3R |
6x2 |
|
12x1 |
|
6x2 |
50 mm/s |
6x2 |
10 Ext. |
No Print |
|
Desired Actions |
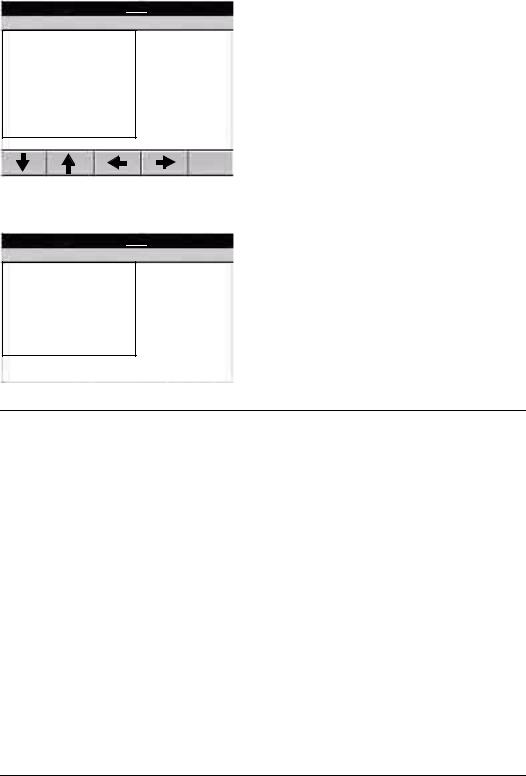
Keys to Press |
|
||
To move up or down a list |
or |
(keyboard or softkey arrows) |
||
To open a standard menu (Figure 13) |
or |
or |
or item’s number or letter |
|
To move from parent menu to submenu on same |
|
|
|
|
screen (Figure 15) |
|
|
|
|
To perform an action |
or |
|
|
|
To accept data |
|
|
|
|
To check or uncheck a checkbox |
|
|
|
|
To return to parent menu from submenu on same |
|
(To select the highlighted submenu |
||
screen (Figure 15) |
or |
|||
item.) |
|
|||
|
|
|
||
|
|
or |
(To make no change.) |
|
To move back through the menus |
or zero key |
|
||
To move through data-entry fields
To return to the “Main Screen” from a standard menu (Figure 13)
Note Keyboard and softkey arrows work the same way.
Service Manual |
CP 100 and CP 200 Electrocardiograph |
19 |
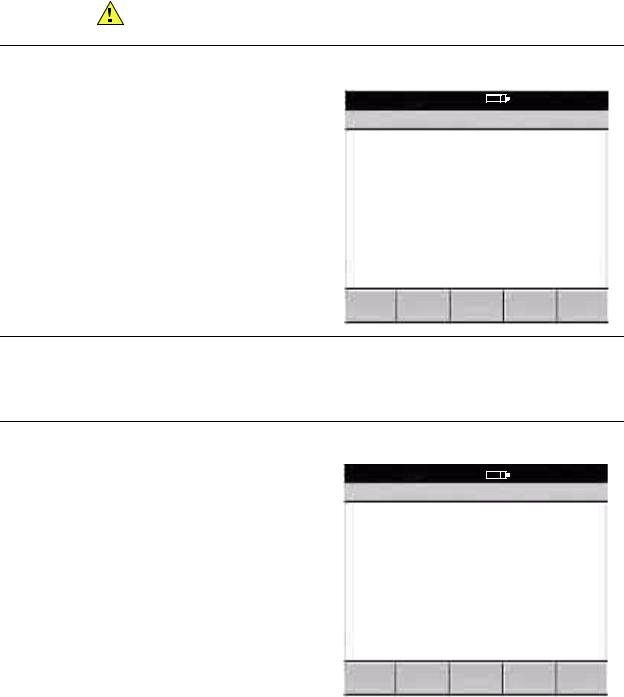
Reviewing the Device Information
1.Press the Menu key  .
.
2.Choose System Settings > Device Info. The following screen appears.
Figure 17. “Device Info” CP 200 Screen


 9:17AM Mar 16 05
System Setup : Device Info
1About
2Print Settings
3Enable Options
4Upgrade Software
5Service Info
0 Previous Menu
Figure 18. “Device Info” CP 100 Screen


 9:17AM Mar 16 05
Device Info
1About
2Print Settings
3Enable Options
4Upgrade Software
5Service Info
0 Previous Menu
3. Select the desired item:
Item |
Description |
|
|
|
|
About |
Displays the following information about the electrocardiograph: |
|
|
• |
serial number |
|
• |
modules configured |
|
• |
version numbers |
Print Settings |
CP 200 = Prints your ECG, spirometry, and system settings as well as medication & |
|
|
history lists. |
|
|
CP 100 = Prints your ECG and system settings. |
|
Enable Options |
Contact Technical Support. For phone numbers, see page ii. |
|
Upgrade Software |
Contact Technical Support. For phone numbers, see page ii. |
|
Service Info |
Accessible to service support only. See Service Menus (page 20) |
|
|
|
|
20 |
Overview |
Welch Allyn CP 100 and CP 200 Electrocardiograph |
CP 100 and CP 200 Electrocardiograph
Service Menus
Entering the Service Info Screen
This menu is password protected and only Welch Allyn Authorized Technician can access the Service Menus,)
CP 200 Service Info Screen
Procedure
1.Power ON unit.
2.Press Menu key. 
3.Choose System Setting> Device Info> Service Info
The “UserLogin” screen appears. See Figure 19.
Use the “Tab” or “Arrow” keys to move the cursor from field to field.
Enter the following:
User ID: Service (case sensitive) Password:normser (case sensitive)
4.Press “Done” using the softkey. Do not use the“Enter” key. The “Service Info” screen appears see Figure 20
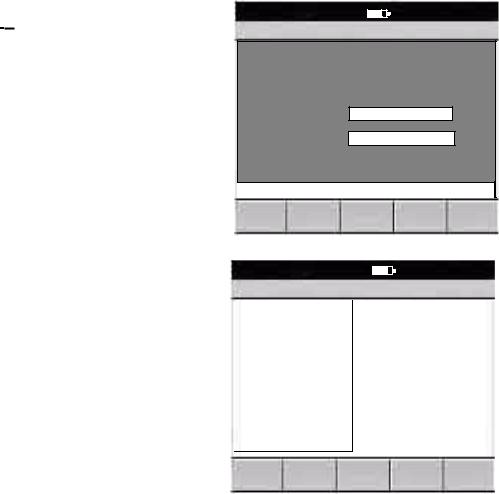
Figure 19. CP 200 “User Login”
9:17AM Mar 16 05
UserLogin
User ID
Password
Enter valid user ID and password
Change |
Cancel |
Done |
Password |
|
|
Figure 20. CP 200 “Service Info” Screen
9:17AM Mar 16 05
Service Info
1.Print Log 2.Battery Life Test 3.Printer Test 4.Export Files 5.Import Files
6. Delete Files 7.Serial Number 8.Lead Off Thershold 9.Service Tests
A LCD Test 0.Previous Menus
Service Manual
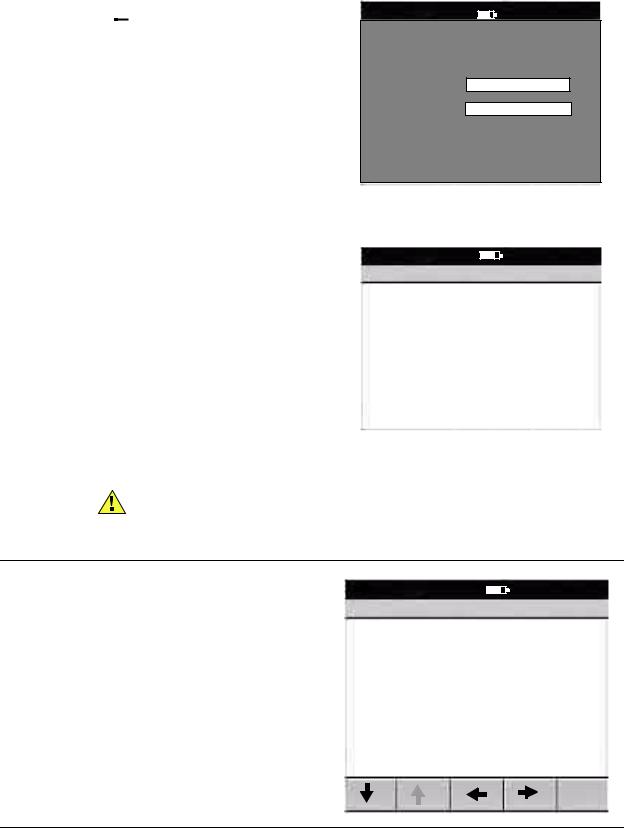
CP 100 Service Info Screen
Procedure
1.Power ON unit.
2.Press Menu key. 
3.Choose System Setting > Device Info > Service Info
The “UserLogin” screen appears. See Figure 21.
Use the “Arrow” keys to move the cursor from field to field.
Enter the following:
User ID: Service (case sensitive) Password:normser (case sensitive)
4.Highlight “Done” using the down arrow key.
5.Press “Enter” key.
The “Service Info” screen appears. See Figure 22
Print Log
CP 100 and CP 200 Electrocardiograph |
21 |
Figure 21. CP 100 “UserLogin” Screen
9:17AM Mar 16 05
User Login
User ID
Password
Done
Figure 22. CP 100 “Service Info” Screen
9:17AM Mar 16 05
Service Info
1. Print Log
2.Battery Life Test
3.Printer Test
4.Export Files
5.Import Files
6.Delete Files
7.Serial Number
7.Lead Off Thershold
8.Service Tests
0. Previous Menus
Caution These printouts can be very long. Only use the printouts if necessary. To stop the printouts press Stop/Cancel.
Function |
Description |
|
|
Print Events: |
This prints all events stored in the unit in descending |
|
order by date and time. Used for development of the |
|
software. Has no Service value. |
|
|
Print Errors: |
This prints any errors that occurred in the unit, in |
|
descending order by date and time, during normal |
|
operation. This can be valuable to use when the end- |
|
user says he/she has been having problems. |
|
|
Print All: |
This prints the Print Events and Print Errors as |
|
described above. |
Figure 23. “Print Log” Screen
9:17AM Mar 16 05
Print Log
1.Print Events 2.Print Errors 3.Print All 0.Previous Menus
22 |
Overview |
Welch Allyn CP 100 and CP 200 Electrocardiograph |
Battery Life Test
This displays the percentage of battery life remaining on the battery, based on the number of charges it has incurred. This percentage approximates the life left in the battery based on this information.
Caution Only reset when the battery has been replaced and charged for at least 12hrs continuously.
Function |
Description |
Figure 24. “Battery Life Test” Screen |
||
|
|
|
|
|
Reset |
Resets the battery life to 100%. This is used only |
|
|
|
|
when the battery has been replaced |
|
|
9:17AM Mar 16 05 |
|
|
|
||
|
|
|
|
|
|
|
|
|
|
Reset Pages |
Resets page count for the number of prints made on |
Battery Life Test |
||
|
the printer. Should only be reset when print head has |
|
|
|
|
been replaced. |
|
|
|
|
|
Battery Life Remaining: 99% |
||
Reset |
Reset |
Exit |
|
Pages |
|||
|
|
Printer Test
Function |
Description |
Figure 25. Printer Test” Screen |
||
|
|
|
|
|
Test Page |
Prints a test page which repeats until the “Cancel” |
|
|
|
|
button is pressed. Refer to Functional Verification test |
|
|
9:17AM Mar 16 05 |
|
|
|
||
|
for explanation. See Printer Test (page 35). |
|
|
|
|
Printer Test |
|||
|
|
|||
Ramp Test |
Prints a one page ramp test. Refer to Functional |
|
|
|
|
Verification test for explanation. See Printer Test |
|
|
|
|
(page 35). |
|
|
|
|
|
Select a print test |
||
Test Page |
Ramp |
Exit |
|
Page |
|||
|
|
||
|
|
|
Service Manual |
CP 100 and CP 200 Electrocardiograph |
23 |
Export Files
Use the “Export Files” function when the Main PCB is replaced, to reinstall the customer’s saved ECG information and spirometry (CP 200 Only) or the unit’s original configuration after repair.
Caution The tests exported to the SD memory card contain patients’ medical information and should be treated the same as any confidential medical information.
Note If you are performing all functions you only need one SD memory card. Use a formatted blank SD memory card installed in the unit for each function.
Function |
Description |
Figure 26. “Export Files” Screen |
||||||||||||||
|
|
|
|
|
|
|
|
|
|
|
|
|
|
|
|
|
Export Log Files |
Exports the Event log to a SD memory card in a folder |
|
|
|
|
|
|
|
|
|
|
|
|
|
|
|
|
called Log. Once complete, a message appears at |
|
|
|
|
|
|
|
|
|
|
|
9:17AM Mar 16 05 |
|||
|
bottom of the screen stating if the export was |
Export Files |
||||||||||||||
|
successful or not. |
|||||||||||||||
|
|
1.Export Log Files |
||||||||||||||
Export Audit Trail |
Exports the audit information of the unit to a SD |
|||||||||||||||
(CP 200 ONLY) |
memory card in a folder called Audit. Once complete |
2.Export Audit Files |
||||||||||||||
3.Export Tests |
||||||||||||||||
|
a message appears at bottom of screen stating if |
|||||||||||||||
|
4.Export Configuration Files |
|||||||||||||||
|
export was successful or not. |
0.Previous Menus |
||||||||||||||
|
Note: Audit information is available if Audit trail |
|
|
|
|
|
|
|
|
|
|
|
|
|
|
|
|
is turned on in Device Administration. See the CP |
|
|
|
|
|
|
|
|
|
|
|
|
|
|
|
|
200 Directions for Use manual |
|
|
|
|
|
|
|
|
|
|
|
|
|
|
|
|
|
|
|
|
|
|
|
|
|
|
|
|
|
|
|
|
Export Tests (CP 200 |
Exports all tests in the memory to a SD memory card |
|
|
|
|
|
|
|
|
|
|
|
|
|
|
|
ONLY) |
in a folder called Tests for importing after repair. |
|
|
|
|
|
|
|
|
|
|
|
|
|
|
|
|
|
|
|
|
|
|
|
|
|
|
|
|
|
|
|
|
Export |
Exports the configuration of the unit (i.e. print |
|
|
|
|
|
|
|
|
|
|
|
|
|
|
|
|
|
|
|
|
|
|
|
|
|
|
|
|
|
|||
Configuration Files: |
formats, patient data settings, logins, etc.) to a SD |
|
|
|
|
|
|
|
|
|
|
|
|
|
|
|
|
memory card in a folder called Config for importing |
|
|
|
|
|
|
|
|
|
|
|
|
|
|
|
|
after repair. |
|
|
|
|
|
|
|
|
|
|
|
|
|
|
|
|
|
|
|
|
|
|
|
|
|
|
|
|
|
|
|
|
Loading...