


9600
Table of contents
 Loading...
9600 Plus Calibration Tester

Copyright 2004, Welch Allyn, Inc. All rights are reserved. No one is
permitted to reproduce or duplicate, in any form, this manual or any part
thereof without permission from Welch Allyn.
Welch Allyn assumes no responsibility for any injury to anyone, or for any
illegal or improper use of the product, that may result from failure to use
this product in accordance with the instructions, cautions, warnings, or
statement of intended use published in this manual.
Welch Allyn is a registered trademark of Welch Allyn. Braun ThermoScan
is a registered trademarks of Braun Corporation.
Printed in Mexico

Contents
Introduction . . . . . . . . . . . . . . . . . . . . . . . . . . . . . . . . . . 1
Symbols and Descriptions . . . . . . . . . . . . . . . . . . . . . . . . . . 2
Cautions . . . . . . . . . . . . . . . . . . . . . . . . . . . . . . . . . . . . . . . . 3
Unpacking the 9600 Plus Calibration Tester . . . . . . . . . . . . . 4
Controls and Indicators . . . . . . . . . . . . . . . . . . . . . . . . . 5
LCD Display . . . . . . . . . . . . . . . . . . . . . . . . . . . . . . . . . . . . . 5
Power On Sequence. . . . . . . . . . . . . . . . . . . . . . . . . . . . . . . 7
Front of the 9600 Plus Calibration Tester . . . . . . . . . . . . . . . 7
Operation. . . . . . . . . . . . . . . . . . . . . . . . . . . . . . . . . . . .11
9600 Plus Calibration Tester Setup. . . . . . . . . . . . . . . . . . . 11
Welch Allyn SureTemp and SureTemp Plus Thermometers 13
Braun ThermoScan Pro 4000 Model. . . . . . . . . . . . . . . . . . 15
Braun ThermoScan Pro 3000 Model. . . . . . . . . . . . . . . . . . 17
Changing the Calibration Set Point Temperature . . . . . . . . 19
i
Maintenance . . . . . . . . . . . . . . . . . . . . . . . . . . . . . . . . 21
Cleaning . . . . . . . . . . . . . . . . . . . . . . . . . . . . . . . . . . . . . . . 21
Problem Solving . . . . . . . . . . . . . . . . . . . . . . . . . . . . . . . . . 22
Specifications . . . . . . . . . . . . . . . . . . . . . . . . . . . . . . . . . . . 25
Electro-Magnetic Compatibility. . . . . . . . . . . . . . . . . . . . . . 26
Warranty and Service . . . . . . . . . . . . . . . . . . . . . . . . . 27
Limited Warranty . . . . . . . . . . . . . . . . . . . . . . . . . . . . . . . . 27
Service . . . . . . . . . . . . . . . . . . . . . . . . . . . . . . . . . . . . . . . . 28

ii
Introduction . . . . . . . . . . . . . . . . . . . . . . . . . . . . . . . . . . 1
Symboles et descriptions . . . . . . . . . . . . . . . . . . . . . . . . . . . 2
Mises en garde . . . . . . . . . . . . . . . . . . . . . . . . . . . . . . . . . . . 3
Déballage du testeur d’étalonnage 9600 Plus . . . . . . . . . . . 4
Commandes et indicateurs . . . . . . . . . . . . . . . . . . . . . . 5
Affichage ACL . . . . . . . . . . . . . . . . . . . . . . . . . . . . . . . . . . . . 5
Séquence de mise en marche . . . . . . . . . . . . . . . . . . . . . . . 7
Avant du testeur d’étalonnage 9600 Plus . . . . . . . . . . . . . . . 7
Fonctionnement . . . . . . . . . . . . . . . . . . . . . . . . . . . . . . 11
Installation du testeur d’étalonnage 9600 Plus. . . . . . . . . . 11
Thermomètres Welch Allyn SureTemp et SureTemp Plus . 13
Modèle Braun ThermoScan Pro 4000. . . . . . . . . . . . . . . . . 15
Modèle Braun ThermoScan Pro 3000. . . . . . . . . . . . . . . . . 17
Modification de la température de consigne d’étalonnage. 20
Entretien . . . . . . . . . . . . . . . . . . . . . . . . . . . . . . . . . . . 21
Nettoyage . . . . . . . . . . . . . . . . . . . . . . . . . . . . . . . . . . . . . . 21
Dépannage . . . . . . . . . . . . . . . . . . . . . . . . . . . . . . . . . . . . . 22
Spécifications . . . . . . . . . . . . . . . . . . . . . . . . . . . . . . . . . . . 25
Compatibilité électromagnétique . . . . . . . . . . . . . . . . . . . . 26
Garantie et entretien . . . . . . . . . . . . . . . . . . . . . . . . . . 27
Garantie limitée. . . . . . . . . . . . . . . . . . . . . . . . . . . . . . . . . . 27
Entretien . . . . . . . . . . . . . . . . . . . . . . . . . . . . . . . . . . . . . . . 28
Einführung. . . . . . . . . . . . . . . . . . . . . . . . . . . . . . . . . . . 1
Symbole und Beschreibungen . . . . . . . . . . . . . . . . . . . . . . . 2
Vorsicht . . . . . . . . . . . . . . . . . . . . . . . . . . . . . . . . . . . . . . . . . 3

Directions for Use Contents iii
Auspacken des Kalibriertesters 9600 Plus . . . . . . . . . . . . . . 4
Bedienelemente und Anzeigen . . . . . . . . . . . . . . . . . . . 5
Flüssigkristallanzeige . . . . . . . . . . . . . . . . . . . . . . . . . . . . . . 5
Einschaltreihenfolge . . . . . . . . . . . . . . . . . . . . . . . . . . . . . . . 7
Vorderseite des Kalibriertesters 9600 Plus . . . . . . . . . . . . . . 7
Betrieb. . . . . . . . . . . . . . . . . . . . . . . . . . . . . . . . . . . . . .11
Konfiguration des Kalibriertesters 9600 Plus . . . . . . . . . . . 11
Die Thermometer SureTemp und SureTemp Plus
von Welch Allyn . . . . . . . . . . . . . . . . . . . . . . . . . . . . . . . . . 13
Das Modell ThermoScan Pro 4000 von Braun . . . . . . . . . . 15
Das Modell ThermoScan Pro 3000 von Braun . . . . . . . . . . 17
Änderung der Kalibriersolltemperatur . . . . . . . . . . . . . . . . . 20
Wartung. . . . . . . . . . . . . . . . . . . . . . . . . . . . . . . . . . . . 21
Reinigung . . . . . . . . . . . . . . . . . . . . . . . . . . . . . . . . . . . . . . 21
Fehlerbehebung . . . . . . . . . . . . . . . . . . . . . . . . . . . . . . . . . 22
Technische Daten . . . . . . . . . . . . . . . . . . . . . . . . . . . . . . . . 26
Elektromagnetische Verträglichkeit. . . . . . . . . . . . . . . . . . . 27
Gewährleistung und Service . . . . . . . . . . . . . . . . . . . . 29
Beschränkte Gewährleistung . . . . . . . . . . . . . . . . . . . . . . . 29
Service . . . . . . . . . . . . . . . . . . . . . . . . . . . . . . . . . . . . . . . . 30

iv

1
1
Introduction
The 9600 Plus Calibration Tester verifies calibration of the
following thermometers:
®
• Welch Allyn SureTemp
986)
• Welch Allyn SureTemp
OEM)
• Braun ThermoScan
The 9600 Plus Calibration Tester provides a tightly regulated
temperature source that eliminates the setup, precision
calibration, and maintenance requirements of water baths and
other general purpose calibration equipment. The user takes
the “temperature” of the 9600 Plus Calibration Tester with the
knowledge and assurance that precise readings are obtained
because the unit is factory calibrated to National Institute of
Standards and Technology (NIST) or equivalent devices. User
adjustments are not required or recommended.
The “blackbody” of the 9600 Plus Calibration System acts as
a heat reservoir for the thermistor probe and as a heat
radiator for the infrared ear thermometer.
The unit contains solid-state circuitry for long-term stability
with minimal maintenance. Welch Allyn uses only precision
components in the construction of the 9600 Plus Calibration
Tester. To maintain traceability to NIST or equivalent, return
the 9600 Plus Calibration Tester to the factory for annual
calibration.
models (678, 678 OEM, 679 and
®
Plus models (690, 692 and 692
®
Pro 3000 and Pro 4000

2 Chapter 1 Introduction Welch Allyn 9600 Plus Calibration Tester
Symbols and Descriptions
Double Insulation.
Direct Current.
Handle with Care.
Conforms to IEC 61010-1:2001 and EN 61010-1:2001
Attention! Caution; Consult Directions for Use for more
information.
Transport/Storage Temperature
Relative Humidity
Separate collection for electronic equipment
Recyclable

Directions for Use Chapter 1 Introduction 3
Cautions
A caution statement in this manual identifies a condition or
practice which, if not corrected or discontinued immediately,
could lead to equipment failure, equipment damage, or data loss.
Caution Do not immerse or soak the 9600 Plus
Calibration Tester in any type of fluid.
Caution Only trained Biomedical personnel should
operate the 9600 Plus Calibration Tester and conduct
calibration verification of thermometers.
Caution When not using the Thermistor or Ear Device
Ports, keep them covered with the Dust Cover.
Caution Store thermometers for testing in the same
room as the 9600 Plus Calibration Tester for
approximately 30 minutes prior to testing to allow for
thermal accommodation.
Caution Do not clean the Thermistor or Ear Device
Ports. Doing so may damage the surface. Only a Welch
Allyn authorized Service Center should clean the Device
Ports.

4 Chapter 1 Introduction Welch Allyn 9600 Plus Calibration Tester
Unpacking the 9600 Plus Calibration Tester
Unpack the 9600 Plus Calibration Tester and inspect for missing
items. Retain the shipping materials to return the device to
Welch Allyn for recalibration.
The following items are enclosed:
• A 9600 Plus Calibration Tester
• A package containing a power supply and four mains plug
inserts
• The Directions for Use
• A Carrying Case
If any of these items are missing after opening, please contact
Welch Allyn Customer Service at the number provided on
page 28.
5
2
Controls and Indicators
LCD Display
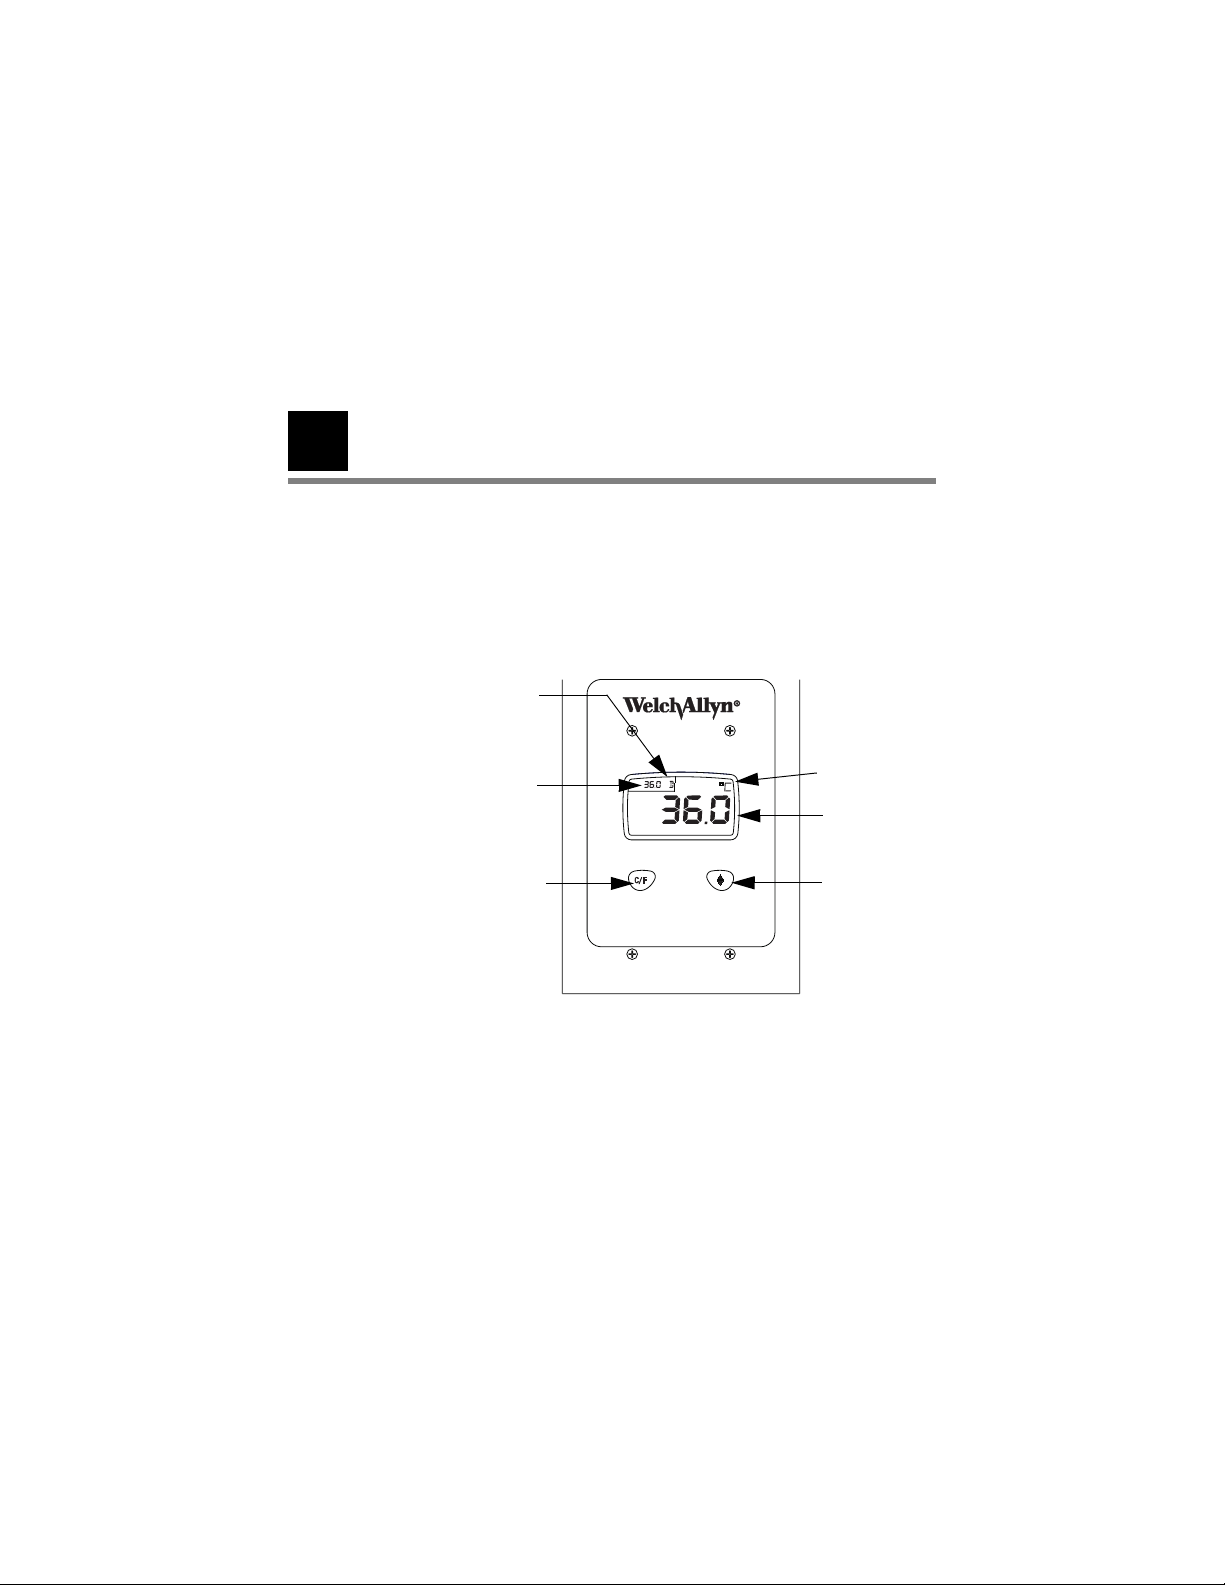
Figure 1. LCD Display and Front Buttons
Calibration Set
Point Temperature
Celsius/Fahrenheit
Selection Button
Set Point
Mode
Temperature
Units
Current Cavity
Temperature
Temperature
Selection
Button
Calibration Set Point Temperature
There are three Calibration Set Point temperatures used to
test the calibration of the thermometer. The three
temperatures are 36° C (96.8° F), 38.5° C (101.3° F), and 41°

6 Chapter 2 Controls and Indicators Welch Allyn 9600 Plus Calibration Tester
C (105.8° F). The LCD displays the current Calibration Set Point
Temperature in the upper left corner of the LCD.
Current Cavity Temperature
The current temperature of the 9600 Plus Calibration Tester is
indicated by the large numbers in the center of the display
(Figure 1).
As the device is transitioning to the current Calibration Set Point
Temperature, the actual temperature flashes on the display.
When the device reaches the Calibration Set Point Temperature,
the temperature in the center of the display stops flashing.
Temperature Units
The 9600 Plus Calibration Tester is capable of displaying the
temperature in degrees Fahrenheit or Celsius.
Set Point Mode
The LCD will display either a "D" (Default) or "L" (Last Used) in the
upper left hand corner (Figure 1). The 9600 Plus Calibration
Tester has two set point modes of operation. The Default mode
(from the factory) causes the 9600 Plus Calibration Tester to heat
up to the lowest set point (36.0
Last Used mode causes the 9600 Plus Calibration Tester to heat
up to the last temperature setting that was used.
°
C / 96.8°F) upon startup. The
To change the Set Point Mode, press and hold the C/F and Arrow
buttons below the LCD display simultaneously until a single
audio beep is heard. A “D” or an “L” will appear in the upper left
corner of the display for the new mode.

Directions for Use Chapter 2 Controls and Indicators 7
Power On Sequence
The 9600 Plus Calibration Tester receives power from a wallmount power pack that plugs into the back of the unit. There is
no ON/OFF switch. On power up, the 9600 Plus Calibration
Tester performs internal self-checks, displays an all-segments
test pattern, beeps and displays the device’s current
temperature. The 9600 Plus Calibration Tester immediately
applies heat, if needed, to reach the selected Calibration Set
Point Temperature.
Front of the 9600 Plus Calibration Tester
Temperature Selection Button
This button allows the user to select one of three set point
temperatures: 36.0
°
(105.8
To scroll from one set point to the next, press and hold the
Temperature Selection button until a beep is heard. The newly
selected set point appears in the upper left corner of the LCD
display. The device’s current temperature is displayed, will start
to flash, and continue flashing until the cavity reaches the
equilibrium at the new set point.
F).
°
C (96.8°F), 38.5°C (101.3°F), or 41.0°C
Celsius/Fahrenheit Selection Button
This button allows the user to select degrees Celsius or degrees
Fahrenheit. To change the temperature units, press and hold the
C/F button until a beep is heard. The temperatures will appear in
either “°C” or “°F”, see (Figure 1).
8 Chapter 2 Controls and Indicators Welch Allyn 9600 Plus Calibration Tester
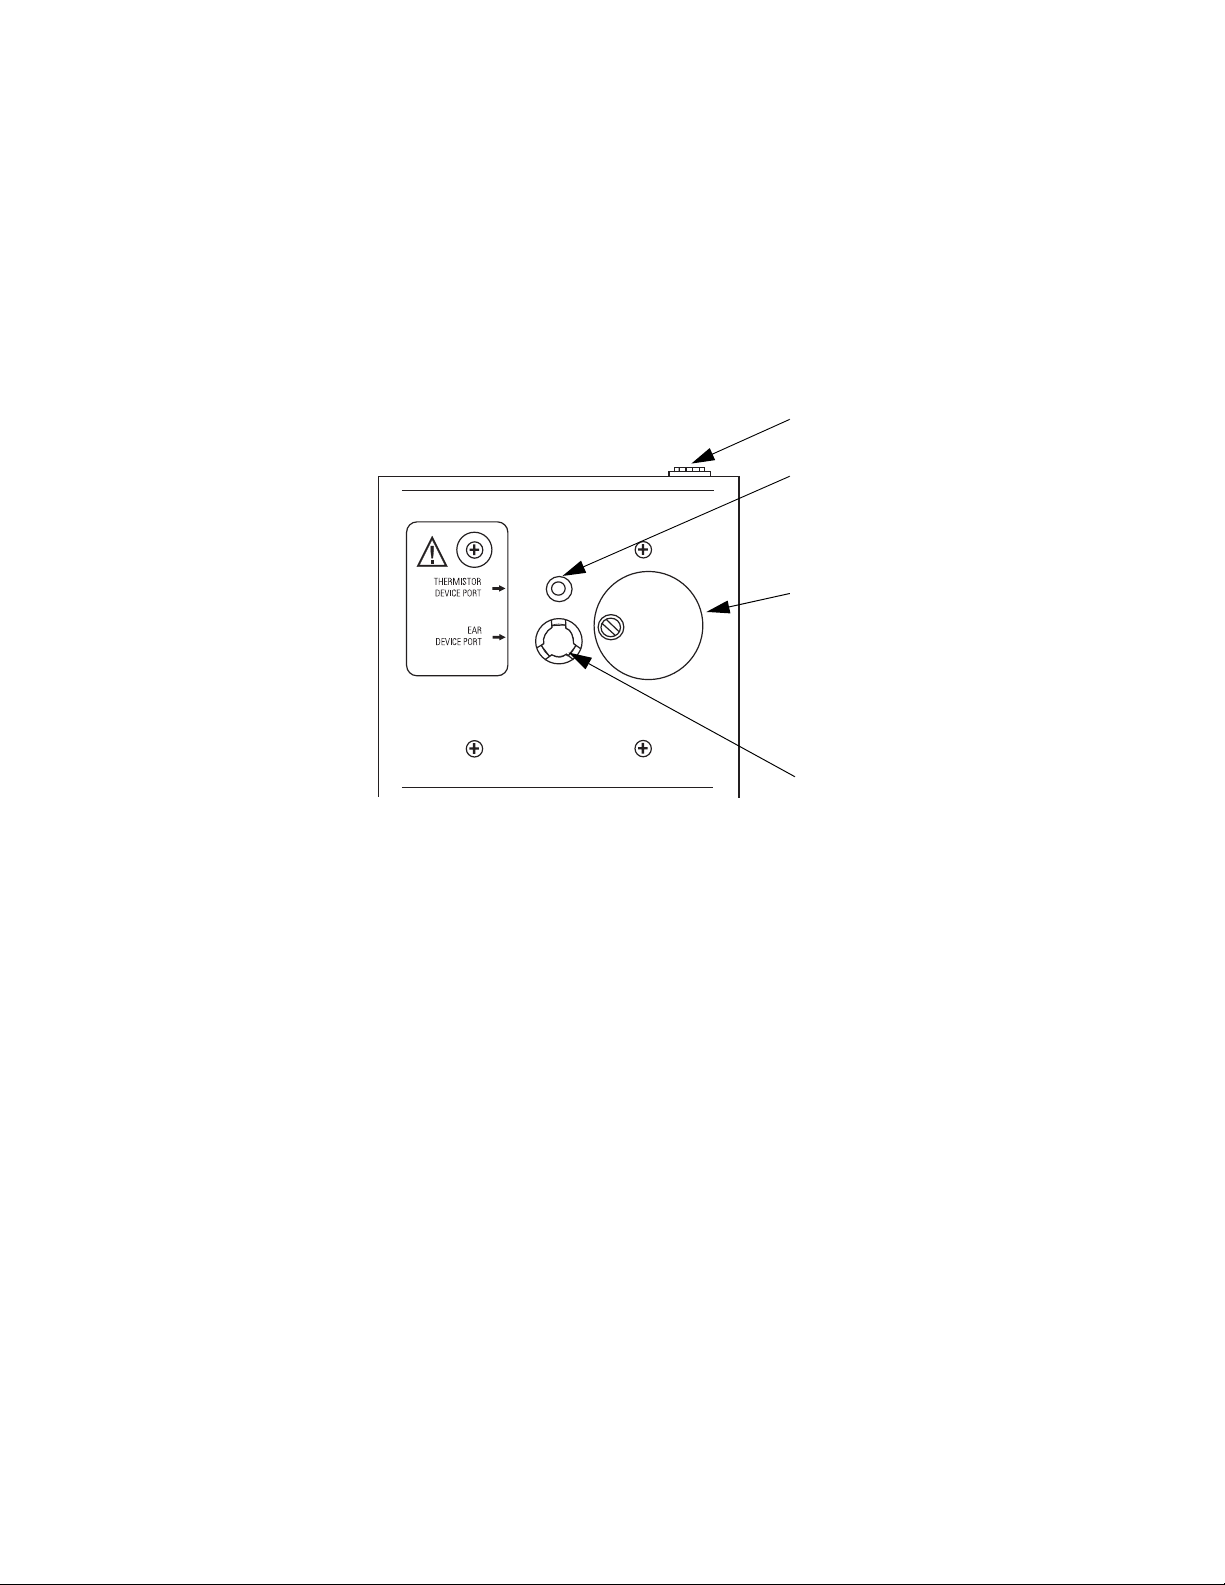
Figure 2. Front of the 9600 Plus Calibration Tester
Power Jack
Thermistor
Device Port
Dust Cover
Ear Device
Port

Directions for Use Chapter 2 Controls and Indicators 9
Dust Cover
This black, plastic cover keeps dust from entering the Thermistor
and Ear Device Ports. To expose the Thermistor and Ear Device
Ports, rotate the Dust Cover counter clockwise. To cover the
ports, rotate the Dust Cover clockwise.
Caution When not using the Thermistor or Ear Device
Ports, keep them covered with the Dust Cover.
Thermistor and Ear Device Ports
The Ear Device Port is the larger of the two ports located under
the dust cover and is for the Braun ThermoScan Pro 3000 and
Pro 4000 ear thermometers (Figure 2).
The Thermistor Device Port is the smaller port located under the
dust cover and is for the SureTemp and SureTemp Plus
thermometers.
The surface texture inside the Ear Device Port is painted with a
special dull, black paint to enable Ear device readings. You can
only see its surface under bright light. The Thermistor Device
Port is not painted black. Keep both clean and dry.
The coating in the device ports of the unit is fragile, so please
follow the cleaning instructions carefully. Do not touch the
surface, and do not allow any foreign objects to be inserted into
the ports. Avoid spilling liquids onto the unit. If liquid or other
contaminants enter the unit, Welch Allyn can not assure proper
calibration and you must return the unit to Welch Allyn for
recalibration.

10 Chapter 2 Controls and Indicators Welch Allyn 9600 Plus Calibration Tester

11
3
Operation
9600 Plus Calibration Tester Setup
Place the 9600 Plus Calibration Tester on a level surface
away from sunlight, drafts, and other sources of heat or cold.
The 9600 Plus Calibration Tester takes approximately 20
minutes to heat to the lowest setting. When testing several
thermometers at all three temperatures, it is recommended
to test all probes at one Calibration Set Point Temperature
before proceeding to the next Calibration Set Point
Temperature. To further expedite testing start at the lowest
Calibration Set Point Temperature. The 9600 Plus Calibration
Tester does not have an internal fan, causing the cool down
time to be greater than the time it takes to heat up.
12 Chapter 3 Operation Welch Allyn 9600 Plus Calibration Tester
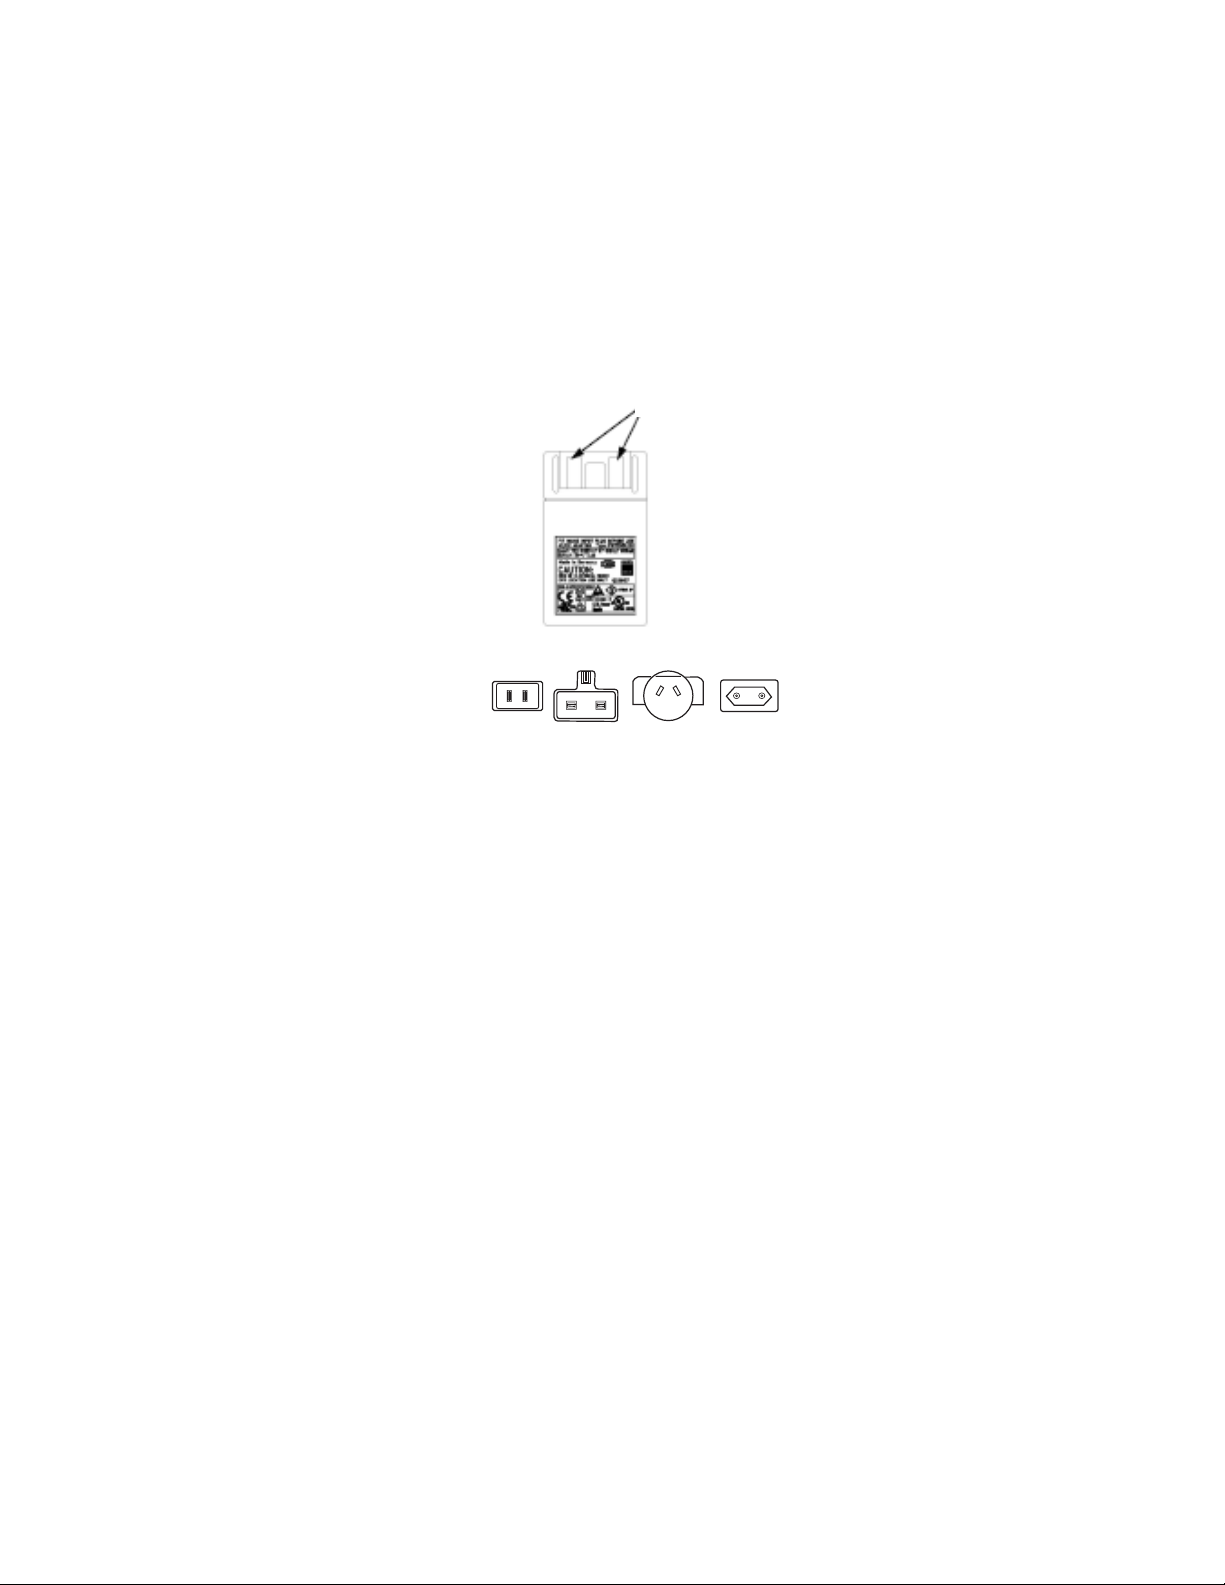
Figure 3. Power Adapter and Mains Plug Inserts
Two prongs in the
power adapter
UKUS EUAUS
For the setup:
1. Choose the proper mains plug insert and slide it over the two
prongs in the power converter (Figure 3).
2. Plug the power adapter into the 9600 Plus Calibration Tester
(Figure 2) and the opposite end into a wall outlet.
3. Observe the Set Point Mode in the upper left hand corner of
the LCD display (Figure 1). If the unit displays a "D", it is in
Default Mode and will heat to the lowest Set Point
Temperature. If you do not want to conduct testing at this Set
Point Temperature, press and hold the Temperature Selection
button to select the desired setting. The temperature display
will flash before staying on continuously to indicate the 9600
Plus Calibration Tester has stabilized and is ready for use.
Directions for Use Chapter 3 Operation 13
Welch Allyn SureTemp and SureTemp Plus Thermometers
Caution Store thermometers for testing in the same
room as the 9600 Plus Calibration Tester for
approximately 30 minutes prior to testing to allow for
thermal accommodation.
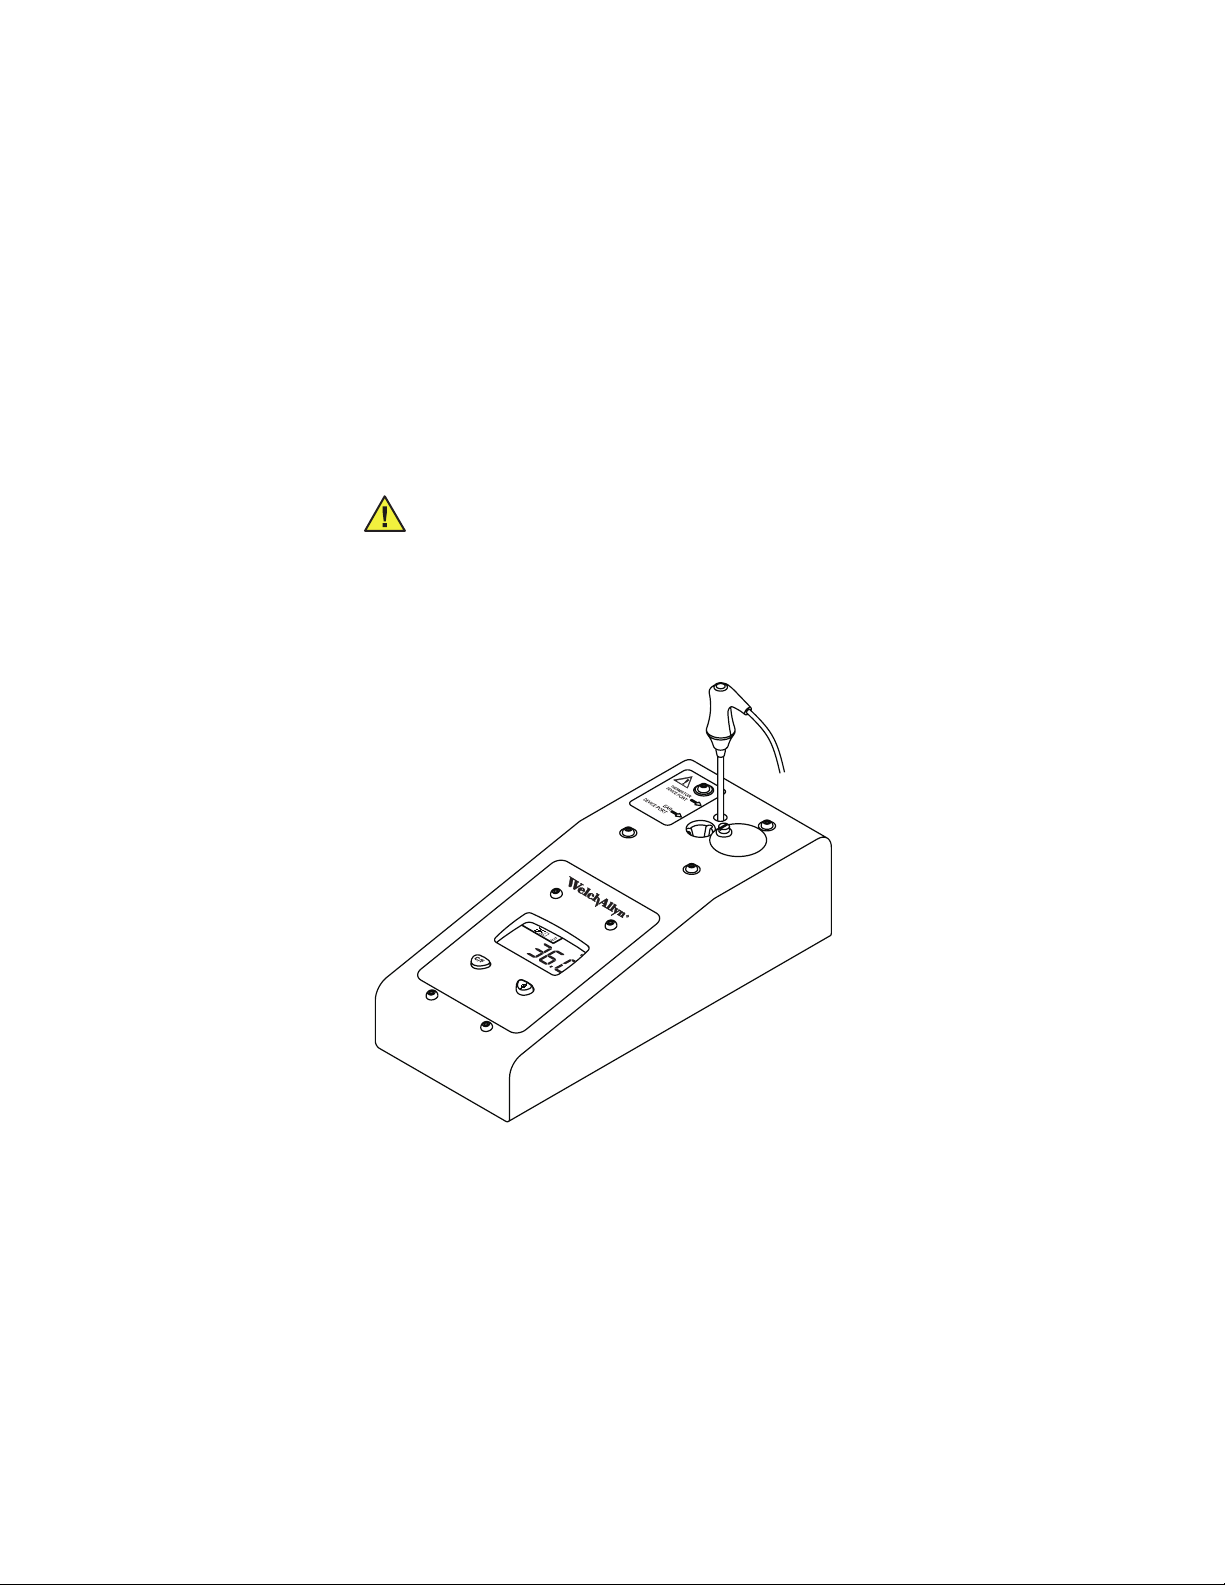
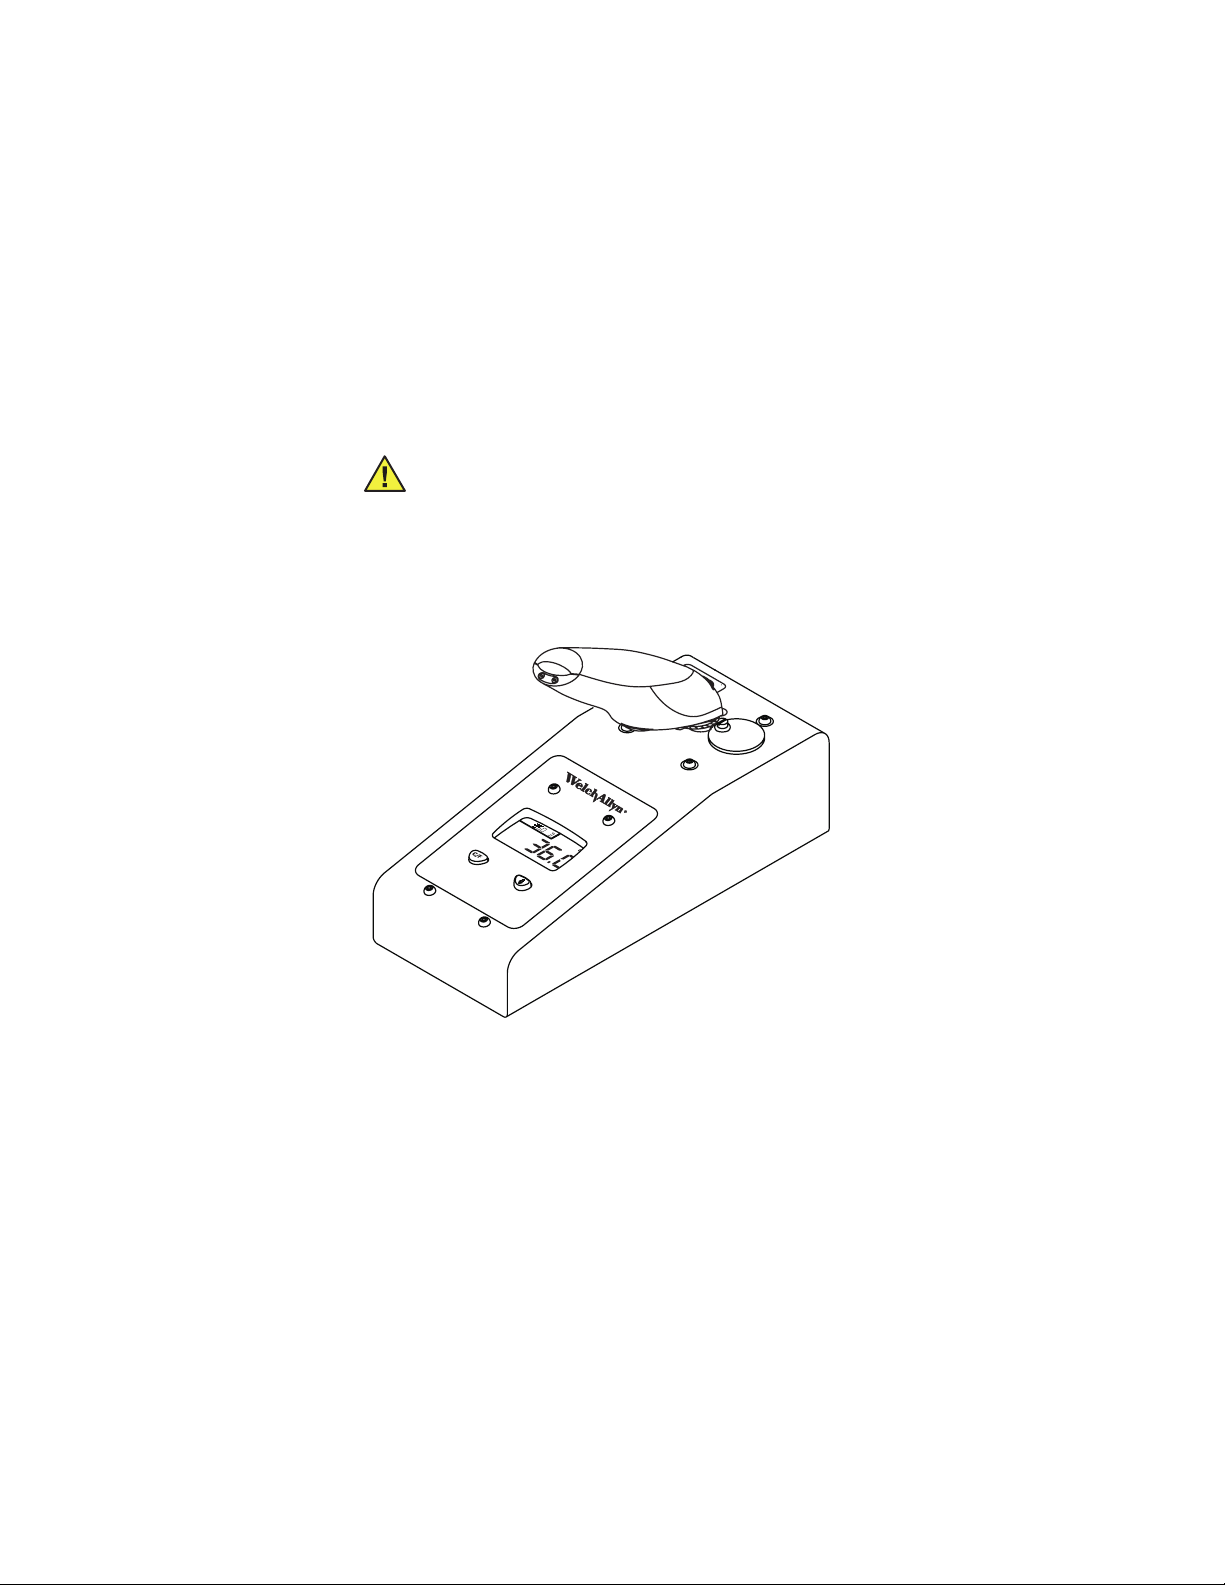
Figure 4. 9600 Plus Calibration Tester with the Welch Allyn SureTemp
Plus Thermometer
To begin calibration verification of the thermometers:

14 Chapter 3 Operation Welch Allyn 9600 Plus Calibration Tester
1. Remove the probe from the probe well and clean it with
either a 70% isopropyl alcohol solution, a 10% chlorine bleach
solution, or a non-staining disinfectant. Let the probe air dry.
Do not apply a probe cover.
2. Place the thermometer in Monitor Mode, refer to the
thermometer’s Operator's Manual.
3. Insert the probe into the Thermistor Device Port (Figure 4).
4. Wait for approximately one minute or until temperature on the
thermometer is stable for ten seconds. Compare the
thermometer's temperature reading to the 9600 Plus'
Calibration Set Point Temperature. If the temperatures are
within ±0.1° C (±0.2° F), the thermometer is within
calibration.
5. Test all available thermometers for calibration verification at
the current Calibration Set Point Temperature. Proceed to the
next Calibration Set Point Temperature, see "Changing the
Calibration Set Point Temperature" (page 19).
Directions for Use Chapter 3 Operation 15
Braun ThermoScan Pro 4000 Model
Caution Store thermometers for testing in the same
room as the 9600 Plus Calibration Tester for
approximately 30 minutes prior to testing to allow for
thermal accommodation.
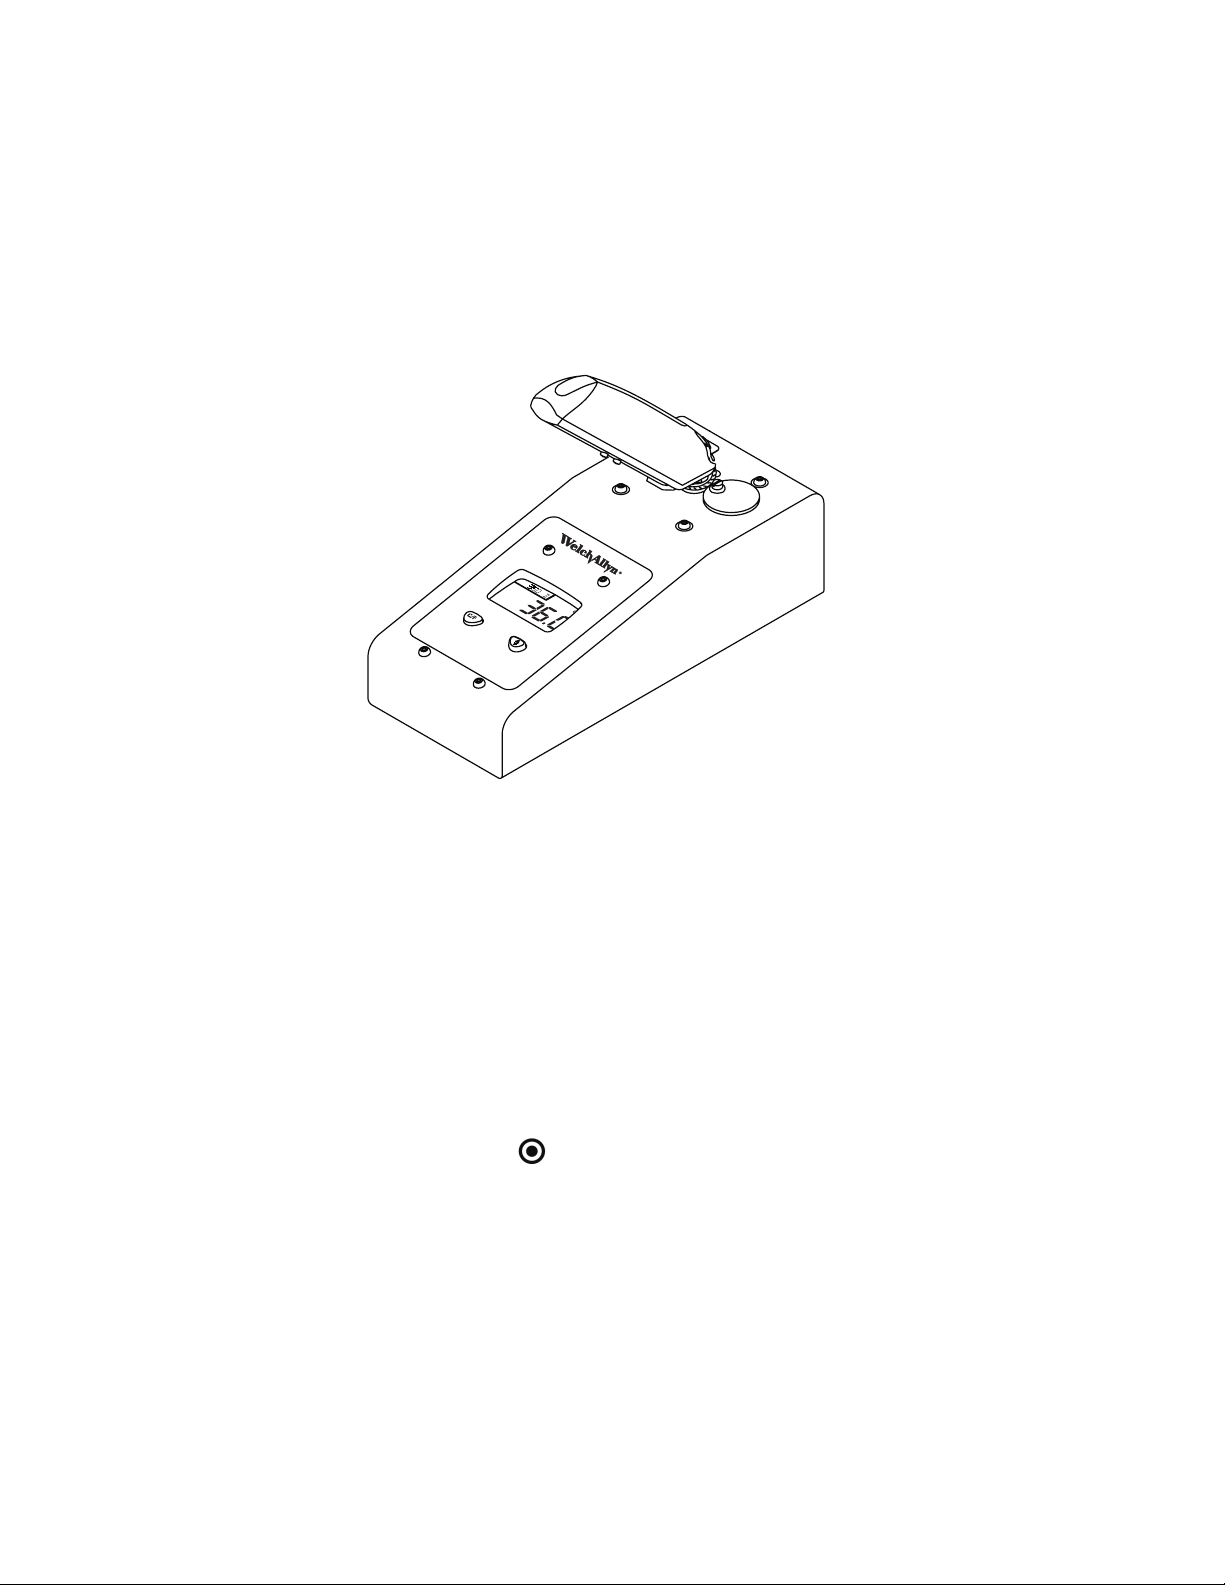
Figure 5. 9600 Plus Calibration Tester with the Braun ThermoScan
Pro 4000
To begin calibration verifcation of the thermometers:
1. Clean the probe tip with a cotton swab slightly moistened
with isopropyl alcohol, remove excess alcohol with a clean

16 Chapter 3 Operation Welch Allyn 9600 Plus Calibration Tester
cotton swab, and let air dry for 5 minutes.Do not use any
chemical other than alcohol to clean the probe window.
2. Place the Braun ThermoScan Pro 4000 in Calibration Mode
using the following steps.
a. Push and release the I/O MEM button to turn the product
on. The display will show symbols and functions. The Pro
4000 will perform an automatic self check. After a few
seconds you will hear a beep and see three dashed lines, a
sound symbol, and ° C or ° F on the display.
b. Push the I/O MEM button again and keep it pressed for
the following steps:
• After approx. 3 seconds the “OFF” symbol will flash on
the display (keep the button depressed).
• When you hear a beep, release the button immediately.
• The Pro 4000 is now in calibration check mode and the
display is flashing and showing the “CAL” symbol.
3. Apply a new probe cover. Place the probe firmly into the Ear
Device Port (Figure 5).
4. Wait approximately three seconds, press the thermometer
Start button, and watch for the "Exac Temp" light to flash.
5. Leave the thermometer in the 9600 Plus Calibration Tester
until you hear a beep.
6. Remove the Pro 4000 Thermometer from the 9600 Plus
Calibration Tester and read the temperature in the
thermometer’s display. If the temperatures are within ±0.2° C
(±0.4° F), the thermometer is within calibration.

Directions for Use Chapter 3 Operation 17
7. Wait one full minute before taking another reading with the
same thermometer. Repeated measurements in short
sequence may cause higher readings.
8. The device will exit CAL mode after four minutes.
9. Test all available thermometers for calibration verification at
the current Calibration Set Point Temperature. Proceed to the
next Calibration Set Point Temperature, see "Changing the
Calibration Set Point Temperature" (page 19).
Braun ThermoScan Pro 3000 Model
Caution Store thermometers for testing in the same
room as the 9600 Plus Calibration Tester for
approximately 30 minutes prior to testing to allow for
thermal accommodation.
18 Chapter 3 Operation Welch Allyn 9600 Plus Calibration Tester
Figure 6. 9600 Plus Calibration Tester with Braun ThermoScan Pro 3000
1. Clean the probe tip with a cotton swab slightly moistened
with isopropyl alcohol, remove excess alcohol with a clean
cotton swab, and let air dry for 5 minutes.Do not use any
chemical other than alcohol to clean the probe window.
2. Place the Braun ThermoScan Pro 3000 in calibration check
mode using the following steps.
a. Wait until the thermometer is in Standby mode (the screen
is blank).
b. Press down and hold the Activation button, do not release
until Step d.
c. Press the /Mem button.

Directions for Use Chapter 3 Operation 19
d. The LCD will flash “CAL” after the self check sequence.
The display will flash “CAL”, even if you have taken a
temperature.
e. Release both buttons.
3. Apply a new probe cover. Place the device firmly into the Ear
Device Port (Figure 6).
4. Wait approximately three seconds, press the thermometer
Activation button, and listen for the beep.
5. Remove the Pro 3000 Thermometer from the 9600 Plus
Calibration Tester and read the temperature in the
thermometer’s display. If the temperatures are within ±0.2° C
(±0.4° F), the thermometer is within calibration.
6. Wait one full minute before taking another reading with the
same thermometer. Repeated measurements in short
sequence may cause higher readings.
7. The device will exit Cal mode after approximately 4 minutes.
8. Test all available thermometers for calibration verification at
the current Calibration Set Point Temperature. Proceed to the
next Calibration Set Point Temperature, see "Changing the
Calibration Set Point Temperature" (page 19).
Changing the Calibration Set Point Temperature
To scroll from one set point to the next, press and hold the
Temperature Selection button until a beep is heard. The newly
selected set point appears in the upper left corner of the LCD
display. The device’s current temperature is displayed, will start
to flash, and continue flashing until the cavity reaches the
equilibrium at the new set point.

20 Chapter 3 Operation Welch Allyn 9600 Plus Calibration Tester

21
4
Maintenance
Cleaning
To clean the 9600 Plus Calibration Tester:
1. Unplug the electrical cord from the back of the unit.
2. Using a cloth slightly dampened with a solution of warm
3. Rinse the cloth with water and thoroughly wring it out.
4. Wipe off the soap and water from the 9600 Plus.
5. Let the 9600 Plus Calibration Tester dry for 15 minutes.
6. Plug the electrical cord into the back of the unit.
water and mild soap, clean the outside of the unit. Take
extra care so that soap and water do not enter the two
device ports.
Caution Do not clean the Thermistor or Ear Device
Ports. Doing so may damage the surface. Only a
Welch Allyn authorized Service Center should clean
the Device Ports.

22 Chapter 4 Maintenance Welch Allyn 9600 Plus Calibration Tester
Problem Solving
Error Problem Solution
E Calibration Tester cannot reach
Set Point Temperature because
room or device is too warm.
E Calibration Tester cannot reach
Set Point Temperature because
room or device is too cold.
Voltage Power adapter voltage problem Call Welch Allyn for replacement
E0.1 Broken Heater, not heating at
all
E0.2 Heater run away (heater does
not turn off at appropriate time)
E0.3 Open thermistor Return to Welch Allyn for service
E0.4 Shorted thermistor Return to Welch Allyn for service
E0.5 Open RCAL resistor Return to Welch Allyn for service
E0.6 Shorted RCAL resistor Return to Welch Allyn for service
E0.7 Open PTB resistor Return to Welch Allyn for service
Ambient temperature and/or device
temperature should be within 18.3°C
to 26.7
°C (65°F to 80°F). Allow 30
minutes for thermal accommodation
prior to testing.
Ambient temperature and/or device
temperature should be within 18.3
to 26.7°C (65°F to 80
minutes for thermal accommodation
prior to testing.
Return to Welch Allyn for service
Return to Welch Allyn for service
°F). Allow 30
°C
E0.8 Shorted PTB resistor Return to Welch Allyn for service
E0.9 Catastrophic internal failure Return to Welch Allyn for service

Directions for Use Chapter 4 Maintenance 23
Error Problem Solution
E1.1 Device not calibrated Return to Welch Allyn for service
E1.3 EEPROM failure Return to Welch Allyn for service
9600 Plus Calibration Tester Checks
If several thermometers do not pass the calibration verification
tests, check the 9600 Plus Calibration Tester to determine if it is
out of calibration. Before sending the unit to an authorized Welch
Allyn service center, complete the checks listed below.
1. Check the calibration date on the side of the 9600 Plus
Calibration Tester. If the 9600 Plus Calibration Tester was
calibrated over 12 months ago, do not use it. Send it to an
authorized Welch Allyn Service center immediately for
calibration.
2. Ensure no one has tampered with the 9600 Plus Calibration
Tester. If someone has tampered with the unit or the
calibration label(s), the calibration settings and warranty are
void. Send it to an authorized Welch Allyn Service center
immediately for calibration.
3. Ensure the 9600 Plus Calibration Tester is not exposed to
extreme temperatures that can damage the precision
thermistor. Exposure to high heat can cause the resistance
versus temperature characteristic of the unit to shift, causing
the 9600 Plus Calibration Tester to become inaccurate. Send
it to an authorized Welch Allyn Service center immediately for
calibration.
4. Verify the probe tip of the Braun ThermoScan Pro 3000 and
the Braun ThermoScan Pro 4000 are clean. Always use new
probe covers when calibration testing these thermometers.

24 Chapter 4 Maintenance Welch Allyn 9600 Plus Calibration Tester
5. Verify the ear thermometers are in calibration mode.
6. Verify the thermistor thermometers are in monitor mode.
Environmental Checks
1. Verify that there is no excessive moisture or steam in the air.
High humidity (above 90%) can cause electrical leakages that
can temporarily shift the device out of calibration. If the
thermometers and/or the 9600 Plus Calibration Tester are
exposed to such conditions, allow each device to sit at normal
room temperature and humidity for at least 30 minutes before
conducting a calibration test.
2. Avoid exposure to extreme temperatures. Thermal gradients
in the thermometer or the 9600 Plus Calibration Tester can
cause unpredictable effects. Verify the 9600 Plus Calibration
Tester is within the specified ambient temperature range of
18.3° C (65.0° F) to 26.7° C (80.0° F).
Loading...