


Auriflush Ear Wash System

Operating Instruction Manual
1
Manual de instrucciones de operación
17
Manuel d’utilisation
33
49
Manuale delle istruzioni operative
65
Manual de instruções sobre o funcionamento
81
SPA-22413 Manual BC_DTP.qxd 3/7/02 9:37 AM Page 100

1
Table of Contents
Introduction ........................................................................................................2
Warnings and Symbols.....................................................................................3
Getting Started...................................................................................................4
Unpacking and Verifying Contents........................................................... 4
Diagram of the Auriflush System...............................................................5
Faucet Aerator Installation.........................................................................6
Chamber Aerator Installation.....................................................................6
Using the Auriflush System.............................................................................7
Steps for Ear Cleaning ............................................................................... 7
Attaching the Tubing and Chamber...........................................................7
Attaching the Eartip.....................................................................................7
Ear Cleaning...................................................................................................7
Disassembly....................................................................................................... 9
Maintenance.....................................................................................................10
Cleaning and Disinfecting the Auriflush System...................................10
Troubleshooting ...............................................................................................12
Warranty and Service Information ...............................................................14
Replacement Parts and Accessories...........................................................15
Ordering Information..................................................................................15
Specifications..................................................................................................16
General Specifications .............................................................................16
Patents..........................................................................................................16
Eartips...........................................................................................................16
Schering-Plough Animal Health Office Locations....................................97
SPA-22413 Manual BC_DTP.qxd 3/7/02 9:36 AM Page 1

2
Introduction
Thank you for purchasing the Schering-Plough Animal Health (SPAH) Auriflush
™
Ear Wash System.
The SPAH Auriflush System provides a safe and effective way to clean the external ear
canal of dogs and cats. This method of cleaning is much neater and safer than other
methods currently on the market. And because of its innovative, intuitive design,
learning to use the product is extremely easy. The Auriflush System provides the
following features:
• Patient Comfort – Hydrovac action
• Patient Safety – High temperature water shut-off valve
– Water pressure regulation inside chamber
• User Friendly – Visual temperature feedback sensor
• Superior Engineering – Fully functional at variable water pressures as well as
different faucets
This manual describes how to operate and maintain the SPAH Auriflush System. Please
follow these instructions to ensure many years of accurate and reliable service.
About this Manual
This manual serves as a guide for ear washing using the SPAH Auriflush System.
The system is intended for use by Veterinary Healthcare Professionals. Any use
other than the intended use invalidates the manufacturer’s warranty.
SPA-22413 Manual BC_DTP.qxd 3/7/02 9:36 AM Page 2

3
Warnings and Symbols
This manual uses the icons and symbols described below.
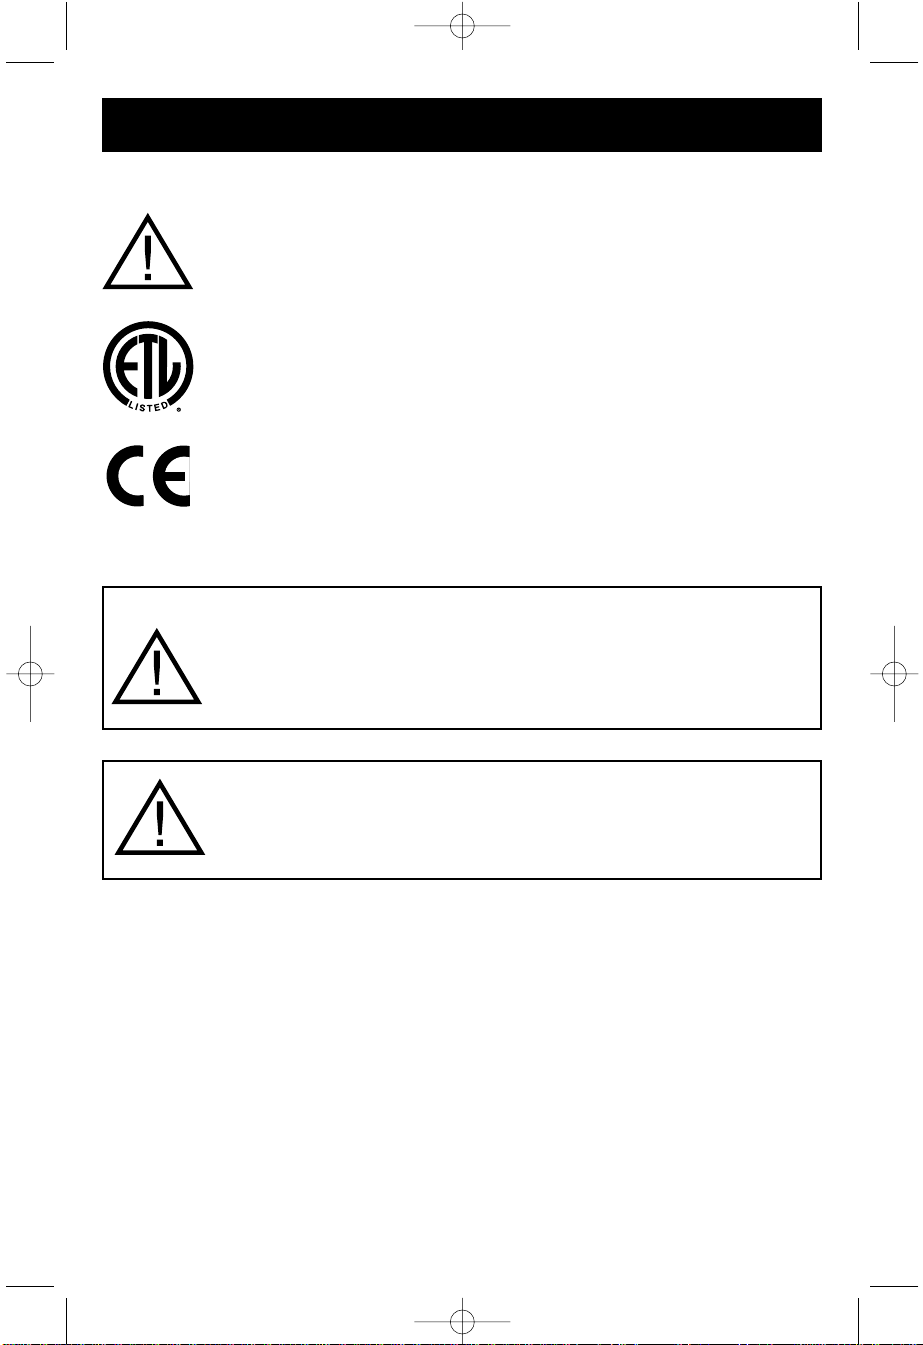
ATTENTION: Refer to the operating instructions. This symbol is intended to
advise the user of the presence of important operating or maintenance
instructions in the documents accompanying the instrument.
Performance specifications verified by ETL Laboratories
The CE mark on this device indicates that it has been tested and conforms
to the provisions noted within the 93/42/EEC Medical Device Directive
Always inspect the ear before attempting any ear cleaning procedures.
The presence of a perforated or compromised tympanic membrane
indicates it is unsafe to use the Auriflush System. Use of the Auriflush
System on patients with current or prior history of chronic middle ear
infections is left to the discretion of the veterinarian.
If the water is too cold, the patient may become dizzy or experience
vertigo. Please verify that the thermal indicator is white before proceeding
with the irrigation.
SPA-22413 Manual BC_DTP.qxd 3/7/02 9:36 AM Page 3

4
Getting Started
Unpacking and Verifying Contents
Inspect the packaging for any damage incurred during shipping. If you find any
damage, notify the carrier.
When you unpack your new Auriflush System, verify that the following items
are included:
• Water chamber
• Handle/Tubing assembly
• One snap aerator
• Four different faucet adapters
• Chamber Aerator
• One box of eartips (25 ct)
• Storage Tray
• Operating Instruction Manual
• Quick Reference Guide
If any items or pieces are missing, please call your Schering-Plough Animal Health
Office (see page 97).
Use the figure on the next page to familiarize yourself with the features of the
Schering-Plough Animal Health Auriflush System.
SPA-22413 Manual BC_DTP.qxd 3/7/02 9:36 AM Page 4

5
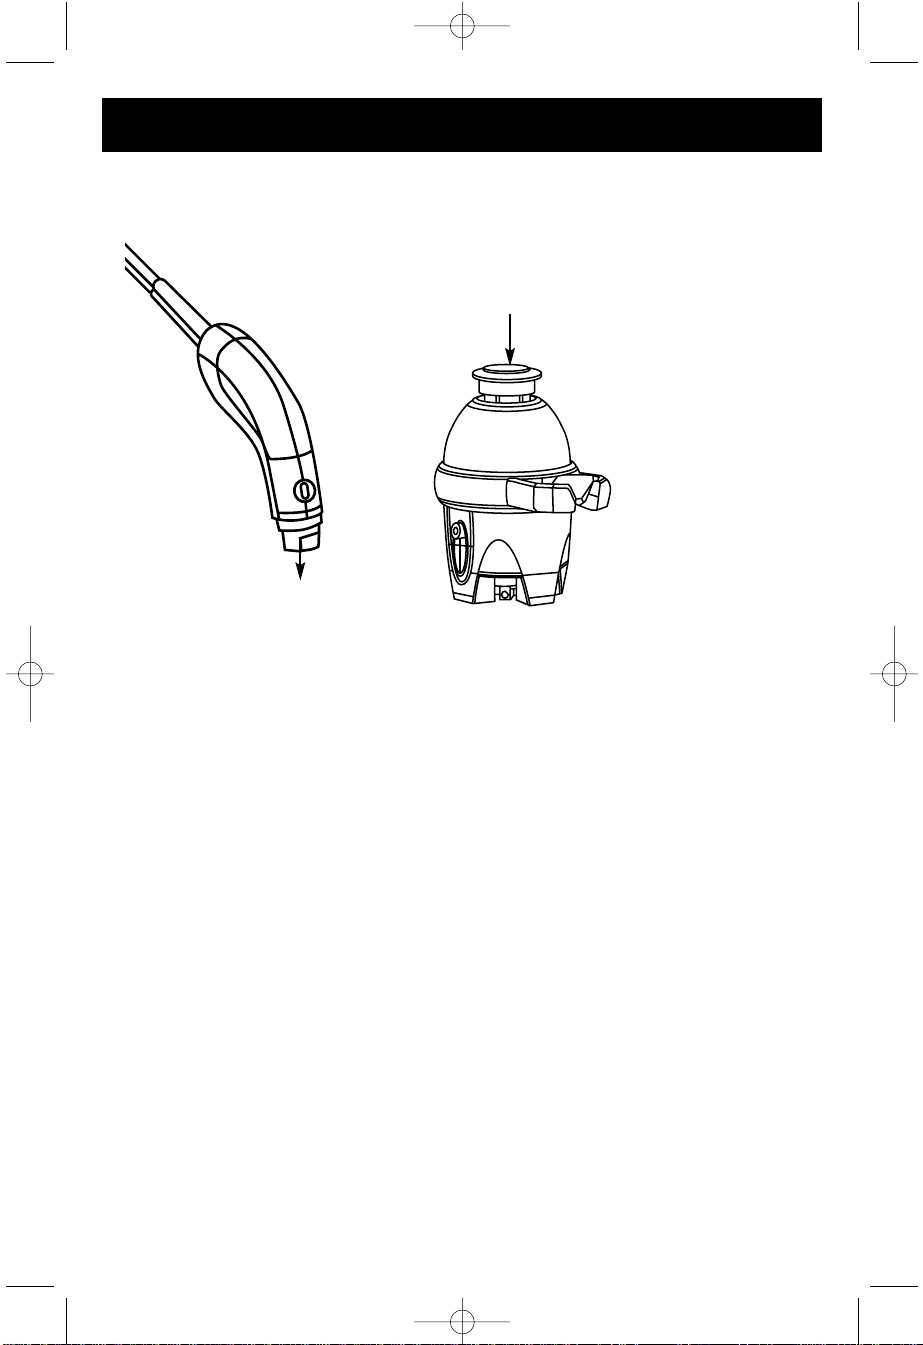
Diagram of the SPAH Auriflush Ear Wash System
1 Snap Aerator
2 Snap Connector with White Ring
3 Handle Rest Grip Ring
4 Irrigation Port – Irrigation Water
to Ear (blue)
5 Return Port – Return Water from
Ear (black)
6 Return Water Exit Port
7 Chamber Aerator
8 Water Flow Actuator
9 Water Temperature Sensor
10 Cerumen Trapping Screen in Eartip
11 Water Jet Output
12 Water Suction Input
13 Disposable Eartip
14 Eartip Removal Tab
15 Injection Port
11
12
10
14
9
13
8
15
1
2
3
4
5
6
7
SPA-22413 Manual BC_DTP.qxd 3/7/02 9:36 AM Page 5

6
Faucet Aerator Installation
1. Remove your current aerator from your faucet, including any original washers. You
may need to use a pair of pliers to remove your aerator. If you still have difficulty in
removing it, soak your current aerator in distilled vinegar for about twenty minutes
and try again.
2. Try attaching the snap aerator to your faucet by turning it counter-clockwise. If it does
not fit, try using one of the adapters that is included with the unit. Attempt to match
the adapter to your faucet and then attach the snap aerator. Verify the rubber washer
on the snap aerator and adapter matches to the old washer on your faucet. If you
need to use the threadless universal adapter (only available in certain regions), you
may need to remove the inner rubber o-ring if it is too small for your faucet.
3. Once the snap aerator is attached to the faucet, the ear cleaning chamber is easily
attached or removed from the snap aerator. You can still use your sink normally when
the Auriflush System is not attached to the snap aerator.
Chamber Aerator Installation
The chamber aerator is an optional attachment that is necessary if you are experiencing
a significant amount of water splash around your sink. When the chamber aerator is
attached, replace the chamber normally into the storage tray.
1. Find the notch located on the top of the chamber aerator and line it up with the blue
irrigation port on the chamber.
2. Gently press the chamber aerator against the chamber until it is snug.
NOTE: The chamber aerator is only capable of attaching to the chamber if it is aligned
correctly. It should go on relatively smoothly and there is no need to force it onto the
chamber.
SPA-22413 Manual BC_DTP.qxd 3/7/02 9:36 AM Page 6

7
Using the Auriflush System
Steps for Ear Cleaning
Always inspect the ear before attempting any ear cleaning procedures.
The presence of a perforated or compromised tympanic membrane
indicates it is unsafe to use the Auriflush System. Use of the Auriflush
System on patients with current or prior history of chronic middle ear
infections is left to the discretion of the veterinarian.
Attaching the Tubing and Chamber
1. Connect the tubing to the chamber. Match the black connector to the black return
port on the side of the chamber. Match the blue connector to the blue irrigation port
on the lower side of the chamber.
2. To attach the chamber to the faucet, pull down the white plastic ring on the top of the
chamber, and then insert the chamber over the snap aerator on the faucet. When the
chamber is positioned, release the white plastic ring. The chamber is now secure.
Attaching an Eartip
1. Line up the grooves on the side of the eartip with the corresponding indentations on
the handle interface. Verify that you are attaching the eartip with the tab facing
upwards.
2. Press firmly on the eartip until it is flush against the handle interface. You will feel a
slight snap when the eartip is in place.
Ear Cleaning
1. The use of sedatives, tranquilizers or general anesthetics may be indicated
depending on the temperment of the animal and the degree of pain present. For
routine cleaning in an otherwise non-fractious animal, the procedure is generally
well tolerated.
2. To reduce procedure time, use an ear cleaning solution or cerumenolytic
3. Initially, you may cover the patient with a cloth drape to eliminate splashing. Once
the technique of sealing the ear canal is mastered, this may not be necessary.
4. Begin to run water through the unit by first turning the cold water on completely.
Then gradually turn on the hot water until the water exiting the bottom of the
chamber feels close to body temperature.
5. Check the temperature of the irrigating water by looking at the thermal sensor while
depressing the water flow actuator. If the thermal sensor is blue, the irrigating water
is not warm enough. If the thermal sensor is white, the water temperature is at least
90° F and the procedure may begin. You must depress the actuator on the handle for
the temperature sensor to function correctly.
If the water is too cold, the patient may become dizzy or experience
vertigo. Please verify that the thermal indicator is white before proceeding
with the irrigation.
SPA-22413 Manual BC_DTP.qxd 3/7/02 9:36 AM Page 7

8
6. To clean the ear, grasp the patient’s pinna. Pull gently to help straighten the ear
canal. While maintaining tension on the pinna, insert the tip of the handle into the ear
to create a seal. Squeeze the actuator on the handle. By adjusting how much force
you push on the actuator, some control over the flow rate is attained.
7. Aim the stream of water toward the ear canal walls by rotating the handle during the
irrigation. Flood the ear with water. The suction return system will return the
discharge away from the ear. (See the quick reference guide for a diagram of correct
water flow).
8. If you wish to administer an additional agent to augment the cleansing effect, simply
inject it into the Injection Port while continuing to irrigate the ear canal.
Use a slow and steady pressure (2cc/sec is recommended) when
introducing an additional agent through the Injection Port. DO NOT exceed
10cc/sec (approx. 15 psi). Excessive irrigation pressures higher than 15 psi
could potentially damage the tympanic membrane. DO NOT inject any
agent through the Injection Port while the faucet water is off or while the
handle actuator is not depressed. Doing so could cause corrosive damage
to the internal components of the water chamber and voids the warranty.
NOTE: Discoloration or staining of the tubing can occur over time due to local water
conditions and/or introduction of ear cleaning solutions or other agents.
9. If the temperature of the irrigating water becomes too hot, the unit will restrict the
flow to the handle, while continuing to discharge out the bottom of the unit. For the
unit to reset, bring the water temperature down to a safe level by adjusting the knobs
on the faucet until the water cools sufficiently.
10. Release the actuator and keep the eartip in the canal for 5 to 10 seconds to vacuum
any residual irrigating water.
NOTE: The Auriflush System will reduce your procedure time. All procedure times are
dependent on the consistency of the cerumen, quantity of debris, degree of
inflammation and/or infection and whether or not a wax softening agent is used
prior to cleaning. In severe cases, procedure times may be extended.
11. When cleaning is complete, grasp the tab located on the eartip of the device and pull
the eartip off of the handle with a downward motion. This eartip is disposable.
Please place in an appropriate receptacle.
If there is no water flow out of the eartip and the actuator is depressed,
check to see if the hot water shut-off has tripped by running cold water
through the unit. This should restore water flow to the handle.
SPA-22413 Manual BC_DTP.qxd 3/7/02 9:36 AM Page 8

9
Disassembly
1. Turn off the faucet and disconnect the tubing from the chamber.
2. Detach the chamber from the faucet. Press down the white ring on top of the
chamber and then pull the chamber from the snap aerator. The chamber will drain
through the open hose ports at the front and bottom.
3. To remove any stagnant water from the tubing, place the open end of the tubing over
the sink. Hold the handle higher than the tubing and squeeze the actuator. Roll the
tubing up into a coil, holding the handle higher than the tubing. The water should
run out of the open end into the sink basin.
SPA-22413 Manual BC_DTP.qxd 3/7/02 9:36 AM Page 9

10
Maintenance
Cleaning and Disinfecting the Auriflush System
Clean the Auriflush System after every use and disinfect at the user’s discretion.
Cleaning the unit with soap and water will eliminate any debris and reduce the number
of microorganisms in the tubing. Disinfect the unit with 70% isopropyl alcohol or 10%
bleach with 90% water solution to eliminate most bacterial and fungal growth. It is
recommended that alcohol is used since it will help to evaporate any remaining water
in the tubing.
1. Remove the eartip and discard.
2. Clean the outside of the chamber, handle and hose with a soft cloth saturated with
a mild solution of soap and water.
3. To clean the unit, prepare an 800 mL solution of soap and water. To disinfect the
unit, prepare a 400 mL solution of Isopropyl Rubbing Alcohol or 10% bleach with
90% water solution.
4. Detach the chamber from the faucet. Leave hoses attached to the unit. Pour 100 mL
of the solution into the top opening of the coupler. Save the remainder of the
solution for later steps of this procedure.
5. Replace the chamber on the faucet head and submerge the exposed handle
interface surface (where the tip attaches) into the remainder of the solution.
Pour 100 mL of
cleaning solution into
chamber
Place handle into 700 mL
of cleaning solution
SPA-22413 Manual BC_DTP.qxd 3/7/02 9:36 AM Page 10
11
6a. To clean the unit, turn on the water. Squeeze the actuator to allow the solution to flow
from the handle into the container. The suction line will remove the solution. Continue
this process for 5 minutes. Remember to keep the exposed tip of the handle
submerged in the solution. This will ensure that the suction line will be cleaned and
will also help prevent accidental contact of the cleaning solution with the user’s
eyes.
6b. To disinfect the unit, turn on the water. Do not squeeze the actuator. After half of the
solution is removed, turn the water off at the faucet. Remove handle from solution
and rest in the handle rest/grip ring. This will trap solution in the return line and allow
effective disinfection. Follow manufacturer’s recommendations on soak times for
maximum benefit. Repeat the cleaning procedure above to remove any residual
disinfecting solutions.
7. Turn the water off and remove both tubes from the chamber.
8. To remove any stagnant solution in the tubing, disconnect the hoses from the
chamber and place the open end in the sink. Hold the handle higher than the tube
and squeeze the actuator. The water will run out of the open end into the sink basin.
9. Remove the chamber from the faucet. Allow the chamber to drip dry. Replace the
unit in its holding container.
10. To facilitate a recommended thorough flush and faster drying, pour isopropyl rubbing
alcohol inside the chamber and hoses.
If hard water/calcium buildup is a concern, a solution of 100% vinegar can
be substituted. Allow the vinegar to soak in the chamber for no more than
2-3 minutes. A final flush of isopropyl alcohol is required.
SPA-22413 Manual BC_DTP.qxd 3/7/02 9:36 AM Page 11

12
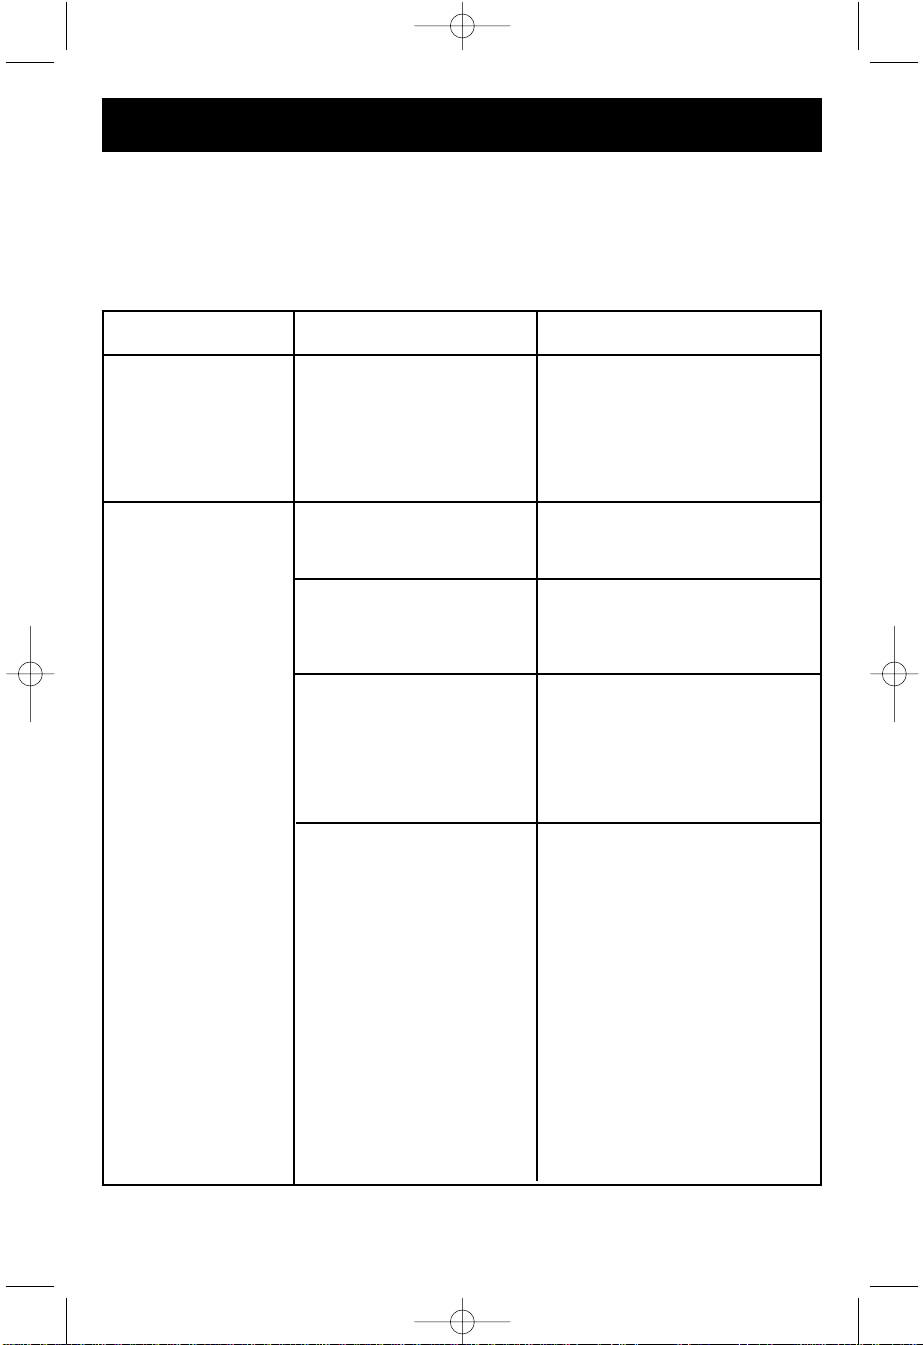
Troubleshooting
If your SPAH Auriflush System is experiencing problems, consult the following table to
find the symptom, the likely cause and the solution. If the information in this table does
not describe or solve the problem you are having, contact your Schering-Plough Animal
Health Office (see page 97).
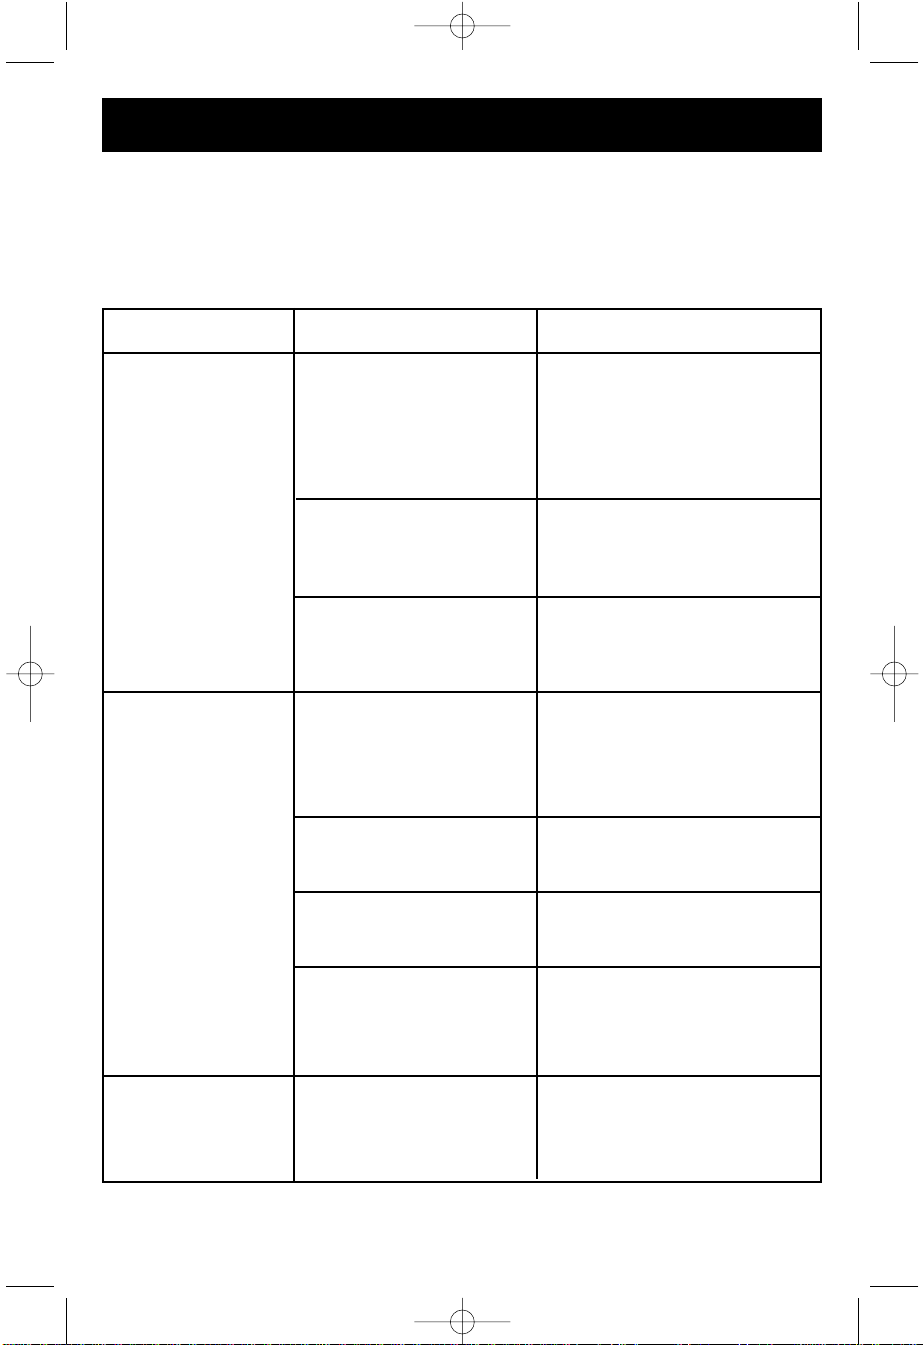
Problem Possible Cause Solution
No water is coming
out of the handle
even though I am
pulling the actuator.
The temperature shut-off
safety feature has acti-
vated due to the hot water
temperature.
Run COLD water through the
system for 10-30 seconds. This
will reset the temperature shut
off safety feature and allow
water to flow again.
Excessive water
leaking from the
ear.
The water is not turned on
high enough.
Turn the cold water on full in
order for the suction system to
work properly (but still within
the right temperature range).
Lack of a clean
water stream
coming from eartip.
Installation of eartip has
caused a problem.
Apply a new eartip with the
tab side pointing upwards.
Eartip attachment
problem.
Replace the eartip with the tab
side pointing upwards.
Tubing connection
problem.
Ensure that both tube fittings
are fit snugly into the chamber.
Incorrect technique. Check the Quick Reference
Guide to verify you are aiming
the water correctly.
There is a kink in the
tubing.
Make sure there are no bends
in the tubing restricting the
flow of water.
The tubing on the INSIDE
of the handle is restricting
water flow.
Prime the actuator 25 - 50
times until water begins to
flow normally
SPA-22413 Manual BC_DTP.qxd 3/7/02 9:36 AM Page 12
13
Problem Possible Cause Solution
The water splash is
making a mess.
Excess water pressure
from the water line.
Ensure that the chamber
aerator is attached to the
bottom of the chamber.
The water pressure
from the eartip
seems too high or
too low.
The return water exit port
is clogged on the bottom
of the chamber.
Remove the chamber from the
faucet and dislodge any
foreign materials from the exit
port. Proceed with the normal
cleaning procedure.
There is an internal
malfunction.
With an eartip attached,
spray water from the handle
into a graduated cylinder or
measuring cup for exactly 20
seconds. If there was less than
90 mL or more than 110 mL of
measured water, contact your
Schering-Plough Animal Health
Office (see page 97).
Installation of eartip has
caused a problem.
Apply a new eartip with the
tab side pointing upwards.
There is leakage from the
chamber aerator and/or
adapter.
Tighten the aerator and/or
adapter with a pair of pliers.
SPA-22413 Manual BC_DTP.qxd 3/7/02 9:36 AM Page 13

14
Warranty and Service Information
SPAH warrants the Auriflush System to be free of original defects in material and
workmanship and to perform in accordance with manufacturer’s specifications
for a period of one year from the date of purchase. If this instrument or any other
component thereof is found to be defective or at variance from the manufacturer’s
specifications during the warranty period, SPAH will repair or replace the Auriflush
System or component(s) at no cost to the purchaser.
This warranty only applies to products purchased new from SPAH or its authorized
distributors or representatives.
If the product is defective, the purchaser must contact the local Schering-Plough
Animal Health Office (see page 97). Instructions will be given by the Technical Service
Department about how to return the Auriflush System.
This warranty does not cover breakage or failure due to tampering, misuse, neglect,
accidents, modification or shipping, and is void if the instrument is not used in
accordance with manufacturer’s recommendations or if repaired or serviced by
other than SPAH or a SPAH authorized representative.
NOTE: Return of the invoice is required for proof of purchase and one-year warranty
validation.
SPA-22413 Manual BC_DTP.qxd 3/7/02 9:36 AM Page 14
15
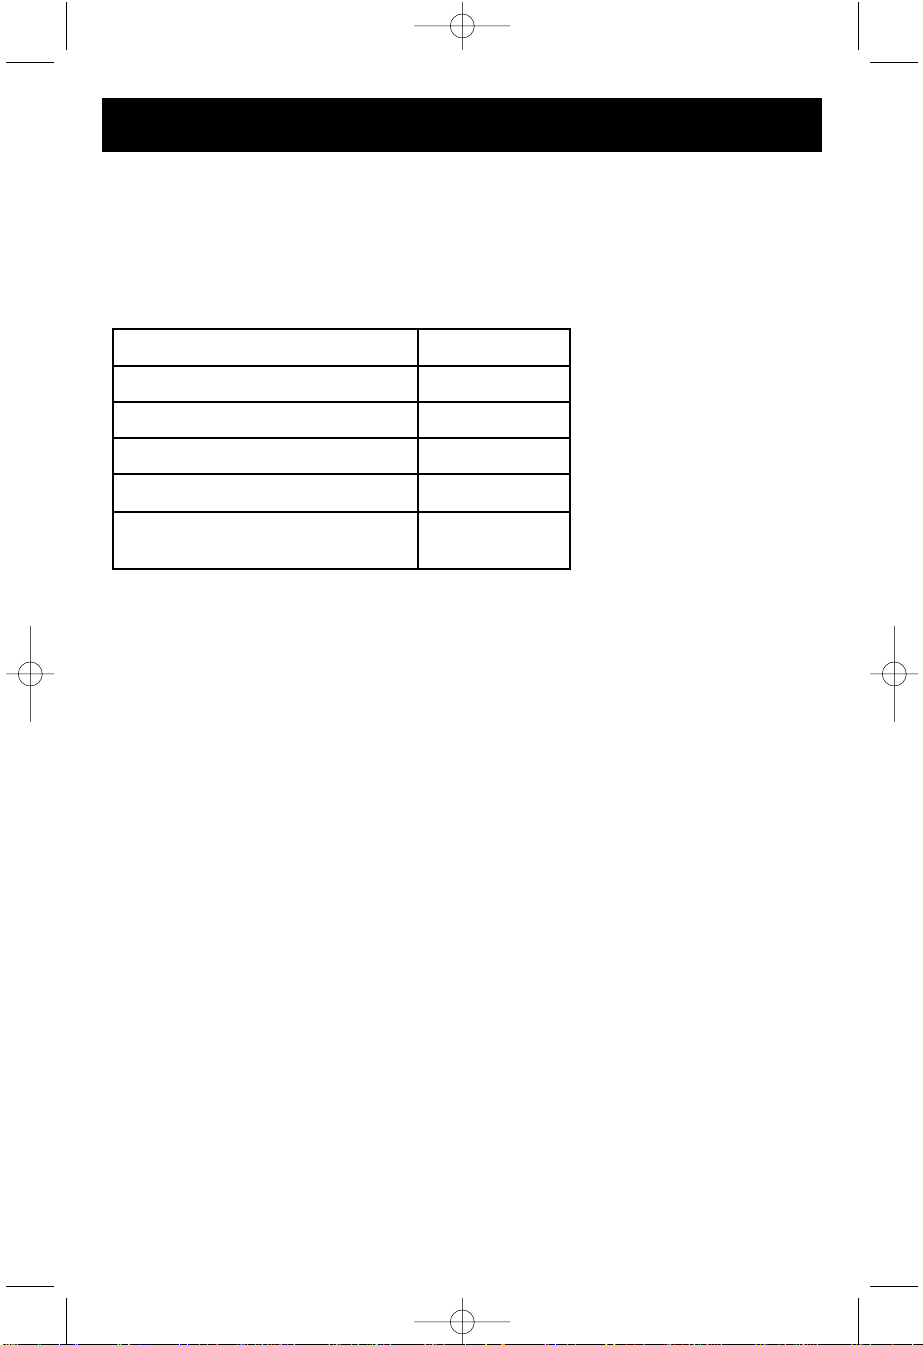
Replacement Parts and Accessories
Ordering Information
To order replacement parts or accessories, contact your SPAH representative or
SPAH authorized distributor.
Part Part Number
Auriflush Ear Wash System A0025-6975-02
Eartips (Case of Eartips) A0061-2005-02
Hose Assembly (Tubing) A0061-2005-03
Chamber Aerator A0061-2005-05
Aerator Adapter Kit
(Snap Aerator & 4 Adapters) A0061-2005-04
SPA-22413 Manual BC_DTP.qxd 3/7/02 9:36 AM Page 15

16
Specifications
General Specifications
The specifications common to all of the major components of SPAH Auriflush System
are listed the following table.
Operating Temperature: 10°- +40°C
Storage Temperature: -40° - +48.8° C
Flow Rate from Eartip: 100 mL (0.0264 gal) of water per 20 seconds
at operating pressure.
Source (faucet) Water
Pressure Range: 40 - 110 Psi (275 kPa - 758 kPa)
Minimum Source Water
Flow Rate: 7.5 l/min (2 gal/min)
Water Pressure from Eartip: 10 Psi (69 kPa)
Patents
U.S. Patent Number 5,685,851; other patents pending
Eartips
• Bio-compatible, latex-free, insert type
• One size fits both dogs and cats
• Single-use only
SPA-22413 Manual BC_DTP.qxd 3/7/02 9:36 AM Page 16

17
Tabla de materias
Introducción......................................................................................................18
Advertencias y símbolos................................................................................19
Primeros pasos.................................................................................................20
Desembalaje y verificación del contenido............................................ 20
Diagrama del sistema Auriflush ...............................................................21
Instalación del aireador de grifo .............................................................22
Instalación del aireador de cámara........................................................22
Modo de empleo del sistema Auriflush......................................................23
Pasos para limpiar el oído ...................................................................... 23
Conexión del tubo y la cámara.................................................................23
Acoplamiento de una punta auditiva......................................................23
Limpieza del oído........................................................................................23
Desmontaje...................................................................................................... 25
Mantenimiento.................................................................................................26
Limpieza y desinfección del sistema Auriflush.....................................26
Solución de problemas...................................................................................28
Garantía e información de servicio.............................................................30
Repuestos y accesorios .................................................................................31
Información de pedido...............................................................................31
Especificaciones.............................................................................................32
Especificaciones generales......................................................................32
Patentes.......................................................................................................32
Puntas auditivas..........................................................................................32
Oficinas de Schering-Plough Animal Health.............................................97
SPA-22413 Manual BC_DTP.qxd 3/7/02 9:36 AM Page 17

18
Introducción
Gracias por haber adquirido el sistema de lavado de oído Auriflush
™
de Schering-
Plough Animal Health (SPAH).
El sistema Auriflush de SPAH es un medio seguro y eficaz de limpiar el canal auditivo
externo de perros y gatos. Este método de limpieza es mucho más limpio y más seguro
que otros métodos de venta actualmente en comercios. Además, gracias a su
innovador e intuitivo diseño, aprender a utilizar este producto es extremadamente fácil.
El sistema Auriflush presenta las siguientes características:
• Comodidad del paciente – Acción Hydrovac
• Seguridad del paciente – Válvula de cierre de agua a alta temperatura
– Regulación de la presión del agua dentro de la cámara
• Fácil para el usuario – Sensor con indicador visual de la temperatura
• Diseño técnico superior – Totalmente funcional a presiones de agua variables así
como con diferentes grifos
Este manual describe cómo utilizar y mantener el sistema Auriflush de SPAH. Por favor,
lea estas instrucciones para disfrutar de muchos años de servicio exacto y fiable.
Acerca de este manual
Este manual sirve de guía para el lavado de oídos con el sistema Auriflush de SPAH.
El sistema está indicado para ser utilizado por veterinarios. Todo uso distinto al
indicado anula la garantía del fabricante.
SPA-22413 Manual BC_DTP.qxd 3/7/02 9:36 AM Page 18
19
Advertencias y símbolos
Este manual utiliza los iconos y símbolos descritos a continuación.
ATENCIÓN: consulte las instrucciones de operación. Este símbolo tiene por
finalidad avisar al usuario de la presencia de importantes instrucciones de
uso y mantenimiento en los documentos que acompañan al aparato.
Especificaciones de rendimiento verificadas por ETL Laboratories.
La marca CE en este dispositivo indica que éste ha sido sometido a prueba
y que cumple con las provisiones contenidas en la Directiva de Dispositivos
Médicos 93/42/EEC.
Examine siempre el oído antes de proceder con cualquier procedimiento de
limpieza. La presencia de una membrana timpánica perforada o afectada
indica que no es seguro usar el sistema Auriflush. La decisión de utilizar el
sistema Auriflush en pacientes con una historia actual o anterior de
infecciones crónicas del oído medio se deja a la discreción del veterinario.
Si el agua está demasiado fría, el paciente podría sentirse mareado o sufrir
vértigo. Por favor, verifique que el indicador térmico esté blanco antes de
proceder con la irrigación.
SPA-22413 Manual BC_DTP.qxd 3/7/02 9:36 AM Page 19

20
Primeros pasos
Desembalaje y verificación del contenido
Inspeccione el embalaje para ver si ha sufrido daño durante el transporte. Si encuentra
daño de algún tipo, notifíquelo al transportista.
Cuando desembale su nuevo sistema Auriflush, compruebe que contiene los siguientes
artículos:
• Cámara de agua
• Conjunto de mango y tubo
• Un aireador de acción instantánea
• Cuatro adaptadores para grifo diferentes
• Aireador de cámara
• Una caja de puntas auditivas (25 unidades)
• Bandeja de almacenamiento
• Manual de instrucciones de operación
• Guía de referencia rápida
Si falta algún artículo o pieza, llame a la oficina de Schering-Plough Animal Health de
su localidad (información en la página 97).
Remítase a la figura en la página siguiente para familiarizarse con las características
del sistema Auriflush de Schering-Plough Animal Health.
SPA-22413 Manual BC_DTP.qxd 3/7/02 9:36 AM Page 20

21
Diagrama del sistema de lavado de oído Auriflush de SPAH
1 Aireador de acción instantánea
2 Conector de acción instantánea con aro blanco
3 Anillo de agarre y soporte del mango
4 Orificio de irrigación – agua de irrigación
al oído (azul)
5 Orificio de retorno – agua de retorno del oído
(negro)
6 Orificio de salida del agua de retorno
7 Aireador de cámara
8 Accionador de flujo de agua
9 Sensor de temperatura del agua
10 Filtro de retención de cera en la punta auditiva
11 Salida de chorro de agua
12 Entrada de succión de agua
13 Punta auditiva desechable
14 Lengüeta para retirar la punta auditiva
15 Orificio de inyección
11
12
10
14
9
13
8
15
1
2
3
4
5
6
7
SPA-22413 Manual BC_DTP.qxd 3/7/02 9:36 AM Page 21

22
Instalación del aireador de grifo
1. Retire el aireador actual de su grifo, incluyendo las arandelas originales. Es posible
que necesite un par de alicates para quitar el aireador. Si sigue teniendo dificultad
para quitarlo, empape el aireador con vinagre destilado durante unos veinte minutos y
vuelva a intentarlo.
2. Intente acoplar el aireador de acción instantánea a su grifo girándolo en dirección
contraria a las agujas del reloj. Si no encaja, inténtelo con ayuda de uno de los
adaptadores que se incluyen con la unidad. Trate de encajar el adaptador en su grifo
y luego acople el aireador de acción instantánea. Compruebe que la arandela de
caucho en el aireador de acción instantánea y en el adaptador coincida con la
arandela que había colocada en su grifo. Si necesita usar el adaptador universal sin
rosca (disponible sólo en ciertas regiones), puede que tenga que quitar la junta de
caucho interna si es demasiado pequeña para su grifo.
3. Una vez que el aireador de acción instantánea esté acoplado al grifo, la cámara para
la limpieza del oído se puede colocar o quitar fácilmente del aireador. Puede seguir
usando su lavabo normalmente si el sistema Auriflush no está acoplado al aireador de
acción instantánea.
Instalación del aireador de cámara
El aireador de cámara es un accesorio opcional que deberá utilizarse en el caso de que
el agua salpique profusamente alrededor de su lavabo. Cuando el aireador de cámara
esté instalado, ponga la cámara normalmente en la bandeja de almacenamiento.
1. Busque la muesca localizada en la parte superior del aireador de cámara y alinéela
con el orificio de irrigación azul en la cámara.
2. Presione suavemente el aireador de cámara contra la cámara hasta que encaje bien.
NOTA:el aireador de cámara sólo puede acoplarse a la cámara si está correctamente
alineado. Esto no debe ofrecer problemas; no hay necesidad de forzar el aireador en la
cámara.
SPA-22413 Manual BC_DTP.qxd 3/7/02 9:36 AM Page 22
23
Modo de empleo del sistema Auriflush
Pasos para limpiar el oído
Examine siempre el oído antes de proceder con cualquier procedimiento de
limpieza. La presencia de una membrana timpánica perforada o afectada
indica que no es seguro usar el sistema Auriflush. La decisión de utilizar el
sistema Auriflush en pacientes con una historia actual o anterior de
infecciones crónicas del oído medio se deja a la discreción del veterinario.
Conexión del tubo y la cámara
1. Conecte el tubo a la cámara. Empareje el conector negro con el orificio de retorno
negro en uno de los lados de la cámara. Empareje el conector azul con el orificio de
irrigación azul en la parte inferior de la cámara.
2. Para acoplar la cámara al grifo, tire hacia abajo del aro de plástico blanco en la parte
superior de la cámara, y luego inserte la cámara sobre el aireador de acción
instantánea en el grifo. Cuando la cámara esté bien colocada, suelte el aro de
plástico blanco. La cámara debe estar ahora bien sujeta.
Acoplamiento de una punta auditiva
1. Alinee las ranuras que hay en el lado de la punta auditiva con las muescas
correspondientes en la superficie de contacto del mango. La punta auditiva debe
colocarse con la lengüeta orientada hacia arriba.
2. Presione firmemente sobre la punta auditiva hasta que quede a ras de la superficie
de contacto del mango. Percibirá un leve chasquido cuando la punta auditiva encaje
en su lugar.
Limpieza del oído
1. El uso de sedantes, tranquilizantes o anestésicos generales podría estar indicado,
dependiendo del temperamento del animal y del grado de dolor presente. Para una
limpieza de rutina en un animal que por lo demás no presente problemas ni signos
de furia, el procedimiento es por lo general bien tolerado.
2. Para reducir el tiempo del procedimiento, utilice una solución de limpieza de oídos o
un ceruminolítico.
3. Inicialmente, puede cubrir al paciente con una sábana para evitar que salpique
agua. Una vez que domine la técnica de sellado del canal auditivo, puede que esto
no sea necesario.
4. Abra el agua fría completamente para que el agua comience a circular por la
unidad. Luego abra gradualmente el agua caliente hasta que la temperatura del
agua en el fondo de la cámara se aproxime a la temperatura corporal.
5. Compruebe la temperatura del agua de irrigación mirando al sensor térmico
mientras aprieta el accionador de flujo de agua. Si el sensor térmico está azul, el
agua de irrigación no está lo suficientemente caliente. Si el sensor térmico está
blanco, la temperatura del agua es por lo menos 32 º C y el procedimiento puede
comenzar. Para que el sensor de temperatura funcione correctamente es necesario
apretar el accionador en el mango.
Si el agua está demasiado fría, el paciente podría sentirse mareado o sufrir
vértigo. Por favor, verifique que el indicador térmico esté blanco antes de
proceder con la irrigación.
SPA-22413 Manual BC_DTP.qxd 3/7/02 9:36 AM Page 23

24
6. Para limpiar el oído, sujete el pabellón de la oreja del paciente, y tire suavemente de
él para enderezar el canal auditivo. Mientras mantiene la tensión en el pabellón de
la oreja, inserte la punta del mango en el oído para crear un sello. Apriete el
accionador en el mango. Regulando la fuerza con la que aprieta el accionador, es
posible controlar algo la velocidad del flujo.
7. Gire el mango mientras irriga el canal auditivo para dirigir la corriente de agua hacia
las paredes del canal. Inunde el oído con agua. El sistema de retorno por succión
sacará la descarga del oído. (En la guía de referencia rápida encontrará un
diagrama del flujo de agua correcto).
8. Si desea administrar un agente adicional para aumentar el efecto limpiador,
inyéctelo por el Orificio de inyección sin dejar de irrigar el canal auditivo.
Emplee una presión lenta y constante (se recomienda 2 cm
3
/seg.) al
introducir un agente adicional a través del Orificio de inyección. NO
sobrepase los 10 cm
3
/seg. (aprox. 15 psi). Presiones de irrigación
excesivas, por encima de 10 cm
3
/seg. , podrían potencialmente dañar la
membrana timpánica. NO inyecte ningún agente a través del Orificio de
inyección si el grifo del agua está cerrado o si el accionador del mango no
está apretado, ya que podría ser causa de corrosión de los componentes
internos de la cámara de agua y anularse la garantía.
NOTA: con el tiempo puede producirse decoloración o manchado de los tubos debido a
las características del agua local o a la introducción de soluciones de limpieza
de oídos u otros agentes.
9. Si el agua de irrigación se calienta demasiado, la unidad restringirá el flujo al
mango, al tiempo que seguirá expulsando la descarga por la parte inferior de la
unidad. Para restablecer la unidad, baje la temperatura del agua a un nivel seguro.
Esto puede hacerlo ajustando las llaves del grifo hasta que el agua se haya enfriado
lo suficiente.
10. Suelte el accionador y mantenga la punta auditiva en el canal durante 5 a 10
segundos para eliminar el agua de irrigación remanente.
NOTA: el sistema Auriflush reducirá la duración del procedimiento. La duración de un
procedimiento depende de la consistencia del cerumen, la cantidad de
suciedad, el grado de inflamación y/o de infección, y de si se utilizó un
ablandador de cera antes de la limpieza. En casos severos, la duración del
procedimiento puede alargarse.
11. Cuando haya terminado la limpieza, sujete la lengüeta localizada en la punta auditiva
del dispositivo y saque la punta auditiva del mango tirando de la lengüeta hacia
abajo. La punta auditiva es desechable. Por favor, colóquela en un recipiente
adecuado.
Si no sale agua de la punta auditiva y el accionador está apretado, haga
circular agua fría por la unidad para ver si la válvula de seguridad de
cierre de agua caliente se ha activado. Esto debería restaurar el flujo de
agua al mango.
SPA-22413 Manual BC_DTP.qxd 3/7/02 9:36 AM Page 24

25
Desmontaje
1. Cierre el grifo y desconecte el tubo de la cámara.
2. Desprenda la cámara del grifo. Presione hacia abajo el aro blanco en la parte
superior de la cámara y luego tire de la cámara para sacarla del aireador de acción
instantánea. La cámara se vaciará a través de los orificios abiertos para tubos que
hay en la parte delantera e inferior.
3. Para sacar todo el agua estancada del tubo, coloque el extremo abierto del tubo
sobre el lavabo. Sujete el mango más alto que el tubo y apriete el accionador. Enrolle
el tubo en espiral sosteniendo el mango más alto que el tubo. El agua deberá salir
por el extremo abierto al lavabo.
SPA-22413 Manual BC_DTP.qxd 3/7/02 9:36 AM Page 25
26
Mantenimiento
Limpieza y desinfección del sistema Auriflush
Limpie el sistema Auriflush cada vez que lo utilice y desinféctelo según lo considere
conveniente.
La limpieza de la unidad con jabón y agua eliminará toda la suciedad y reducirá el
número de microorganismos en el tubo. Desinfecte la unidad con alcohol isopropílico al
70 % o con una solución de 10 partes de lejía y 90 partes de agua; esto eliminará casi
por completo el crecimiento de bacterias y hongos. Se recomienda utilizar alcohol ya
que éste contribuye a la evaporación del agua que queda en el tubo.
1. Retire la punta auditiva y deséchela.
2. Limpie la superficie exterior de la cámara, el mango y el tubo flexible con un paño
suave saturado con una solución de agua jabonosa.
3. Para limpiar la unidad, prepare una solución de 800 ml de agua jabonosa. Para
desinfectar la unidad, prepare una solución de 400 ml de alcohol de frotar
isopropílico o una solución de 10 partes de lejía y 90 partes de agua.
4. Desprenda la cámara del grifo. Deje los tubos flexibles conectados a la unidad.
Vierta 100 ml de la solución en la abertura superior del acoplador y guarde el resto
para los pasos posteriores de este procedimiento.
5. Vuelva a colocar la cámara en el cabezal del grifo y sumerja la superficie de
contacto expuesta del mango (donde se sujeta la punta) en el resto de la solución.
Vierta 100 ml de la
solución de limpieza
en la cámara
Coloque el mango en
700 ml de la solución de
limpieza
SPA-22413 Manual BC_DTP.qxd 3/7/02 9:36 AM Page 26

27
6a. Para limpiar la unidad, abra el grifo del agua. Apriete el accionador para que la
solución fluya del mango al recipiente. La línea de succión aspirará la solución.
Prosiga con este proceso durante 5 minutos. Recuerde que debe mantener la punta
expuesta del mango sumergida en la solución. Esto asegurará que la línea de succión
se limpie bien y servirá además para prevenir el contacto accidental de la solución de
limpieza con los ojos.
6b. Para desinfectar la unidad, abra el grifo del agua. No apriete el accionador. Una vez
que la mitad de la solución haya salido, cierre el grifo del agua. Saque el mango de
la solución y déjelo en el aro de agarre y soporte del mango. La solución quedará
retenida en la línea de retorno lo que contribuirá a una mayor eficacia de la
desinfección. Siga las recomendaciones del fabricante con respecto a los tiempos
de inmersión o remojo para lograr el máximo beneficio. Repita el procedimiento de
limpieza anterior para eliminar todo resto de solución desinfectante.
7. Cierre el agua y retire ambos tubos de la cámara.
8. Para eliminar cualquier resto de solución estancada en los tubos, desconecte los
tubos flexibles de la cámara y coloque el extremo abierto en el lavabo. Sostenga el
mango más alto que el tubo y apriete el accionador. El agua saldrá por el extremo
abierto al lavabo.
9. Retire la cámara del grifo. Deje escurrir la cámara. Vuelva a colocar la unidad en su
contenedor.
10. Para lograr un lavado en profundidad y un secado más rápido, vierta alcohol de
frotar isopropílico dentro de la cámara y de los tubos flexibles.
Si la acumulación de calcio y de agua dura representa un problema, puede
utilizarse una solución de vinagre puro. Deje el vinagre a remojo en la
cámara no más de 2-3 minutos. Es necesario una última irrigación con
alcohol isopropílico.
SPA-22413 Manual BC_DTP.qxd 3/7/02 9:36 AM Page 27
28
Solución de problemas
Si tiene problemas con su sistema Auriflush de SPAH, consulte la tabla siguiente para
encontrar el síntoma, la causa probable y la solución. Si la información en esta tabla no
describe ni resuelve el problema que tiene, póngase en contacto con la oficina de
Schering-Plough Animal Health de su localidad (información en la página 97).
Problema Causa posible Solución
No sale agua del
mango aun cuando
estoy tirando del
accionador.
La válvula de cierre de
seguridad por temperatura
alta se ha activado debido
a que el agua está
caliente.
Haga circular agua FRÍA por el
sistema durante 10-30
segundos. Esto restablecerá la
válvula de cierre de seguridad
por temperatura alta, y el agua
podrá volver a circular.
Hay una fuga
excesiva de agua
del oído.
El agua no está abierta del
todo.
Abra completamente el agua fría
para que el sistema de succión
funcione correctamente (si bien
dentro del rango de temperatura
correcto).
El agua procedente
de la punta auditiva
no sale limpia.
La instalación de la punta
auditiva ha causado un
problema.
Aplique una nueva punta
auditiva con el lado de la
lengüeta orientado hacia
arriba.
Problema de sujeción de
la punta auditiva.
Coloque la punta auditiva con
la lengüeta orientada hacia
arriba.
Problema de conexión de
los tubos.
Asegúrese de que los
accesorios de ambos tubos
encajen bien en la cámara.
Técnica incorrecta.
Consulte la Guía de referencia
rápida para verificar que está
dirigiendo el chorro de agua
correctamente.
El tubo está doblado o
retorcido.
Compruebe que no haya
dobleces ni retorcimientos en el
tubo que restrinjan el flujo del
agua.
El tubo en el INTERIOR del
mango está restringiendo
el flujo de agua.
Apriete y suelte el accionador
entre 25 y 50 veces hasta que
el agua comience a fluir
normalmente.
SPA-22413 Manual BC_DTP.qxd 3/7/02 9:36 AM Page 28

29
Problema Causa posible Solución
El agua salpicada lo
está poniendo todo
perdido.
Presión excesiva del agua
de la línea de agua.
Asegúrese de que el aireador
esté acoplado a la parte
inferior de la cámara.
La presión del agua
de la punta auditiva
parece demasiado
alta o demasiado
baja.
El orificio de salida del
agua de retorno está
atascado en el fondo de la
cámara.
Retire la cámara del grifo y
saque todos los materiales
extraños del orificio de salida.
Proceda con el procedimiento
de limpieza normal.
Hay una avería interna. Con una punta auditiva
acoplada, pulverice agua del
mango en un cilindro graduado
o en una cubeta de medición
durante 20 segundos
exactamente. Si obtiene
menos de 90 ml o más de 110
ml de agua, póngase en
contacto con la oficina de
Schering-Plough Animal Health
de su localidad (información
en la página 97).
La instalación de la punta
auditiva ha causado un
problema.
Aplique una nueva punta
auditiva con el lado de la
lengüeta orientado hacia arriba.
Hay una fuga en el
aireador de cámara o en
el adaptador.
Apriete el aireador o el
adaptador con unos alicates.
SPA-22413 Manual BC_DTP.qxd 3/7/02 9:36 AM Page 29
 Loading...