


WASHING MACHINE LAVE-LINGE WASCHVOLLAUTOMAT LAVADORA MÁQUINA DE LAVAR ROUPA WASMACHINE
СТИРАЛЬНАЯ МАШИНА
INSTRUCTION MANUAL |
EN |
MANUEL D'INSTRUCTIONS |
FR |
GEBRAUCHSANLEITUNG |
DE |
MANUAL DE INSTRUCCIONES |
ES |
|
|
MANUAL DE INSTRUÇÕES |
PT |
РУКОВОДСТВО ПО ЭКСПЛУАТАЦИИ |
RU |
|
|

EN
Contents
1. |
Precautions for safety and use |
2 |
|
|
|
2. |
Installation instructions |
5 |
|
|
|
3. |
Description of controls |
8 |
|
|
|
4. |
Using the appliance for washing |
9 |
|
|
|
5. |
Cleaning and maintenance |
15 |
|
|
|
6. |
Troubleshooting |
17 |
|
|
|
This appliance is tagged  in accordance with European Directive 2002/96/EC on Waste Electrical and E- lectronic Equipment - WEEE.
This directive contains the regulations governing the collection and recycling of decommissioned appliances throughout the European Union.
The symbol of the rubbish bin with a line through it on the appliance or its packaging indicates that the product must be disposed of separately from other waste at the end of its life cycle. The user is thus obliged to consign scrapped appliances to the special electronic and electrotechnical waste disposal centres, or return them to the dealer on purchase of a similar new appliance, on a one-to-one basis.
Consignment to the appropriate facility for environmentally responsible recycling, treatment and disposal helps to prevent any negative effects on the environment and health, and encourages the reuse and/or recycling of the appliance’s component materials.
Illegal dumping of the appliance by the user will be subject to prosecution under the relevant law.
1

EN
 READ THE INSTRUCTIONS Attention!
You are advised to read all the instructions in this manual carefully; it will inform you about the right conditions for the proper, safe use of your washing machine.
It is very important to keep this instruction manual with the appliance for future reference.
In the event of sale or transfer, ensure that the manual always accompanies the appliance, to provide the necessary information about its use.
1. PRECAUTIONS FOR SAFETY AND USE
Attention!
These precautions are detailed for reasons of safety.
This section must be read carefully before installation and use.
Disposing of packaging
•Never leave packaging residues unattended in the home. Separate waste packaging materials by type and consign them to the nearest recycling centre.
•Packaging materials (plastic bags, polystyrene, etc.) must not be left within reach of children.
Disposing of old appliances
•Once no longer in use, the appliance must be rendered unusable: permanently disarm the lock on the door (this will prevent children risking their lives by locking themselves inside during play) and cut the power supply lead after removing the plug from the socket.
The appliance must be delivered to a recycling facility.
Environmental protection
•Use the whole of the maximum recommended capacity. Never exceed the maximum permitted load.
•Do not use the prewash function for lightly or normally soiled items.
•Follow the manufacturer's recommendations on detergent usage.
•Use the highest spin speed permitted for the fabric type. Fast spins reduce the drying time and thus energy consumption.
Safety instructions
•This appliance is intended for domestic use and is compliant with Directives 72/23/EEC and 89/336/EEC (including Directives 92/31/EEC and 93/68/EEC) currently in force.
•Read all the instructions in this manual carefully before installation and use.
•Check that the drum assembly has been released before use (see instructions). Failure to release the drum assembly may cause damage to the washing machine and the surrounding furniture or appliances during the spin cycle.
•This Instruction Manual is an integral part of the appliance: it must always be kept intact with the appliance. Installation must be carried out by qualified staff in compliance with the relevant regulations. The appliance is built to provide the following functions: washing and drying of clothes or fabrics stated to be suitable for machine washing by the producer on the relevant label. All other u- ses are to be considered improper. The manufacturer declines all liability for uses other than those stated above.
•The nameplate with the technical data, serial number and mark is in a visible position in the part in view after the door has been opened. The nameplate must never be removed.
•The electrical and plumbing works required to install the appliance must only be carried out by skilled staff.
•The appliance must be connected to earth in compliance with electrical system safety regulations.
The manufacturer declines all liability for direct or indirect injury or damage deriving from a non-existent or defective earth connection.
•In the event that the appliance is not connected by means of a plug, an omnipolar circuit-breaker device with contact gap of at least 3 mm must be provided.
•The plug to be connected to the power supply lead and the relative socket must be of the same type and comply with the relevant regulations. Check that the mains voltage and frequency are the
2

EN
same as the values marked on the nameplate. The use of adapters or junctions is not recommended. Never disconnect the plug by pulling on the power supply lead.
•The appliance is only disconnected from the electricity supply if the plug has been removed from the socket or the electrical system master switch has been turned off. The power plug must be accessible after the appliance has been installed.
•The appliance must be installed using new sets of hoses (supplied with the appliance). Old hose sets should not be reused.
•Take care that the appliance is not standing on the power supply cable.
•The washing machine must never be used on vehicles, on board ships or planes, or in environments with hazards, such as explosive or corrosive environments (powders, vapours and gases) or explosive and/or corrosive liquids.
•Do not install the washing machine in places with a risk of frost. Frozen pipes may burst under the pressure.
•Make sure that the drain hose connected to the sink is securely fastened and cannot move.
•If it is not fixed in place, the repulsive force of the water might thrust it away from the sink, causing the risk of flooding.
•When connecting the hose to a sink also check that the water drains from it quickly, as otherwise the sink may overflow.
•Do not overload the appliance.
•Never use detergents which contain solvents or chemicals for washing in the washing machine.
They might damage the appliance and form poisonous vapours. These fumes might also catch fire and explode.
•Garments soaked in petroleum products must not be washed in the washing machine. Before washing, check that garments do not contain inflammable devices (e.g. cigarette-lighters, matches, etc.)
•If volatile cleaning fluids are used, ensure that these substances have been removed from the garments before they are placed in the appliance.
•Before loading garments for washing, check that the pockets are empty, buttons secure and zips fastened.
•Do not wash frayed or torn garments.
•During washing at high temperatures, the glass in the door will become very hot.
•Check that all water has been drained from the appliance before opening the door.
•If there is water inside, pump it out before opening the door. If in doubt, read the instruction manual.
•The water in the appliance is not suitable for drinking!
•Swallowing washing machine detergents may injure the mouth and throat.
•Before removing the garments from the washing machine check that the drum is at a standstill.
•Switch the appliance off after each use to avoid wasting electricity.
•Leave the door ajar between washes to keep the gasket in good condition.
•In the event of a malfunction never attempt to repair the appliance yourself. Disconnect the appliance from the electricity supply and turn off the water tap. Then contact a qualified engineer.
Repairs must only be carried out by qualified staff.
•The appliance is intended for use by adults. Do not allow children to tamper with the washing machine's controls or play with it and do not keep children in the vicinity while the programme is in progress.
•Young animals or small children might climb into the washing machine.
•Always check the inside of the drum before use and do not allow children to play with the appliance.
•Keep children away from the appliance when the door or the detergent drawer is open; the appliance might contain detergent resides which may cause permanent injury to the eyes, mouth and throat, or even cause death by suffocation.
•The appliance is not intended for use by persons (including children) with reduced physical, sensory or mental capabilities, or lack of experience and knowledge, unless they have been given supervision or instruction concerning use of the appliance by a person responsible for their safety.
•Do not store flammable fluids near the appliance.
Length periods out of use.
•If the appliance is not to be used for a lengthy period it should be disconnected from the electricity and water supplies and the door should be left ajar to prevent unpleasant smells from building up inside.
3
EN
For Great Britain only
Warning: this appliance must be earthed.
Fuse replacement
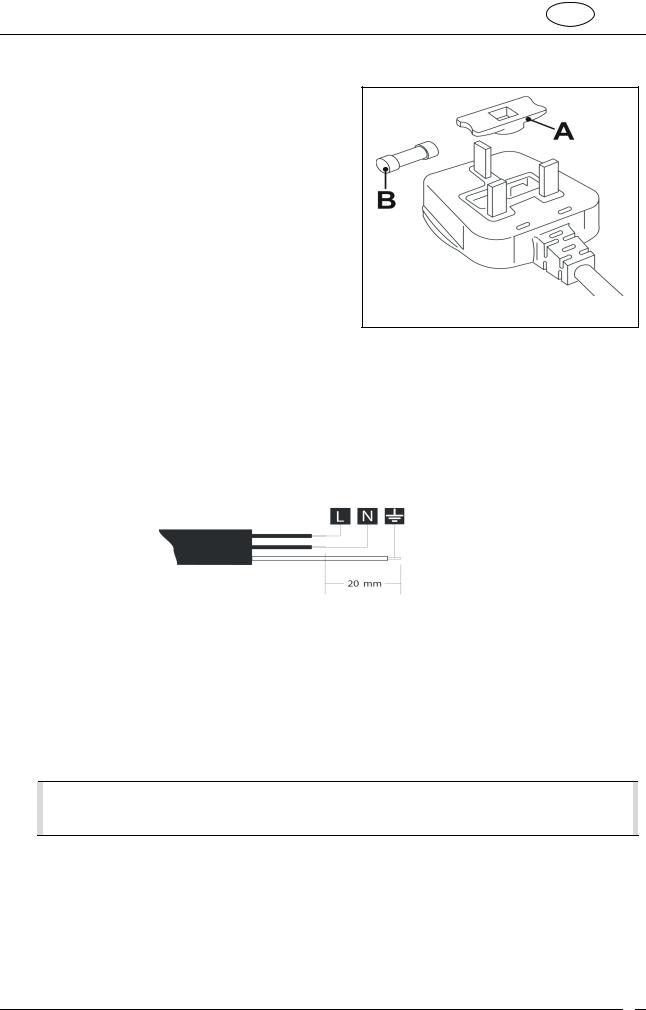
If the mains lead of this appliance is fitted with a BS 1363A 13amp fused plug, to change a fuse in this type of plug use an A.S.T.A. approved fuse to BS 1362 type and proceed as follows:
1.Remove the fuse cover (A) and fuse (B)
2.Fit replacement 13A fuse into fuse cover
3.Refit both into plug
Important:
The fuse cover must be refitted when changing a fuse and if the fuse cover is lost the plug must not be used until a correct replacement is fitted.
Correct replacement are identified by the colour insert or the colour embossed in words on the base of the plug.
Replacement fuse covers are available from your local electrical store.
If the appliance is provided with a plugless supply cord:
•It is necessary to install in the fixed wiring an all-pole disconnection device having a gap between contacts of at least 3,5mm. After installation the disconnection device has to be easy to reach.
•The connection to the mains must be carried out by a qualified technician in accordance to the scheme shown below and the regulations in force
L = brown N = blue
 = yellow-green
•In the event of damage to the supply cord, it has to be replaced by the manufacturer or an authorized technical service center in order to avoid any risk.
Important!
This appliance is easy to use.
However, for the best results it is important to read this manual carefully and follow all the instructions before putting it into operation.
The manual provides the correct instructions for installation, use and maintenance, as well as giving useful advice.
The manufacturer declines all responsibility for injury or damage caused by failure to comply with the above regulations or deriving from tampering with even just one part of the appliance and the use of non-original spare parts.
4
EN
2. INSTALLATION INSTRUCTIONS
Important!
The appliance must be installed by a qualified engineer in compliance with the relevant regulations. The washing machine is heavy. Take care when lifting it.
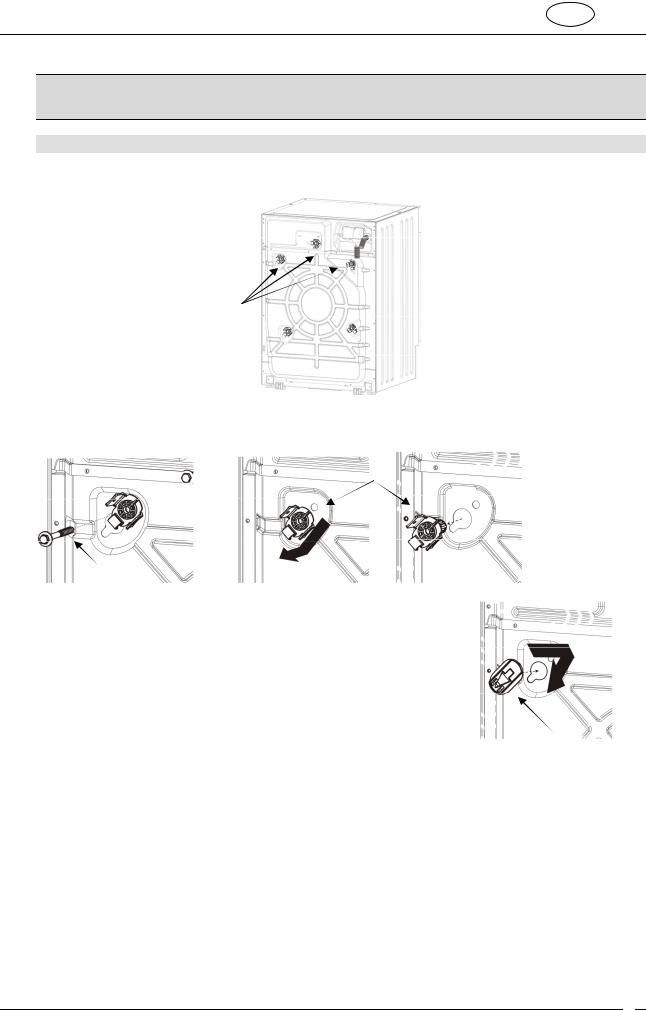
2.1 UNPACKING
The unit on flexible mounts is fixed in place for transport using the screws (A) on the rear of the washing machine with the relative plastic spacers (B). Once the screws have been removed, the power supply lead can be used.
A+B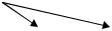
1.Undo all the screws with a 10 mm spanner.
2.Remove all the screws (A) from the rear
3.Remove all the plastic spacers (B)
B
A
4.Fit all the plastic plugs (C) provided, to prevent water splashes from getting into the appliance, and contact with live parts.
C
Warning!
•Do not turn the appliance upside-down or place it on its sides.
•All the transport retainer fittings should be kept in a safe place; they must be fitted again if the appliance has to be moved around in the future.
5

EN
2.2 POSITIONING AND LEVELLING
1.Place the appliance in the chosen position.
2.Level the appliance carefully in all directions with the aid of a spirit level, adjusting the height of the feet if necessary. Once done, fix the feet in place with the locknuts provided.
3.On appliances with adjustable rear feet, note that the rear of the appliance rests on skids and not on the feet. Before inserting the appliance into its place between the kitchen units, check that the rear feet are screwed fully in to prevent damage as the appliance is shifted into position.
Once the appliance is in position in the kitchen, the height of the rear feet has to be increased so that the appliance no longer stands on the skids. After adjusting the rear feet, level the appliance and fix the front feet at the height required.
The water intake and drain hoses can be fitted pointing to the left or right for effective installation.
Warning!
•This operation must be carried out with care to prevent the washing machine from vibrating, moving or generating excessive noise during use.
•If the appliance is installed on a carpeted floor, take care to ensure that the openings in the bottom of the washing machine are not obstructed.
•Also check that during operation the washing machine is not resting against walls, kitchen units, etc.
•The appliance must not be installed behind a door with lock, a sliding door, or a door with hinge on the opposite side.
6
EN
2.3 CONNECTING TO THE WATER SUPPLY
1.Check that the water supply pressure is in the following range: 0,05-0,9MPa. With higher pressures, use a pressure reducer.
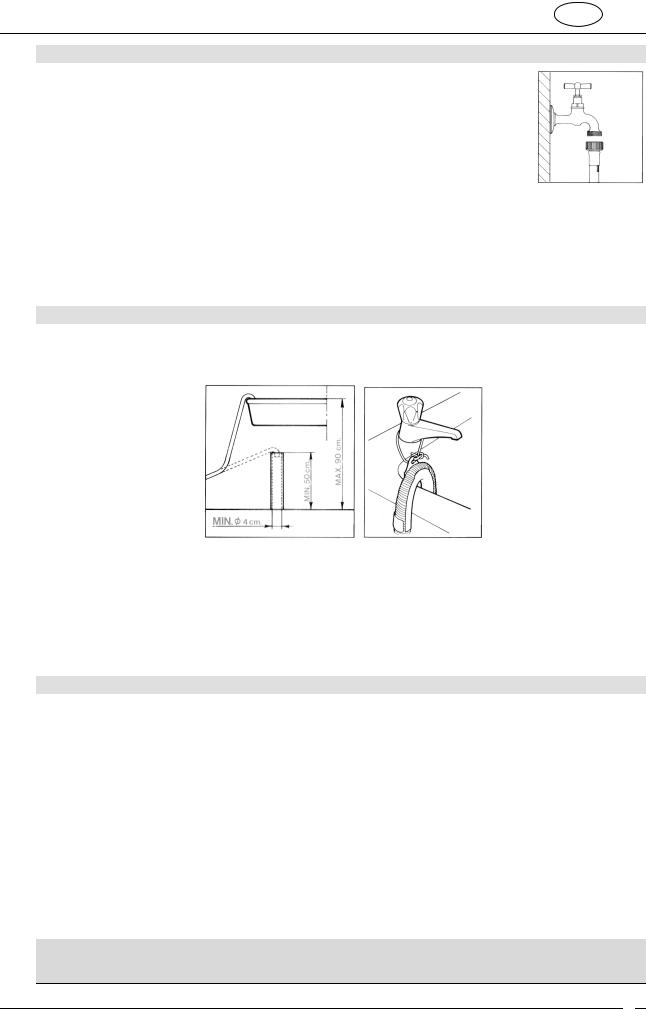
2.Connect the cold water supply hose (blue screw collar) to the cold water tap with ¾ gas threaded connector, taking care to tighten firmly to prevent leaks. The water supply hose must not be kinked or crushed and must not be changed or cut. Threaded connections must only be tightened by hand.
3.When appliances are supplied with hot water, the intake water temperature must not exceed 60°C and the hose with red screw collar must be connected to the hot water supply tap.
Warning!
•If the connection is made to new pipelines, or lines which have been out of use for a long time, allow a considerable amount of water to flow out before connecting the intake hose. This prevents any sand or other dirt from fouling the filters installed in the appliance to protect the water intake valves.
•The new intake hose supplied with the appliance must be used, and the old water supply hose must not be used.
2.4 CONNECTING TO THE DRAIN
1.Insert the end of the drain hose into a drain pipe having inside diameter of at least 4 cm, at least 50 to 90 cm above floor level, or connect it securely (using the plastic fitting on the elbow in the hose) to a sink or bathtub.
2.In all cases, check that the end of the drain hose is securely fixed to prevent the repulsive force of the water from pushing it out of place.
Warning!
•Avoid kinks or restrictions to ensure effective drainage.
•Any drain hose extensions must be no more than 1 metre long, must be of the same diameter and must be free from restrictions of all kinds.
•The end of the drain hose must never be submerged in water.
2.5 ELECTRICAL CONNECTION
Before connecting the plug to the power socket ensure that:
1.The electrical system voltage is the same as that stated on the nameplate on the front of the appliance, in the zone visible when the door is open. The rated power supply and the fuses required are specified on the nameplate.
2.The meter, safety breakers, power supply line and power socket are rated to withstand the maximum load required, stated on the nameplate.
3.The power supply socket and the plug fitted to the appliance are compatible without the use of reductions, multiple sockets, adapters and extension leads which might cause overheating or scorching.
If the power supply socket is not compatible with the plug supplied, replace the socket with one of the appropriate type.
Warning
•The power plug must be accessible after the appliance has been installed.
•It is absolutely essential to connect the appliance to earth. Connect the plug to a socket with an earth connection in good working order.
The manufacturer declines all liability for direct or indirect injury or damage deriving from a non-existent or defective earth connection. Correct electrical connection guarantees conditions of maximum safety.
•This appliance is compliant with the requirements of EEC directive 89/336 of 3.5.89 (including the amendment directive 92/31/EEC) concerning the elimination of radio-frequency disturbance.
•If the power supply lead is damaged, it must only be replaced with an original spare, available from the AfterSales Service.
•Do not connection/disconnect the power supply plug from the socket with wet hands
•Only disconnect the power supply plug from the socket by taking hold of the plug itself, never by pulling on the lead.
7
EN
3. DESCRIPTION OF CONTROLS
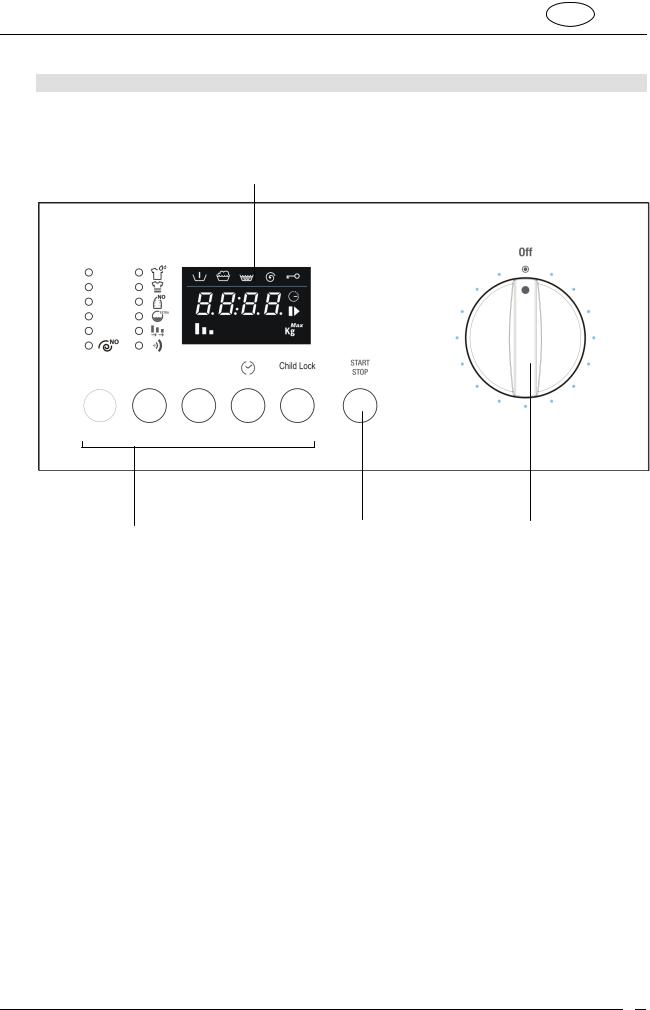
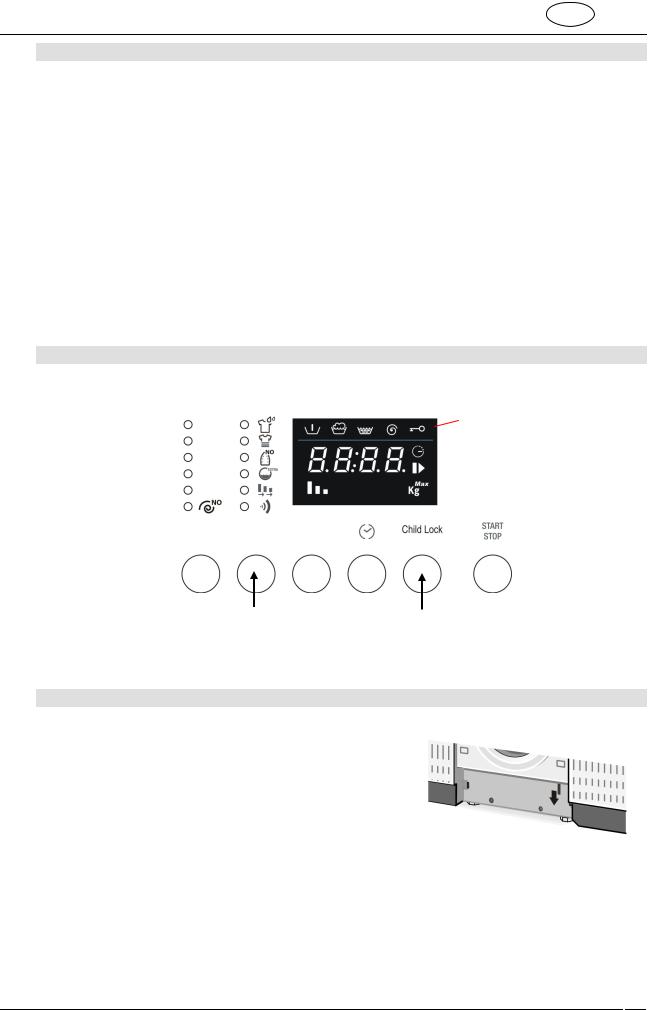
3.1 CONTROL PANEL
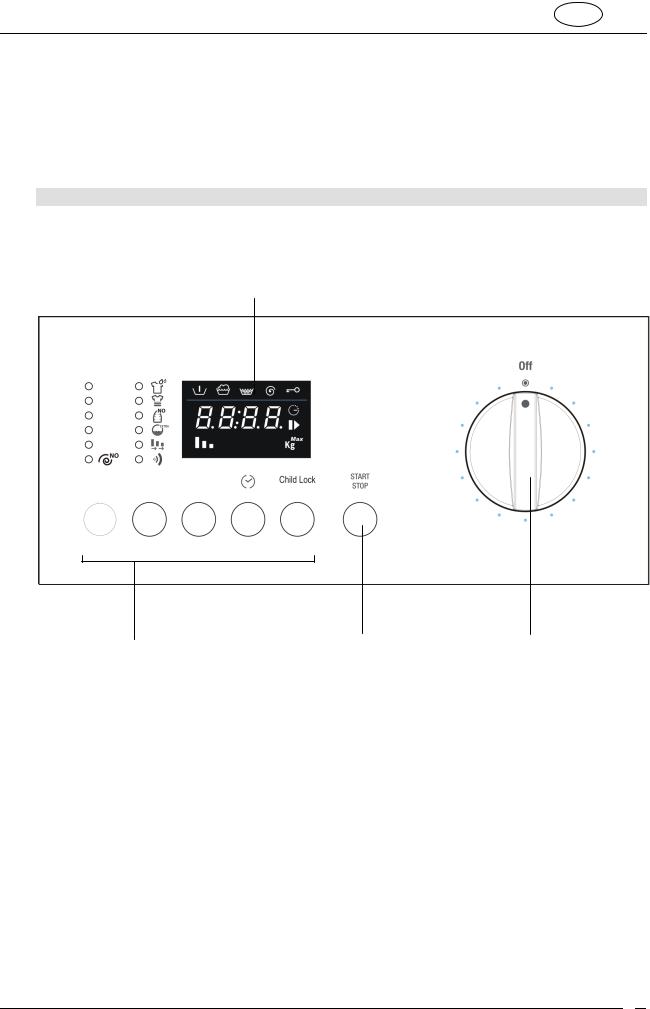
All the appliance's control and monitoring devices are placed together on the front panel.
Display: shows the settings (spin speed, cycle status, flexi timer, child lock on/off, maximum recommended weight). The settings can be modified using the buttons underneath.
Buttons (from left to right):
Spin speed selection Option selection Confirm option Delay Timer
Child Lock
Start/Pause button: For starting and stopping working cycles.
Programme Selector
For switching the washing machine on and off and selecting programmes. Can be turned in either direction. Does not turn while programmes are in progress.
8
EN
4.USING THE APPLIANCE FOR WASHING
4.1PREPARING THE ITEMS FOR WASHING
1.Subdivide the items for washing by fabric type and colour fastness.
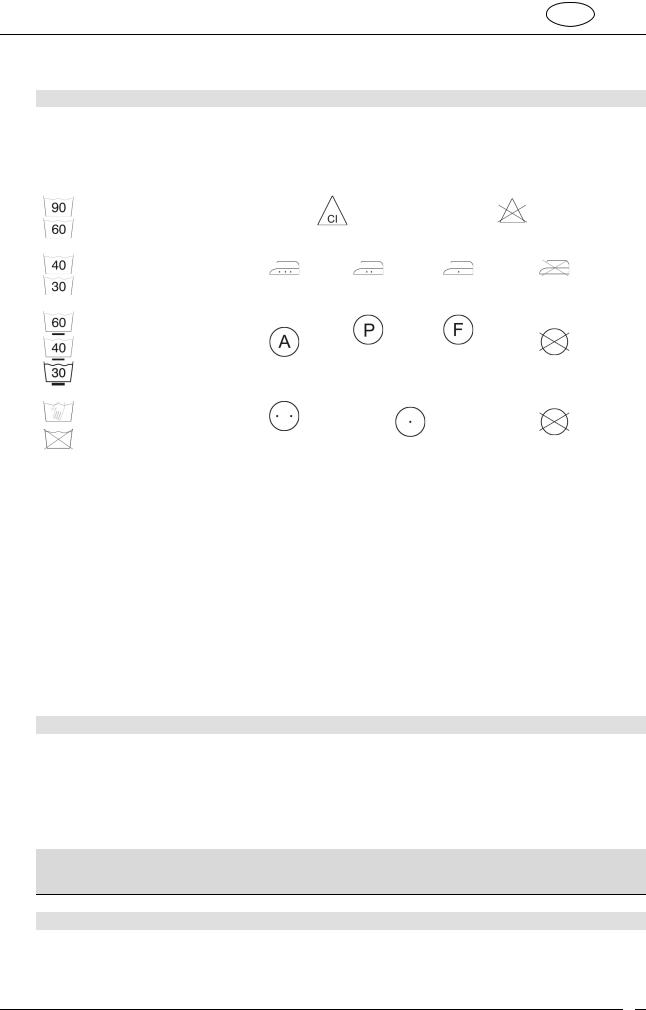
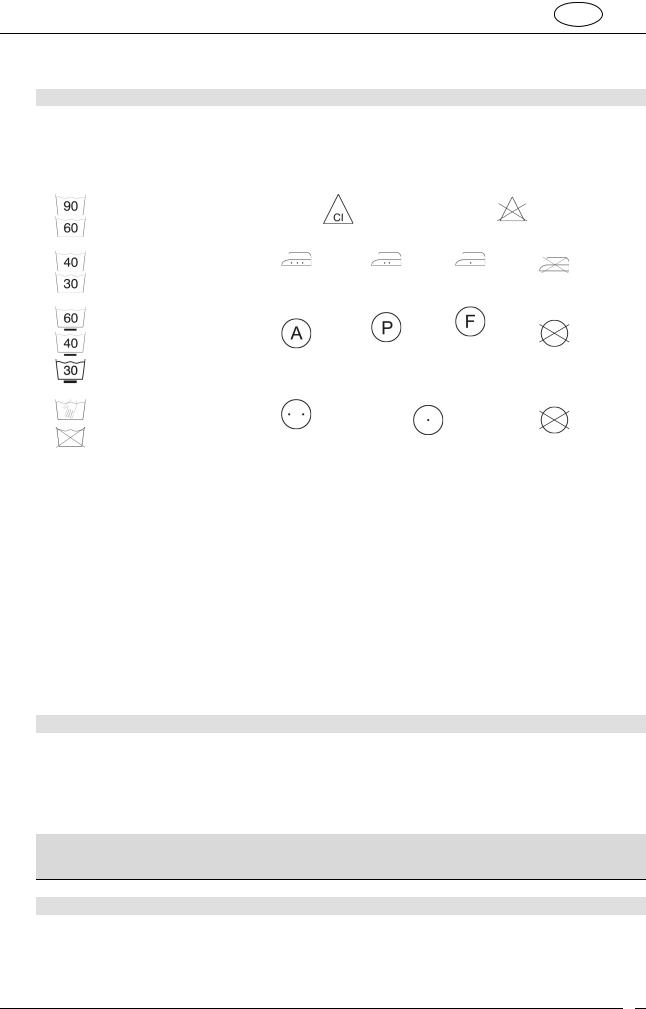
2.Wash white and coloured items separately. New coloured items should be washed separately the first time. Normally, items carry labels with washing instructions. The following is a short description of the symbols u- sed on these labels.
|
WASHING |
|
BLEACHING |
|
||
|
Machine wash at max. 90°C |
|
|
|
|
|
|
|
|
|
|
|
|
|
Machine wash at max. 60°C |
Bleaching allowed |
|
Do not bleach |
||
|
|
|
|
|
||
|
|
|
IRONING |
|
||
|
|
|
|
|
|
|
|
Machine wash at max. 40°C |
|
|
|
|
|
|
|
Hot iron |
Warm iron |
|
Cool iron |
Do not iron |
|
Machine wash at max. 30°C |
|
||||
|
|
|
|
|
|
|
|
|
|
|
|
|
|
|
|
|
DRY CLEANING |
|
||
|
|
|
|
|
|
|
|
Machine wash, delicate cycle |
|
|
|
|
|
|
at max. 60°C |
|
|
|
|
|
|
Machine wash, delicate cycle |
|
Any solvent e- |
|
Petroleum |
|
|
at max. 40°C |
|
|
|
||
|
Any solvent |
xcept trichloroe- |
|
solvent and |
Do not dry clean |
|
|
Machine wash, delicate cycle |
|
||||
|
|
thylene |
|
R113 |
|
|
|
at max. 30°C |
|
|
|
||
|
|
|
|
|
|
|
|
|
|
|
DRYING |
|
|
|
|
|
|
|
|
|
|
Hand wash |
|
|
|
|
|
|
|
High tem- |
|
|
|
|
|
Do not wash |
Less than 60°C |
Do not tumble dry |
|||
|
|
perature |
||||
|
|
|
|
|
|
|
Warning!
•Do not wash unhemmed or torn items as they may fray.
•Unrelated items in the wash may damage the garments or parts of the washing machine. So: empty pockets and turn them inside-out, and remove wheels from curtains or wrap them in a mesh bag.
•Wash very small items (belts, handkerchiefs, socks, padded bras, etc.) in a white canvas bag. Fasten pressstuds and zips and sew on loose buttons.
•The use of modern detergents and the correct washing temperature is generally sufficient to remove stains from fabrics. However, some difficult stains such as grass, fruit, egg, blood, rust, ballpoint pen, etc. should be dealt with before washing. Depending on the type of fabric, there are a large number of commercial stain removers on the market. In all cases, stains should be cleaned or diluted at once, since the older they are, the harder they are to remove.
•Failure to comply with washing guidance symbols may result in damage to the items washed.
Wool – Only wool marked as pure new wool, with the  mark, or labelled "shrink-proof, machine-washable" can be washed in a washing machine on the specific programme; other types of wool should be hand-washed or dry-cleaned.
4.2 OPENING THE DOOR
The appliance is fitted with a safety device which prevents the door from being opened while the programme is in progress.
1.Check that all the water has been drained from the tank and the drum is at a standstill.
Warning!
•If the washing programme is interrupted, it will be from 3 to 15 minutes before the door can be opened, depending on the temperature reached inside the appliance.
Warning!
The water may still be boiling hot if the wash was at high temperature.
Do not open the door if there is still water in the drum!
4.3 LOADS OF WASHING
As far as possible, to save electricity, it is more economical to wash complete loads of the various types of fabric. Shake out the washing before loading, and alternate large and small items. It is best to weight the load the first few times, after which you will be able to rely on your experience.
9
EN
4.4LOADING THE ITEMS FOR WASHING
1.Open the door and load the washing, distributing it evenly over the drum, with items opened out and not bundled together; if possible, large and small items should be well mixed.
2.The washing machine covered by this manual can be loaded with up to 7kg of washing for each wash. If this weight is exceeded, the washing results will be poor and the appliance may malfunction.
3.To save energy it is more economical to wash full loads of the various types of fabric, following the guidance on quantities provided in the “Programmes Table” supplied in this manual.
4.Close the door by pressing against the frame until you hear it click shut. Take care not to trap items of washing between the door and the rubber gasket.
Warning!
•If the door is not properly closed, a safety device prevents the washing machine from starting.
•Do not exceed the maximum load: overloading adversely affects washing results.
4.5 ADDING DETERGENT AND ADDITIVE
The internal tray comprises three compartments, marked with the symbols
prewash detergent
main wash detergent
 for fabric conditioner, starch, additives, etc. (e.g. treatment products). The additives are added to the washing tank automatically during the final rinse.
The main wash detergent compartment has a tang allowing the use of liquid detergent. To insert it, pull it towards the front and then lower it.
Following the recommendations in the "Programmes Table" supplied with this manual, place the detergent and any additives in the drawer before the start of the programme.
Never fill with liquids above the maximum level marked; otherwise the trays will empty too quickly.
Before pouring dense additives into the container, dilute with a little water to ensure they do not clog the outlet.
Use only low-foam detergents suitable for use in a washing machine.
The amount of detergent must be decided in relation of the hardness of the water, the type and quantity of items loaded, and their degree of dirt.
This will provide the desired effect with optimal detergent consump-
tion.
On detergent packs the recommended dose is indicated for 4 levels of water hardness and for loads of 4-5 kg of washing with average dirt levels.
Request information about the water's hardness from your water supply company.
Water hardness |
|
|
|
|
Level of hardness |
French degrees fH |
German degrees dH |
|
|
|
|
|
Soft |
Up to 15° |
Up to 8° |
|
|
|
|
|
Medium |
15° - 25° |
8° - 14° |
|
|
|
|
|
Hard |
25° - 40° |
14° - 22° |
|
Very hard |
More than 40° |
More than 22° |
|
|
|
|
10
EN
4.6 POWDER DETERGENT DOSES
Laundry with normal dirt
1.Choose a programme without prewash.
2.Pour the total amount of detergent shown on the pack into the main wash compartment of the detergent drawer.
Very dirty laundry
1.Choose a programme with prewash.
2.Place ¼ of the recommended amount of detergent in the prewash compartment of the detergent drawer and ¾ of the detergent in the wash compartment.
Warning!
•If no recommended doses are provided, for delicate items in synthetic fibre use from ½ to 2/3 of the recommended dose for washing tough cotton fabrics.
•Only neutral detergents recommended for wool should be used on the wool programme.
•Use the doses recommended by the detergent producer.
4.7 LIQUID DETERGENT DOSES
1.Pour the dose required into the measuring cap supplied with the bottle of liquid detergent and place it in the drum, or use the main wash compartment of the detergent drawer, fitting the insert provided.
2.The scale on the red insert is intended as an aid when deciding the dose of liquid detergent.
Warning!
•Liquid detergents can be used, at the doses recommended by the producer, only for the main wash, i.e. in all programmes without prewash.
4.8 DESCALERS
Descalers can be added to the prewash and main wash compartments as recommended by their producers. Place the detergent in the compartments first, followed by the descaler.
4.9 PROGRAMMES AND FUNCTIONS
For advice on selecting programmes in relation to the type of fabric, refer to the "Programmes Table", supplied with this manual. (Inside the bag of accessories)
4.10 SWITCHING ON THE APPLIANCE AND SELECTING THE WASHING PROGRAMME
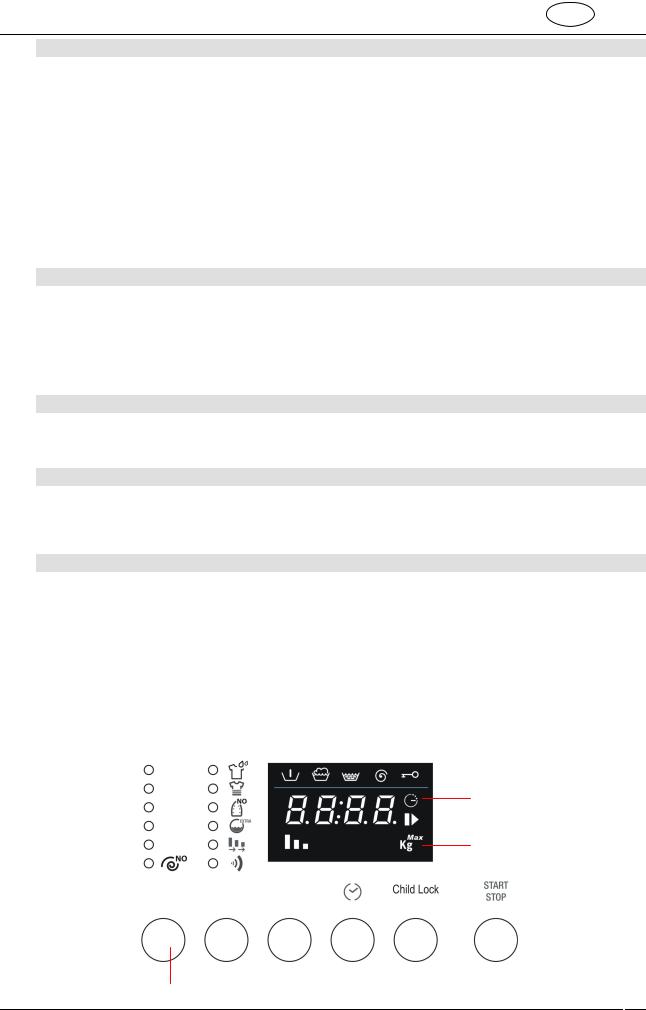
To switch on the appliance and select the programme, proceed as follows:
1.Turn the programmes knob in either direction. This switches on the washing machine.
2.Select the washing programme. The time left to the end of the programme and the maximum recommended weight for the selected programme alternate on the display. The symbols on the display light up to identify the information shown.
3.The default spin speed values are shown. The initial settings can be modified using the button underneath the sequence of spin speeds.
4.If spin speed  is set, there will be no spin cycle and the appliance will stop with the tank full. If this value is set the appliance does not perform the final spin and the washing programme ends with water in the tank.
Delay Timer
Max recommended weight
Spin Speed selection
11

EN
4.11 SELECTING AND CONFIRMING OPTIONS
Options
|
|
|
|
|
|
|
|
|
|
|
|
Option selection |
Confirm option |
Start Pause |
|||
|
|
|
|
|
|
1.The Option Selection button can be used to select the following options in sequence (from the top down):
Prewash: adds a stage before the main wash, lasting about 20 minutes at a temperature of 35°C. Suitable for loads of particularly dirty items.
Intensive: the max. temperature is changed to 60°C and the washing stage is extended to increase the effectiveness of the enzymes in the detergents. Suitable for delicate but dirty items.
Easy iron: produces items which are less creased and easy to iron. Water plus: Increases the amount of water used for washing and rinses.
In alternative Extra rinse: this option adds a rinse to the selected washing programme.
Flexi Time: reduces the duration of the cycle. The symbol is completely illuminated with the initial duration of the selected programme. Once the option has been selected the cycle duration can be further reduced to an intermediate setting and a minimum setting and then returned to the initial duration by repeated pressing of the Set button
In alternative Rapid: reduces the duration of the washing cycle. Suitable for small amounts of laundry with only light dirt.
Buzzer: sets whether or not the buzzer will sound at the end of the cycle. The appliance comes with the buzzer function "on".
2.To confirm the selected option, simply press the Confirm options button and the LED of the option remains on.
3.To delete an option selection, simply return to the option with the Selection button and press the Confirm options button. To annul all the options previously selected in a single operation, simply hold down the Confirm options button for 4 seconds.
4.The Buzzer option retains its "on" or "off" status for subsequent cycles. It is only automatically switched to "off" if the Night Wash programme is chosen.
12
EN
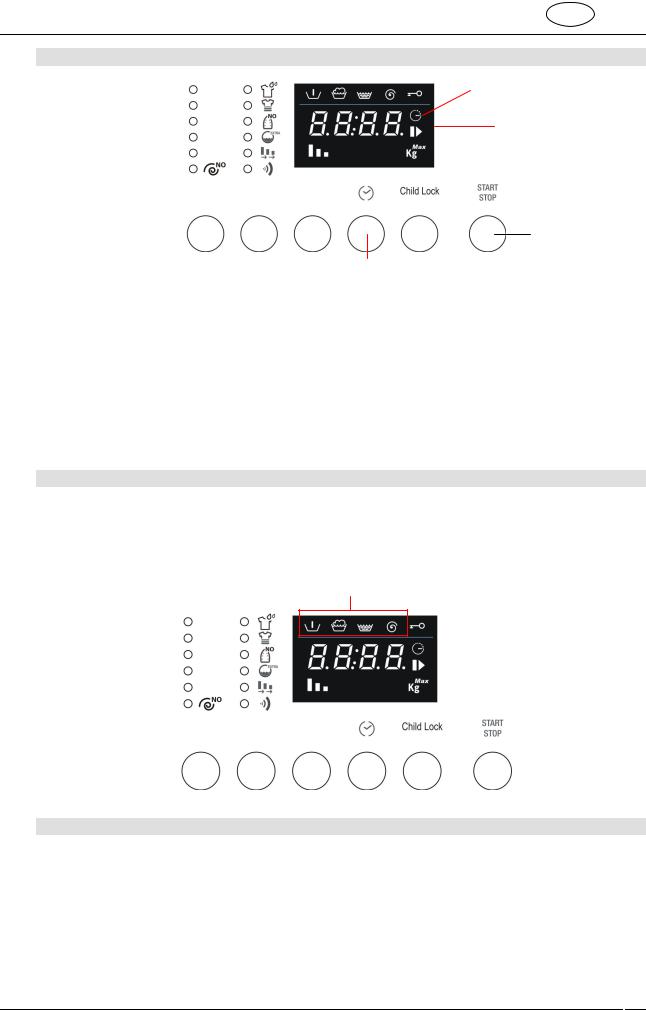
4.12 TIME REMAINING
Delay Timer symbol
Start pause symbol
Start Pause
Delay Timer button
1.The Delay Timer can be pressed repeatedly to select the time after which the washing programme will end. The time left before the end of the cycle calculates the initial duration of the washing cycle, the settings made (temperature, spin speed and options) which may shorten or lengthen the cycle's initial duration, and the delay time the user wishes to add before the cycle starts.
2.After the Delay Timer function has been set, the symbol on the display remains on.
3.To annul the Delay Timer function, keep pressing the button repeatedly until the display shows 0.
4.The Start Pause symbol flashes on and off until the cycle starts. After the cycle starts, the symbol remains constantly lit.
4.13STARTING THE WASHING PROGRAMME
1.To start the washing programme after making your personal settings, press the Start Pause button.
2.Once the cycle has started, the display shows the time remaining before the end of the cycle and the Start Pause symbol on the display is constantly on.
3.During performance of the washing/drying programme, the symbols which identify the various phases light up:
Cycle phase symbols: Prewash, wash, rinse and final spin.
4.14 INTERRUPTING OR CHANGING THE WASHING PROGRAMME
The washing programme in progress can be interrupted at any moment:
1.Press the “Start/Pause” button for about 3 seconds: the display shows the word PAUS (for 1 second) alternating with the time remaining until the end of the cycle (for 1 second). The Start/Pause light flashes on and off.
Programmes can also be interrupted by turning the programme/temperature setting knob while the cycle is in progress.
2.To change the washing programme, simply turn the programme knob to select the new programme; there is no need to set the appliance in pause status. The new cycle will be carried out completely, beginning from the start. If the tank had already been filled with water during the previous cycle, the water intake phase will be omitted from the new programme.
3.To restart the cycle, press the Start-Pause button again.
13
EN
4.15 PROGRAMME END
Washing programmes are completed automatically. The word END appears on the display and the "Time remaining" light goes out.
1.Switch the appliance off by turning the programmes knob to OFF
2.Unload the laundry from the drum.
3.Leave the door ajar to allow the interior of the washing machine to dry out.
4.Turn off the water intake tap.
If during the initial spin speed setting stage, the "no spin" mode with stop with tank full  (spin speed set as 0) was selected, at the end of the washing programme the word STOP appears on the display, alternating with ----
(spin speed of 0) and the spin light is on.
To proceed with the pump-out and spin, press the spin selection button twice. The appliance restarts the cycle with the pump-out and spin. To select the spin speed required, press the button until the chosen speed is displayed. To pump out the water from the tank without performing the spin, press the spin selection button until the display indicates speed of 0: the pump-out will be run without spin.
4.16CHILD LOCK
1.When this function is activated, the modification of options, temperatures, spin speed and the washing/drying cycle is not possible while the cycle is in progress.
Child Lock Symbol
2 |
|
1 |
|
|
|
2.To activate the Child Lock Function, press the Child Lock (1) button and hold it down. Also press the Options selection (2) button within 3 seconds.
3.The Child Safety Function symbol lights up to show that the function has been activated.
4.Repeat the same procedure to deactivate the function.
4.17OPENING THE APPLIANCE IN AN EMERGENCY
In the event of a power failure, the door is opened using the mechanical release device activated by means of the lever in the bottom of the appliance:
•Turn the knob to Off and disconnect the power supply plug from the socket.
•Drain off the water (see point 5.4)
•Pull the lever down and open the door.
Warning, scolding hazard: before opening the door, check that the appliance does not contain boiling hot water and detergent which may pour out and cause injury when the door is opened.
Warning: do not open the door using the emergency release lever while the drum is turning.
14
EN
5. CLEANING AND MAINTENANCE
Important – Before carrying out any cleaning or maintenance procedure, the plug must be disconnected from the power supply socket.
5.1CLEANING THE OUTSIDE OF THE APPLIANCE
•Regular, thorough cleaning will keep your appliance looking good.
•Clean the exterior of the appliance with soap and water only, then dry thoroughly with a soft cloth.
•The plastic parts should just be wiped with a damp cloth.
•Do not scrape with pointed objects, or use solvents or products containing abrasive substances because they damage the surfaces.
•For reasons of safety, never spray the washing machine with jets of water.
5.2CLEANING THE DRUM
•Remove any rust marks from the drum using a stainless steel cleaner, or very fine sandpaper for particularly stubborn cases.
•For descaling the washing machine use only brand-name descalers which contain an anti-corrosion a- gent for washing machines.
•Always follow the producer's instructions with regard to use and dosages.
•After descaling or removing rust from the drum, carry out a few rinse cycles to remove all acid residues which might damage the appliance. Never use cleaners which contain solvents. There is the risk of the formation of vapours which might catch fire and explode.
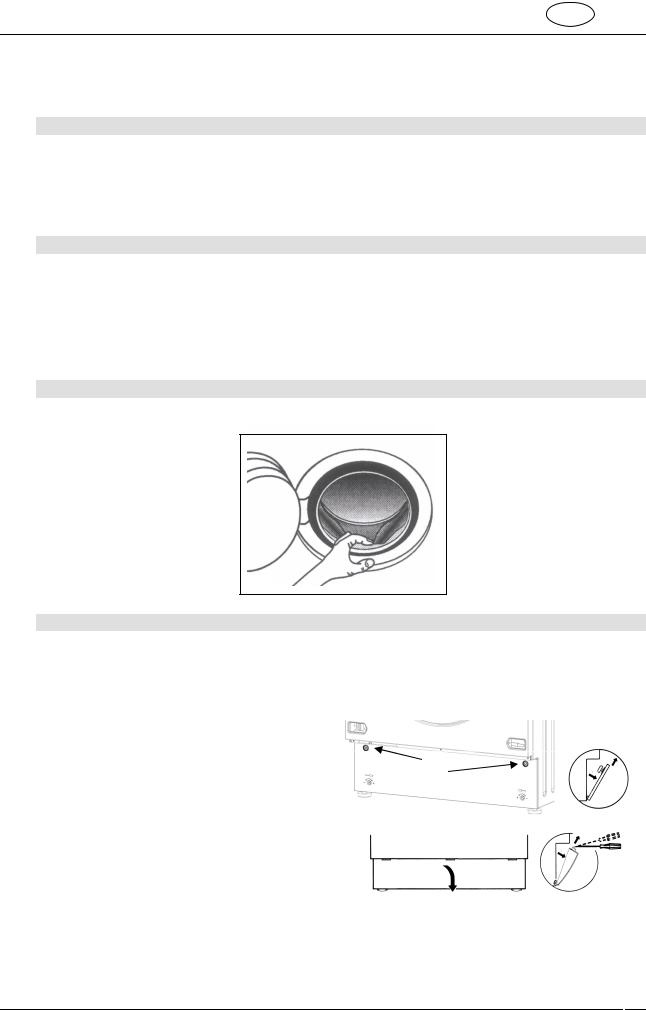
5.3CLEANING THE DOOR GASKET
Check regularly that there are no paper clips, buttons, nails or pins in the folds of the door gasket.
5.4 CLEANING THE DRAIN PUMP
The drain pump only needs cleaning if it has been blocked by buttons, brooches or similar objects and the water is not being pumped out.
In this case, proceed as described below.
1.Remove the mains plug to disconnect the appliance from the electricity supply.
2.Depending on the model, proceed as follows: Built-in/totally concealed model – use a small screw-
driver as a lever to remove the plugs shown here, turn the plinth downwards and access the pump.
Free-Standing Model – Insert a small screwdriver through the slits in the front of the plinth, then apply upward leverage with the screwdriver to release the top of the plinth from the cabinet.
Tilt the plinth forward slightly and pull it upward to remove it completely.
15
EN
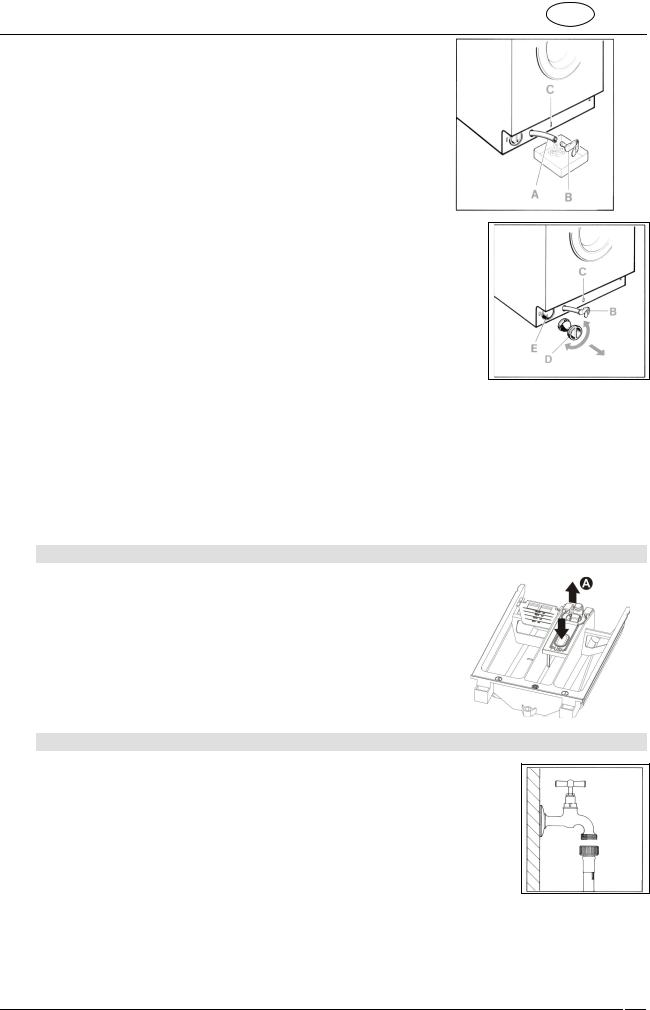
3.Extract the drain hose ”A”.
Warning: if the hose is hot, the water is hot or boiling hot. Place a shallow container on the floor and remove the plug “B” to drain off the water.
Depending on the amount of water in the appliance, the container may have to be emptied several times.
When no more water is coming out, close the hose again by pushing the plug “B” firmly back into place.
4.Unscrew the cover of the pump “D” by turning it to the left. Clean the pump and remove any foreign bodies.
Also check the inside “E”, making sure that the impeller turns freely; any foreign bodies stuck in it must be removed.
5.Screw the cover back on the pump.
Secure the drain house by snapping the plug back into place "C". Depending on the model, replace the plinth as follows:
Built-in/completely concealed model - Fit the bottom of the plinth first. Push it towards the cabinet and put the plugs back into place.
Free-standing model – Fit the bottom of the plinth first and then push it towards the cabinet until it snaps into place.
5.5 CLEANING THE DETERGENT DRAWER
The detergent drawer should be kept clean, removing all solid deposits.
To simplify this operation, completely remove the detergent drawer (pull the drawer fully out, press in the zone marked PUSH and then remove completely).
Remove the siphon "A" and clean all parts with hot water.
Fully re-insert the siphon and remove any detergent deposits before putting the drawer back in position.
5.6 CLEANING THE WATER INTAKE FILTERS
The machine is fitted with a filter which protects the water intake valves.
The filter is in the fitting on the intake hose which is connected to the tap
The filter must be cleaned if the washing machine is not taking in water or the amount of water is insufficient.
To clean, proceed as follows:
•Remove the mains plug to disconnect the appliance from the electricity supply.
•Turn off the water tap.
•Unscrew the intake hose fitting from the tap.
•Unscrew the intake hose fitting from the tap.
•Clean the filter with water, with the aid of a small brush.
•When screwing the intake hose fitting back into place, check that the filter is positioned correctly.
16

EN
6. TROUBLESHOOTING
This produce complies with the relevant regulations governing the safety of electrical equipment. For safety reasons, any technical inspections or repairs must be performed by qualified staff, to prevent all hazards for the user.
If the appliance does not work, before calling the After-Sales Service, to avoid unnecessary expense, check yourself that the operations listed in this troubleshooting table have been carried out..
1 Appliance does not start |
Check that: |
|
|
- plug is properly connected to socket |
|
|
- door is securely closed |
|
|
- “Start/Pause” button has been pressed. |
|
2 No water filling |
Check that: |
|
|
- |
plug is properly connected to socket |
|
- |
door is securely closed |
|
- |
water tap is turned on |
|
- |
water intake hose filters not fouled. |
|
- |
water intake hose not trapped or kinked. |
3No water visible in washing drum
No malfunction.
The water level is below the level of the glass in the door because new appliances use very little water to achieve the same washing and rinsing results.
4 Water not pumped out |
Check that: |
|
|
- |
drain hose is not kinked |
|
- |
drain pump not fouled. |
5Water not pumped out after It is not a malfunction: pause programmed into washing programme to
last rinse in delicate fabrics and wool wash programmes
6Water takes in and pumps out water continually
prevent creasing of fabrics.
To pump out water, proceed as described in "Programme End" point.
Check that end of drain hose is not too low down.
7Strong vibrations during Check that: spins
-Appliance is properly levelled
-washing machine not too close to walls or kitchen units
-internal unit on flexible mounts locked in position.
8Too much foam formed in tank and flowing out of drawer
9Water on floor
Check that:
-detergent used is recommended for automatic washing machines and not for hand washing
-quantity used is as stated in manual and no more
Check that:
-water intake hose fittings not loose
-end of drain hose still correctly positioned.
10Not all fabric conditioner Check that detergent drawer siphons are correctly fitted and not fouled. used or too much water left
in compartment
17
|
|
|
EN |
|
|
|
|
11 |
Appliance does not spin |
Anti-imbalance safety device tripped because laundry not evenly distrib- |
|
|
|
|
uted in drum. If laundry is still wet at end of cycle, rearrange it in the drum |
|
|
|
by hand and repeat spin programme only. |
12 |
Emptying water from drum |
In the event of a power blackout or appliance failure, the water can be |
|
|
|
|
removed from the drum using the emergency procedure. |
13 |
Laundry not properly spun |
Large items screwed up and not evenly distributed within drum. Always |
|
|
|
|
wash a mix of large and small items. |
14 |
Traces |
of detergent on |
Many phosphate-free detergents contain substances with low water solu- |
|
laundry |
|
bility. |
|
|
|
Select Rinse programme or brush the laundry. |
15 |
Washing |
results unsatis- |
- Probably too little detergent or unsuitable detergent used |
|
factory |
|
- Difficult stains not dealt with before washing |
|
|
|
|
- Correct temperature not set
- Basket overloaded.
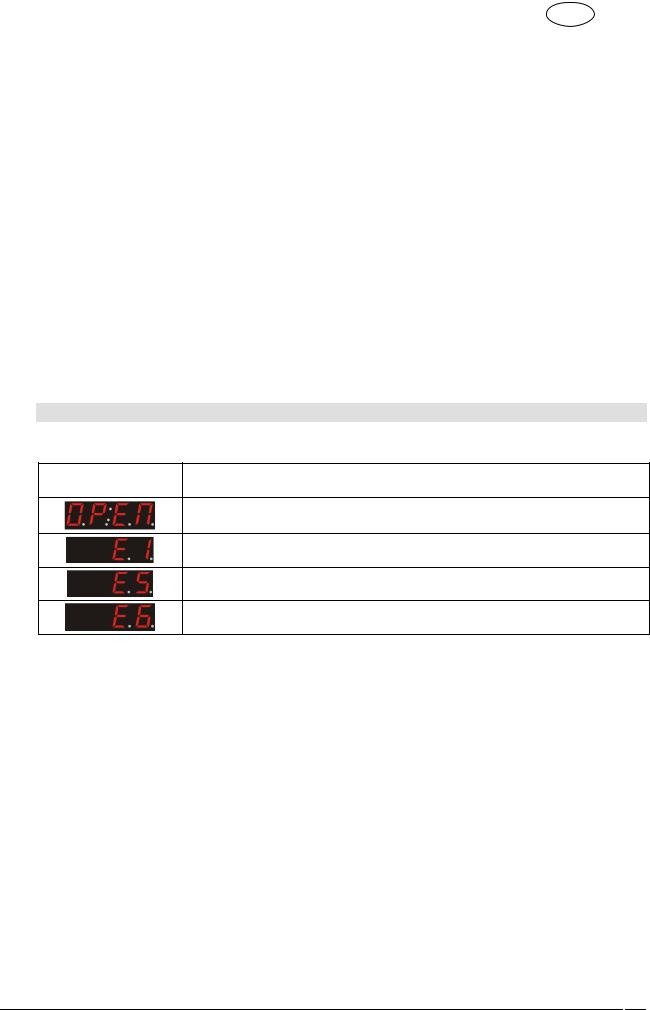
ERROR DISPLAY
In case of a malfunction, the appliance will identify the problem by showing an error code on the display.
Error code |
Key to problem |
Door not properly closed. Try reclosing.
Aqua stop device tripped. Cut off power supply, turn off water tap and contact nearest service centre.
Water not taken in for washing. See point 2 in troubleshooting table.
Water not pumped out. See point 4 in troubleshooting table.
For all the other error codes displayed, cut off the electricity supply, turn off the water tap and contact your nearest Service Centre.
18

FR
Sommaire
1. |
Avertissements pour la sécurité et l’utilisation |
2 |
2. |
Instructions pour l’installation |
5 |
|
|
|
3. |
Description des commandes |
8 |
|
|
|
4. |
Utilisation de la machine pour le lavage |
9 |
|
|
|
5. |
Nettoyage et entretien |
16 |
|
|
|
6. |
Anomalies et dysfonctionnement |
18 |
|
|
|
Le marquage CE est apposé sur cet appareil  conformément à la directive européenne 2002/96/CE relative aux déchets d'équipements électriques et électroniques (Waste Electrical and Electronic Equipment - WEEE).
Cette directive définit les normes pour la collecte et le recyclage de ces appareils valables sur tout le territoire de l'Union Européenne.
Le symbole de la poubelle barrée reportée sur les appareils ou sur l'emballage indique que le produit, à la fin de sa vie utile, doit être collecté séparément. Par conséquent, l’utilisateur devra remettre l’appareil arrivé en fin de vie aux centres de collecte différenciée des déchets électroniques et électrotechniques, ou le donner au revendeur au moment de l’achat d’un appareil équivalent, sur une base de un pour un.
La collecte sélective pour le passage suivant de l’appareil usagé au recyclage, au traitement et à la destruction écologiquement compatible contribue à éviter des effets négatifs possibles sur l’environnement et sur la santé et favorise la réutilisation et/ou le recyclage des matériaux qui composent l’appareil.
L’élimination abusive du produit par l’utilisateur entraîne l’application de sanctions administratives conformément à la loi.
1
FR
 LIRE ATTENTIVEMENT LES INSTRUCTIONS ! Avertissement !
Nous vous conseillons de lire attentivement toutes les instructions de ce manuel pour connaître les conditions les plus appropriées pour une utilisation correcte et sûre de l’appareil.
Il est très important que ce manuel d'instructions soit conservé avec l’appareil pour pouvoir le consulter à tout moment.
En cas de vente ou de déménagement, s'assurer que le manuel accompagne toujours l'appareil, pour permettre de s'informer sur son mode de fonctionnement.
1. AVERTISSEMENTS POUR LA SÉCURITÉ ET L’UTILISATION
Avertissement !
Ces avertissements sont fournis pour des raisons de sécurité.
Les lire avec beaucoup d'attention avant l’installation et l'utilisation.
Élimination de l'emballage
•Ne jamais laisser les résidus de l'emballage abandonnés dans le milieu domestique. Séparer les différents matériaux de rebut provenant de l'emballage et les remettre au centre de ramassage des déchets différenciés le plus proche.
•Les matériaux qui composent l'emballage (sachets en plastique, polystyrène, etc.) ne doivent pas être laissés à la portée des enfants.
Élimination de l'appareil qui n'est plus utilisé
•L’appareil usagé doit être rendu inutilisable : il faut rendre inutilisable la vieille fermeture du hublot (on évitera ainsi que les enfants, en jouant, puissent s'enfermer dedans et être en danger de mort) et couper le cordon d'alimentation électrique après avoir débranché l'appareil.
L’appareil devra ensuite être remis à un centre de ramassage des déchets différenciés.
Protection de l'environnement
•Exploiter à 100% la capacité maximale conseillée. Ne pas dépasser la charge maximale consentie.
•Ne pas utiliser la fonction prélavage pour une petite quantité de linge ou du linge normalement sale.
•Doser le détergent selon les recommandations du fabricant
•Sélectionner la vitesse maximum d'essorage selon le type de linge. Les essoreuses à grande vitesse réduisent le temps de séchage et la consommation d'énergie.
Instructions sur la sécurité
•Cet appareil est prévu pour un usage domestique, et est conforme aux Directives 72/23/CEE, 89/336/CEE (y compris les Directives 92/31/CEE et 93/68/CEE), actuellement en vigueur.
•Avant son installation et son utilisation, lire attentivement toutes les indications données dans ce manuel.
•Avant utilisation, s'assurer que le groupe cuve ait été débloqué (voir instructions). Si le groupe cuve n'a pas été débloqué, pendant l'essorage le lave-linge, les meubles ou les appareils proches pourraient être endommagés.
•Ce manuel fait partie intégrante de l’appareil : il faut toujours le conserver en parfait état avec l’appareil. L’installation devra être effectuée par du personnel qualifié et conformément aux normes en vigueur. L’appareil a été conçu pour les fonctions suivantes : lavage de linge ou de tissus déclarés appropriés par le fabricant au traitement en machine sur la plaquette d'identification. Toute autre utilisation doit être considérée impropre. Le fabricant décline toute responsabilité pour des utilisations différentes de celles indiquées.
•La plaquette d'identification, avec les données techniques, le numéro de série et le marquage est visiblement positionnée dans la partie que l'on voit après l'ouverture du hublot. La plaquette d'i- dentification ne doit jamais être enlevée.
•Les travaux électriques et hydrauliques pour l'installation de l'appareil doivent être exécutés par du personnel qualifié.
2

FR
•La mise à la terre est obligatoire selon les modalités prévues par les normes de sécurité des installations électriques. Le fabricant décline toute responsabilité pour d'éventuels dommages matériels ou corporels, dérivant du branchement manqué ou défectueux de la ligne de terre.
•Si l'appareil n'est pas branché par l'intermédiaire d'une fiche, il faut prévoir un dispositif d'interruption omnipolaire avec distance d'ouverture des contacts d'au moins 3mm.
•La fiche à raccorder au câble d'alimentation et la prise devront être du même type et conformes aux normes en vigueur. Vérifier que les valeurs de tension et de fréquence de réseau correspondent à celles reportées sur la plaquette d'identification. Éviter les adaptateurs ou les dérivateurs. Ne jamais ôter la fiche en tirant le câble.
•L'appareil est débranché uniquement si la fiche est extraite de la prise ou si l'interrupteur général de l'installation électrique a été désactivé. La fiche devra être accessible après l’installation.
•L’appareil doit être installé en utilisant des jeux de flexibles neufs (fournis en équipement à l'appareil). Les vieux flexibles ne devraient pas être réutilisés.
•Faire attention que l’appareil ne pose pas sur le câble d'alimentation électrique.
•Le lave-linge ne doit absolument pas être utilisé sur les véhicules, à bord de navires ou d'avions, ou dans des pièces qui présentent des conditions particulières comme, par exemple, des atmosphères explosives ou corrosives (poussières, vapeurs et gaz) ou des liquides explosifs et/ou corrosifs.
•Ne pas placer le lave-linge dans des lieux exposés au gel. Les tuyaux gelés peuvent exploser sous pression.
•S'assurer que le tuyau de vidange, accroché à l'évier, soit solidement bloqué et ne puisse pas bouger.
•S'il n'est pas bloqué, la force répulsive de l'eau pourrait le faire glisser de l'évier avec le risque d'inondation.
•Si l'on accroche le tuyau à un évier contrôler que l'eau s'écoule rapidement de l'évier pour éviter un débordement.
•Ne pas mettre trop de linge dans la machine.
•En aucun cas il ne faut utiliser pour le lave-linge des détergents contenant des solvants ou des produits chimiques, pour le lavage. Ils pourraient endommager l'appareil et former des vapeurs toxiques. Par ailleurs, celles-ci pourraient s'incendier et exploser.
•Des vêtements imprégnés de produits pétroliers ne doivent pas être lavés dans la machine. Avant le lavage, vérifier qu'il n'y ait pas d'appareils inflammables dans les vêtements (exemple : briquets, allumettes, etc.)
•Si l'on utilise pour le nettoyage des fluides volatiles, s'assurer que les substances aient été enlevées du vêtement avant de l'introduire dans la machine.
•Avant d'introduire les vêtements à laver, s'assurer que les poches soient vides, les boutons bien fixés et les fermetures éclair fermées.
•Éviter de laver des vêtements effilochés ou arrachés.
•Le lavage à des températures élevées provoque la surchauffe du verre du hublot.
•Avant d'ouvrir le hublot, contrôler si l'eau est complètement évacuée.
•S'il y a encore de l'eau, n'ouvrir le hublot que si celle-ci est complètement évacuée. Dans le doute, lire le manuel d'instructions.
•L’eau de la machine n'est pas potable !
•Avaler des détergents pour lave-linge peut provoquer des lésions dans la bouche et la gorge.
•Avant de sortir le linge du lave-linge s'assurer de l'arrêt du tambour.
•À la fin de chaque utilisation, éteindre l'appareil pour éviter de la dispersion d'énergie électrique.
•Laisser le hublot entrouvert entre deux lavages afin de maintenir le joint dans de bonnes conditions.
•En cas de fonctionnement anomal ne jamais essayer de réparer l'appareil soi-même. Débrancher l'appareil du réseau électrique et fermer le robinet de l'eau. Puis se mettre en contact avec un technicien qualifié. Les réparations ne peuvent être effectuées que par un professionnel qualifié.
•L'appareil ne peut être utilisé que par des adultes. Ne jamais laisser les enfants toucher aux commandes ou jouer avec le lave-linge et les éloigner de la machine pendant le déroulement du programme.
•Les petits animaux ou les petits enfants pourraient s'introduire à l'intérieur du lave-linge.
•Il faut toujours contrôler l'intérieur de la cuve avant de charger la machine et éviter que les enfants jouent avec l’appareil.
3

FR
•Les enfants ne doivent pas s'approcher de la machine lorsque le hublot est ouvert ou le bac à détergent est ouvert ; d'éventuels résidus de détergent pourraient causer des dommages irréparables aux yeux, à la bouche et à la gorge et même provoquer la mort par étouffement.
•L’appareil ne doit pas être utilisé par des personnes (y compris des enfants) avec des capacités mentales, sensorielles ou physiques réduites, ou qui n’ont pas une expérience et une connaissance nécessaires, sauf sous la supervision d’un personnel, responsable de leur sécurité ou si ce personnel leur a fourni les instructions sur l’utilisation de l’appareil.
•Ne pas stocker de liquides inflammables près de l’appareil.
Période d'inactivité prolongée.
•Si la machine est inutilisée pendant un temps assez long, il est conseillé de débrancher les raccordements électriques et hydrauliques et de laisser le hublot entrouvert pour éviter la stagnation de mauvaises odeurs.
Important !
L'utilisation de cet appareil est facile.
Toutefois, pour obtenir les meilleurs résultats, il est important de lire très attentivement ce manuel et suivre toutes les instructions avant de mettre en marche l'appareil.
Le manuel fournit les indications correctes sur l’installation, l’utilisation et l'entretien et donne aussi des conseils utiles.
Le fabricant décline toute responsabilité pour tous dommages subis par des personnes ou des choses, causés par l'inobservation des prescriptions susmentionnées ou dérivant de la modification, même d'une seule partie de l’appareil, et de l'utilisation de pièces de rechange qui ne sont pas d'origine.
4

FR
2. INSTRUCTIONS POUR L’INSTALLATION
Important !
L’appareil devra être installé par un technicien spécialisé et conformément aux normes en vigueur. Le lave-linge a un poids très élevé. Il faut faire très attention en le soulevant.
2.1 DÉBALLAGE
Le groupe oscillant est bloqué pour le transport par les vis (A) placées derrière le lave-linge et par les cales en plastique (B). Le démontage des vis permet d'utiliser le câble d'alimentation électrique.
A+B
1.Dévisser toutes les vis avec la clé de 10 mm.
2.Enlever toutes les vis (A) derrière la machine
3.Enlever toutes les cales en plastique (B)
B
A
4.Monter tous les bouchons en plastique fournis (C), pour éviter que des projections d'eau pénètrent à l'intérieur de la machine, ou le contact avec des pièces sous tension.
C
Attention !
•Ne pas retourner la machine et ne pas la coucher sur ses flancs.
•Il est conseillé de conserver toutes les protections qui devront être remontées en cas de transport de l’appareil.
5

FR
2.2 POSITIONNEMENT ET MISE DE NIVEAU
1.Placer l'appareil à l'endroit choisi.
2.Niveler l'appareil au sol dans toutes les directions avec le niveau à bulle et régler, si nécessaire, la hauteur des pieds. Après réglage, bloquer les pieds avec les contreécrous appropriés.
3.En présence des pieds réglables arrière, faire attention que, dans la partie arrière, l'appareil ne pose pas sur les pieds mais sur les patins prévus. Vérifier, avant d'encastrer l'appareil dans la cuisine, que les pieds arrière soient complètement vissés pour éviter leur endommagement pendant la mise en place.
Après avoir encastré l’appareil dans la cuisine, lever les pieds arrière pour éviter que l'appareil pose sur les patins. Après avoir levé les pieds arrière, mettre l'appareil de niveau et fixer les pieds avant.
Les tuyaux pour l'arrivée et l'évacuation de l'eau peuvent être orientés vers la droite ou vers la gauche pour permettre une bonne installation.
Attention !
•Exécuter cette opération avec le plus grand soin pour éviter des vibrations bruyantes ou des déplacements du lave-linge en cours de fonctionnement.
•Si l'appareil est posé sur un sol recouvert de moquette, veiller à ce que les ouvertures dans la partie inférieure du lave-linge ne soient pas bouchées.
•S'assurer aussi que pendant le fonctionnement, le lave-linge n'appuie pas contre des murs, des parois, des meubles, etc.
•L'appareil ne doit pas être installé derrière une porte blocable, porte coulissante ou une porte avec charnière dans la partie opposée.
6
FR
2.3 ALIMENTATION EN EAU
1.La pression de l'eau doit être comprise entre les valeurs suivantes : 0,05-0,9MPa. Si la pression est supérieure, installer un réducteur de pression.
2.Raccorder le tuyau d'alimentation en eau froide (bague de couleur bleue) au robinet d'eau froide à embout fileté ¾ gaz, en ayant soin de le visser à fond pour éviter des fuites. Le tuyau d'arrivée de l'eau ne doit être ni plié ni écrasé et ne doit pas être changé ou coupé. Les filetages doivent être serrés exclusivement à la main.
3.S'il y a l’alimentation en eau chaude, la température de l'eau ne doit pas être supé-
rieure à 60°C et le tuyau à embout de couleur rouge doit être raccordé au robinet d'eau chaude.
Attention !
•Si le raccordement est effectué avec des tuyauteries neuves ou qui n'ont pas été utilisées depuis très longtemps, faire couler une certaine quantité d'eau avant d'introduire le tuyau d'évacuation. On évite ainsi des dépôts de sable ou d'autres impuretés qui pourraient obstruer les filtres fournis en équipement afin de protéger les vannes d'arrivée d'eau.
•Le nouveau tuyau d'alimentation fourni doit être utilisé mais pas le vieux tuyau.
2.4 VIDANGE
1.Enfiler l'extrémité du tuyau de vidange dans un conduit d'évacuation d'un diamètre interne minimum de 4 cm à une distance du sol comprise entre 50 et 90 cm, ou bien l'accrocher (utiliser le support en plastique sur le coude du tuyau) à un évier ou à une baignoire.
2.Contrôler que l'extrémité du tuyau de vidange soit bien fixée pour empêcher que la force répulsive de l'eau puisse le déplacer de sa position.
Attention !
•Pour faciliter l'écoulement de l'eau, éviter que les tuyaux présentent des pliures ou des étranglements.
•L'éventuel tuyau de rallonge ne doit pas dépasser 1 mètre, il doit avoir le même diamètre interne que le tuyau de vidange et ne doit pas présenter d'étranglements.
•L'extrémité du tuyau de vidange ne doit absolument pas être plongée dans l'eau.
2.5 ALIMENTATION ÉLECTRIQUE
Avant de brancher la fiche dans la prise de courant, contrôler que :
1.La valeur de la tension d'alimentation de l'installation électrique corresponde à la valeur indiquée sur la plaquette des caractéristiques placée devant, dans la zone visible avec le hublot ouvert. La valeur de la puissance et les fusibles nécessaires sont indiqués sur la plaquette.
2.Le compteur, les soupapes de limitation, la ligne d'alimentation et la prise de courant soient dimensionnés pour supporter la charge maximale demandée, indiquée sur la plaquette des caractéristiques.
3.La prise de courant et la fiche fournies en équipement soient compatibles entre elles sans l’interposition de réducteurs, prises multiples, adaptateurs variés, et rallonges qui pourraient provoquer des échauffements ou des brûlures.
Si la prise de courant n'est pas compatible avec la fiche fournie, remplacer la prise par un type plus approprié.
Attention
•La fiche devra être accessible après l’installation.
•La mise à la terre de l'appareil est absolument nécessaire. Introduire la fiche dans une prise de courant munie d'une mise à la terre efficace.
Notre société décline toute responsabilité pour d'éventuels dommages matériels et corporels dérivant du branchement manqué ou défectueux à la ligne de terre. Un branchement électrique correct garantit une sécurité maximum.
7
FR
•Cet appareil est conforme aux prescriptions de la directive 89/336/CEE du 3.5.89 (y compris la directive de modification 92/31/CEE) relative à l'élimination de perturbations radioélectriques.
•Si le câble d'alimentation est endommagé, il doit être remplacé par une pièce d'origine, disponible auprès du SAV.
•Ne pas brancher/débrancher la fiche d'alimentation de la prise avec les mains mouillées
•Extraire la fiche d'alimentation de la prise uniquement en saisissant directement la fiche et non pas le câble.
3.DESCRIPTION DES COMMANDES
3.1 PANNEAU DES COMMANDES
Toutes les commandes et tous les contrôles de l’appareil sont réunis sur le bandeau frontal.
Afficheur : il visualise les paramètres (vitesse d'essorage, cycles, flexi time, activation protection enfants, charge maximale conseillée). Les paramètres sont modifiables avec les touches cidessous.
Touches (de gauche à droite) : |
Touche Marche/Pause: |
Sélection vitesse d'essorage |
Pour faire partir et arrê- |
Sélection option |
ter les cycles. |
Confirmation option |
|
Départ différé |
|
Child Lock |
|
Sélecteur des programmes
Pour allumer et éteindre le lavelinge et sélectionner les programmes. Rotation possible dans les deux directions. Le sélecteur ne tourne pas pendant l'exécution des programmes.
8
FR
4.UTILISATION DE LA MACHINE
4.1PRÉPARATION DU LINGE
1.En premier lieu, trier le linge à laver en séparant les pièces selon le genre de tissu et la solidité des couleurs.
2.Laver séparément le blanc et les couleurs. La première fois, il est conseillé de laver les vêtements neufs de couleur à part. Normalement, sur les vêtements une étiquette reporte les indications utiles pour leur lavage. Ci-dessous, nous donnons une brève description des symboles de ces étiquettes.
|
LAVAGE |
|
BLANCHISSAGE |
|
|
|
|
|
|
|
|
|
Programme normal à 90°C |
|
|
|
|
|
|
|
|
|
|
|
Programme normal à 60°C |
Traitement de chlorage permis |
Traitement de chlorage proscrit |
||
|
|
|
REPASSAGE |
|
|
|
|
|
|
|
|
|
Programme normal à 40°C |
À température |
À température |
À température |
|
|
|
Ne pas repasser |
|||
|
Programme normal à 30°C |
||||
|
élevée |
moyenne |
basse |
||
|
|
||||
|
|
|
|
|
|
|
|
|
NETTOYAGE À SEC |
|
|
|
|
|
|
|
|
|
Programme modéré à 60° |
|
|
|
|
|
|
|
|
Exclusivement |
|
|
Programme modéré à 40°C |
Tous les solvants |
Tous solvants |
Ne pas nettoyer |
|
|
|
les solvants |
|||
|
Programme très modéré à |
sauf le trichlo- |
|||
|
usuels |
pétroliers et |
à sec |
||
|
réthylène |
||||
|
30°C |
|
R113 |
|
|
|
|
|
|
||
|
|
SÉCHAGE EN TAMBOUR APRÈS LAVAGE |
|||
|
Lavage à la main |
|
|
|
|
|
|
À température |
|
|
|
|
Ne pas laver |
À température inférieure à 60°C |
Ne pas sécher |
||
|
|
élevée |
|
|
|
Attention !
•Éviter le lavage de linge non ourlé ou déchiré car il pourrait s'effilocher.
•Les corps étrangers peuvent endommager les vêtements ou les composants du lave-linge. Par conséquent : vider et retourner les poches, enlever les roulettes des rideaux ou les mettre dans un sac en filet.
•Laver les pièces très petites (ceintures, mouchoirs, chaussettes, soutiens-gorge push-up, etc.) en les mettant dans un sac en toile blanche, fermer les automatiques, les fermetures éclair, coudre les boutons mal fixés.
•L’emploi des détergents modernes et la juste température de lavage suffisent généralement pour éliminer les taches des tissus. Toutefois, certaines taches difficiles (herbe, fruits, œuf, sang, rouille, stylo, etc.) devraient être prétraitées avant le lavage. Selon le type de tissu, il existe dans le commerce de nombreux produits pour le traitement des taches. Toutefois, il est conseillé de nettoyer ou de diluer les taches immédiatement, parce que plus elles sont vieilles plus elles sont difficiles à enlever.
•Si l'on n'observe pas les symboles de traitement des tissus, le linge peut s'abîmer.
Laine – Seule la laine marquée pure laine vierge identifiée par la marque  ou avec l'étiquette << traitée infeutrable lavable en lave-linge séchant >> peut être lavée en machine dans le programme spécifique, il est préférable de laver à la main ou à sec les autres types de laine.
4.2 OUVERTURE DU HUBLOT
La machine a été équipée d'un dispositif de sécurité qui empêche l'ouverture du hublot au cours du programme.
1.Contrôler que l'eau ait été complètement évacuée de la cuve et que le tambour soit arrêté.
Attention !
•En cas d'interruption du programme de lavage, attendre de 3 à 15 minutes en fonction de la température interne atteinte par la machine.
Attention !
L'eau peut être bouillante si le lavage a été fait à des températures élevées.
S'il y a encore de l'eau à l'intérieur du tambour, éviter d'ouvrir la porte du hublot !
4.3 CHARGEMENT DU LINGE
Autant que possible, afin d'économiser de l'énergie électrique, faire un chargement complet pour les différents types de tissu. Introduire le linge sans le tasser en alternant les grandes pièces et les petites. Les premières fois, peser le linge ensuite l'expérience acquise sera suffisante.
9

FR
4.4INTRODUCTION DU LINGE
1.Ouvrir le hublot et introduire le linge dans la cuve en le distribuant uniformément, bien ouvert et non pas tassé ; si possible, mélanger les grandes pièces et les petites.
2.Le lave-linge, accompagné du présent manuel, peut être chargé jusqu'à un maximum de 7kg de linge pour chaque lavage. Si l'on met plus de linge, on aura des résultats de lavage non satisfaisants et des dysfonctionnements possibles de la machine.
3.Pour économiser de l'énergie, compléter la charge pour les différents types de tissu en respectant les quantités reportées dans le « Tableau des programmes » fourni avec ce manuel.
4.Fermer la porte en la poussant contre le bâti jusqu'à ce que l'on entende le déclic de la serrure. Faire attention que le linge ne reste pas pris entre le hublot et le joint en caoutchouc.
Attention !
•Si la porte n'est pas bien fermée, un dispositif de sécurité empêche la mise en marche du lave-linge.
•Ne pas dépasser la capacité maximum de chargement : un chargement excessif ne donne pas de bons résultats de lavage.
4.5 INTRODUCTION DU DÉTERGENT ET DES ADDITIFS
Le bac interne est composé de trois compartiments portant les symboles
détergent pour prélavage
détergent pour lavage
 pour l'adoucissant, amidon, additifs, etc (ex. produits pour le traitement). Les produits additifs sont introduits automatiquement dans la cuve de lavage pendant le dernier rinçage.
Dans le compartiment de lavage, une languette permet d'utiliser le détergent liquide. Pour cela, la tirer vers l'avant puis la baisser.
En suivant les indications du « Tableau des programmes » fourni avec ce manuel, introduire avant le début du programme, dans le bac, le détergent et les éventuels produits additifs.
Le niveau des liquides ne doit pas dépasser l’indication maximum, dans le cas contraire, les compartiments se videraient trop vite.
Avant de verser les additifs denses dans le compartiment prévu, les diluer avec un peu d'eau pour empêcher que le siphon s'obstrue.
N'utiliser que des détergents qui produisent peu de mousse et appropriés à une utilisation dans un lave-linge.
Déterminer la quantité de détergent selon la dureté de l'eau, le type et la quantité de linge chargée et son degré de salissure.
On obtiendra ainsi le résultat désiré et une consommation optimale de détergent.
Sur les emballages des détergents le dosage est indiqué selon 4 niveaux de dureté et pour une quantité de linge de 4-5 kg normalement sale.
Demander les informations relatives au degré de dureté de l'eau à la compagnie locale de distribution d'eau.
Dureté de l'eau |
|
|
|
|
Niveau de dureté |
Degrés français fH |
Degrés allemands dH |
|
|
|
|
|
Douce |
Jusqu'à 15° |
Jusqu'à 8° |
|
Moyenne |
15° - 25° |
8° - 14° |
|
|
|
|
|
Dure |
25° - 40° |
14° - 22° |
|
|
|
|
|
Très dure |
Plus de 40° |
Plus de 22° |
10

FR
4.6 DOSAGE DES DÉTERGENTS EN POUDRE
Linge normalement sale
1.Choisir un programme sans prélavage.
2.Introduire la quantité totale de détergent indiquée sur les emballages dans le compartiment lavage du bac à détergent.
Linge très sale
1.Choisir un programme avec prélavage.
2.Introduire ¼ de la quantité de détergent conseillée dans le compartiment prélavage du bac à détergent et ¾ du détergent dans le compartiment lavage.
Attention !
•S'il n'y a pas les indications de dosage pour le linge délicat en fibre synthétique, doser de ½ jusqu'à 2/3 de la quantité indiquée pour le lavage des tissus résistants en coton.
•Pour le programme laine, il est recommandé de n'utiliser que des détergents neutres pour la laine.
•Doser selon les indications données par le producteur du détergent.
4.7 DOSAGE DE DÉTERGENTS LIQUIDES
1.Verser, dans le doseur fourni avec le détergent liquide, la dose indiquée et la verser dans la cuve ; ou utiliser le compartiment lavage du bac à détergent, en mettant l'insert prévu.
2.La graduation sur l'insert rouge sert pour le dosage du détergent liquide.
Attention !
•Les détergents liquides peuvent être utilisés à la dose prévue par le producteur uniquement pour le lavage principal, c'est-à-dire dans tous les programmes sans prélavage.
4.8 ADOUCISSEURS
Les adoucisseurs peuvent être ajoutés en suivant les indications des producteurs dans les compartiments prélavage et lavage.
Introduire dans les compartiments d'abord le détergent puis l'adoucisseur.
4.9 PROGRAMMES ET FONCTIONS
Pour la sélection des programmes selon le type de tissu, consulter le « Tableau des programmes » fourni avec ce manuel (À l'intérieur de la valise d'accessoires).
11
 Loading...