


Teka IQX 635, IRX 635, IQX 645, TRX 635, IRX 645 User Manual
...INSTALLATION INSTRUCTIONS AND
USE AND MAINTENANCE RECOMMENDATIONS
INDUCTION AND VITROCERAMIC HOBS
EINBAU-ANLEITUNG
UND EMPFEHLUNGEN FÜR GEBRAUCH UND INSTANDHALTUNG
INDUKTIONSKOCHFELD
INSTRUCTIONS POUR L'INSTALLATION
ET RECOMMANDATIONS D'UTILISATION ET MAINTENANCE
PLANS DE TRAVAIL DE CUISSON PAR
INDUCTION ET VITROCÉRAMIQUES
INDUKCIÓS ÉS ÜVEGKERÁMIA FŐZŐLAPOS TÜZHELYEK BESZERELÉSI, HASZNÁLATI ÉS KARBANTARTÁSI
JAVASLATOKAT TARTALMAZÓ ÚTMUTATÓJA
TRX 645 - TRX 635 - IRX 645
IRX 635 - IQX 645 - IQX 635
2

Contents / Inhalt / Table des matières / / Tartalomjegyzék
GB |
|
|
|
DE |
|
|
Introduction |
Page 6 |
|
Allgemeines |
6 |
||
User Guide |
14 |
|
Bedienungsanleitung |
35 |
||
Installation
Positioning the hobs Fixing the hob Connecting the electricity
Technical information
Dimensions and characteristics
15 |
Einbau |
36 |
15 |
Einbauort |
36 |
16 |
Verankerung |
37 |
17 |
Netzanschluss |
38 |
18 |
Technische Angaben |
39 |
Abmessungen und Eigenschaften |
39 |
|
18 |
|
|
|
|
|
|
Bedienung und Pflege |
40 |
|
|
Use and Maintenance |
19 |
||||
|
|
Maßnahmen vor Inbetriebnahme |
40 |
|||
|
Special requirements before |
|
|
Sensorbedienung |
40 |
|
|
first use |
19 |
|
|
Kindersicherung |
42 |
|
Touch Control Panel |
|
|
|
Stopp-Funktion |
43 |
|
User Instructions |
19 |
|
|
Zweiund Dreikreis-Kochzonen |
44 |
|
Locking the sensor buttons of |
|
|
|
Energieverbrauch |
44 |
|
the hob |
21 |
|
|
Topferkennung |
44 |
|
Stop function |
22 |
|
|
Erinnerungsfunktion |
45 |
|
Double or triple circuit hotplates |
22 |
|
|
Ankochautomatik |
45 |
|
Energy supplied according to |
|
|
|
Warmhaltefunktion |
46 |
|
the power level chosen |
23 |
|
|
Power-Funktion |
47 |
|
Cookware detection |
23 |
|
|
Sicherheitsabschaltung |
47 |
|
Recovery function |
23 |
|
|
Zeitschaltung (Timer) |
48 |
|
Heat-up function |
24 |
|
|
Stoppuhr |
49 |
|
Keep warm function |
25 |
|
|
Überhitzungsschutz |
49 |
|
Power function |
25 |
|
|
Verhalten bei Überspannung |
49 |
|
Safety disconnection |
26 |
|
|
Hinweise und Empfehlungen |
49 |
|
Timer function |
26 |
|
|
Reinigung und Pflege |
50 |
|
Using the clock as a countdown |
|
|
|
|
|
|
|
|
|
Störungsbehebung |
53 |
|
|
chronometer |
27 |
|
|
||
|
Safety against overheating |
27 |
|
|
|
|
|
|
|
|
|
||
|
Power surges |
28 |
|
|
|
|
|
Suggestions and recommendations |
28 |
|
|
|
|
|
Cleaning and care |
29 |
|
|
|
|
|
|
|
|
|
|
|
|
If something doesn't work |
32 |
|
|
|
|
|
|
|
|
|
|
|
3

FR
|
Présentation |
6 |
|
Guide d'utilisation |
56 |
|
|
|
|
Installation |
57 |
|
Emplacement des plans de travail |
|
|
de cuisson |
57 |
|
Ancrage du plan de travail de cuisson |
58 |
|
Connexion électrique |
59 |
|
|
|
|
Information technique |
60 |
|
Dimensions et caractéristiques |
60 |
|
|
|
|
Utilisation et Maintenance |
61 |
|
Conditions particulières avant la |
|
|
mise en service |
61 |
|
Instructions d'utilisation de la |
|
|
commande tactile |
61 |
|
Blocage des capteurs du plan de |
|
|
travail de cuisson |
63 |
|
Fonction Stop |
64 |
|
Plaques de double et triple circuit |
64 |
|
Énergie fournie selon le niveau |
|
|
de puissance sélectionné |
65 |
|
Détection des récipients |
65 |
|
Fonction de Récupération |
65 |
|
Force de cuisson |
66 |
|
Fonction pour maintenir chaud un |
|
|
récipient |
67 |
|
Fonction Power |
67 |
|
Déconnexion de sécurité |
68 |
|
Fonction minuterie |
69 |
|
L'horloge comme chronomètre |
|
|
à rebours |
69 |
|
Sécurité de surchauffes |
70 |
|
Surtensions du réseau |
70 |
|
Suggestions et recommandations |
70 |
|
Nettoyage et conservation |
71 |
|
|
|
|
Si quelque chose ne fonctionne pas |
74 |
|
|
|
4

HU
|
Termékismertető |
6 |
|
Használati útmutató |
123 |
|
|
|
|
Beszerelés |
124 |
|
A főzőlap elhelyezése |
124 |
|
A főzőlap rögzítése |
125 |
|
Elektromos kapcsolások |
126 |
|
|
|
|
Műszaki adatok |
127 |
|
Méretek és jellemzők |
127 |
|
|
|
|
Használat és karbantartás |
128 |
|
Az üzembe helyezés előtti |
|
|
speciális feltételek |
128 |
|
Utasítások az érintőgombos |
|
|
használathoz |
128 |
|
A főzőlap érzékelőinek a |
130 |
|
blokkolása |
|
|
Stop funkció |
131 |
|
Kétkörös és háromkörös főzőlap |
131 |
|
A kiválasztott teljesítményszint |
132 |
|
szerinti energiaellátás |
|
|
A főzőedények érzékelése |
132 |
|
Visszaállítási funkció |
132 |
|
Forralás |
133 |
|
A főzőedény melegen tartására |
134 |
|
szolgáló funkció |
|
|
Power funkció |
134 |
|
Biztonsági kikapcsolás |
135 |
|
Időzítő funkció |
135 |
|
Visszaszámláló időmérő óra |
136 |
|
Túlmelegedés gátlás |
136 |
|
Hálózati túlfeszültség |
137 |
|
Ötletek és javaslatok |
137 |
|
Tisztítás és tárolás |
137 |
|
|
|
|
Ha valami nem működik |
141 |
|
|
|
5

Introduction / Allgemeines / Présentation /
Termékismertető
GB
Notes about the cookware to be used with your induction hob.
The size of the base of the cookware to be used should be large enough to completely cover the cooking zone drawn on the glass.
Depending on the type of cookware (material and size), the induction zones may work with smaller cookware.
Please remember that in order to work, the induction elements need to be used with cookware that has a ferromagnetic base (material attracted by a magnet).
 Always use cookware with a flat, smooth base on the induction elements. Using cookware with a deformed, concave or curved base can lead to overheating that can damage the glass or the cookware.
 Please take into account that the cookware that you use can greatly affect the how well the induction element works. You may find cookware on the market that, although marked as being suitable for induction hobs, does not work very well or is not easily recognised by the induction element due to the little amount or poor quality of the ferromagnetic material that the cookware has in its base.
DE
Hinweise zum Kochgeschirr
Der Boden des verwendeten Kochgeschirrs sollte die gesamte Fläche der auf der Glaskeramik gekennzeichneten Kochzone bedecken.
Dennoch kann ebenso Kochgeschirr kleineren Durchmessers verwendet werden, sofern Material und Größe des Geschirrs eine Magnetisierung erlauben.
Die Induktionszonen sind ausschließlich für Kochgeschirr mit ferromagnetischem Boden geeignet (magnetisierbares Material).
 Der Boden des Kochgeschirrs sollte glatt und vollkommen eben sein. Andernfalls können Geschirr und Glaskeramik durch Überhitzung beschädigt werden.
 Die Leistung der Induktionskochzonen hängt wesentlich von der Art des verwendeten Kochgeschirrs ab. Kochgeschirr für Induktionskochzonen wird vom Hersteller entsprechend gekennzeichnet, jedoch
ist dies keine Garantie dafür, dass das Geschirr vom Kochfeld erkannt wird oder dass die Leistung der Kochzonen effektiv ausgenutzt werden kann. Ausschlaggebend sind hier in jedem Fall Qualität und Menge des im Boden des Geschirrs verarbeiteten ferromagnetischen Materials.
FR
Notes sur les récipients à utiliser sur votre plan de travail à induction.
Le récipient à employer doit avoir un fond dont la dimension de fond couvre complètement la zone de cuisson qui figure sur la vitre.
Selon le type de récipient (matériel et dimension), les zones à induction peuvent fonctionner avec des récipients plus petits.
Il convient de tenir compte que les plaques à induction nécessitent pour fonctionner des récipients à fond ferromagnétique (matériau attiré par un aimant).
 Sur les plaques à induction, utilisez toujours des récipients à fond plat et lisse. L'emploi de récipients à fond déformé, concave ou ondulé provoque des surchauffes qui peuvent endommager la vitre ou le propre récipient.
 Il convient de tenir compte que le récipient que vous utilisez peut avoir une grande influence sur le rendement de toute plaque à induction. Il existe sur le marché des récipients qui, malgré le fait d'être signalé comme aptes pour l'induction, ont un rendement très faible ou des problèmes pour être reconnus par la plaque à induction, en raison de la légère quantité ou qualité du matériel ferromagnétique qu'a le fond du récipient.
RU
6

HU
Az indukciós főzőlaphoz használandó edényekről.
A főzőedény aljának akkorának kell lennie, hogy tökéletesen befedje az üvegkerámia főzőlapjára rajzolt kört.
Az edény típusától függően (anyag és méret) az indukciós zónák kisebb edényekkel is m?ködhetnek.
Vegye figyelembe, hogy az indukciós főzőlapokhoz ferromagnézium tartalmú edényekre van szükség (olyan anyag, amit vonz a mágnes).
 Az indukciós főzőlapokhoz mindig egyenes és sima aljú edényeket használjon. Az eldeformálódott, homorú vagy domború aljú edények használata túlmelegedéshez vezethet, ami rongálhatja az üvegkerámia
főzőlapot, és magát az edényt is.
GR
Vegye figyelembe, hogy az indukciós főzőlapok teljesítménye nagyban függhet az edény kiválasztásától. Léteznek olyan edények a piacon, amiket attól függetlenül, hogy úgy kerülnek forgalomba,mint az indukciós főzőlapokhoz megfelelő termékek, mégis kis teljesítményt nyújtanak, vagy az indukciós lap nehezen ismeri fel őket, ami annak tudható be, hogy az edény alján található ferromagnetikus anyag kis mennyiség ű vagy gyenge minőségű.
7
1 2
3 4
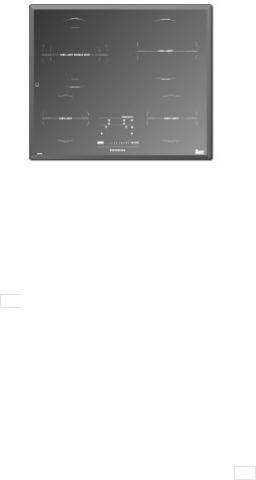
GB |
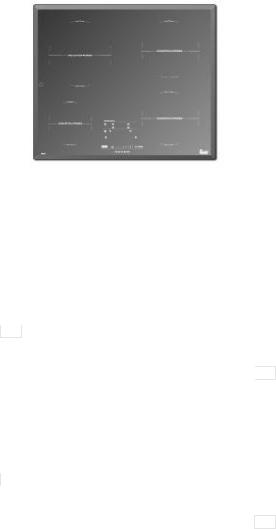
Model IRX 645 |
RU |
1 2,300 / 3,200* watt induction element
2 1,850 / 2,500* watt induction element
3 1,400 / 1,800* watt induction element
4 1,850 / 2,500* watt induction element
* Induction power with the Power function activated.
-Residual heat indicator. (H)
-Maximum induction power: 7,200 watts.
-Power supply voltage: 230 volts.
-Frequency: 50/60 hertz.
-Induction frequency: 20 to 60 kilohertz.
DE Modell IRX 645
1 Induktionskochzone mit 2 300 / 3 200* W
2 Induktionskochzone mit 1 850 / 2 500* W
3 Induktionskochzone mit 1 400 / 1 800* W GR 4 Induktionskochzone mit 1 850 / 2 500* W
* Induktionsleistung bei aktivierter Power-Funk- tion
-Restwärmeanzeige (H)
-Maximale Induktionsleistung: 7 200 W
-Betriebsspannung: 230 V
-Frequenz: 50/60 Hz
-Induktionsfrequenz: 20 - 60 kHz
FR Modèle IRX 645
1 Plaque à induction de 2 300 / 3 200* W 2 Plaque à induction de 1 850 / 2 500* W.
3 Plaque à induction de 1 400 / 1 800* W HU 4 Plaque à induction de 1 850 / 2 500* W.
* Puissance à induction avec la fonction Power activée.
-Indicateur de chaleur résiduelle. (H)
-Puissance maximum à induction : 7 200
Watts.
-Tension d'alimentation : 230 Volts.
-Fréquence : 50/60 Hertz.
-Fréquence induction : 20 à 60 Kilohertz.
8
2
1
3
GB |
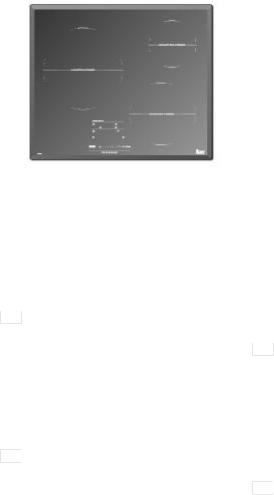
Model IRX 635 |
RU |
1 2,400 / 3,200* watt induction element
2 1,400 / 1,800* watt induction element
3 2,300 / 3,200* watt induction element
* Induction power with the Power function activated.
-Residual heat indicator. (H)
-Maximum induction power: 6,800 watts.
-Power supply voltage: 230 volts.
-Frequency: 50/60 hertz.
-Induction frequency: 20 to 60 kilohertz.
DE Modell IRX 635
1 Induktionskochzone mit 2 400 / 3 200* W
2 Induktionskochzone mit 1 400 / 1 800* W GR 3 Induktionskochzone mit 2 300 / 3 200* W
* Induktionsleistung bei aktivierter Power-Funk- tion
-Restwärmeanzeige (H)
-Maximale Induktionsleistung: 6 800 Watt
-Betriebsspannung: 230 Volt
-Frequenz: 50/60 Hz
-Induktionsfrequenz: 20 - 60 kHz
FR Modèle IRX 635
1 Plaque à induction de 2 400 / 3 200* W
2 Plaque à induction de 1 400 / 1 800* W HU 3 Plaque à induction de 2 300 / 3 200* W
* Puissance à induction avec la fonction Power activée.
-Indicateur de chaleur résiduelle. (H)
-Puissance maximum à induction : 6 800
Watts.
-Tension d'alimentation : 230 Volts.
-Fréquence : 50/60 Hertz.
-Fréquence induction : 20 à 60 Kilohertz.
9
1 2
3 4
GB |
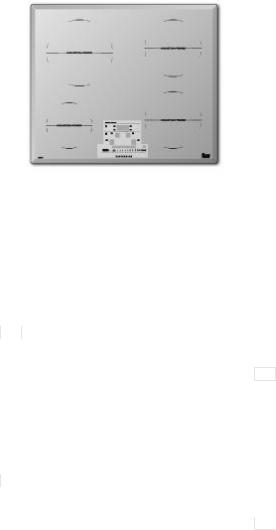
Model IQX 645 |
RU |
1 2,300 / 3,200* watt induction element
2 1,850 / 2,500* watt induction element
3 1,400 / 1,800* watt induction element
4 1,850 / 2,500* watt induction element
* Induction power with the Power function activated.
-Residual heat indicator. (H)
-Maximum induction power: 7,200 watts.
-Power supply voltage: 230 volts.
-Frequency: 50/60 hertz.
-Induction frequency: 20 to 60 kilohertz.
DE Modell IQX 645
1 Induktionskochzone mit 2 300 / 3 200* W
2 Induktionskochzone mit 1 850 / 2 500* W
3 Induktionskochzone mit 1 400 / 1 800* W GR 4 Induktionskochzone mit 1 850 / 2 500* W
* Induktionsleistung bei aktivierter Power-Funk- tion
-Restwärmeanzeige (H)
-Maximale Induktionsleistung: 7 200 W
-Betriebsspannung: 230 V
-Frequenz: 50/60 Hz
-Induktionsfrequenz: 20 - 60 kHz
FR Modèle IQX 645
1 Plaque à induction de 2 300 / 3 200* W 2 Plaque à induction de 1 850 / 2 500* W.
3 Plaque à induction de 1 400 / 1 800* W HU 4 Plaque à induction de 1 850 / 2 500* W.
* Puissance à induction avec la fonction Power activée.
-Indicateur de chaleur résiduelle. (H)
-Puissance maximum à induction : 7 200 Watts.
-Tension d'alimentation : 230 Volts.
-Fréquence : 50/60 Hertz.
-Fréquence induction : 20 à 60 Kilohertz.
10
2
1
3
GB |
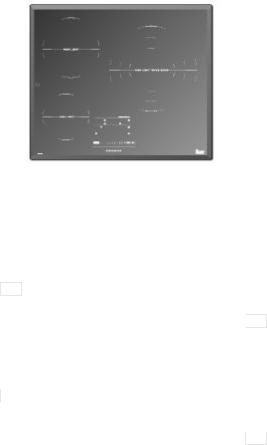
Model IQX 635 |
RU |
1 2,400 / 3,200* watt induction element
2 1,400 / 1,800* watt induction element
3 2,300 / 3,200* watt induction element
* Induction power with the Power function activated.
-Residual heat indicator. (H)
-Maximum induction power: 6,800 watts.
-Power supply voltage: 230 volts.
-Frequency: 50/60 hertz.
-Induction frequency: 20 to 60 kilohertz.
DE Modell IQX 635
1 Induktionskochzone mit 2 400 / 3 200* W
2 Induktionskochzone mit 1 400 / 1 800* W GR 3 Induktionskochzone mit 2 300 / 3 200* W
* Induktionsleistung bei aktivierter Power-Funk- tion
-Restwärmeanzeige (H)
-Maximale Induktionsleistung: 6 800 Watt
-Betriebsspannung: 230 Volt
-Frequenz: 50/60 Hz
-Induktionsfrequenz: 20 - 60 kHz
FR Modèle IQX 635
1 Plaque à induction de 2 400 / 3 200* W
2 Plaque à induction de 1 400 / 1 800* W HU 3 Plaque à induction de 2 300 / 3 200* W
* Puissance à induction avec la fonction Power activée.
-Indicateur de chaleur résiduelle. (H)
-Puissance maximum à induction : 6 800
Watts.
-Tension d'alimentation : 230 Volts.
-Fréquence : 50/60 Hertz.
-Fréquence induction : 20 à 60 Kilohertz.
11
1
2
3
GB |
Model TRX 635 |
RU |
1 1,800 watt induction element
2 1,050/1,950/2,700 watt induction element
3 1,200 watt induction element
-Residual heat indicator (H).
-Maximum power: 5,700 watts.
-Power supply voltage: 230 volts.
-Frequency: 50/60 hertz.
DE Modell TRX 635
1 Blitzkochzone 1 800 W
2 Blitzkochzone 1 050/1 950/2 700 W GR
3 Blitzkochzone 1 200 W
-Restwärmeanzeige (H)
-Maximale Leistung: 5 700 W
-Betriebsspannung: 230 V
-Frequenz: 50/60 Hz
FR Modèle TRX 635
1 |
Plaque radiante de 1 |
800 |
W. |
|
2 |
Plaque radiante de 1 |
050/1 950/2 700 W. |
|
|
3 |
Plaque radiante de 1 |
200 |
W |
HU |
-Indicateur de chaleur résiduelle (H).
-Puissance maximum : 5 700 Watts.
-Tension d'alimentation : 230 Volts.
-Fréquence : 50/60 Hertz.
12
1 2
3 4
GB |
Model TRX 645 |
RU |
1 1,400/2,000 watt induction element
2 1,800 watt induction element
3 1,200 watt induction element
4 1,200 watt induction element
-Residual heat indicator (H).
-Maximum power: 6,200 watts.
-Power supply voltage: 230 volts.
-Frequency: 50/60 hertz.
DE Modell TRX 645
1 |
Blitzkochzone 1 400/2 000 W |
|
|
2 |
Blitzkochzone 1 800 W |
|
|
3 |
Blitzkochzone 1 200 W |
GR |
|
4 |
Blitzkochzone 1 200 W |
|
|
|
- Restwärmeanzeige (H) |
|
|
|
- Maximale Leistung: 6 200 W |
|
|
|
- Betriebsspannung: 230 V |
|
|
|
- Frequenz: 50/60 Hz |
|
|
|
Modèle TRX 645 |
|
|
FR |
|
||
1 |
Plaque radiante de 1 400/2 000 W. |
|
|
2 |
Plaque radiante de 1 800 W. |
|
|
3 |
Plaque radiante de 1 200 W. |
|
|
4 |
Plaque radiante de 1 200 W. |
HU |
|
- Indicateur de chaleur résiduelle (H). - Puissance maximum : 6 200 Watts. - Tension d'alimentation : 230 Volts.
- Fréquence : 50/60 Hertz.
13

GB Guide to Using the Instructions Booklet
Dear Customer, |
brand ovens. |
We are delighted that you have put your trust in us.
We are confident that the new hob that you have purchased will fully satisfy your needs.
This modern, functional and practical model has been manufactured using topquality materials that have undergone strict quality controls throughout the manufacturing process.
Before installing and using it, please read this Manual carefully and follow the instructions closely; this will guarantee better results when using the appliance.
Keep this Instruction Manual in a safe place so that you can refer to it easily and thus abide by the Guarantee conditions.
In order to benefit from this Guarantee, it is essential that you submit the purchase receipt together with the Guarantee certificate.
 You should keep the Guarantee Certificate or, where relevant, the technical datasheet, together with the Instruction Manual for the duration of the useful life of the appliance. It has important technical information about the appliance.
Safety Instructions
Before first use, you should carefully read the installation and connection instructions.
These hob models may be installed in the same kitchen furniture units as TEKA
For your safety, installation should be carried out by an authorised technician and should comply with existing installation standards. Likewise, any internal work on the hob should only be done by TEKA's technical staff, including the change of the flexible supply cable of the appliance.
Attention:
 When the heating elements are being used or have recently been used, some areas will be hot and can burn. Children should be kept well away.
 If the glass ceramic breaks or cracks, the hob should immediately be disconnected from the electric current in order to avoid the risk of electric shock.
 Do not leave any objects on the cooking zones of your hob while it is not in use. Prevent possible fire risks.
 Metallic objects such as knives, forks, spoons or lids should not be placed on the hob surface.
 If you are frying oil, keep an eye on the cooking as the induction hobs heat up very quickly and they could ignite.
 Never try to put out the flame with water! Use a lid, a plate or similar device to cover the recipient and mitigate the flame.
14

Installation
INSTALLATION AND SETUP SHOULD BE CARRIED OUT BY AN AUTHORISED TECHNICIAN ACCORDING TO CURRENT INSTALLATION STANDARDS.
Positioning the hobs
To install these models, an opening with the dimensions shown in figure 1 should be cut into the unit's worktop.
The system for fixing the hob is intended for use with kitchen units with a thickness of 20, 30 and 40 mm.
The minimum distance between the surface of the hob and the lower part of the kitchen unit or the hood located above the hob should be 650 mm. If the hood's installation instructions recommend that the gap is greater than this, you should follow this advice.
The unit where the hob and oven will be located should be suitably fixed.
INSTALLATION WITH A CUTLERY DRAWER OR LOW CUPBOARD
If you wish to have a cupboard or cutlery drawer beneath the hob, you should install a separation board between them. The board should be installed 20 mm below the bottom of the hob and an empty space of at least 20 mm should be left at the back of the cupboard (fig. 1).
This will prevent accidental contact with the hot surface of the body of the vitroceramic plates underneath the appliance. (Fig. 1)
 Make sure that you do not keep objects in the drawer that could obstruct the fans of the hob or materials that may be flammable.
GB
|
fig. 1 |
Minimum distan- |
|
ce to walls |
|
Important: minimum ventilation distances
DRAWER
THERMOVENTI-
LATED OVEN
Radiant element hobs:
DRAWER
Fitting holes
L |
W |
|
The dimensions L and W are in the table "Dimensions and characteristics" in the Technical Information section.
15
GB
INSTALLATION WITH A THERMOVENTI- |
|
|||
Fixing the hob |
||||
LATED OVEN UNDER THE HOB |
||||
The oven should be installed according to |
When the gap has been properly sized, |
|||
the corresponding manual. |
the gasket should be put on the lower side |
|||
|
|
|
of the glass. Silicone should not be |
|
If installing over a thermoventilated oven, |
applied between the glass and the unit |
|||
please remember that this hob has been |
worktop because if it becomes neces- |
|||
certified to work only with TEKA brand |
sary to remove the hob from its posi- |
|||
ovens. |
tion, the glass could break when trying |
|||
An opening of 20 mm should be made in |
to detach it. |
|||
|
||||
the back part of the kitchen unit so that |
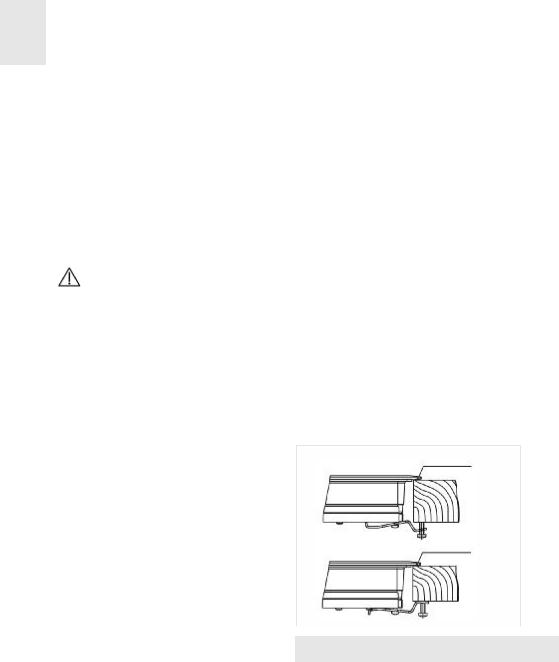
To fasten the cooking top to the kitchen |
|||
cold air is able to enter (see figure 1). |
unit, use four clips fastened to the existing |
|||
|
|
|
openings in the lower part of the body (two |
|
|
|
It is advisable not to use the |
in front and two in back). There are two |
|
induction hob during the pyrolitic clea- |
possible ways to position the clips, as can |
|||
ning function in the case of the pyrolitic |
be seen in figure 2. |
|||
ovens, due to the high temperature rea- |
|
|||
ched by this appliance. |
|
|||
 When hobs are handled before being installed, care should be taken in case there is any protruding part or sharp edge which could cause injury.
 When installing units or appliances above the hob, the hob should be protected by a board so that the glass cannot be damaged by accidental blows or heavy weight.
 The glues used in manufacturing the kitchen unit and on the decorative laminates and on the laminates that are part of the worktop surface should be made to tolerate temperatures of up to 100ºC.
 TEKA does not assume any responsibility for any malfunction or damage caused by faulty installation.
fig. 2 |
Sealing washer |
Sealing washer
Connecting the electricity
PLEASE REMEMBER THAT THE |
GUA- |
The electric connection is made using an |
RANTEE DOES NOT COVER |
THE |
omnipolar switch or plug, where accessi- |
GLASS IF IT SUFFERS A VIOLENT |
ble, that is suitable for the intensity to be |
|
BLOW OR IF IT IS USED IMPROPERLY. |
tolerated and that has a minimum gap of 3 |
|
16

GB
mm between its contacts. This will ensure disconnection in case of emergency or when cleaning the hob.
The connection should include correct earthing, in compliance with current norms.
If the flexible supply cable fitted to the appliance ever needs to be changed, it should be replaced by TEKA's official technical service.
The input cable should not be in contact either with the body of the hob or with the body of the oven, if the oven is installed in the same unit.
17
 Loading...