


 Loading...
3-198-123-14 (1)
 Stereo
 Turntable System
Owner’s Record
The model number and serial numbers are located at the rear. Record these numbers in the spaces provided below. Refer to these numbers whenever you call upon your Sony dealer regarding this product.
Model No. PS-LX300USB Serial No.________________
Operating Instructions
PS-LX300USB
© 2008 Sony Corporation

WARNING
To reduce the risk of fire or electric shock, do not expose this apparatus to rain or moisture.
To prevent fire, do not cover the ventilation of the apparatus with news papers, table-cloths, curtains, etc. And don’t place lighted candles on the apparatus.
To prevent fire or shock hazard, do not place objects filled with liquids, such as vases, on the apparatus.
Do not install the appliance in a confined space, such as a bookcase or built-in cabinet.
The unit is not disconnected from the AC power source (mains) as long as it is connected to the wall outlet, even if the unit itself has been turned off.
Install this system so that the power cord can be unplugged from the wall socket immediately in the event of trouble.
Notice for the customers in the U.S.A.
This symbol is intended to alert the user to the presence of uninsulated “dangerous voltage” within the product’s enclosure that may be
magnitude to constitute a risk of shock to persons.
This symbol is intended to alert the user to the presence of important operating and maintenance (servicing) instructions in the literature accompanying the appliance.
The Caution Marking is put on the Bottom Enclosure.
Important Safety Instructions
1)Read these instructions.
2)Keep these instructions.
3)Heed all warnings.
4)Follow all instructions.
5)Do not use this apparatus near water.
6)Clean only with dry cloth.
7)Do not block any ventilation openings. Install in accordance with the manufacturer’s instructions.
8)Do not install near any heat sources such as radiators, heat registers, stoves, or other apparatus (including amplifiers) that produce heat.
9)Do not defeat the safety purpose of the polarized or grounding-type plug. A polarized plug has two blades with one wider than the other. A grounding type plug has two blades and a third grounding prong. The wide blade or the third prong are provided for your safety. If the provided plug does not fit into your outlet, consult an electrician for replacement of the obsolete outlet.
10)Protect the power cord from being walked on or pinched particularly at plugs, convenience receptacles, and the point where they exit from the apparatus.
11)Only use attachments/accessories by the manufacturer.
12)Use only with the cart, stand, tripod, bracket, or table
by the manufacturer, or sold the apparatus. When a cart used, use caution when
the cart/apparatus combination to avoid injury from tip-over.
13)Unplug this apparatus during lightning storms or when unused for long periods of time.
14)Refer all servicing to qualified service personnel. Servicing is required when the apparatus has been damaged in any way, such as power-supply cord or plug is
damaged, liquid has been spilled or objects have fallen into the apparatus, the apparatus has been exposed to rain or moisture, does not operate normally, or has been dropped.
WARNING
This equipment has been tested and found to comply with the limits for a Class B digital device, pursuant to Part 15 of the FCC Rules. These limits are designed to provide reasonable protection against harmful interference in
a residential installation. This equipment generates, uses, and can radiate radio frequency energy and, if not installed and used in accordance with the instructions, may cause harmful interference to radio communications.
GB
However, there is no guarantee that interference will not occur in a particular installation. If this equipment does cause harmful interference
to radio or television reception, which can be determined by turning the equipment off and on, the user is encouraged to try to correct the interference by one or more of the following measures:
Reorient or relocate the receiving antenna.
Increase the separation between the equipment and receiver.
Connect the equipment into an outlet on a circuit different from that to which the receiver is connected.
Consult the dealer or an experienced radio/TV technician for help.
CAUTION
You are cautioned that any changes or modification not expressly approved in this manual could void your authority to operate this equipment.
If you have any questions about this product, you may call:
Sony Customer Information Services Center 1-800-222-7669
or http://www.sony.com/
Declaration of Conformity
Trade Name : SONY
Model Name : PS-LX300USB (Stereo
Turntable System)
Responsible Party : Sony Electronics Inc.
Address : 16450 W. Bernardo Dr, San Diego,
CA92127 USA
Telephone No. : 858-942-2230
This device complies with Part 15 of the FCC Rules. Operation is subject to the following two conditions. (1) This device may not cause harmful interference, and (2) this device must accept any interference received, including interference that may cause undesired operation.
Notice for the customers in Canada
This class B digital apparatus complies with Canadian ICES-003.
NOTICE FOR THE CUSTOMERS IN THE UNITED KINGDOM
A moulded plug complying with BS1363 is fitted to this equipment for your safety and convenience.
Should the fuse in the plug supplied need to be replaced, a fuse of the same rating as the supplied one and approved by ASTA or BSI to BS1362, (i.e., marked with or mark) must be used.
If the plug supplied with this equipment has a detachable fuse cover, be sure to attach the fuse cover after you change the fuse. Never use the plug without the fuse cover.
If you should lose the fuse cover, please contact your nearest Sony service station.
Notice for the customers in the countries applying EU Directives
The manufacturer of this product is Sony Corporation, 1-7-1 Konan Minato-ku Tokyo, 108-0075 Japan. The Authorized Representative for EMC and product safety is Sony Deutschland GmbH, Hedelfinger Strasse 61, 70327 Stuttgart, Germany. For any service or guarantee matters please refer to the addresses given in separate service or guarantee documents.
For the customers in Europe
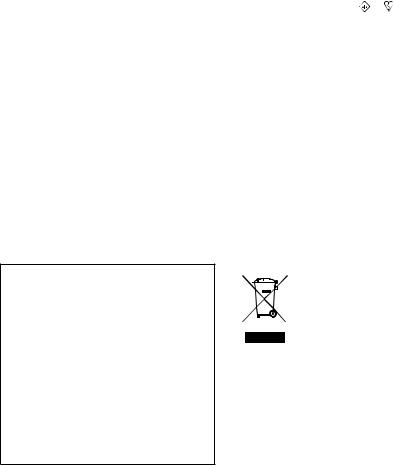
Disposal of Old Electrical
& Electronic Equipment (Applicable in the European
Union and other European countries with separate collection systems)
This symbol on the product or on its packaging indicates that this product shall not be treated as household waste. Instead it shall be handed over to the applicable collection point for the recycling of electrical and electronic equipment. By ensuring this product is disposed of correctly, you will help prevent potential negative consequences for the environment and human health, which could otherwise be caused by inappropriate waste handling of this product. The recycling of materials will help to conserve natural resources. For more detailed information about recycling of this product, please contact your local Civic Office, your household
waste disposal service or the shop where you purchased the product.
This equipment has been tested and found to comply with the limits set out in the EMC
Directive using a connection cable shorter than 3 meters.
GB

Table of Contents |
|
About This Manual.................................................... |
4 |
Getting Started |
|
Unpacking...................................................................... |
5 |
Assembling the Turntable..................................... |
5 |
Hooking Up the Turntable.................................... |
7 |
Operations |
|
Playing a Vinyl Record.............................................. |
8 |
Recording Audio Tracks on |
|
Your Computer............................................................ |
9 |
Additional Information |
|
Precautions.................................................................. |
13 |
Maintenance.............................................................. |
14 |
Troubleshooting...................................................... |
15 |
Specifications............................................................. |
18 |
Parts and Controls................................................... |
19 |
About This Manual
Thank you for purchasing the Sony Stereo Turntable System. Before operating the unit, please read this manual thoroughly and retain it for future reference.
IBM and PC/AT are registered trademarks of International Business Machines Corporation.
Microsoft, Windows and Windows Vista are either registered trademarks or trademarks of Microsoft Corporation in the United States and / or other countries.
In this manual, Microsoft® Windows® XP Home Edition and Microsoft® Windows® XP Professional are referred to as Windows XP.
In this manual, Microsoft® Windows Vista® Home Basic, Windows Vista® Home Premium, Windows Vista® Business, and Windows Vista® Ultimate are referred to as Windows Vista.
Sound Forge is a trademark or registered trademark of Sony Creative Software Inc. in the United States and other countries.
All other names of systems and products are trademarks or registered trademarks of their respective owners. TM and ® marks are omitted in this manual.
GB
Getting Started
Unpacking
Check that you received the following items with your turntable:
Platter (with drive belt) (1)
Rubber mat (1)
45 r/min adaptor (1)
USB cable (1)
CD-ROM, “Sound Forge Audio Studio LE” included (1)
Operating Instructions (this manual)
The installation guide for “Sound Forge Audio Studio LE”
Recording audio tracks of a vinyl record to your computer
Please read this first.
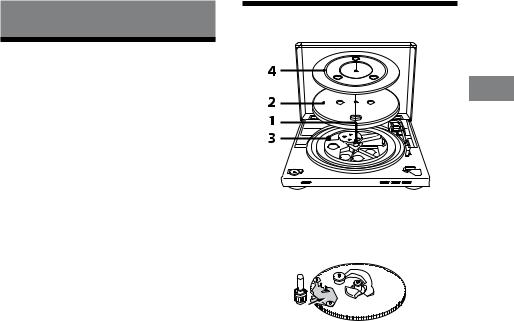
Assembling the Turntable
Started Getting
1 Move the metallic parts inside the larger gear in the direction of the arrow.
Continued
GB

2 Carefully place the platter on the spindle.
3 Using the ribbon, loop the drive belt around the motor pulley.
After looping the belt, do not forget to remove the ribbon.
4 Place the rubber mat on the platter.
Note
When the AC power cord is plugged after assembling or moving the turntable, the turntable sometimes rotates and the tone arm descends to the platter even if START is not pressed.
If this occurs, press STOP to return the tone arm to the arm stand.
To remove the dust cover
With the dust cover fully opened, grasp both sides of the cover, then remove it carefully.
Hinge pocket
Hinge
Tip
You can use the turntable leaving the dust cover removed. In that case, store the cover correctly.
To install the dust cover
Insert the hinge pockets on the dust cover into the hinges on the rear of the cabinet.
GB
Loading...