


PS2
3-076-132-11(1)
Instruction manual
Thank you for purchasing the PlayStation®2
computer entertainment system.
You can play PlayStation®2 format CD-ROM
and DVD-ROM discs, PlayStation® format CDROM discs, audio CDs and DVD video discs
with NTSC 1 designation with this system.
Before using this product, carefully read this
manual and retain it for future reference.
Mode d’emploi
Nous vous remercions d’avoir fait l’acquisition
du système de loisir interactif PlayStation®2.
Avec ce système, vous pouvez lire des disques
CD-ROM et DVD-ROM au format
PlayStation®2, des CD-ROM au format
PlayStation®, des CD audio et des disques
DVD vidéo de type NTSC 1.
Avant d’utiliser ce produit, lisez attentivement
ce mode d’emploi et conservez-le pour pouvoir
vous y reporter ultérieurememt.
English Français
US ➔ P.2
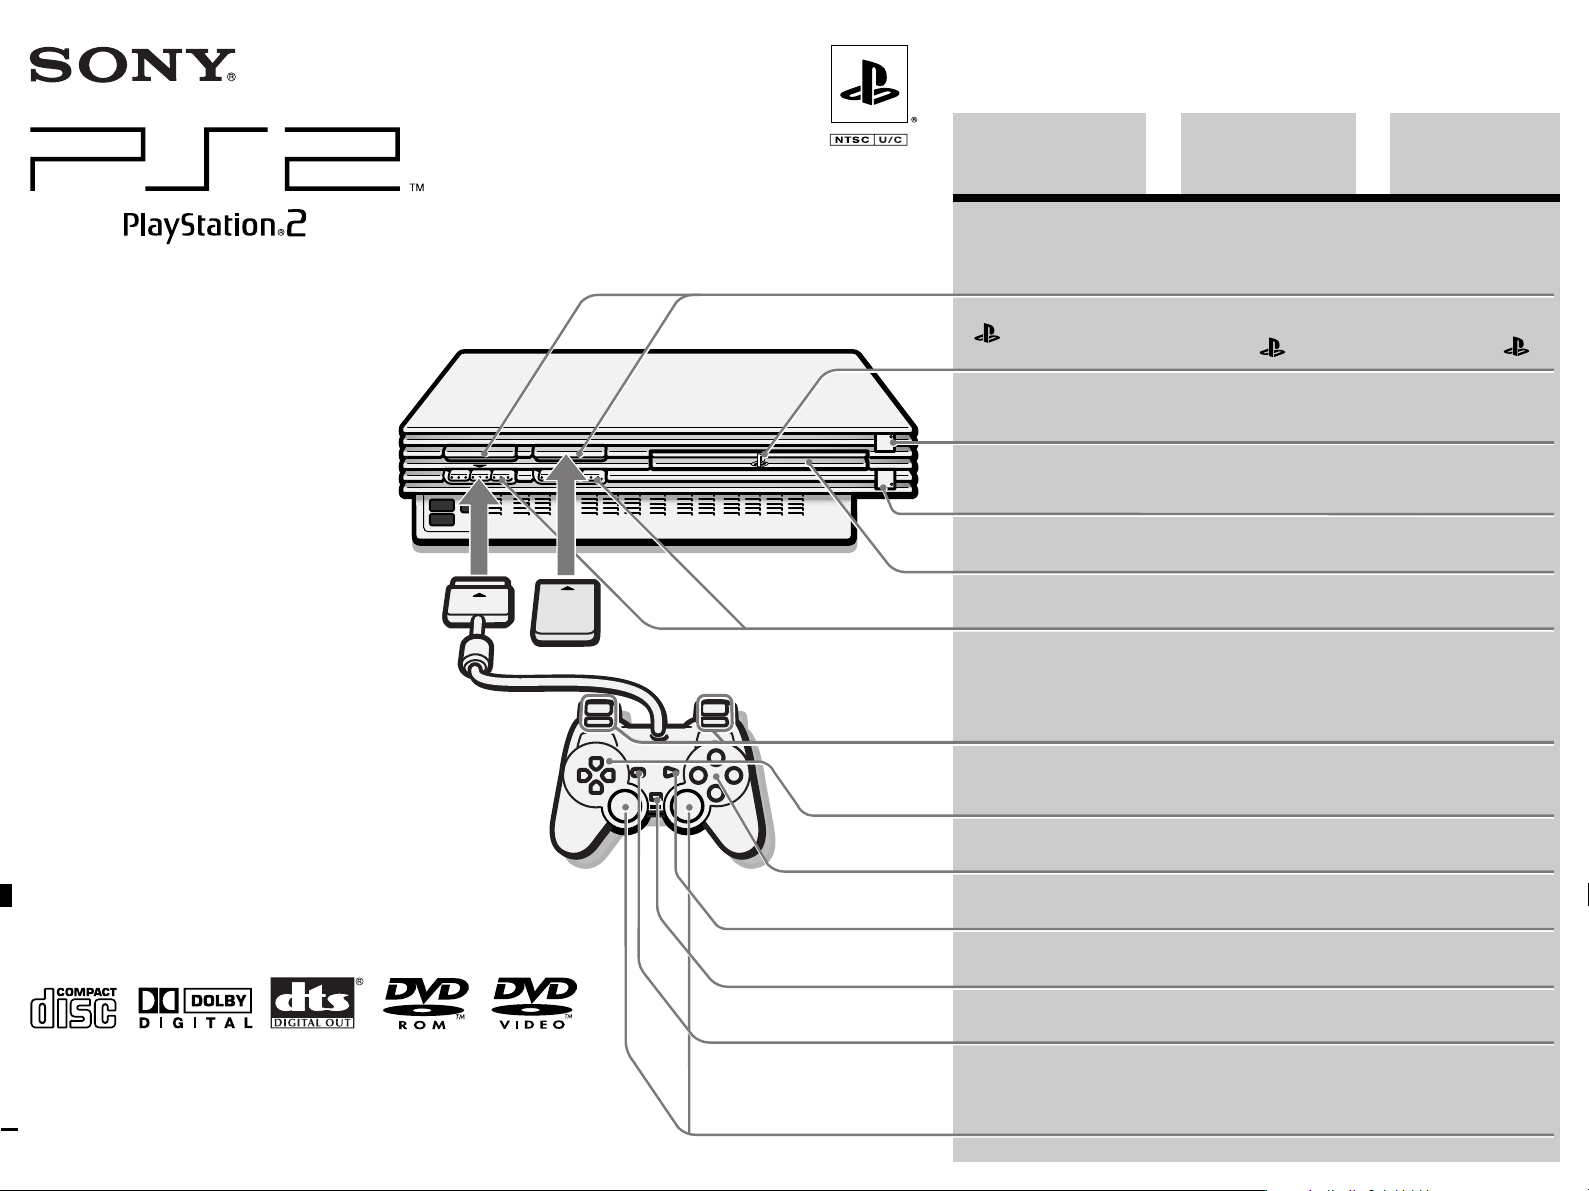
MEMORY CARD slots
” product family
“
logo
1 (standby)/RESET
button and 1 indicator
A (open) button and
A indicator
Disc tray
Controller ports
L2 button, R2 button,
L1 button, R1 button
Fentes pour MEMORY
CARD (carte mémoire)
Logo de la gamme de
produits “
Bouton 1 (veille)/
RESET et indicateur 1
Bouton A (ouvrir)
indicateur
Compartiment à
disque
Ports de manette
Touche L2, touche R2,
touche L1, touche R1
”
et
A
Español
ES ➔ P.46FR ➔ P.24
Ranuras para
MEMORY CARD
(tarjeta de memoria)
Logotipo de la familia
de productos “
Botón 1 /RESET
(espera/reinicio) e
indicador 1
Botón A (abrir) e
indicador A
Bandeja del disco
Puertos de control
Botón L2, botón R2,
botón L1, botón R1
”
Manual de instrucciones
Gracias por adquirir el sistema de
entretenimiento computarizado PlayStation®2.
Con este sistema, puede reproducir DVD-ROM
y CD-ROM de formato PlayStation®2, y CDROM de formato PlayStation®, y discos de
vídeo DVD, CD audio con la designación
NTSC 1.
Antes de utilizar este producto, lea
detenidamente este manual y consérvelo para
consultarlo en el futuro.
SCPH-39001 / 97004
© 2002 Sony Computer Entertainment Inc. All rights reserved.
Directional buttons
¢ , a , ✕ , s buttons
START button
ANALOG mode button
SELECT button
Left analog stick,
right analog stick,
L3 button, R3 button
Touches directionnelles
Touches ¢ , a , ✕ , s
Touche START
(de mise en marche)
Touche de mode
ANALOG (analogique)
Touche SELECT
(de sélection)
Manche analogique
gauche, manche
analogique droit,
touche L3, touche R3
Botones de dirección
Botones ¢ , a , ✕ , s
Botón START (inicio)
Botón modo ANALOG
(analógico)
Botón SELECT
(selección)
Joystick analógico
izquierdo, Joystick
analógico derecho,
botón L3 ,botón R3

2
WARNING
Precautions
To prevent fire or shock hazard, do not
expose the unit to rain or moisture.
To avoid electrical shock, do not disassemble.
Refer servicing to qualified personnel only.
Caution
The use of optical instruments with this
product will increase eye hazard. As the
laser beam used in this unit is harmful to
eyes, do not attempt to disassemble the
cabinet.
Refer servicing to qualified personnel only.
This label is located on the Laser protective housing inside
the enclosure.
This graphical symbol with supplemental marking is
located on the right surface of the unit (when it is in a
vertical position).
This symbol is intended to alert the user to the
presence of uninsulated “dangerous voltage”
within the product’s enclosure that may be of
sufficient magnitude to constitute a risk of
electric shock to persons.
This symbol is intended to alert the user to the
presence of important operating and
maintenance (servicing) instructions in the
literature accompanying the console.
Caution
TO PREVENT ELECTRIC SHOCK, MATCH
WIDE BLADE OF PLUG TO WIDE SLOT,
FULLY INSERT.
Information
For customers in the USA
This equipment has been tested and found to comply with
the limits for a Class B digital device, pursuant to Part 15
of the FCC rules. These limits are designed to provide
reasonable protection against harmful interference in a
residential installation. This equipment generates, uses,
and can radiate radio frequency energy and, if not
installed and used in accordance with the instructions,
may cause harmful interference to radio communications.
However, there is no guarantee that interference will not
occur in a particular installation. If this equipment does
cause harmful interference to radio or television reception,
which can be determined by turning the equipment off
and on, the user is encouraged to try to correct the
interference by one or more of the following measures:
– Reorient or relocate the receiving antenna.
Increase the separation between the equipment and receiver.
–
– Connect the equipment into an outlet on a circuit
different from that to which the receiver is connected.
– Consult the dealer or an experienced radio/TV
technician for help.
If you have questions about this product, call our
technical support line at 1-800-345-7669, or write to:
Sony Computer Entertainment America
Consumer Services/Technical Support
PO Box 5888, San Mateo, CA 94402-0888 U.S.A.
Declaration of Conformity
Trade Name : SONY
Model No. : SCPH-39001
Responsible Party : Sony Electronics Inc.
Address : 680 Kinderkamack Road
Telephone No. : 201-930-6972
This device complies with Part 15 of the FCC
Rules. Operation is subject to the following two
conditions: (1) This device may not cause harmful
interference, and (2) this device must accept any
interference received, including interference that
may cause undesired operation.
You are cautioned that any changes or modifications not
expressly approved in this manual could void your
authority to operate this equipment.
Oradell, NJ 07649 U.S.A.
Before operating your PlayStation®2 console
A very small percentage of individuals may experience
epileptic seizures when exposed to certain light patterns or
flashing lights. Exposure to certain patterns or backgrounds on a television screen or while playing video
games, including games played on the PlayStation
console, may induce an epileptic seizure in these
individuals. Certain conditions may induce previously
undetected epileptic symptoms even in persons who have
no history of prior seizures or epilepsy.
If you, or anyone in your family, has an epileptic condition,
consult your physician prior to playing. If you experience
any of the following symptoms while playing a video
game - dizziness, altered vision, eye or muscle twitches,
loss of awareness, disorientation, any involuntary
movement, or convulsions - IMMEDIATELY discontinue
use and consult your physician before resuming play.
2
®
Owner’s record
The model and serial numbers are located on the rear of the
PlayStation
the space provided below. Refer to these numbers
whenever you call for technical assistance at 1-800-345-7669.
Model No. SCPH-39001
Serial No. _______________________________
2 console. Record the appropriate number in
®
Do not expose the console to
cigarette smoke or dust
When setting up the PlayStation®2 console, avoid places
subject to excessive cigarette smoke or dust. Cigarette
smoke residue or dust build-up on internal components
such as the lens, may cause the console to malfunction.
Disc handling
• Do not leave discs near a heat source, in direct sunlight,
or in high humidity.
• Store discs in their cases when they are not being used.
Stacking discs or standing them at an angle without
putting them in their cases can cause the discs to warp.
• Do not touch the disc surface when handling a disc;
hold it by the edges.
• Do not stick paper or tape onto the disc.
• Do not write on the disc with a marker, etc.
• Fingerprints or dust on the disc can distort the picture
or reduce sound quality. Make sure discs are always
clean before use.
• Clean discs using a soft cloth, lightly wiping from the
center outwards.
• Do not use solvents such as benzine, commercially
available cleaners not intended for CDs or anti-static
spray intended for vinyl LPs as these may damage your
disc.
Do not place the console in an unusually hot
location
Do not leave the console in a car with its windows closed
(particularly in summer) as this may warp the exterior of
the console or cause the console to malfunction.
Moisture condensation
If the console or the disc is brought directly from a cold
location to a warm one, moisture may condense on the
lens inside the console or on the disc. Should this occur,
the console may not operate properly. In this case, remove
the disc and do not put the disc back in until the moisture
evaporates. (This could take several hours.) If the console
still does not operate properly, call 1-800-345-7669 for
technical assistance.
Do not subject the console to violent
physical shock
Do not throw or drop the console or its accessories, and do
not knock the console or its accessories against other
objects. When carrying the console, do not subject it to any
type of violent physical shock. This may damage the disc
or cause the console to malfunction.
Avoid damaging the exterior of the console
Do not apply any solvents, and do not place any rubber or
vinyl materials on the surface of the console for an
extended period of time. Doing so may damage the plastic
surface or cause the paint to peel off.
Cleaning the vents
Dust can accumulate in both the front and rear vents of the
PlayStation
and remove any accumulated dust with a low-powered
vacuum cleaner.
®2 console. Check the vents from time to time
Cleaning the exterior of the console
When cleaning the exterior of the console, be sure to turn
the power off with the MAIN POWER switch on the back
of the console and disconnect the AC power plug from the
electrical socket.
• If the exterior of the console becomes dirty, soak a soft
cloth in a mild detergent solution diluted with water,
tightly squeeze the cloth to remove the excess liquid,
wipe the affected area of the exterior and finish by
wiping with a dry cloth.
• Do not use paint thinner, solvents or other chemicals, as
these may damage the console. When using a
commercially available cleaning cloth, follow the
instructions supplied with the cloth.
Never disassemble the console
• Use your PlayStation®2 computer entertainment
system according to the instructions in this manual. No
authorization for the analysis or modification of the
PlayStation
circuit configurations, is provided herein.
• There are no user-serviceable components inside the
PlayStation
warranty. Additionally, there is a risk of exposure to
(laser) radiation as well as to electrical shock hazards.
2 console, nor the analysis and use of its
®
2 console. Disassembling it will void the
®
Notes on safety when using the analog
controller (DUALSHOCK
controller (DUALSHOCK
• Stop using this console immediately if you begin to feel
tired or if you experience discomfort or pain in your
hands and/or arms while operating the controller. If
the condition persists, consult a doctor.
• Do not attempt to operate the controller in any way
except with your hands. Do not bring the controller
into close contact with your head, face or near the
bones of any other part of your body.
• The vibration function of the analog controller
(DUALSHOCK
(DUALSHOCK
Do not use the vibration function of the analog
controller (DUALSHOCK
(DUALSHOCK
any ailment in the bones or joints of your hands or
arms.
• Do not use the analog controller (DUALSHOCK
the analog controller (DUALSHOCK
that supports the vibration function if you have injuries
or ailments to the bones or muscles of your fingers,
hands, wrists or arms. The vibration of the controller
may aggravate such conditions.
• Avoid prolonged use of the analog controller
(DUALSHOCK
(DUALSHOCK
intervals.
®2) or the analog controller
®) can aggravate injuries.
®) supported by software if you have
®2) and analog controller
®). Take a break at about 30 minute
®2) and analog
®)
®2) and analog controller
®2) or
®) with software

Discs that can be played with the PlayStation®2
Table of contents
3
PlayStation®2 format
DVD-ROM
Disc logo
Disc color
Contents
Disc size
Disc logo
Contents
Disc size
Play time
*1 When you position the console vertically and play an 8 cm audio CD, be sure to use an optional adaptor.
*2 When playing an 8 cm DVD, always place the console in the horizontal position.
DVD video systems and regional restrictions
•This console conforms to the NTSC broadcast
standard. You cannot play discs recorded for
other broadcast standards (such as PAL or
SECAM) on this console.
•Some DVD videos are marked with region
numbers such as
within the symbol represents the region
number of DVD players on which the disc can
be played. DVD videos that do not bear this
symbol, or that do not display the number 1
cannot be played on your console.
•DVDs with the
on this console.
If you attempt to play any other DVDs, a
message stating “This disc cannot be played
due to regional restrictions” will appear on
the screen.
“ ”, PlayStation®2 logo
and
designation
Silver
Audio CDs
Audio
12 cm
74 min
1
. The number contained
ALL
label can also be played
PlayStation®2 format
CD-ROM
“ ”, PlayStation®2 logo
and
designation
Blue
Audio and video
12 cm
*1
8 cm
(CD single)
20 min
(single-sided) /
•Some DVDs that have no region code
markings may still be subject to area
restrictions and may not be playable on the
console.
Note on playback operations of DVD video
This console plays back DVD video as
originally designed by the software producers.
Some of the playback features of this console
may not have been incorporated into the DVD
video design. As a result some playback
features may not be available with certain
software. Please refer to the instructions
supplied with your DVD video for details.
Specially shaped discs
Do not use irregularly shaped CDs (for
example, heart- or star-shaped CDs) as they
may cause the console to malfunction.
The “DVD VIDEO” logo is a trademark.
12 cm
About 4 hrs
About 8 hrs
(double-sided)
PlayStation® format
CD-ROM
PlayStation® logo and
Black
DVD VIDEOs
Audio and video
About 80 min
(single-sided) /
About 160 min
(double-sided)
designation
*2
8 cm
Getting started
Connection
Games / Audio CDs
DVD videos
Additional
information
WARNING / Precautions
Discs that can be played with the PlayStation®2
Important Safeguards
Checking the package contents
Positioning the console
Connecting your console to a TV set
Connecting digital audio components
Connecting other digital devices
Using the Main menu
Playing a game
Using the analog controller
Using memory cards
Playing an audio CD
Playing a DVD video
Using the Control Panel
Settings and adjustments for the DVD player
Troubleshooting
Specifications
Glossary
LIMITED WARRANTY
US
2
3
4
6
6
6
8
8
9
10
11
12
12
13
14
17
21
22
23
23

4
Important Safeguards
For your protection, please read these safety instructions
completely before operating the PlayStation®2 console, and
keep this manual for future reference.
Carefully observe all warnings, precautions and instructions
on the console, or those described in the instruction manual
and adhere to them.
USE
Power Sources
This console should be operated only from the type of power
source indicated on the marking label. If you are not sure of the
type of electrical power supplied to your home, consult your
dealer or local power company. For those units designed to
operate from battery power, or other sources, refer to the
operating instructions.
Grounding or Polarization
The console is equipped with a polarized AC power cord plug (a
plug having one blade wider than the other). This plug will fit
into the power outlet only one way. This is a safety feature. If you
are unable to insert the plug fully into the outlet, try reversing the
plug. If the plug should still fail to fit, contact your electrician to
have a suitable outlet installed. Do not defeat the safety purpose
of the polarized plug by forcing it in.
Overloading
Do not overload wall outlets, extension cords or convenience
receptacles beyond their capacity, since this can result in fire or
electric shock.
Cleaning
Refer to the precautions section of this manual (page 2) for a
complete description of a safe method for cleaning the console
exterior.
INSTALLATION
Water and Moisture
Do not use the powerline operated console near water – for
example, near a bathtub, kitchen sink, in a wet basement or near a
swimming pool.
Power-Cord Protection
Route the power cord so that it is not likely to be walked on or
pinched by items placed upon or against it, paying particular
attention to the plugs, receptacles, and the point where the cord
exits from the console.
Ventilation
The slots and openings in the console exterior are provided for
necessary ventilation. To ensure reliable operation of the console,
and to protect it from overheating, these slots and openings must
never be blocked or covered.
– Never cover the slots and openings with a cloth or other
materials.
– Never block the slots and openings by placing the console on a
bed, sofa, rug or other similar surface.
Liquid and Foreign Objects
Never push objects of any kind, other than authorized items, into
the console openings as they may touch dangerous voltage points
or short out parts that could result in a fire or electrical shock.
Never spill liquid of any kind on the console.
Attachments
Do not use attachments not recommended by the manufacturer,
as they may cause hazards.
Accessories
Do not place the console on an unstable cart, stand, bracket or
table. The console may fall, causing serious injury to a child or an
adult and serious damage to the console.
Use only the vertical or horizontal stand or other accessories
recommended by the manufacturer to stabilize the console.
An appliance and cart combination should be moved with care.
Quick stops, excessive force, and uneven surfaces may cause the
appliance and cart combination to overturn.

5
– Never place the console in a confined space, such as a bookcase,
or built-in cabinet, unless proper ventilation is provided.
– Do not place the console near or over a radiator or heat register,
or where it is exposed to direct sunlight.
ANTENNAS
Outdoor Antenna Grounding – If an outdoor antenna or
cable system is installed, follow the precautions below.
An outdoor antenna system should not be located in the
vicinity of overhead power lines or other electric light or
power circuits, or where it can come in contact with
such power lines or circuits.
WHEN INSTALLING AN OUTDOOR ANTENNA
SYSTEM, EXTREME CARE SHOULD BE TAKEN TO
KEEP FROM CONTACTING SUCH POWER LINES
OR CIRCUITS AS CONTACT WITH THEM IS
ALMOST INVARIABLY FATAL.
Be sure the antenna system is grounded so as to provide
some protection against voltage surges and built-up
static charges. Section 810 of the National Electrical
Code provides information with respect to proper
grounding of the mast and supporting structure,
grounding of the lead-in wire to an antenna discharge
unit, size of grounding conductors, location of antennadischarge unit, connection to grounding electrodes, and
requirements for the grounding electrode.
Ground Clamp
Electric
Service
equipment
Ground Clamps
Power Service Grounding
Electrode System
(NEC Art 250, Part H)
Lightning
For added protection for this console during a lightning storm, or
when it is left unattended and unused for long periods of time,
unplug it from the wall outlet and disconnect the antenna or cable
system. This will prevent damage to the console due to lightning
and power-line surges.
SERVICE
Damage Requiring Service
Unplug the console from the wall outlet and refer servicing to
qualified service personnel under the following conditions:
– When the AC power cord or plug is damaged or frayed.
Antenna Lead
in Wire
Grounding Conductors
(NEC Section 810-21)
NEC- National Electrical Code
FRAYED OR TAUT AC power cord
CRACKED PLUG
Antenna
Discharge unit
(NEC Section
810-20)
– If liquid has been spilled or objects have fallen onto the console.
– If the console has been exposed to rain or water.
– If the unit has been subject to excessive physical shock by being
dropped, or the console exterior has been damaged.
– If the console does not operate normally when following the
instruction manual. Adjust only those controls that are specified
in the instruction manual. Improper adjustment of other
controls may result in damage and will often require extensive
work by a qualified technician to restore the console to normal
operation.
– When the console exhibits a distinct change in performance –
this indicates a need for service.
Servicing
Do not attempt to service the console yourself, as removing the
console exterior may expose you to dangerous voltage or other
hazards.
Refer all servicing to an authorized service center. Call
1-800-345-7669 to receive instructions on obtaining repair/
replacement services.
Replacement parts
When replacement parts are required, be sure the service
technician has used replacement parts specified by the
manufacturer that have the same characteristics as the original
parts.
Unauthorized substitutions may result in fire, electric shock, or
other hazards.
Safety Check
Upon completion of any service or repairs to the console, ask the
service technician to perform routine safety checks (as specified
by the manufacturer) to determine that the unit is in safe
operating condition.
US
Getting started
6
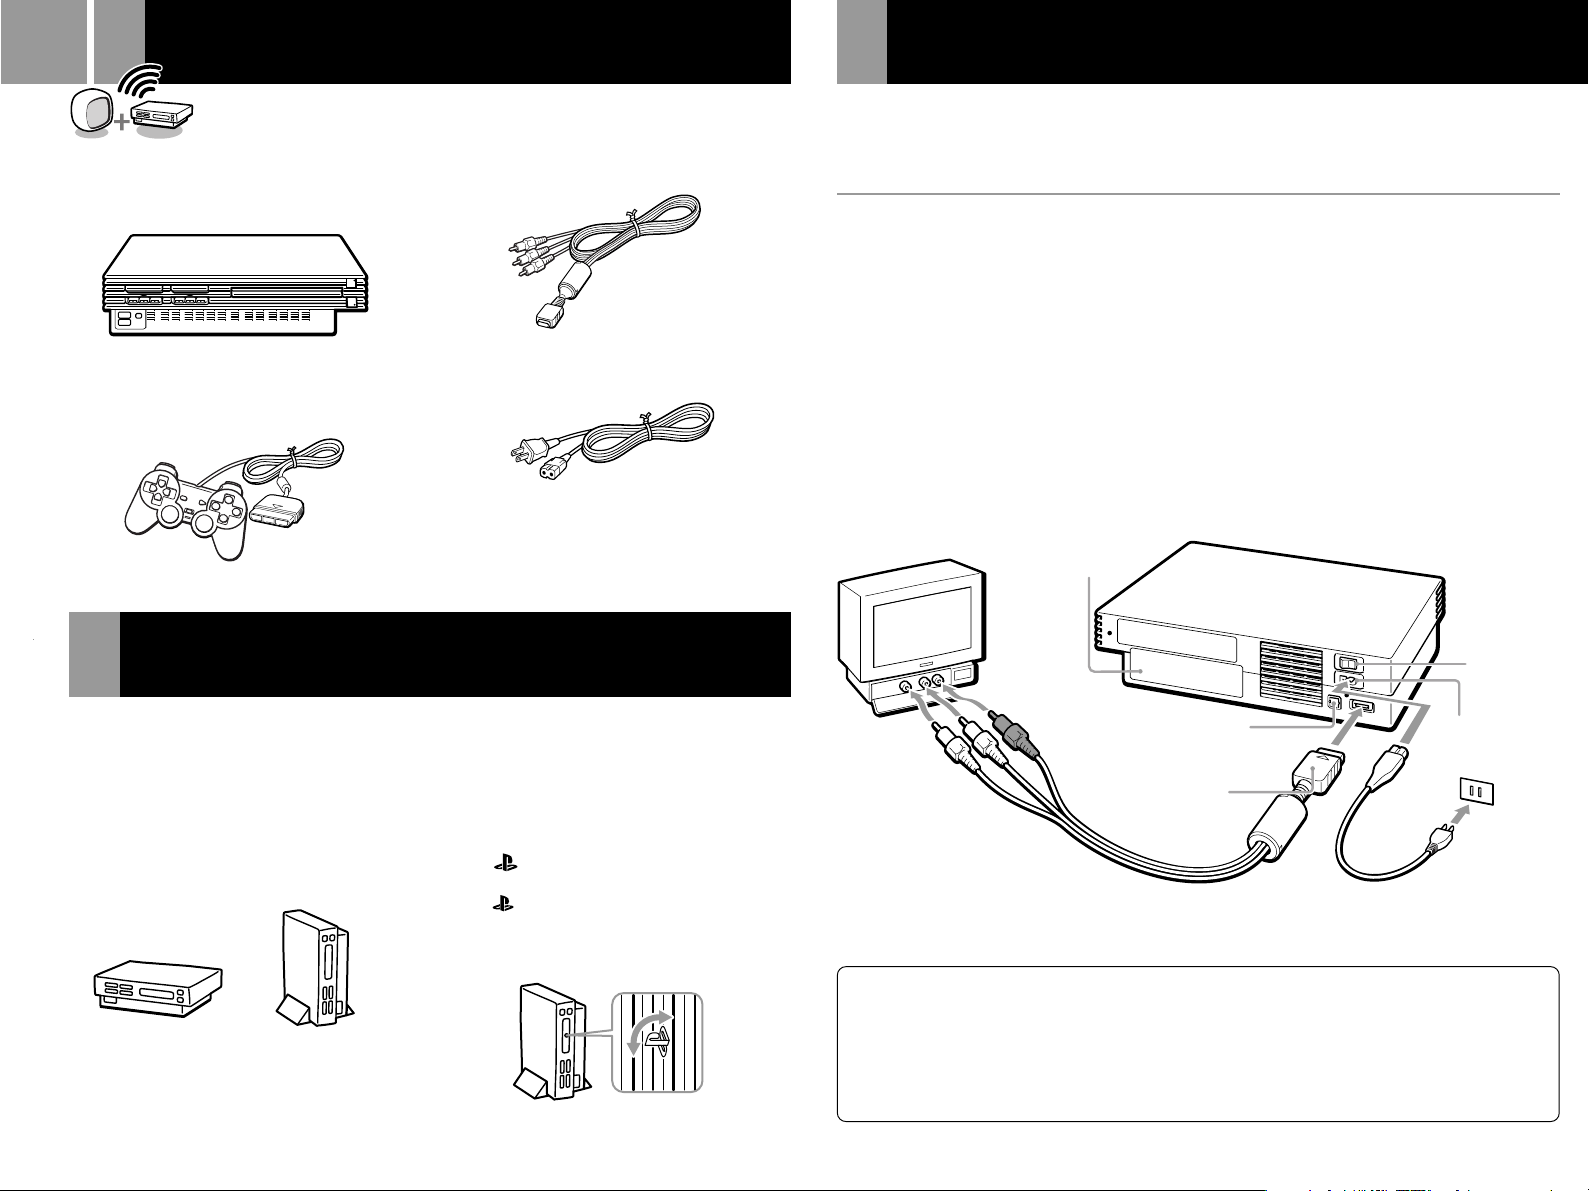
Checking the package contents
Check that you have the following items:
• Console
• Analog controller (DUALSHOCK®2)
• AV cable (integrated audio/video)
• AC power cord
• Instruction manual
Connecting your console to a TV set
This section explains the connecting method for listening to sound through your TV speakers.
When connecting to audio equipment with digital connectors, see “Connecting digital audio
components” on page 8.
Connecting to a TV with audio/video input
Connect your PlayStation®2 computer entertainment system to the TV using the supplied AV cable
(integrated audio/video).
When connecting the cords, be sure to match the color-coded cords to the appropriate jacks on the
components: yellow (video) to yellow, red (right audio) to red and white (left audio) to white.
After connecting
Set your TV to the appropriate video input mode. Refer to the instruction manual for your TV.
When connecting to a wide screen TV (16:9 aspect ratio)
Set “Screen Size” in the System Configuration menu to “16:9.” For details on the System
Configuration menu, see page 9.
If your TV is monaural
Do not connect the red plug. If you want to hear both left and right sounds from a monaural TV, use a commercially
available dual phono to single phono (stereo to monaural) type audio cable (sold separately).
EXPANSION BAY
Positioning the console
You can position the console either horizontally
or vertically.
When positioning the console vertically, use the
SCPH-10040 U vertical stand (for PlayStation®2)
(sold separately).
When positioning the console horizontally, you
can use the SCPH-10110
PlayStation®2) (sold separately).
U
horizontal stand (for
Vertical positioningHorizontal positioning
Notes
The console may be damaged if it is placed in any position
other than a horizontal or vertical one.
Do not change the position of the console (from horizontal
to vertical or vice versa) while it is in operation. Doing so
may damage the disc or cause the console to malfunction.
The ” ” product family logo located on
the disc tray
The “ ” product family logo on the disc tray
can be rotated to match the horizontal or
vertical positioning of the console.
DIGITAL OUT (OPTICAL)
connector
To AV MULTI OUT
connector
AV cable (integrated audio/video) AC power cord
Static image caution
Static, non-moving images, such as DVD menus,
configuration displays or paused images may leave a
faint image permanently on the TV screen if left on for
extended periods of time.
Projection TVs are more susceptible to this than other
types of displays. Do not operate the console in such a
manner that this could occur.
MAIN POWER
switch
~AC IN connector
Note about bouncing effect
Some TVs or monitors may experience a bouncing effect
in their pictures when using the PlayStation
There is nothing wrong with the PlayStation
or the way it is manufactured. The problem technically
lies within the television. If you encounter such a
problem with your television/monitor, please contact
our technical support line at 1-800-345-7669.
®2 console.
®2 console
7
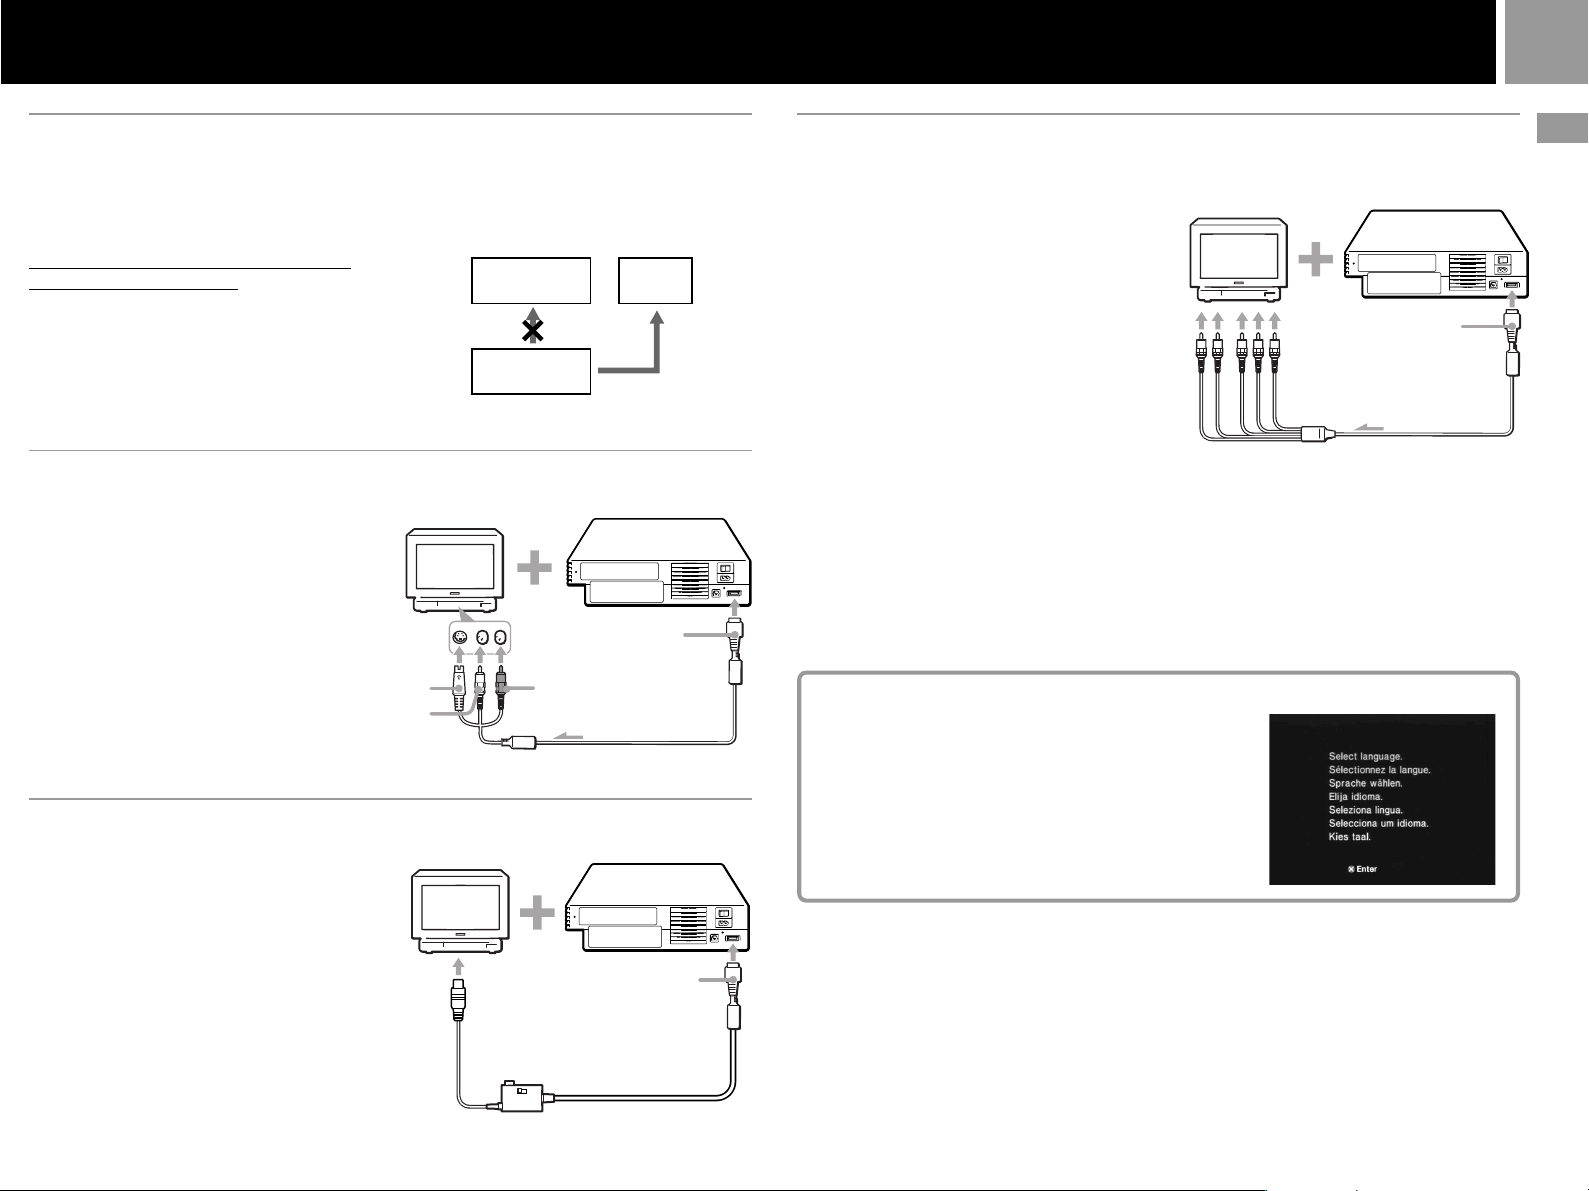
Connecting to a VCR
Connect your PlayStation®2 console to the VCR
using the supplied AV cable (integrated audio/
video) matching the plug colors.
If your VCR is monaural, do not connect the
red plug.
However, when playing a DVD video, do not
connect the console to a VCR. If you do,
picture quality may be reduced. Connect the
console directly to the TV.
After connecting
Set your TV and VCR adjustments
appropriately.
Refer to the instruction manuals for your TV
and VCR.
When playing a DVD video
VCR
PlayStation®2
console
Connecting to a TV with an S VIDEO input connector
Connect your PlayStation®2 console to the
S VIDEO input connector on the TV using the
SCPH-10060 U S VIDEO cable (sold separately).
You will get a better picture.
After connecting
Set your TV to the appropriate video input
mode (such as “S VIDEO”).
To S VIDEO
input
To audio input
(left)
To audio input
(right)
Connecting to a TV with an antenna input
Connect your PlayStation®2 console to the
antenna input on the TV using the SCPH-10071
RFU adaptor (sold separately). In this case, the
sound will be monaural.
After connecting
Set the channel switch on the RFU adaptor and
the channel selector of your TV to VHF channel
CH 3 or CH 4, whichever is not active in your
area.
To antenna
input
TV
Connect directly
To AV MULTI OUT
connector
To AV MULTI OUT
connector
Connecting to a TV with component video input connectors
If your monitor or projector has component
video input connectors (Y, CB/PB, CR/PR),
connect your PlayStation®2 console using the
SCPH-10100 U component AV cable (for
PlayStation®2) (sold separately). This will
provide the best picture.
Before connecting
If you connect your PlayStation®2 console to a
television using the component AV cable
without first setting the “Component Video
Out” option under the “System Configuration”
menu to “Y Cb/Pb Cr/Pr,” the TV screen
might not display properly. Before connecting
your console with the component AV cable,
first use the supplied AV cable (integrated
audio/video) and make sure that the
“Component Video Out” option is set to
“Y Cb/Pb Cr/Pr.”
Note
The PlayStation®2 console is not compatible with HDTV
unless the proper software and connecting devices are
used.
Refer to the instruction manual for your TV for details.
To audio
input
To component
video input
connectors
To AV MULTI OUT
connector
When turning on the console for the first time
The initial setup screen appears.
Set “Language,” “Time Zone” and “Daylight Savings Time
(Summer Time)” according to the instructions on the
screen.
Settings can be adjusted later in the System Configuration
menu. For details, see
menu” on page 9.
“Using the System Configuration
US
Connection
C

8
Connecting digital audio components
Connecting other digital devices
This section explains how to connect the
PlayStation®2 computer entertainment system
to audio equipment with digital connectors
(such as Dolby Digital optical (AC-3) output).
Using digital receivers and amplifiers, you can
enjoy features such as multi-channel sound and
surround sound.
Connecting to a receiver or
amplifier, “MD (Minidisc)” deck
or “DAT (Digital Audio Tape)”
deck with a digital connector
Use a commercially available optical digital
cable (sold separately) and set “DIGITAL OUT
(OPTICAL)” in the System Configuration menu
to “On” (the default setting).
For details on the System Configuration menu,
see page 9.
Rear panel
Receiver or amplifier,
MD deck or DAT deck
DIGITAL INPUT
OPTICAL
DIGITAL OUT
(OPTICAL)
MAIN POWER
AV MULTI OUT
AC IN
~
Notes
• Refer also to the instructions supplied with the
component to be connected.
• You cannot directly make digital audio recordings of
discs recorded in Dolby Digital format or DTS format
using an MD or a DAT deck.
Connecting to an audio
component with a built-in DTS*
or Dolby Digital** decoder
(DVD video only)
By connecting to audio equipment with a builtin DTS or Dolby Digital decoder (sold
separately), you can playback sound recorded
on your DVD video in Dolby Digital (AC-3) or
DTS format to reproduce the effect of listening
in a movie theater or concert hall.
Connect the component via the DIGITAL OUT
(OPTICAL) connector using an optical digital
cable (sold separately).
console
2
®
Optical digital cable
(sold separately)
Speakers
PlayStation
Audio component
with a built-in DTS
or Dolby Digital
decoder
Setups for the DVD player on your
PlayStation
2 console
®
Some setup adjustments are necessary for the
DVD player depending on the components to
be connected.
For details on using the Setup display, see page
17.
• When you connect an audio component with a
built-in DTS decoder
Set “DIGITAL OUT (OPTICAL)” to “On” and
then set “DTS” to “On” in the “Audio Setup”
display.
• When you connect an audio component with a
built-in Dolby Digital decoder
Set “DIGITAL OUT (OPTICAL)” to “On” and
then set “Dolby Digital” to “On” in the
“Audio Setup” display.
Note
Refer to the operating and setup instructions for the audio
components to be connected.
* “DTS” and “DTS Digital Out” are trademarks of Digital
Theater Systems, Inc.
** Manufactured under license from Dolby Laboratories.
“Dolby” and the double-D symbol are trademarks of
Dolby Laboratories.
Confidential unpublished works. ©1992-1997 Dolby
Laboratories. All rights reserved.
Connecting a device using the
i.LINK interface
The S400 i.LINK connector on the front of the
console can be used to connect an i.LINKcompatible (IEEE 1394) device. Refer also to the
instructions supplied with the device to be
connected.
The S400 i.LINK connector does not supply
power to external devices. Some external
devices that require power from the S400
i.LINK connector will not function properly
when connected to the PlayStation®2 console.
The PlayStation®2 S400 i.LINK connector
supports transfer rates up to 400 Mbps.
However, the actual transfer rate will vary,
depending upon the transfer rate of the
connected i.LINK-compatible device.
S400 i.LINK connector
Note
Not all i.LINK products work with the PlayStation®2
computer entertainment system. Refer also to the
appropriate i.LINK product’s user manual for more
information.
i.LINK is a trademarked version of the IEEE 1394-1995
standard and its revisions.
i.LINK and the i.LINK logo “
” are trademarks.
Connecting a device using the
Universal Serial Bus (USB)
interface
The two USB connectors on the front of the
console can be used to connect USB-compatible
devices. Also refer to the instructions supplied
with the device to be connected.
USB connectors
Note
Not all USB-compatible products work with the
PlayStation
appropriate USB-compatible product’s user manual for
more information.
2 computer entertainment system. See the
®
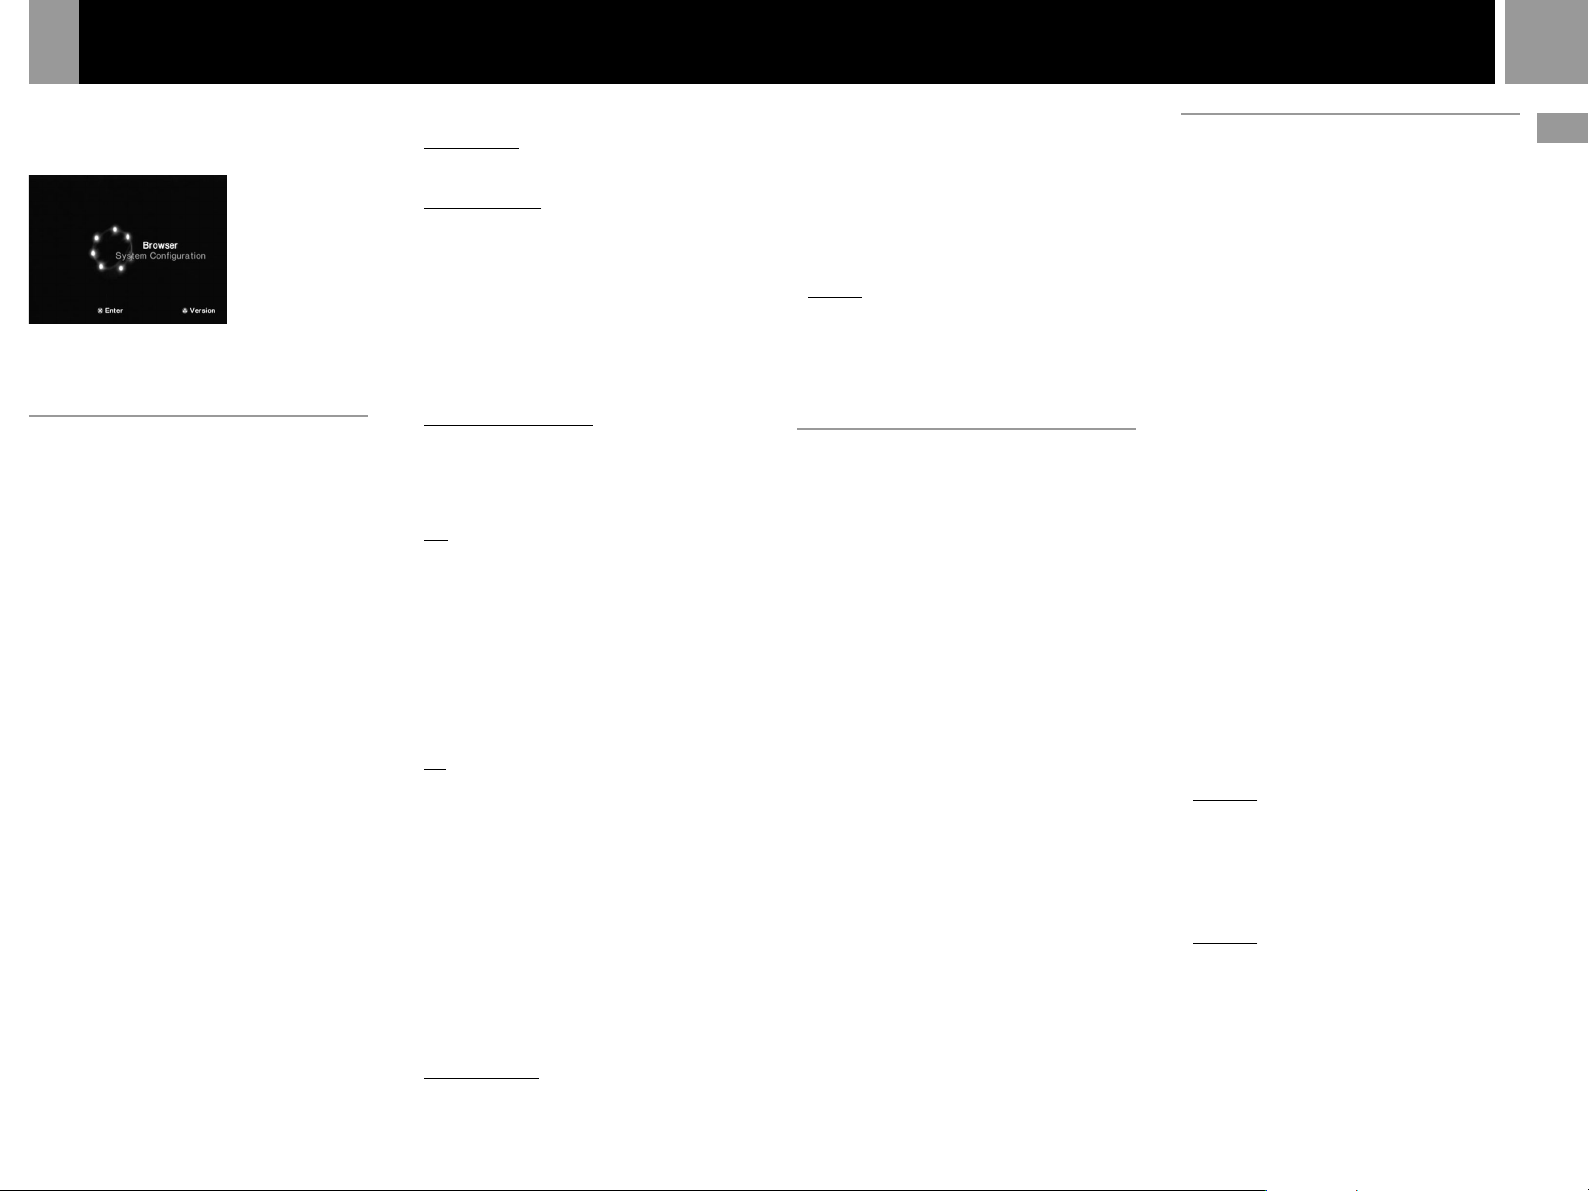
Using the Main menu
9
When turning on the console without first
inserting a disc, the Main menu appears on the
TV screen.
You can move to the System Configuration
menu or the Browser screen from the Main
menu.
Using the System Configuration
menu
Using the System Configuration menu, you can
change or update your system settings for the
PlayStation®2 console.
These settings are not canceled when you turn
off the console.
1...... Select “System Configuration” using the
up and down directional buttons and
press the ✕ button.
The System Configuration menu appears
on the TV screen.
2...... Select the item you want using the up and
down directional buttons and press the ✕
button.
The default settings are underlined.
x Clock Adjustment
Sets the clock.
1...... Use the up and down directional buttons
to set the month and then press the right
directional button.
Use the same method to set the day, year,
hour, minute and second. To return to the
previous menu, press the left directional
button.
2...... Press the ✕ button in time with an
accurate clock.
You can select optional settings for the clock
Select “Clock Adjustment” using the up and
down directional buttons and press the ¢
button. You can set the optional items.
Time Format
•12 hour clock
•24 hour clock
Date Format
•MM/DD/YYYY
•DD/MM/YYYY
•YYYY/MM/DD
Time Zone
Select your country or region to set the time
zone.
Daylight Savings Time (Summer Time)
Set this item to “Daylight Savings Time
(Summer Time)” when daylight savings time is
in effect.
•Standard (Winter Time)
•Daylight Savings (Summer Time)
x Screen Size
Selects the display mode according to the TV to
be connected.
•4:3 : select this when you connect a standard
TV to the console.
•Full : select this when you connect a standard
TV to the console. The black margins on the
upper and lower portions of the screen are cut
off.
•16:9 : select this when you connect a widescreen TV to the console.
x DIGITAL OUT (OPTICAL)
Selects whether to output signal via the
DIGITAL OUT (OPTICAL) connector.
•On : select this when you connect with an
optical digital cable (sold separately).
Normally select this option.
•Off : select this when you do not want sound
signal to be output via the DIGITAL OUT
(OPTICAL) connector.
x Component Video Out
If your TV, monitor or projector has a RGB
input connector or component video input
connectors (Y, CB/PB, CR/PR) that conform to
the output signals of the console, set this item.
When connecting the console using the
supplied AV cable (integrated audio/video) or
S VIDEO cable (sold separately), you do not
need to set this item.
•Y Cb/Pb Cr/Pr : select this when you connect
the console to the component video input
connectors.
•RGB : select this when you connect the
console to the RGB input connector.
Note
You can output PlayStation® and PlayStation®2 format
software in either RGB or Y Cb/Pb Cr/Pr format.
However, the PlayStation
override the “Component Video Out” setting in the
System Configuration menu and output all DVD video
software in Y Cb/Pb Cr/Pr.
2 console has been designed to
®
x Language
Selects the language for the on-screen display.
•English
•French
•Spanish
•German
•Italian
•Dutch
•Portuguese
Using the Browser screen
You can do the following operations using the
Browser screen.
•Checking/copying/deleting game data on
the memory card (8MB) (for PlayStation®2) or
memory card
•Starting PlayStation® or PlayStation®2 format
software
•Playing an audio CD
•Playing a DVD video
Select “Browser” using the up and down
directional buttons and press the ✕ button.
The Browser screen appears on the TV screen.
The memory card (8MB) (for PlayStation®2),
memory card or discs inserted in the console
are displayed as icons.
Checking/copying/deleting game data
You can copy game data from one memory card
(8MB) (for PlayStation®2) or memory card to
another or delete data you no longer wish to keep.
You cannot, however, copy game data of the
PlayStation®2 format software to the SCPH1020 U memory card.
Insert the memory card (8MB) (for
PlayStation®2) or memory card in advance.
1...... Select the icon of the memory card (8MB)
(for PlayStation®2) or memory card where
the game data you want to check/copy/
delete is saved, and then press the ✕
button.
2...... Check/copy/delete game data according
to the instructions on the screen.
Note
While copying or deleting game data, do not remove the
memory card (8MB) (for PlayStation
2) or memory card.
®
Checking version information
You can check the version of the console,
Browser, CD Player, PlayStation
DVD Player.
Press the ¢ button in the Main menu.
Auto-diagnosis feature
The PlayStation
console settings for best possible disc playback.
However, you can also manually start the autodiagnosis feature whenever necessary.
2 console automatically adjusts
®
1...... Select “Console” using the up and down
directional buttons and press the ¢ button.
2...... Select “On” using the up and down
directional buttons and press the ✕ button.
3...... Insert a disc.
The console automatically starts the
diagnosis.
Note
The diagnosis setting automatically returns to “Off”
(default setting) when you press the 1/RESET button or
start playing a PlayStation
format disc or a DVD video disc.
format disc, PlayStation®2
®
Setting the PlayStation® Driver
The PlayStation® Driver is a program for
loading PlayStation® format software.
1...... Select “PlayStation
and down directional buttons and press
the ¢ button.
®
2...... Select the item you want using the up and
down directional buttons and press the ✕
button.
Disc Speed
•Standard: normally select this position.
•Fast: loading time for a PlayStation® format
software disc can be shortened.
Depending on the software, there may be no
effect or the software may unexpectedly fail.
In this case, select “Standard.”
Texture Mapping
•Standard: normally select this position.
•Smooth: you can make the display smoother
when playing certain PlayStation® format
software titles.
Depending on the software, there may be no
effect. In this case, select “Standard.”
Note
The “PlayStation® Driver” setting automatically returns to
“Standard” (default setting) when you press the 1/RESET
button or turn off the console.
Driver and
®
Driver” using the up
US
Connection
10
1,3
4
2
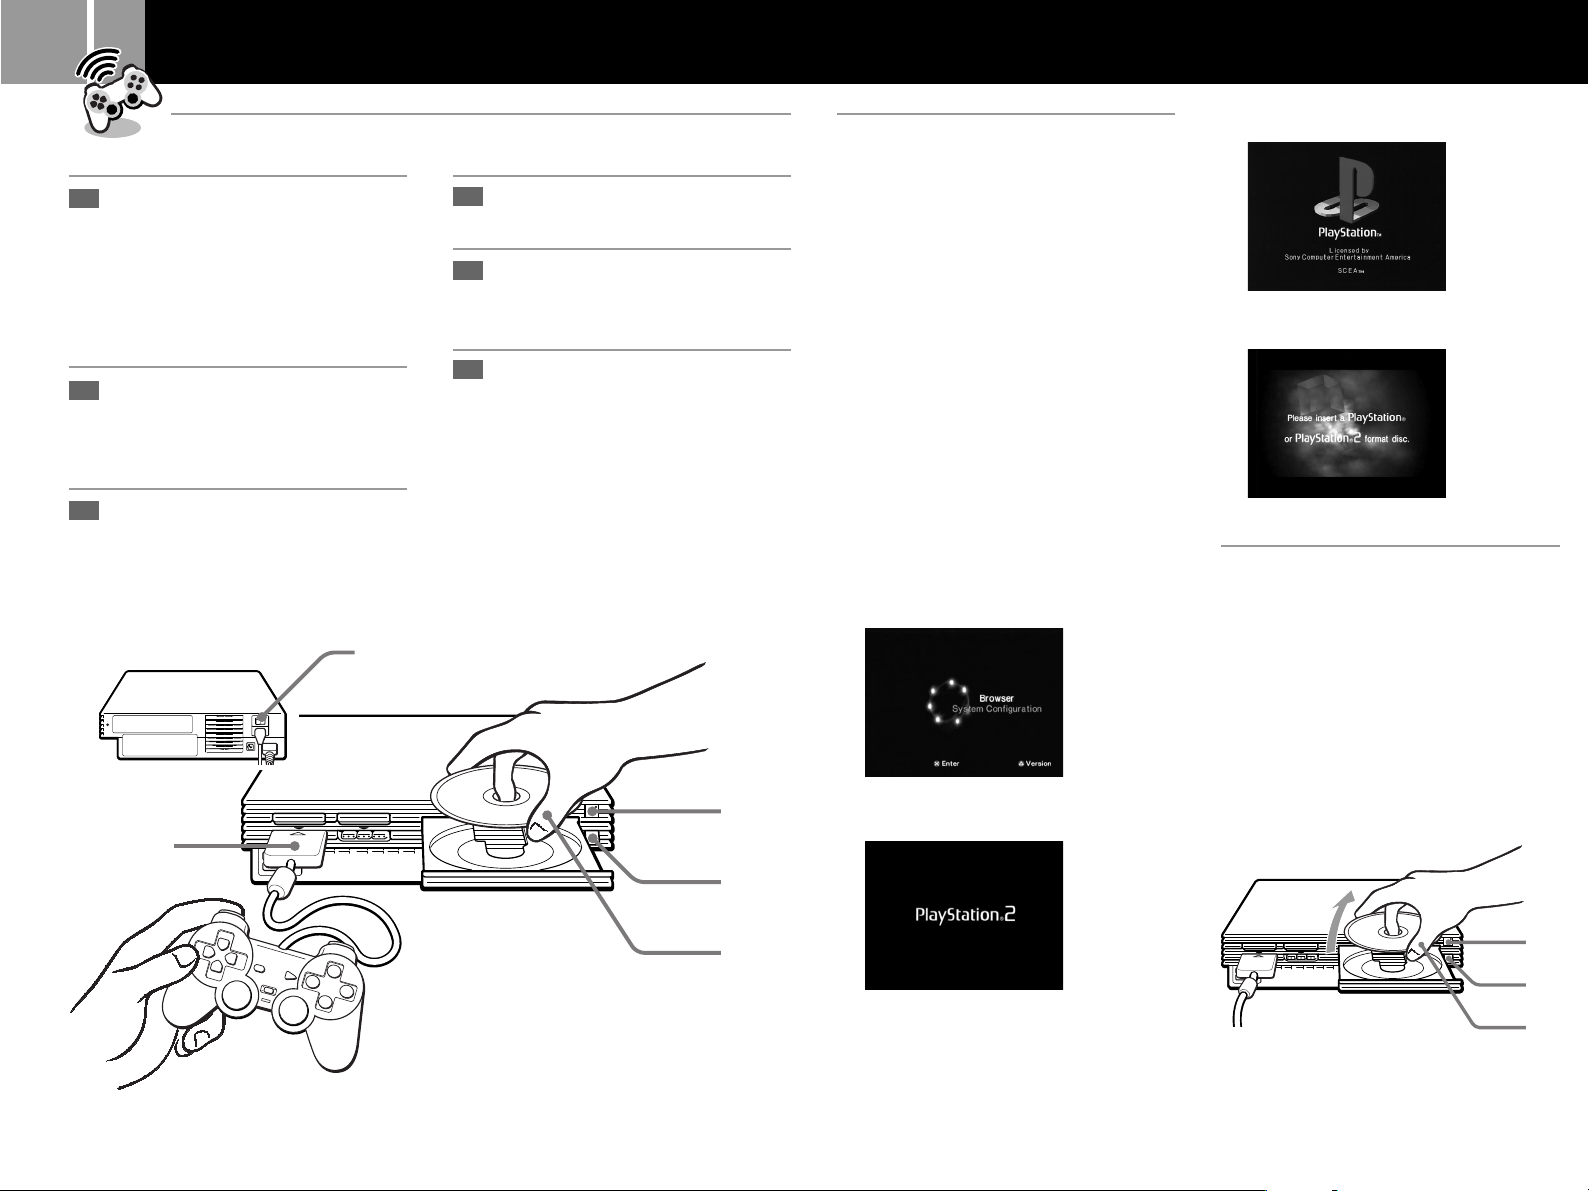
Playing a game
Starting a game
1
Turn on the console using the
MAIN POWER switch on the
back of the console.
The 1 (standby) indicator on the
front of the console lights up in red
to indicate that the console is now in
standby mode.
2
Press the 1 (standby) /RESET
button.
The 1 indicator turns green and the
start-up screen appears.
3
Plug the analog controller
(DUALSHOCK
controller (DUALSHOCK
the console.
®2) or analog
®) into
4
Press the A (open) button.
The disc tray opens.
5
Place a disc on the disc tray
with the label side facing up
(data side down).
6
Press the A button.
The disc tray closes. Screen 2 or 3
appears and the game is ready to
begin.
Note
Set the analog controller (DUALSHOCK®2) or analog
controller (DUALSHOCK
the software (page 11). See the appropriate software
manual for details.
®) to the appropriate mode for
Screens that appear at start-up
When turning on the console without first
inserting a disc
Screen 1 appears.
•When you insert a PlayStation®2 or
PlayStation® format disc after screen 1 has
appeared, screen 2 or 3 will appear and
you can start the game.
•You can move to the System Configuration
menu or the Browser screen from screen 1.
(For details, see “Using the Main menu” on
page 9.)
When turning on the console with a disc
already inserted
Depending on the type of disc inserted, screen
2, 3 or 4 will appear.
If screen 4 appears, it is possible that the
inserted disc is not a PlayStation® or
PlayStation®2 format disc. Check the disc type
(page 3).
1 No disc is inserted (Main menu).
3
PlayStation® format CD-ROM is inserted.
4 A disc that cannot be played with the
PlayStation
2 console is inserted.
®
Ending a game
1...... Press the A button.
The disc tray opens.
3
1
2
4,6
5
Restarting a game
Press the 1/RESET button very briefly. (Be
sure not to hold the button down for any length
of time, as that will put the console in standby
mode.)
Be careful not to accidentally press the 1/
RESET button while playing a game, or the
game will restart.
2 PlayStation
CD-ROM is inserted.
2 format DVD-ROM /
®
2...... Remove the disc.
3...... Press the A button.
The disc tray closes.
4...... Press the 1/RESET button for about two
seconds.
The 1 indicator turns red and the console
enters standby mode.
Using the analog controller
11
When not intending to play a game for an
extended period of time
Turn the power off at the MAIN POWER
switch on the back of the console, and
disconnect the AC power plug from the
electrical socket.
Changing from one game to
another
There is no need to turn off the console when
you want to change games.
1...... Press the A button.
The disc tray opens.
2...... Remove the disc.
3...... Place a new disc in the disc tray.
4...... Press the A button.
The disc tray closes.
5...... Press the 1/RESET button briefly to reset.
(Warning: holding the 1/RESET button
down for any length of time may cause the
console to go into standby mode.)
After the start-up screen, screen 2 or 3
appears and the game begins.
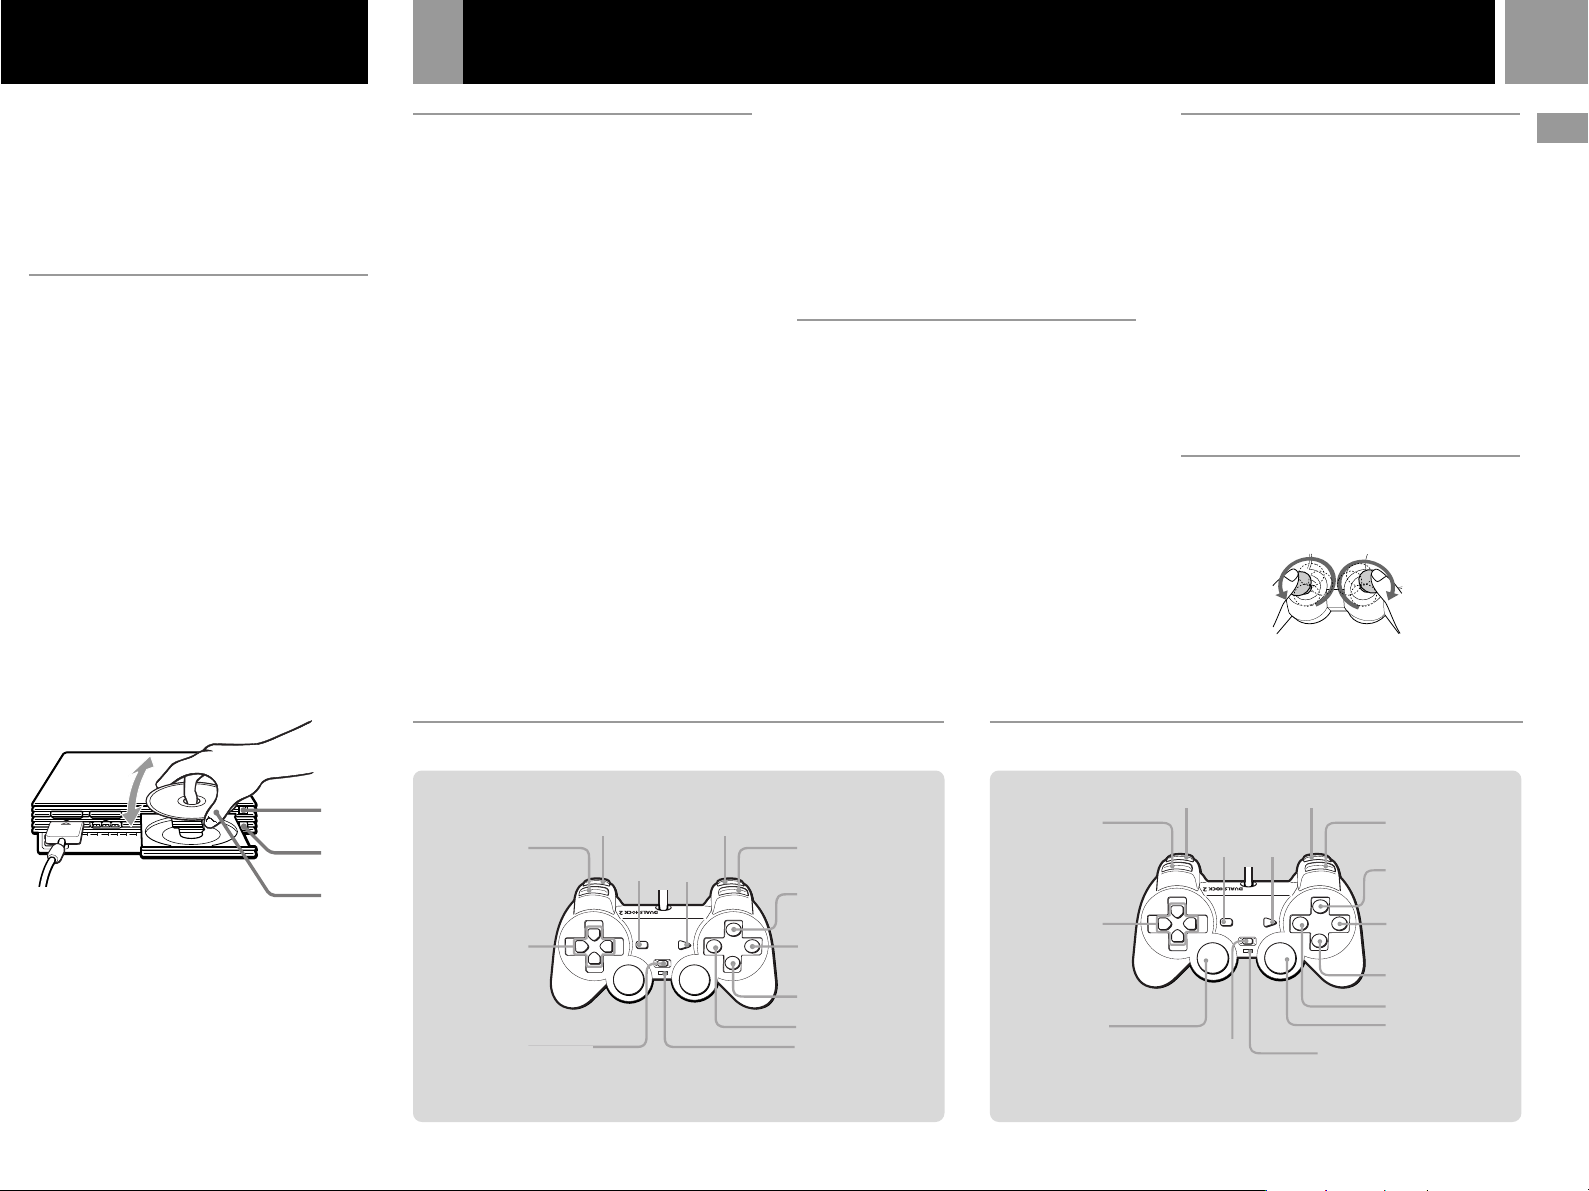
Differences between the analog
controller (DUALSHOCK®2) and
analog controller (DUALSHOCK®)
1 Analog controller (DUALSHOCK®2)
(supplied / sold separately)
•The analog controller (DUALSHOCK®2) can
be used with PlayStation®2 and PlayStation
format software.
•You can switch between digital and analog
modes. When the controller is in analog
mode, the following buttons and sticks may
operate in analog fashion depending on the
features supported by the software title. Refer
to the software manual for details.
PlayStation®2 format software
Directional buttons / ¢ , a , ✕ , s buttons /
left analog stick / right analog stick / L1, R1,
L2, R2 buttons
PlayStation® format software
Left analog stick / right analog stick
•You can enjoy the vibration function.
2 Analog controller (DUALSHOCK®)
(sold separately)
•The analog controller (DUALSHOCK®) can
be used with PlayStation®2 and PlayStation
format software.
®
®
•You can switch between digital and analog
modes. When in analog mode, you can enjoy
the analog operation of the left analog stick
and right analog stick.
PlayStation®2 format software
Left analog stick / right analog stick
PlayStation® format software
Left analog stick / right analog stick
•You can enjoy the vibration function.
Mode switching and the mode
indicator
The analog controller (DUALSHOCK®2) and
analog controller (DUALSHOCK®) can be
switched between two modes by pressing the
ANALOG mode button.
Each time the ANALOG mode button is
pressed, the mode changes as follows:
Digital mode (indicator: off)
Xx
Analog mode (indicator: red)
Note
Switch to the appropriate mode for use.
Note however, that some software makes this adjustment
automatically. In such cases, the ANALOG mode button is
overridden by the software. For details, refer to the
software manual.
Vibration function
The analog controller (DUALSHOCK®2) and
analog controller (DUALSHOCK®) both feature
a vibration function when the function is
supported by the software title. The vibration
function can be set to ON or OFF on the
software option screen.
Notes
• When the analog controller (DUALSHOCK®2) and
analog controller (DUALSHOCK
turn the console off or unplug the controller from the
console.
• Before using the vibration function, please read “
on safety when using the
(DUALSHOCK
(DUALSHOCK
®2) and analog controller
®)
”
on page 2.
Before using the
®) is not being used,
Notes
analog controller
analog
controller (DUALSHOCK®2) and
analog controller (DUALSHOCK®)
Rotate the analog sticks once with your thumbs as
if drawing a circle, as shown in the diagram above.
Do not twist the analog sticks.
US
Games / Audio CDs
5
1,4
2,3
Note
With a multi-disc game, follow steps 1 through 4 to switch
discs. Refer to the software manual for details.
L1 button
Directional
buttons
ANALOG mode button
L2 button R2 button
SELECT
button
START
button
R1 button
¢ button
a button
✕ button
s button
Mode indicator: Off
Analog mode (indicator: red)Digital mode (indicator: off)
L1 button
Directional
buttons
Left analog stick /
L3 button*
* The R3 button and the L3 button function when the stick is pressed.
L2 button R2 button
SELECT
button
ANALOG mode button
START
button
Mode indicator: Red
R1 button
¢ button
a button
✕ button
s button
Right analog stick /
R3 button*
12
Using memory cards
Playing an audio CD
You can save and load game or other data using
the memory card (8MB) (for PlayStation®2) or
memory card (each sold separately).
Differences between the memory
card (8MB) (for PlayStation®2) and
memory card
When playing PlayStation®2 format
software, use the memory card (8MB*)
(for PlayStation®2) (1).
When playing PlayStation® format software,
use the memory card (2).
For the PlayStation® game console, units of
game data are described as “memory blocks,”
however for the PlayStation®2 computer
entertainment system, they are described as
“KB” (kilobytes).
*8 MB = 8,000 KB
1 Memory card (8MB) (for PlayStation®2)
(sold separately)
The memory card (8MB) (for PlayStation®2)
can save and load PlayStation®2 format
software game data. Each memory card (8MB)
(for PlayStation®2) can save about 8MB of
game data, but some of this may be used as file
control information.
2 Memory card (sold separately)
The memory card can save and load
PlayStation® format software game data. Each
memory card can save 120 KB (15 memory
blocks) of game data.
Note
You cannot copy data to a memory card (8MB) (for
PlayStation®2) or memory card that does not have enough
memory available. Before playing, check how much space
is needed to save the game and how much space is
available on the memory card (8MB) (for PlayStation®2)
or memory card. Check the appropriate software manual
to determine the amount of space needed to save the data
for a given game.
created by Sony Corp. This
is a copyrighted anti-copying technology
necessarily imply compatibility with other products
bearing the “MAGICGATE” trademark.
mark does not
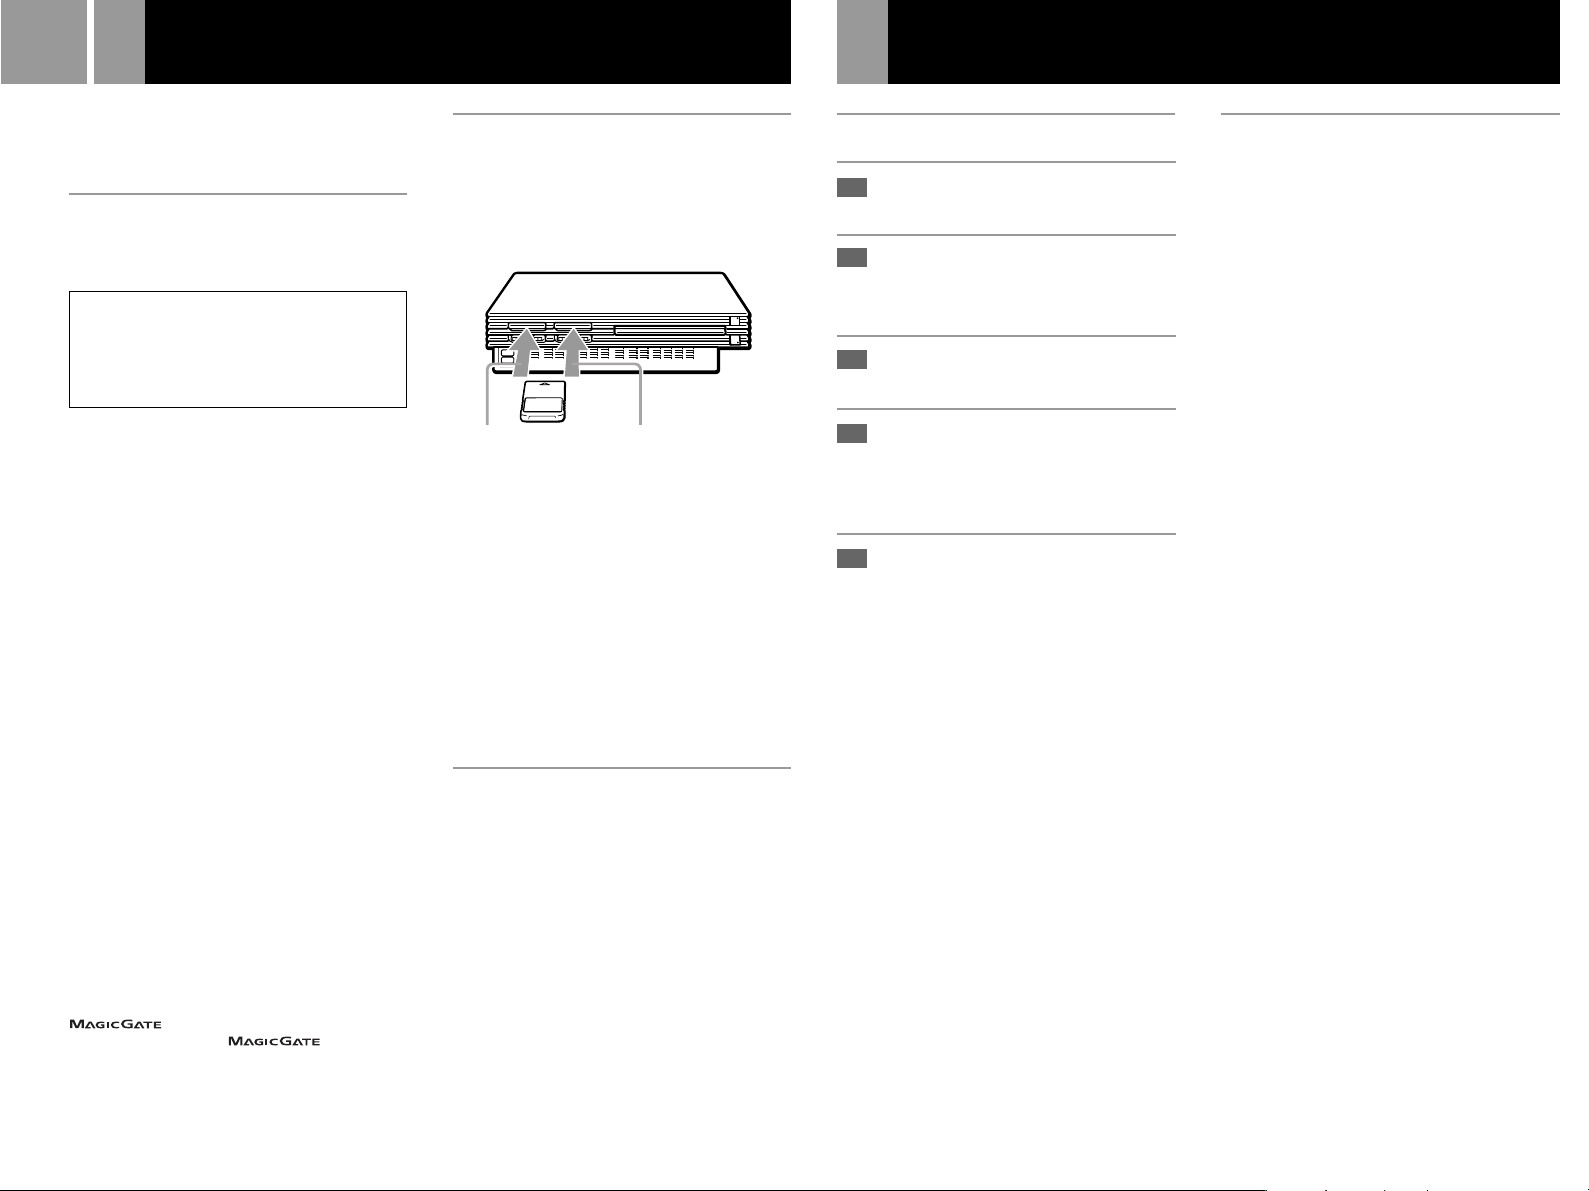
Inserting
the memory card (8MB)
(for PlayStation®2) and memory
card
Insert the memory card (8MB) (for PlayStation®2)
or the memory card into the MEMORY CARD
slot, with the arrow side up.
MEMORY CARD slot 2MEMORY CARD slot 1
Notes on using the memory card (8MB) (for
PlayStation
multitap
•When using PlayStation®2 format software,
use the SCPH-10090 U multitap
(for PlayStation®2).
When using PlayStation® format software,
use the SCPH-1070 U multitap.
•When you insert the SCPH-1070 U multitap into
controller port 1, do not insert the memory card
(8MB) (for PlayStation®2) or memory card into
MEMORY CARD slot 1 of the PlayStation®2
console. This also applies when you insert a
multitap into controller port 2. If you do so, the
data may be lost.
2) or memory card with a
®
Copying/deleting game data
You can copy game data from one memory
card (8MB) (for PlayStation®2) or memory card
to another or delete data you no longer wish to
keep.
You cannot, however, copy game data of the
PlayStation®2 format software to the memory
card.
You can check, copy and delete game data in
the Browser screen. For details on the browser,
see “Checking/copying/deleting game data”
on page 9.
Note
You cannot save or load game data in the Browser screen.
For details on game data saving or loading, refer to the
software manual.
Playing an audio CD
Press the A (open) button.
1
The disc tray opens.
2
Place a disc on the disc tray
with the label side facing up
(data side down).
Press the A button.
3
The disc tray closes.
Select the audio CD icon in the
4
Browser screen (page 9), then
press the ✕ button.
The “Audio CD” screen appears.
Select the icon number using
5
the directional buttons, then
press the ✕ button.
The CD operation screen appears
and playback starts.
Operating the CD player
While a disc is playing, select the button in the
CD operation screen using the right and left
directional buttons. Then press the ✕ button.
N Start playing.
X Pause.
x Stop playing.
. Find the beginning of the current or
previous track.
M Fast Forward.
m Rewind.
> Find the beginning of the next track.
Playing in various modes
You can change between various play modes.
As a default setting, ”Normal” is selected for
“Play mode,” and “Off” is selected for
“Repeat.”
Select the audio CD icon in the Browser screen,
then press the f button to change the settings.
To play the desired tracks in a specified order
1 ... Select “Play mode” using the up and
down directional buttons and press the ✕
button.
2......
Select “Program” using the right and left
directional buttons and press the ✕ button.
3...... Select the number of the specific track
using the directional buttons then press
the ✕ button.
Repeat this step until you have selected all
the tracks you want to play.
4...... Press the a button to return to the
Browser screen.
To play the tracks in random order
1...... Select “Play mode” using the up and
down directional buttons and press the ✕
button.
2......
Select “Shuffle” using the right and left
directional buttons and press the ✕ button.
3...... Press the a button to return to the
Browser screen.
To play all tracks repeatedly
1...... Select “Repeat” using the up and down
directional buttons and press the ✕ button.
2
......
Select “All” using the right and left
directional buttons and press the ✕ button.
3...... Press the a button to return to the
Browser screen.
To play a track repeatedly
1...... Select “Repeat” using the up and down
directional buttons and press the ✕ button.
2......
Select “1” using the right and left
directional buttons and press the ✕ button.
3...... Press the a button to return to the
Browser screen.
Playing a DVD video
13
Playing a DVD video
Depending on the DVD video, some operations
may be different or restricted. Refer to the
instructions supplied with your disc.
1
Turn on the console using the
MAIN POWER switch on the
back of the console.
The 1 (standby) indicator on the
front of the console lights up in red
to indicate that the console is now in
standby mode.
Press the 1 (standby) /RESET
2
button.
The 1 indicator turns green and the
start-up screen appears.
Press the A (open) button.
3
The disc tray opens.
4
Place a disc on the disc tray
with the label side facing up
(data side down).
5
Press the A button.
The disc tray closes and the console
starts playback.
Notes
• Depending on the DVD, a DVD menu or Title menu
may appear on the TV screen (see page 15).
• If you press the A button after playback, the Browser
screen appears.
If you experience problems playing a DVD video:
In rare instances, certain DVD videos may not operate
properly with PlayStation
variations in the manufacturing process or software
encoding of the DVD video software. If you experience
problems, try restarting your DVD video. If problems
persist, for more information call the publisher of the
DVD video or contact SCEA's customer service.
®2. This is primarily due to
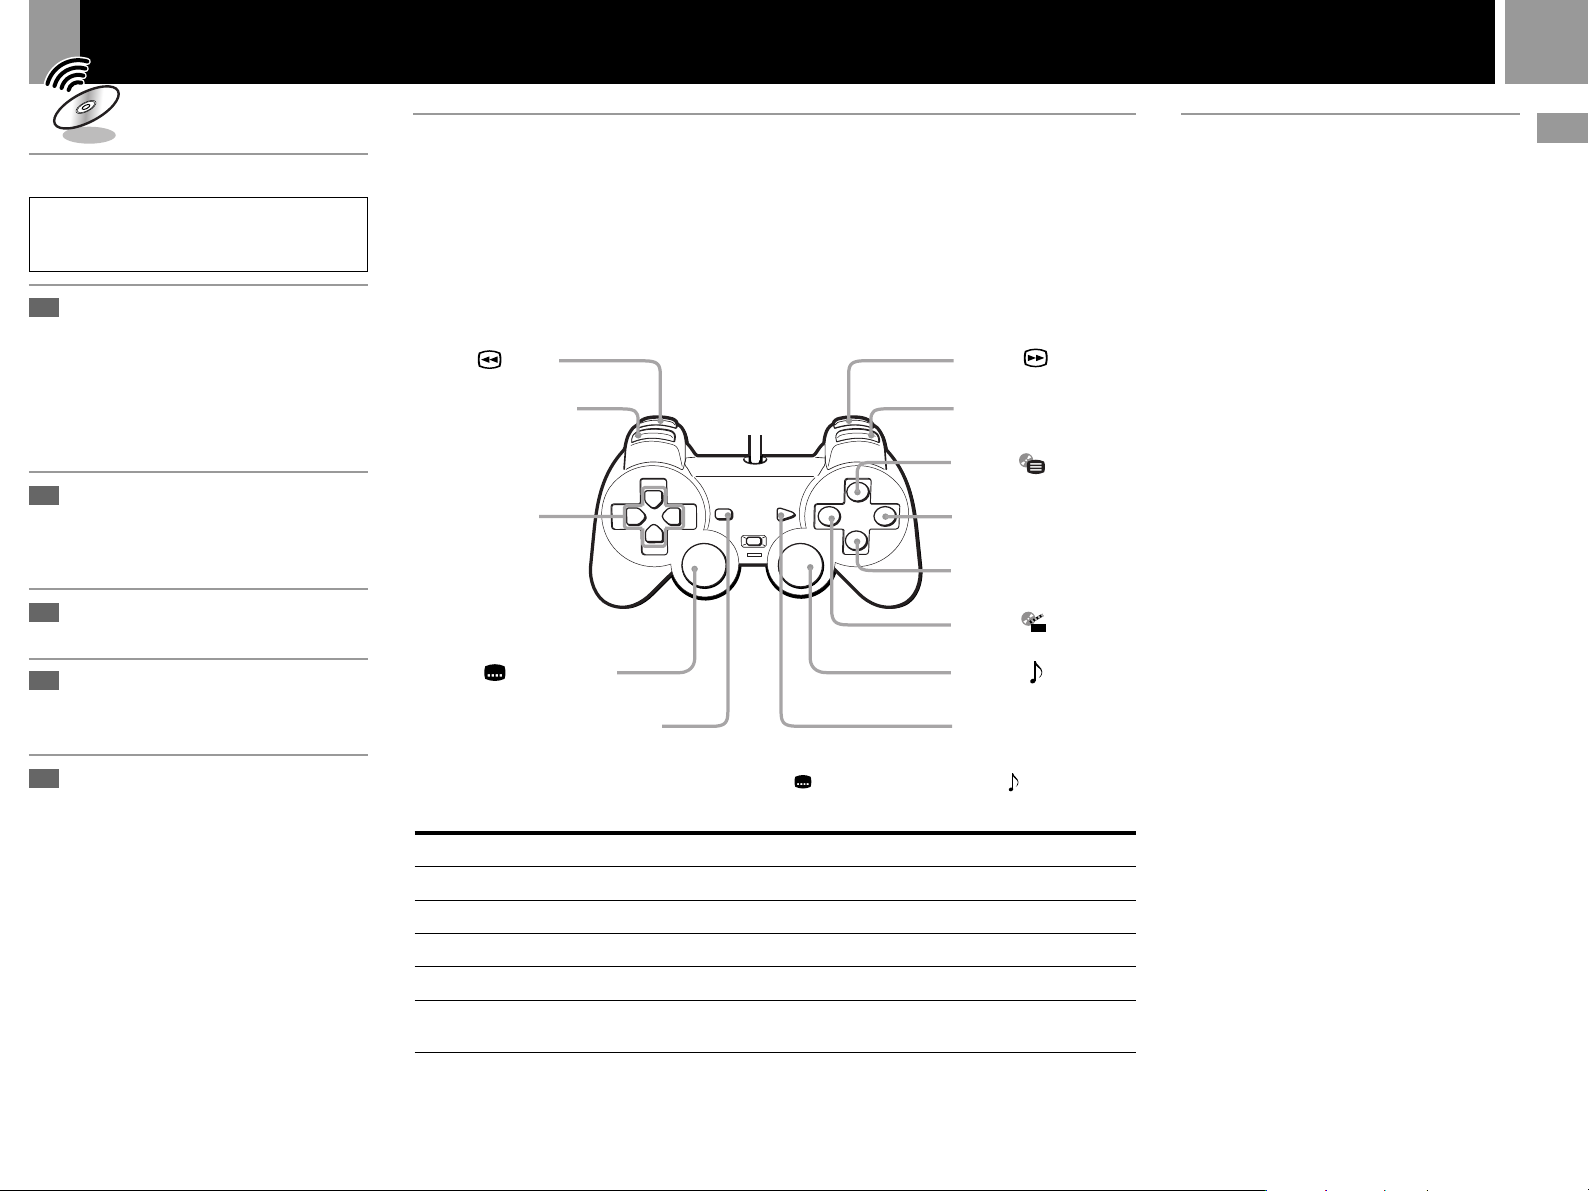
Operating the DVD player directly with a controller
You can operate the DVD player directly with the buttons on a controller when the Control Panel
(page 14) is not displayed. You can also operate the DVD player using the DVD remote control (for
PlayStation®2) (sold separately). For detailed instructions, refer to the instruction manual supplied
with the SCPH-10171 DVD remote control (for PlayStation®2) with IR receiver unit.
This console is equipped with DVD Player software that is compatible with the DVD remote control
(for PlayStation®2). You can use the DVD remote control simply by inserting the IR receiver unit
(supplied with the DVD remote control) into a controller port of the console. No memory card (8MB)
(for PlayStation®2) is required when using the DVD remote control (for PlayStation®2) with this
console.
L2 button: (Search)
(Page 16)
L1 button: . (Previous)
DUALSHOCK
2
Directional buttons:
Cursor control
L3 button*: (Subtitle Options)
(Page 15)
SELECT button: Display the Control Panel
(Page 14)
* When using a controller without the L3 or R3 button, select the (Subtitle Options) function or the (Audio Options)
function using the Control Panel (see page 14).
To
Stop
Pause
Resume play after pause
Go to the next chapter in continuous play mode
Go back to the preceding chapter in continuous
play mode
You can also operate various DVD functions using the on-screen menu (Control Panel). For details,
see “Using the Control Panel” (page 14).
Operation
Press the a button.
Press the START button.
Press the START button.
Press the R1 button.
Press the L1 button twice.
R2 button: (Search)
(Page 16)
R1 button: > (Next)
¢ button:
(Page 15)
a button: Cancel / x (Stop)
✕ button: Enter
s button:
(Page 15)
R3 button*:
(Page 15)
START button:
N (Play) / X (Pause)
(DVD Menu)
(Title Menu)
(Audio Options)
Playback from the last
stopping point (Resume Play)
The DVD player remembers the point where
you stopped the disc, and you can resume
playback from that point.
1...... While playing a disc, press the a button to
stop playback.
“Press [Play] to resume viewing. To start
from the beginning, press [Stop] and then
[Play].” appears, and then the Control
Panel (page 14) is displayed on the TV
screen.
If the message “Resume function cannot
be used here. Play will restart from the
beginning.” appears, Resume Play is not
available.
2...... Select N (Play) using the directional
buttons and press the ✕ button.
The DVD player starts playback from the
point where you stopped the disc in step 1.
To play from the beginning of the disc
After step 1, select x (Stop) and press the ✕
button. The point where you stopped playing is
cleared.
Select N (Play) and press the ✕ button.
Notes
• Resume Play may not be available on some DVDs.
• Depending on where you stop the disc, the console may
resume playback from a slightly different point.
• The point where you stopped playing is cleared when:
– you open the disc tray
– you shift to standby mode by pressing and holding
down the 1/RESET button on the front of the
console
– you turn the power off using the MAIN POWER
switch on the back of the console
– you start playback after selecting a title or chapter.
US
Games / Audio CDs / DVD videos
14
Using the Control Panel
Using the Control Panel
You can enjoy various functions using the onscreen menu (Control Panel).
The possible functions are different depending
on the disc.
1
Press the SELECT button.
The Control Panel appears on the TV
screen.
2
Select the item you want using
the directional buttons.
Press the ✕ button.
3
For details on each Control Panel
display item, see pages 15 - 20.
You can select some items directly with the
controller
See page 13.
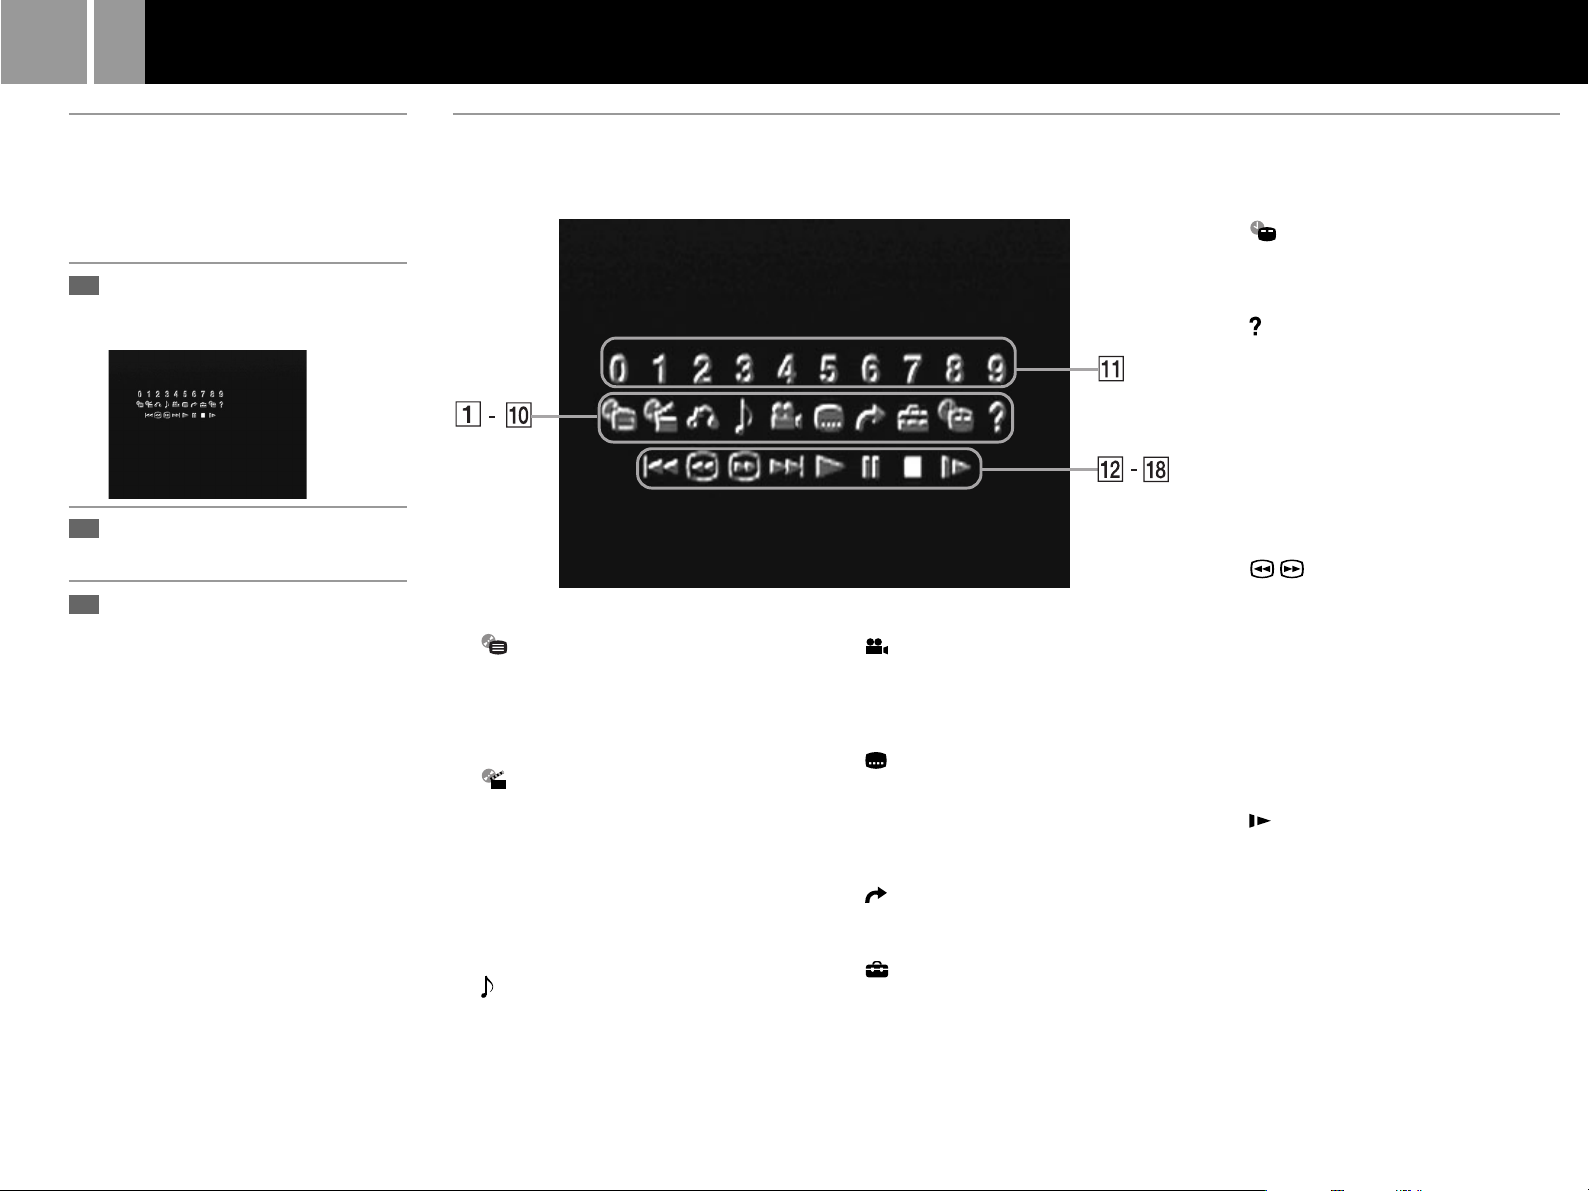
Control Panel item list
1 DVD Menu (page 15)
Some DVDs allow you to select the disc
contents using a menu. When you play
these DVDs, you can select the language for
the subtitles, the language for the sound,
etc., using the DVD menu.
2 Title Menu (page 15)
A DVD is divided into long sections of a
movie or a music feature called “titles.”
When you play a DVD that contains several
titles, you can select the title you want
using the Title menu.
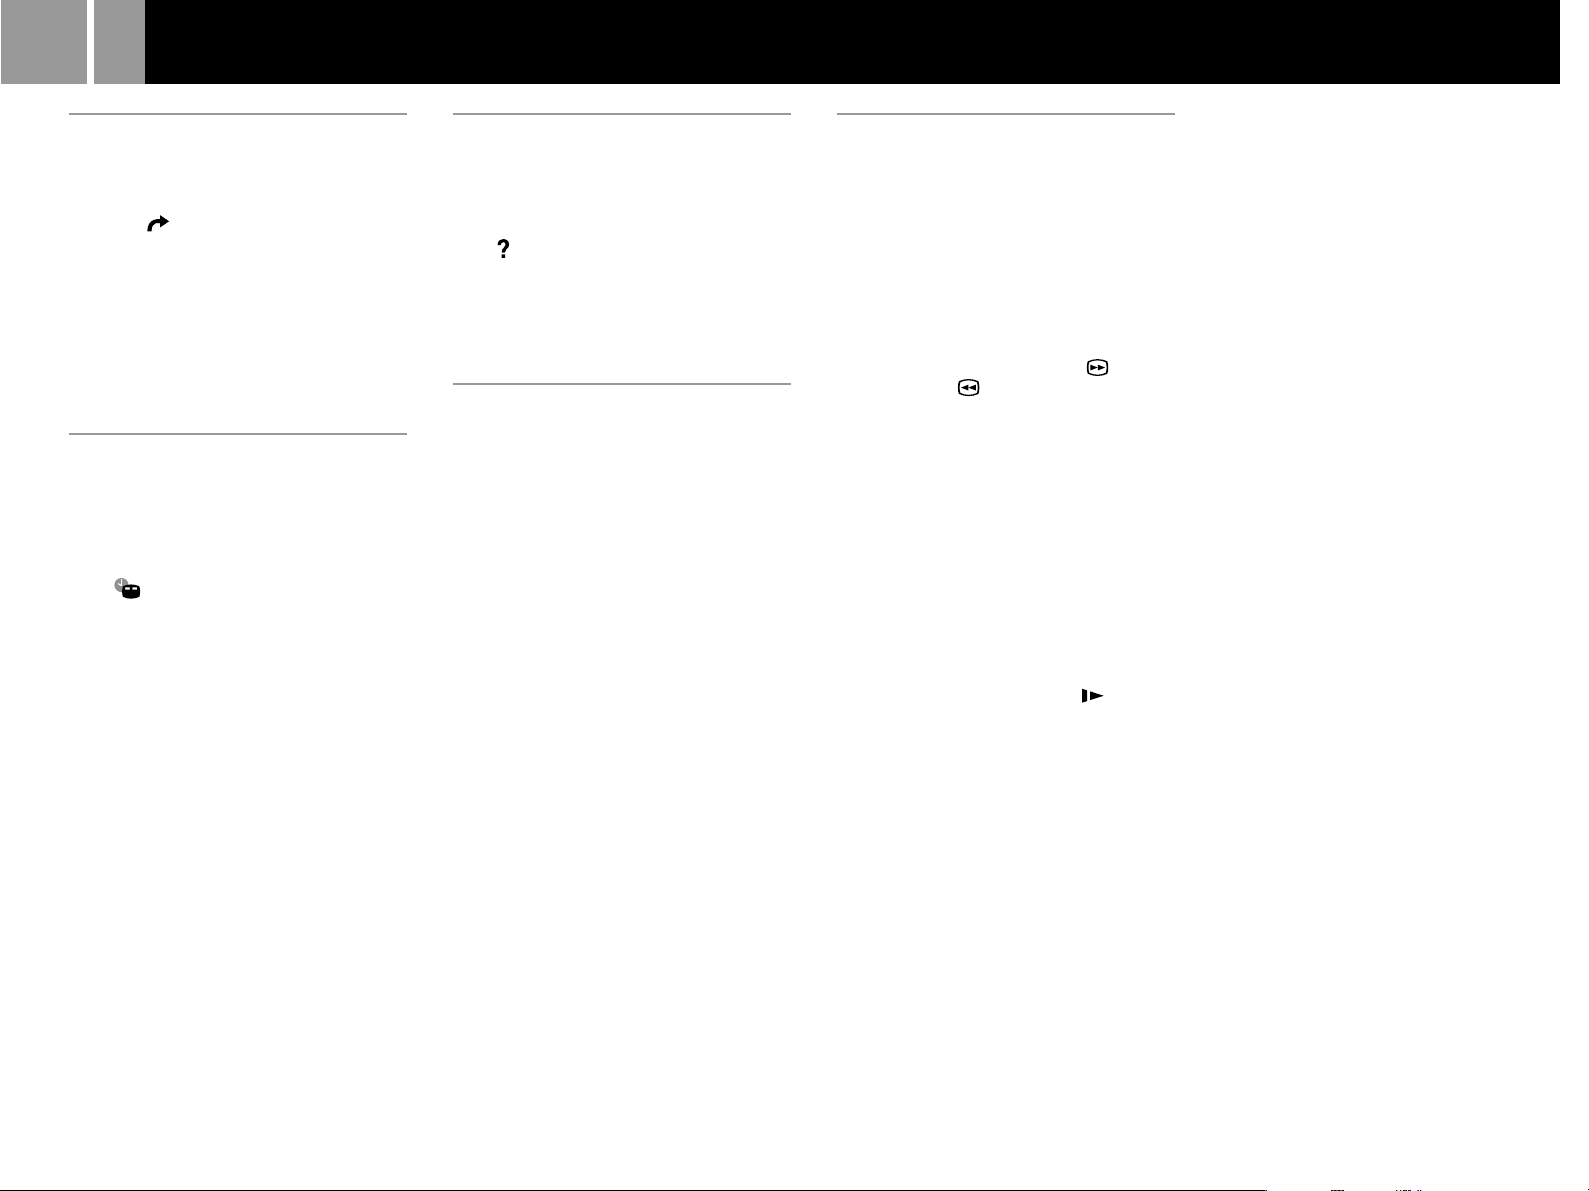
3 O Return (page 15)
You can return to the previous screen in the
DVD menu or Title menu.
4 Audio Options (page 15)
If the DVD is recorded with multilingual
tracks, you can select the language you
want to hear while playing the DVD.
5 Angle Options (page 15)
With DVDs on which various angles
(multi-angles) for a scene are recorded,
you can select among the various angles
available.
6 Subtitle Options (page 15)
With DVDs on which subtitles are
recorded, you can change the language
whenever you want while playing the
DVD, and turn it on and off whenever you
want.
7 Go to Title (page 16)
You can select the number of the title you
want to search for.
8 Setup (page 17)
Using the Setup display, you can do the
initial setup, adjust the picture and sound
and set the various outputs. You can also
set a language for the subtitles and the
Setup display, restrict playback by
children, and so on.
9 Chapter Display (page 16)
While playing a disc, you can check the
current title number and current chapter
number on the TV screen.
0 Help (page 16)
The list of the direct buttons on the
controller is displayed on the TV screen.
qa Go to Chapter (page 16) /Number buttons
You can select the number of the chapter
you want to search for.
qs . Previous
You can go to the previous chapter in
continuous play mode.
qd / Search (page 16)
You can locate a particular point on the
DVD quickly by monitoring the picture.
qf > Next
You can go to the next chapter in
continuous play mode.
qg N Play
qh X Pause
qj x Stop
qk Slow (page 16)
You can locate a point on the DVD slowly
by watching the screen.

15
Using the DVD menu
Some DVDs allow you to select the disc
contents using a menu. When you play these
DVDs, you can select the language for the
subtitles, the language for the sound, etc., using
the DVD menu.
1...... Select (DVD Menu) using the
directional buttons and press the ✕ button.
The DVD menu appears on the TV screen.
The contents of the menu vary from disc to
disc.
2...... Press the directional buttons to select the
item you want to change.
3...... To change other items, repeat step 2.
4...... Press the ✕ button.
You can display the DVD menu directly
Press the ¢ button on the controller when the
Control Panel is not displayed.
If you want to select the language for the
DVD menu
You can change this setting by choosing
“Language Setup” and then “DVD Menu.”
For details, see page 18.
To return to the previous screen in the DVD
menu
Select O (Return) and press the ✕ button.
This function may not be available on some
DVDs.
Notes
•A DVD menu may not be available on some DVDs.
• Depending on the DVD, the “DVD menu” may be
referred to as a “menu” in the instructions supplied
with the disc.
Using the Title menu
A DVD is divided into long sections of a movie
or a music feature called “titles.” When you
play a DVD which contains several titles, you
can select the title you want using the Title
menu.
1...... Select (Title Menu) using the
directional buttons and press the ✕ button.
The Title menu appears on the TV screen.
The contents of the menu vary from disc to
disc.
2...... Press the directional buttons to select the
title you want to play.
3...... Press the ✕ button.
The console starts playing the selected
title.
You can display the Title menu directly
Press the s button on the controller when the
Control Panel is not displayed.
To return to the previous screen in the Title
menu
Select O (Return) and press the ✕ button.
This function may not be available on some
DVDs.
Notes
• On some DVDs, you may not be able to select the title.
• On some DVDs, the “Title menu” may be referred to as
a “menu” or “title” in the instructions supplied with
the disc. “Press ENTER.” may also be expressed as
“Press SELECT.”
Changing the audio language
If the DVD is recorded with multilingual
tracks, you can select the language you want to
hear when playing the DVD.
The languages you can select are different
depending on the DVD.
Select (Audio Options) using the directional
buttons and press the ✕ button.
Each time you press the ✕ button, the language
changes.
You can select “Audio Options” directly
Press the R3 button on the controller when the
Control Panel is not displayed. Each time you
press the button, the language changes.
Notes
• Due to the programming on some DVDs, you may not
be able to change languages even if multilingual tracks
are recorded on the DVD.
• When playing a DVD, the audio settings may change
when you change titles.
Changing the viewing angle
With DVDs on which various angles (multiangles) for a scene are recorded, you can
change the angles. For example, while playing
a scene of a train in motion, you can display the
view from either the front of the train, the left
window of the train or from the right window
without having the train’s movement
interrupted.
Select (Angle Options) using the directional
buttons and press the ✕ button.
Each time you press the ✕ button, the angle
changes.
Notes
• The number of angles varies from disc to disc or from
scene to scene. The number of angles that can be
changed on a scene is equal to the number of angles
recorded for that scene.
• Due to the programming on some DVDs, you may not
be able to change angles even if multiple angles are
recorded on the DVD.
Displaying subtitles
With DVDs on which subtitles are recorded,
you can turn the subtitles on and off whenever
you want while playing the DVD.
With DVDs on which multilingual subtitles are
recorded, you can also change the subtitle
language whenever you want while playing the
DVD. For example, you can select the language
you want to practice and turn the subtitles on
for better understanding.
Select (Subtitle Options) using the
directional buttons and press the ✕ button.
You can select the subtitle language, and turn it
on or off.
The languages you can select are different
depending on the DVD.
You can select “Subtitle Options” directly
Press the L3 button on the controller when the
Control Panel is not displayed. You can select
the subtitle language, and turn it on or off.
Notes
• When playing a DVD on which no subtitles are
recorded, no subtitles appear.
• Due to the programming on some DVDs, you may not
be able to turn the subtitles on even if there are subtitles
recorded on the DVD.
• Depending on the DVD, you may not be able to turn
the subtitles off.
• The type and number of languages for subtitles vary
from disc to disc.
• Due to the programming on some DVDs, you may not
be able to change the subtitles even if multilingual
subtitles are recorded on the DVD.
• When playing a DVD, the subtitle settings may change
when you change titles.
US
DVD videos
16
Using the Control Panel (continued)
Searching for a title
You can select the number of the title you want
to search for using the number buttons.
1...... Select (Go to Title) using the
directional buttons and press the ✕ button.
“Go to Title - -” appears on the TV screen.
2...... Enter the number of the title in 2 digits
using the number buttons.
The DVD player starts playback at the
selected title.
Displaying information while
playing a disc
While playing a disc, you can check the current
title number and current chapter number on
the TV screen.
Select (Chapter Display) using the
directional buttons and press the ✕ button.
Each time you press the ✕ button, you can turn
the display on and off.
Displaying the list of direct
button functions (Help)
The list of the direct buttons on the controller
can be displayed on the TV screen.
Select (Help) using the directional buttons
and press the ✕ button.
To turn off the list
Press the ✕ button.
Searching for a chapter
You can select the number of the chapter you
want to search for using the number buttons.
Enter the number of the chapter in 2 digits
using the number buttons.
The DVD player starts playback at the selected
chapter.
Finding a particular point on a
disc (Search)
You can locate a particular point on a disc
quickly by monitoring the picture or playing
back slowly.
Note
Depending on the DVD, you may not be able to do some
of the operations described.
Locating a point quickly (Search)
1...... While a disc is playing, select (Search
forward) or (Search backward) using
the directional buttons.
2...... Keep the ✕ button pressed until you locate
the point you are looking for.
When you find the point you want, release
the button to return to normal playback
speed.
You can also use the direct buttons
Press the R2 (forward) or L2 (backward) buttons on the
controller when the Control Panel is not displayed.
Locating a point slowly by watching the
screen (Slow-motion play)
1...... While a disc is playing, select (Slow)
using the directional buttons.
2...... Press the ✕ button.
Slow-motion playback starts.
When you find the point you want, select
N (Play) and press the ✕ button to return
to the normal speed.
You can also resume playback by pressing
the START button.

Settings and adjustments for the DVD player
17
Using the Setup display
Using the Setup display, you can change the
initial settings, adjust the picture and sound
and set various other output options. You can
also choose a language for subtitles, restrict
playback by children, and so on.
1
Press the SELECT button to
show the Control Panel on the
TV screen.
2
Select (Setup) using the
directional buttons and press
the ✕ button.
The Setup display appears on the TV
screen.
3
Select the category you want
using the directional buttons.
4
Press the ✕ button.
The selected category is highlighted.
Select the item you want using
5
the directional buttons.
Setup display item list
The default settings are underlined.
US
DVD videos
Press the ✕ button.
6
After changing DVD settings
To save your changes, be sure to eject the DVD
before pressing the 1/RESET button or
turning off the unit with the MAIN POWER
switch. Please note that changes will not be
saved if you reset or turn off the console
without first ejecting the DVD.

18
Settings and adjustments (continued)
Setting language options
(Language Setup)
“Language Setup” allows you to choose from
among various languages for the on-screen
display or audio track.
The default settings are underlined.
Select “Language Setup” in the Setup display.
Notes
• When you select a language that is not recorded on the
DVD, one of the recorded languages is automatically
selected for the “DVD Menu,” “Audio” and “Subtitles”
settings.
• Depending on the DVD, the console may not start
playing the language you have selected in the “DVD
Menu,” “Audio” or “Subtitles.”
x OSD
Selects the language for the on-screen display.
• English
• French
• German
• Italian
• Spanish
• Dutch
• Portuguese
x DVD Menu
Selects the language for the DVD menu.
• English
• French
• German
• Italian
• Spanish
• Dutch
• Danish
• Swedish
• Finnish
• Norwegian
• Portuguese
• Russian
• Chinese
• Japanese
• Language Options
When you select “Language Options,” the
language list is displayed. Select the
language from the list.
x Audio
Selects the language for the audio track.
• English
• French
• German
• Italian
• Spanish
• Dutch
• Danish
• Swedish
• Finnish
• Norwegian
• Portuguese
• Russian
• Chinese
• Japanese
• Language Options
When you select “Language Options,” the
language list is displayed. Select the language
from the list.
x Subtitles
Selects the language for the subtitles.
• Audio Follow*
• English
• French
• German
• Italian
• Spanish
• Dutch
• Danish
• Swedish
• Finnish
• Norwegian
• Portuguese
• Russian
• Chinese
• Japanese
• Language Options
When you select “Language Options,” the
language list is displayed. Select the
language from the list.
* When you select “Audio Follow,” the language for the
subtitles changes according to the language you
selected for the audio track.
After changing DVD settings
To save your changes, be sure to eject the DVD
before pressing the 1/RESET button or turning
off the unit with the MAIN POWER switch. Please
note that changes will not be saved if you reset or
turn off the console without first ejecting the DVD.
Setting TV display options
(Screen Setup)
“Screen Setup” allows you to set various
options for your TV display.
The default settings are underlined.
Select “Screen Setup” in the Setup display.
x TV Type
Selects the aspect ratio of the TV to be
connected.
You can change this setting only when the
DVD is stopped.
• 16:9: Select this option when using a widescreen TV, or a standard TV that displays in
wide mode.
• 4:3 Letter Box: Select this option when using
a standard TV. This setting displays a wide
picture with margins on the upper and lower
portions of the screen.
• 4:3 PAN SCAN: Select this option when
using a standard TV. Displays a wide picture
adjusted to match the height of the screen,
automatically cutting off the portions at left
and right that do not fit.
16:9
4:3 Letter Box
4:3 PAN SCAN
Note
Depending on the DVD, “4:3 Letter Box“ may be selected
automatically instead of “4:3 PAN SCAN” and vice versa.
x DNR (Digital Noise Reduction)
If the playback picture has noise or
interference, set this item to “DNR1” or
“DNR2.”
• Off: Normally select this position.
• DNR1: makes the picture clear by reducing
noise.
• DNR2: makes the picture even clearer by
reducing noise.
Notes
• When you select “DNR2,” an afterimage may appear.
In this case, select ”Off.”
• Depending on the DVD, the DNR function may
produce limited results.
x Outline Sharpening
Makes the outline of the picture sharpened or
softened. The higher the value, the sharper the
outline.
•+2
•+1
• 0 : Normally select this position.
•-1
•-2
x Display
Displays or turns off the playing status
information on the TV screen.
• On : When you operate the DVD player, the
playing status appears for a few seconds on
the TV screen.
• Off : The playing status is not displayed.
After changing DVD settings
To save your changes, be sure to eject the DVD
before pressing the 1/RESET button or turning
off the unit with the MAIN POWER switch. Please
note that changes will not be saved if you reset or
turn off the console without first ejecting the DVD.
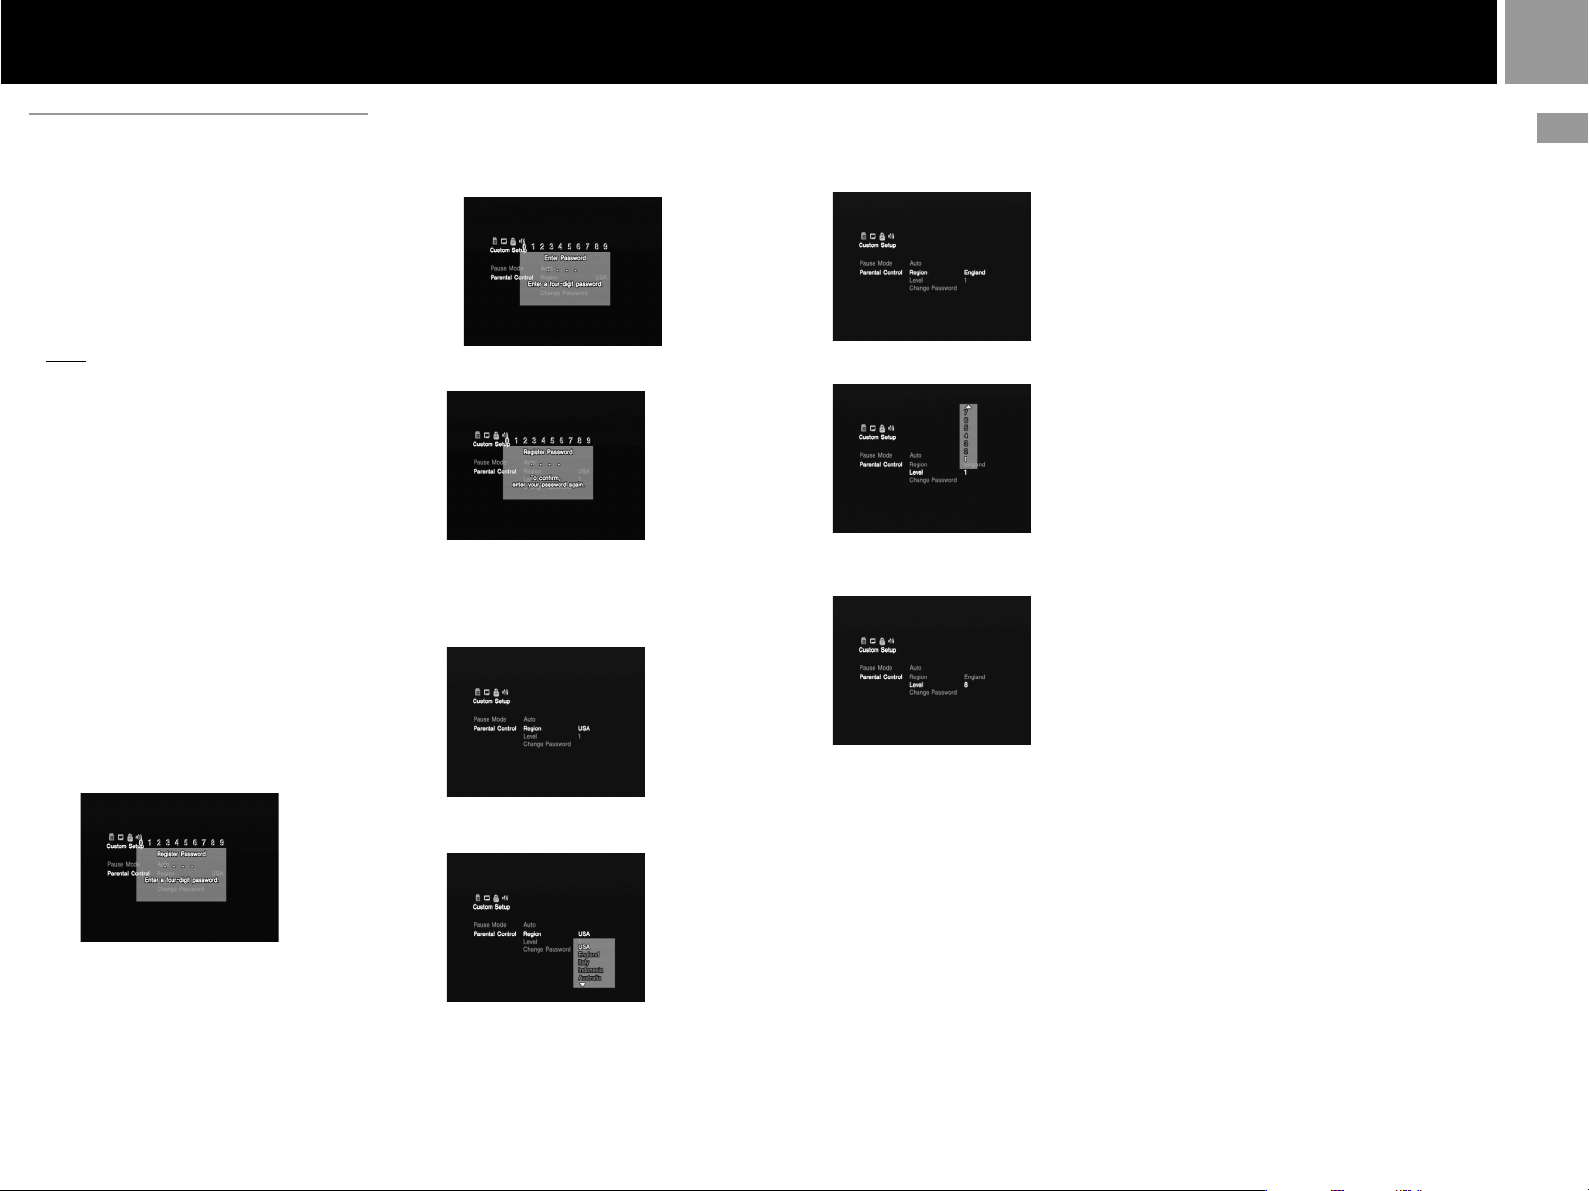
19
Setting viewer options
(Custom Setup)
“Custom Setup” allows you to set the playback
conditions.
The default settings are underlined.
Select “Custom Setup” in the Setup display.
x Pause Mode
Selects the picture in pause mode.
• Auto : A picture, including subjects that
move dynamically, is output without any
jitter. Normally select this position.
• Frame : A picture including subjects that do
not move dynamically is output with high
resolution.
x Parental Control
Playback of some DVDs can be restricted.
The Parental Control function allows you to set
a playback restriction level and a password to
prevent children from viewing certain content.
Select “Custom Setup” in the Setup display.
1...... Select “Parental Control” using the
directional buttons, then press the ✕
button.
x When you have not entered a password
The display for entering a password
appears.
x When you have already registered a
password
The display for confirming the
password appears. Skip step 2.
2...... Enter a password in 4 digits using the
number buttons.
3...... To confirm your password, enter it again
using the number buttons.
You can set the Parental Control level and
change the password.
4...... Select “Region” using the directional
buttons, then press the ✕ button.
5...... Select a geographic region to set the
standard Parental Control level for that
region using the directional buttons, then
press the ✕ button.
6...... Select “Level” using the directional
buttons, then press the ✕ button.
7...... Select the level you want using the
directional buttons, then press the ✕
button.
The lower the value, the more strict the
restriction.
To turn off the Parental Control function
and play the DVD after entering your
password
Set “Level” to “Off” in step 7, then press the ✕
button.
To change the password
1...... After step 3, select “Change Password”
using the directional buttons, then press
the ✕ button.
The display for changing the password
appears.
2...... Follow steps 2 and 3 to enter a new
password.
Playing a disc which is protected by
Parental Control
1...... Insert the disc and press the START
button.
The Parental Control display appears.
2...... Enter your 4-digit password using the
number buttons.
The DVD player starts playback.
When you stop playing the DVD, the
Parental Control level returns to the
original setting.
If you forget your password
Press the SELECT button and enter the 4-digit
number “7444” whenever the Parental Control
display asks you for your password. The old
password is deleted.
Notes
• When you play DVDs that do not have the Parental
Control function, playback cannot be restricted on this
DVD player.
• If you do not set a password, you cannot change the
Parental Control settings.
• Depending on the DVD, you may be asked to change
the Parental Control level while playing the disc. In
this case, enter your password, then change the level.
When you stop playing the DVD, the Parental Control
level returns to the original setting.
US
DVD videos
After changing DVD settings
To save your changes, be sure to eject the DVD
before pressing the 1/RESET button or
turning off the unit with the MAIN POWER
switch. Please note that changes will not be
saved if you reset or turn off the console
without first ejecting the DVD.

20
Settings and adjustments (continued)
Setting sound options
(Audio Setup)
“Audio Setup” allows you to adjust your audio
settings according to the playback conditions.
The default settings are underlined.
Select “Audio Setup” in the Setup display.
x Audio Digital Out
Switches the methods of outputting audio
signals when you, connect 1. a digital
component such as a receiver (amplifier) with a
digital connector, 2. an audio component with a
built-in decoder (Dolby Digital or DTS), 3. a
DAT or MD deck, via the DIGITAL OUT
(OPTICAL) connector using an optical digital
cable. For connection details, see page 8.
You cannot adjust “Dolby Digital” and “DTS”
if you set “DIGITAL OUT (OPTICAL)” to
“Off.”
x DIGITAL OUT (OPTICAL)
Selects whether to output signal via the
DIGITAL OUT (OPTICAL) connector.
• On : select this when you connect with an
optical digital cable (sold separately).
Normally select this option.
When you select “On,” you can set “Dolby
Digital” and “DTS.”
• Off : select this when you do not want sound
signal to be output via the DIGITAL OUT
(OPTICAL) connector.
Note
When you select “Off,” you cannot set “Dolby Digital”
and “DTS.”
x Dolby Digital
Selects the Dolby Digital signals to be output
via the DIGITAL OUT (OPTICAL) connector.
• On : when the console is connected to an
audio component with a built-in Dolby
Digital decoder.
If the console is connected to an audio
component without a built-in Dolby Digital
decoder, do not turn this option on. If you
select this option by mistake, when you play
a Dolby Digital audio track, a loud noise (or
no sound) will come out from the speakers,
possibly hurting your ears or damaging the
speakers.
• Off : when the console is connected to an
audio component without a built-in Dolby
Digital decoder.
x DTS
Selects the DTS signals to be output via the
DIGITAL OUT (OPTICAL) connector.
• On : when the console is connected to an
audio component with a built-in DTS
decoder.
If the console is connected to an audio
component without a built-in DTS decoder,
do not turn this option on. If you select this
option by mistake, when you play a DTS
audio track, a loud noise (or no sound) will
come out from the speakers, possibly hurting
your ears or damaging the speakers.
• Off : when the console is connected to an
audio component without a built-in DTS
decoder.
x Audio Track Auto Select Mode
Gives the audio track which contains the
highest number of channels priority when you
play a DVD on which multiple audio formats
(PCM, DTS or Dolby Digital format) are
recorded.
• On : Priority given.
• Off : No priority given.
Notes
• When you set this item to “On,” the language may
change depending on the “Audio” settings in
“Language Setup.”
The “Audio Track Auto Select Mode“ setting has
higher priority than the “Audio” settings in “Language
Setup” (page 18).
• If you set “DIGITAL OUT (OPTICAL)” to “On” and
“DTS” to “Off” in “Audio Setup,” the DTS audio track
is not played even if you set this item to “On” and the
highest-numbered audio channel is recorded in DTS
format.
• If PCM, DTS and Dolby Digital audio tracks have the
same number of channels, the console selects PCM,
Dolby Digital and DTS audio tracks in this order.
• Depending on the DVD, the audio channel with
priority may be predetermined. In this case, you cannot
give priority to the DTS or Dolby Digital format by
selecting “On.”
x DVD Video Volume
If the audio output level of the DVD is low, you
can turn up the volume of the DVD. (Note:
DIGITAL OUT (OPTICAL) must be set to “Off”
to access this function.)
• +2 : You can turn up the volume.
• +1 : You can turn up the volume.
• Standard : Original audio volume. Normally
select this position.
Note
Depending on the DVD, the sound may be distorted if you
select “+1” or “+2.”
After changing DVD settings
To save your changes, be sure to eject the DVD
before pressing the 1/RESET button or
turning off the unit with the MAIN POWER
switch. Please note that changes will not be
saved if you reset or turn off the console
without first ejecting the DVD.
This product incorporates copyright protection
technology that is protected by method claims
of certain U.S. patents and other intellectual
property rights owned by Macrovision
Corporation and other rights owners. Use of
this copyright protection technology must be
authorized by Macrovision Corporation, and is
intended for home and other limited viewing
uses only unless otherwise authorized by
Macrovision Corporation. Reverse engineering
or disassembly is prohibited.
Troubleshooting
21
Please go through this
section if you experience
difficulty in operating the
PlayStation®2 console.
1 If you experience any of the following
difficulties, use this troubleshooting
guide to help remedy the problem
before requesting repair. Should any
problem persist, contact our technical
support line at 1-800-345-7669 for
assistance.
2 Make sure the AC power cord is
connected to the console and the wall
outlet, and the TV (or VCR) or the
supplied accessories are connected to
the console correctly.
Power
The power is not turned on.
, Make sure the AC power cord is connected
securely.
, The console is not turned on. Turn on the
console using the MAIN POWER switch on
the back of the console.
Picture
There is no picture.
, Make sure the console is connected to the
TV (or VCR) with the AV cable (integrated
audio/video).
,
Make sure the console and the TV (or VCR)
are turned on.
, Make sure you have selected the video
input on the TV (or VCR).
, Make sure the AV cable (integrated audio/
video) is connected securely.
, Make sure the inserted disc can be played
with this console. (see page 3)
, Make sure the disc is placed with the label
side facing up (data side down).
, The disc is not inserted correctly.
, The console is in pause mode.
, Try another set of AV cables .
Picture noise appears.
, Clean the disc.
, Moisture has condensed inside the console.
(see page 2)
, The console is placed on an unstable
surface. Place the console on a stable and
flat surface. Do not shake or vibrate the
console.
, If the video signal from the console has to
go through the VCR to get to the TV, the
copy protection applied to some DVD
videos could affect picture quality. When
playing a DVD video, connect the console
to the TV directly. (see page 7)
The aspect ratio cannot be changed
according to the TV when playing wide
picture DVD videos.
, Depending on the disc, the aspect ratio is
fixed.
, Make sure the console is connected to the
TV directly. (The selector or receiver
(amplifier) may not be connected between
the console and the TV.)
, Depending on the TV, the aspect ratio is
fixed.
Sound
There is no sound.
, Make sure the console is connected to the
TV (or VCR) with the AV cable (integrated
audio/video).
, Make sure the console and the TV (or VCR)
are turned on.
, Make sure you have selected the video
input on the TV (or VCR).
, Make sure the TV volume is set properly or
“mute” is not selected on the TV.
, Make sure the AV cable (integrated audio/
video) is connected securely.
, Make sure the inserted disc can be played
with this console. (see page 3)
, Make sure the disc is placed with the label
side facing up (data side down).
, Make sure you have connected the console
to the audio input connectors on the
receiver (amplifier) correctly.
, Try another set of AV cables.
, Check the speaker connections and
settings.
Refer to the operating manual of your
receiver (amplifier).
, Make sure you select the appropriate input
on the receiver (amplifier) so that you can
listen to sound from the console.
, The console is in pause mode.
, The console is in search/slow-motion mode
(when playing a DVD video).
, The system setting is not correct for when
the console is connected to audio
equipment with DIGITAL OUT (OPTICAL)
connectors. (see page 8)
Poor sound quality.
, Clean the disc.
,
The console is placed on an unstable surface.
Place the console on a stable and flat surface.
Do not shake or vibrate the console.
, Moisture has condensed on the disc. (see
page 2)
, You are playing a CD with DTS audio
tracks.
You can play a CD with DTS audio tracks
only when the console is connected to
audio equipment with a DTS decoder.
The surround effect is difficult to hear when
you are playing a DVD video with a Dolby
Digital audio track.
, Check the speaker connections and
settings.
Refer to the operating manual of your
receiver (amplifier).
,
Depending on the DVD, the output signal
may not comprise the entire 5.1 channel
range. It may be monaural or stereo even if
the audio track is recorded in Dolby Digital.
The sound comes from the center speaker
only.
, Depending on the disc, the sound may
come from the center speaker only.
Operation
The controller does not function.
, Make sure the controller is connected to the
console.
, Make sure the analog controller
(DUALSHOCK®2) or the analog controller
(DUALSHOCK®) is set to the appropriate
mode for the software. (see page 11)
, Try another set of controllers.
The software title does not start.
, Make sure the inserted disc can be played
with this console. (see page 3)
, Make sure the disc is placed with the label
side facing up (data side down).
, Make sure the disc is inserted correctly.
, Moisture has condensed on the disc. (see
page 2)
, Clean the disc.
, Try another copy of the disc.
You cannot save data on the memory card
(8MB) (for PlayStation
, Make sure the memory card (8MB) (for
PlayStation®2) or memory card is inserted
securely.
, Make sure you are playing the game
correctly.
Refer to the appropriate software manual.
, Make sure there are empty blocks on the
memory card (8MB) (for PlayStation®2) or
memory card.
, Try another memory card (8MB) (for
PlayStation®2) or memory card.
The console does not function properly.
, Static electricity, etc. may affect the
console’s operation.
Turn off the MAIN POWER switch and
then turn it back on.
1 indicator flashes in red and the console
does not work.
, A flashing red light indicates a console
“fault” condition and the unit will not
operate. Remove any obstructions from the
vents to allow the console to cool down.
Resume play after the console returns to
standby mode.
2) or memory card.
®
US
DVD videos / Additional information
 Loading...