


 Loading...
4-083-403-12 (1)
TV Projection
XA43-KP
Projection TV
Operating Instructions |
|
EN |
|||
|
|
|
|
|
|
Mode d’emploi |
|
|
F |
||
|
|
|
|
||
xxxxxxxxxx |
C |
||||
|
|
|
|
|
|
xxxxxxxxxx |
|
|
|
|
C |
|
|
|
|
|
|
|
|
|
|
|
PR |
|
|
|
|
|
|
|
|
|
|
|
A |
KP-XA43
M61, M91, M31
© 2001 Sony Corporation
2
 3
3
L(MONO) |
R |
ENTER |
MENU |
AUTO PROGRAM
PR : 0 1
T V SYS : B / G
VHF L O W
1
3

4

WARNING
To prevent fire or shock hazard, do not expose the projection TV to rain or moisture.
Dangerously high voltages are present inside the projection TV. Do not open the cabinet. Refer servicing to qualified personnel only.
For general safety:
•Do not expose the projection TV to rain or moisture.
•Do not open the rear cover.
For safe installation:
•Do not block the ventilation openings.
•Do not install the projection TV in hot, humid or excessively dusty places.
•Do not install the projection TV where it may be exposed to mechanical vibrations.
•Avoid operating the projection TV at temperatures below 5° C (41° F).
•If the projection TV is transported directly from a cold to a warm location, or if the room temperature has changed suddenly, the picture may be blurred or show poor color. This is because moisture has condensed on the mirror or lenses inside. If this happens, let the moisture evaporate before using the projection TV.
•To obtain the best picture, do not expose the screen to direct illumination or direct sunlight. It is recommended to use spot lighting directed down from the ceiling or to cover the windows that face the screen with opaque drapery. It is desirable to install the projection TV in a room where the floor and walls are not of reflecting material. If necessary, cover them with dark carpeting or wall paper.
•Do not install the appliance in a confined space, such as a bookcase or built-in cabinet.
For safe operations:
•Do not operate the projection TV on anything but 110–120/220-240 V AC, 50/60 Hz.
•Do not operate the projection TV if any liquid or solid object falls in it—have it checked immediately.
•Do not keep the projection TV plugged in if you are not going to use it for several days.
•Do not pull the power cord to disconnect the projection TV. Pull it out by the plug.
Caution
•When using TV games, computers, and similar products with your projection TV, keep the brightness and contrast functions at low settings. If a fixed (non-moving) pattern such as a station logo is left on the screen for long periods of time at a high brightness or contrast setting, the image can be permanently imprinted onto the screen. These types of imprints are not covered by your warranty.
•Avoid touching the screen surface and do not scratch it with hard objects.
Table of contents
Getting Started
6 Connections
9Installing the projection TV
10Getting to know the remote commander
11Introducing the menu system
12Changing the menu language
13Presetting channels
16 Adjusting the convergence (CONVERGENCE)
Operations
EN
17 Watching the TV
19 Adjusting the picture and sound
21Listening with dynamic sound (POWER BASSO)
22Listening to the surround sound (HYPER SURROUND)
23Selecting a stereo or bilingual program
24Viewing Teletext
25Operating optional components
27Viewing a video game screen (GAME MODE)
28Customizing the TV
Additional Information
29Troubleshooting
30Cleaning the screen
30Specifications
Getting Started 5-EN
Getting Started
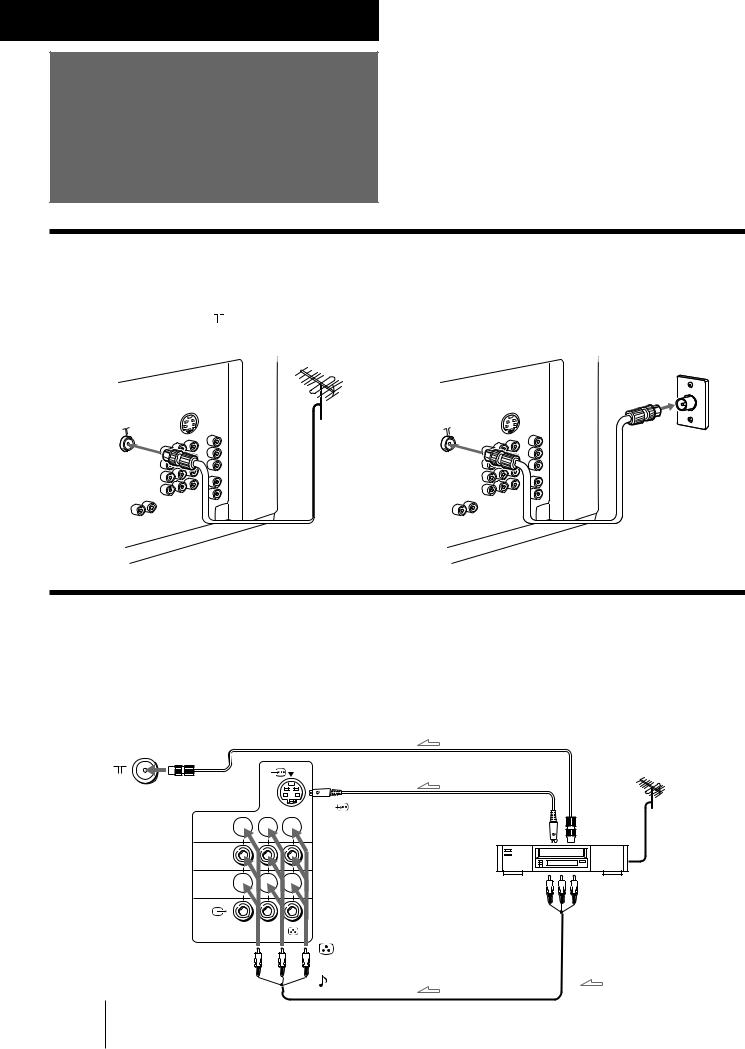
Connections
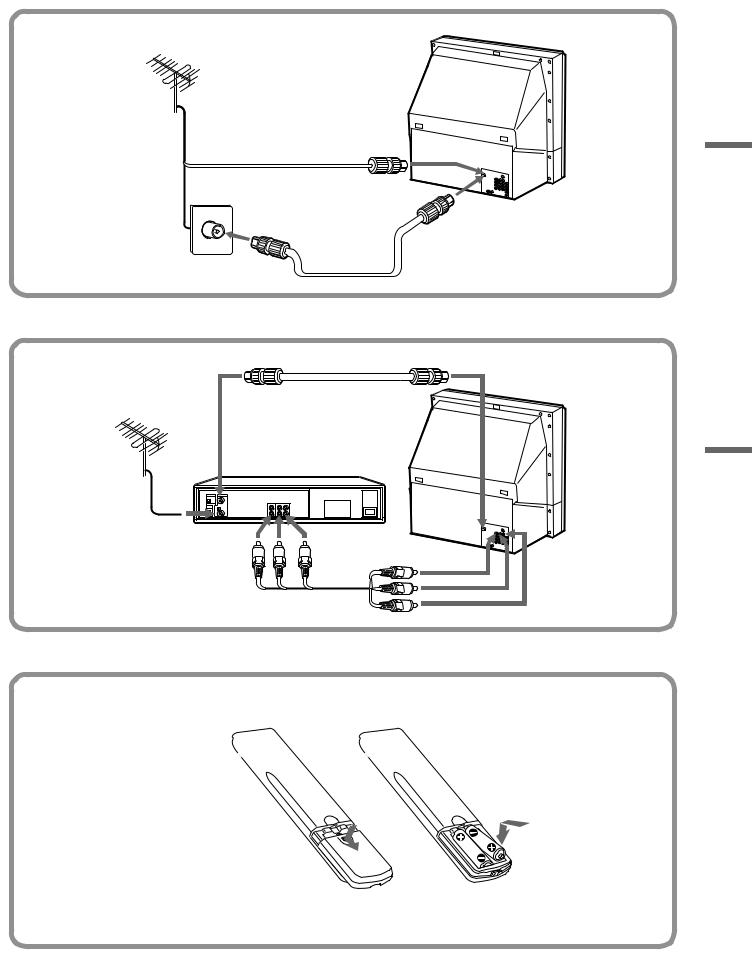
Connecting a VHF antenna or a combination VHF/UHF antenna
— 75-ohm coaxial cable (round)
Attach an optional IEC antenna connector to the 75-ohm coaxial cable. |
|
|
Plug the connector into the |
(antenna) socket at the rear of the TV. |
|
Rear of TV |
Rear of TV |
On a wall |
or
Connecting optional equipment
You can connect optional audio/video equipment to your TV such as a VCR, multi disc player, camcorder, video game or stereo system.
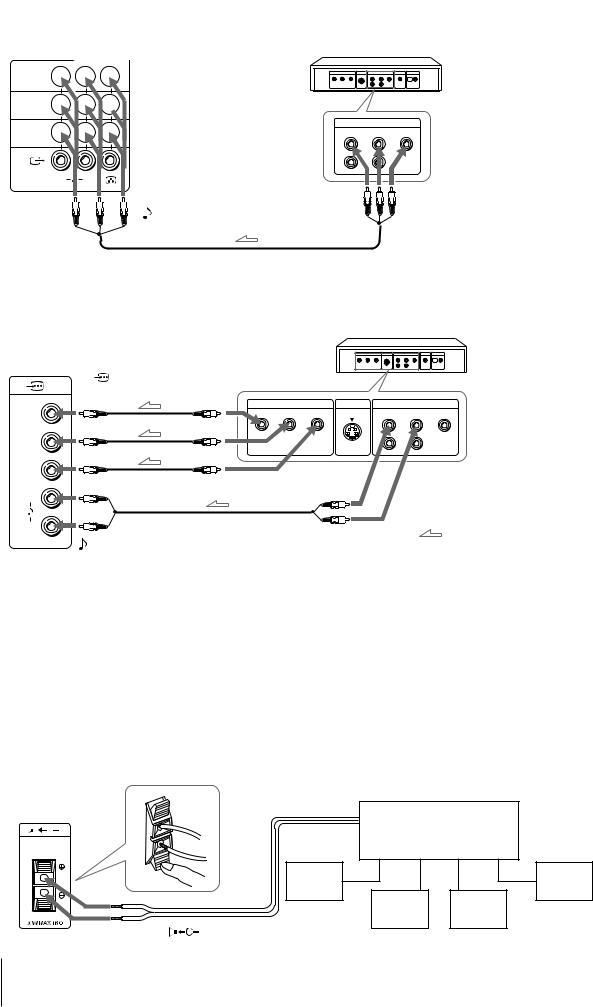
Connecting video equipment using video input jacks
Rear of TV
to 
 (antenna) socket
 1
1 


 2
2
 3
3 


R 

 L
L
(MONO)
to |
(S video input) |
to |
to |
|
|
||
|
|
S video |
antenna |
|
|
output |
output |
VCR
to video and audio outputs
to … 1, 2, or 3 (video input)
(yellow)
 -L (MONO)(white)
-R (red) |
: Signal flow |
6-EN Getting Started
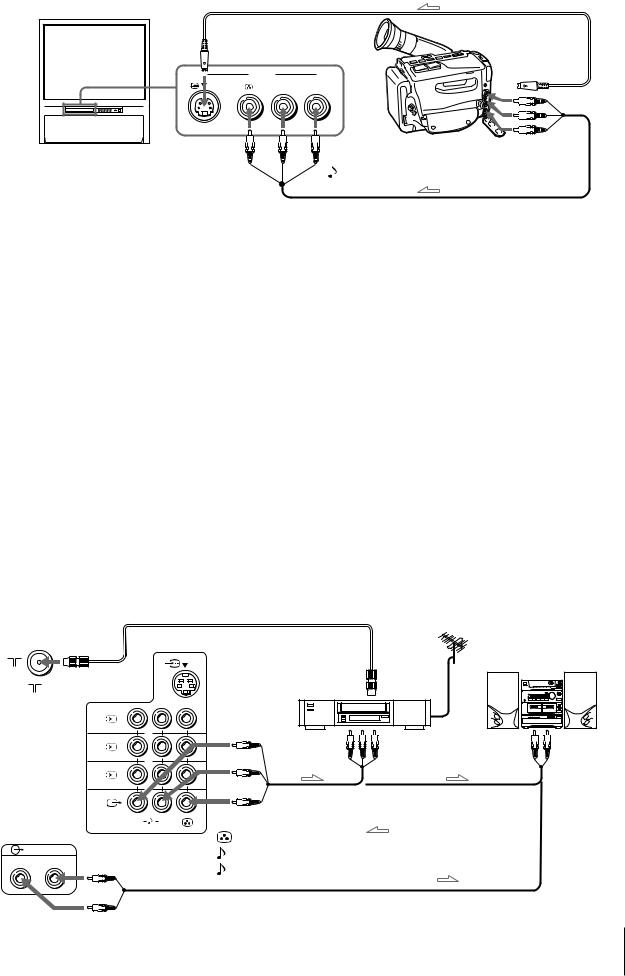
Front of TV
Camcorder
to  (S video input)
 3
3
L(MONO) 
 R
R
to … 3 (video input)
 (yellow)
-L (MONO)(white)  -R (red)
to S video output
to video and audio outputs
 : Signal flow
When connecting a monaural VCR
Connect the yellow plug to  (video input) and the black plug to
  -L (MONO) (audio input).
When connecting video game equipment
Connect video game equipment to the … 3 (video input) jacks at the front or the rear of your TV.
When connecting a VCR to the 
 (antenna) terminal
Preset the signal output from the VCR to the program position 0.
When connecting video equipment to the … 3 (video input) jacks at the front and the rear
Do not connect video equipment to the … 3 (video input) jacks at the front and the rear of your TV simultaneously; otherwise the picture will not be displayed properly on the screen.
If both S Video and video signals are input simultaneously
The S video input signal is selected. To view a video input signal, disconnect the  (S video) connection.
Note on the video input
When no signal is input, the screen becomes blue.
Connecting audio/video equipment using Ú (monitor/TV output) jacks
When the audio cable is connected to the  (VARIABLE) jacks, you can adjust the volume with Á+/–.
Rear of TV
|
|
|
|
to |
Audio system |
|
|
|
|
|
|
to |
(antenna) socket |
|
VCR |
antenna |
|
|
output |
|
|||
|
|
|
|
||
|
1 |
|
|
|
or |
|
2 |
|
|
to video and |
to audio |
|
|
|
audio inputs |
inputs |
|
|
|
|
|
||
|
3 |
|
|
|
|
|
R |
L |
to Ú (monitor/TV output) |
|
|
|
|
(MONO) |
|
: Signal flow |
|
|
|
|
(yellow) |
|
|
|
|
|
|
|
|
|
(VARIABLE) |
|
-L (MONO)(white) |
|
|
R |
L |
|
-R (red) |
|
|
|
|
|
|
|
Getting Started 7-EN
Connecting a DVD player
Rear of TV
 1
1 


 2
2 


 3
3 


R |
L |
to … 1, 2, or 3 (video input) |
|
(MONO) |
 (yellow)
-L (MONO)(white)  -R (red)
DVD player
LINE OUT
R-AUDIO-L VIDEO
to audio/ video outputs
 : Signal flow
Connecting a DVD player with component video output connectors
DVD player
Rear of TV
to |
(component video |
|
|
input) Y/C /B-Y/C /R-Y |
|
||
|
B |
R |
|
|
|
COMPOMENT VIDEO OUT S VIDEO OUT |
LINE OUT |
Y |
|
Y CB/B-Y CR/R-Y |
R-AUDIO-L VIDEO |
CB/ |
|
|
|
B-Y |
|
|
|
CR/ |
|
|
|
R-Y |
|
to component video |
|
L |
|
output |
|
|
|
|
|
R |
|
to audio output |
: Signal flow |
|
|
||
-L (white)
 -R (red)
Notes
•Since the high quality pictures on a DVD disc contain a lot of information, picture noise may appear. In this case, adjust the sharpness (SHARP) in the VIDEO ADJUST menu. (See page 19.)
•Connect your DVD player directly to your TV. Connecting the DVD player through other video equipment will cause unwanted picture noise.
•If your DVD player can output interlace and progressive mode
signals, select the interlace output when connecting to  (component video input) on your TV.
Your TV can receive either 525i/60 Hz or 625i/50 Hz interlace signals.
Connecting an amplifier with Dolby* Pro Logic decoder
Even though you use an amplifier with Dolby Pro Logic decoder instead of the projection TV’s audio system, you can still use the projection TV’s center speaker.
*Manufactured under license from Dolby Laboratories
Licensing Corporation.
DOLBY, the double-D symbol a and “PRO LOGIC” are trademarks of Dolby Laboratories Licensing Corporation.
Rear of TV |
|
|
C |
Amplifier with Dolby Pro |
|
Logic decoder |
|
|
|
Rear |
Rear |
|
speaker |
speaker |
|
(L) |
(R) |
|
Front |
Front |
|
speaker |
speaker |
|
(L) |
(R) |
to |
(center speaker |
|
inputs) |
|
|
8-EN Getting Started

Installing the projection TV
For the best picture quality, install the projection TV within the areas shown below.
Optimum viewing area (Horizontal)
min 1.5m (5 ft.)
75°
75°
Optimum viewing area (Vertical)
min 1.5m (5 ft.)
27°
27°
Getting Started 9-EN
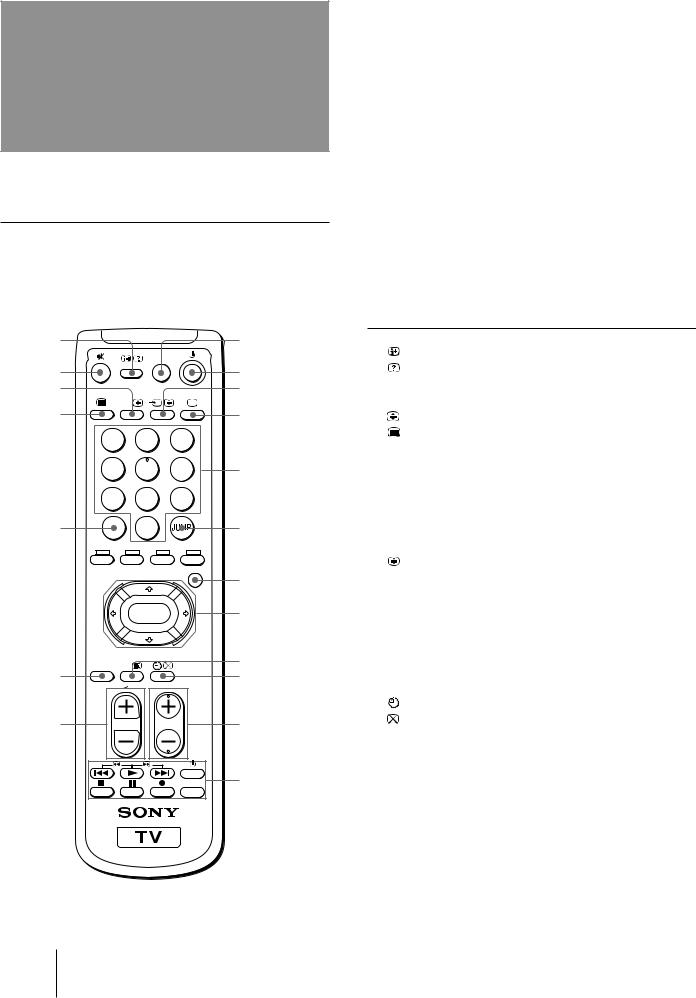
Getting to know the remote commander
Names/symbols of buttons on the remote commander are indicated in different colors to represent the available functions.
Label color |
Button function |
Grey |
For general TV operations. |
|
|
Green |
For Teletext operations. |
|
|
1 |
|
|
|
8 |
|
|
|
GAME |
|
2 |
|
|
|
9 |
3 |
|
|
|
!º |
|
A/B |
|
|
|
4 |
|
|
|
!¡ |
|
1 |
2 |
3 |
|
|
4 |
5 |
6 |
!™ |
|
7 |
8 |
9 |
|
5 |
-/-- |
0 |
|
!£ |
|
|
|
MENU |
|
|
|
|
|
!¢ |
|
|
ENTER |
!∞ |
|
|
POWER |
|
|
!§ |
6 |
BASSO |
|
|
!¶ |
|
|
|
||
|
|
|
PROGR |
|
7 |
|
|
|
!• |
|
|
|
VIDEO |
|
|
|
|
TITLE |
!ª |
Symbol |
Name |
Refer to page |
||
1 |
|
On-screen display button |
|
18 |
|
|
Teletext: Reveal button |
|
25 |
|
|
|
|
|
2 |
¤ |
Mute on/off button |
|
18 |
3 A/B |
Sound select button |
|
23 |
|
|
|
Teletext: Enlarge button |
|
25 |
|
|
|
|
|
4 |
|
Teletext button |
|
24 |
|
|
|
|
|
5 |
÷ |
Double-digit entering button |
|
17 |
|
|
|
|
|
6 POWER |
POWER BASSO button |
|
21 |
|
|
BASSO |
|
|
|
7 |
.+/– |
Volume control button |
|
17 |
8 GAME |
GAME button |
|
25 |
|
9 u |
TV standby button |
|
17 |
|
!º … |
Input mode selector |
|
18 |
|
|
|
Hold button |
|
24 |
|
|
|
||
!¡ ; |
TV power on/TV mode selector |
18 |
||
!™ 1,2,3,4,5, |
Number buttons |
|
17 |
|
|
6,7,8,9,0 |
|
|
|
!£ JUMP |
JUMP button |
|
18 |
|
!¢ MENU |
MENU button |
|
11 |
|
!∞ V/b/v/B |
Cursor control key |
|
11 |
|
|
ENTER |
Enter button |
|
11 |
!§ © |
Teletext: INDEX button |
|
24 |
|
!¶ |
|
Sleep timer button |
|
18 |
|
|
Teletext: Text clear button |
|
25 |
|
|
|
|
|
!• PROGR +/– |
Program selectors |
|
17 |
|
!ª |
|
DVD, VCR, MDP, CD, MD |
|
25 |
|
|
operation buttons |
|
|
|
VIDEO u |
Power button |
|
25 |
|
+/# |
Fastforward/search forward |
|
26 |
|
|
button |
|
|
|
( |
Play button |
|
26 |
|
=/3 |
Rewind/search backward |
|
26 |
|
|
button |
|
|
|
p |
Stop button |
|
26 |
|
P |
Pause button |
|
26 |
|
r |
Record button |
|
26 |
|
TITLE |
TITLE button |
|
26 |
|
|
|
|
|
10-EN Getting Started
Introducing the menu system
You can preset TV channels, adjust the picture and sound qualities, and select some settings using the on-screen menus. You can use the buttons on both the remote commander and the TV to operate the menus.
A/V CONTROL
A / V CONTROL
DYNAM I C
STANDARD
SOF T
PERSONAL
V I DEO AD J UST
AUD I O AD J UST
|
|
|
|
|
|
|
|
|
|
|
|
|
|
|
|
|
|
|
|
|
|
|
|
|
|
|
|
|
|
|
|
|
|
|
|
|
|
|
|
|
|
|
|
|
|
|
|
|
|
|
|
|
|
|
|
|
|
|
|
|
|
|
|
|
|
|
|
|
|
|
|
|
|
|
|
|
|
|
|
|
|
|
|
|
|
|
|
|
|
|
|
|
|
|
|
|
|
|
|
|
V I DEO AD J UST |
|
|
|
|
AUD I O AD J UST |
8 0 |
||||||||||||||||||||||||||||||||||||||||||
|
P I CTURE |
|
|
|
|
|
|
|
|
|
|
|
|
|
|
|
|
|
|
|
|
|
|
|
|
|
|
|
|
|
|
|
|
9 0 |
|
|
|
BASS |
|
|
|
||||||||
|
COLOR |
|
|
|
|
|
|
|
|
|
|
|
|
|
|
|
|
|
|
|
|
5 0 |
|
|
|
TREBLE |
|
|
|
8 0 |
|||||||||||||||||||
|
BR I GHT |
|
|
|
|
|
|
|
|
|
|
|
|
|
|
|
|
|
|
5 0 |
|
|
|
BA L ANCE |
|
0 0 |
|||||||||||||||||||||||
|
HUE |
|
|
0 0 |
|
|
|
SPEAKER: |
|
||||||||||||||||||||||||||||||||||||||||
|
SHARP |
|
|
|
|
|
|
|
|
|
|
|
|
|
|
|
|
|
|
|
|
|
|
|
|
|
|
|
|
|
|
|
|
5 0 |
|
|
|
|
|
|
MAIN |
|
|||||||
|
|
|
|
|
|
|
|
|
|
|
|
|
|
|
|
|
|
|
|
|
|
||||||||||||||||||||||||||||
|
VM : H I G H |
|
|
|
|
|
|
|
|
|
|
|
|
||||||||||||||||||||||||||||||||||||
|
|
|
|
|
|
|
|
|
|
|
|
|
|
|
|
|
|
|
|
|
|
|
|
|
|
|
|
|
|
|
|
|
|
|
|
|
|
|
|
|
|
|
|
|
|
|
|
|
|
|
|
|
|
|
|
|
|
|
|
|
|
|
|
|
|
|
|
|
|
|
|
|
|
|
|
|
|
|
|
|
|
|
|
|
|
|
|
|
|
|
|
|
|
|
|
|
|
|
|
FEATURES
F E AT URES

 GAME MODE
HYPER SURROUND : OF F
AV OUT :
MON I TOR C O N V E R G E N C E
PRESET
|
|
|
|
|
|
|
PRESET |
|
|
: |
|
|
|
|
|
|
||||
|
|
|
|
|
|
|
L ANGUAGE / |
|
|
|
|
|
|
|||||||
|
|
|
|
|
|
|
|
|
|
|
|
ENGL I SH |
|
|
|
|
||||
|
|
|
|
|
|
|
AUTO PROGRAM |
|
|
|
|
|||||||||
|
|
|
|
|
|
|
MANUA L |
PROGRAM |
|
|
|
|
||||||||
|
|
|
|
|
|
|
T V |
SYS : |
B / G |
|
|
|
|
|||||||
|
|
|
|
|
|
|
COL |
SYS : AUTO |
|
|
|
|
||||||||
|
|
|
|
|
|
|
SK I P : P R0 2 |
O F F |
|
|
|
|
||||||||
|
|
|
|
|
|
|
|
|
|
|
|
|
|
|
|
|
|
|
|
|
|
|
|
|
|
|
|
|
|
|
|
|
|
|
|
|
|
|
|
|
|
|
AUTO PROGRAM |
|
|
|
|
|
|
MANUA L |
PROGRAM |
|||||||||||
|
PR : 0 1 |
|
|
|
|
|
|
PR : 0 1 |
|
|||||||||||
|
|
|
|
|
|
|
T V SYS : |
B / G |
||||||||||||
|
T V |
SYS : B / G |
|
|
|
|
|
|
AT T : |
|
OFF |
|||||||||
|
VHF |
|
LOW |
|
|
|
|
|
|
VOLUME: 0 |
||||||||||
|
|
|
|
|
|
|
|
|
|
|
|
|
|
VHF |
|
LOW |
||||
|
|
|
|
|
|
|
|
|
|
|
|
|
|
|
||||||
|
|
|
|
|
|
|
|
|
|
|
|
|
|
|
|
|
|
|
|
|
|
|
|
|
|
|
|
|
|
|
|
|
|
|
|
|
|
|
|
|
|
|
|
|
|
|
|
|
|
|
|
|
|
|
|
|
|
|
|
|
|
|
|
|
|
|
|
|
|
|
|
|
|
|
|
|
|
|
|
|
|
|
|
Getting back to the previous menu (except for AUTO PROGRAM)
Press V or v to move the cursor (z) to the first line (N) of each menu, and press ENTER.
Cancelling the menu screen
Press MENU.
Notes (except for AUTO PROGRAM)
•When a menu is selected after pressing ENTER, the color of both the menu and the menu symbol change and the cursor (z) appears beside the first item of the menu.
•When an item on the menu is selected after pressing ENTER, the color of the item changes.
•You can refer to the guide (

 ) at the bottom of the menus (except for the and PRESET menu) for the basic operations of the menu.
•If more than approximately 60 seconds elapse after you press a button, the menu screen disappears automatically.
Getting Started 11-EN
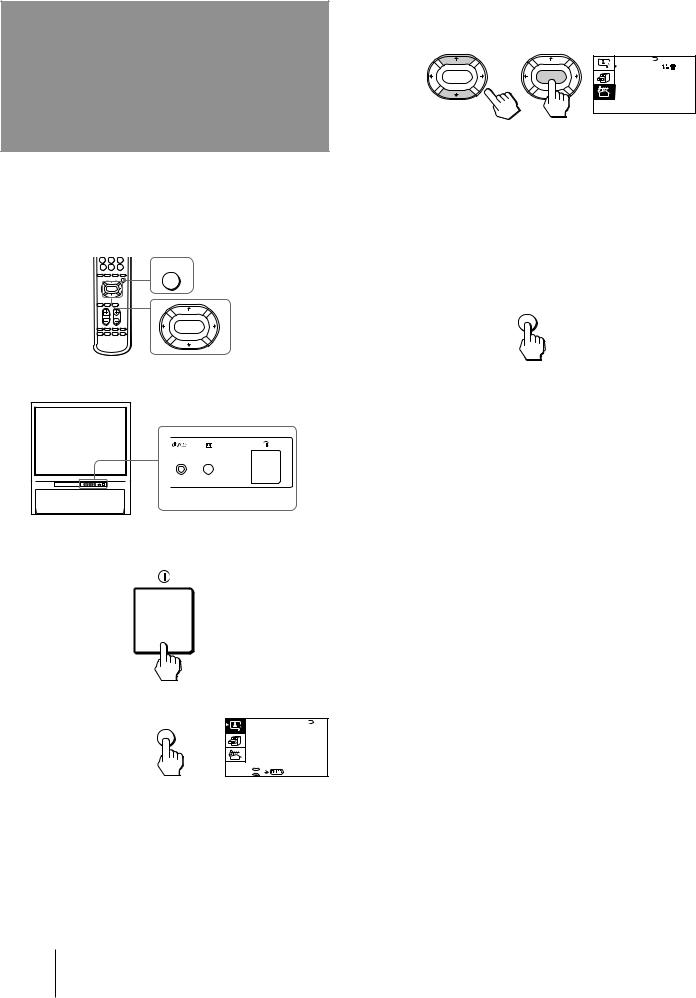
Changing the menu language
If you prefer Chinese (for M61/M31 model)/Arabic (for M91 model) to English, you can change the menu language. You can use buttons on both the remote commander and the TV.
MENU
ENTER
1
2
Press U to turn on the TV.
Press MENU.
MENU
A / V CONTROL |
|
DYNAM I C |
|
STANDARD |
|
SOF T |
|
PERSONAL |
|
V I DEO |
AD J UST |
AUD I O |
AD J UST |
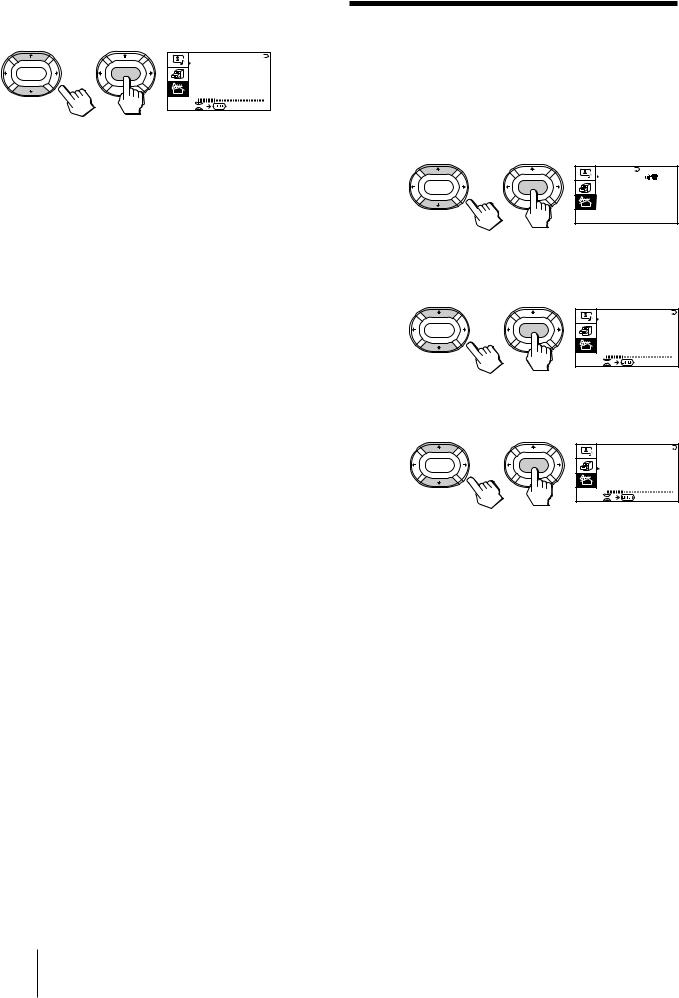
3 Press V or v to move the cursor (z) to the
PRESET menu ( ), and press ENTER.
|
PRESET |
|
: |
|
|
L ANGUAGE / |
|||
ENTER |
ENTER |
|
ENGL I SH |
|
|
AUTO PROGRAM |
|||
|
MANUA L |
PROGRAM |
||
|
T V |
SYS : |
B / G |
|
|
COL |
SYS : AUTO |
||
|
SK I P : PR 0 2 |
O F F |
||
4 Make sure the cursor (z) appears beside
LANGUAGE/ 
 (
( ), and press ENTER.
5 Press V/b/v/B to select  (
( ), and press
ENTER.
All of the menus change to Chinese (Arabic).
6 Press MENU to return to the normal screen.
MENU
12-EN Getting Started
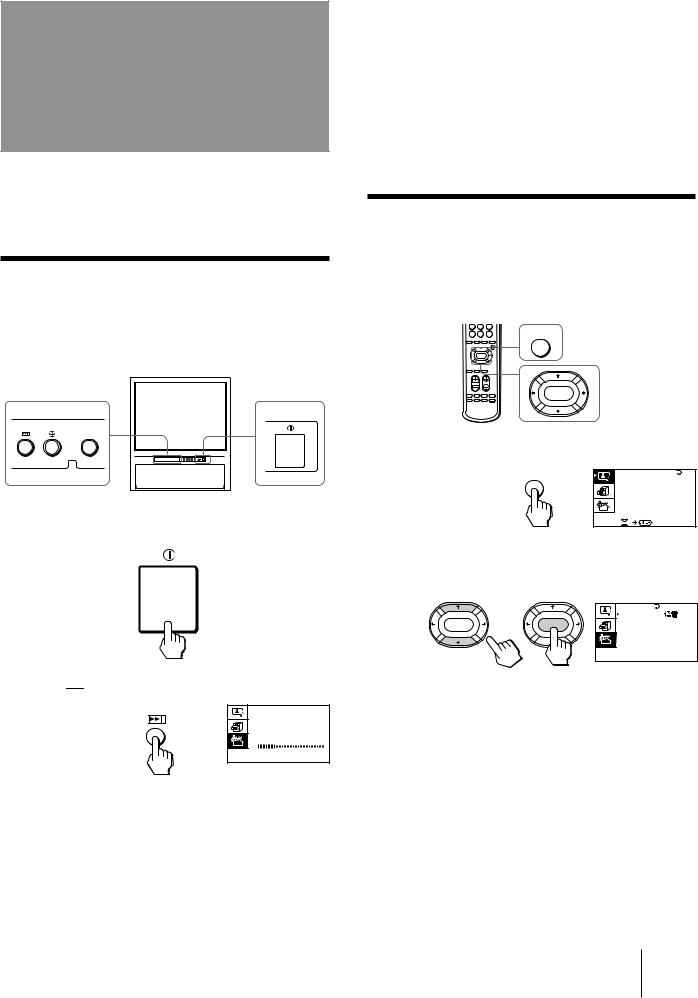
Presetting channels
You can preset TV channels easily by storing all the receivable channels automatically. You can also preset channels manually or disable program positions (see page 15 ).
Presetting channels automatically
You can preset up to 100 TV channels in numerical sequence from the program position 1. You can preset channels automatically using the button on the TV or the menu.
ENTER
1 Press U to turn on the TV.
2 Press 

 .
.
AUTO PROGRAM
PR : 0 1
T V SYS : B / G
VHF LOW
The TV starts scanning and presetting channels automatically. When all of the receivable channels are stored, the AUTO PROGRAM menu disappears.
To preset channels automatically using the menu
1Press MENU.
2Press V or v to move the cursor (z) to the
PRESET menu ( ), and press ENTER.
3Press V or v to move the cursor (z) to AUTO
PROGRAM, and press ENTER.
Presetting channels manually
To change the program position for a channel or to receive a channel with a weak signal which you cannot receive by automatic presetting, preset the channel manually. 


MENU
ENTER
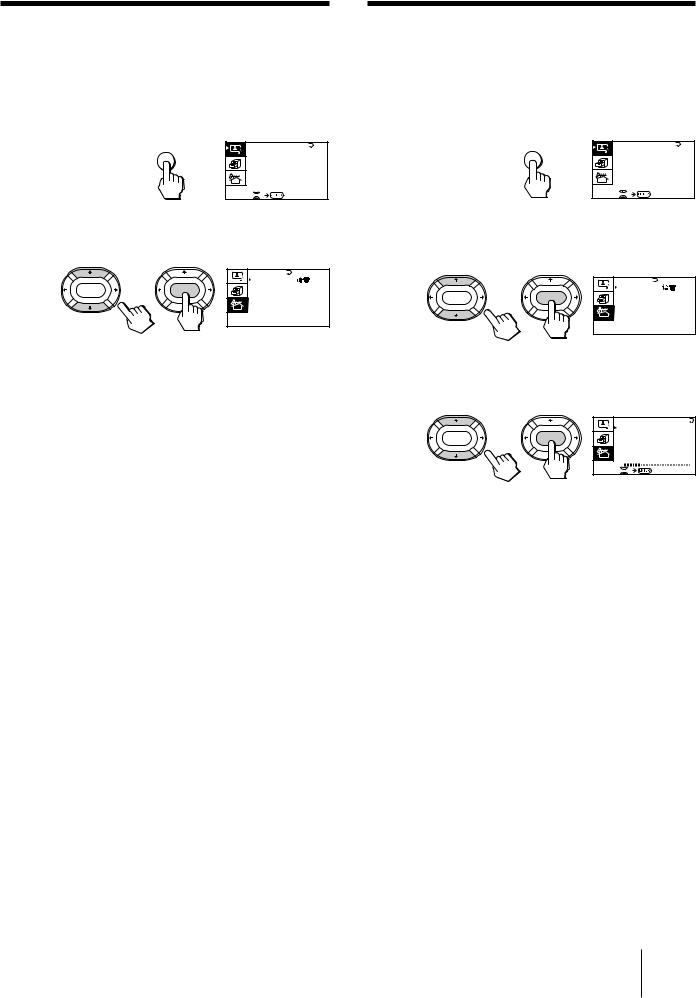
1 Press MENU.
MENU |
A / V CONTROL |
|
|
DYNAM I C |
|
|
STANDARD |
|
|
SOF T |
|
|
PERSONAL |
|
|
V I DEO |
AD J UST |
|
AUD I O |
AD J UST |
2 Press V or v to move the cursor (z) to the
PRESET menu (  ), and press ENTER.
|
PRESET |
|
: |
|
|
L ANGUAGE / |
|||
ENTER |
ENTER |
|
ENGL I SH |
|
|
AUTO PROGRAM |
|||
|
MANUA L |
PROGRAM |
||
|
T V |
SYS : |
B / G |
|
|
COL |
SYS : AUTO |
||
|
SK I P : PR 0 2 |
O F F |
||
3 Select your local TV system.
(1)Press V or v to move the cursor (z) to TV SYS, and press ENTER.
(2)Press V/b/v/B until your local TV system appears on the menu, and press ENTER.
Getting Started 13-EN
4 Press V or v to move the cursor (z) to
MANUAL PROGRAM, and press ENTER.
|
|
MANUA L PROGRAM |
|
|
|
PR : 0 1 |
|
ENTER |
ENTER |
T V SYS : B / G |
|
AT T : OFF |
|||
|
|
||
|
|
V O L U M E : 0 |
|
|
|
VHF LOW |
5 Select the program position to which you want to preset a channel.
(1)Make sure the cursor (z) appears beside PR, and press ENTER.
(2)Press V/b/v/B until the program position you want appears on the menu, and press ENTER.
6 Select the desired channel.
(1)Press V or v to move the cursor (z) to VHF LOW (VHF Hi or UHF), and press ENTER.
(2)Press V/b/v/B until the desired channel picture appears on the TV screen, and press ENTER.
7 Press MENU to return to the normal screen.
If the TV system is not properly selected
The picture color may be poor and/or the sound may be noisy. In this case, select the appropriate TV system.
1Press PROGR +/– or the number buttons to select the program position.
2Display the PRESET menu.
3Press V or v to move the cursor (z) to TV SYS, and press ENTER.
4Press V/b/v/B until the appropriate TV system appears, and press ENTER.
Notes
•The TV SYS (TV system), the ATT (attenuator), and the VOLUME (volume offset) settings are memorized for each program position.
•If you do not know your local TV system, consult your nearest Sony dealer or authorized service center.
Attenuating the signal for individual programs
If the TV signal is too strong, the picture may be distorted. You can reduce the picture distortion by attenuating the signal individually.
1 Display the PRESET menu.
|
PRESET |
|
: |
|
|
L ANGUAGE / |
|||
ENTER |
ENTER |
|
ENGL I SH |
|
|
AUTO PROGRAM |
|||
|
MANUA L |
PROGRAM |
||
|
T V |
SYS : |
B / G |
|
|
COL |
SYS : AUTO |
||
|
SK I P : PR 0 2 |
O F F |
||
2 Press V or v to move the cursor (z) to
MANUAL PROGRAM, and press ENTER.
|
|
MANUA L PROGRAM |
|
|
|
PR : 0 1 |
|
ENTER |
ENTER |
T V SYS : B / G |
|
AT T : OFF |
|||
|
|
||
|
|
V O L U M E : 0 |
|
|
|
VHF LOW |
3 Press V or v to move the cursor (z) to ATT, and press ENTER.
|
|
MANUA L PROGRAM |
|
|
|
PR : 0 1 |
|
ENTER |
ENTER |
T V SYS : B / G |
|
AT T : OFF |
|||
|
|
||
|
|
V O L U M E : 0 |
|
|
|
VHF LOW |
4 Press V/b/v/B to select ON, and press ENTER.
14-EN Getting Started
Disabling program positions
By disabling unused or unwanted program positions, you can skip those positions when you press PROGR +/–.
1 Press MENU.
MENU |
A / V CONTROL |
|
|
DYNAM I C |
|
|
STANDARD |
|
|
SOF T |
|
|
PERSONAL |
|
|
V I DEO |
AD J UST |
|
AUD I O |
AD J UST |
2 Press V or v to move the cursor (z) to the
PRESET menu (  ), and press ENTER.
|
PRESET |
|
: |
|
|
L ANGUAGE / |
|||
ENTER |
ENTER |
|
ENGL I SH |
|
|
AUTO PROGRAM |
|||
|
MANUA L |
PROGRAM |
||
|
T V |
SYS : |
B / G |
|
|
COL |
SYS : AUTO |
||
|
SK I P : PR 0 2 |
O F F |
||
3 Press V or v to move the cursor (z) to SKIP, and press ENTER.
4 Press V or v until the unused or unwanted program position appears on the menu, and press ENTER.
5 Press V/b/v/B to select ON, and press ENTER.
6 To disable other program positions, repeat steps 4 and 5.
7 Press MENU to return to the normal screen.
To cancel the skip setting
1Display the PRESET menu.
2Press V or v to move the cursor (z) to SKIP, and press ENTER.
3Press V or v until the program position you want to cancel the skip setting appears, and press ENTER.
4Press V/b/v/B to select OFF, and press ENTER.
Presetting the volume level for individual programs
If the volume of the selected program is louder than that of other programs, set the volume level.
1 Press MENU.
MENU |
A / V CONTROL |
|
|
DYNAM I C |
|
|
STANDARD |
|
|
SOF T |
|
|
PERSONAL |
|
|
V I DEO |
AD J UST |
|
AUD I O |
AD J UST |
2 Press V or v to move the cursor (z) to the
PRESET menu (  ), and press ENTER.
|
PRESET |
|
: |
|
|
L ANGUAGE / |
|||
ENTER |
ENTER |
|
ENGL I SH |
|
|
AUTO PROGRAM |
|||
|
MANUA L |
PROGRAM |
||
|
T V |
SYS : |
B / G |
|
|
COL |
SYS : AUTO |
||
|
SK I P : PR 0 2 |
O F F |
||
3 Press V or v to move the cursor (z) to
MANUAL PROGRAM, and press ENTER.
|
|
MANUA L PROGRAM |
|
|
|
PR : 0 1 |
|
ENTER |
ENTER |
T V SYS : B / G |
|
AT T : OFF |
|||
|
|
||
|
|
V O L U M E : 0 |
|
|
|
VHF LOW |
4 Press V or v to move the cursor (z) to
VOLUME, and press ENTER.
5 Press V/b/v/B to set the level, and press
ENTER.
The level can be set as 0, –1, –2, ....–6 (minimum).
Getting Started 15-EN
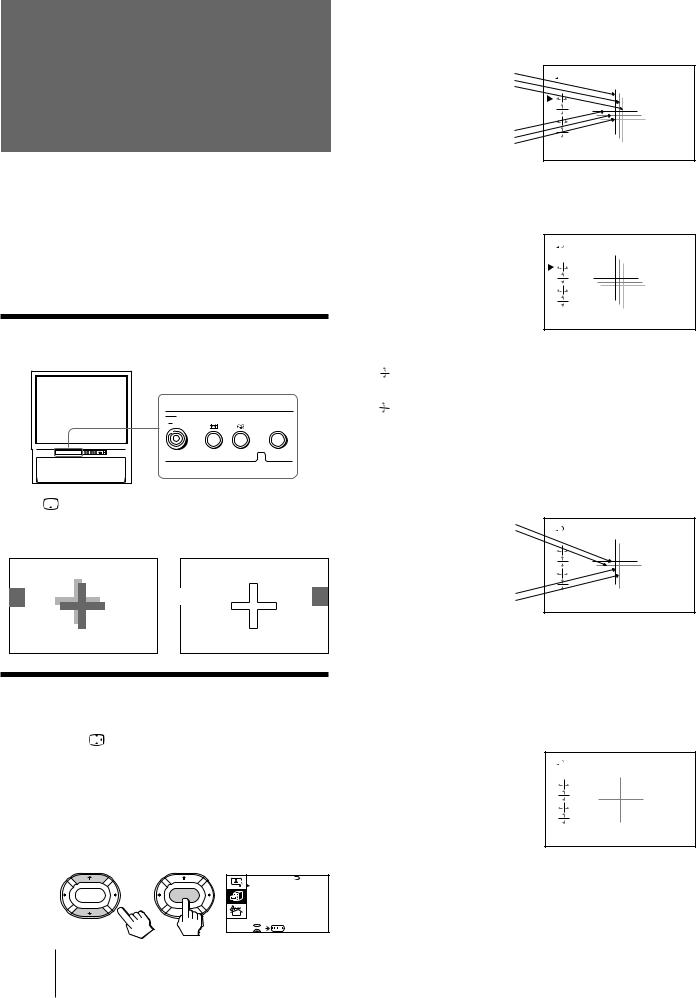
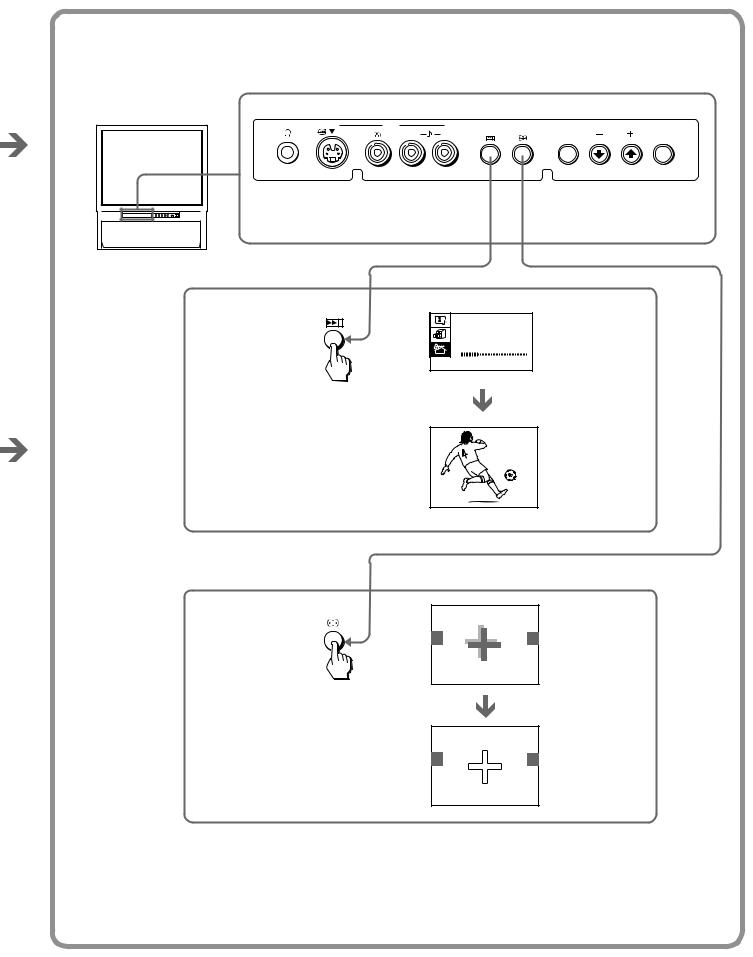
Adjusting the convergence (CONVERGENCE)
Before you use the projection TV, adjust convergence. The projection tube image appears on the screen in three layers (red, green and blue). If they do not converge, the color is poor and the picture blurs. To correct this, adjust convergence.
After 20-30 minutes of turning on the power, adjust convergence.
Adjusting the convergence automatically
R |
ENTER |
Press on the TV.
The auto convergence function works for about 30 seconds.
 /
/
Adjusting the convergence manually
When the auto convergence function does not work correctly with , adjust convergence by selecting CONVERGENCE of the FEATURES menu.
1 Press MENU.
2 Press V or v to move the cursor (z) to the
FEATURES menu (  ), and press ENTER.
|
|
F E AT URES |
|
|
|
GAME MODE |
|
ENTER |
ENTER |
HYPER SURROUND : |
|
OF F |
|||
|
|
||
|
|
AV OUT : |
|
|
|
MON I TOR |
|
|
|
CONVERGENCE |
3 Press V or v to move the cursor (z) to
CONVERGENCE and press ENTER.
The CONVERGENCE adjustment screen appears.
|
R |
|
|
G |
|
|
B |
|
R=Red |
R |
|
G=Green |
||
G |
||
B=Blue |
B |
4 Press V or v to move the cursor (z) to the symbol showing the line you want to adjust, and press ENTER.


 : Red vertical line (left/right adjustment)
: Red horizontal line (up/down adjustment)


 : Blue vertical line (left/right adjustment)
: Blue horizontal line (up/down adjustment)
5 Press V or v to move the line until it converges with the center green line, and press ENTER.
R
G+B (Light blue)
R
G+B (Light blue)
To move up/right, press V.
To move down/left, press v.
6 Repeat steps 4 and 5 to adjust the other lines until all three lines converge and are seen as a white cross.
7 Press MENU to return to the normal screen.
16-EN Getting Started
Operations
Watching the TV
PROGR 
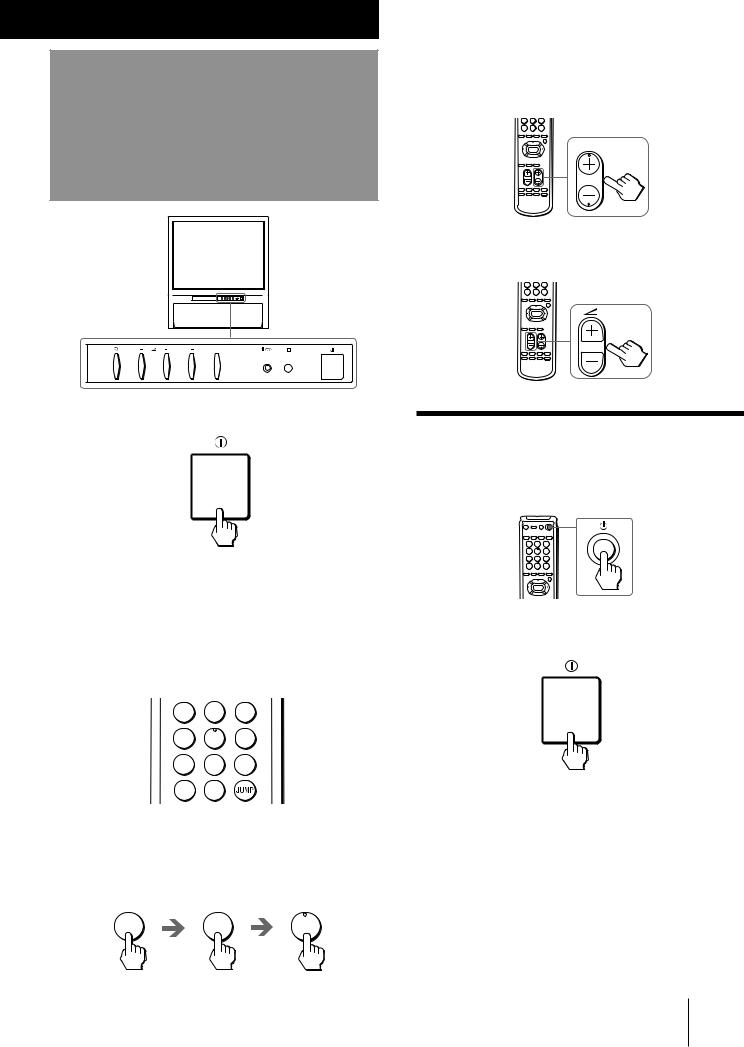
1 Press U to turn on the TV.
To scan through program positions
Press PROGR +/– on the remote commander or the TV until the program position you want appears.
PROGR
3 Press Á +/– on the remote commander or the TV to adjust the volume.
Turning off the TV
To turn off the TV temporarily
Press uon the remote commander. The u/Â indicator lights up.
When the TV is turned on in the standby mode, the u/Â indicator on the TV lights up. To turn on the TV completely, press uon the remote commander.
2 Select the TV program you want to watch.
To select a program position directly
Press the number button.
1 2 3
4 5 6
7 8 9
-/-- 0
To select a two-digit program position, press “÷” before the number buttons.
For example: to select program position 25, press “÷,” then “2” and “5.”
-/-- |
2 |
5 |
To turn off the TV completely
Press Uon the TV.
Operations 17-EN
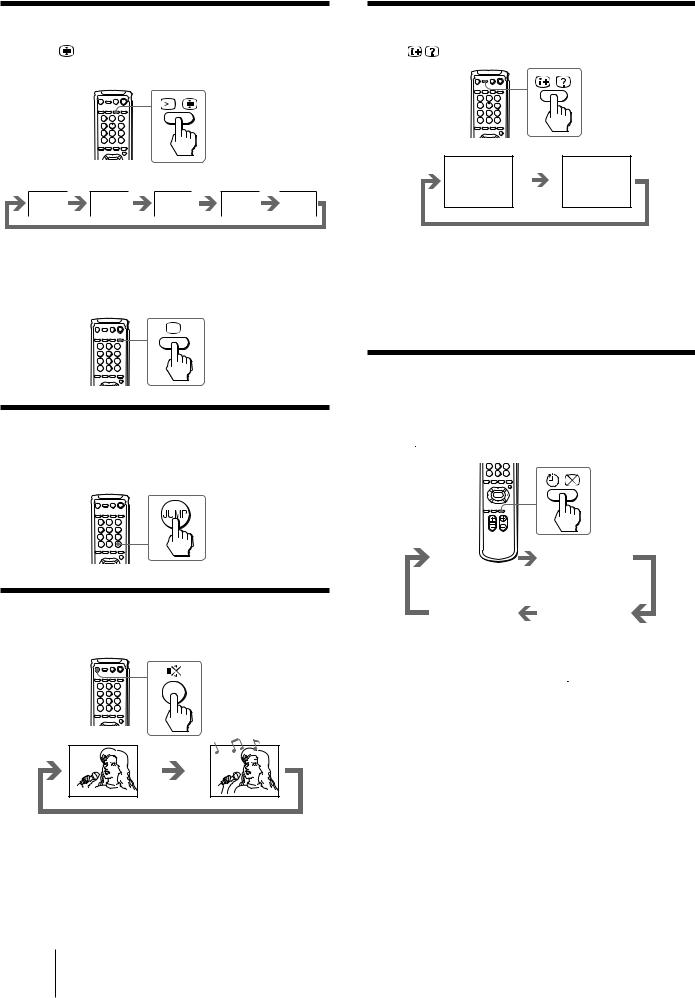
Watching the video input |
Displaying the on-screen information |
|
Press … on the remote commander or … on |
Press |
. |
the TV. |
|
|
8
VIDEO 1 |
VIDEO 2 |
VIDEO 3 |
DVD |
1 |
DYNAMIC |
|
|
|
|
|
POWER BASSO: ON |
To watch TV
Press ; on the remote commander or …on the TV.
Switching back quickly to the previous channel
Press JUMP.
Note
•The on-screen display shows the program position or the video mode, the picture and sound information. The on-screen display for the picture and sound information disappears after being displayed for approximately three seconds.
Setting the Sleep Timer
You can set the TV to turn off automatically after the period of time you want.
Press .
.
Muting the sound
Press ¤.
|
|
|
|
|
|
|
|
|
|
|
|
|
|
|
SLEEP TIMER:30M |
|
|
SLEEP TIMER:60M |
|
|
After 30 minutes |
|
After 60 minutes |
||||
|
SLEEP TIMER:OFF |
|
|
SLEEP TIMER:90M |
|
|
|
|
|||||
No Sleep Timer |
|
After 90 minutes |
||||
To cancel the Sleep Timer, press 
 repeatedly until “SLEEP TIMER: OFF” appears, or turn the TV off.
MUTING
18-EN Operations
Loading...