


 Loading...
kÉï=~ë=çÑW= MTKOMMU
qbkbl
j~бенЙе~еЕЙ=j~ем~д
qbkbl=L=aPRMV |
|
jçÇÉä |
pЙкб~д=емгДЙк |
bеЦдблЬ
|
|
E |
|
|
N |
|
|
|
|
|
AP |
|
L |
|
|
|
PE |
|
VPC |
|
|
|
|
|
P |
~ |
MD |
fелйЙЕнбзе=~еЗ=г~бенЙе~еЕЙ |
p~СЙну=ЕЬЙЕвл |
||

Contents
1 |
General information ............................................................... |
4 |
|
|
1.1 |
Purpose of the Maintenance Manual .............................. |
4 |
|
1.2 |
Work to be performed ..................................................... |
4 |
2 |
Installation Report / Warranty Passport ................................. |
5 |
|
|
2.1 |
Master data of the unit .................................................... |
5 |
|
2.2 |
Inspection and maintenance ........................................... |
5 |
3 |
Safety checks ........................................................................ |
6 |
|
|
3.1 |
Visual inspection ............................................................. |
8 |
|
3.2 |
Protective ground wire test............................................ |
10 |
|
3.3 |
Measurement of equivalent leakage currents ............... |
11 |
bеЦдблЬ |
3.3.1 Equivalent device leakage current ........................................ |
15 |
|
3.3.2 Equivalent patient leakage current ....................................... |
17 |
|
3.3.3 Final work ............................................................................. |
18 |
|
3.4 |
Safety check |
|
|
(Initial test after initial startup) ....................................... |
18 |
3.5 |
Safety check (re-tests) .................................................. |
19 |
4 Treatment centers with HF surgical equipment ................... |
23 |
|
4.1 |
General information....................................................... |
23 |
4.2 |
List of trained personnel................................................ |
24 |
4.3 |
Repair work on the HF module ..................................... |
25 |
4.4 |
Effects of malfunctions and repeated, similar operator |
|
|
errors on the HF module ............................................... |
27 |
5
6
Reporting of incidents to authorities / manufacturers .......... |
29 |
Remarks / special issues with regard to the dental treatment |
|
center ................................................................................... |
31 |
61 93 952 D 3509 |
3 |
D 3509.102.01.01.02 01.2008 |

1 General information
1 General information
1.1 Purpose of the Maintenance Manual
In order to ensure the operational safety and reliability of the system and to protect the health of patients, users and other persons, inspection and maintenance must be performed at scheduled intervals.
This includes:
•Inspection and maintenance (yearly) to prevent damage due to natural wear
•Safety tests (every 2 years)
to ensure the technical safety of the system
This document describes the work to be performed by the service engineer.
The performance of the work and the measurement results are documented by the service engineer.
This document must be stored near the dental treatment center.
|
i |
NOTE |
|
|
For systems with HF surgical equipment, this Maintenance Manual simulta- |
||
|
neously serves as a Medical Product Log. |
||
|
|
|
|
|
1.2 |
Work to be performed |
|
By the service engineer: |
1. Write the serial number of the dental treatment center (see type label on |
||
|
|
the base of the patient chair) on the cover sheet and on the corresponding |
|
|
|
pages (header) of the maintenance log. |
|
|
2. |
Complete the “Installation Report / Warranty Passport” after the initial in- |
|
|
|
stallation and file it after chapter 2. |
|
|
3. |
Perform inspection and maintenance according to the maintenance |
|
|
|
schedule. |
|
|
|
Document the performance of these in the “Installation Report / Warranty |
|
|
|
Passport". |
|
|
4. |
Conduct the safety tests in accordance with chapter 3. Document the re- |
|
|
|
sults. |
|
|
5. |
For systems with HF surgical equipment (see section 4.1), carry out the |
|
|
|
documentation as specified in sections 4.2 and 4.3. |
|
|
|
Please inform the user of the obligation to carry out points 1 and 2 below. |
|
|
6. |
Document comments and special issues regarding the dental treatment |
|
|
|
center in chapter 5. |
|
By the user: |
1. |
For systems with HF surgical equipment, carry out the documentation as |
|
|
|
specified in sections 4.2 and4.4 . |
|
|
2. |
Document the reporting of incidents to authorities / manufacturers in |
|
|
|
chapter 5. |
|
4 |
61 93 952 D 3509 |
D 3509.102.01.01.02 07.2008 |
|
|
|

|
|
2 Installation Report / Warranty Passport |
|
2 |
Installation Report / Warranty |
|
|
|
Passport |
|
bеЦдблЬ |
|
2.1 |
Master data of the unit |
|
|
|
||
|
Complete the document “Installation Report / Warranty Passport” and file |
|
|
|
the “Customer Copy” after this page. |
|
|
|
Unusual occurrences during installation can be additionally noted on the sec- |
|
|
|
ond page of the “Dealer Copy”. |
|
|
|
2.2 |
Inspection and maintenance |
|
|
To avoid damage due to natural wear, an inspection must be performed every |
|
|
|
year. |
|
|
|
The dental treatment center automatically recognizes when the regular main- |
|
|
|
tenance is due and indicates this in a timely manner on the user interface. |
|
|
|
You'll find more detailed information about the maintenance indicator in the |
|
|
|
user manual. |
|
|
|
The steps to be performed as well as the parts which must be replaced are |
|
|
|
specified in the document “Maintenance Schedule”. The performance of |
|
|
|
these is documented there. |
|
|
|
A separate maintenance schedule is produced for each maintenance event. |
|
|
|
In addition, list the inspection and maintenance events under the mainte- |
|
|
|
nance overview in the “Installation Report / Warranty Passport”. |
|
|
Attachment: Installation Report/Warranty Passport
61 93 952 D 3509
D 3509.102.01.01.02 07.2008 |
5 |

3 Safety checks
3 Safety checks
Medical products are designed in such a way that the first occurrence of a fault does not create a hazard to the safety of the patient, the user or other persons. Hence it is important to detect such faults before a second fault occurs, which might then lead to safety hazards.
For that reason it is essential to perform safety tests aimed particularly at detecting electrical faults every 2 years. All inspections and measurements are performed by the authorized service engineer. They are specified in the following.
Safety tests are performed on the following occasions:
•initial startup (section 3.4)
•regularly every 2 years
•after extensions/upgrades (conversion) of the treatment center
•after repair work
You must document the measured values in section 3.4 and/or 3.5.
 CAUTION
When taking measurements, please observe that hazardous voltages might be present on the system under test.
 CAUTION
If the dental treatment center does not pass the safety tests, it must not be operated any longer!
You must advise the user of this fact in your capacity as service engineer. Corresponding repair work by an authorized service engineer is required before putting the system into service again.
i NOTE
The safety checks correspond to the standards IEC 62353:2007 and/or
VDE 0751-1:2001.
If you use an automatic tester, you can program it according to these standards.
–Application components Type BF
–Permanently attached unit
–Protection Class I
The measurements to be performed are complex and time-consuming.
Sirona therefore explicitly recommends using an automatic tester.
6 |
61 93 952 D 3509 |
D 3509.102.01.01.02 07.2008 |
|
|
|
Measurement according to IEC 60601-1
3 Safety checks |
|
|
If you have no possibility of performing the measurements according to |
|
|
VDE 0751-1:2001, you may also perform them according to IEC 60601-1. |
|
|
For details on how to perform the measurements, please refer to the standard |
bеЦдблЬ |
|
IEC 60601-1 and the documents on your measuring device. |
||
|
||
i NOTE |
|
|
This type of measurement is not recommended by Sirona due to its complex- |
|
|
ity. |
|
|
When taking measurements, please observe the following: |
|
Type B application compo- |
Micromotors SL, BL BL ISO or |
nents |
BL implant |
|
Turbine |
|
Ultrasonic handpiece |
|
Curing light Mini-LED |
|
Sprayvit |
|
|
Type BF application parts |
HF surgery handpiece |
|
SiroCam digital (does not require any |
|
testing) |
|
|
Protective ground wire resis- |
> 0.1W |
tance |
|
|
|
Earth leakage current |
N.C. – 5 mA |
|
S.F.C. – 10 mA (permanent connection) |
|
|
Patient leakage current |
N.C. – 0.1 mA |
|
S.F.C. – 0.5 mA |
|
|
N.C. – normal condition
S.F.C. – single fault condition
When the measurements are performed, the individual treatment instruments must be operated one after the other. However, the HF surgical instrument must be measured in an inactive state.
Thus several measurements must be performed one after the other.
Make a note in Section 3.4 or 3.5 stating that you have performed the measurements according to IEC 60601-1 and correct the specified limiting values.
Document the highest measured values.
61 93 952 D 3509 |
7 |
D 3509.102.01.01.02 07.2008 |

3 Safety checks
3.1 Visual inspection
Check the following points:
•Perform a functional test of the dental treatment center in accordance with the operating instructions.
Are all functions present?
•Are all optical and acoustic warning signals functioning properly?
•Are all housing parts safely attached and intact?
•Are all labels specified in the “Installation Report / Warranty Passport” affixed and legible?
•Are all operating instructions which belong to the treatment center available?
•Is the “Maintenance Manual” for the dental treatment center, which also serves as the Medical Device Log for systems with HF surgical equipment, available?
•In Germany:
Is the Service Log of the amalgam separator (if applicable) available and properly maintained?
•Are all safety switches functioning?
–Press a key to move the patient chair, e.g. a program key.
–While the patient chair is moving, actuate all safety switches one after the other and check whether a corresponding error message appears on the user interface. The positions for triggering the safety switches are shown in the diagram below.
–Perform the following actions: 1 - Elevate backrest
2 - Elevate footrest
3 - Push rear right and left facing upwards
4 - Push rear right and left elevation frame upwards 5 - Push front right and left elevation frame upwards
6 - Push front right and left manual switch bar on seat support upwards
7 - Push rear right and left manual switch bar on seat support upwards
8 - Swivel armrest on the dentist element side outwards
9 - Push the head of the assistant element and pull it upwards 10 - Cuspidor bowl (see below for test)
|
|
10 |
|
|
|
9 |
|
|
|
|
|
8 |
|
|
1 |
|
|
6 |
2 |
|
|
7 |
|
|
|
|
|
|
|
|
3 |
4 |
|
|
|
|
|
5 |
|
|
|
|
|
Fig. 3-1 Trigger points for the safety switches
61 93 952 D 3509
8 |
D 3509.102.01.01.02 07.2008 |

3 Safety checks
• |
Fig. 3-2 Display on the EasyTouch user interface
–When a safety switch is triggered, the following events occur:
•an acoustic signal sounds
•the patient chair stops moving; a corrective movement in the opposite direction may take place.
•the triggered safety switch is displayed on the user interface of the touchscreen
Does the safety switch of the cuspidor bowl (10) work?
–Move the patient chair to the lowest position.
–Swivel the cuspidor bowl towards the patient chair.
–Move the patient chair upwards.
ªThe chair can be moved.
However, when the patient chair moves near the cuspidor bowl, the latter swivels inwards.
bеЦдблЬ |
Test preparations |
Before beginning the safety tests described below, carry out the following |
|
preparations: |
•Move the dental treatment center to a middle height so that the connection box is easily accessible.
•Shut off the mains power connection to the dental treatment center.
•Remove the seat upholstery (leave the backrest upholstery in place).
•Open the cover of the connection box of the patient chair.
•If a PC is connected: Disconnect the power supply of the PC and remove
all other connections (e.g. shielded signal cables) which ground the PC.
|
NSA |
• |
|
|
|
|
X1 |
|
L |
|
|
N |
A |
|
|
|
|
|
X1 |
|
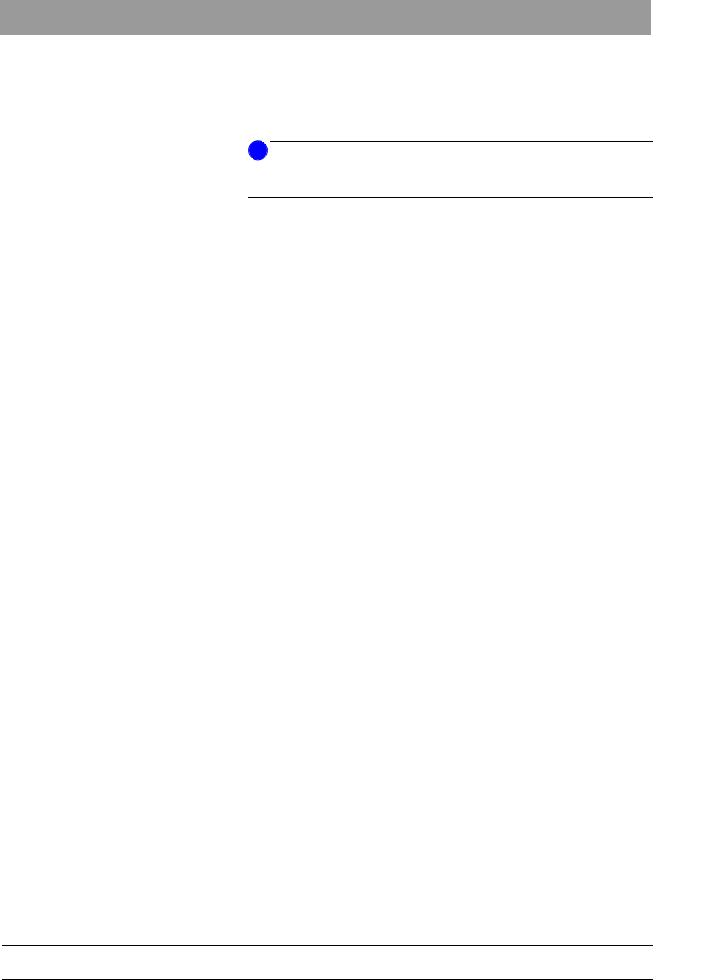
Disconnect the power supply connector of the dental treatment center from the building mains (Figure 3-3).
Fig. 3-3 Disconnect the power supply connec-
tor. |
|
|
|
|
||
|
|
• Replace it with the special test connector (1) of the test cable 1 |
||||
|
|
|||||
|
|
|
|
(Figure 3-4). |
||
1 |
|
• Plug the grounded plug (2) into the test unit. |
||||
2 |
|
i |
|
|
||
NOTE |
||||||
|
|
If you use an automatic tester, it may be necessary to bring the application |
||||
Fig. 3-4 Test cable |
||||||
components into contact with the unit before the following protective ground |
||||||
|
|
|||||
|
|
wire test. Proceed according to section 3.3.1. |
||||
|
|
|
|
|
|
|
|
|
|
|
|
|
|
|
|
|
|
1. You can order the test cable, consisting of the test connector, power cable |
||
|
|
|
|
(2 m) and grounded plug, under Article No. 771-9993/306-201 |
||
|
|
|
|
from WAGO Kontakttechnik GmbH Co. KG, Postfach 2880, 32385 Minden, |
||
|
|
|
|
Germany, www.wago.com. |
||
|
|
|
|
You can obtain this test cable free of charge when you attend a training session |
||
|
|
|
|
for service engineers. |
||
|
|
|
|
|
|
|
61 93 952 D 3509 |
9 |
|||||
D 3509.102.01.01.02 07.2008 |
||||||
|
|
|
|
|
|
|
3 Safety checks
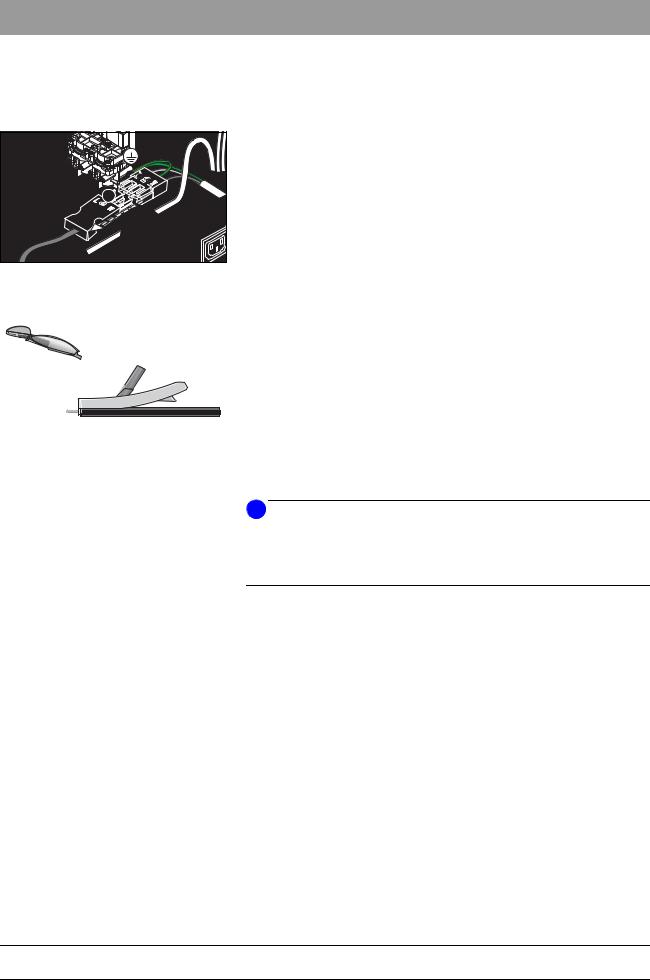
X1 |
Fig. 3-5 Protective ground wire connection with test cable on the power connection terminal
Fig. 3-6 Measurement points below the seat upholstery
TENEO
Fig. 3-7 Measurement point in the dentist element
Fig. 3-8 Measurement point in the water unit
Fig. 3-9 Assistant element
10
3.2 Protective ground wire test
Before beginning the protective ground wire test, ensure that all protective ground wire connections are present, firmly attached and intact.
1.Measure the electrical resistance of electrically conductive parts and parts connected to the protective ground wire on the dental treatment
center to the protective ground wire connected to the power connection terminal (deduct the resistance of the test cable, Figure 3-5).
Remove the power supply connector of the PC connected to the dental treatment center and any other network connections that ground the PC.
2.Document the highest measured value.
The measured resistance must not exceed 0.3 W .
The measuring current (I meas) must be between 0.2 A and 25 A.
The no-load voltage must be between 4 V min. and 24 V max.
Measurements must be performed in accordance with the following measuring set-up as per IEC 62535:2007 or VDE 0751-1.
N
L
PE
 M
M
 Imess
Imess
Ω
i NOTE
If you use an automatic tester as specified in IEC 62353 or VDE 0751, the aforementioned parameters are automatically guaranteed. Plug the connector of the test cable into the tester and carry out the measurement in accordance with the operating instructions for the tester.
The following list provides a selection of possible measuring points (M):
–plate in the connection box on which the power supply connection is installed
–plate on the base of the patient chair in which the power switch is installed
–elevation frame and seat support below the seat upholstery (Figure 3-6)
–backrest support (Figure 3-6)
–screw on the underside of the dentist element (Figure 3-7)
–floor plate of the cable foot control
–screw behind the amalgam separator rotor (open cover, Figure 3-8)
–protective ground wire connection of the monitor (if present)
–cold unit plug socket for additional devices (if present)
–assistant element, screw below the transverse arm (Figure 3-9)
–protective ground wire connection of the external PC on dental treatment centers with PCs (PC power plug disconnected)
Document the measuring results obtained during initial startup in section 3.4.
Document the measuring results obtained during re-tests in section 3.5.
61 93 952 D 3509 D 3509.102.01.01.02 07.2008
3 Safety checks
3.3 Measurement of equivalent leakage currents
Two different equivalent leakage currents are measured:
•Equivalent device leakage current
•Equivalent patient leakage current
i NOTE
Sirona recommends using an automatic tester that complies with standard IEC 62353:2007 or VDE 0751 to perform the measurements.
If you do not use an automatic tester, please comply with the instructions on page 13.
bеЦдблЬ |
Use of the VPC measuring point
Fig. 3-10 Opened dentist element
i NOTE
The equivalent leakage current measurements also include the applied parts (treatment instruments).
Since the treatment center is in a non-operating state, the motors of the treatment instruments, their supply cables and lamps are disconnected via relays and therefore not connected to the potential of the patient circuit.
Thus, under the circumstances insulation defects in the patient circuit may not be detected.
The following measurements are therefore also measured against the potential of the patient circuit (measuring point in the voltage patient circuit [VPC]). This circuit is treated like an application component.
The VPC measurement point is located in the head of the dentist element. Proceed as follows to establish contact:
1.Open the dentist element by flipping the two locking brackets (A) downwards and removing the two screws with a screwdriver (Figure 3-10).
2.Flip the cover of the dentist element head with the
instrument holder upwards and secure the housing cover with pin C. The instruments remain in the holder.
3.Remove the two screws (F) on the cover plate.
4.Flip the locking bracket (G) upwards.
5.Now fold the plate (H) downwards.
6.Attach the test terminal to the VPC measuring point (see Figure 3-11, 3-12).
7.The VPC measuring point is located on the upper board.
8.Connect the test terminal to the tester like an application component.
61 93 952 D 3509 |
11 |
D 3509.102.01.01.02 07.2008 |
Loading...