


C2+
Table of contents
 Loading...
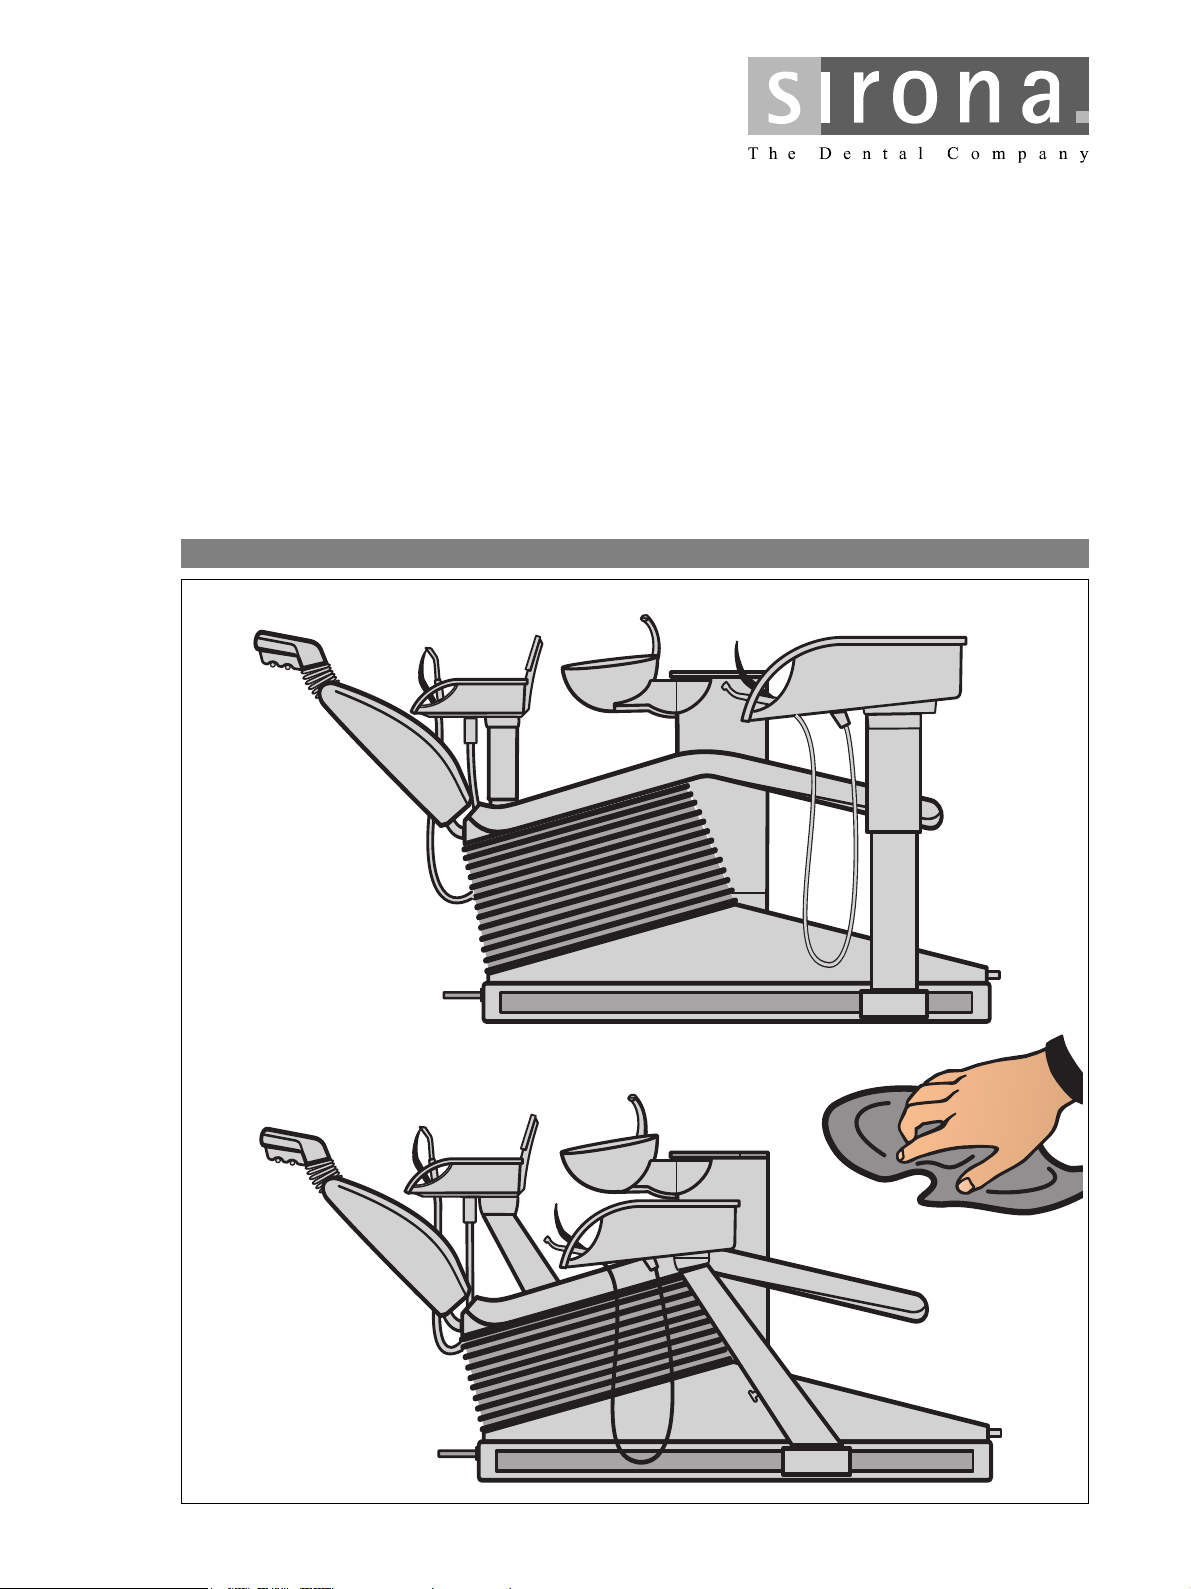
H
`OHI=jN
`~кЙ=~еЗ=ЕдЙ~ебеЦ=белнкмЕнбзел=Сзк=нЬЙ=йк~ЕнбЕЙ=нЙ~г
bеЦдблЬ

Sirona Dental Systems GmbH
ATTENTION
Care and cleaning instructions for the practice team C2
+
, M1
General information
Care and cleaning instructions for the practice team Dear user,
To maintain the value and safe functioning of your treatment center it is necessary to care for, clean and disinfect it regularly.
The work steps you have to perform are described in this
document.
Hygiene and disinfection The national requirements and recommendations for
hygiene and disinfection must be observed (e.g. RKI,
ADA, CDC etc).
Care and cleaning agents
Use only care and cleaning agents as well as lubricants
which are approved by SIRONA.
+
Maintenance of the treatment center by the service
engineer
A continuously updated list of approved agents can be
downloaded from the Sirona Internet homepage under
REF 59 70 905: š www.sirona.com
If you do not have Internet access, you can use one of
the following two ways to order the list:
• Order from your local dental depot
• Order from Sirona
Tel: ++49 (0) 62 51/16-16 16
FAX: ++49 (0) 62 51 / 16-18 18
Despite the outstanding quality of your treatment center
and the regular care performed by the practice team,
inspections and maintenance by the service engineer
are required at scheduled intervals to ensure its operational reliability and safety.
Please refer to your operating instructions for details.
+
Your C2
, M1+ Team
2 D 3370.103.01.13.02
59 58 512 D 3370

Sirona Dental Systems GmbH Contents
Care and cleaning instructions for the practice team C2
+
, M1
+
Contents
1 Connection box ........................................................................................................... 5
2 Cuspidor....................................................................................................................... 6
3 Vacuum system ........................................................................................................... 7
3.1 Care .................................................................................................................................................. 7
3.2 Disinfection with a dry suction system.............................................................................................. 7
3.3 Disinfection with a wet suction system ............................................................................................. 8
3.4 Suction handpieces .......................................................................................................................... 9
3.5 Cleaning the suction hoses............................................................................................................... 10
3.6 Thermodisinfecting the suction hoses .............................................................................................. 11
4 Amalgam separation ................................................................................................... 12
4.1 Replacing the amalgam separator.................................................................................................... 12
4.2 Cleaning the siphon......................................................................................................................... 13
bеЦдблЬ
5 Instrument hoses ........................................................................................................ 14
5.1 Removal/Replacement of instrument hoses ..................................................................................... 14
5.2 Checking the flow rate of the SPRAYVIT L ...................................................................................... 14
5.3 Highspeed handpiece hose .............................................................................................................. 15
6 Disinfection system .................................................................................................... 16
6.1 Microbiological water test ................................................................................................................. 16
6.2 Purge/Auto Purge function (purging the water paths)....................................................................... 17
6.3 Sanitation.......................................................................................................................................... 20
7 Surfaces / O-rings ....................................................................................................... 26
8 Satelec Mini L.E.D. curing light.................................................................................. 29
8.1 Care and cleaning of the handpiece and the connecting cable ........................................................ 29
8.2 Care and cleaning of the light guide and the glare shield ................................................................. 29
9 SIROCAM 3 / SIVISION 3 video camera and monitor ............................................... 30
9.1 Care and cleaning of the SIROCAM 3.............................................................................................. 30
9.2 Care and cleaning of the SIROCAM C ............................................................................................. 31
9.3 Care and cleaning of the monitor...................................................................................................... 31
10 Checking the safety switches .................................................................................... 32
59 58 512 D 3370
D 3370.103.01.13.02
3

Overview Sirona Dental Systems GmbH
C2
+
A
/B
2
5
SS
11
00
22
100
75
50
40
30
20
10
0.2
r
pm
x
1
0
00
25
1
M
o
d
e
–
+
0
2
S
SA
N
1
L
S
0
1
5
2
3
4
67
8
9
R
P
M
A
AMALGAMALG
D
E
S
I
N
F
DESINF
M
o
d
e
–
+
1
0
0
75
50
25
1
4
0
3
0
2
0
1
0
0
.
2
r
p
m
x
1
0
0
0
0
S
2
1
A/B
C
S
0
M
1
+
0
2
S
1
S
A
N
L
C2
+
M1
+
5
2
3
4
67
8
9
1
Care and cleaning instructions for the practice team C2
+
, M1
Overview
The numbers indicated in the overview correspond to
the chapter numbers in the table of contents.
Thus you can easily find the work to be performed in this
document.
+
1 Connection box
2 Cuspidor
3 Vacuum system
4 Amalgam separation
5 Instrument hoses
6 Disinfection system
7 Surfaces
8 Satelec Mini L.E.D. curing light
9 SIROCAM 3 / SIROCAM C / SIVISION 3
video camera
10 Checking the safety switches
For care and maintenance of the following products,
please refer to the relevant operating instructions supplied:
• SPRAYVIT syringe
• T1 CLASSIC, T1 LINE and T1 TITAN straight and
contra-angle handpieces,
• Electric motors
• Highspeed handpieces
• SIROSONIC L scaler
• SIROTOM electrosurgical unit
• SIROCAM 3 video camera
• SIROLUX FANTASTIC operation light
4 D 3370.103.01.13.02
59 58 512 D 3370

Sirona Dental Systems GmbH 1 Connection box
OFF
Care and cleaning instructions for the practice team C2
+
, M1
+
1 Connection box
Replacing the water and air filters
If you notice any changes in media flows, please check
the water and air filters (1) for permeability. Replace
them if necessary.
• Switch the main switch OFF.
• Pry off cover 2 with a screwdriver.
• Remove screw caps 3 and replace filters 1.
For reorders:
Filters: Order No. 14 43 436
Main fuse
The main fuse (4) is located below the air filter.
For reorders:
Unit main fuse for
230VAC:
T 6.3AH, 250VAC,
Order No. 10 77 452
bеЦдблЬ
Unit main fuse for
100VAC/115VAC:
T 10AH, 250VAC,
Order No. 10 77 460
59 58 512 D 3370
D 3370.103.01.13.02
5
2 Cuspidor Sirona Dental Systems GmbH
ATTENTION
ATTENTION
ATTENTION
ATTENTION
Grease
5
6
Amalgam
Care and cleaning instructions for the practice team C2
+
, M1
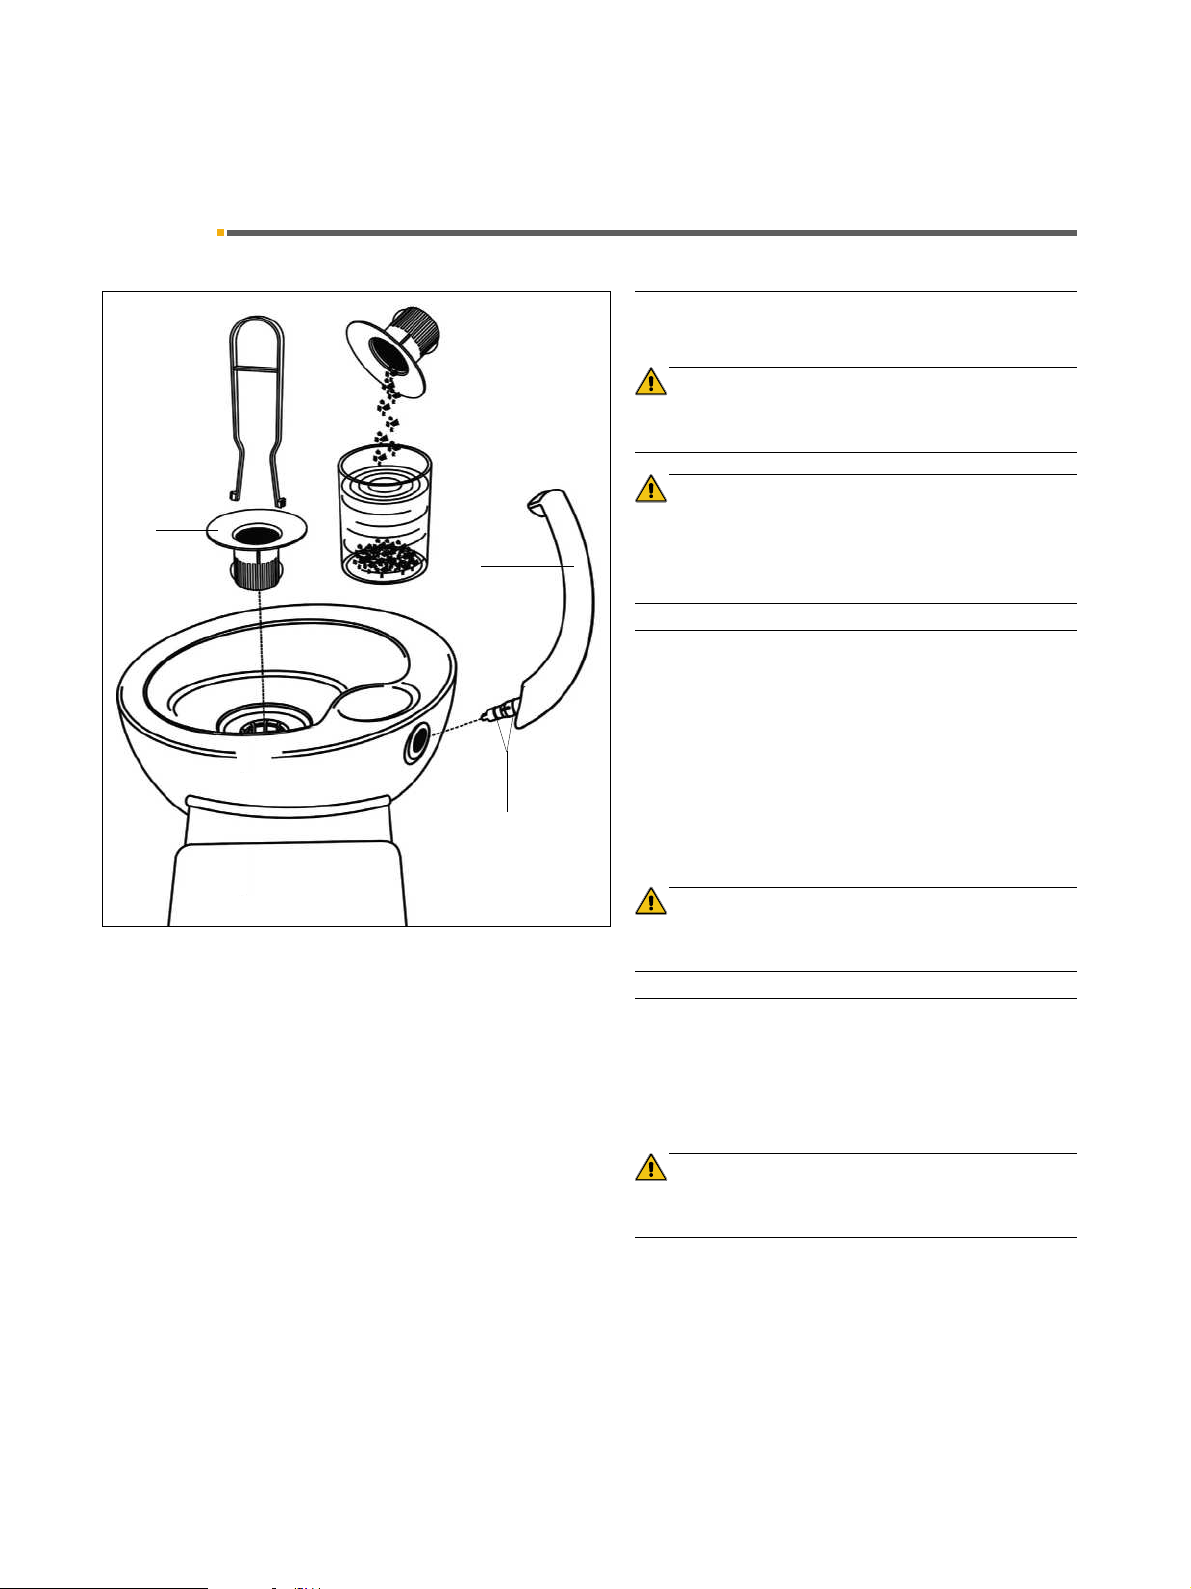
2 Cuspidor
After each patient
Clean the cuspidor.
Use only cleaning agents which have been approved by
Sirona (see page 2, General information)!
Do not use any domestic cleaning and care agents.
Foaming domestic cleaning agents lead to foam and water being drawn into the dry suction system, resulting in
damage to the suction machine.
Daily during the noon break and at the end of
each workday
+
Remove the gold trap (5) and clean it.
Store the amalgam residues under water in a separate,
closed container. When replacing the amalgam rotor
(see page 12), put the residues into the rotor for disposal.
After the cleaning process, fill at least 1 liter of water into
the cuspidor for flushing.
Do not dispose of amalgam residues caught in the gold
trap in the cuspidor or the sink!
Weekly
Pull out the tumbler outlet (6) or the hydrocolloid
adapter, if applicable, and clean it.
Before refitting the tumbler outlet or the hydrocolloid
adapter, lightly lubricate the O-rings.
Use only lubricants which have been approved by Sirona
(see page 2, General information)!
6 D 3370.103.01.13.02
59 58 512 D 3370
Sirona Dental Systems GmbH 3 Vacuum system
ATTENTION
8
A
Care and cleaning instructions for the practice team C2
+
, M1
+
3.1 Care
3 Vacuum system
3.1 Care
After each patient
To ensure that the vacuum system is always ready for
use, you must aspirate a large glass of cold, clear water
through the suction hoses used after each patient,
especially after each intervention during which the
patient loses blood and after using hydrogen peroxide
).
(H
2O2
During prolonged treatments, you must aspirate a
glass of water at least every 60 minutes.
3.2 Disinfection with a dry suction system
Daily during the noon break and at the end of
each workday
bеЦдблЬ
The vacuum system is subjected daily to septic secretions, saliva and blood. For hygienic reasons the system
must therefore be disinfected with a detergent/disinfectant approved by Sirona.
Use only cleaning and disinfecting agents which have
been approved by Sirona (see page 2, General information)!
Do not use any washing powder or other disinfectants!
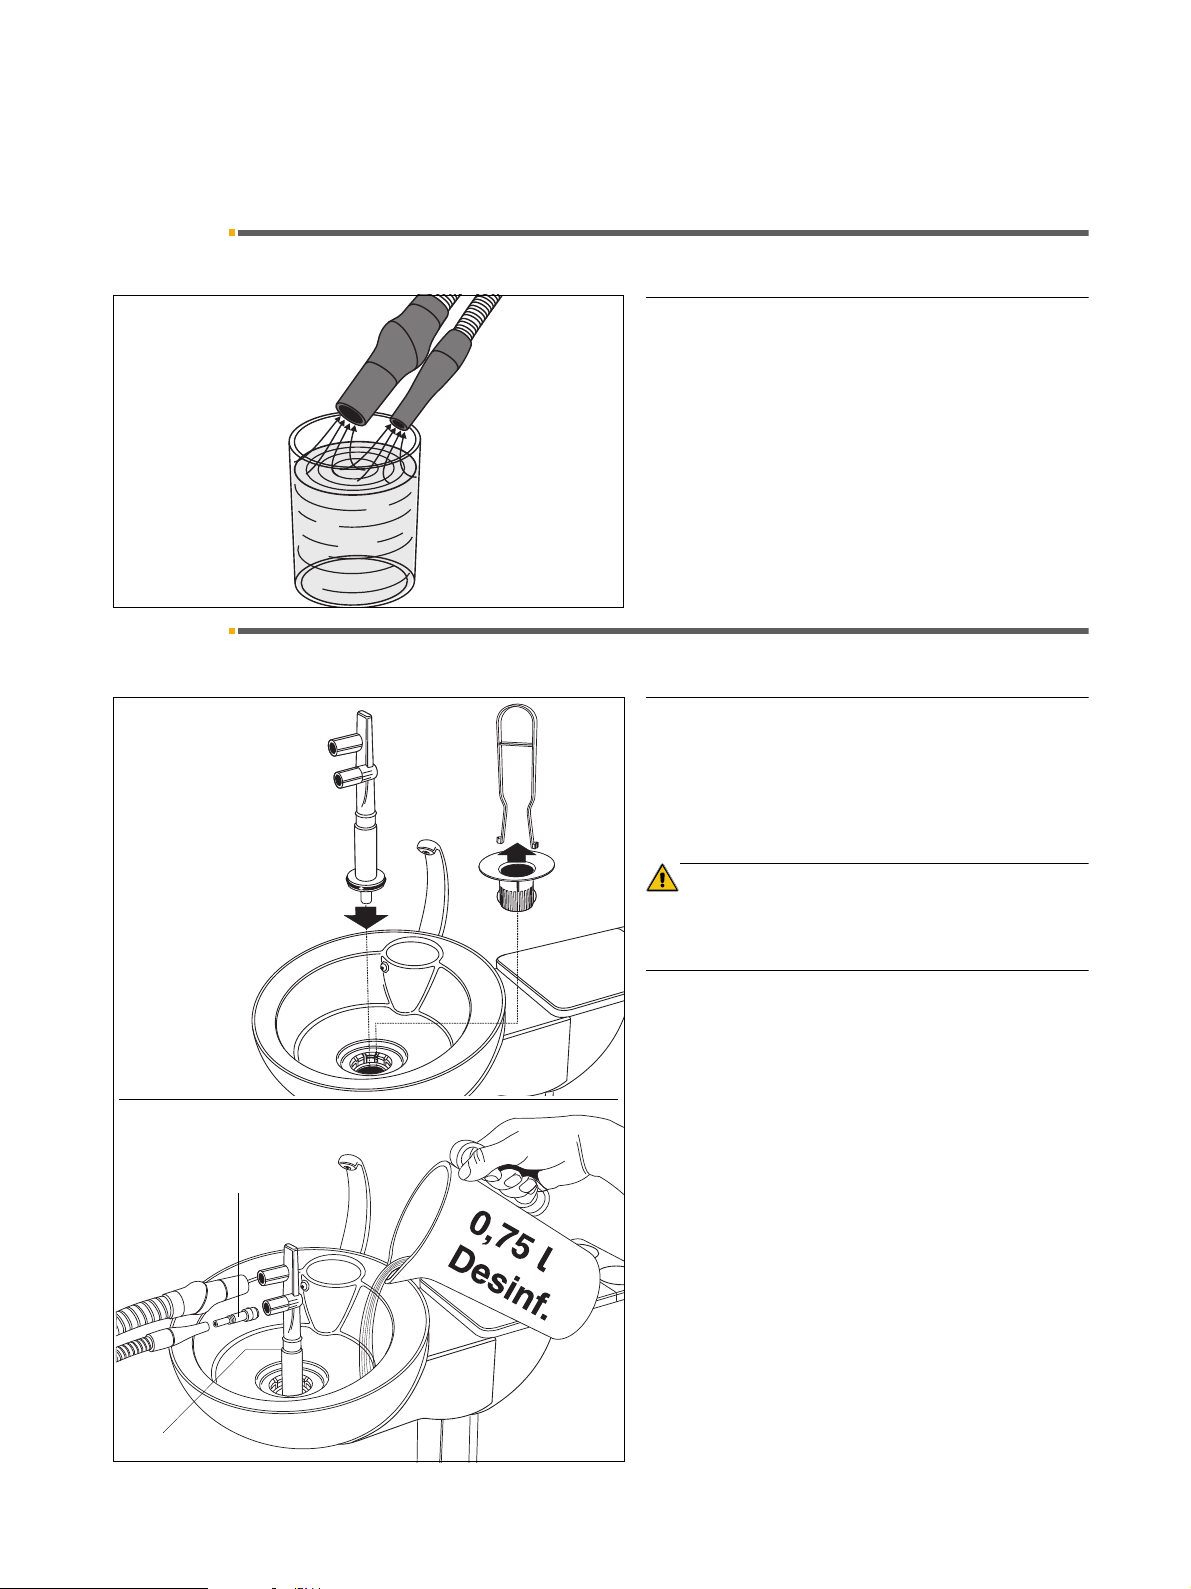
• Prepare the cleaning solution in a separate container according to the manufacturer’s instructions and
mix thoroughly.
• Remove the gold trap.
• Clean the cuspidor.
• Plug in the cleaning adapter up to the stop. For the
saliva ejector hose, insert the intermediate piece (8)
into the cleaning adapter.
• Fill the cleaning solution up to the filling limit (A) in
the cuspidor (approx. 0.75 liters).
• Remove the suction hoses from their holders and attach them to the side of the cleaning adapter, if possible all at once.
• The cleaning solution is aspirated.
Observe manufacturer’s instructions regarding the
reaction time!
59 58 512 D 3370
D 3370.103.01.13.02
7

3 Vacuum system Sirona Dental Systems GmbH
ATTENTION
simultaneously
3.3 Disinfection with a wet suction system Care and cleaning instructions for the practice team C2
• After the cleaning process, you must fill at least
1 liter of water into the cuspidor and aspirate it in order to remove any disinfectant residues from the
suction hoses.
• At the end of the cleaning process, pull off the hoses
and put them back into their holders.
• Remove the cleaning adapter.
• Finally, reinsert the gold trap.
+
, M1
3.3 Disinfection with a wet suction system
With this system, the automatic separator and, where
appropriate, the amalgam separator are not integrated in
the water unit. Both separation processes are performed
centrally.
+
Daily during the noon break and at the end of
each workday
• Flush the vacuum system with a suitable cleaning
and disinfecting agent as described under 3.2 Disin-
fection with a dry suction system.
• After the liquid has been aspirated through the two
suction hoses, remove the cleaning adapter.
• Then pour 1 liter of disinfectant solution into the cuspidor while simultaneously pressing the button (arrow) for approx. 10 seconds.
Pressing the button enables the cleaning and disinfectant liquid from the cuspidor to reach the vacuum
line via the cuspidor valve.
• Finally, reinsert the gold trap.
Use only cleaning and disinfecting agents which have
been approved by Sirona (see page 2, General information)!
Do not use any washing powder or other disinfectants!
8 D 3370.103.01.13.02
59 58 512 D 3370

Sirona Dental Systems GmbH 3 Vacuum system
ATTENTION
ATTENTION
1
2
3
4
5
3
G
re
a
s
e
G
r
e
a
s
e
Care and cleaning instructions for the practice team C2
+
, M1
+
3.4 Suction handpieces
3.4 Suction handpieces
Sterilization
The following parts can be sterilized:
• the suction cannula (1)
• the intermediate piece (2)
• the suction handpiece (3)
• the saliva ejector handpiece (4)
• and the surgical suction cannula (5)
Sterilization only in the autoclave at 135°C (275°F), 2.1
bar, 3min.
Thermodisinfection
All parts can be thermodisinfected at 93×C (197°F).
Disinfection
All parts can be sprayed or wiped with a disinfecting
solution.
bеЦдблЬ
Use only cleaning agents which have been approved by
Sirona (see page 2, General information)!
Grease the O-rings at the joints afterwards!
Weekly
Separate the suction handpiece at the joint, clean it and
and grease the joints.
Use only lubricants which have been approved by Sirona
(see page 2, General information)!
59 58 512 D 3370
D 3370.103.01.13.02
9
3 Vacuum system Sirona Dental Systems GmbH
ATTENTION
ATTENTION
Grease
3.5 Cleaning the suction hoses Care and cleaning instructions for the practice team C2
+
, M1
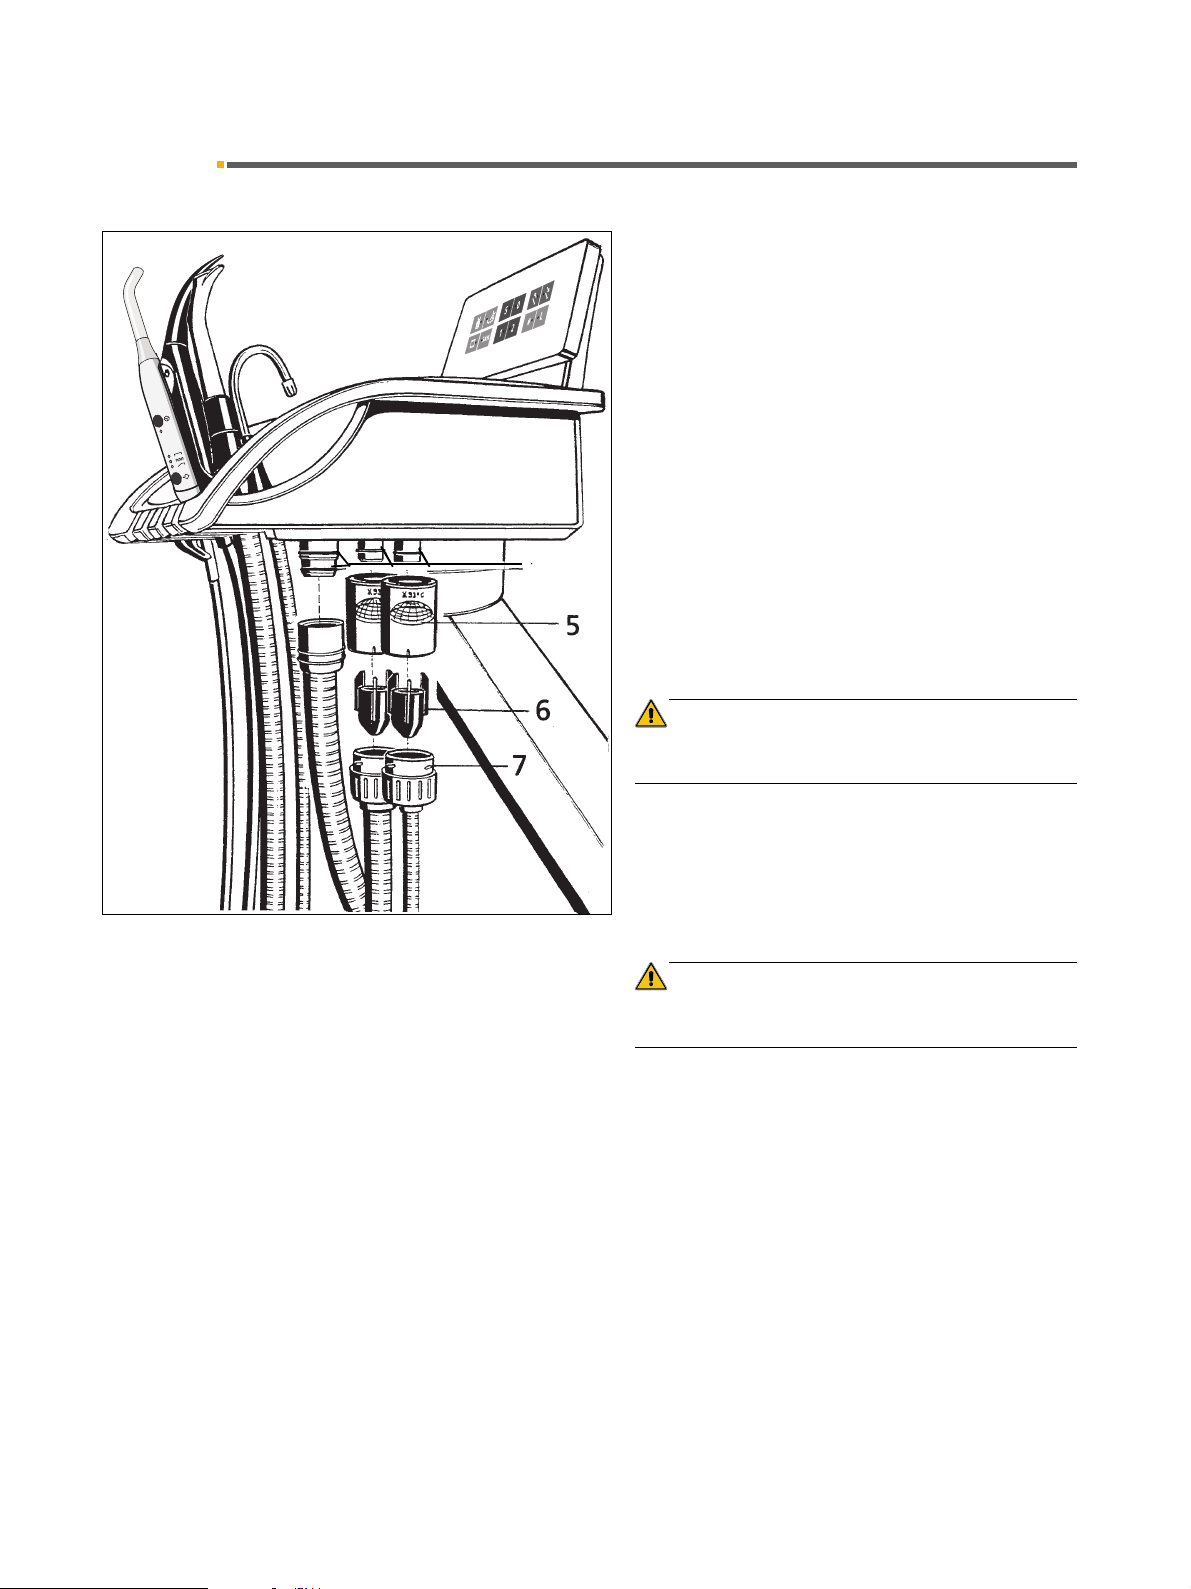
3.5 Cleaning the suction hoses
The hoses of the saliva ejector and suction cannula as
well as the connection hose to the water unit can be
pulled off from the assistant element for rinsing under
running water or thermodisinfection.
• Switch the treatment center OFF!
• Unscrew the suction hoses from the top parts (5) of
the filter housings.
• Rinse the hoses under running water.
Thoroughly clean the top parts of the housings (5) with
the filter inserts every day.
The top parts of the filter housings can be thermodisinfected.
Remove the amalgam residue collectors (6) from the
lower parts (7) if the suction power decreases, otherwise
once a day. Store the amalgam residues under water in
a separate, closed container. When replacing the amalgam rotor (see page 12), put the residues into the rotor
for disposal.
+
Do not dispose of amalgam residues in the cuspidor or
the sink!
When the surfaces of the hoses have become sticky
from disinfectants, clean them with a commercially available dish washing liquid and then powder them lightly
with talcum, if necessary.
Before refitting the hoses, grease the O-rings on the
connection pieces.
Use only lubricants which have been approved by Sirona
(see page 2, General information)!
The hoses must engage firmly.
If the unit is equipped with a 3rd suction hose, clean it the
same way.
10 D 3370.103.01.13.02
59 58 512 D 3370
Sirona Dental Systems GmbH 3 Vacuum system
ATTENTION
ATTENTION
Grease
10
Grease
Grease
Care and cleaning instructions for the practice team C2
+
, M1
+
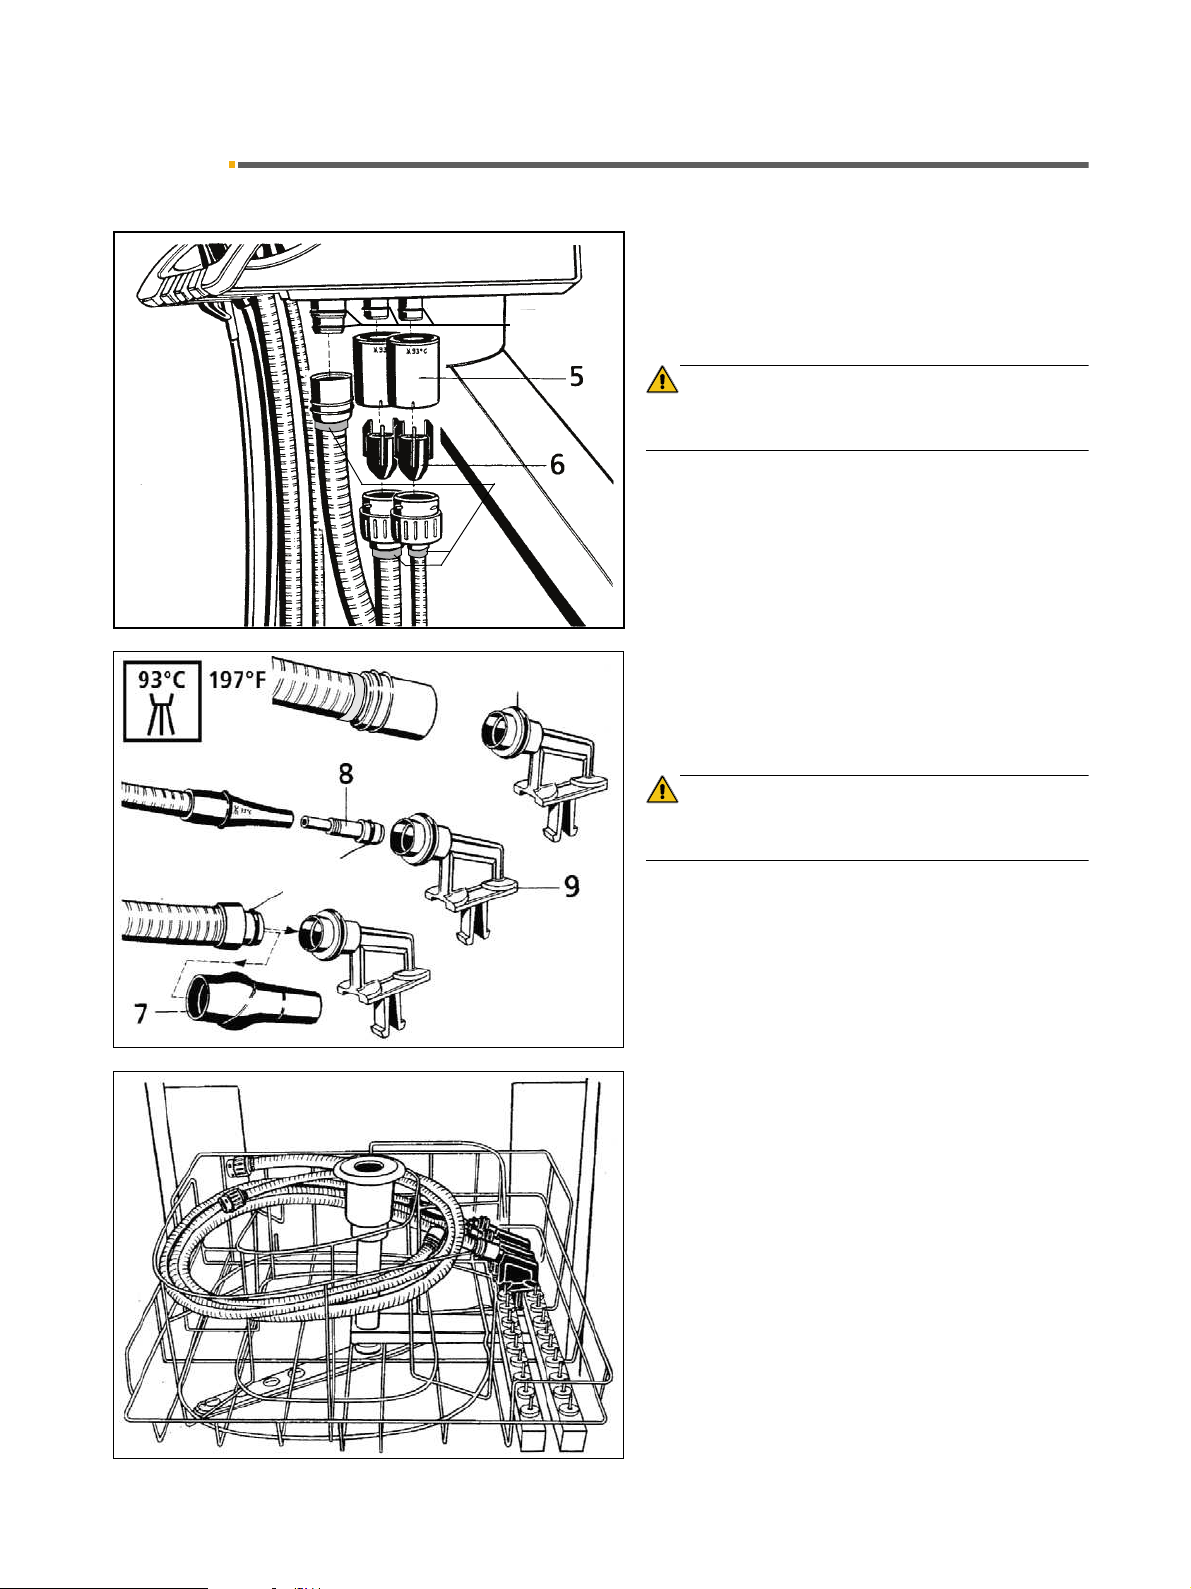
3.6 Thermodisinfecting the suction hoses
3.6 Thermodisinfecting the suction hoses
The unit is usually equipped with suction hoses that cannot be thermodisinfected.
However, it may have suction hoses that can be thermodisinfected as special accessories. These are
marked in turquoise color (10).
Only hoses marked with a turquoise ring (10) can be
thermodisinfected!
• Switch the treatment center OFF.
• Pull off the suction hoses and the connection hose
from the assistant element and the water unit.
• Remove the top parts of the filter housings 5 and the
amalgam residue collector 6.
Pull off the handpiece (7) from the suction hose.
For the saliva ejector hose, insert the intermediate piece
(8) in the hose holder (9).
Lubricate the O-rings.
bеЦдблЬ
Use only lubricants which have been approved by Sirona
(see page 2, General information)!
Fit the hose holders onto the rails in the thermodisinfector (by Miele) as illustrated.
Connect the suction hoses to the hose holders and place
them in the wire basket (by Miele) intended for thermodisinfection.
Thermodisinfect at max. 93×C (197°F).
Before refitting the hoses, grease the O-rings on the
connection pieces.
The hoses must engage firmly.
Hose holder for Miele thermodisinfector
Order No. 89 18 757
59 58 512 D 3370
D 3370.103.01.13.02
11
Loading...